Calendar View
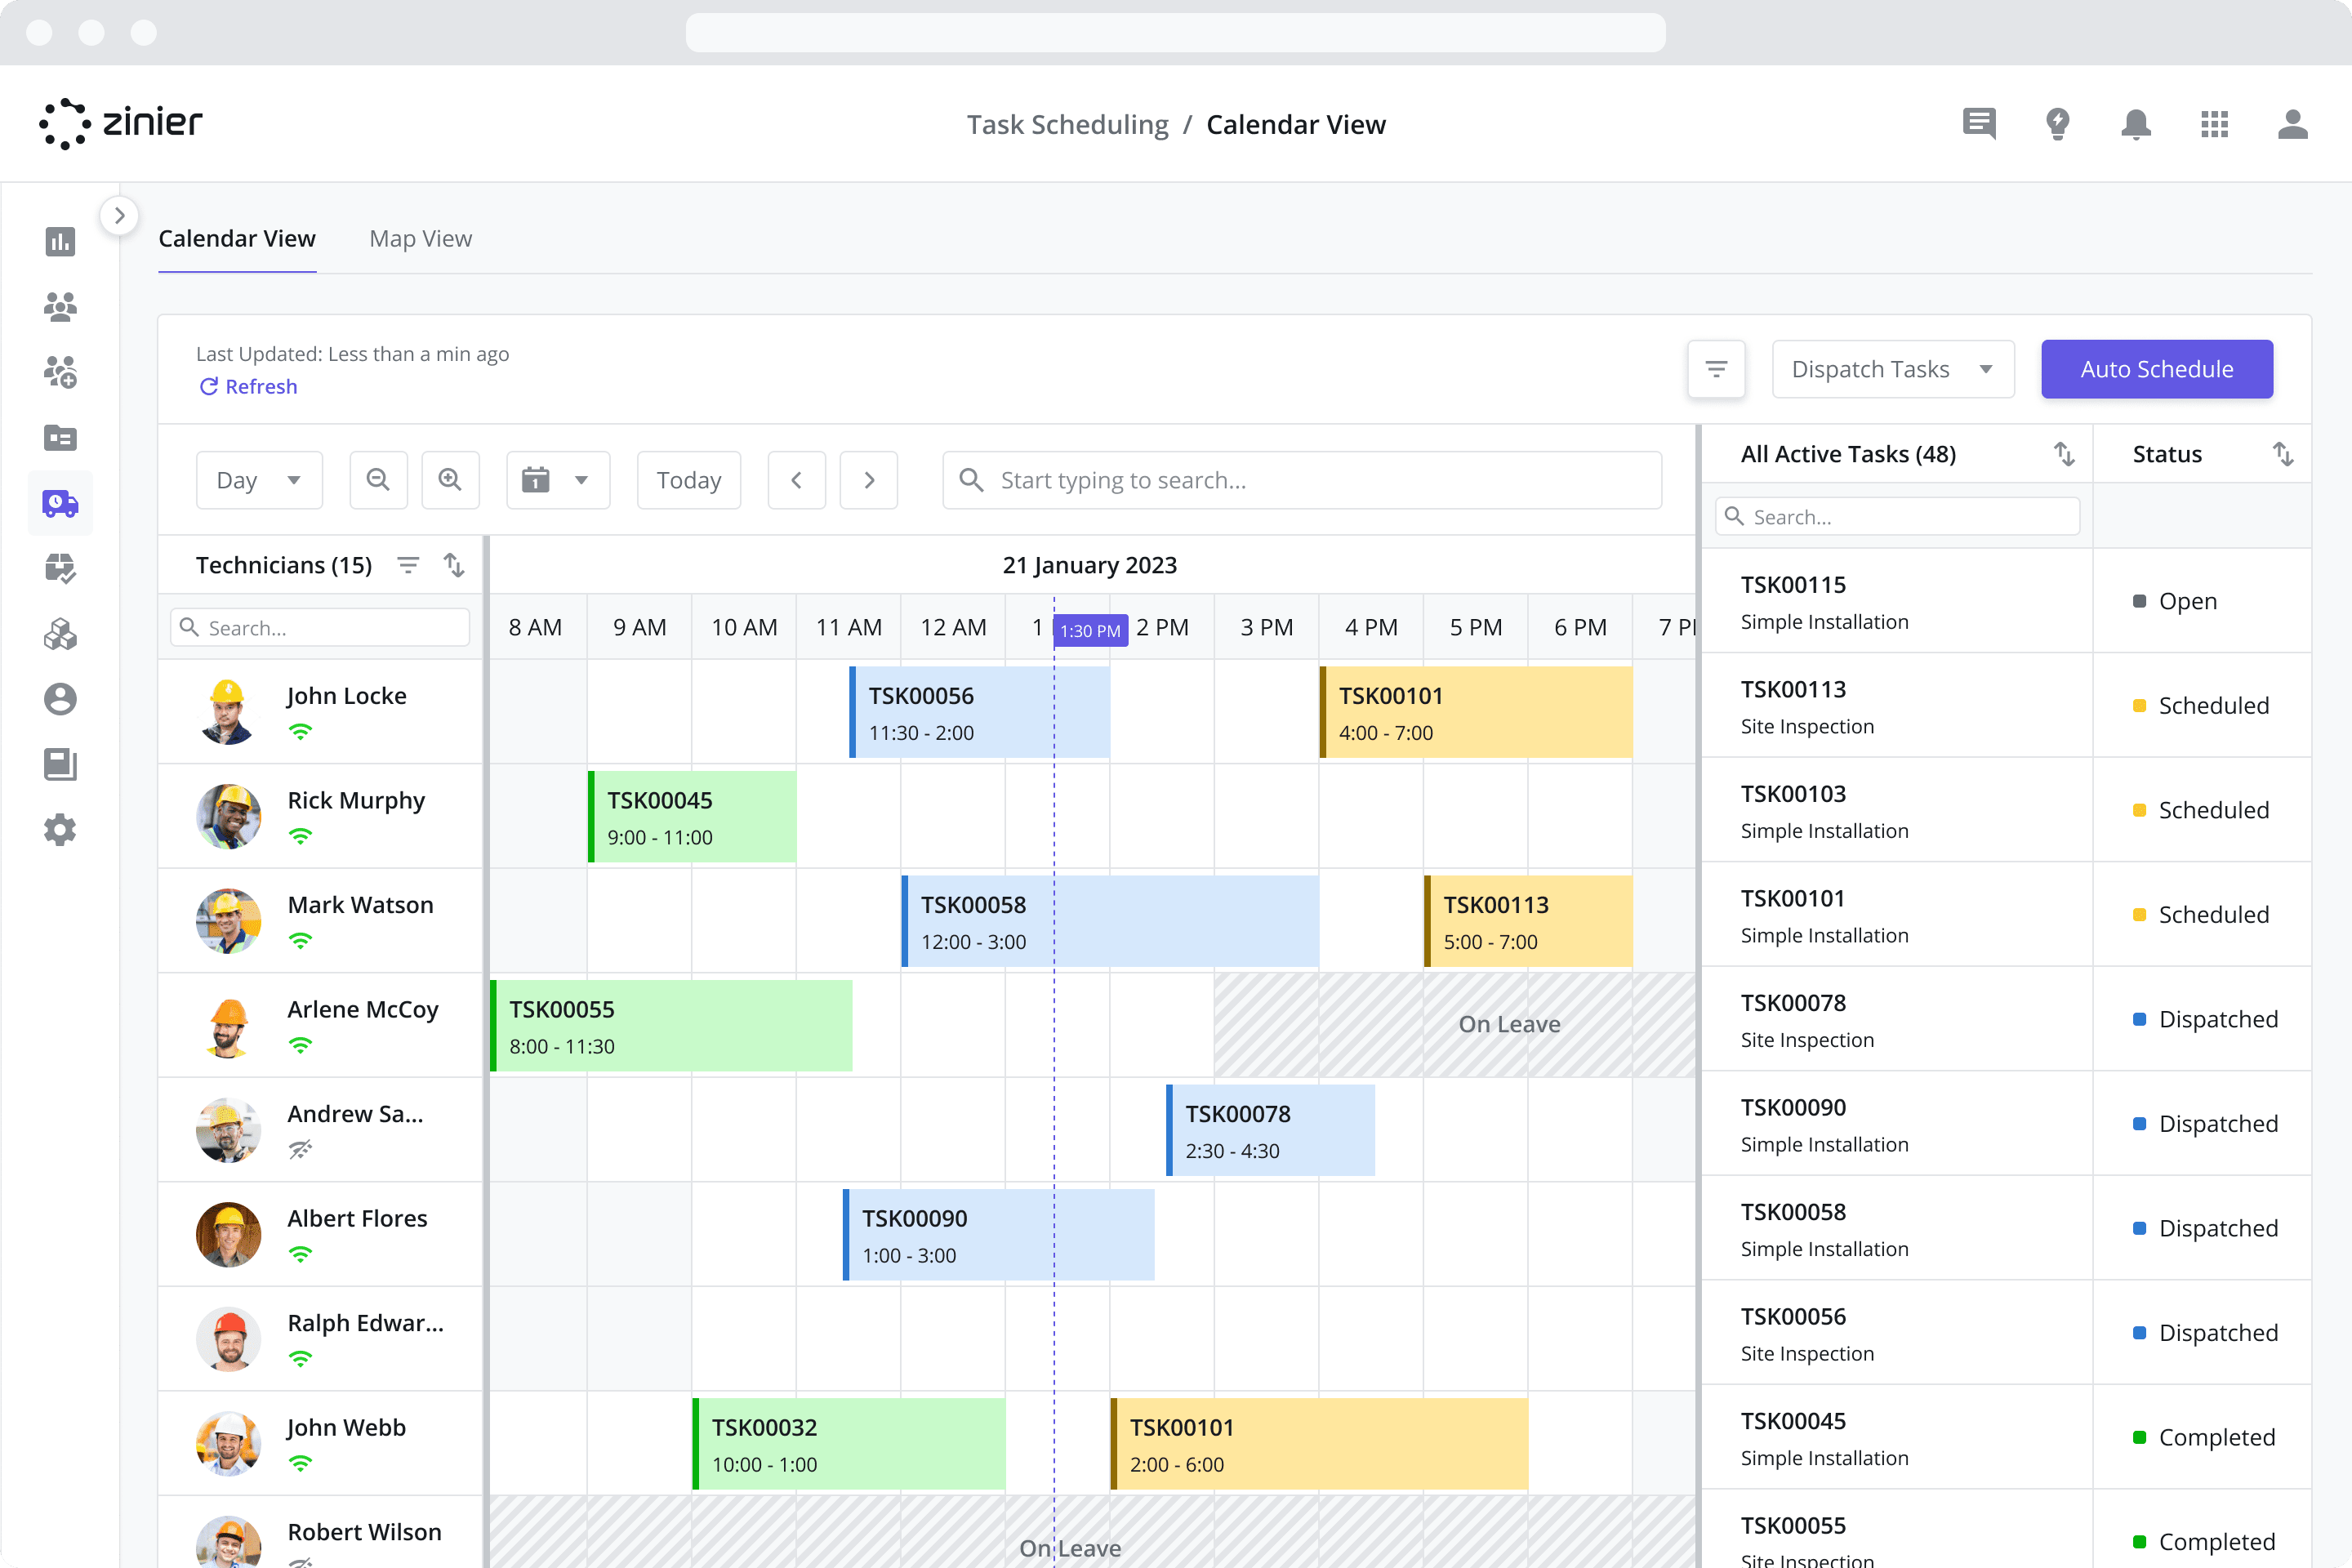
The Calendar view provides dispatchers with a visual representation of their technicians' schedules so they can better understand their team's availability on a daily, weekly, and monthly basis. Dispatchers can also schedule, assign, and dispatch tasks from this view using the drag-and-drop interface.
To access the Calendar View, go to the Task Scheduling > Dispatch Console > Calendar View module.
Understanding the Calendar View Layout
The layout is can be thought of as two separate panels: the technician list/calendar on the left and the task list on the right. The layout comes with a number of capabilities worth noting here:
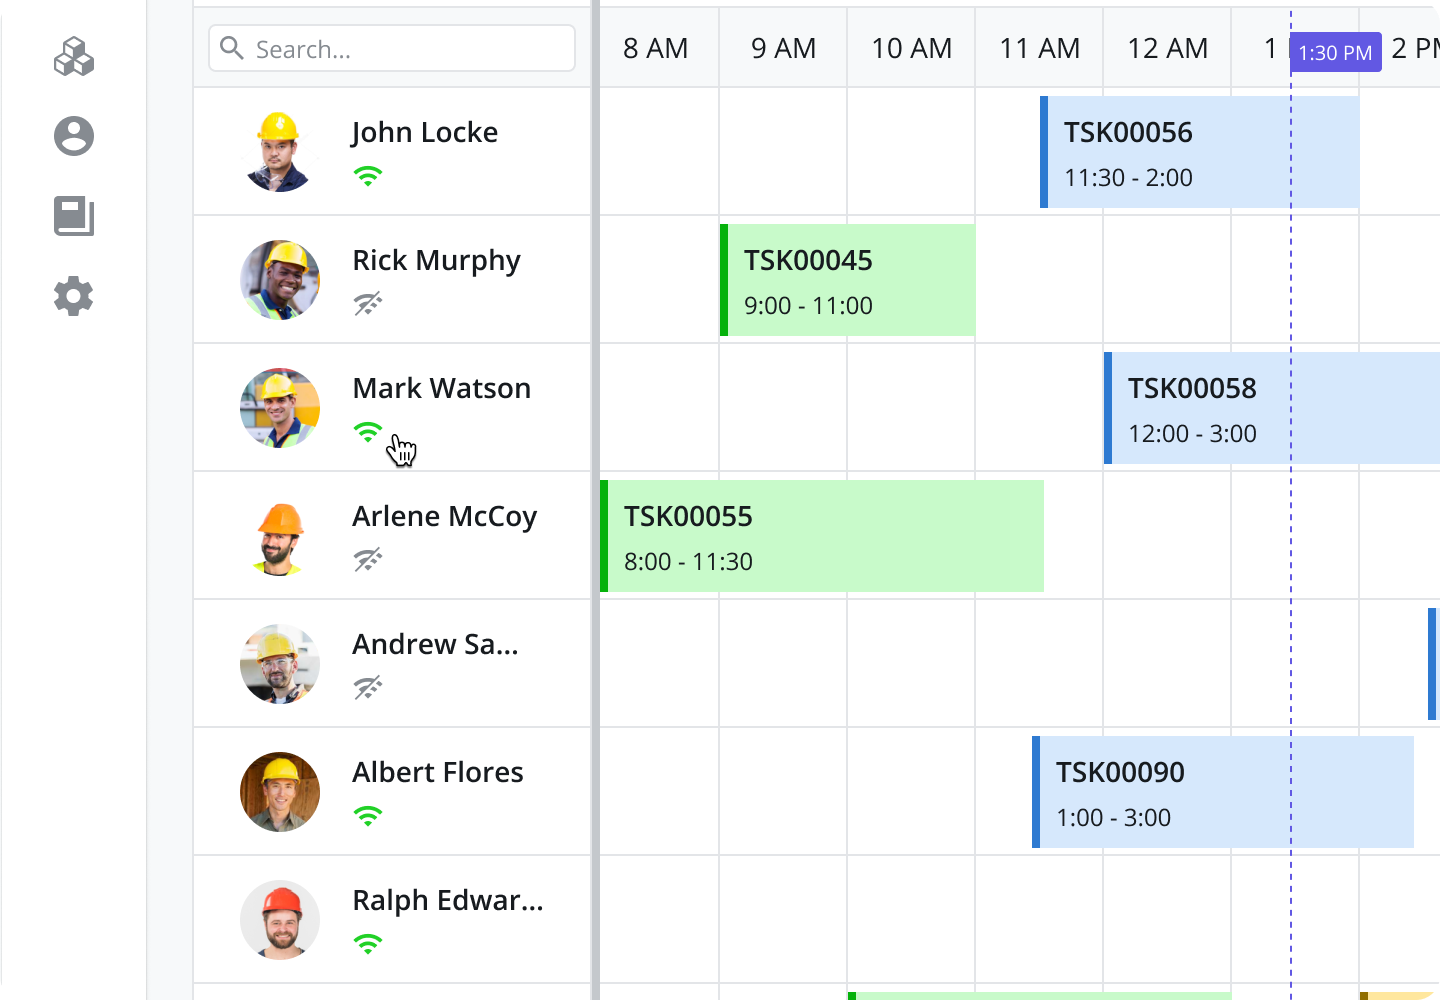
View the Online/Offline Status of Techs
In the technician list, you will notice an icon below the tech’s name. This represents the tech’s online status. If a technician has not been active on the mobile app for the last 60 minutes, an "offline" icon will appear under the technician's name – represented as a wifi strength signal with a cross through it. If a technician has been active within the last 60 minutes, the “online” icon will appear under the tech’s name – the same wifi strength icon but without the cross through it.
Calendar Time Frame and Navigation
Timeframe: The dropdown menu at the top right of the technician list shows the time frame associated with the calendar, effectively zooming it in and out for easier navigation. Dispatchers can choose from Day, Week, or Month.
Navigating to Today: At any time, you have the option of returning to “Today” by clicking the “Today” button. In addition, the current date/time is represented on the calendar by a red dotted line with a flag at the top containing the current time.
Selecting a Specific Day: To view the calendar for a specific day, click on the “Calendar Icon” and select the date from the date picker.

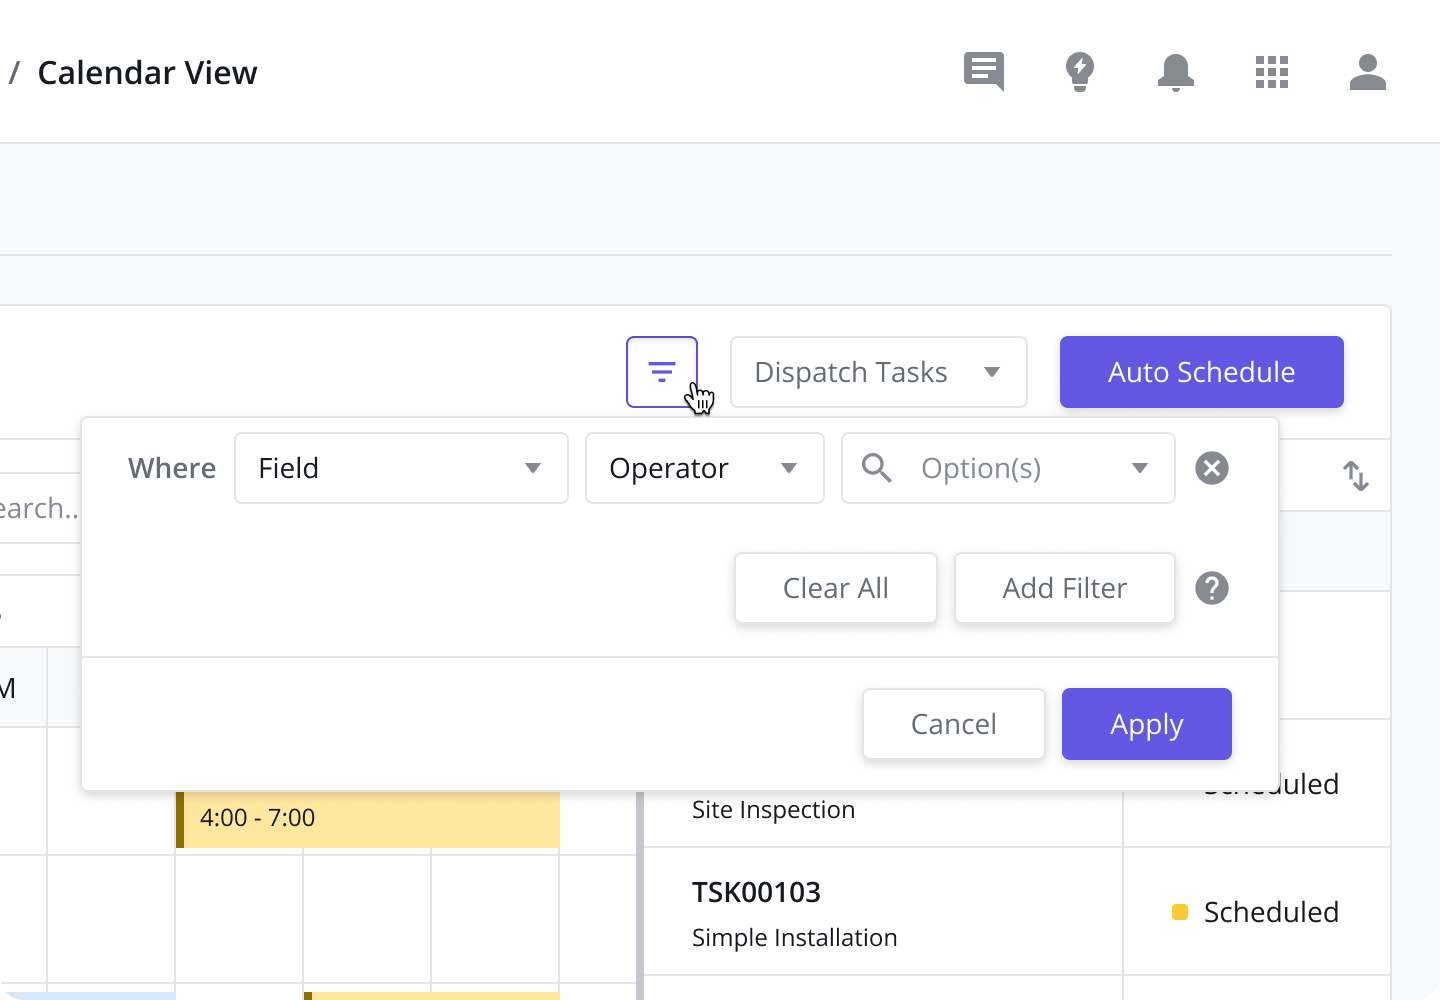
Filter the List of Tasks
To filter tasks shown in the task list panel on the right, click the “filter” button at the top right of the calendar view.
Task and Calendar Event Color Key
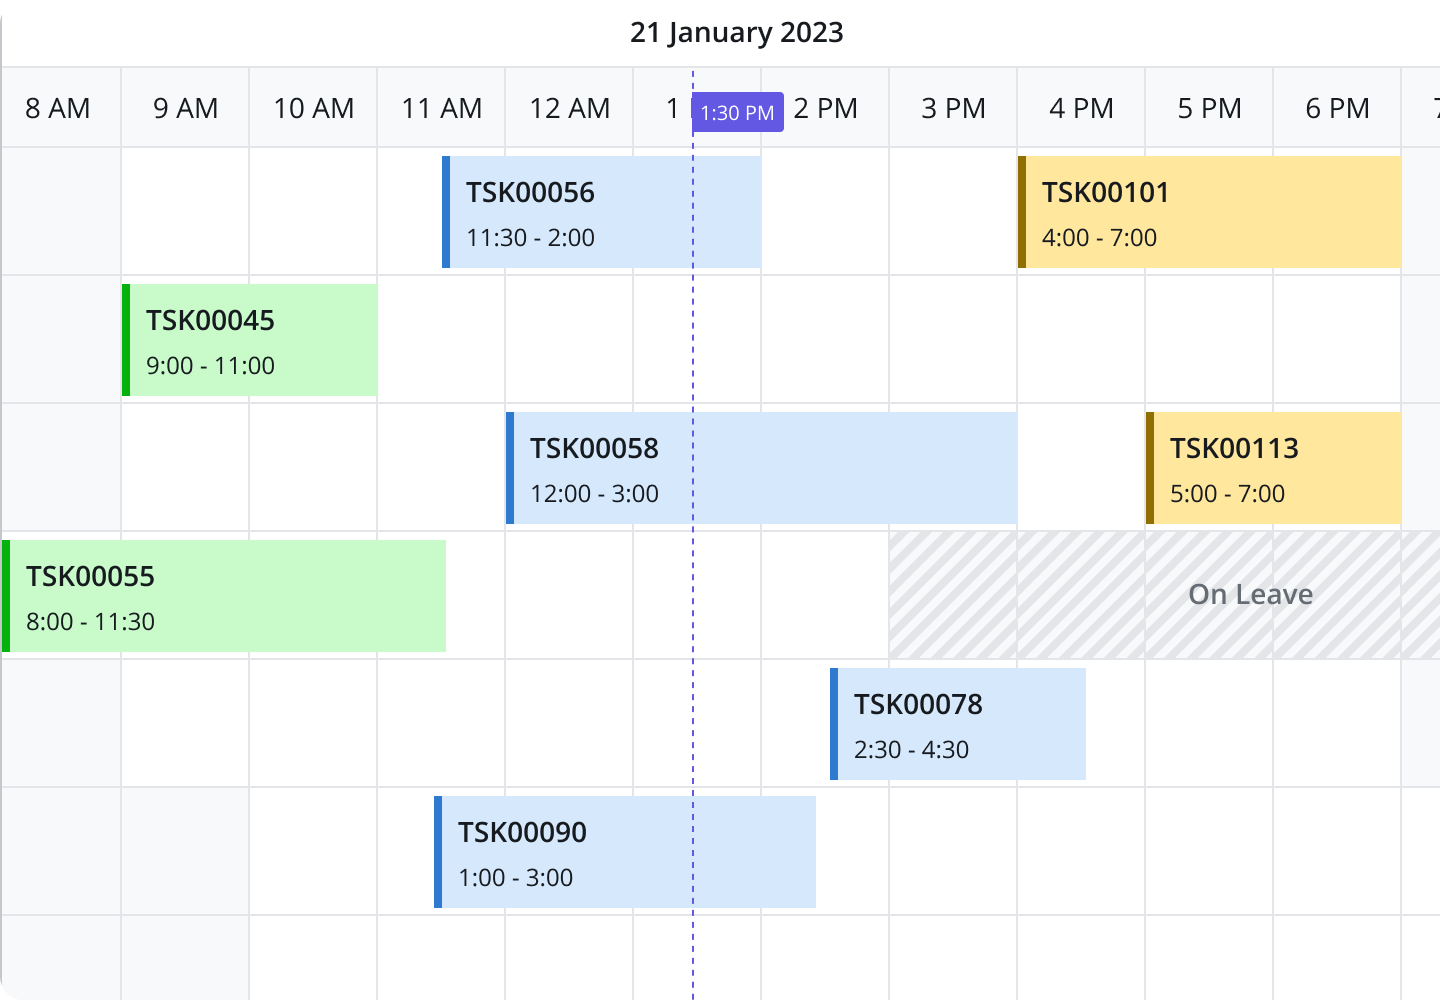
Within the technician calendar, tasks, breaks, leave, etc. all show up as events next to their assigned technician’s name. The colors associated with different events are described below:
Available Working Hours (empty white box): A technician’s available working hours (Work Schedule / Shift) are shown as an empty white background. This includes any added Overtime.
Non-working Hours (empty grey box): Anytime outside of the tech’s available working hours is shown as an empty grey box. This includes Public Holidays added to their work schedule.
Leave and Breaks (grey dashes): Leave and Breaks is shown as a box with dashed grey background lines and text. If it is a break added to the tech’s weekly schedule, the event container will display the words “Break”. If it is Leave, the event container will display the Reason for the leave as text.
Tasks (color = status): Tasks are displayed as shorter, colored boxes with the Task Type and Task ID written in them. The color of the box matches the color associated with the task status.
Scheduling & Dispatching with the Calendar View
Scheduling Tasks
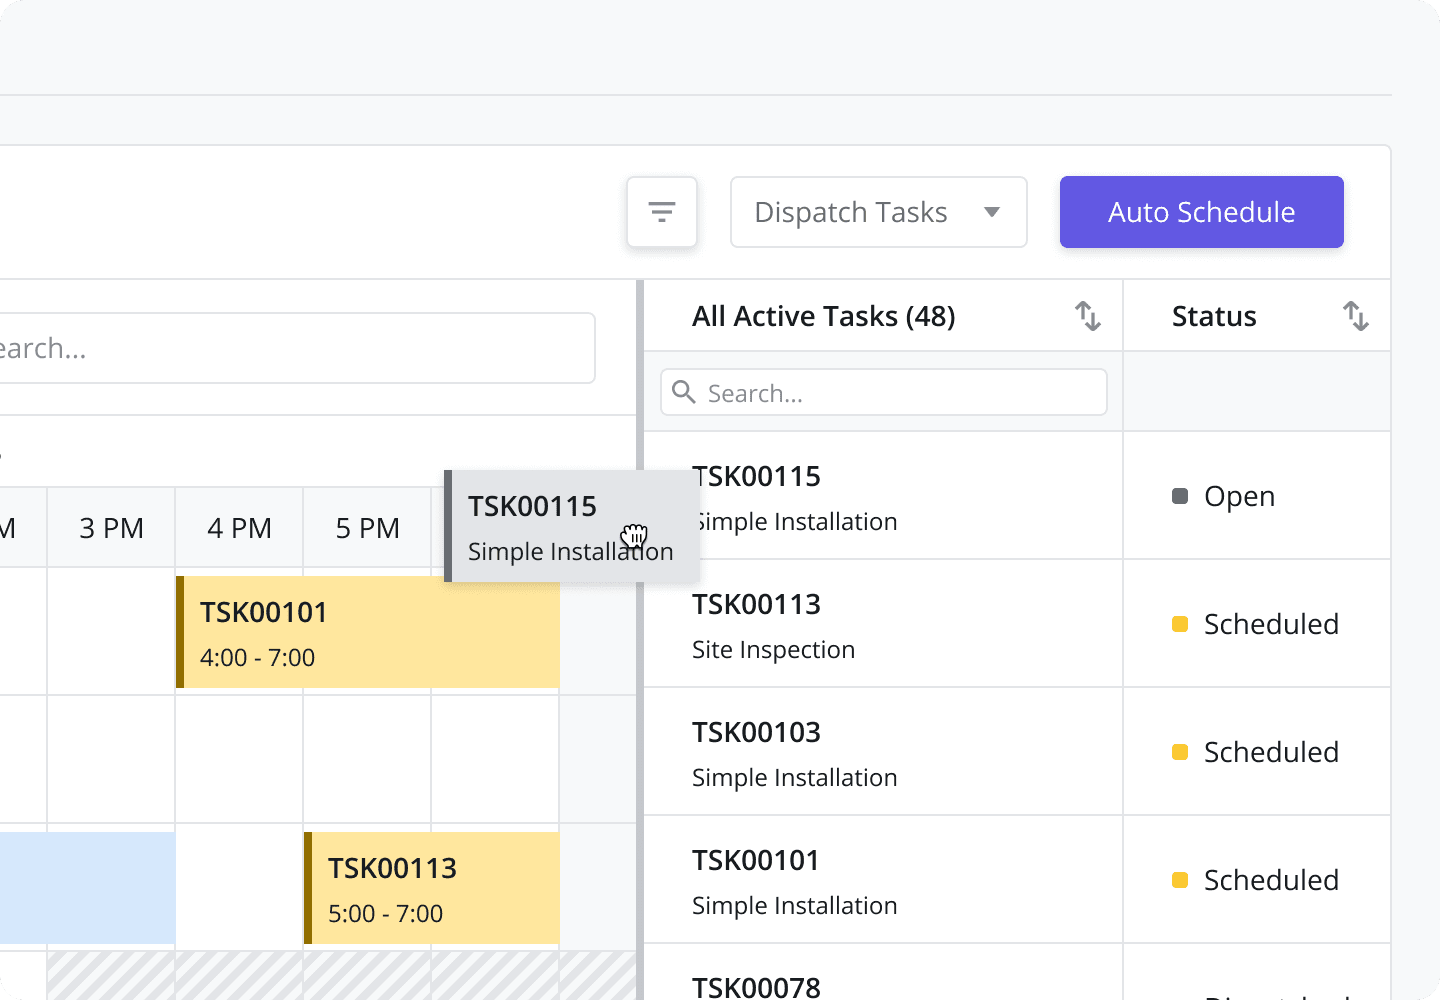
To schedule an open task, drag it from the task list on the right-hand side of the calendar grid to the desired time slot of the technician.
Reassigning and Rescheduling Tasks
Tasks can also be dragged within the calendar grid to easily adjust the schedule.
Validations
When the tasks are dragged and dropped on the calendar grid, automated validations are conducted to satisfy constraints such as leaves, off-shift timings, public holidays, appointment windows, and deadlines.
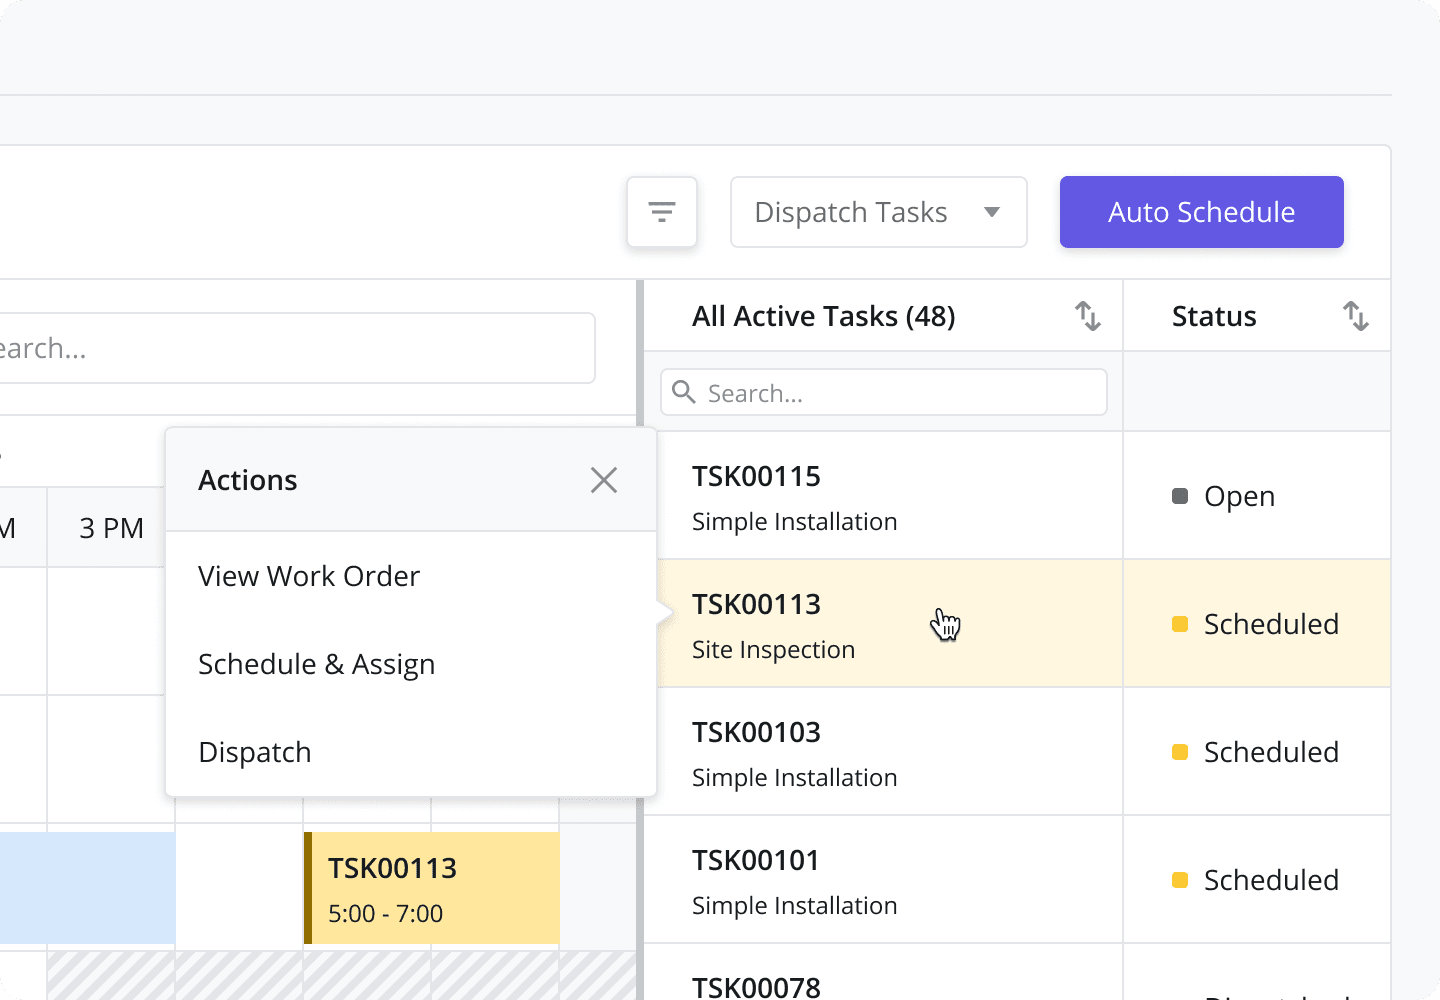
Task Card Actions (from Popup)
After a task has been assigned to e technician, it becomes visible from the calendar next to the tech’s name at the scheduled start time. From here you can take a number of actions directly from the popup that appears after clicking the task:
View Task Details: Click this button to open the Task Scheduling sidepanel and view the task’s full details
Dispatch to Technician: If the task status is “Scheduled” (the task has been assigned but not dispatched), the option “Dispatch to Technician” will appear.
Task Review: If the task status is “Pending Review” (the task has been completed), the option “Task Review” will appear. Clicking this button will bring up the Task Review sidepanel.
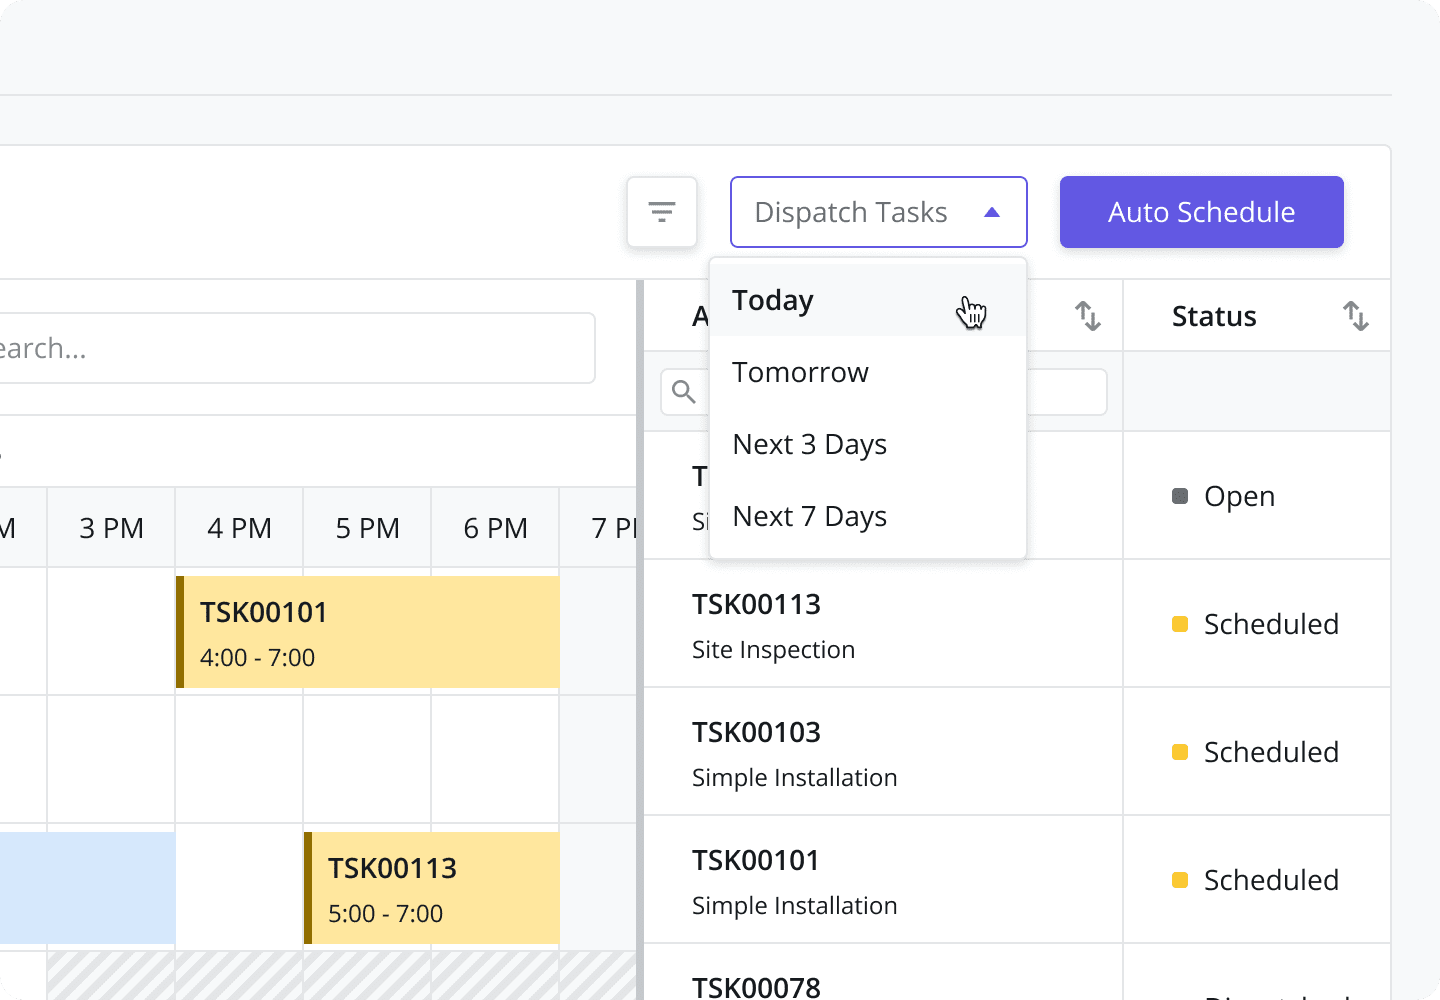
Bulk Dispatching Tasks
Dispatchers may find themselves with several tasks that have been scheduled but not yet dispatched to their assigned technicians – sometimes on purpose in the case where dispatching happens on a set schedule. To make the dispatching process easier, users can bulk dispatch multiple tasks at the same time.
To dispatch tasks in bulk, click on the “Dispatch Tasks” dropdown menu located at the top of the data grid. Next, select a timeframe (Today / Tomorrow / Next 3 Days / Next 7 Days). Doing so will dispatch all Scheduled tasks with Scheduled Start Times matching the criteria in the selected time frame.
Today - Dispatches all Scheduled tasks with a scheduled start time for the current calendar day based on the time zone of the Dispatcher. Example: It’s currently Feb 22nd, 17:10. All tasks are dispatched which are scheduled between 17:10 and 23:59 on the 22nd.
Tomorrow - Dispatches all Scheduled tasks with a scheduled start time for the next calendar day (between 00:00 and 23:59). Any tasks scheduled for the current day (Today) are not dispatched!
Next 3 days - Dispatches all tasks with a scheduled start time within the next 3 calendar days (including the current day). Today, Tomorrow, Day After Tomorrow.
Next 7 days - Dispatches all tasks with a scheduled start time within the next 7 calendar days (including the current day). Starting from the current date to 23:59 on the 7th day.