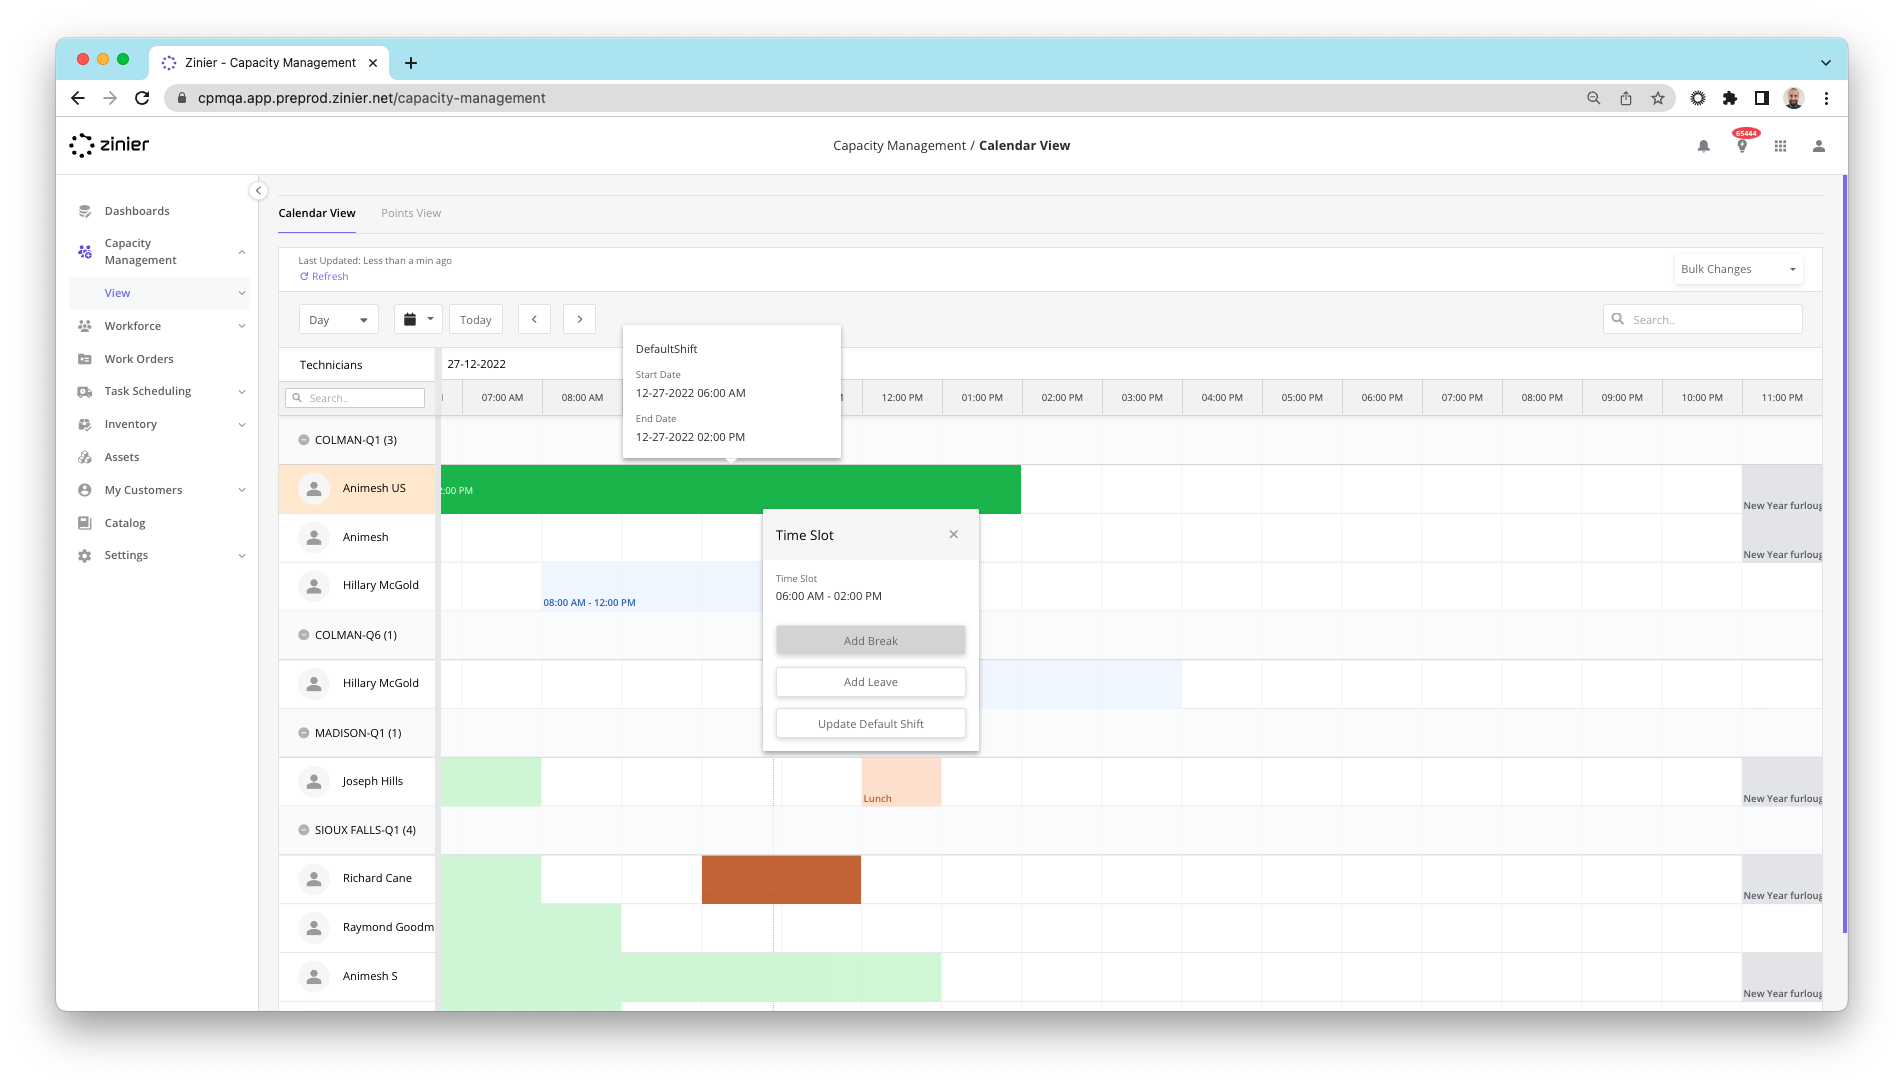
Capacity Calendar View
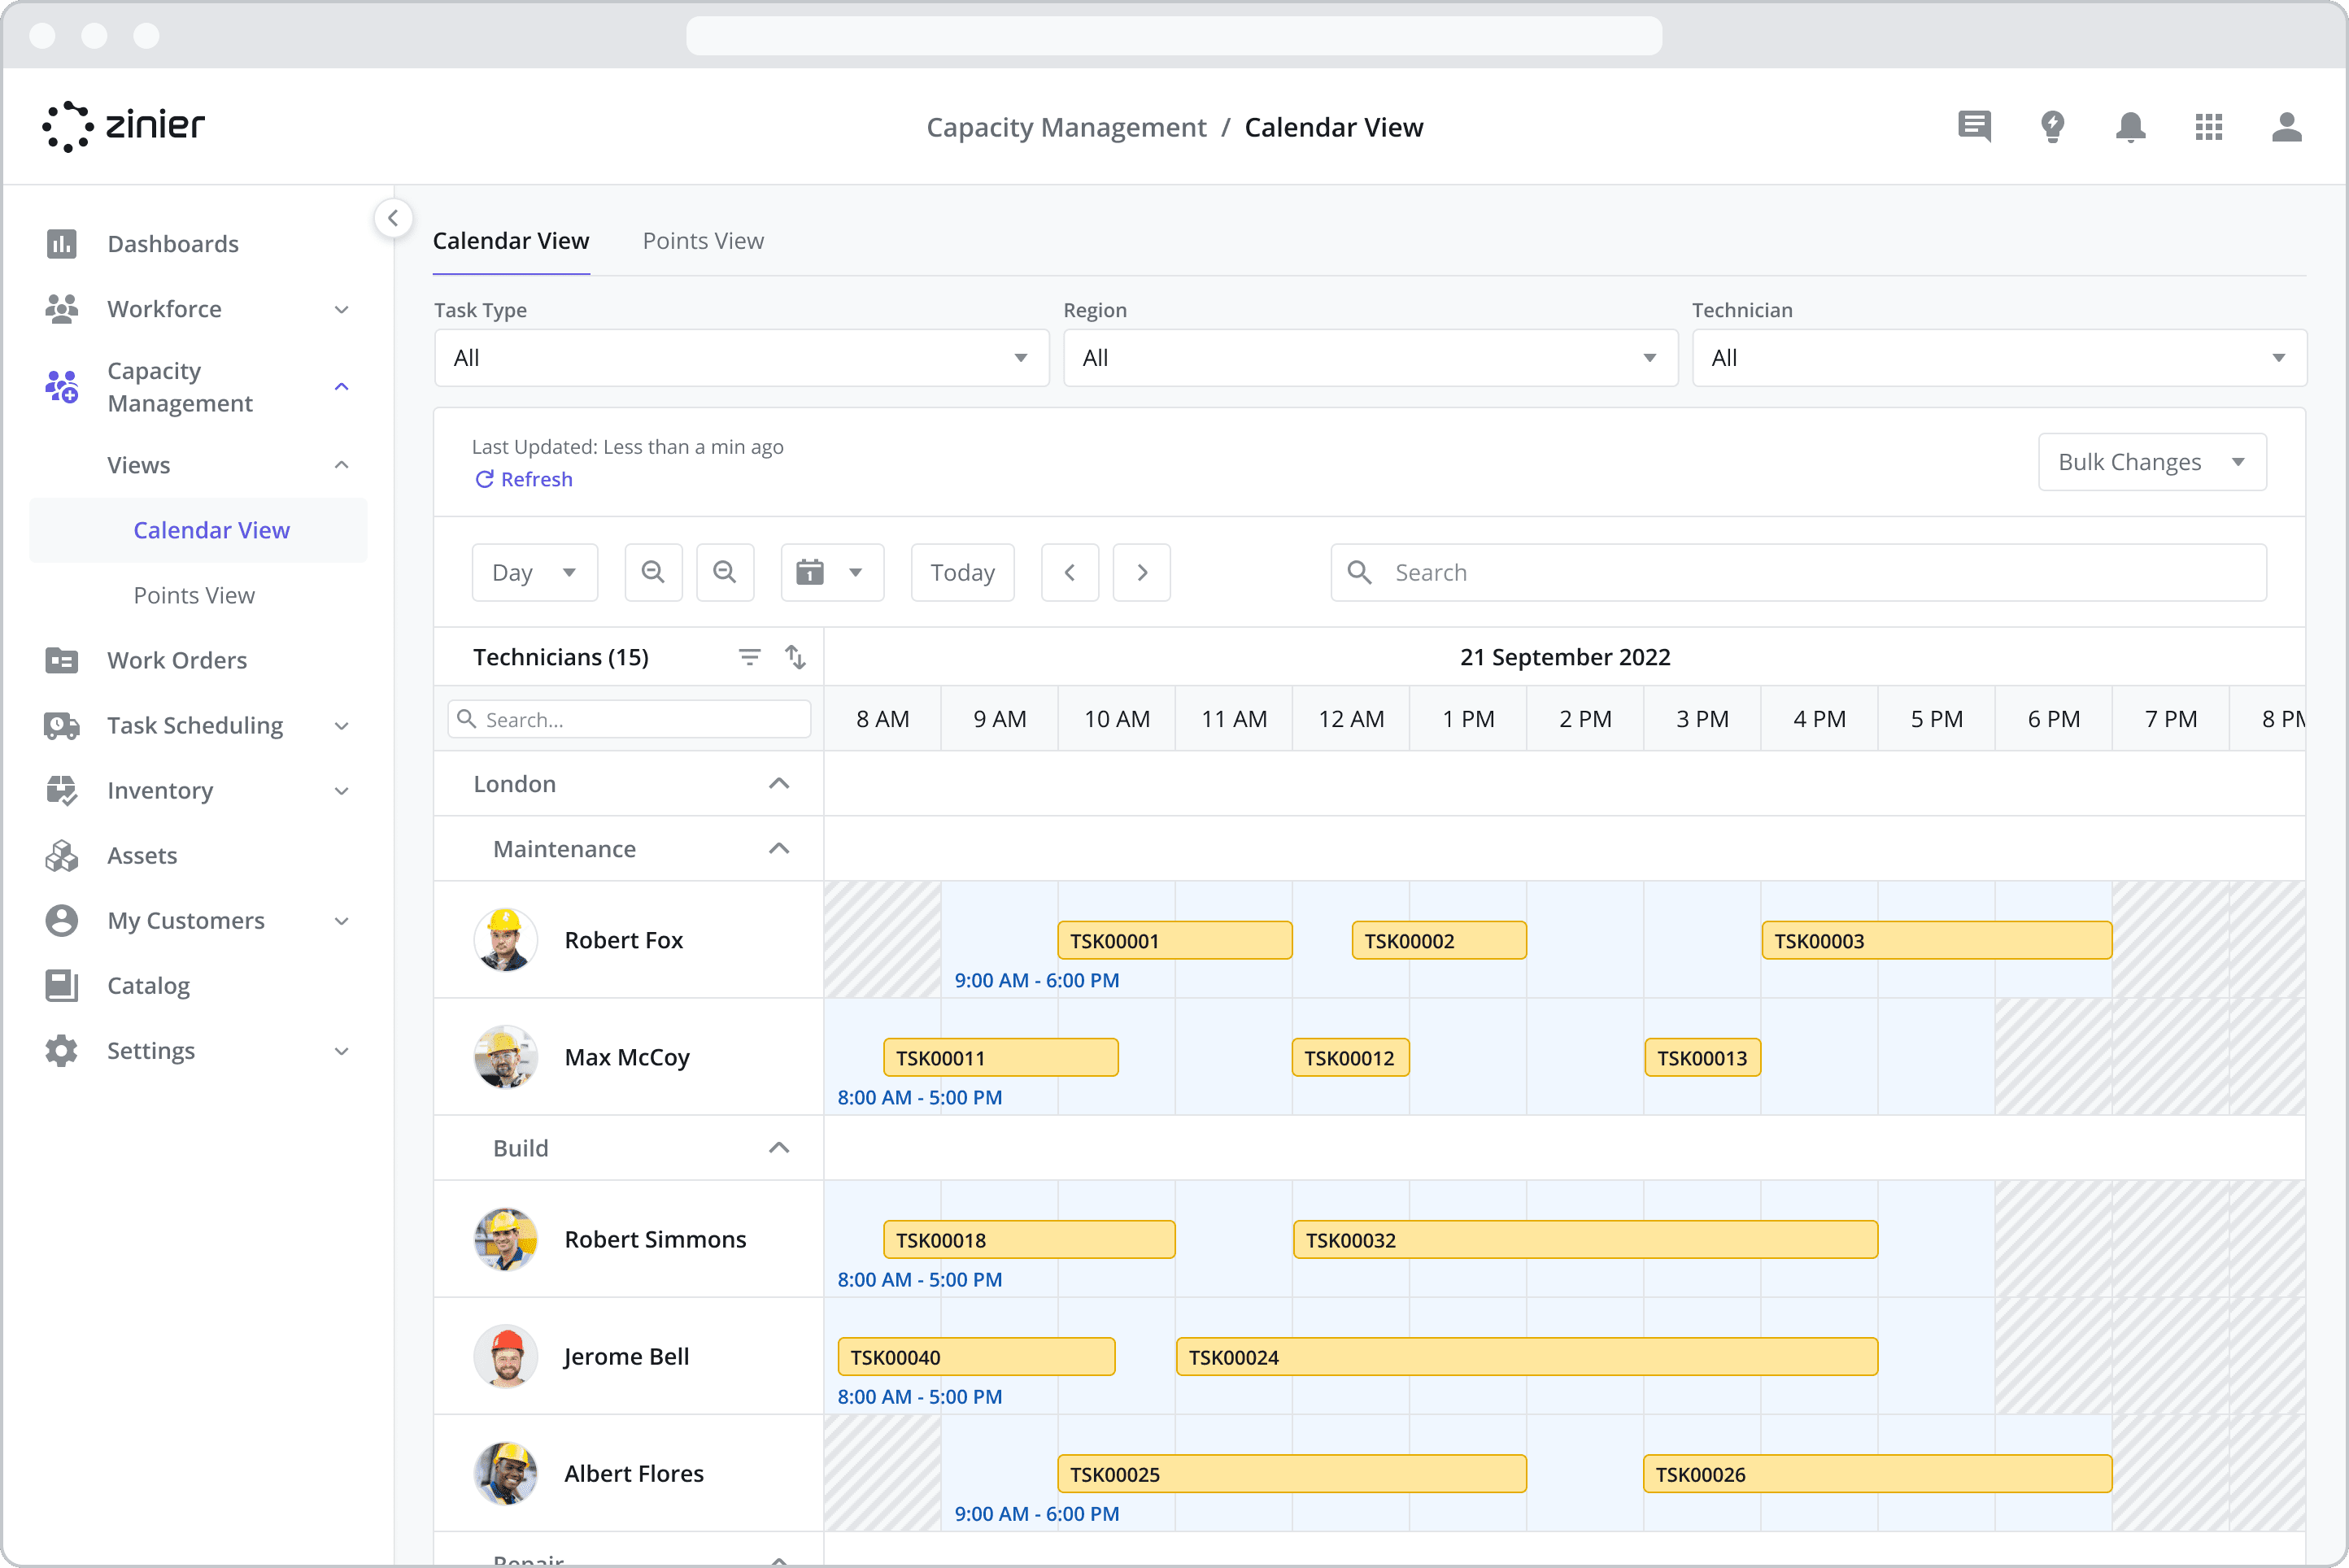
The Calendar view module provides a visual representation of your workforce capacity so you can better understand your technicians' availability on a daily and weekly basis. Organized by Region, technician's working hours (represented by Shifts), non-working hours, and assigned tasks are all shown on the Calendar.
In addition to centralizing all the information about your workforce capacity, the Calendar View also allows you to take the following actions so you can better meet anticipated or actual demand:
Temporarily adjust your Technicians' working hours and/or move them to other Regions by adding Shift Overrides
Permanently adjust your Technicians' working hours by updating their default Shifts
Add Overtime (in bulk to multiple Technicians)
Add Breaks (in bulk to multiple Technicians)
Calendar View and Work Groups
Work Groups play a critical role in determining Capacity and should be configured before using the Capacity modules. In the example on the screen, you can see 3 groups of technicians: London/ Maintenance, London/ Build, and London/ Repair. What you are seeing is Region / Task Type pairings, where the Region = London and the different Task Types associated with technicians in this region are Maintenance, Build and Repair. So how did we get to this view? How was this originally configured? You guessed: Work Groups were used to create these groupings. Here’s how it works:
Workforce: Let’s assume I have a workforce consisting of 6 technicians as shown above, all belonging to the London Region. Let’s further assume I have 3 Task Types as shown above (Maintenance, Build, and Repair).
Techs and Task Types:
Maintenance Task Types: Robert Fox and Max McCoy are capable of doing Maintenance Task Types
Build Task Types: Robert Simmons, Jerome Bell, and Albert Flores are capable of doing Build Task Types
Repair Task Types: Jeremy Black is capable of doing Repair Task Types
Assigning by Region: To assign your workforce to a Region, I would create 1 Work Group, filtered by the London Region, and then assign all 6 technicians to that Work Group. This links the technicians to the London Region.
Assigning by Task Type: To assign your workforce to a Task Type, I would create 3 different Work Groups, each filtered by the Task Types above, and then assign the appropriate technicians to each Task Type. This links the technicians to those Task Types.
There you have it – Work Groups have now been used to organize your workforce into the different capacity groups as shown on the Calendar View.
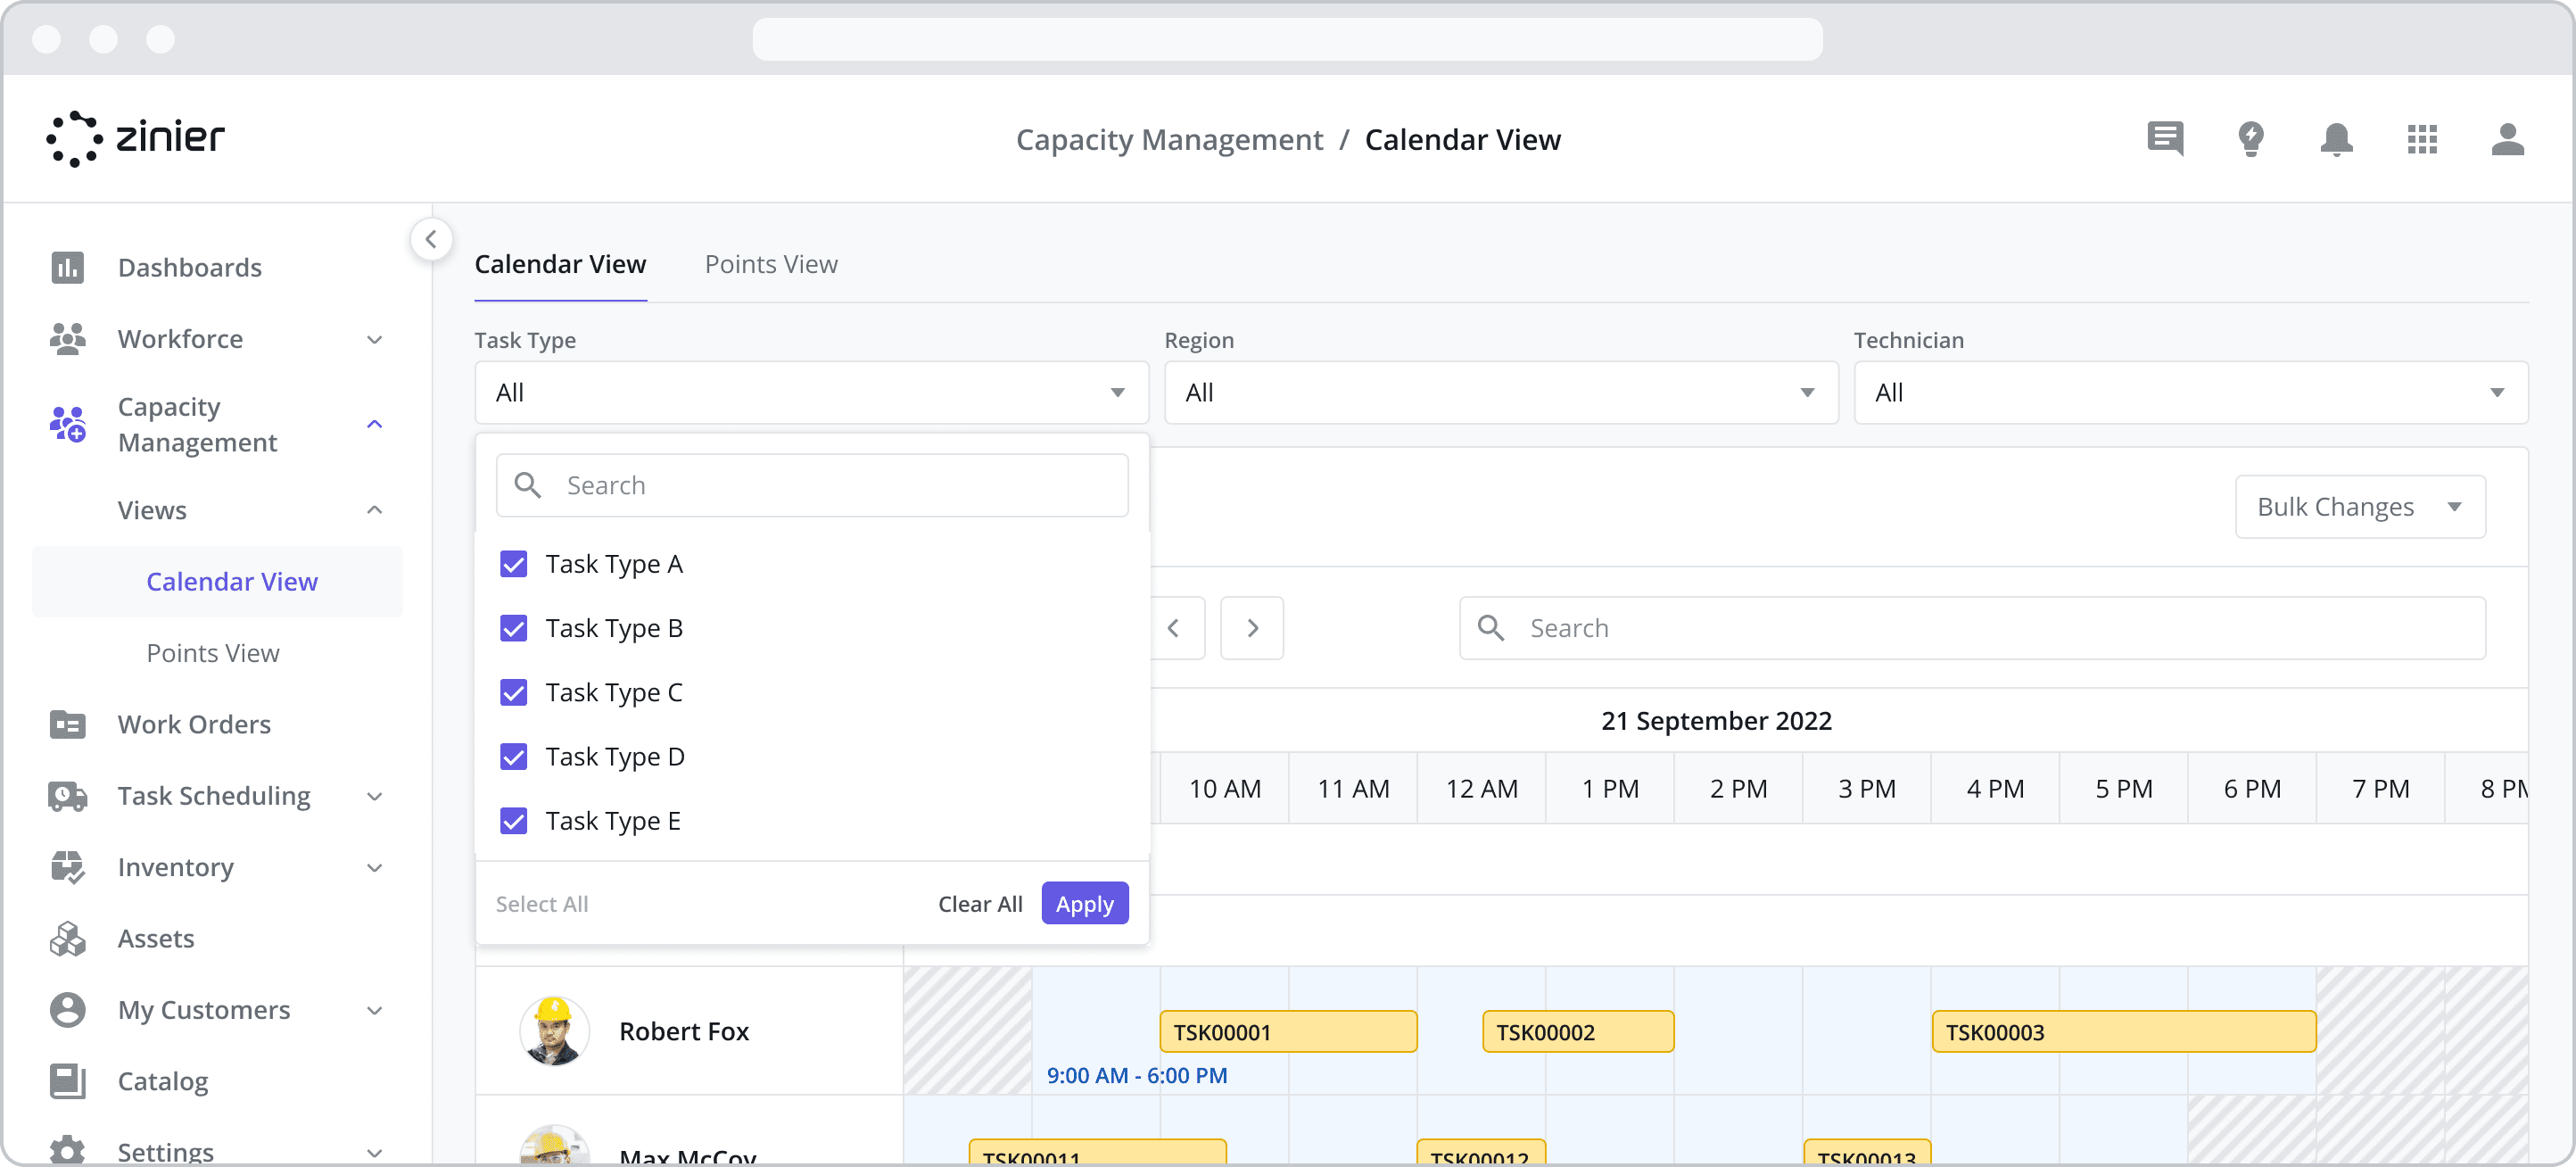
Filter the List of Tasks and Technicians
NEW (23.4)
Use filters at the top of the screen to display specific tasks and technicians. The Calendar View comes with the following filters:
Task Type: Allows you to filter by Work Groups that use Task Type as the filter method. If selected, only tasks of that Task Type that have been added to the Work Group will be displayed in the Calendar.
Regions: Allows you to filter by Work Groups that use Region as the filter method. If selected, only the technicians that have been added to the Work Group and tasks located in the regions that have been added to the Work Group (matching the Region of the Customer Site associated with the task) will be displayed in the Calendar.
Technician: Allows you to filter by Technician. If selected, only the technicians you select will be displayed in the Calendar.
Filter Method for Task Types and Regions
The Task Type and Region filters are actually based on Work Groups – the dropdown menus are populated by Work Groups that have been configured using Task Type and Region as the filter methods respectively. Let’s take an example:
I create a Work Group with name = “Corrective Tasks” and Filter Method = “Task Type”
I add “Task Type A” and “Task Type B” to that Work Group filter
I add a technician named Johnny Tech and a Web User named Sara D. to the Work Group.
Sara D. is not part of any other Work Groups.
When Sara D. is viewing the Calendar View, she will see “Corrective Tasks” in the Task Type filter – she will NOT see “Task Type A” or “Task Type B”
However, if “Corrective Tasks” is selected in the Task Type filter, all tasks with Task Type = “Task Type A” or “Task Type B” will be displayed in the Calendar View.
Because Sara D. is not a member of any other Work Group, the Regions filter will remain blank
Sara D. will ONLY see Johnny Tech in the Calendar as he is the only other member of the Work Group.
For more information on configuring Work Groups, visit the Work Groups page.
Using Shift Overrides to Temporarily Adjust Capacity
What happens when you face a sudden surge in demand or a technician in your region falls sick? When the unexpected happens, operators need to be able to shift resources to meet the demand and keep their end customers happy. To meet these challenges, Shift Overrides allow you to temporarily shift the capacity of your workforce between Regions / Task Types so they can pick up additional work should demand or capacity change.
To accomplish this, Shift Overrides use the concept of a “temporary shift” which overrides the default Shift, Region, and Task Types (that a technician can perform) associated with a technician for a set period. Outside of the Shift Override timeframe, the Technician will revert to their default Shift and Region.
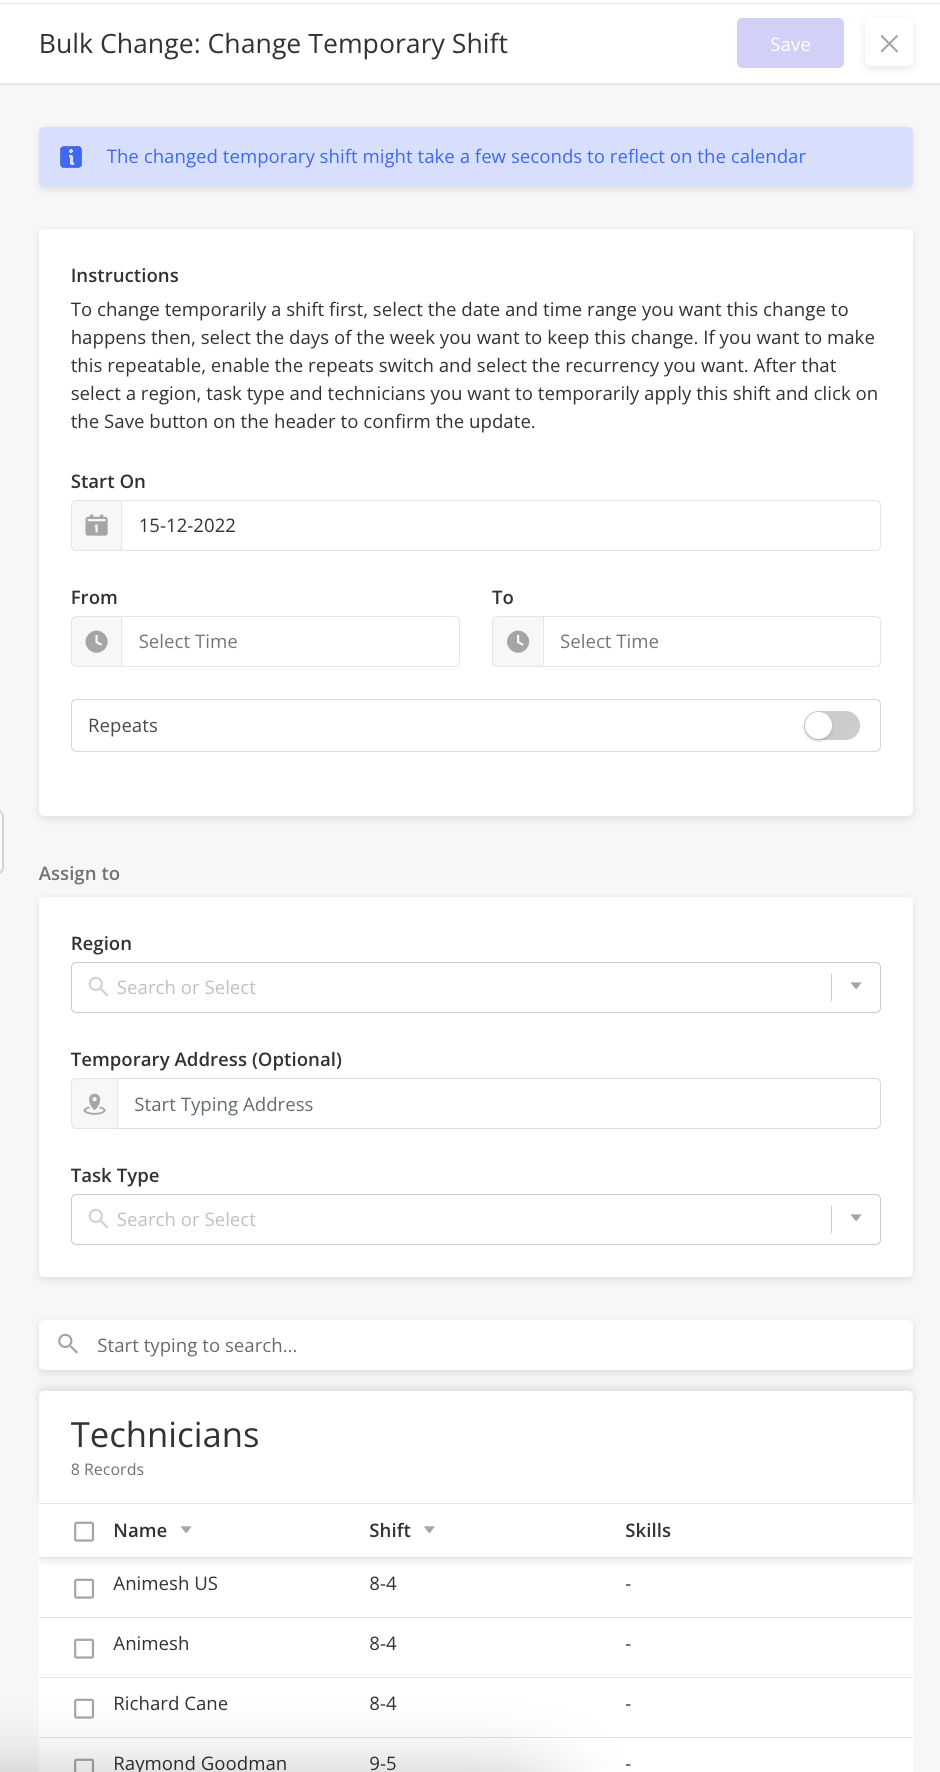
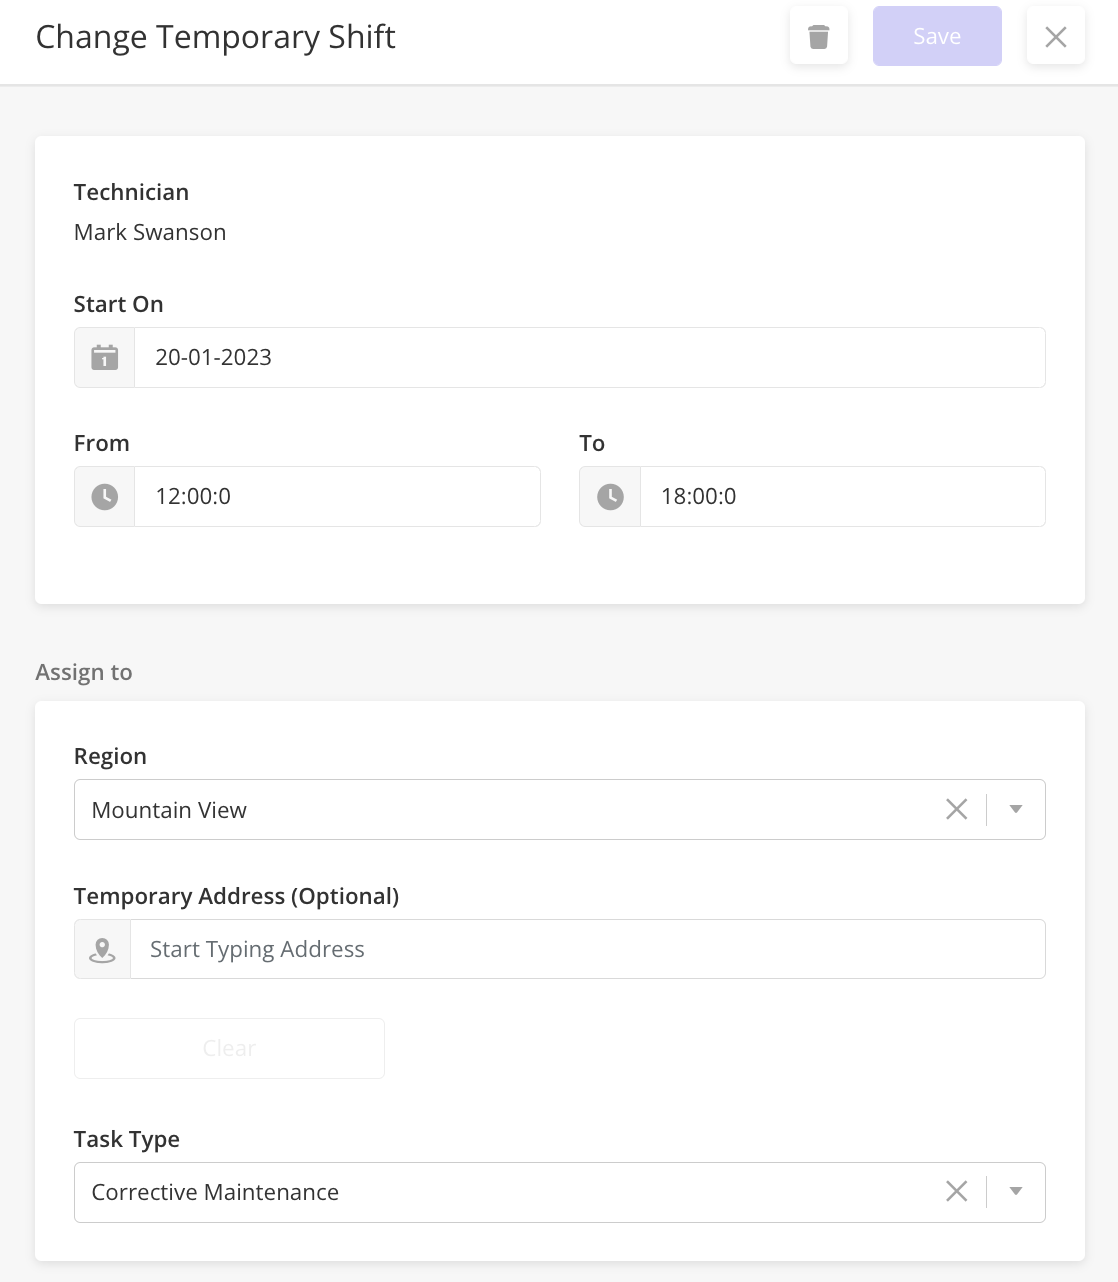
Creating Shift Overrides (in bulk)
To create a Shift Override, follow the steps below:
Click on the “Bulk Actions” dropdown, select “Create Shift Override”
Select the Start On date, which is the date you wish the Shift Override to start
Using the From dropdown, select the starting time for the Shift Override. This time is applied to the Start On date.
Using the To dropdown, select the ending time for the Shift Override. This time is applied to the Start On date.
To repeat the Shift Override so that it recurs on more than one day, enable the “Repeats” toggle and define the recurrence:
Define how often the override will repeat (Daily, Weekly, Monthly, etc)
Or, create a custom recurrence by entering the time unit and a number to define how often it will occur.
Using the Until dropdown, enter the ending date for the recurring Shift Override. After this date, the Technician(s) will revert to their default Shift.
Select the Region(s) that you’d like to assign the technicians to during the Shift Override. This will move the Technician temporarily to the Work Group associated with the selected Region(s)
Select the Task Type(s) that you’d like to assign the technicians to during the Shift Override. This will move the Technician temporarily to the Work Group associated with the selected Task Type(s)
Select a Temporary Address (Optional) if needed. This is useful if a technician is assigned to a distant region and would be starting work from a different home address. The Temporary Address will be considered as a starting point (the technician’s home base) during Scheduling and Dispatch.
Select the Technicians you’d like the Shift Override applied to from the list
Click the Save button to apply the changes
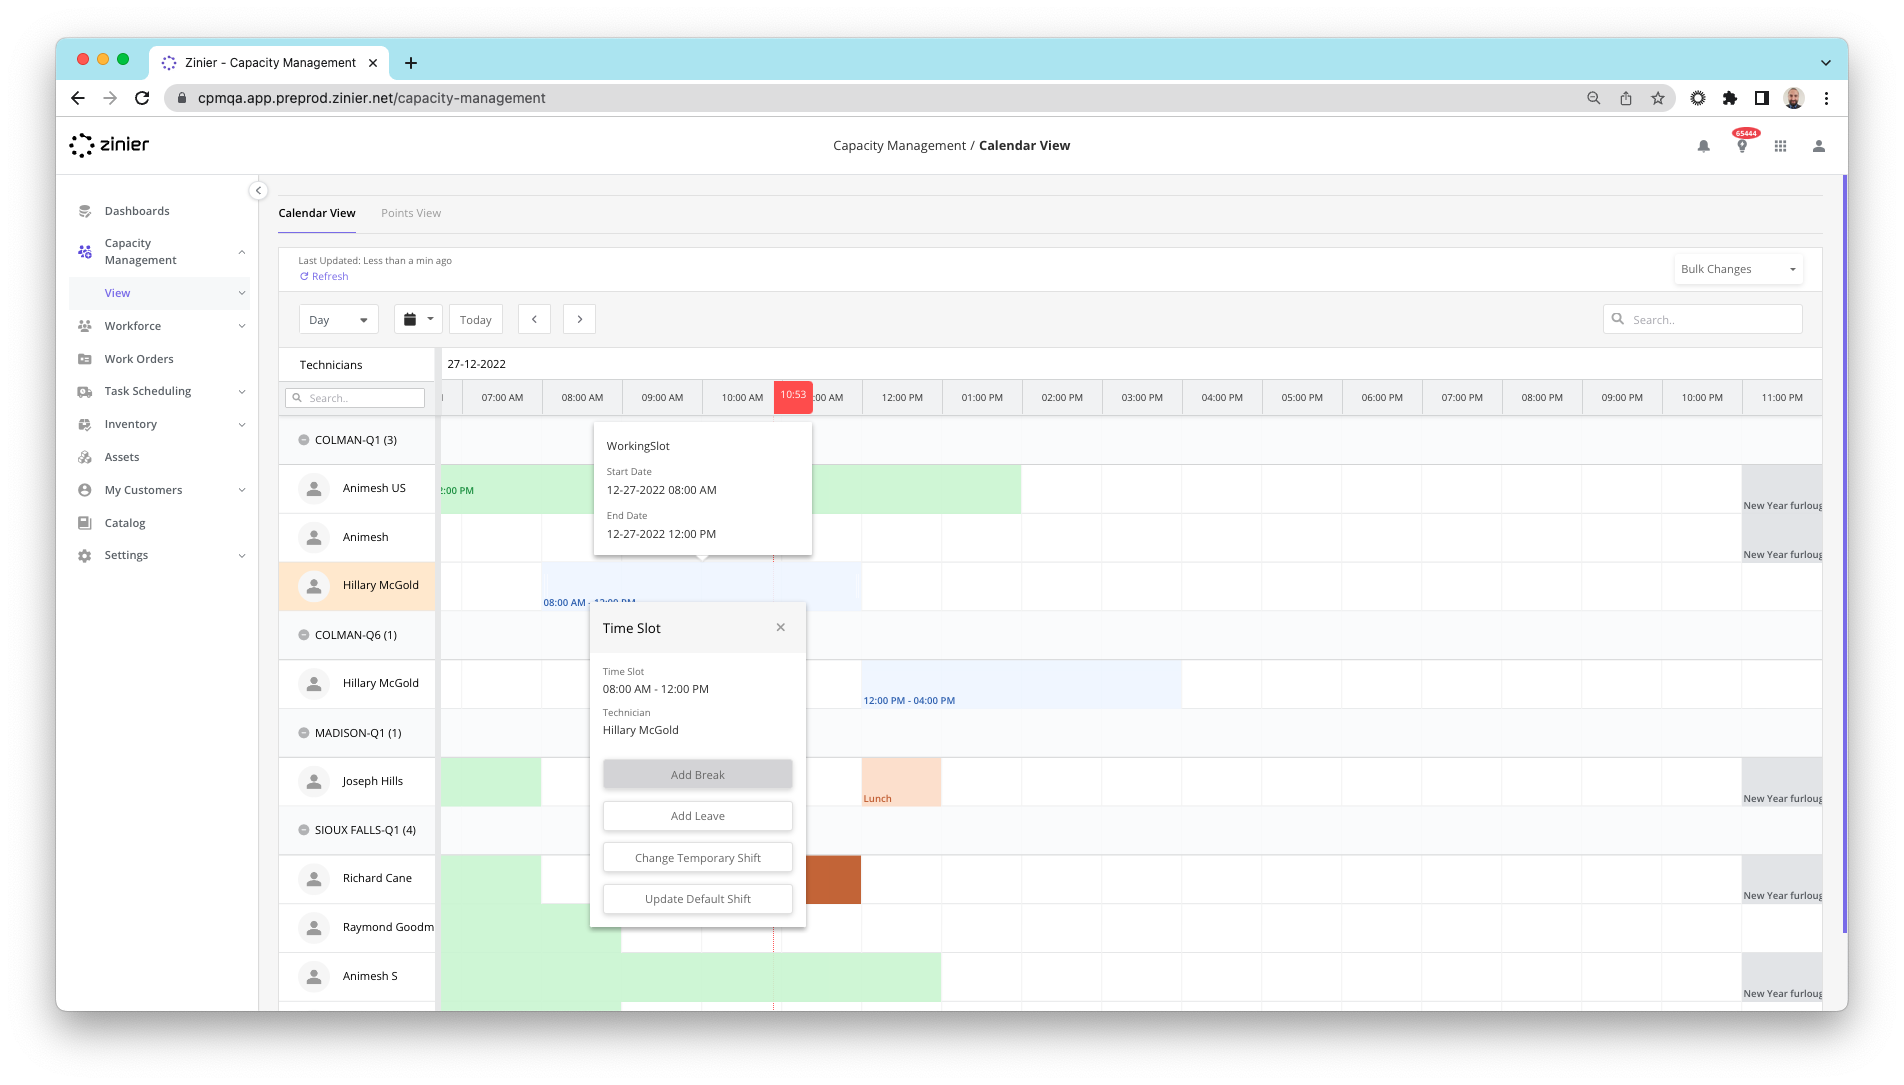
Editing a Shift Override from the Calendar
In addition to making bulk changes, you can also interact with edit individual Shift Overrides by clicking directly on the event in the Calendar. To edit an existing Shift Override, follow the steps below:
Click on the Shift Override event you wish to edit in the Calendar. Shift overrides are displayed as blue boxes
Click the “Change Shift Override” button from the popup to bring up the sidepanel
Make your desired changes and click the Save button
Add Overtime to Temporarily Increase Capacity
Adding Overtime allows you to increase the capacity of your workforce by adding additional working hours to the calendar (Shift) of your technicians. During Overtime, technicians are available for Scheduling & Dispatch, even if the task falls outside their Work Schedule/default Shift. While Overtime can be added from the Workforce module, the benefit of adding it here is that you can make changes in bulk.
When creating a new Technician, you add Overtime from the Work Schedule tab in the side panel after the record is saved. For more information on adding Leave, see the Workforce Management Settings page.
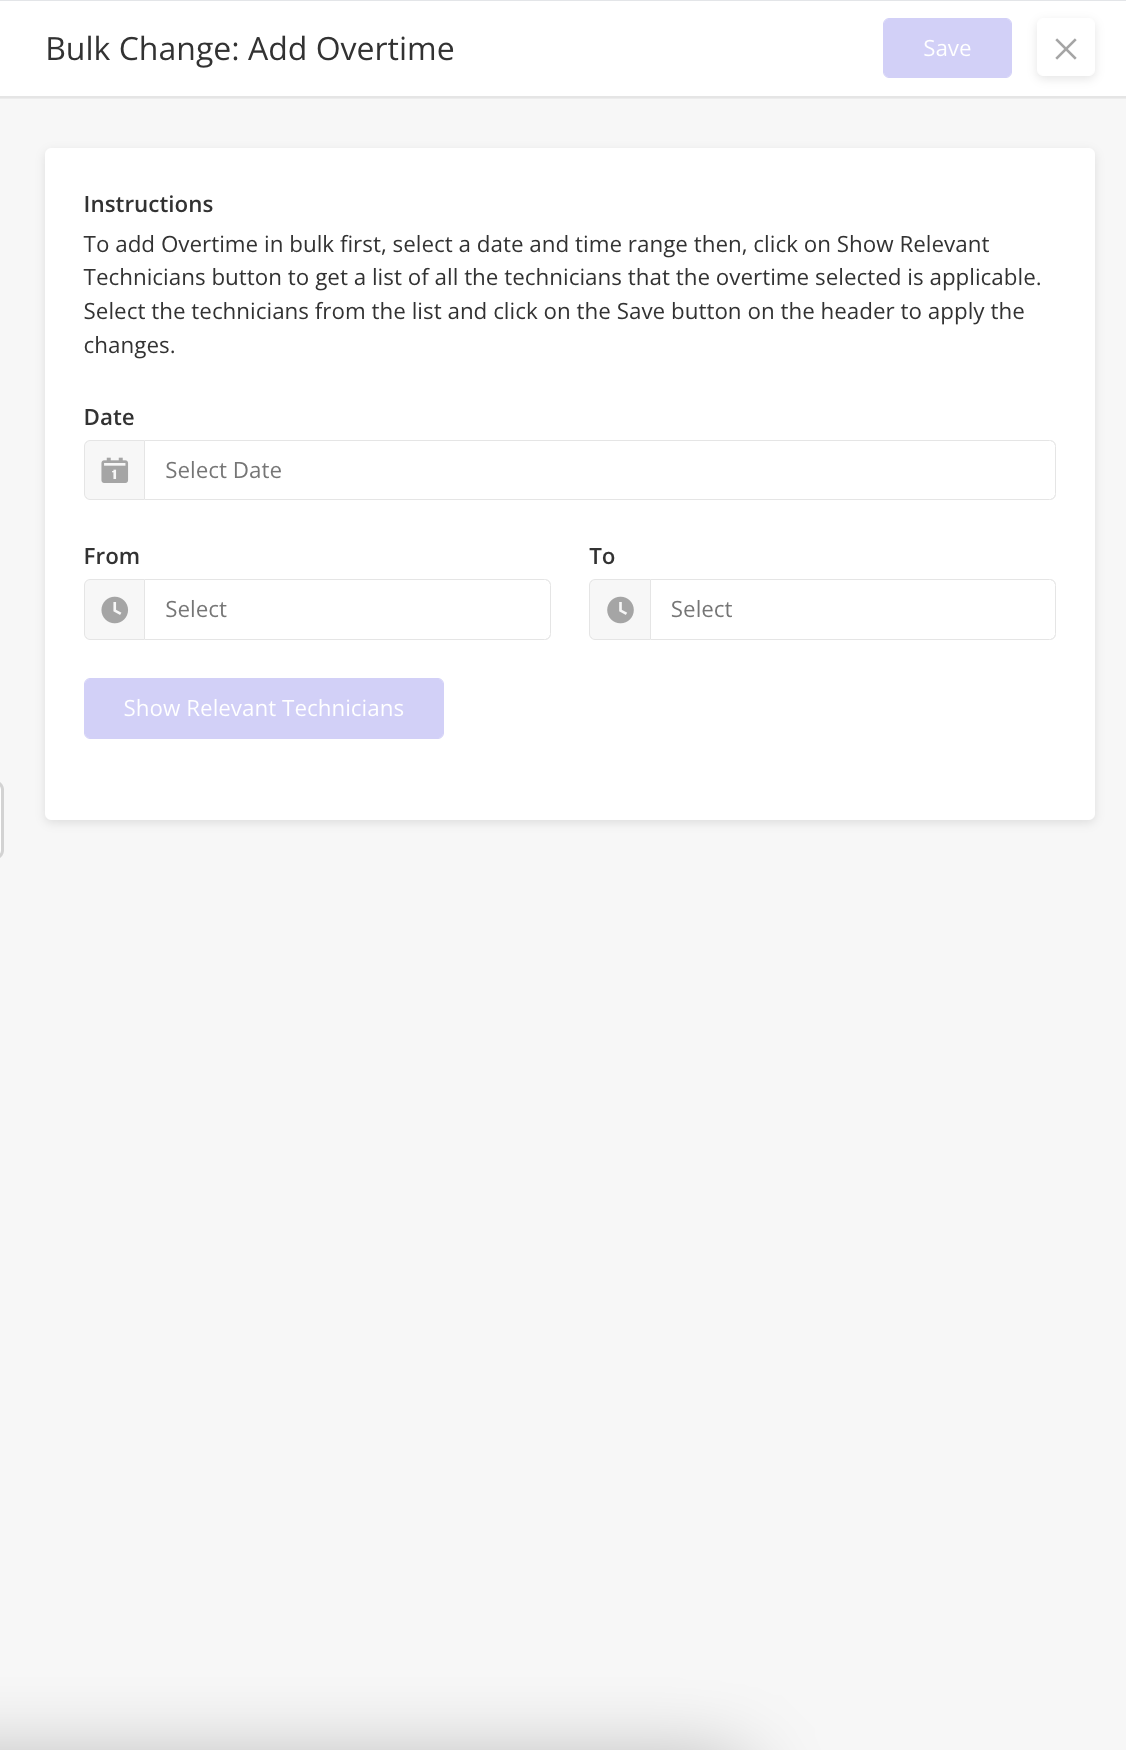
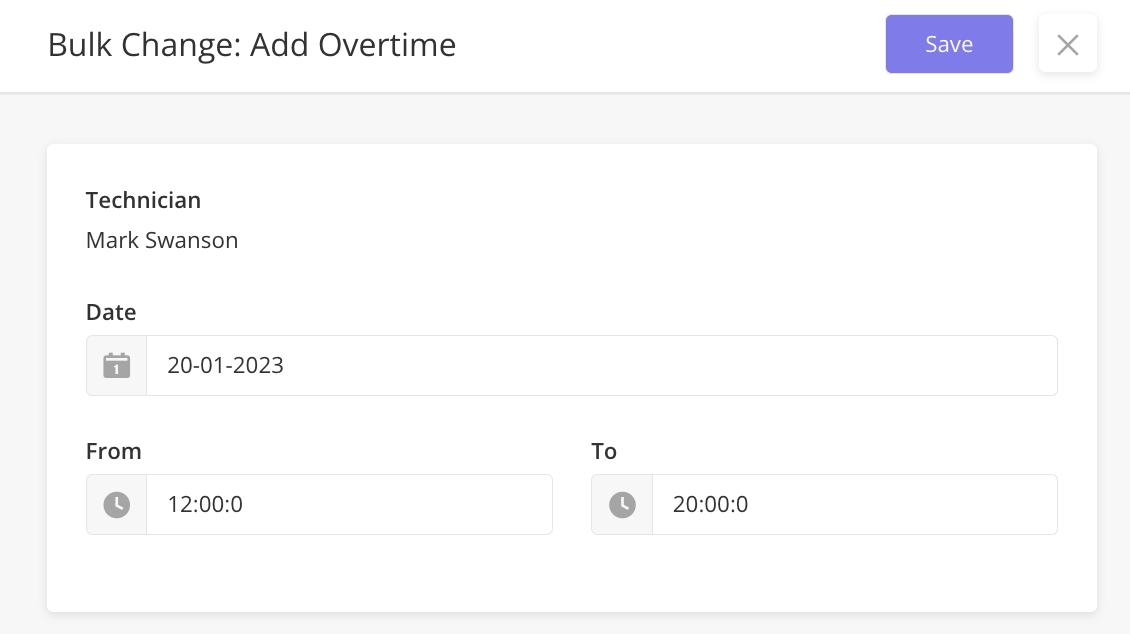
Adding Overtime (in bulk)
To Add Overtime to your workforce, follow the steps below:
Click on the “Bulk Actions” dropdown, select “Add Overtime”
Select the Date you wish the Overtime to start
Using the From dropdown, select the starting time for Overtime. This is applied to the date selected above.
Using the To dropdown, select the ending time for Overtime. This is applied to the date selected above.
Click the See Relevant Technicians button to show a list of technicians where that the overtime selected is applicable.
Select the Technicians you’d like the Overtime applied to from the list
Click the Save button to apply the changes
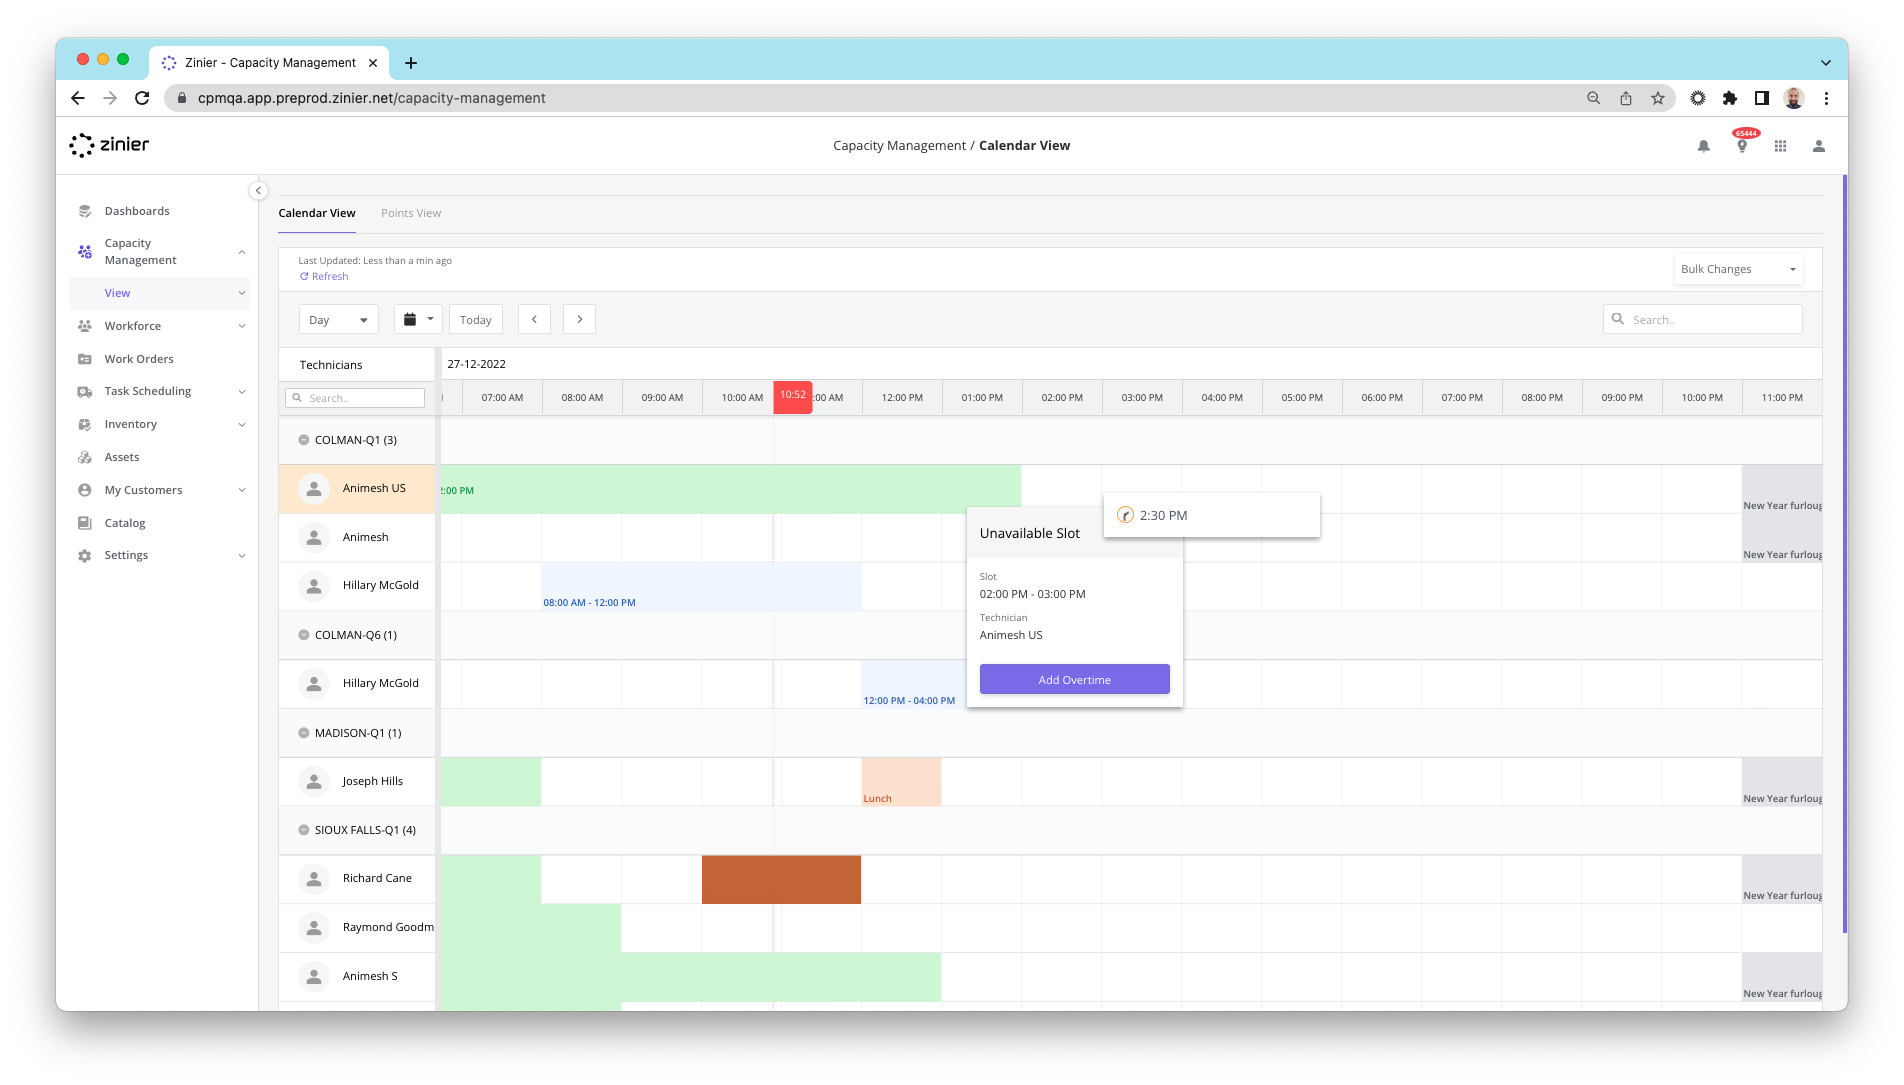
Adding Overtime from the Calendar
In addition to making bulk changes, you can also add Overtime events individually directly from the Calendar. To do so, follow the steps below:
Click on the empty time slot you wish to convert to Overtime. Empty time slots are displayed as white/blank boxes with no text in them
Click the “Add Overtime” button from the popup to bring up the sidepanel
Update the fields as described in the prior section and click the Save button to apply the changes
Update Default Shifts to Adjust Capacity
The Calendar View also allows you to modify the default working hours (Shifts) of your workforce which is used to determine the availability of a technician during Scheduling & Dispatch. While this can also be done from the Workforce module, the benefit of doing it here is that you can make changes in bulk.
When creating a new Technician, the selected Shift will populate the Work Schedule tab in the side panel after the record is saved. For more information on configuring Shifts, see the Workforce Management Settings page.
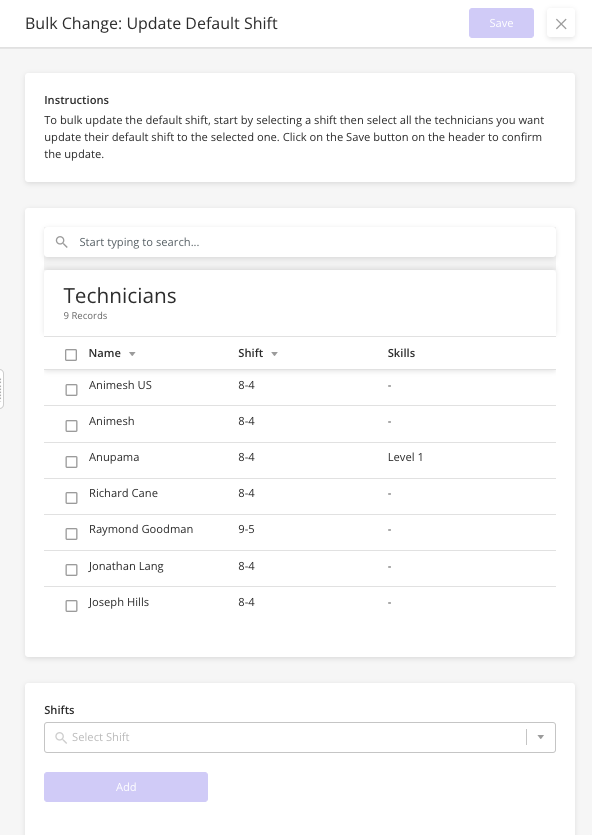
Updating Default Shifts (in bulk)
To update the default Shift of one or more Technicians, follow the steps below:
Click on the “Bulk Actions” dropdown, select “Update Default Shift”
Select the Technicians you’d like the changes applied to from the list
Select the new Shift you would like applied to the selected technicians
Click the Add button to apply the changes to the selected technicians. Once added, the technicians will appear in a new list below
Repeat steps 2-4 as needed to make additional Shift changes
Click the Save button to apply the changes
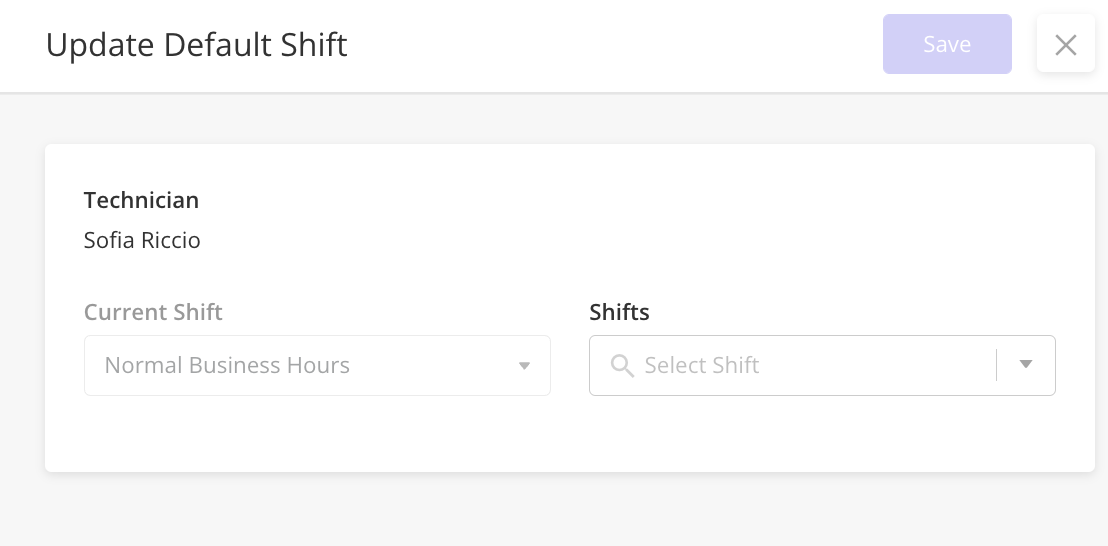
Editing a Default Shift from the Calendar
In addition to making bulk changes, you can also interact with edit individual default Shifts by clicking directly on the event in the Calendar. To edit an existing default Shift, follow the steps below:
Click on the Shift event you wish to edit in the Calendar. Defaults Shifts are displayed as green boxes
Click the “Update Default Shift” button from the popup to bring up the sidepanel
Select the default Shift you wish to update from the Shifts dropdown
Click the Save button to apply the changes
Add Breaks in Bulk
Adding Breaks decreases the capacity of your workforce by removing working hours from your technicians' Work Schedules. During breaks, technicians are not available for Scheduling & Dispatch, even if the task falls within their Work Schedule/default Shift. While Breaks can be added from the Workforce module, the benefit of doing it here is that you can make changes in bulk.
When creating a new Technician, you add “Breaks” from the Work Schedule tab in the side panel after the record is saved by adding Leave (breaks act the same as “Leave”). For more information on adding Leave, see the Workforce Management Settings page.
Adding Breaks (in bulk)
To add Breaks to your workforce, follow the steps below:
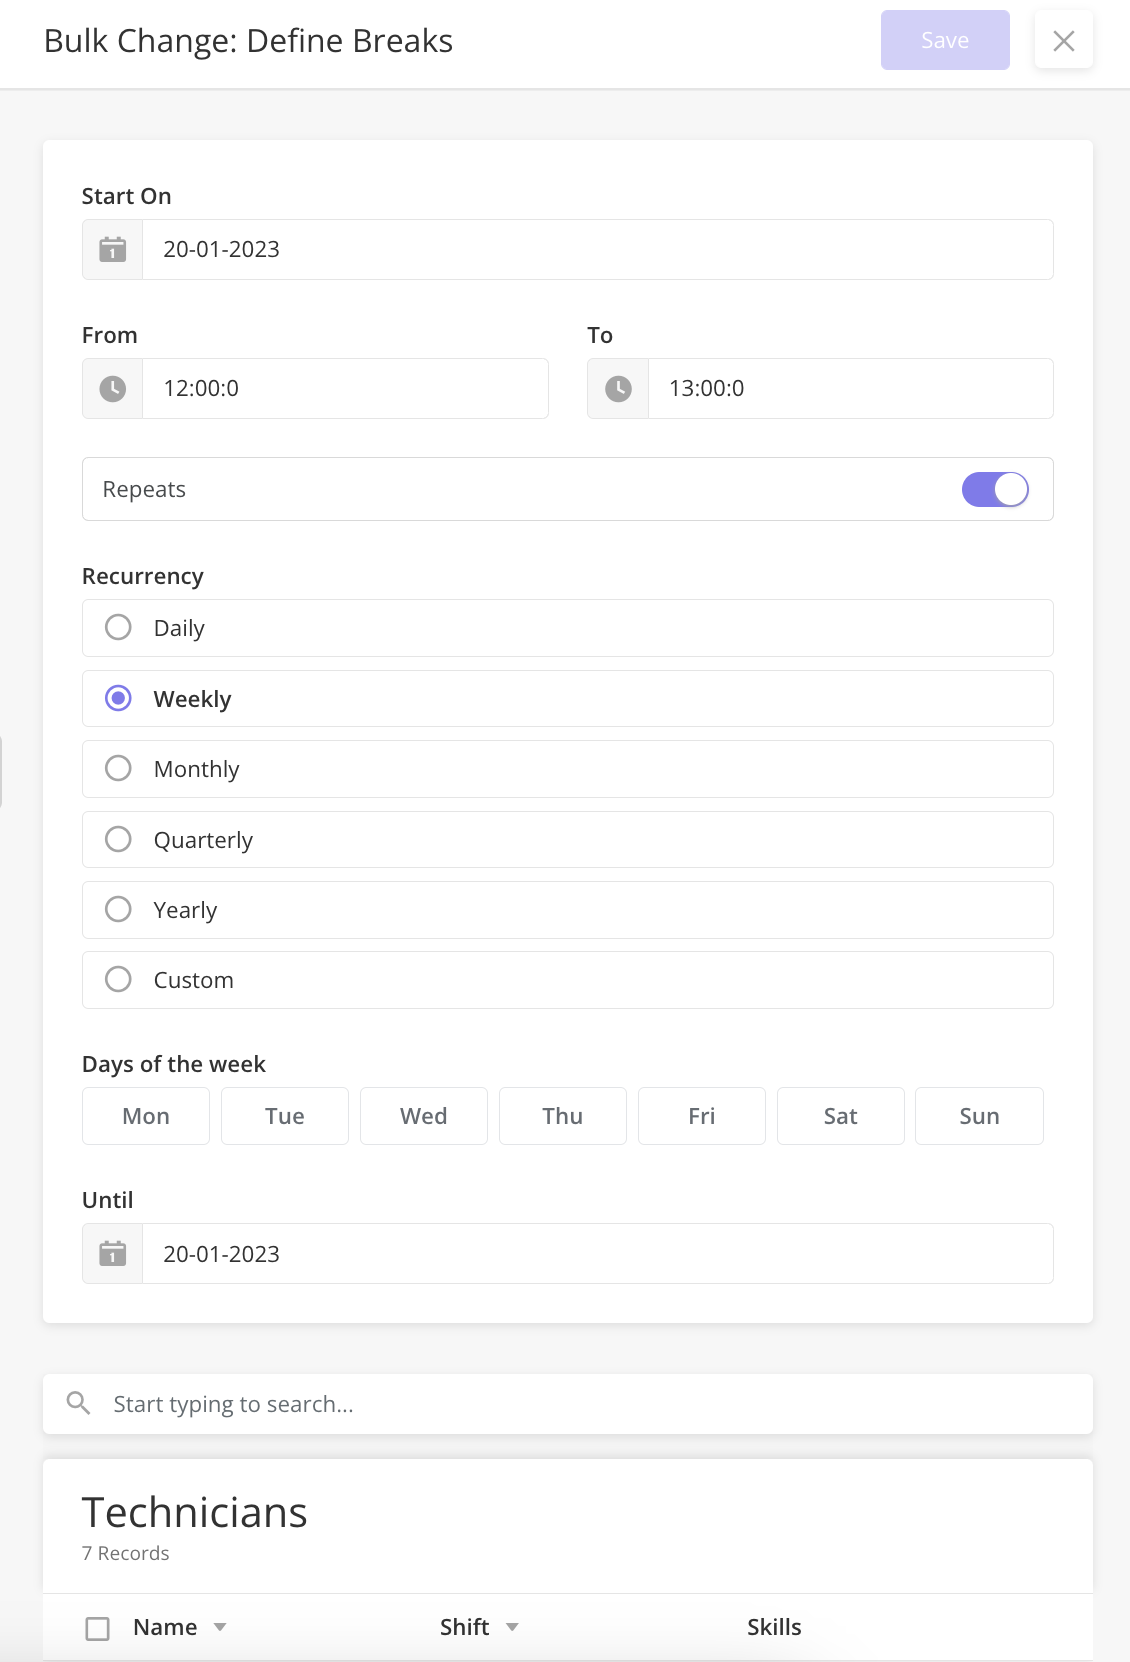
Click on the “Bulk Actions” dropdown, select “Define Breaks”
Select the Start On date, which is the date you wish the Break to start
Using the From dropdown, select the starting time for the Break. This time is applied to the Start On date.
Using the To dropdown, select the ending time for the Break. This time is applied to the Start On date.
To repeat the Break so that it recurs on more than one day, enable the “Repeats” toggle and define the recurrence:
Define how often the Break will repeat (Daily, Weekly, Monthly, etc)
Or, create a custom recurrence by entering the time unit and a number to define how often it will occur.
Using the Until dropdown, enter the ending date for the recurring Break. After this date, the Technician(s) will revert to their default Work Schedule.
Select the Technicians you’d like the Break applied to from the list
Click the Save button to apply the changes
Adding Breaks within a specific Work Shift or Shift Override from the Calendar
In addition to adding Breaks in bulk, you can add Breaks to individual default Shifts and Shift Overrides by clicking directly on the event in the Calendar. Adding Breaks in this manner allows you to define non-working hours for specific reasons inside a working shift. i.e: Inventory Restock, Lunch, Internal Job, etc.
To add a Break to a default Shift or Shift Override, do the following:
Click on the Shift or Shift Override event you wish to edit in the Calendar. Defaults Shifts are displayed as green boxes while Shift Overrides are displayed as blue boxes
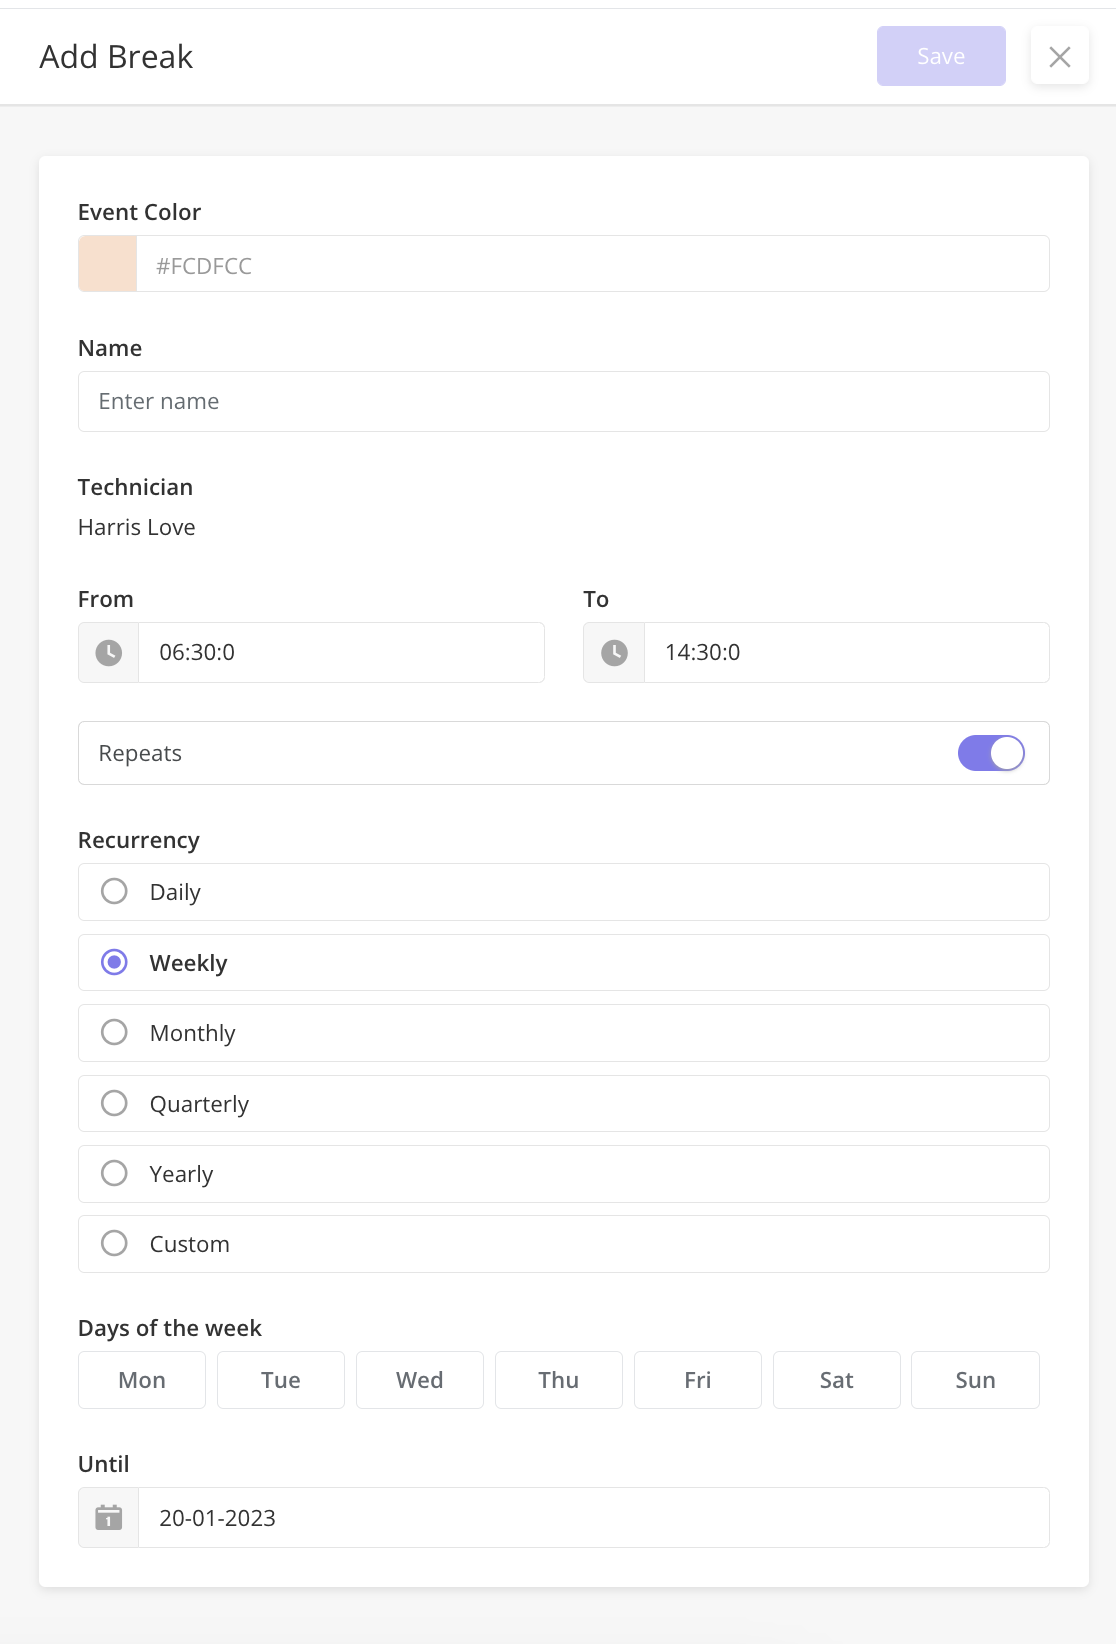
Click the “Add Break” button from the popup to bring up the sidepanel
In the Event Color field, enter a color hex code to define the color used in the Calendar for the break. Or use the default hex color code provided. For example hex color codes and palettes, you may find this site useful: https://www.color-hex.com/
Give your Break a Name (i.e. Lunch or Inventory Restock). This will be displayed in the calendar once the Break is saved.
Add the time and date fields as described in the prior section and click the Save button to apply the changes
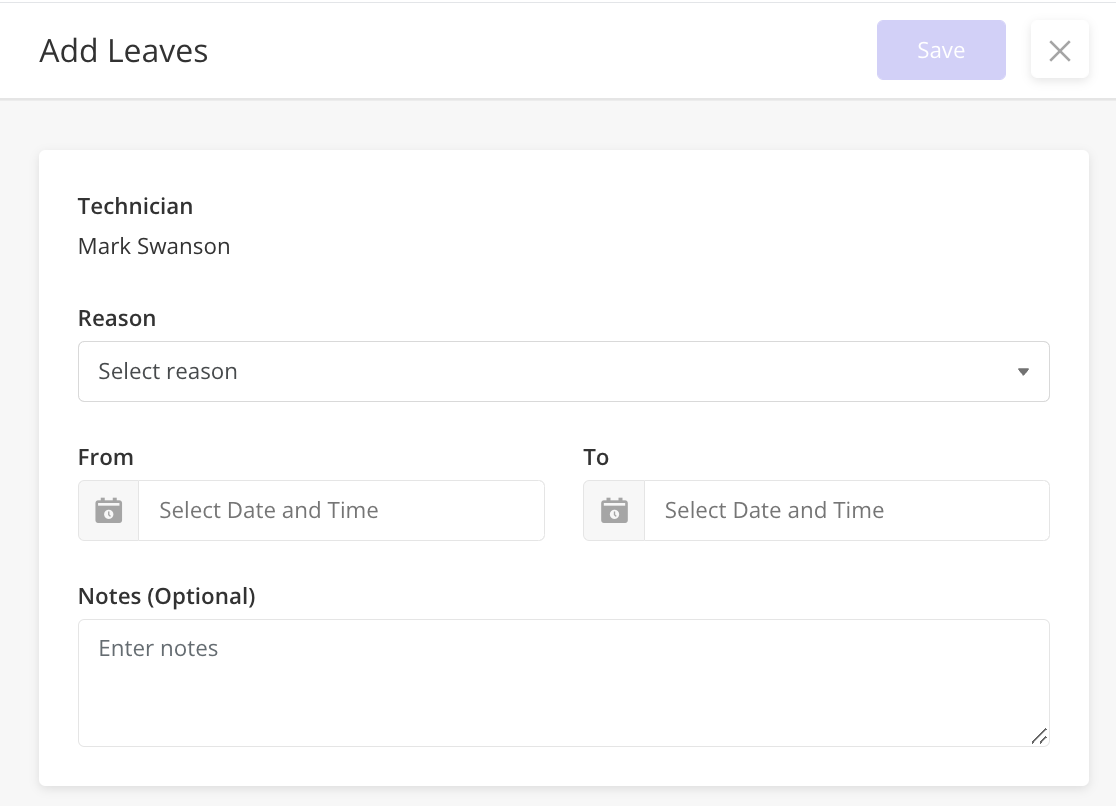
Adding Leave within a specific Work Shift or Shift Override from the Calendar
In addition to adding Breaks, you can also add Leave to individual default Shifts and Shift Overrides by clicking directly on the event in the Calendar. Adding Leave blocks time on a technician’s calendar so they can take time off. During Leave, the technician is considered unavailable for Scheduling & Dispatch. Adding Leave in this manner allows you to select a specific reason for the leave from a dropdown menu (i.e. Vacation, Personal Time).
Configuring the Reasons that can be selected for Leave is done from the Settings > General Settings > List Options. For more information on configuring List Options, visit the List Options page
To add Leave to a default Shift or Shift Override, do the following:
Click on the Shift or Shift Override event you wish to edit in the Calendar. Defaults Shifts are displayed as green boxes while Shift Overrides are displayed as blue boxes
Click the “Add Leave” button from the popup to bring up the sidepanel
Select a Reason for the Leave from the dropdown menu (i.e. Personal Time or Vacation). The default dropdown menu options can be modified at any time from the List Options module
Using the From dropdown, select the starting date and time for the Leave
Using the To dropdown, select the ending date and time for the Leave
Enter any additional Notes (Optional) if required
Click the Save button to apply the changes
Default Shift click