(Android) Mobile App Installation and Account Creation
After a user has been invited to join a Zinier, the next step in activating their account is downloading the Zinier mobile app and creating an account. The following section guides you through the Zinier mobile app installation and account setup process for Android devices.
To view a list of compatible devices and recommended specifications, visit the Recommended Browsers & Devices page
Activating your account for the first time (Android)
After being invited to join a Zinier, you’ll receive an email invitation with installation and signup instructions to help you get started using the Zinier mobile app. To activate your account, follow the steps below:
Step 1: Download and Install the Zinier mobile app
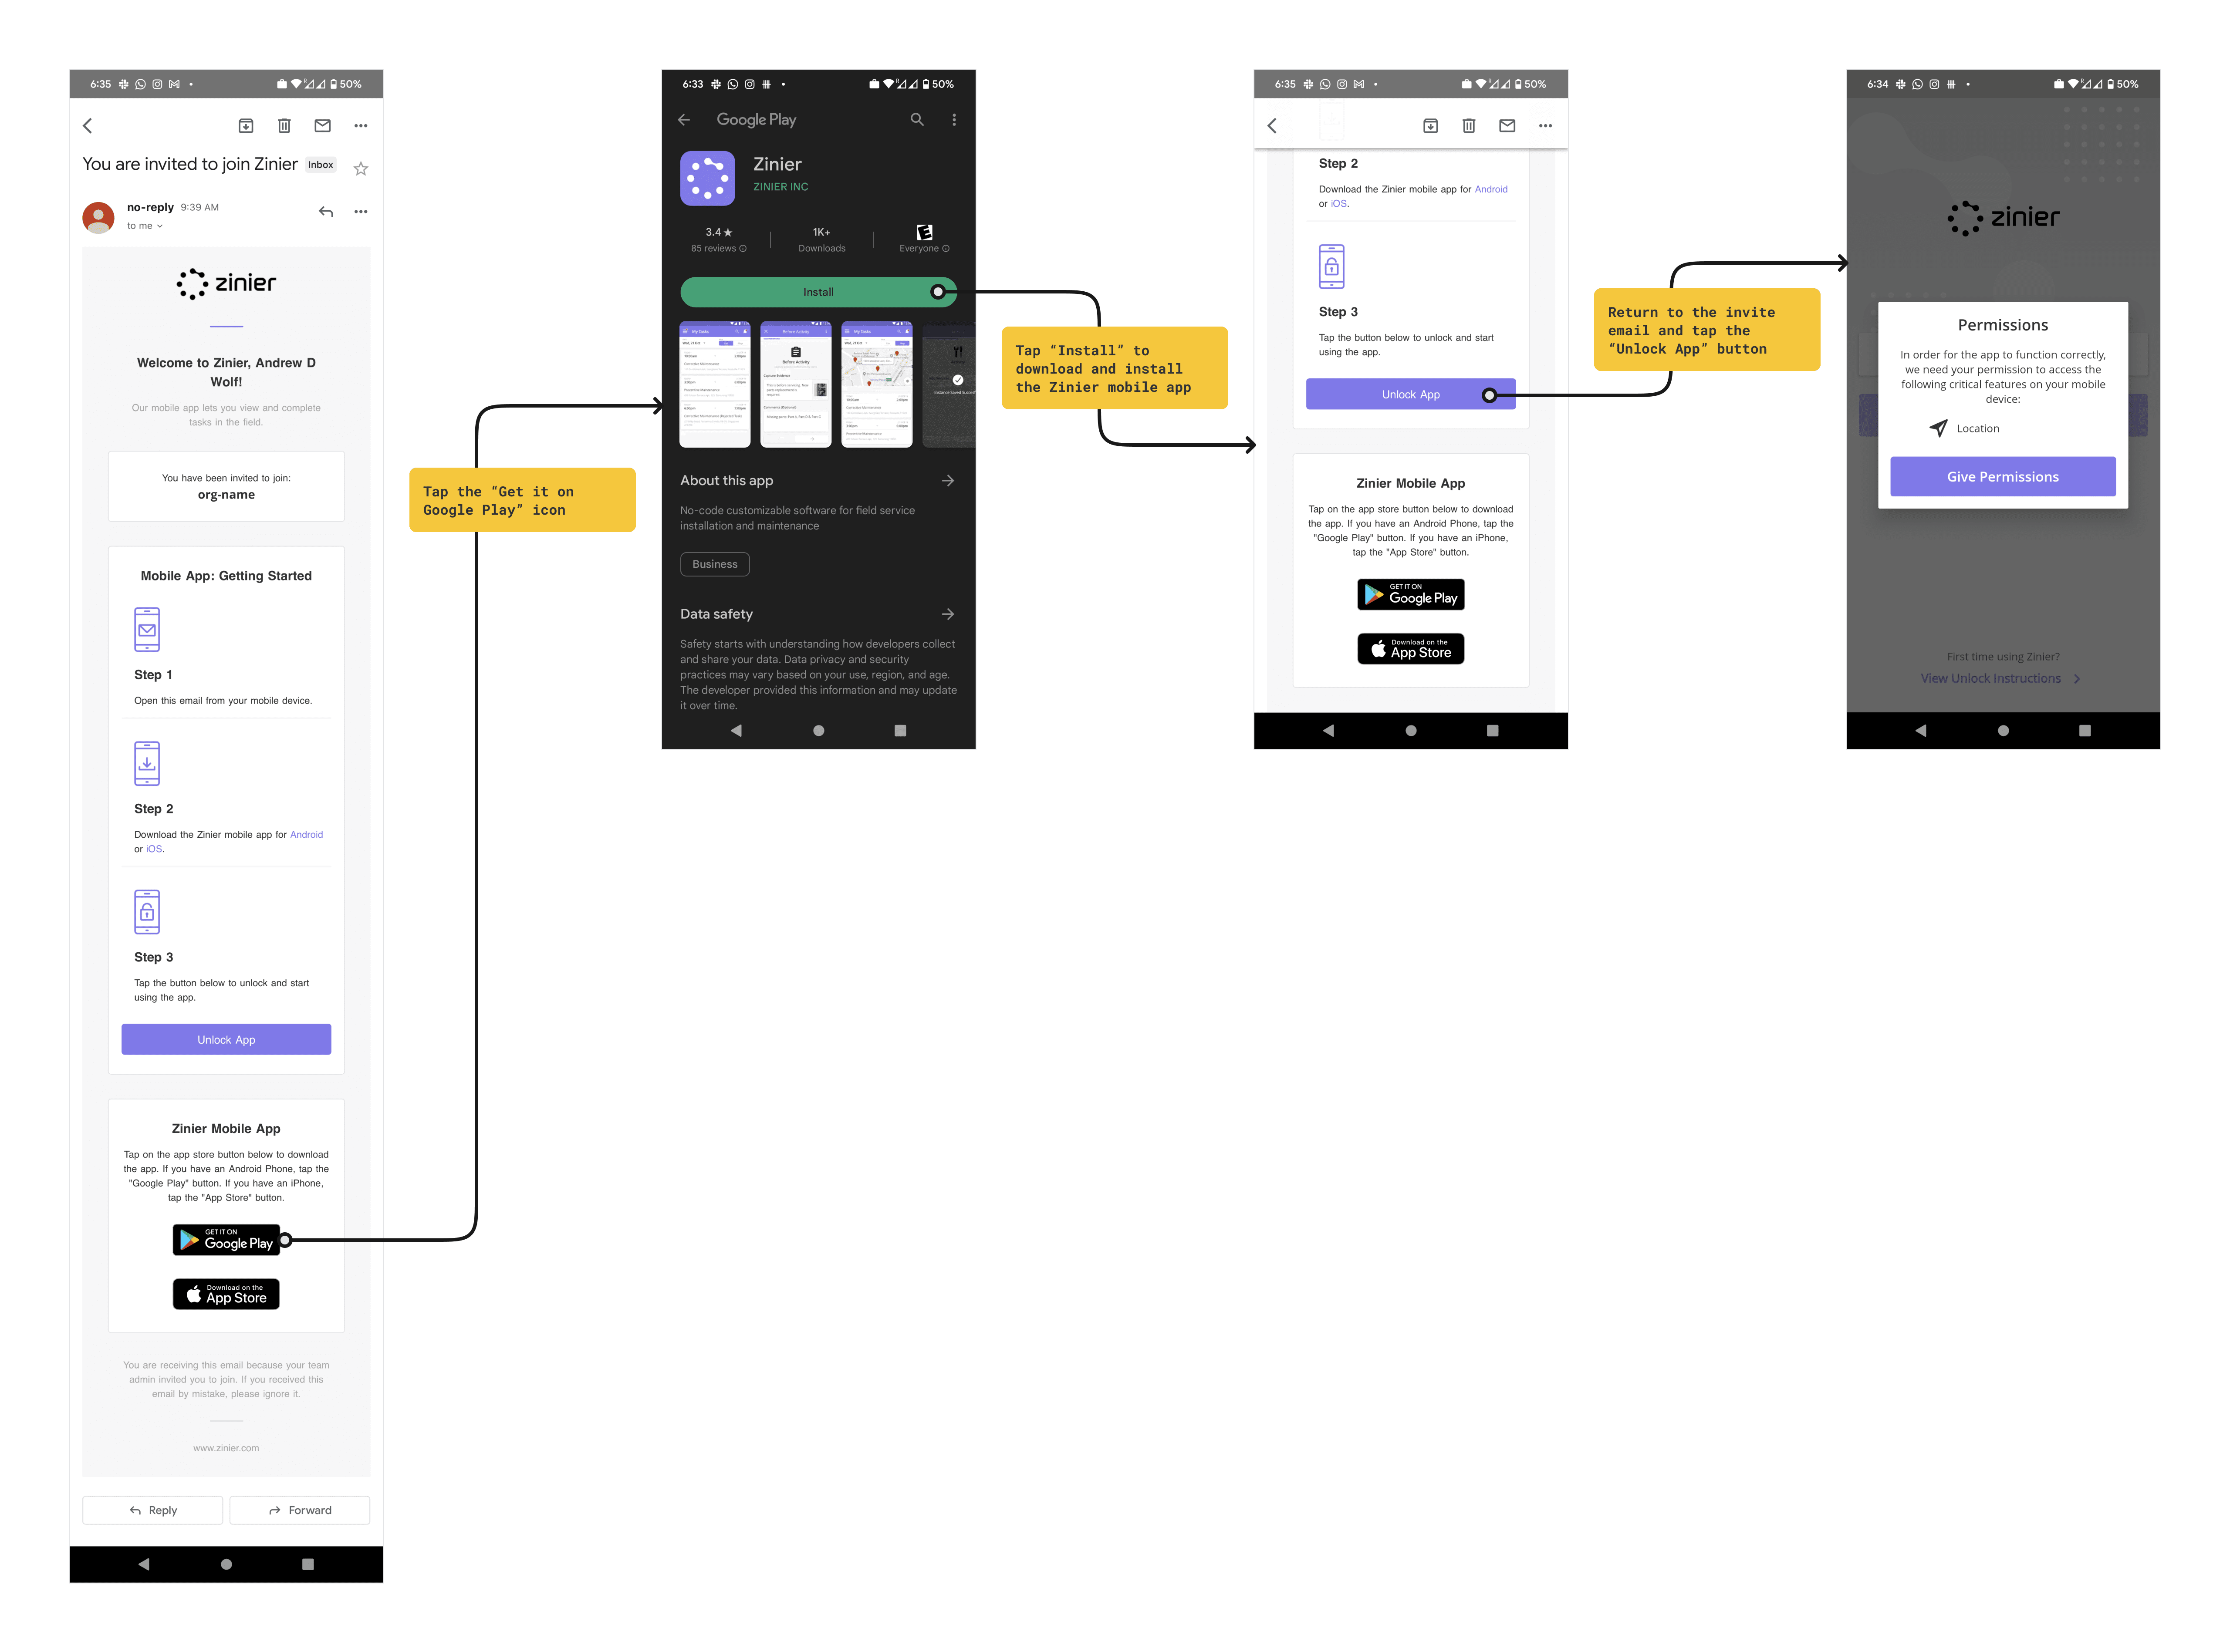
Using the mobile device you intend to install the app on, open the email invitation with the subject line “You are invited to join Zinier”.
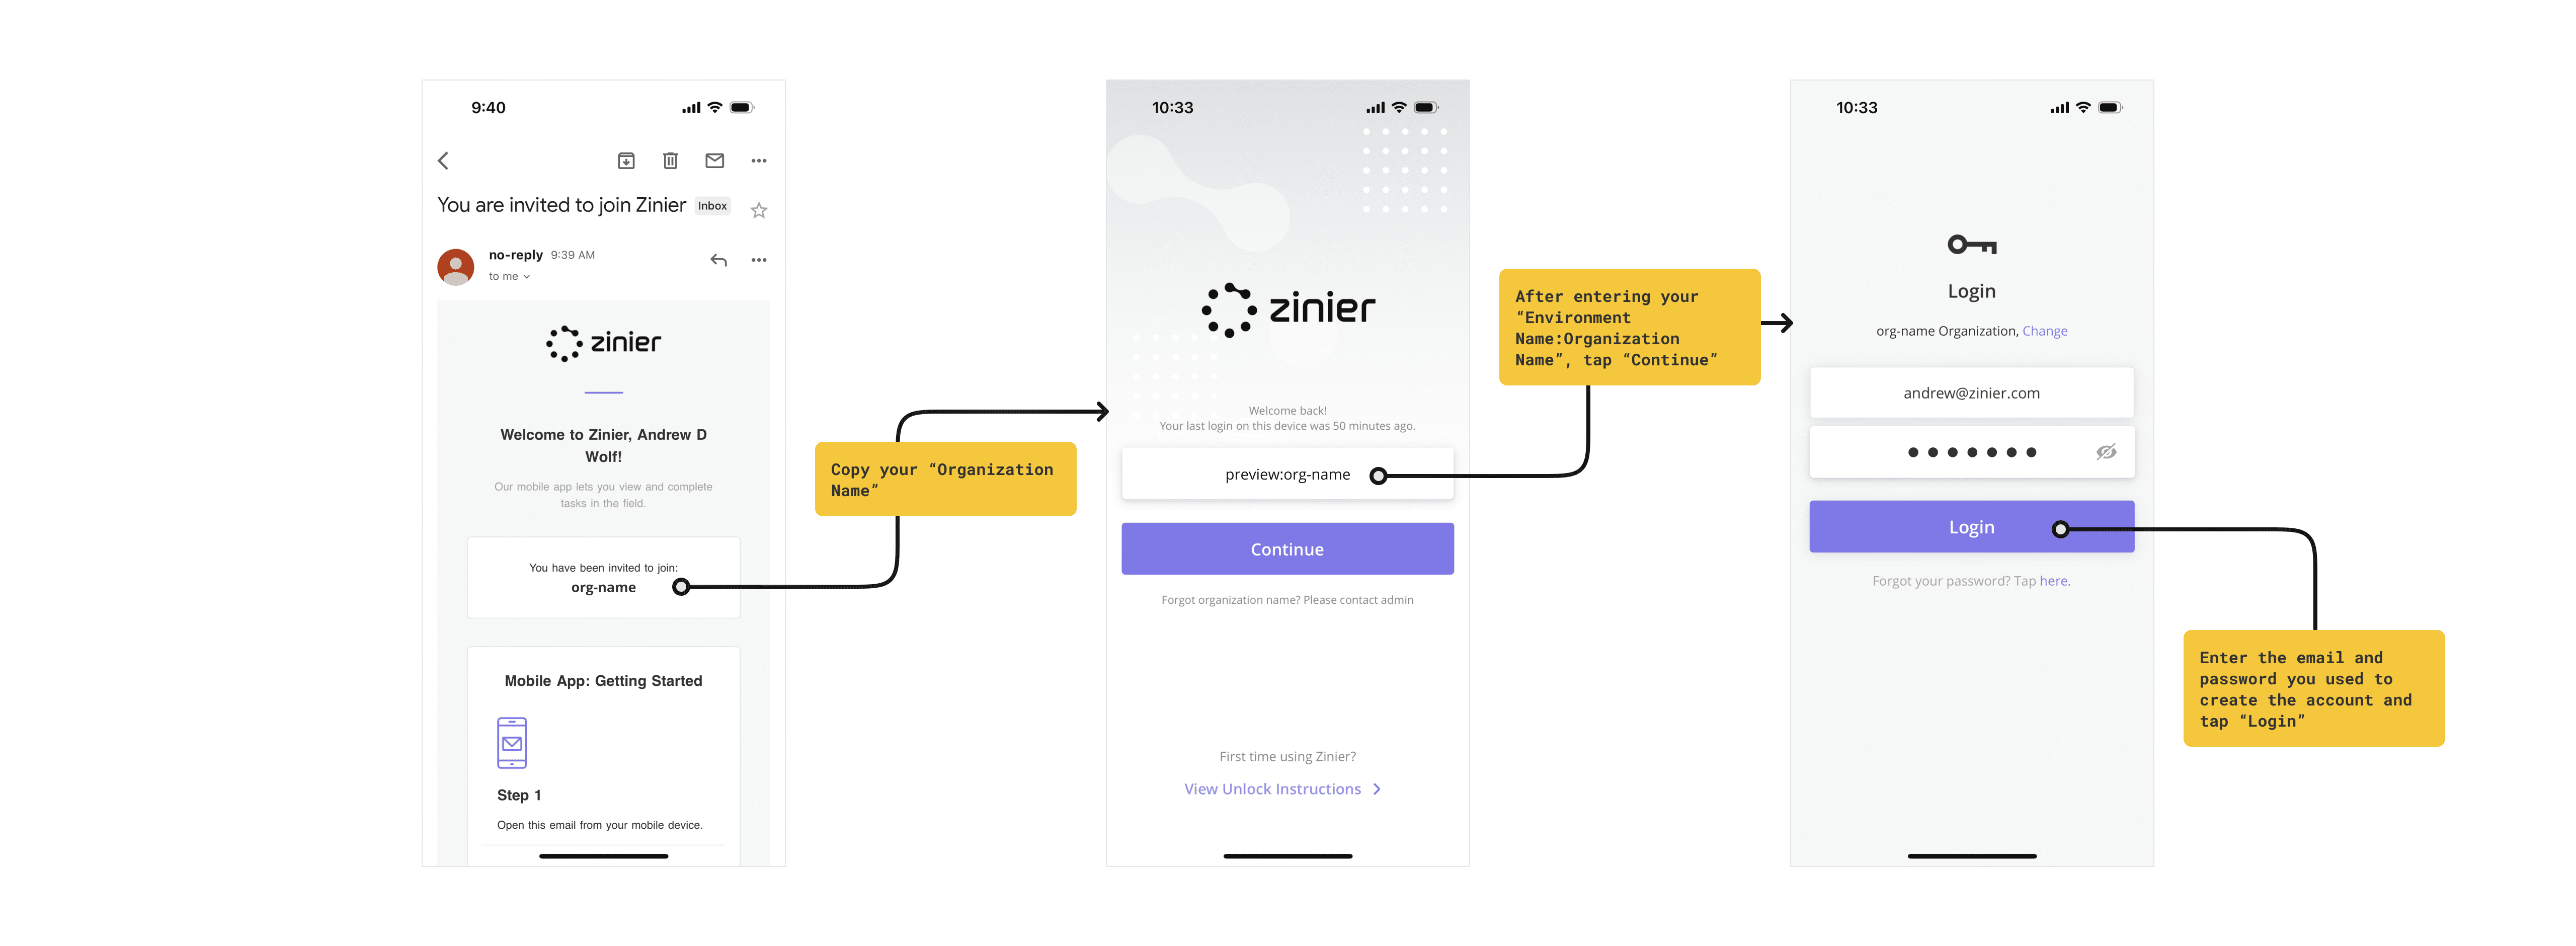
Organization Name: In the email body, you will notice a word in bold below the text “You have been invited to join:” This is the Organization Name that you have been invited to. Please make a note of this. In the example below, the Organization Name is “org-name”.
Scroll down to the bottom of the email and tap the “Get it on Google Play” icon to open the Google Play Store on your device
From the Google Play Store, tap “Install” to download and install the Zinier mobile app
After downloading the app, return to the invite email and tap the “Unlock App” button in the email body. This will pair your device to your account and open the Zinier app automatically.
Step 2: Grant app permissions
When you first open the app after installation, you will be asked to grant a series of permissions for the app to function correctly:
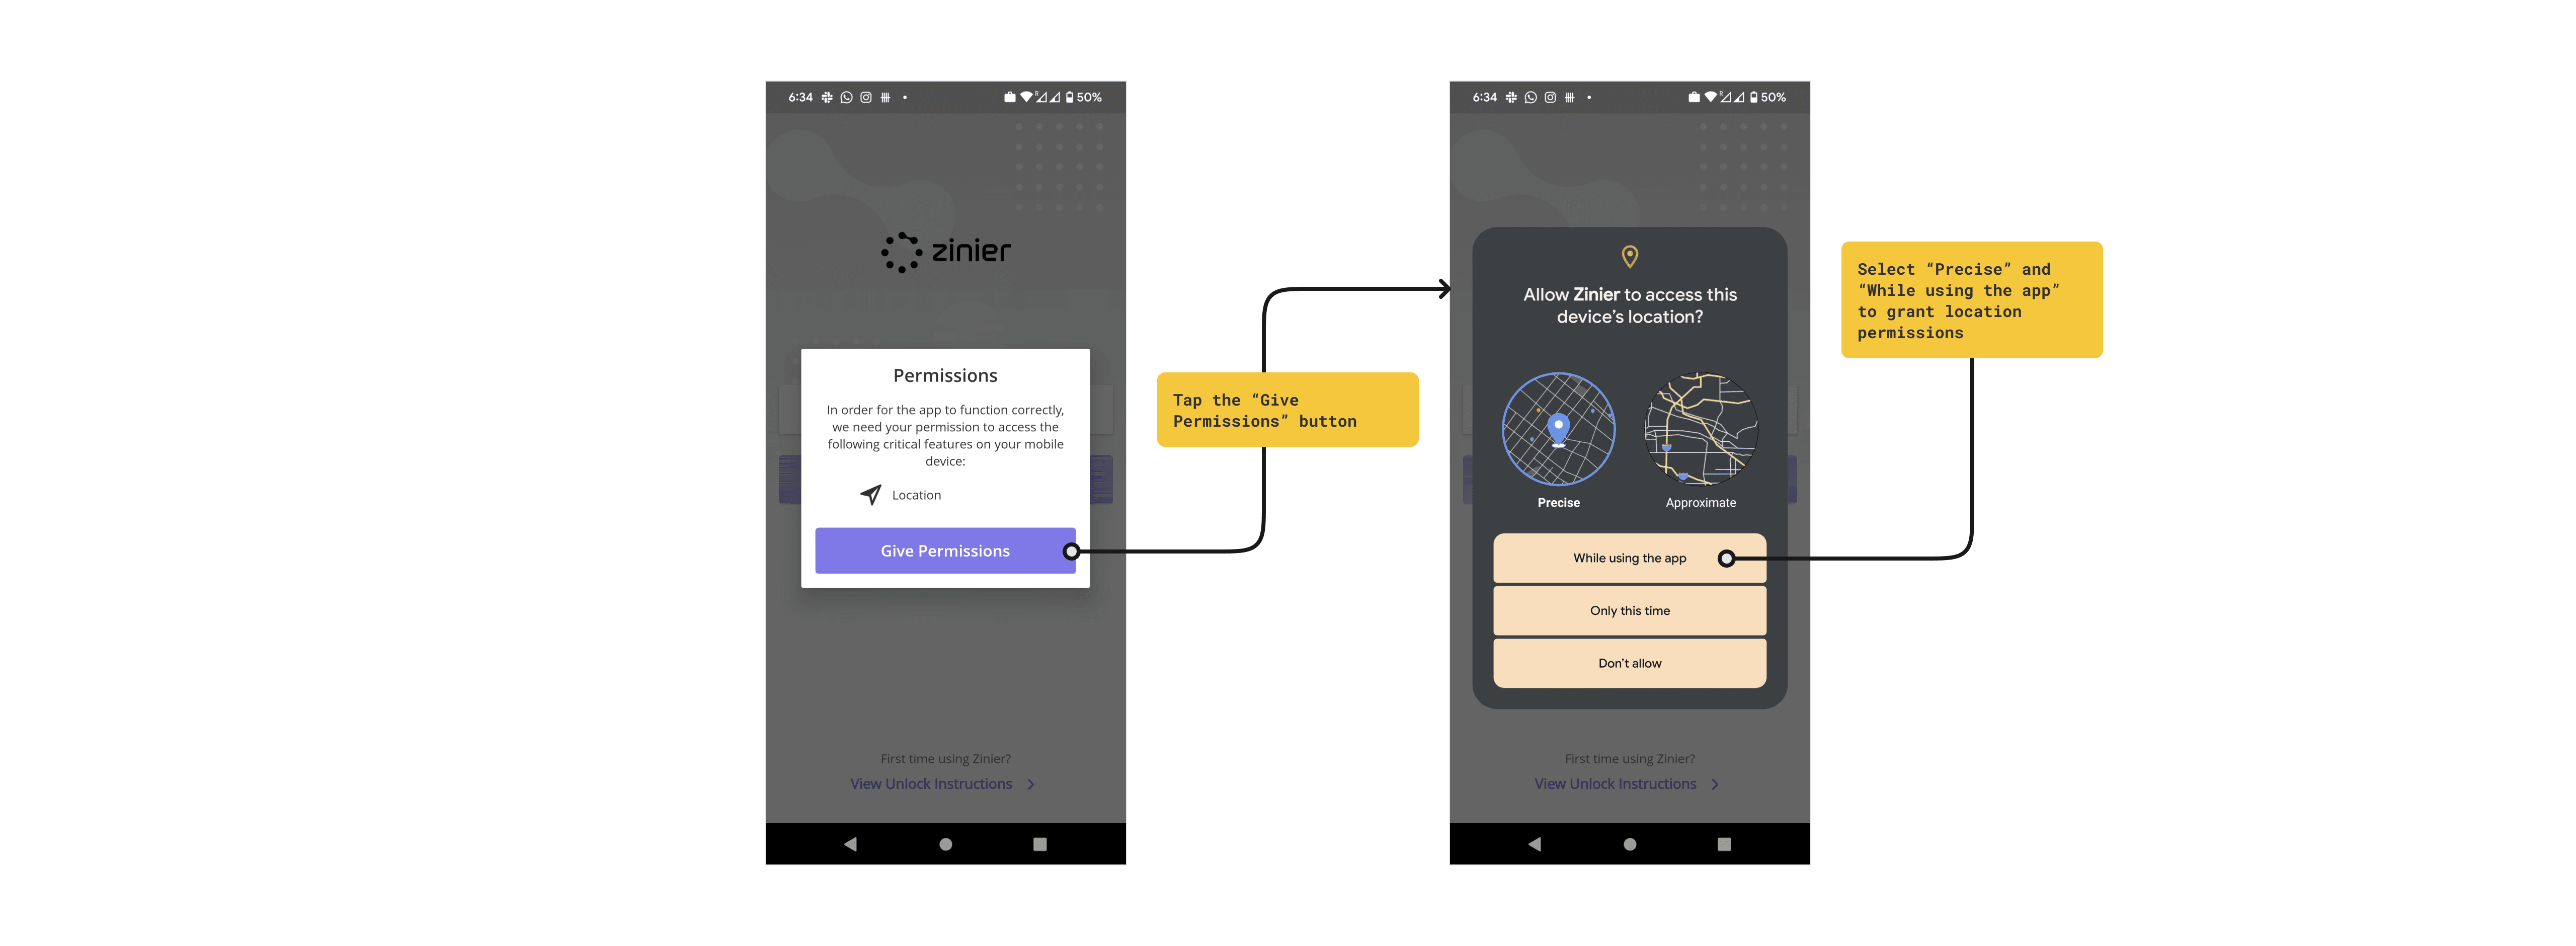
Tap the “Give Permissions” button from the Permissions popup
Location Permissions: Select “Precise” and “While using the app” to grant location permissions. Location permissions allow your dispatcher to see your location and are required for you to be able to check in to a task site using the geo-check-in functionality.
Additional Permissions for Android
On Android, you will be required to grant additional permissions when using the apps features for the first time:
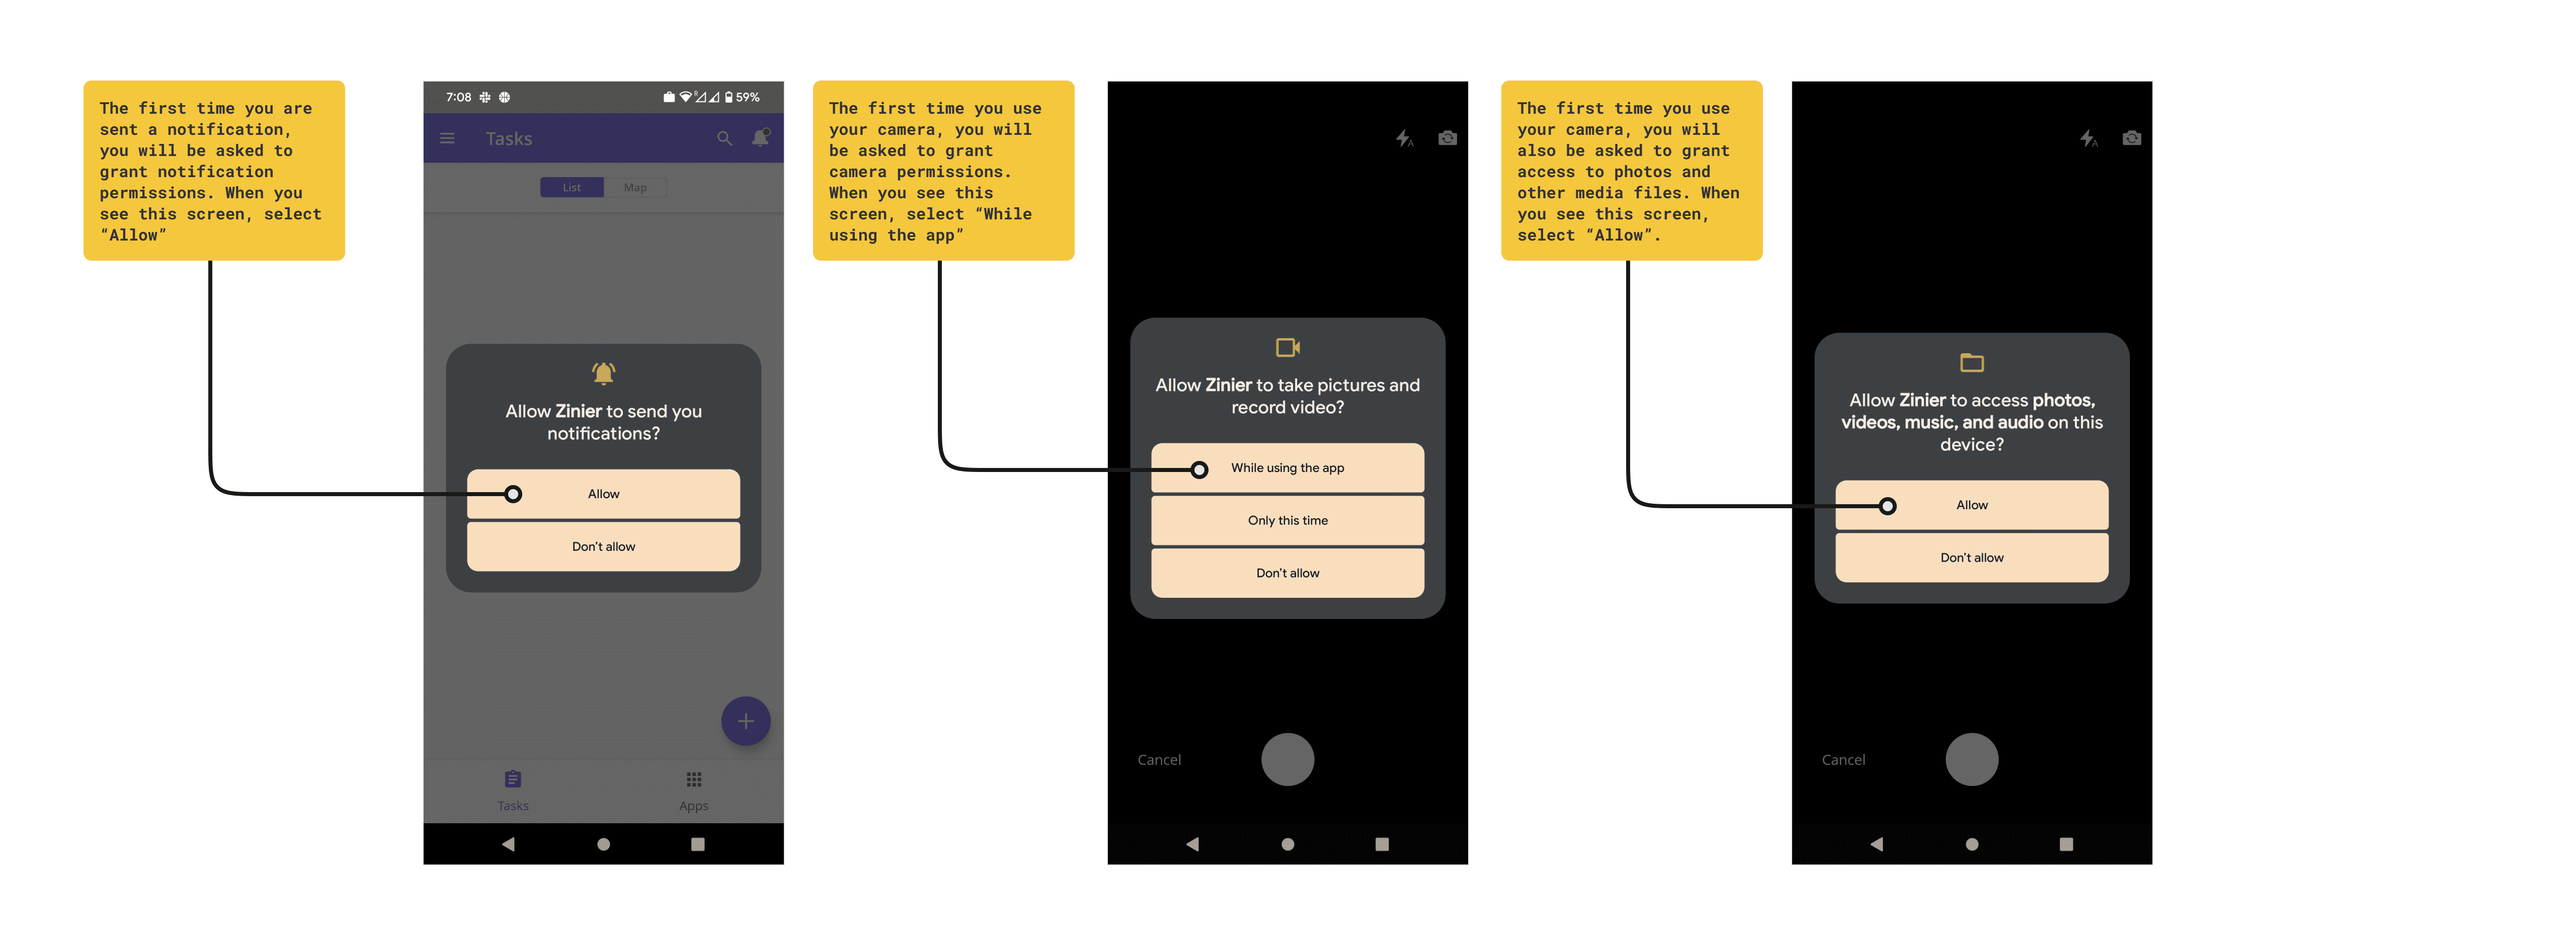
Notification Permissions: The first time you are sent a notification, you will be asked to grant notification permissions. When you see this screen, select “Allow” to grant the app permission. Notifications are used in many different places. For example, when you are assigned a task, you will receive a notification that the task has been assigned and dispatched.
Camera Permissions: The first time you use your camera, you will be asked to grant camera permissions. When you see this screen, select “While using the app” to grant the app permission. Your camera is used primarily to capture photo evidence while performing a task.
Camera Roll / Media File Permissions: The first time you use your camera, you will also be asked to grant access to photos and other media files. When you see this screen, select “Allow” to grant the app permission. Your camera is used primarily to capture photo evidence while performing a task.
Step 3: Create a password to complete your account setup
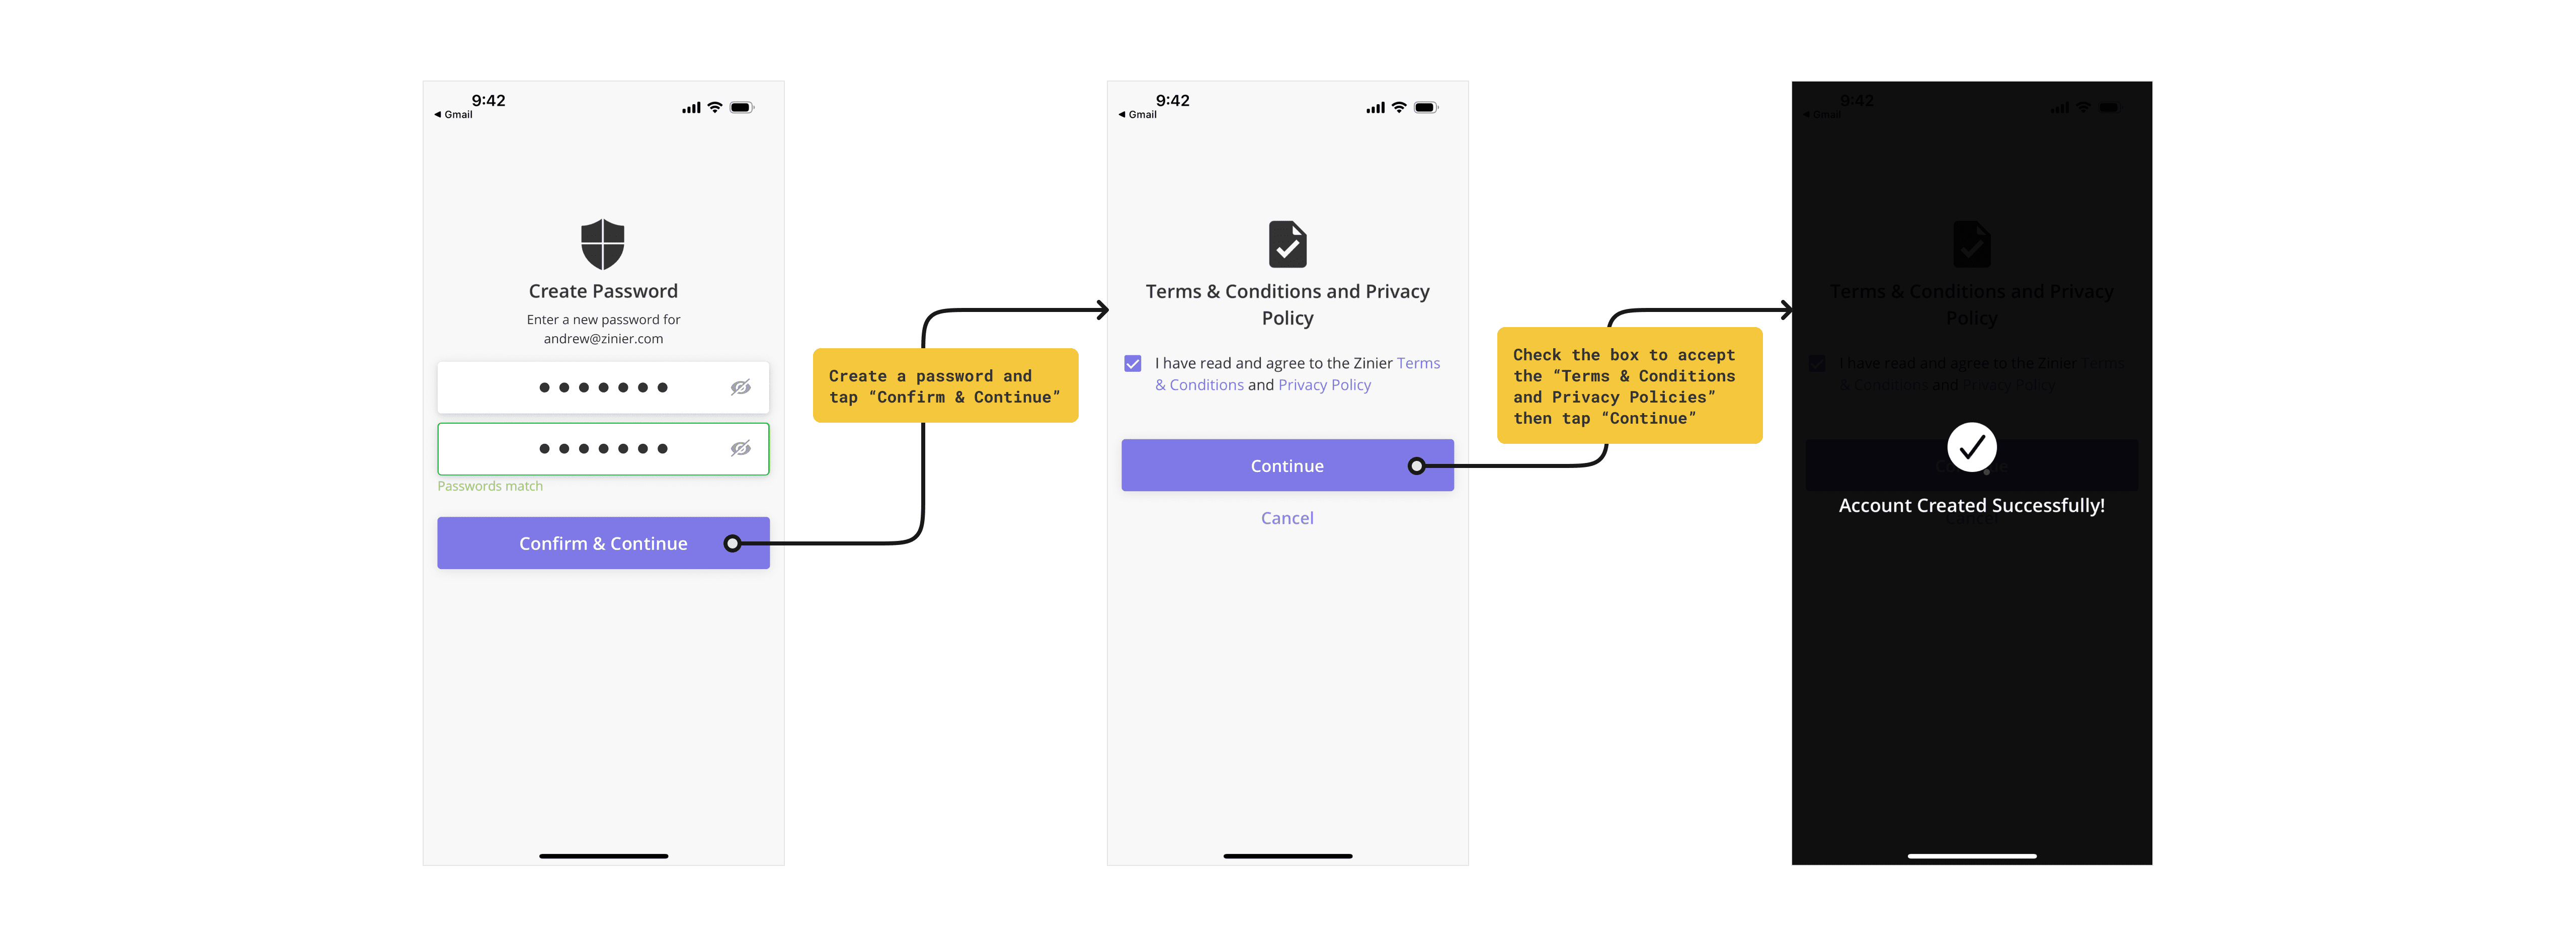
After granting permissions, you will be asked to create and confirm a password used to log in to your account. Enter and confirm a password of your choosing and tap “Confirm & Continue”.
Check the box to accept the “Terms & Conditions and Privacy Policies” then tap “Continue” to complete the account activation process.
Re-installing the app on the same device after account creation (Android)
If you need to delete and re-install the app on a device that has already been activated, follow the steps below:
If you are re-installing the app on the device that was used to create your account originally, you do NOT need to “Unlock” the app again as the device has already been tied to your account credentials.
Step 1: Download and Install the Zinier mobile app
Using the same mobile device you used to create your account initially, open the email invitation with the subject line “You are invited to join Zinier”.
Alternatively, you can go directly to the Apple App Store and search for “Zinier”
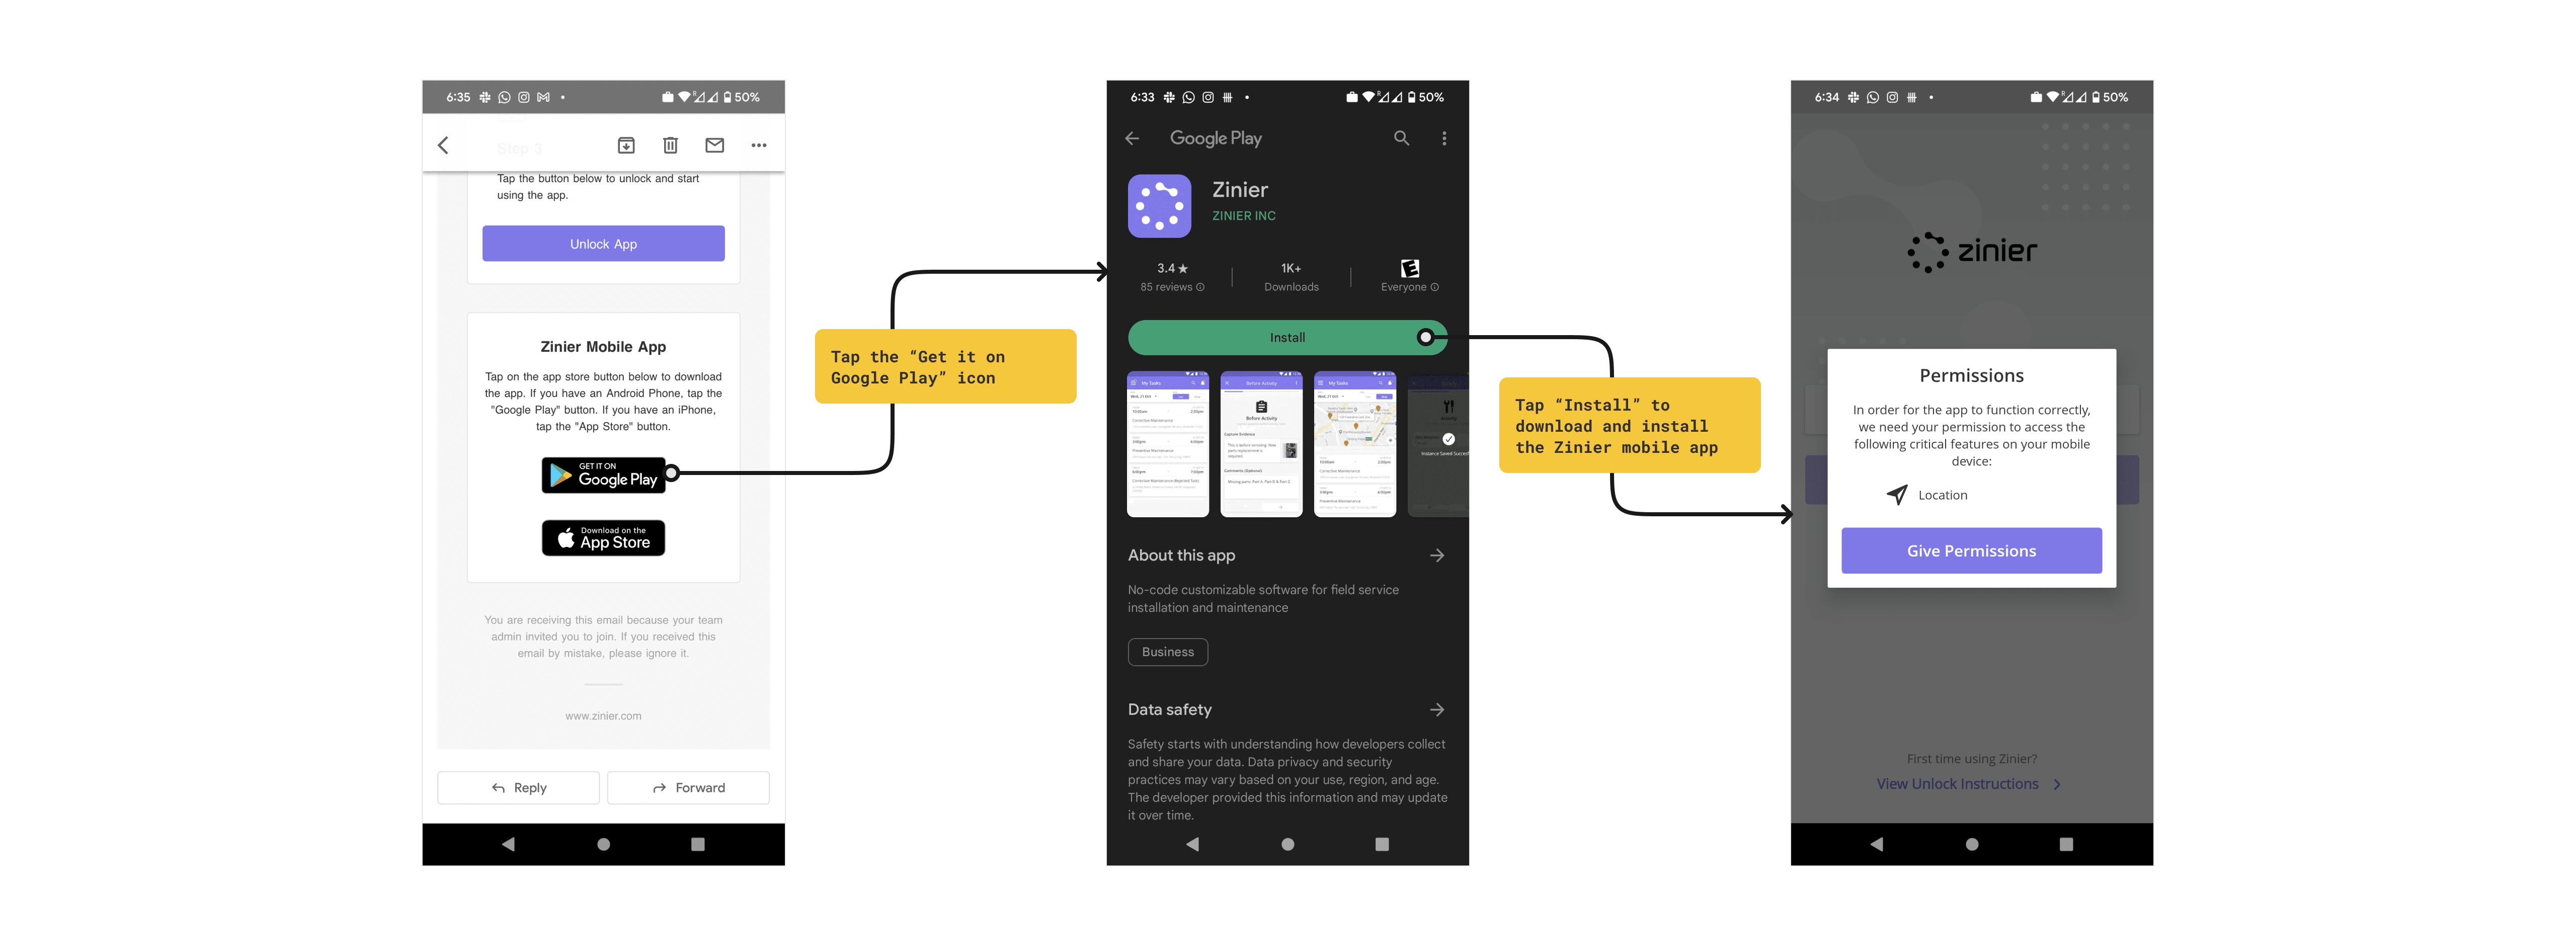
Scroll down to the bottom of the email and tap the “Get it on Google Play” icon to open the Google Play Store on your device
From the Google Play Store, tap “Install” to download and install the Zinier mobile app
After downloading the app, find the Zinier app icon on your home screen and tap it to Open the app
Step 2: Grant app permissions
When you first open the app after installation, you will be asked to grant a series of permissions for the app to function correctly:
Tap the “Give Permissions” button from the Permissions popup
Location Permissions: Select “Precise” and “While using the app” to grant location permissions. Location permissions allow your dispatcher to see your location and are required for you to be able to check in to a task site using the geo-check-in functionality.

Step 3: Log in to your account
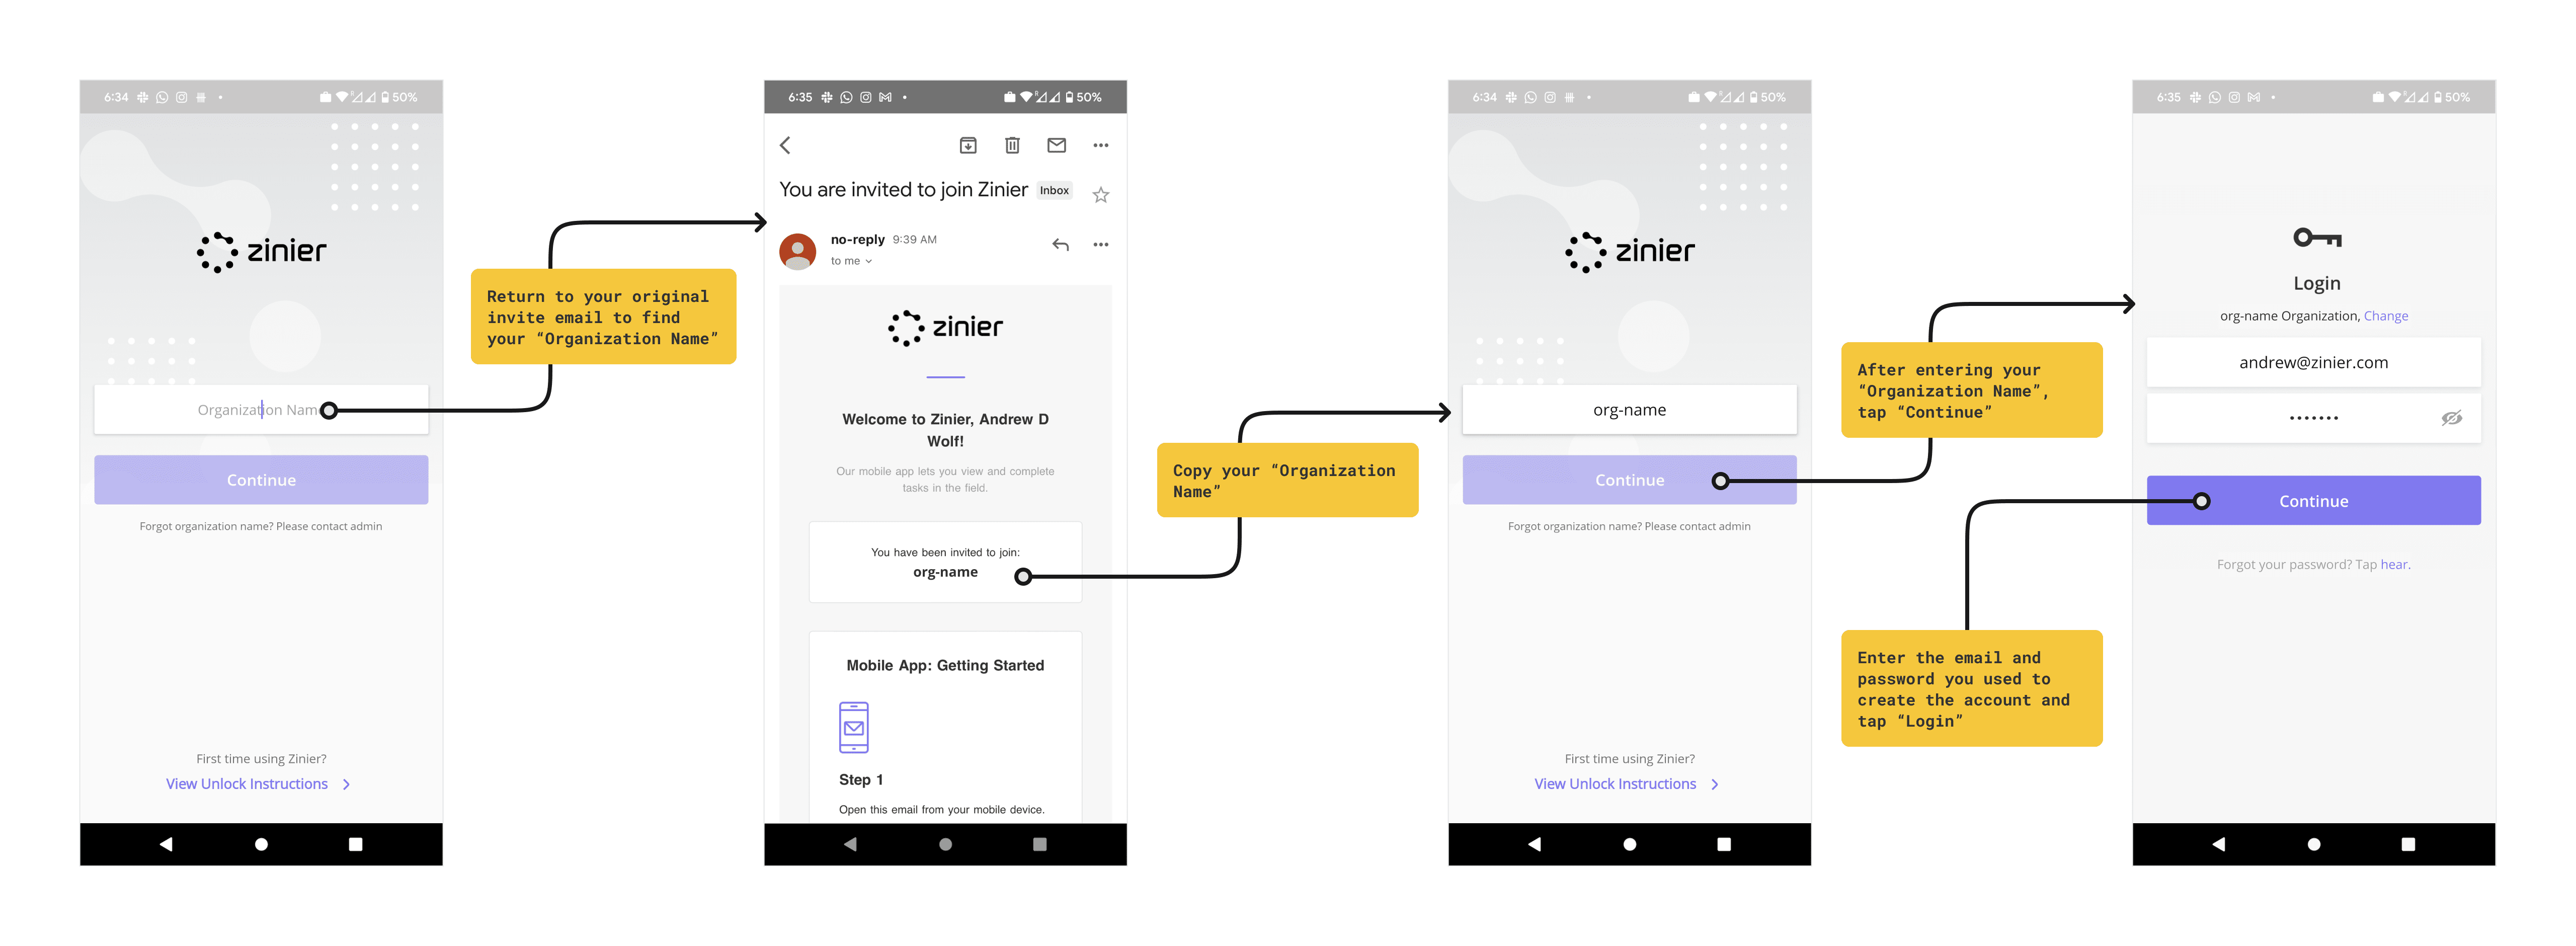
The first screen you see will ask you to enter the “Organization Name”. You can find this by searching for your original invite email (with the subject line “You are invited to join Zinier”). In the email body, you will notice a word in bold below the text “You have been invited to join:” This is your Organization Name. In the example below, the Organization Name is “org-name”. Copy this name to your device’s clipboard.
Paste your “Organization Name” into the field and tap “Continue”. Upon subsequent logins, this field will be saved automatically.
Enter the email and password you used to create the account and tap “Login”.
If you have forgotten your Organization Name and/or can’t find your invite email see the I can’t find my Organization Name section below
Installing the app on a NEW device after account creation (Android)
If you have already activated your account but need to install the Zinier app on a new device, follow the steps below:
If you have an existing account and need to install the app on a new device, you do NOT need to create a new password, but you WILL need to “Unlock” the app again to tie it to your account credentials. If you are unable to find your original invite email which has the unlock instructions, see the I can’t find my Organization Name section below
Step 1: Download and Install the Zinier mobile app
Using the new mobile device you intend to install the app on, open the email invitation with the subject line “You are invited to join Zinier”.
Alternatively, you can go directly to the Apple App Store and search for “Zinier”
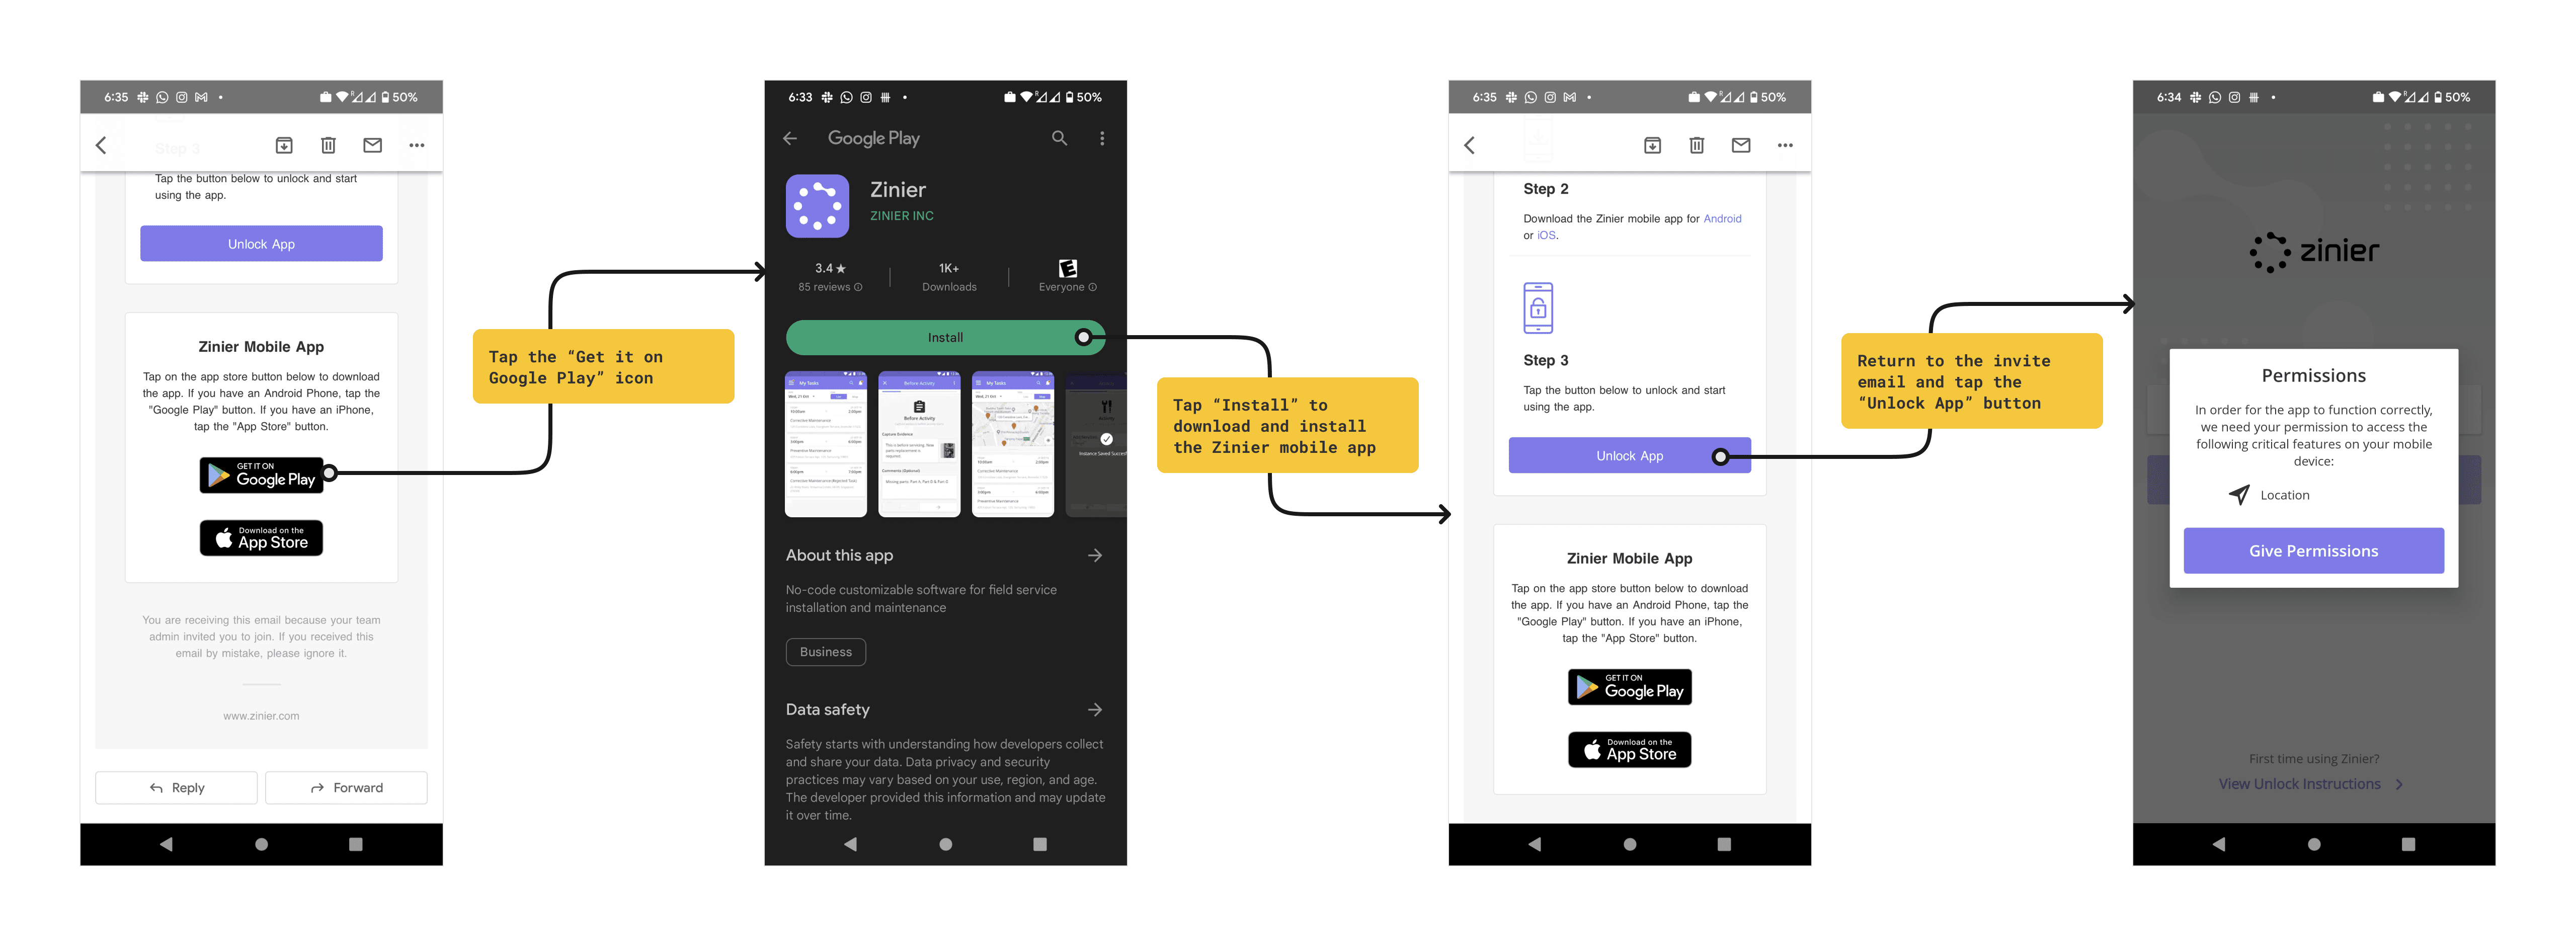
Scroll down to the bottom of the email and tap the “Get it on Google Play” icon to open the Google Play Store on your device
From the Google Play Store, tap “Install” to download and install the Zinier mobile app
After downloading the app, return to the invite email and tap the “Unlock App” button in the email body. This will pair your device to your account and open the Zinier app automatically.
Step 2: Grant app permissions
When you first open the app after installation, you will be asked to grant a series of permissions for the app to function correctly:
Tap the “Give Permissions” button from the Permissions popup
Location Permissions: Select “Precise” and “While using the app” to grant location permissions. Location permissions allow your dispatcher to see your location and are required for you to be able to check in to a task site using the geo-check-in functionality.

Step 3: Log in to your account
The first screen you see will ask you to enter the “Organization Name”. You can find this by searching for your original invite email (with the subject line “You are invited to join Zinier”). In the email body, you will notice a word in bold below the text “You have been invited to join:” This is your Organization Name. In the example below, the Organization Name is “org-name”. Copy this name to your device’s clipboard.
Paste your “Organization Name” into the field and tap “Continue”. Upon subsequent logins, this field will be saved automatically.
Enter the email and password you used to create the account and tap “Login”.
If you have forgotten your Organization Name and/or can’t find your invite email see the I can’t find my Organization Name section below

I can’t find my Organization Name (when re-installing the Zinier app)
If you have already activated your account and need to re-install the Zinier app, you will be asked to enter your Organization Name as part of the login flow. But what happens if you can’t remember it? To solve this issue, follow the steps below:
Option 1: Search for the original invite email
To find your original invite email, search for an email with the subject line “You are invited to join Zinier”.
In the email body, you will notice a word in bold below the text “You have been invited to join:” This is your Organization Name. In the example above, the Organization Name is “org-name”.
Option 2: Ask your admin to re-invite you
Ask your admin to re-invite you to Zinier. Doing so will ensure you have access to the invite email for future use. Your admin can re-invite you by doing the following:
From the web, click the Zinier Apps icon on the top right of the screen and open the Admin app.
After opening the Admin app, go to the Users > User Base module
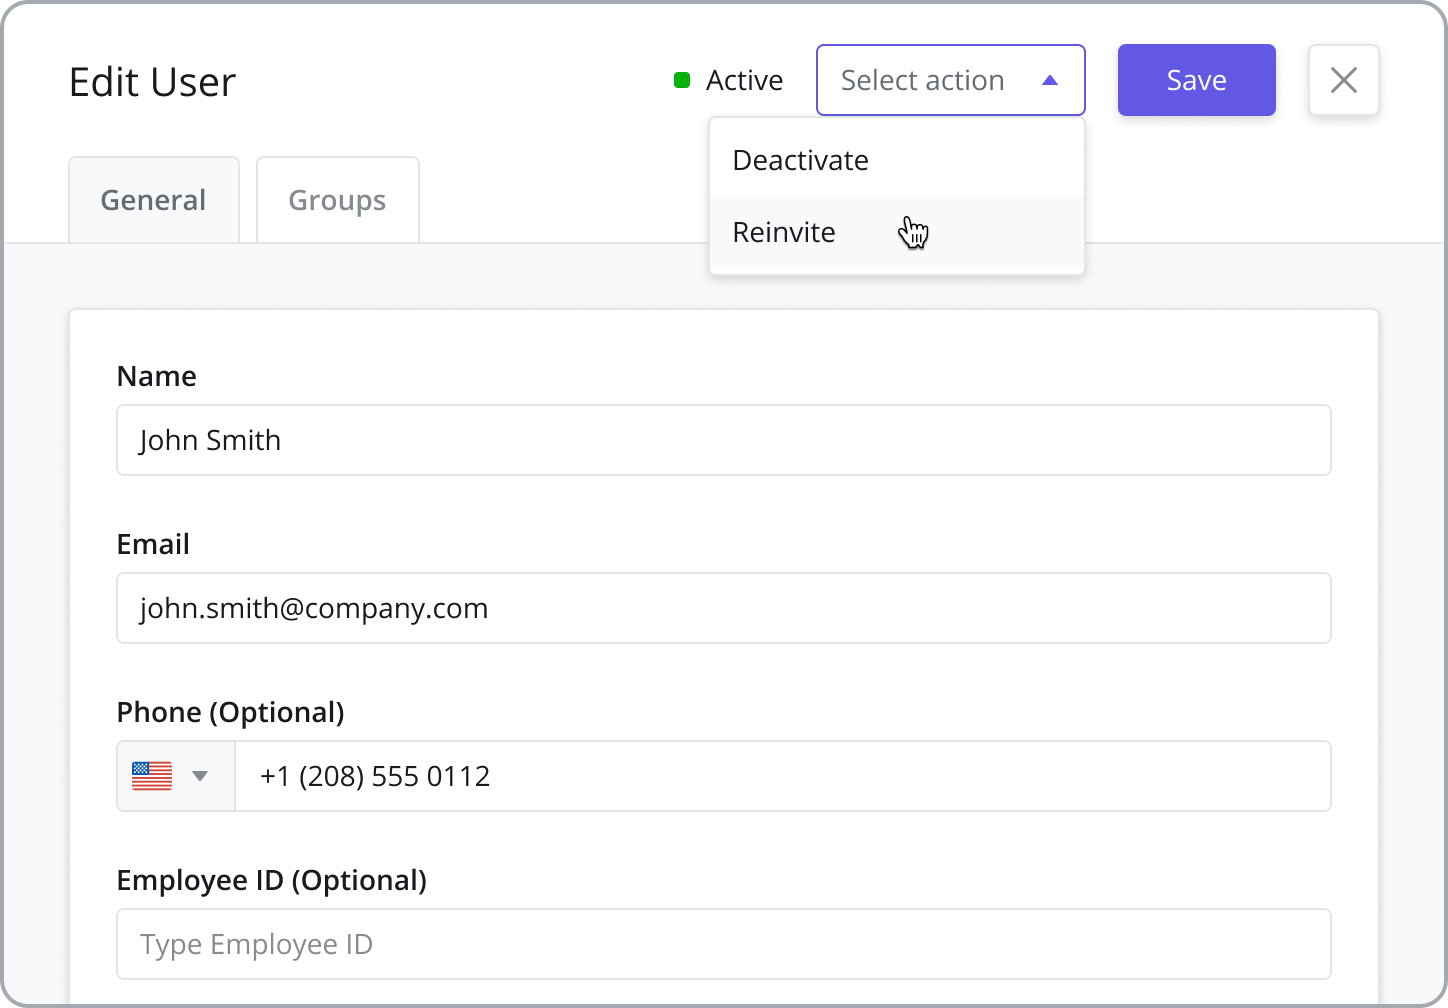
Search for the name of the user to re-invite and click on the Edit icon to open the sidepanel
Click “Reinvite” from the “Select Action” dropdown menu
Option 3: Ask your admin to send you the Organization Name (and Environment Name if relevant)
Alternatively, you can ask your admin to send you the Organization Name and enter it manually.
Logging in to non-production environments (UAT, preview, etc.)
If you need to log in to a non-production environment for testing purposes but can’t find the invite email, there is an alternative/hack that you can use to “Unlock” the app and log in: Enter the Organization Name and Environment name into the “Organization Name” login field using the following format: ”environment name: organization name”.
For example, let’s say you need to log in to the following environment/org:
Environment Name = “preview”
Organization Name = “org-name”
To log in, you would type “preview:org-name” in the Organization Name field at login as shown below.
