List View
Scheduling & Dispatch lets you assign, schedule, and dispatch the Tasks you add to a Work Order. Dispatchers have several different visualizations they can use to manage their field teams: List View, Calendar View, and Map View. In addition, the List View is used by backoffice admins and auditors to review and approve the data captured in completed tasks.
List View: Viewing Tasks by Status
The List View allows you to view tasks grouped by status to quickly understand what needs your attention.
If you are using Work Groups, the list of Tasks and the list of Technicians available for assignment is limited to the technicians and tasks associated with that dispatcher's Work Group. This helps dispatchers focus only on their area of responsibility.
Tasks are grouped by the following navigation tabs/modules:
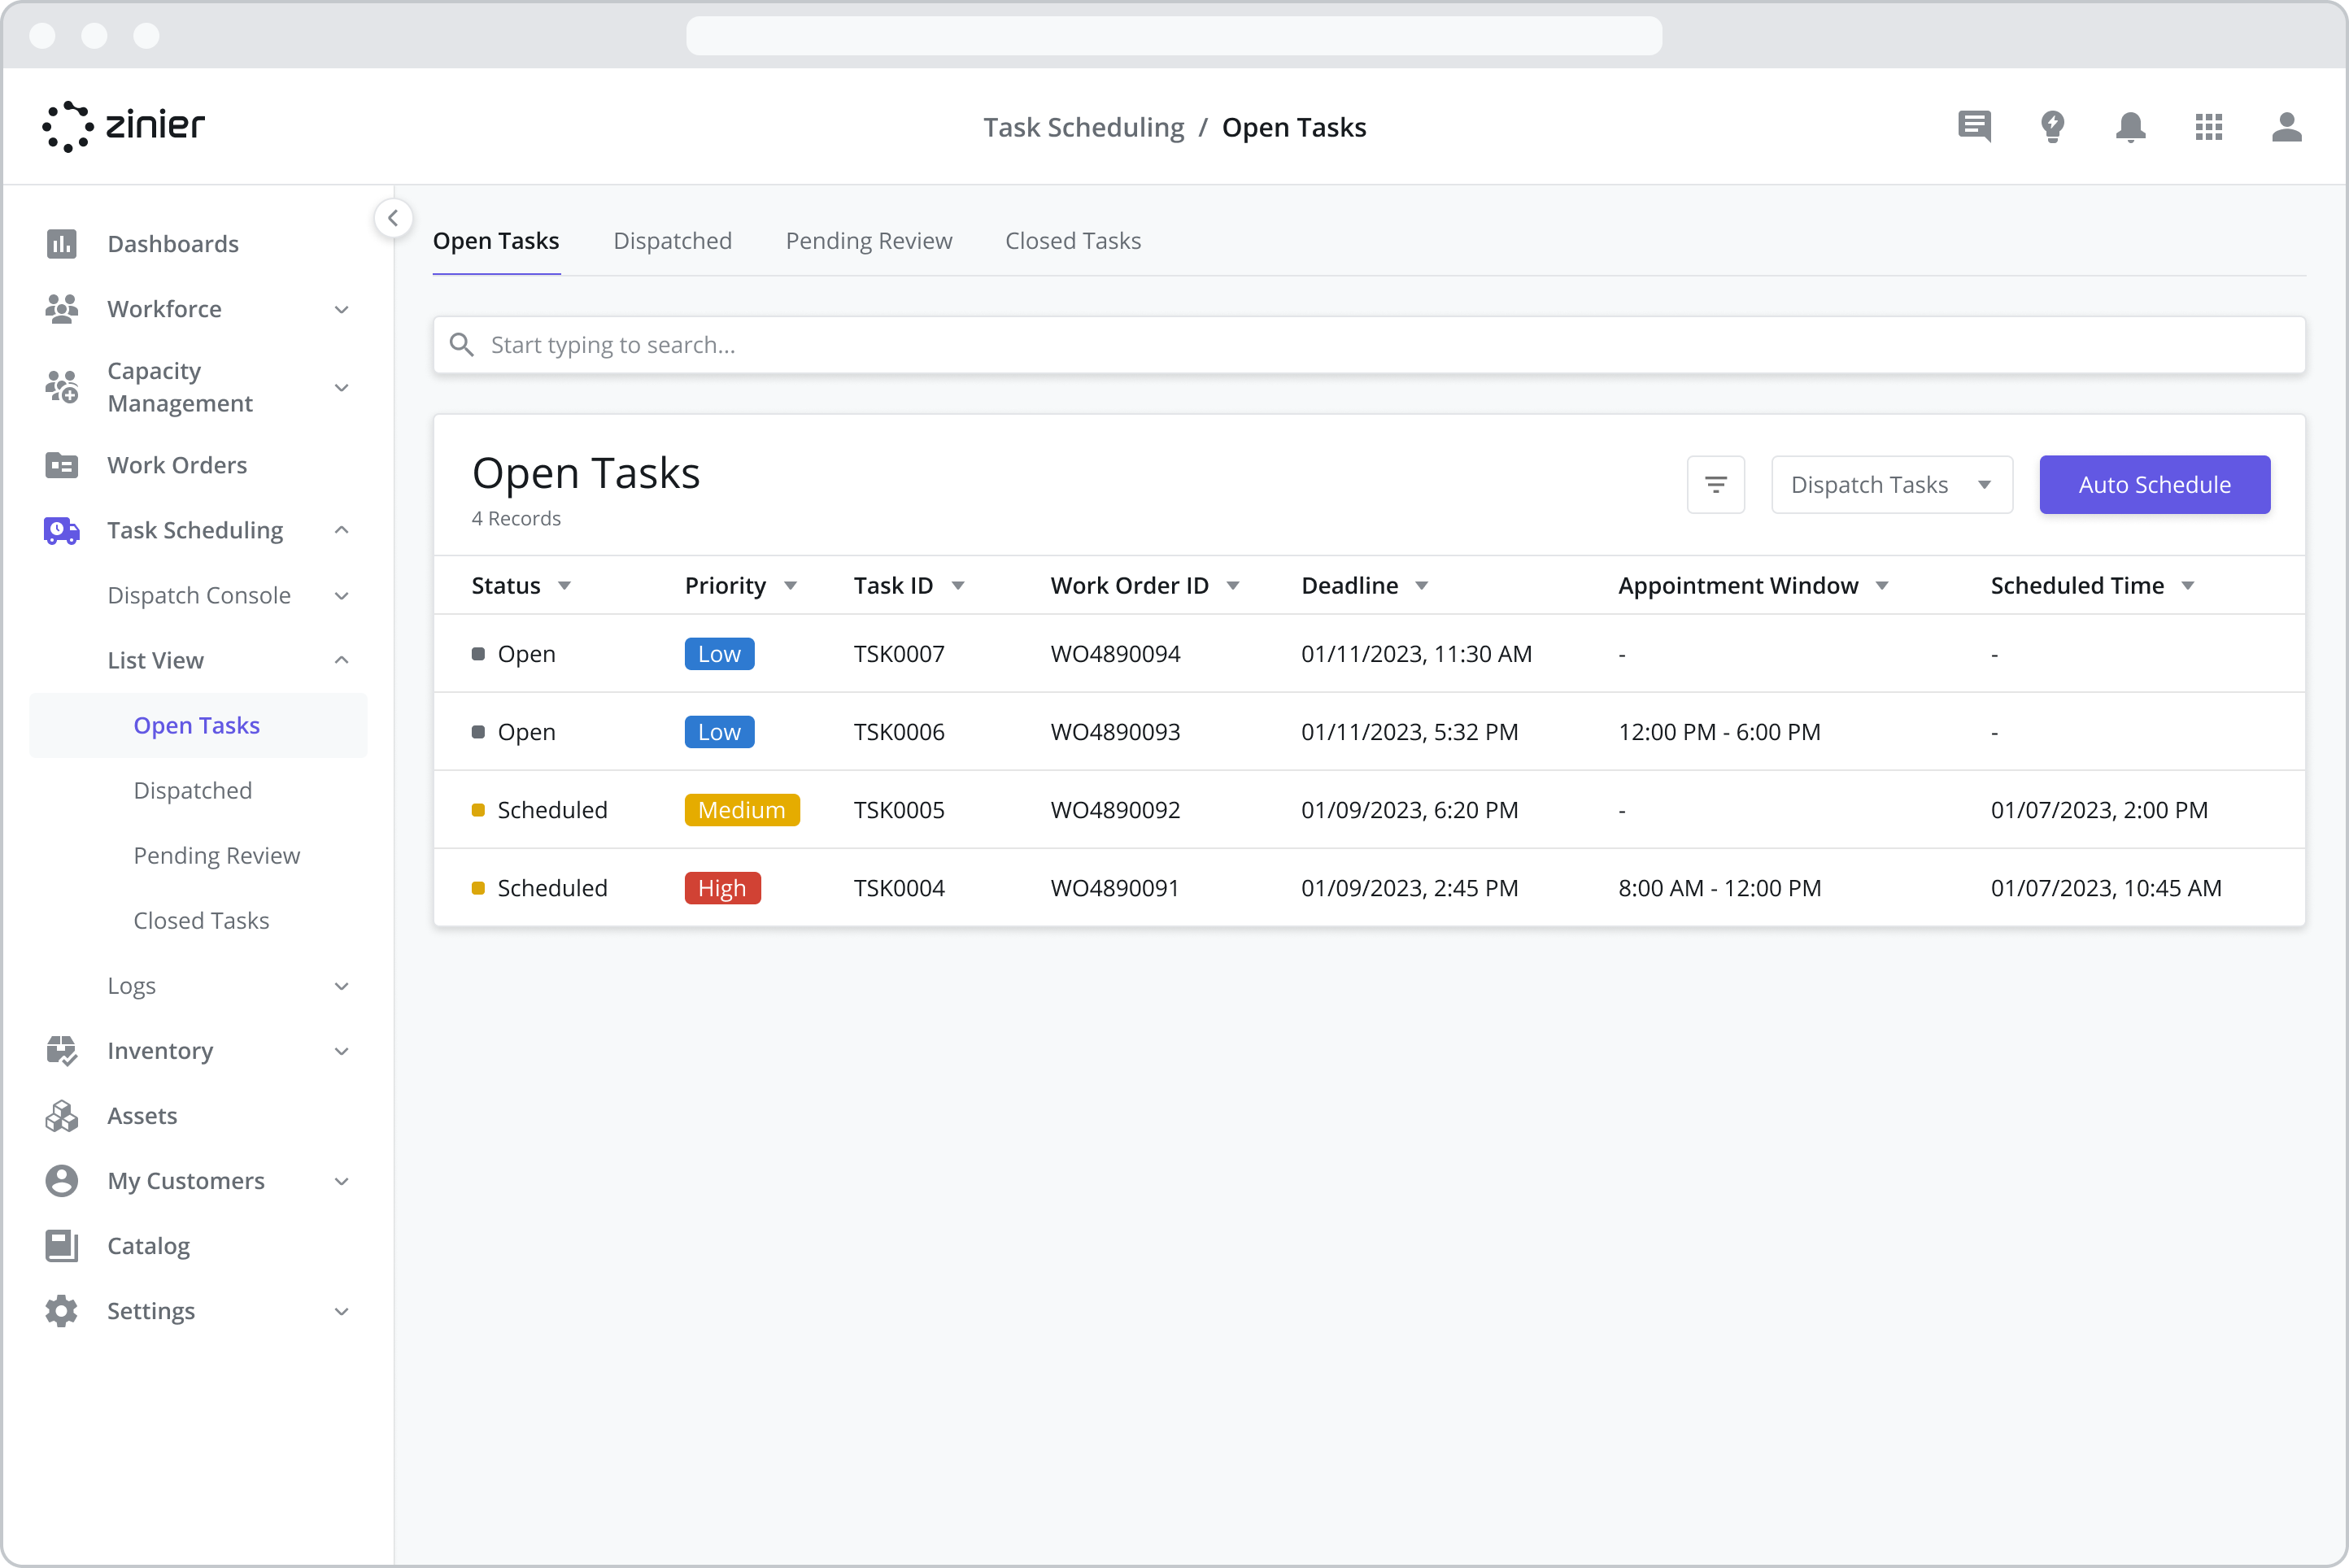
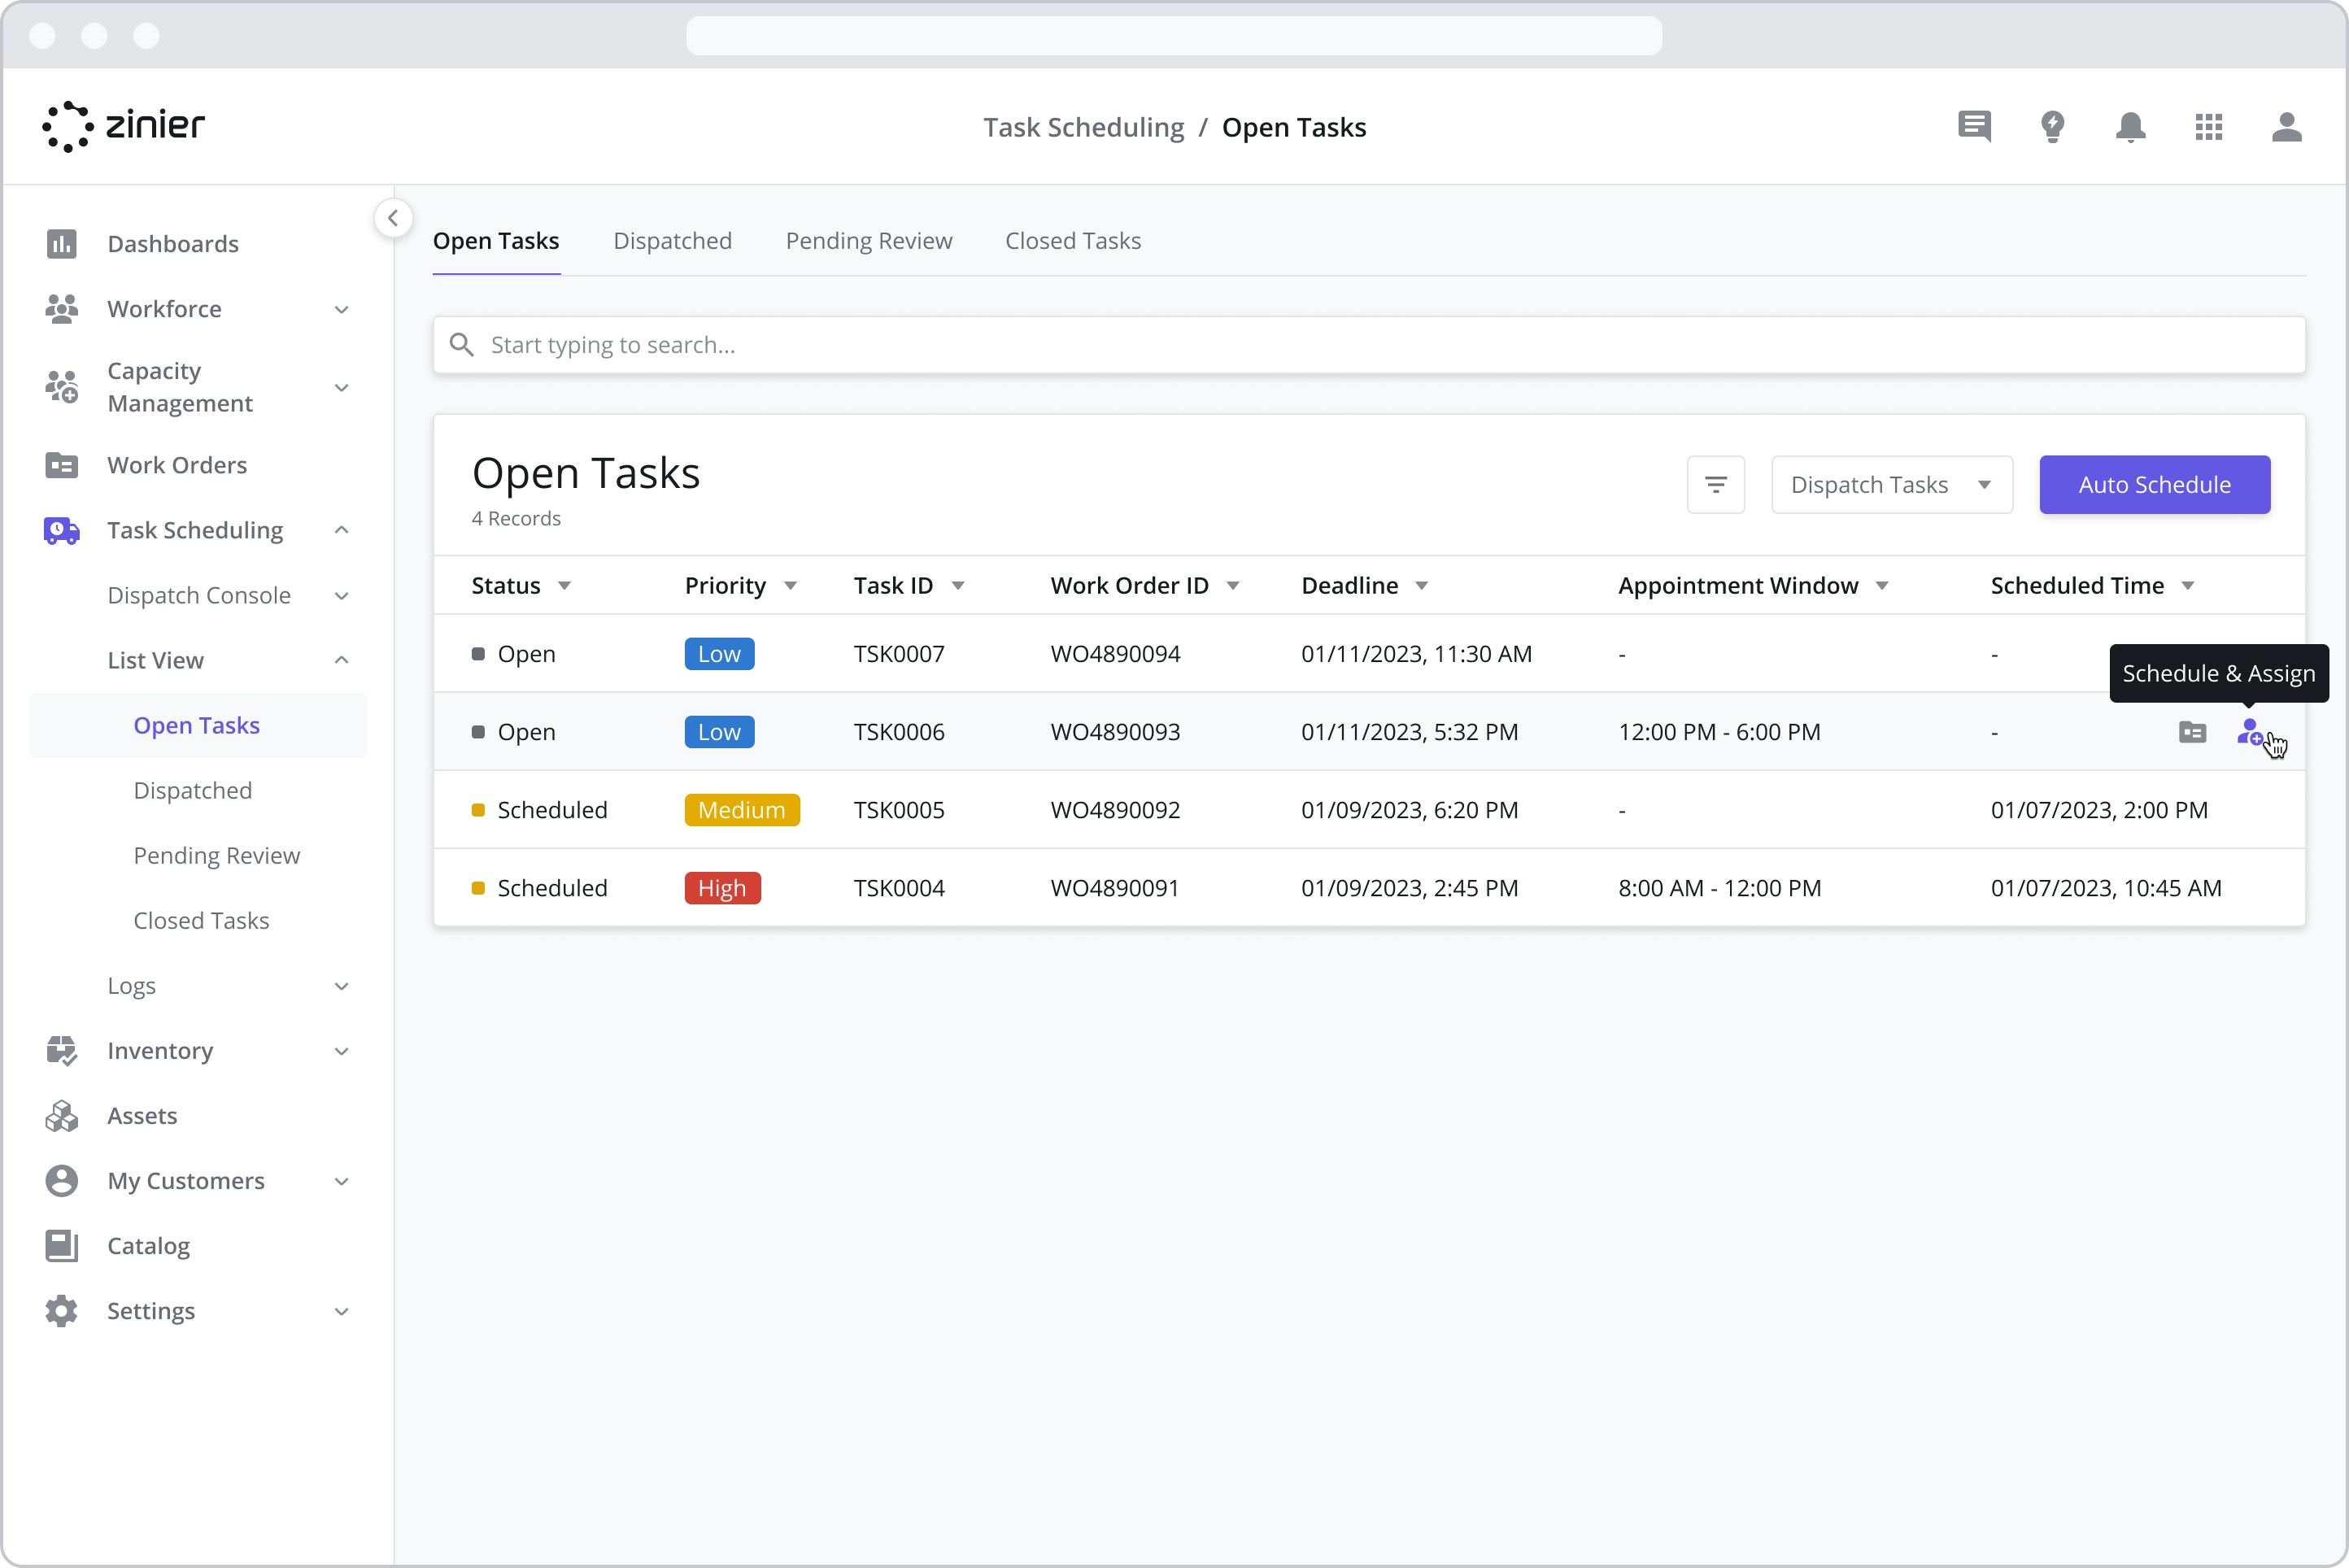
View Open Tasks
Where you schedule and assign tasks. This module contains tasks with the following statuses:
Open tasks have not yet been scheduled or assigned
Scheduled tasks have been assigned and scheduled but not yet dispatched, and are not visible to a tech
Reopened tasks are open tasks that were previously submitted and rejected and are once again open for assignment and scheduling
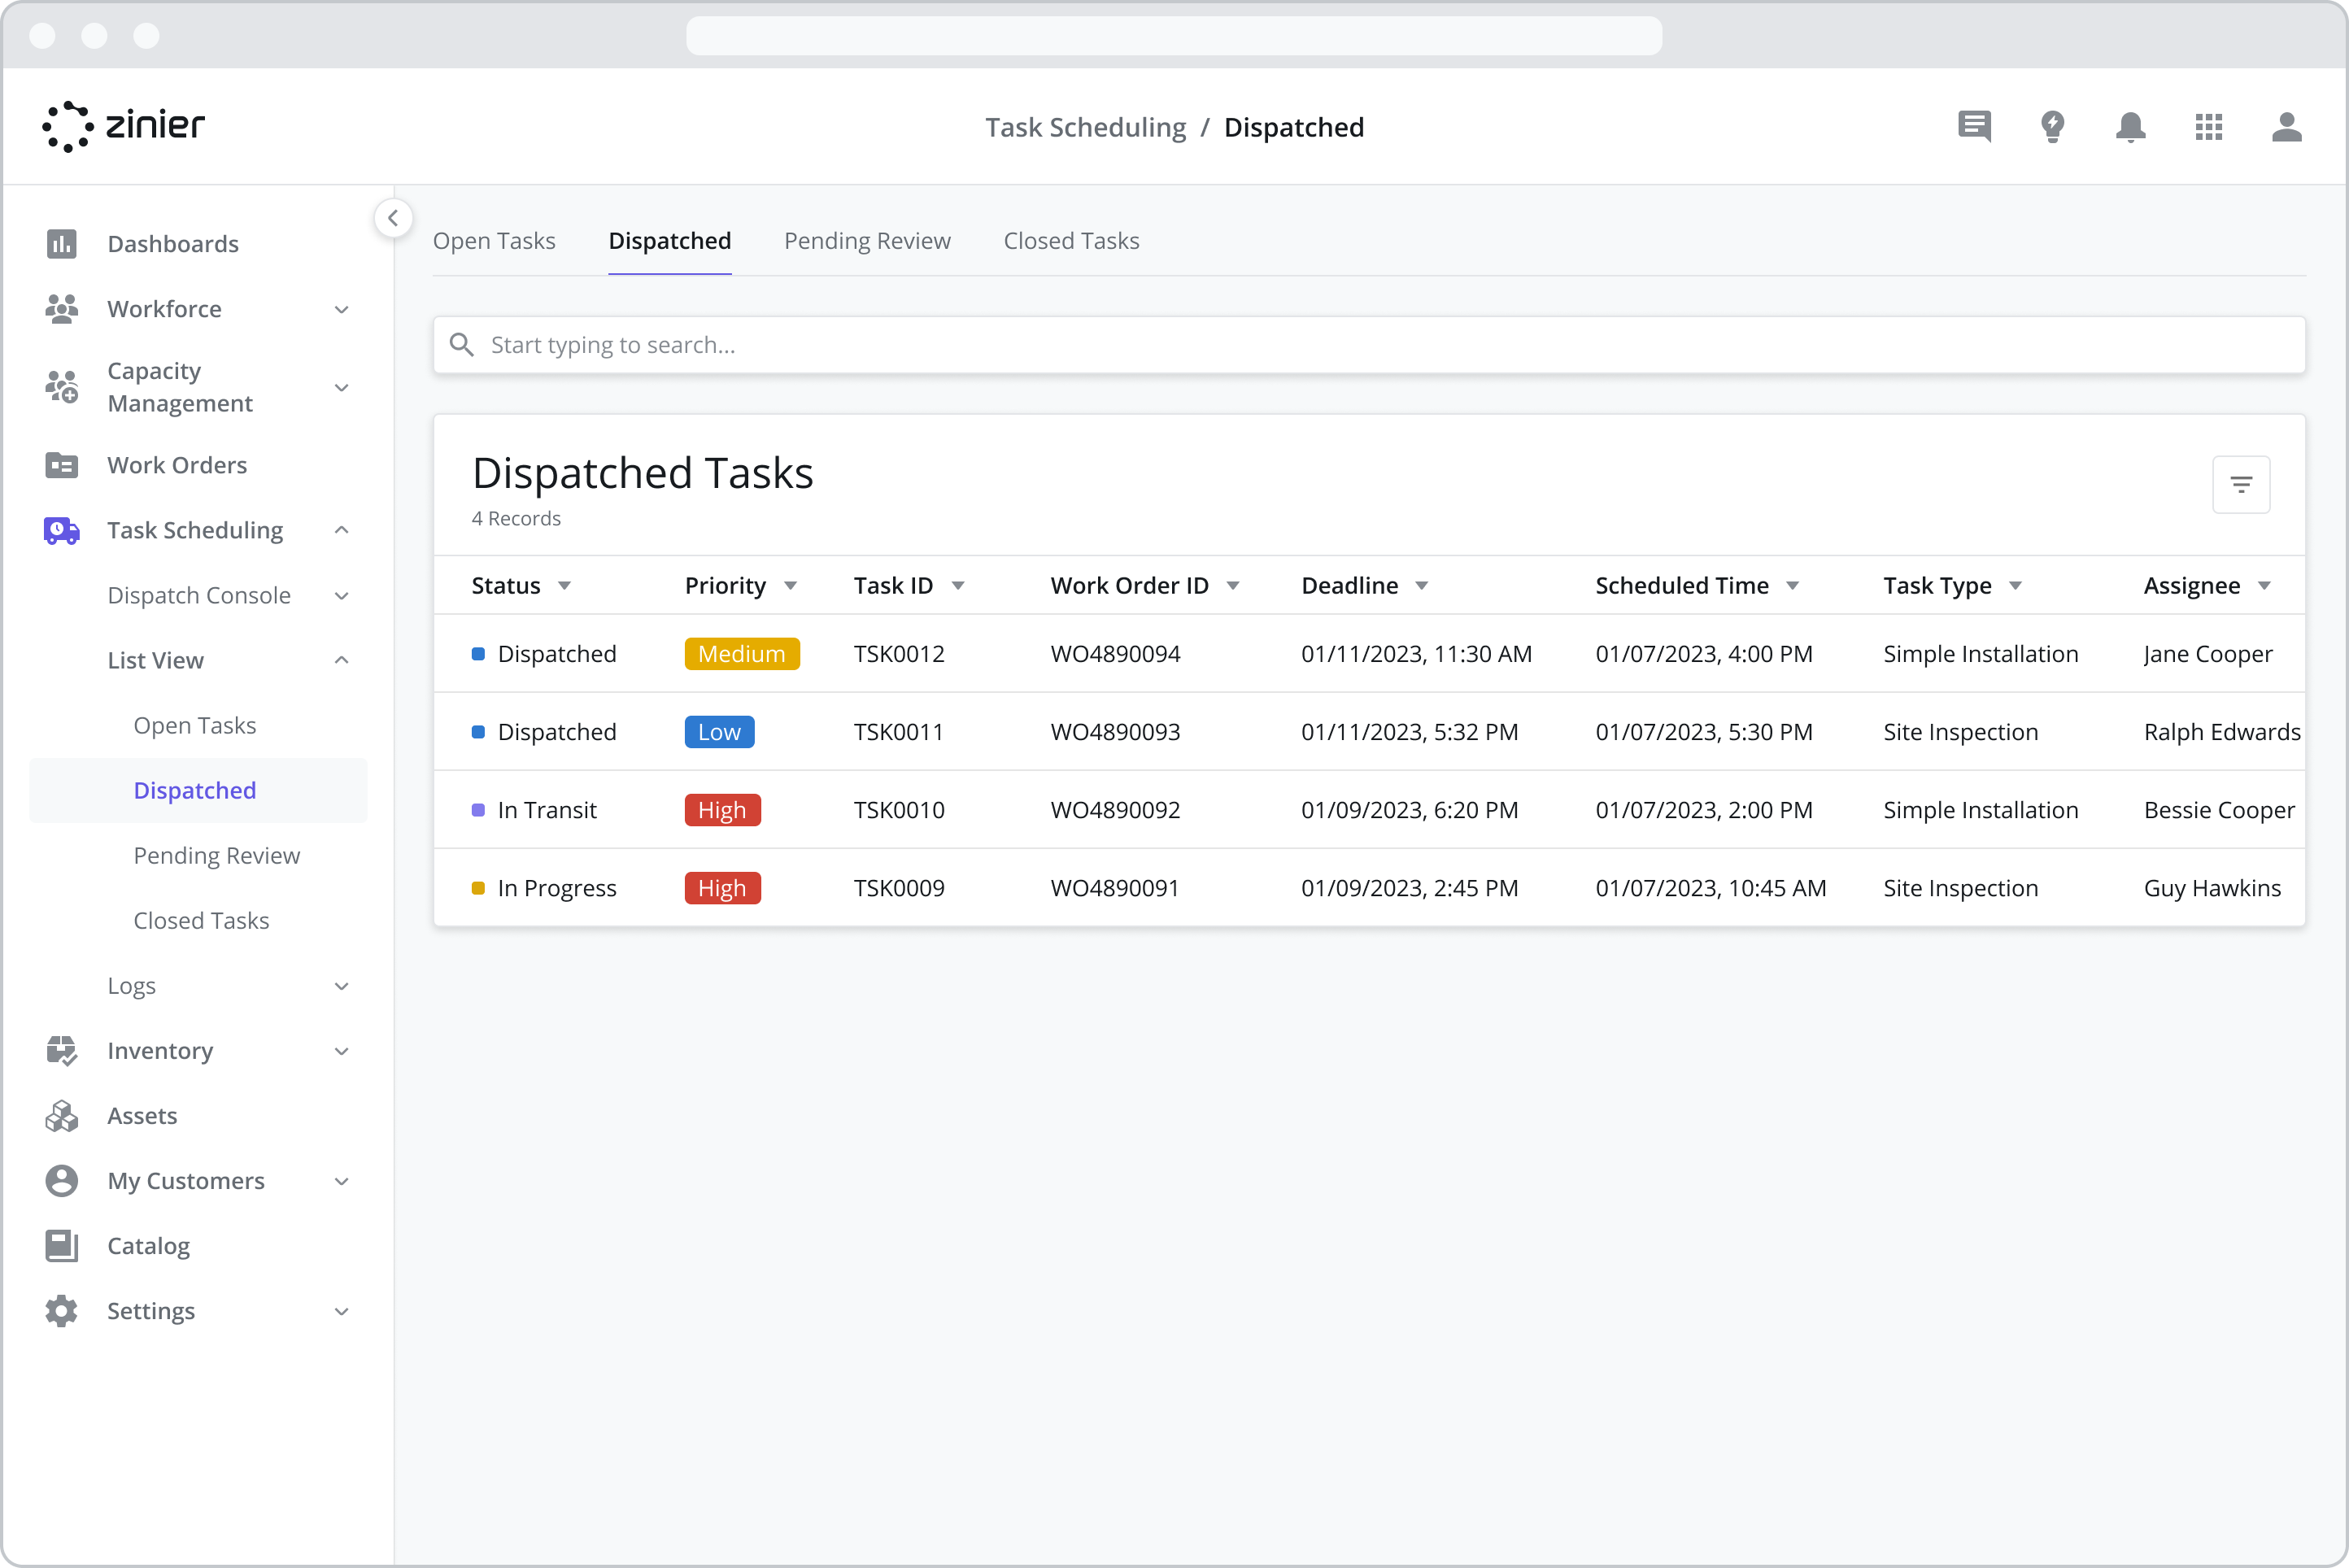
View Dispatched Tasks
Where you can view dispatched tasks that are still in progress. This module contains tasks with the following statuses:
Dispatched tasks are those that have been sent to an assigned tech (and are viewable on the tech's mobile device) where the tech has yet to commence travel or check-in to the site.
In Transit tasks are those where the tech has started traveling to the site but has not yet checked in / started the task. Task transition from Dispatched to In Transit when the technician clicks the “Start Travel” button from their mobile device.
In Progress tasks are those where the tech has checked in to the site from their mobile device
Delayed tasks are those where the tech has submitted a task delay notification (using a workflow action from within the task) from their mobile device.
Incident tasks are those where the tech has submitted an incident notification (using a workflow action from within the task) from their mobile device.
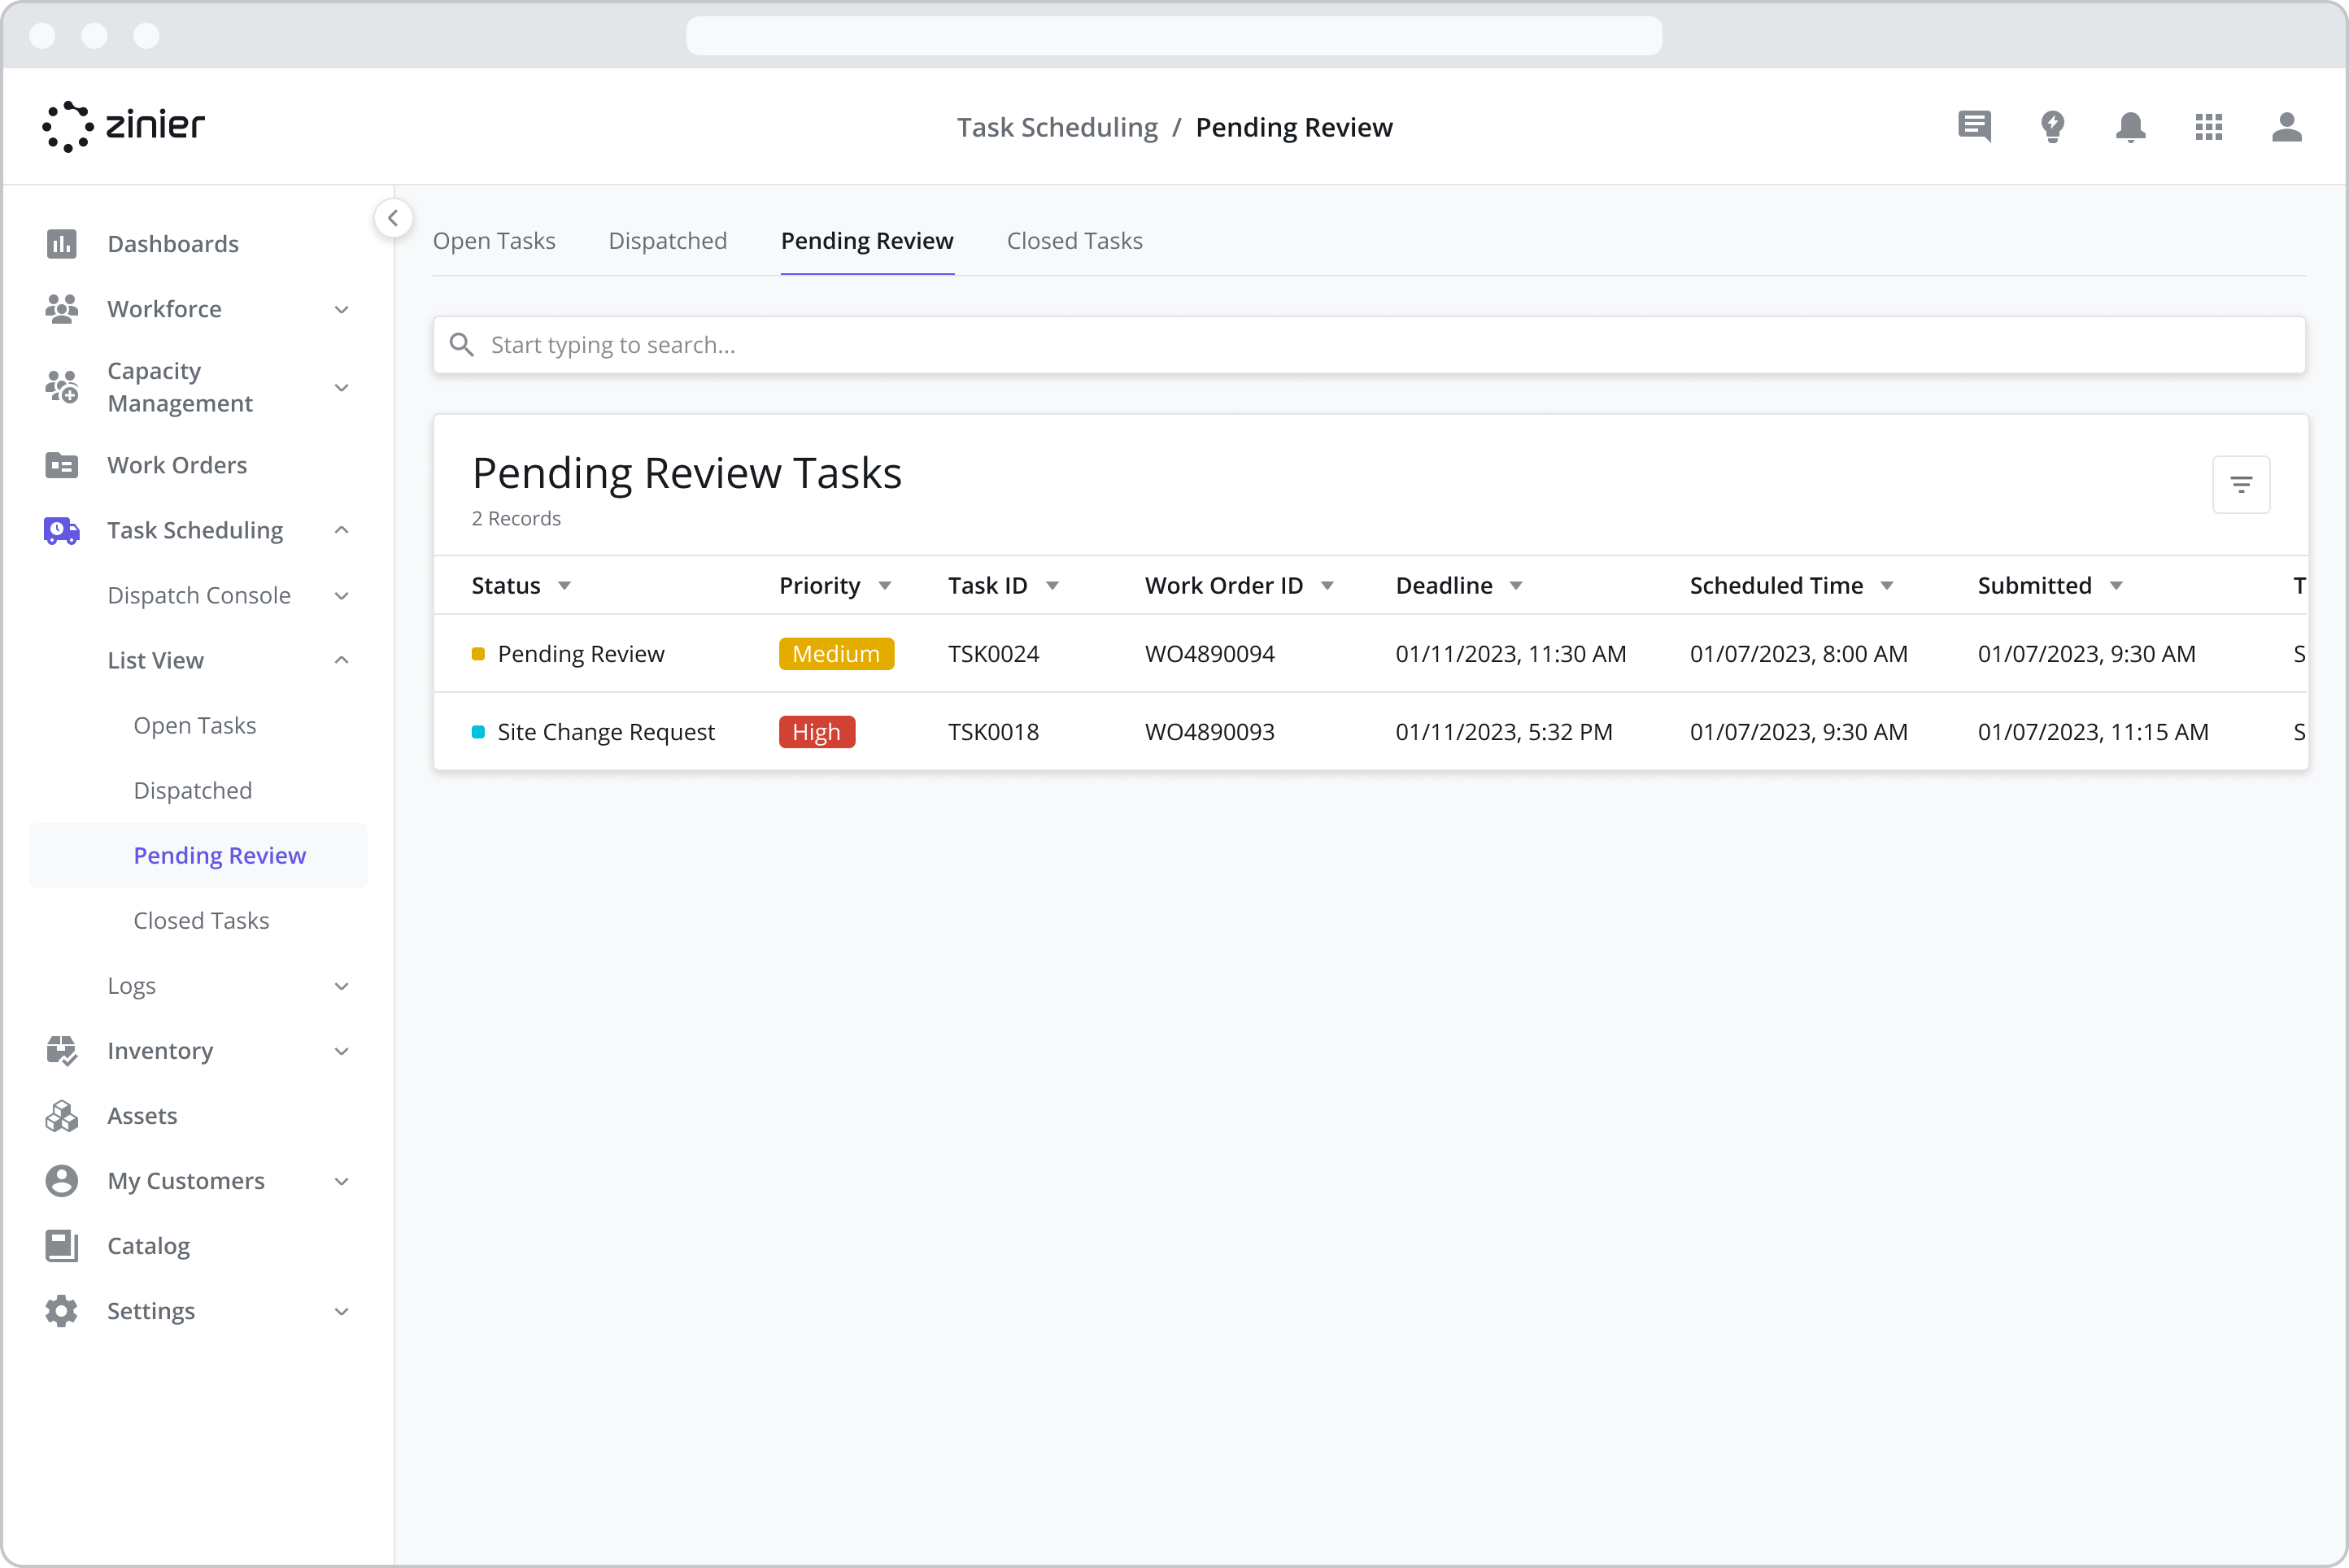
View Tasks Pending Review
Where you can view tasks that have been submitted for review. This module contains tasks with the following statuses:
Pending Review tasks have been completed in the field and submitted for review.
Site Change Request tasks are submitted when a tech has discovered that the site address needs to be updated.
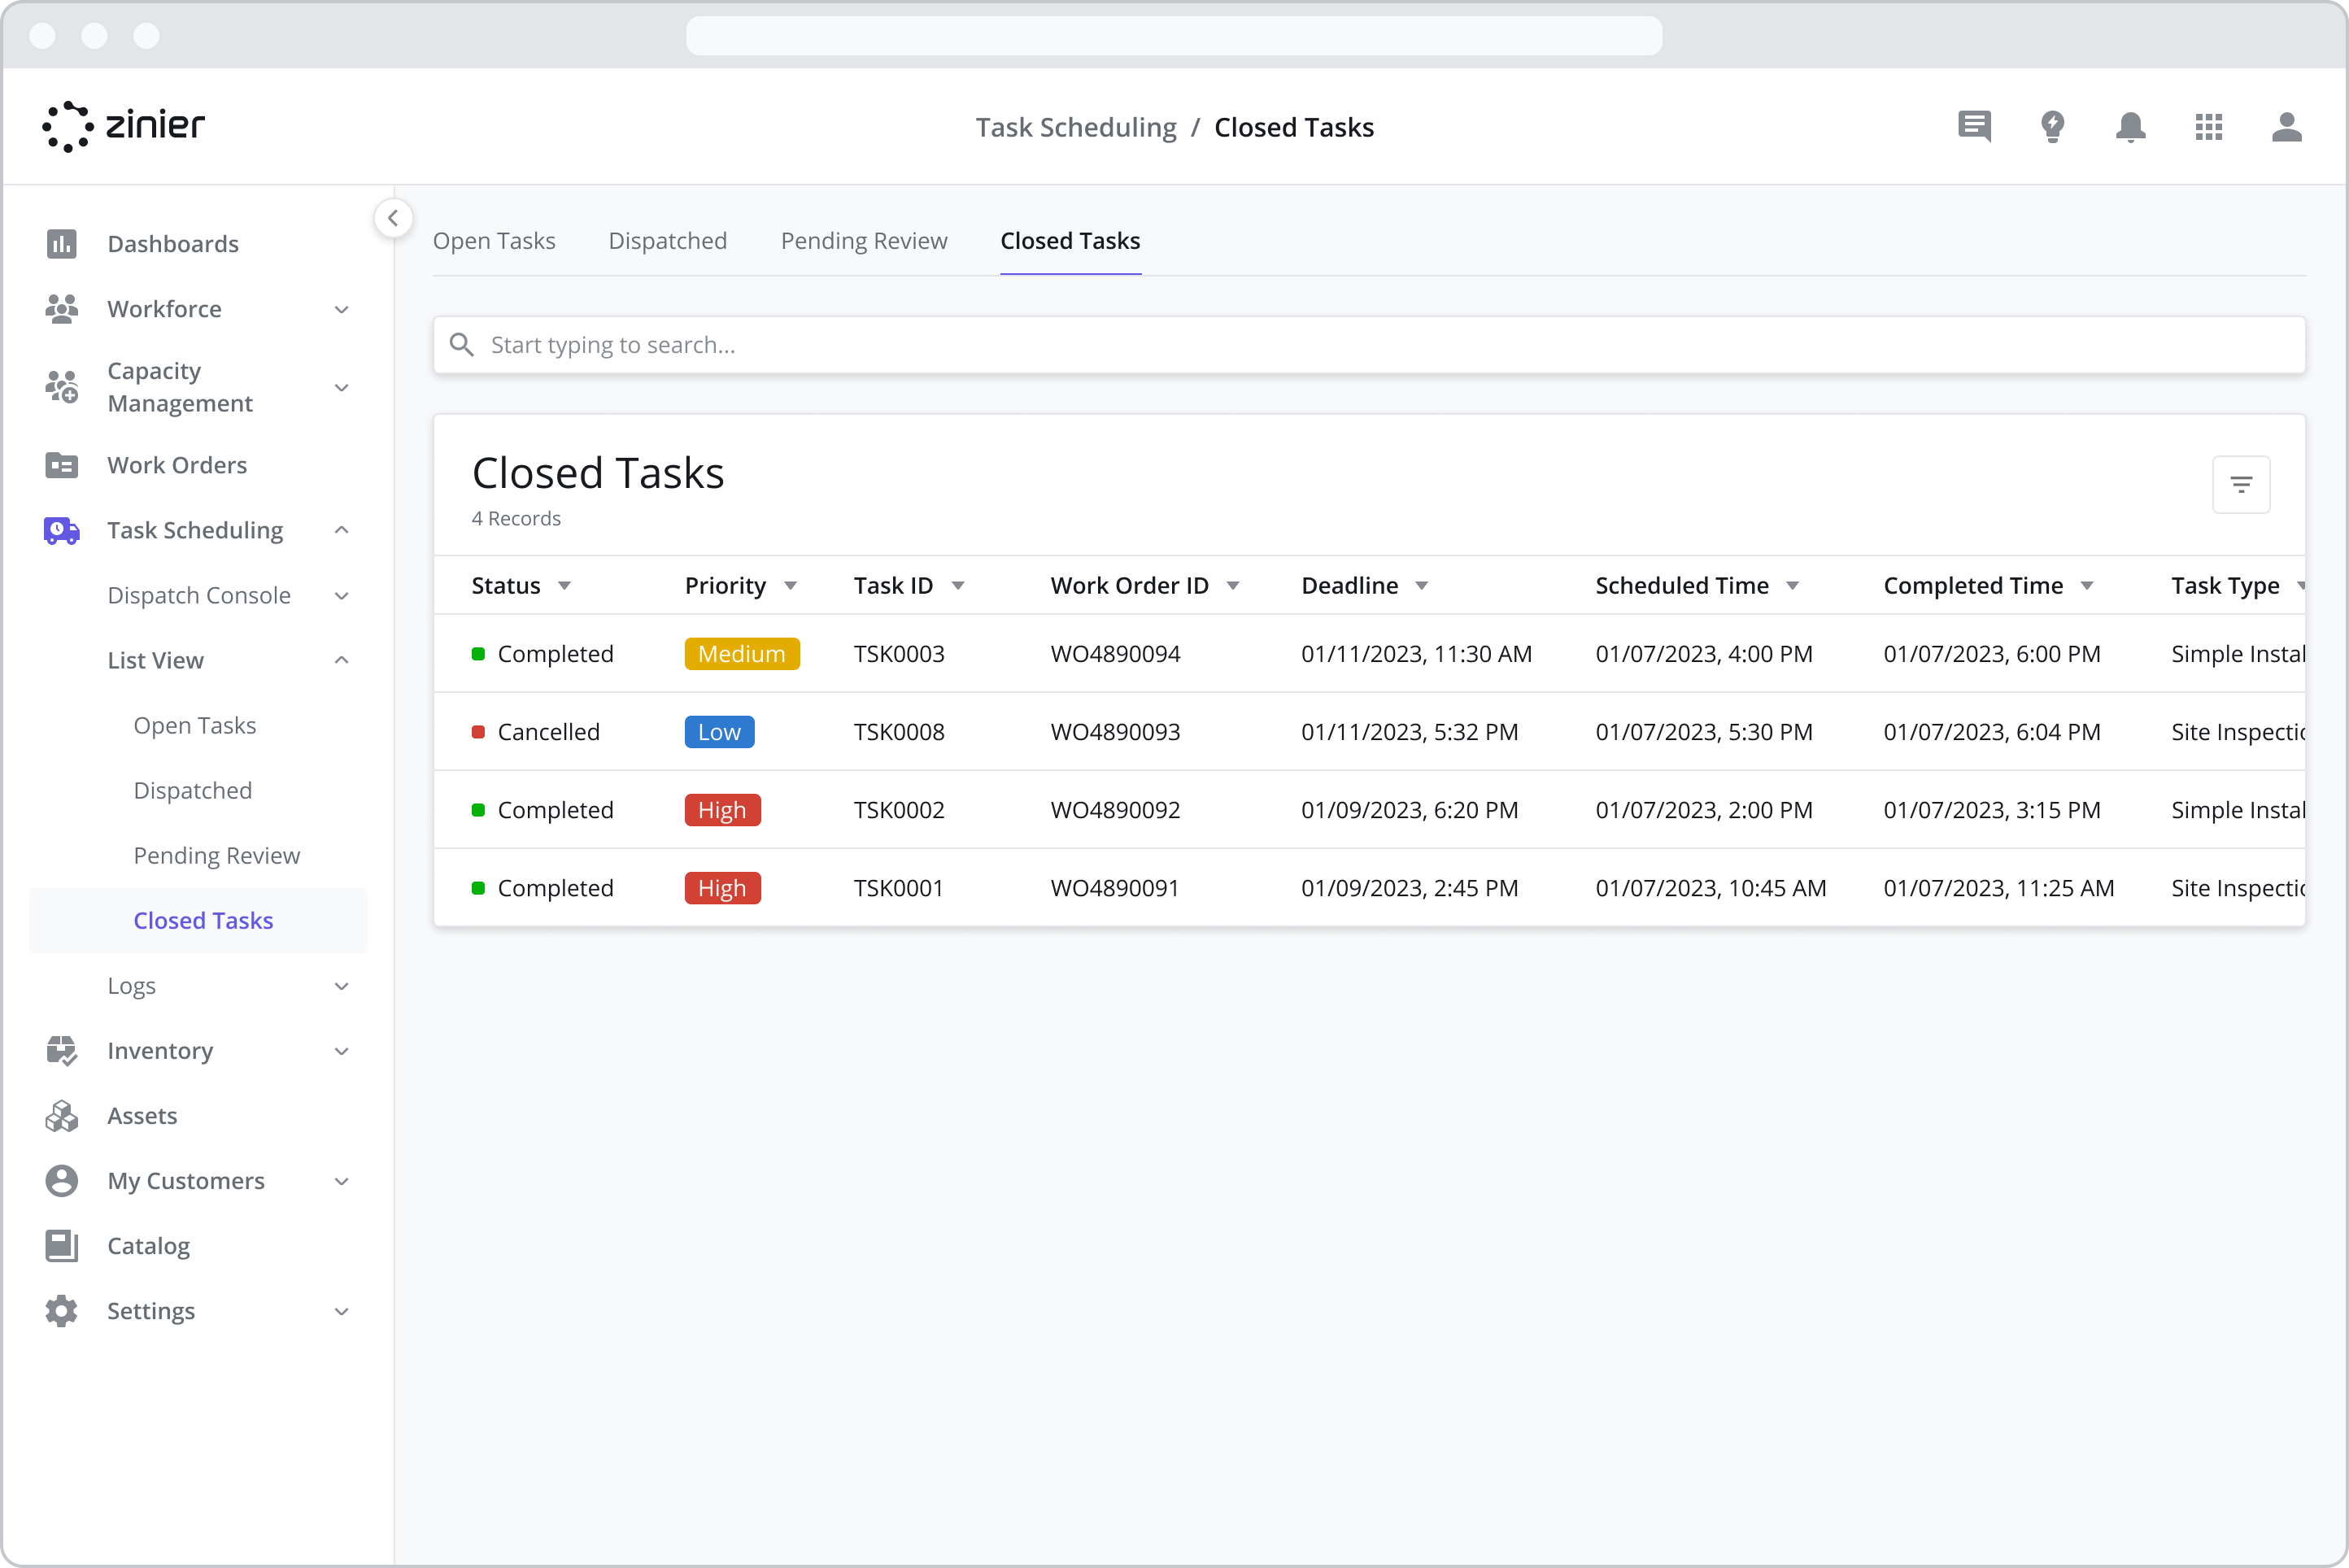
View Closed Tasks
Where you can historical data on completed and canceled tasks. This module contains tasks with the following statuses:
Completed tasks that have been completed, reviewed, and approved.
Canceled tasks are those that have been canceled.
Manually Scheduling and Dispatching Tasks
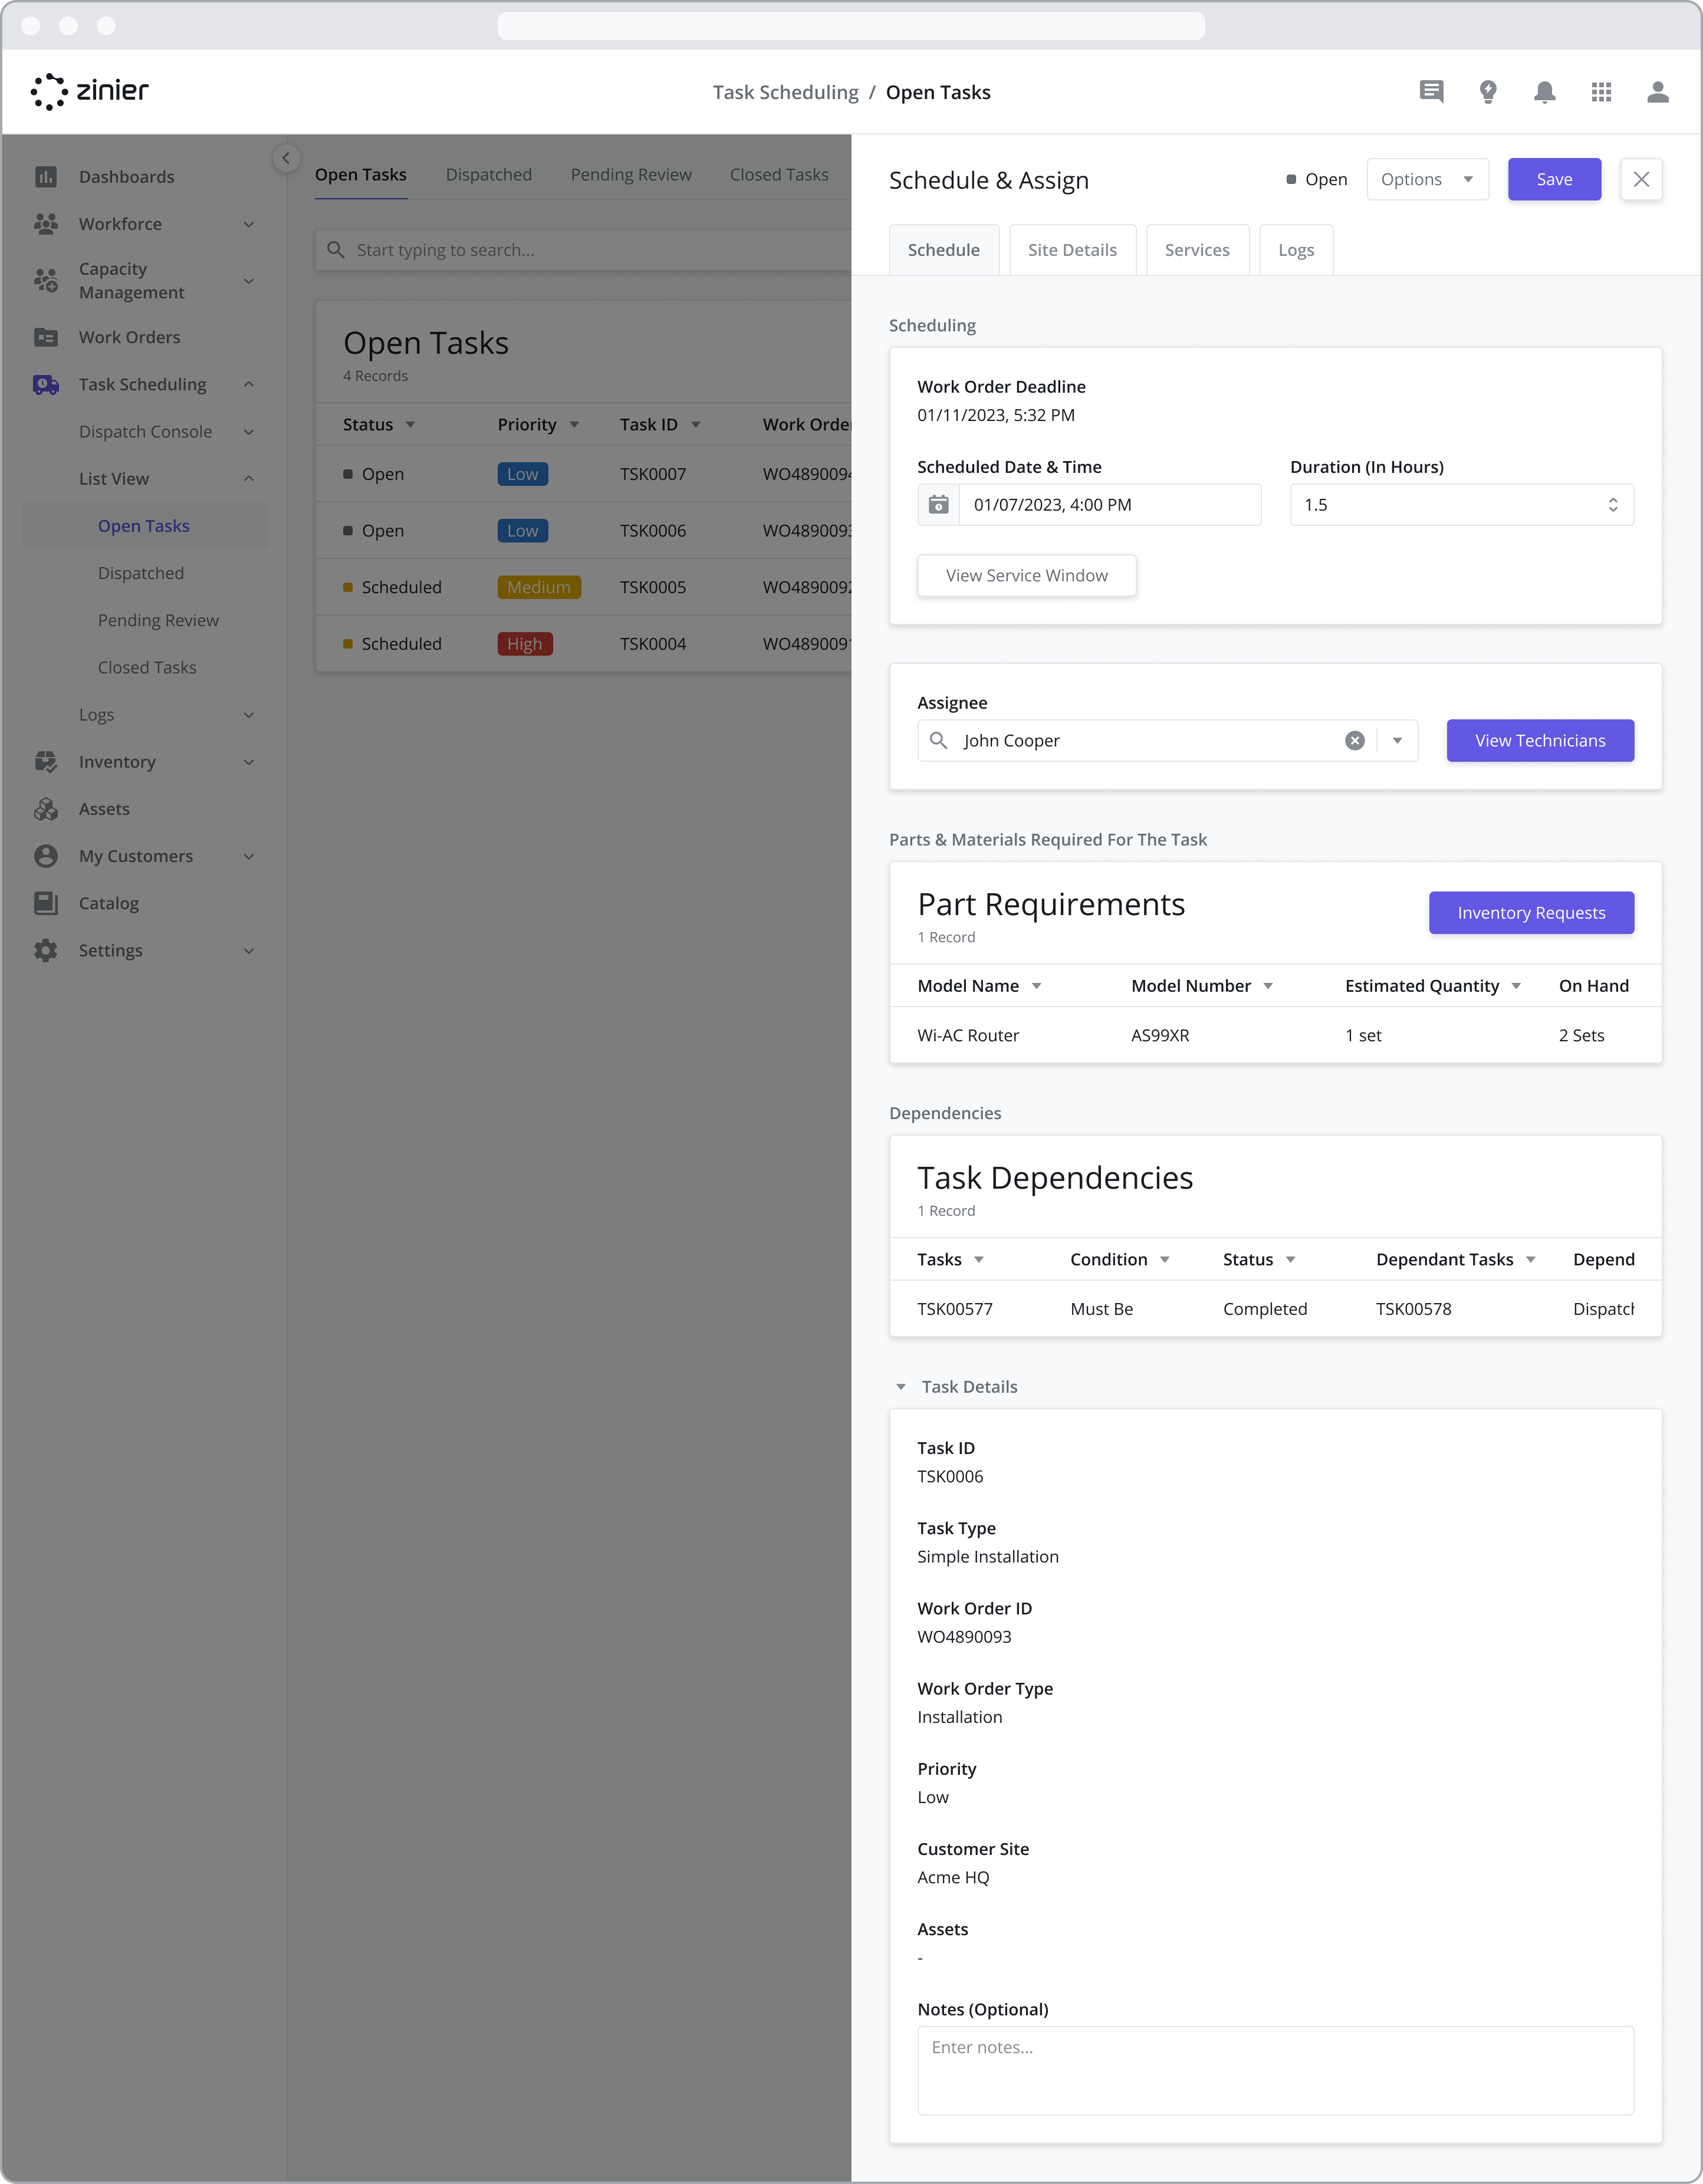
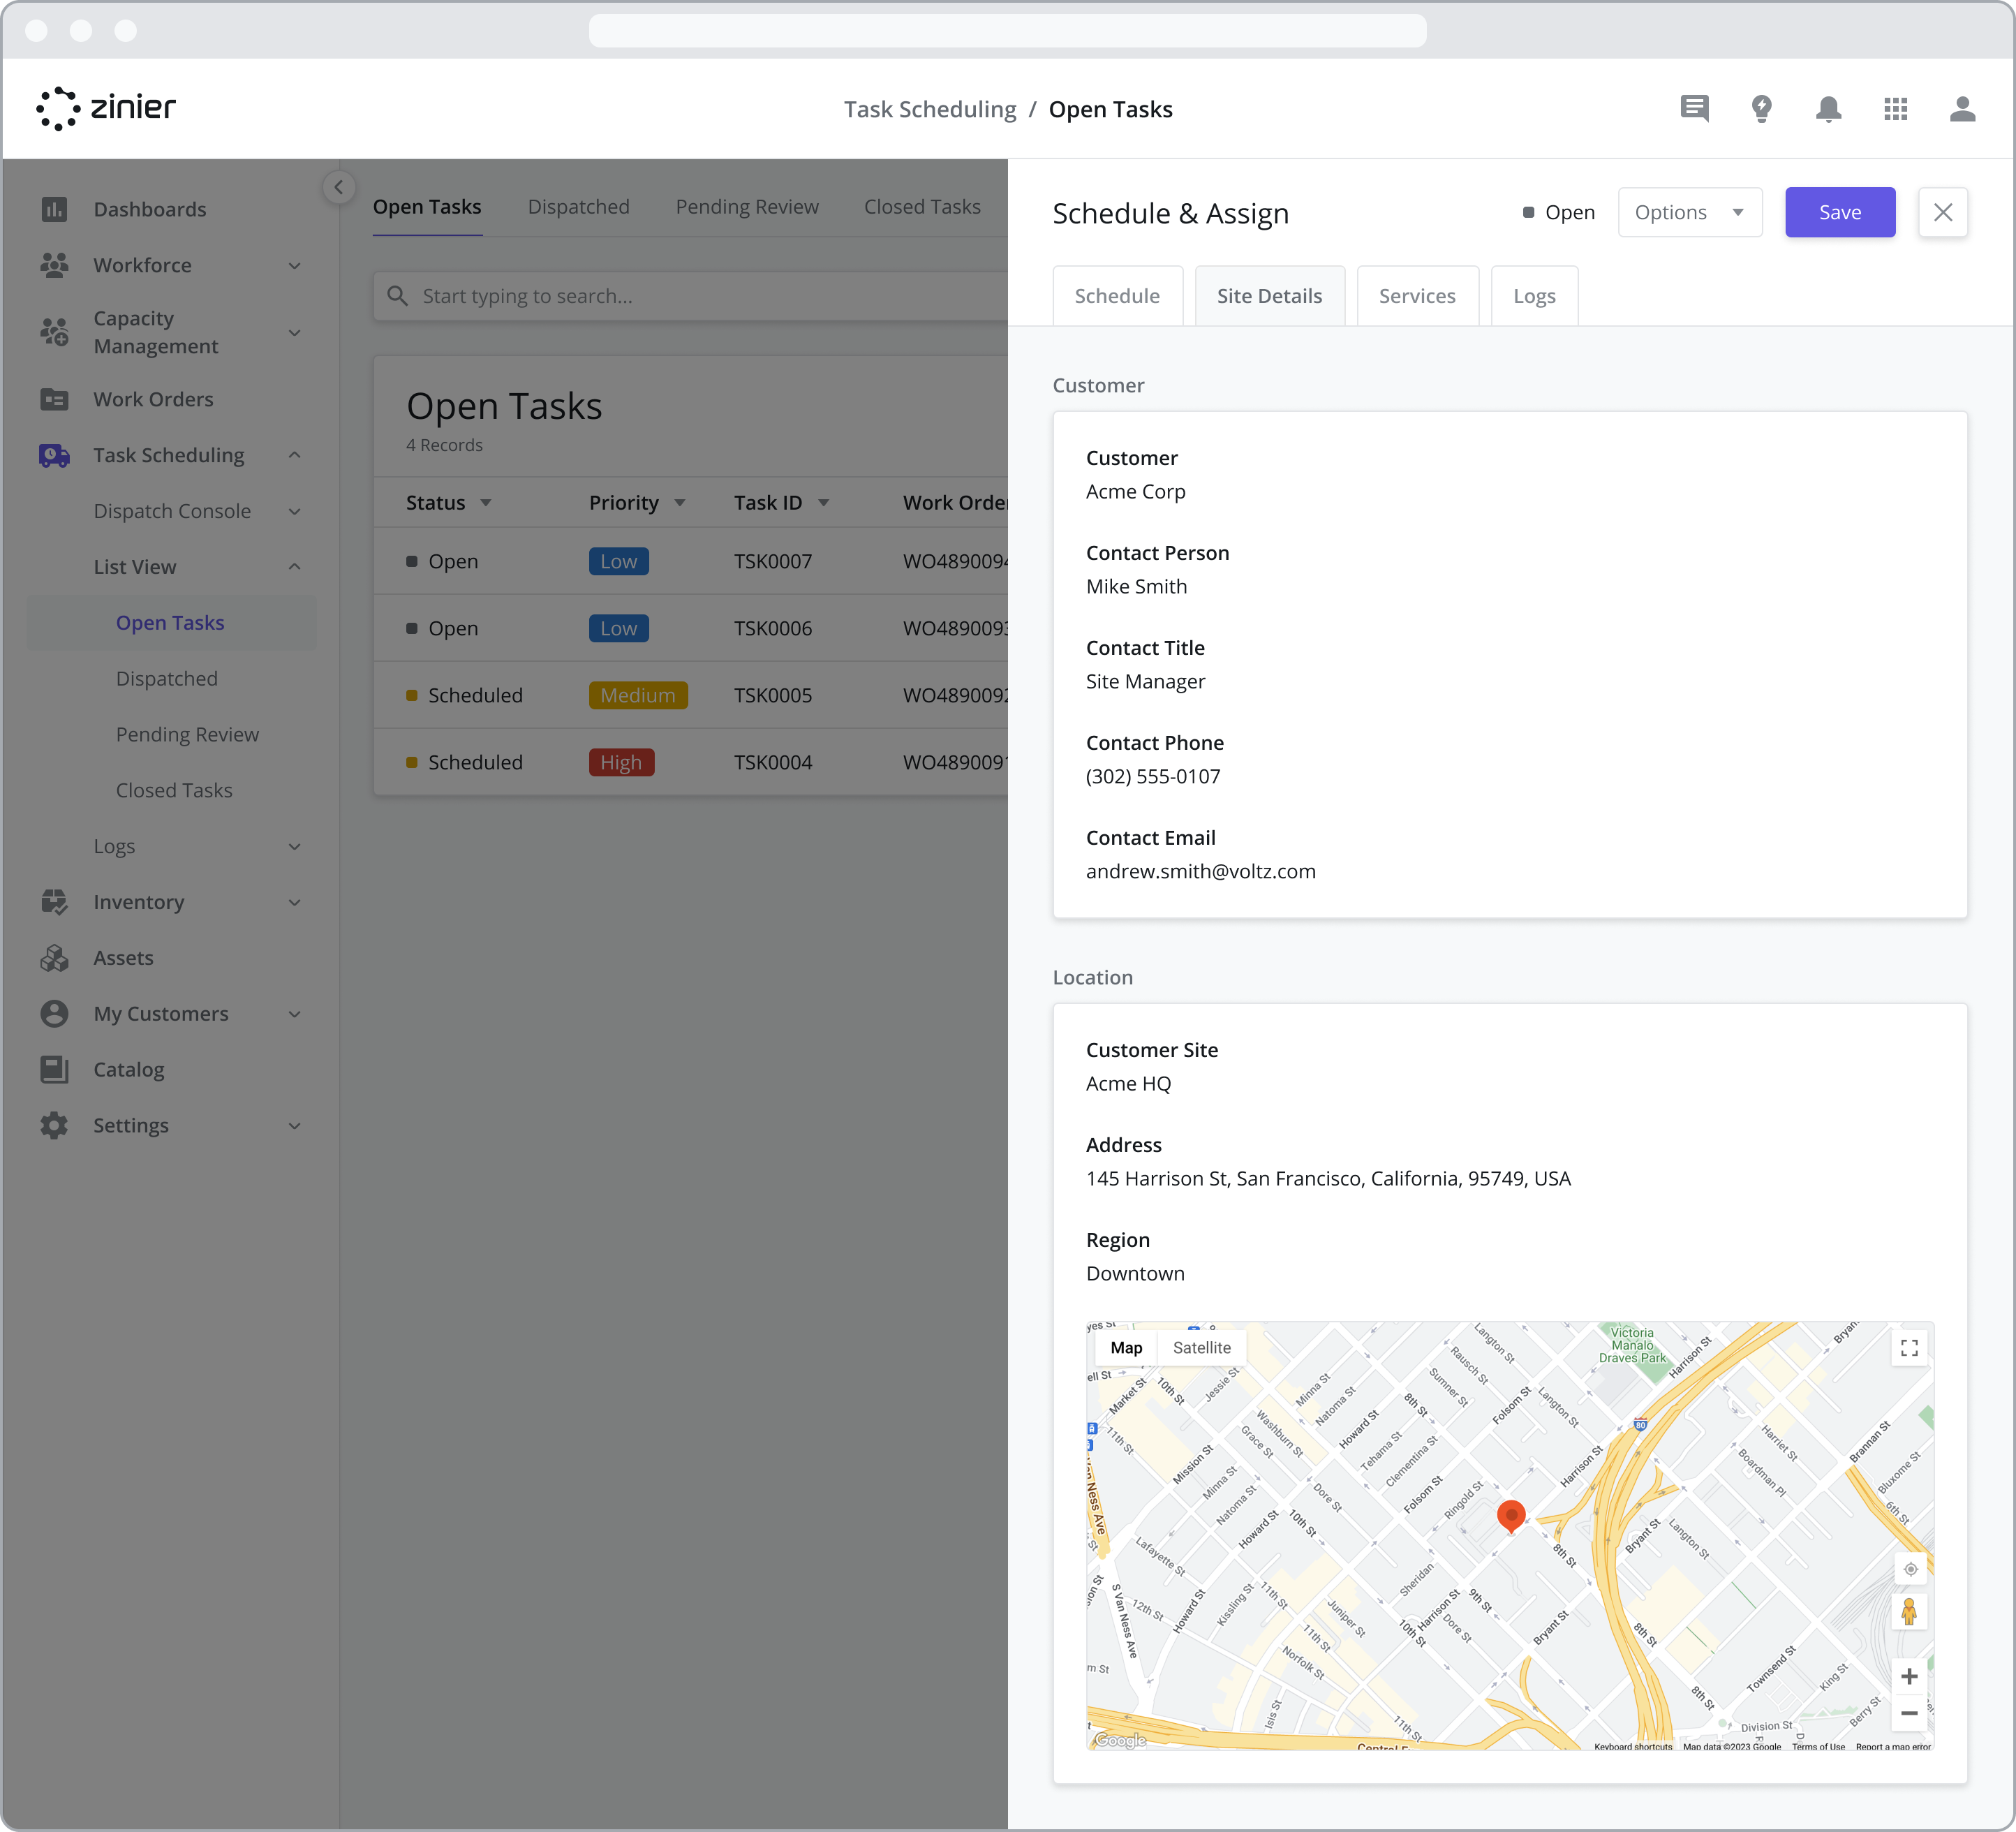
To manually schedule and assign a Technician to an Open Task, go to the Task Scheduling > List View > Open Tasks module, hover over the task you wish to schedule, and click on the “Schedule & Assign” icon to bring up the Scheduling side panel. Next, fill in the scheduling details as described below.
Work Order Deadline
This field is auto-populated based on the Work Order Deadline used when Work Order was created. Typically, this is based on the SLA requirement associated with the Customer Contract.
For example, if the SLA deadline for the Work Order is 10 days, the Work Order Deadline will be calculated as 10 days from the creation date of the Work Order.
Scheduled Date & Time
Enter the Scheduled Date & Time for the task. This is the scheduled Start Time that the assigned technician will see from their task list on the mobile app as well as in the Calendar View from the Dispatch Console.
The back office user who originally added the task to the Work Order (during Work Order creation) has the option to pre-populate this field. But it can be overridden at any time by the dispatcher.
Duration (In Hours)
Defines the duration of the task in relation to the assigned technician’s calendar and blocks off the calendar from the “Scheduled Date & Time” + duration. For example, if the “Scheduled Date & Time” = January 10 @ 9 am and the duration is 1 hour, the assigned technician’s calendar will show the assigned task blocked in their Calendar View from January 10th, 9 am-10 am.
The duration is pre-populated based on the Task Type. Again, the back office user who originally added the task to the Work Order has the option to edit the default duration during the Work Order creation.
As a dispatcher, you also have the option to modify the expected duration of the task when scheduling it here.
View Service Window
Clicking on this button brings up the Service Window associated with the Customer Site where the task is to be performed as defined during the Work Order creation. This gives dispatchers a way to double-check the standard opening hours associated with the site and schedule accordingly.
Assignee
Select the technician you wish to assign the task to. When scheduling manually, you can simply select the technician from the searchable dropdown menu. To see a list of all Technicians and their availability or to view a list of Recommended Technicians and their availability, click on the “View Technicians” button.
For more information on Technician Recommendation, see the Scheduling Automation section.
If you are using Work Groups, the list of Assignees is limited to the technicians associated with the dispatcher's Work Group. This helps dispatchers focus only on their area of responsibility.
Part Requirements
Displays the lists of Parts / Materials added to the task during the work order creation. Once an assignee is selected, the inventory “On Hand Qty” will be populated based on the quantity of that part available on the assigned Technician’s truck.
Should the technician not have the required parts on hand, the dispatcher has the option to create an Inventory Request directly from the dispatching sidepanel. For more information, visit the Inventory Requests page.
Task Details
Displays the task details, including any “Notes” added by the user who created the Work Order.
Site Details
Displays information about the location of the Customer Site where the task will be performed.
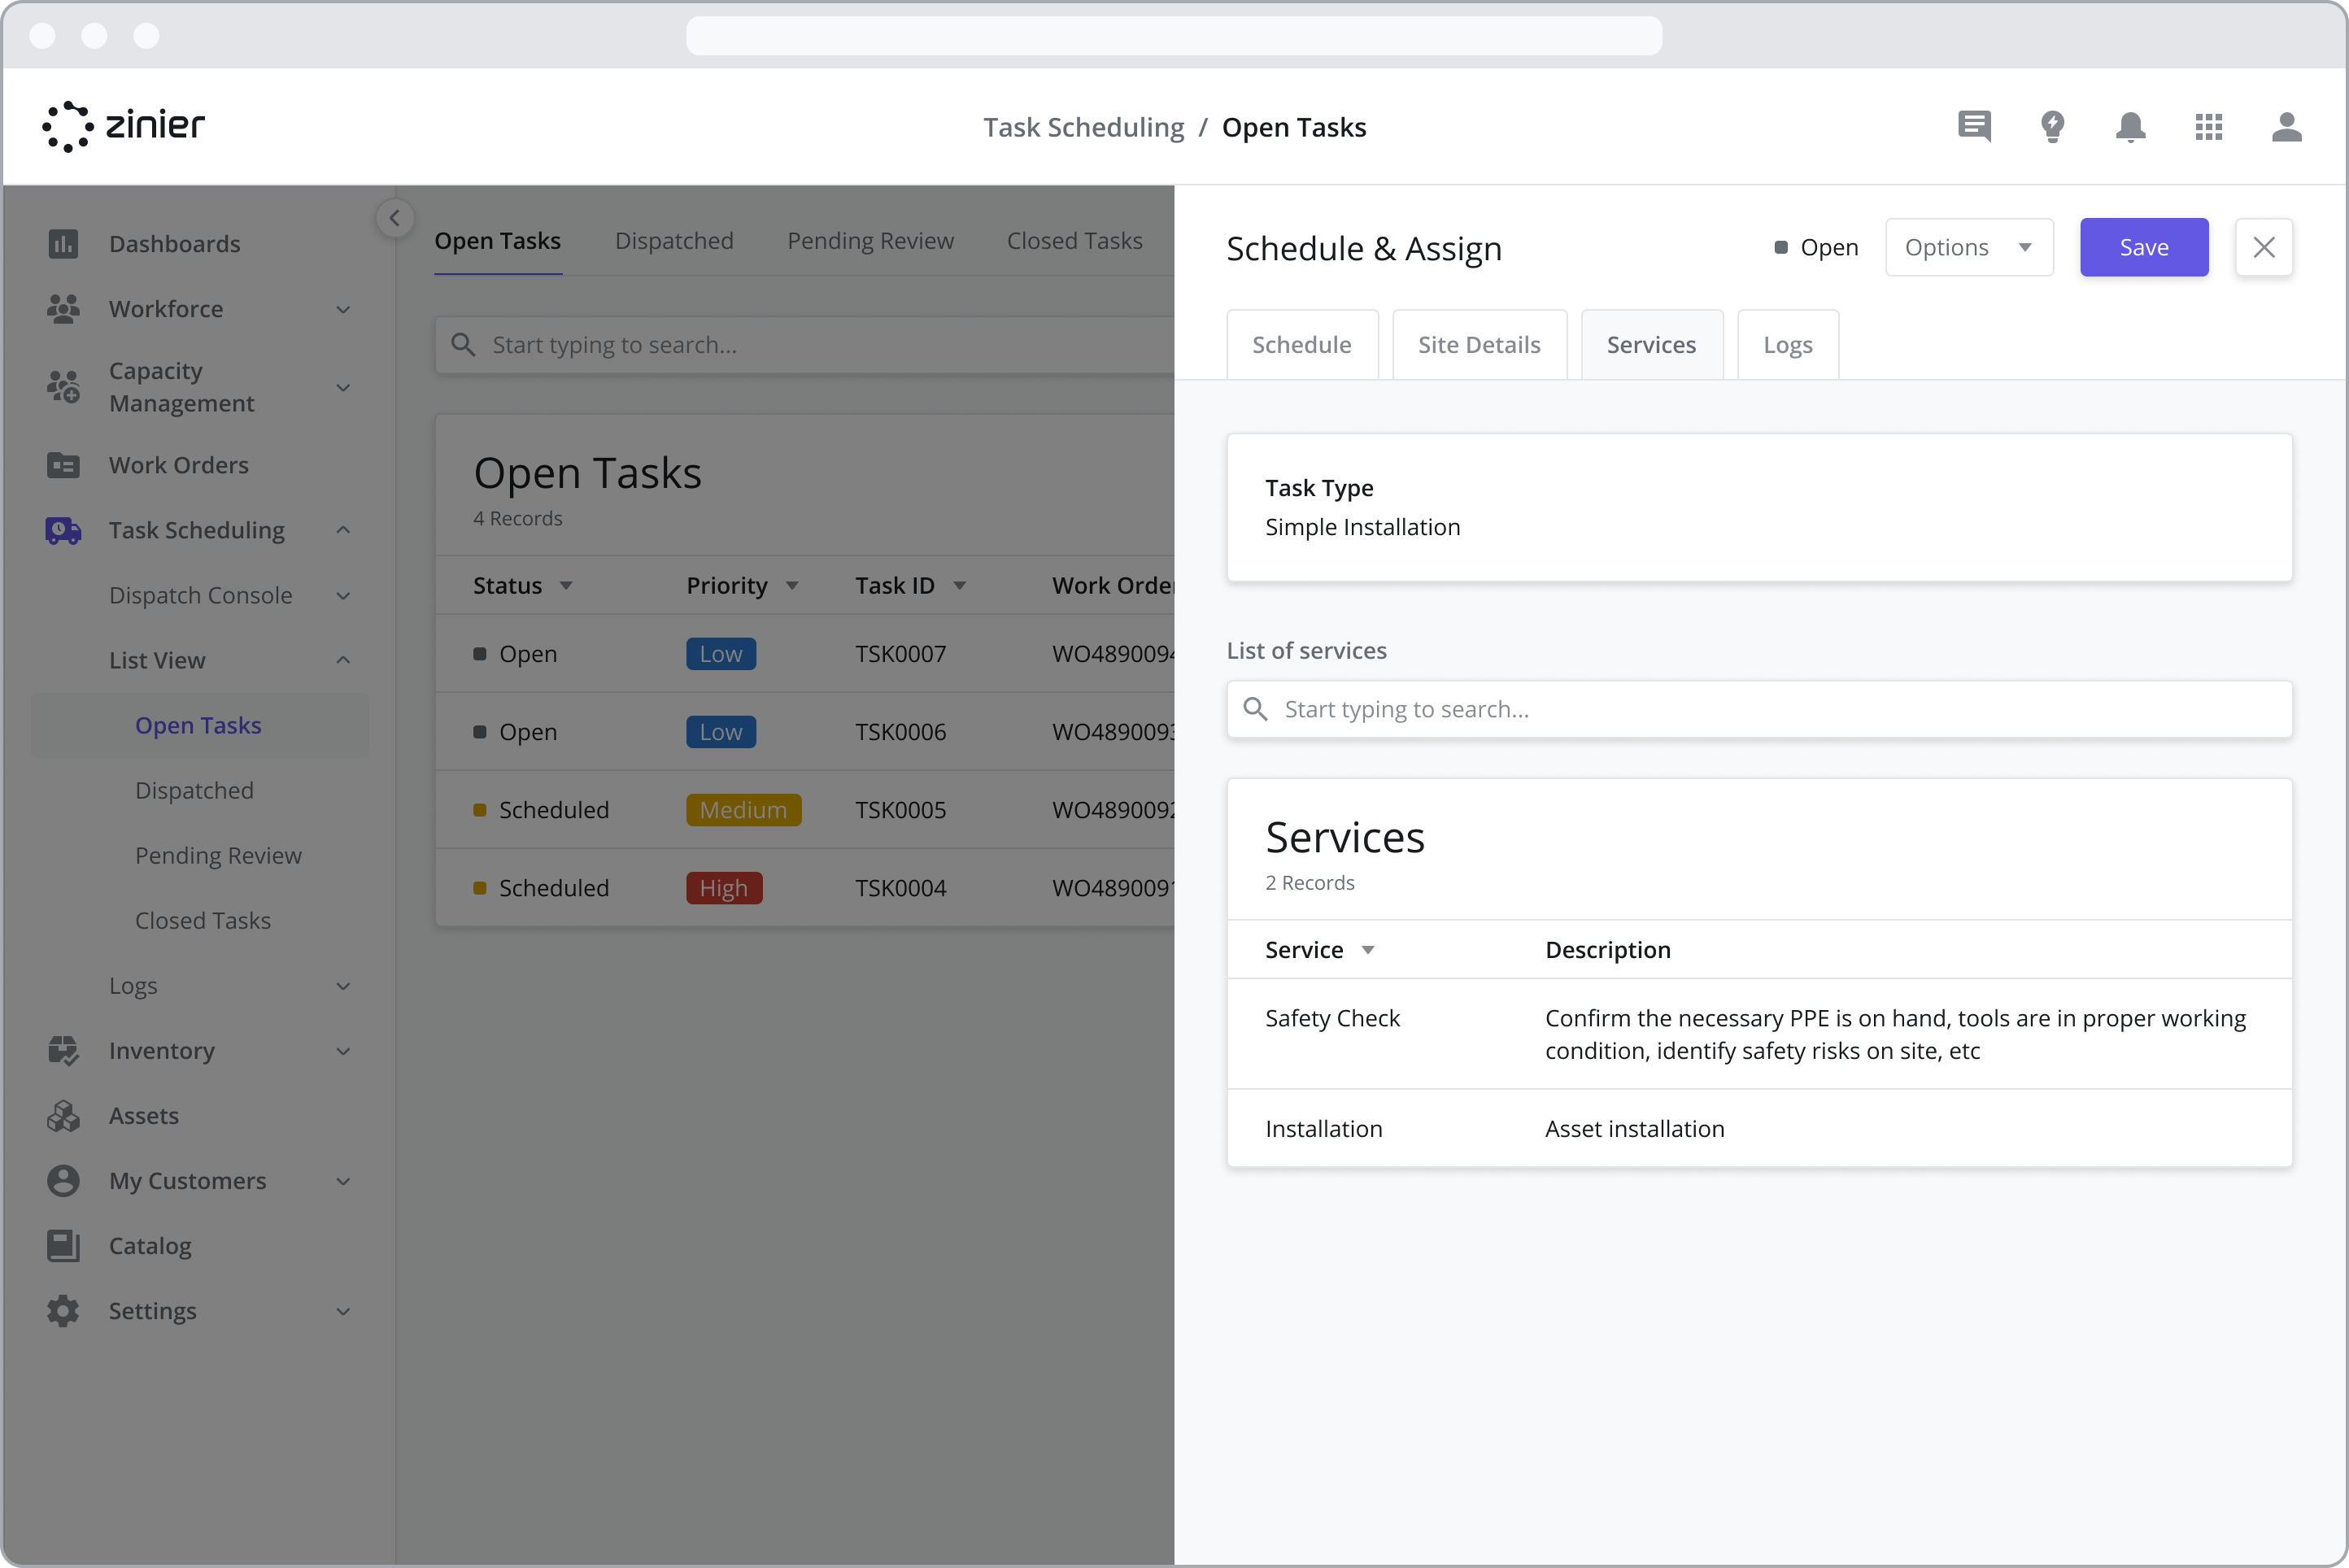
Services
The Services tab shows the Services assigned to the task during the Work Order creation.
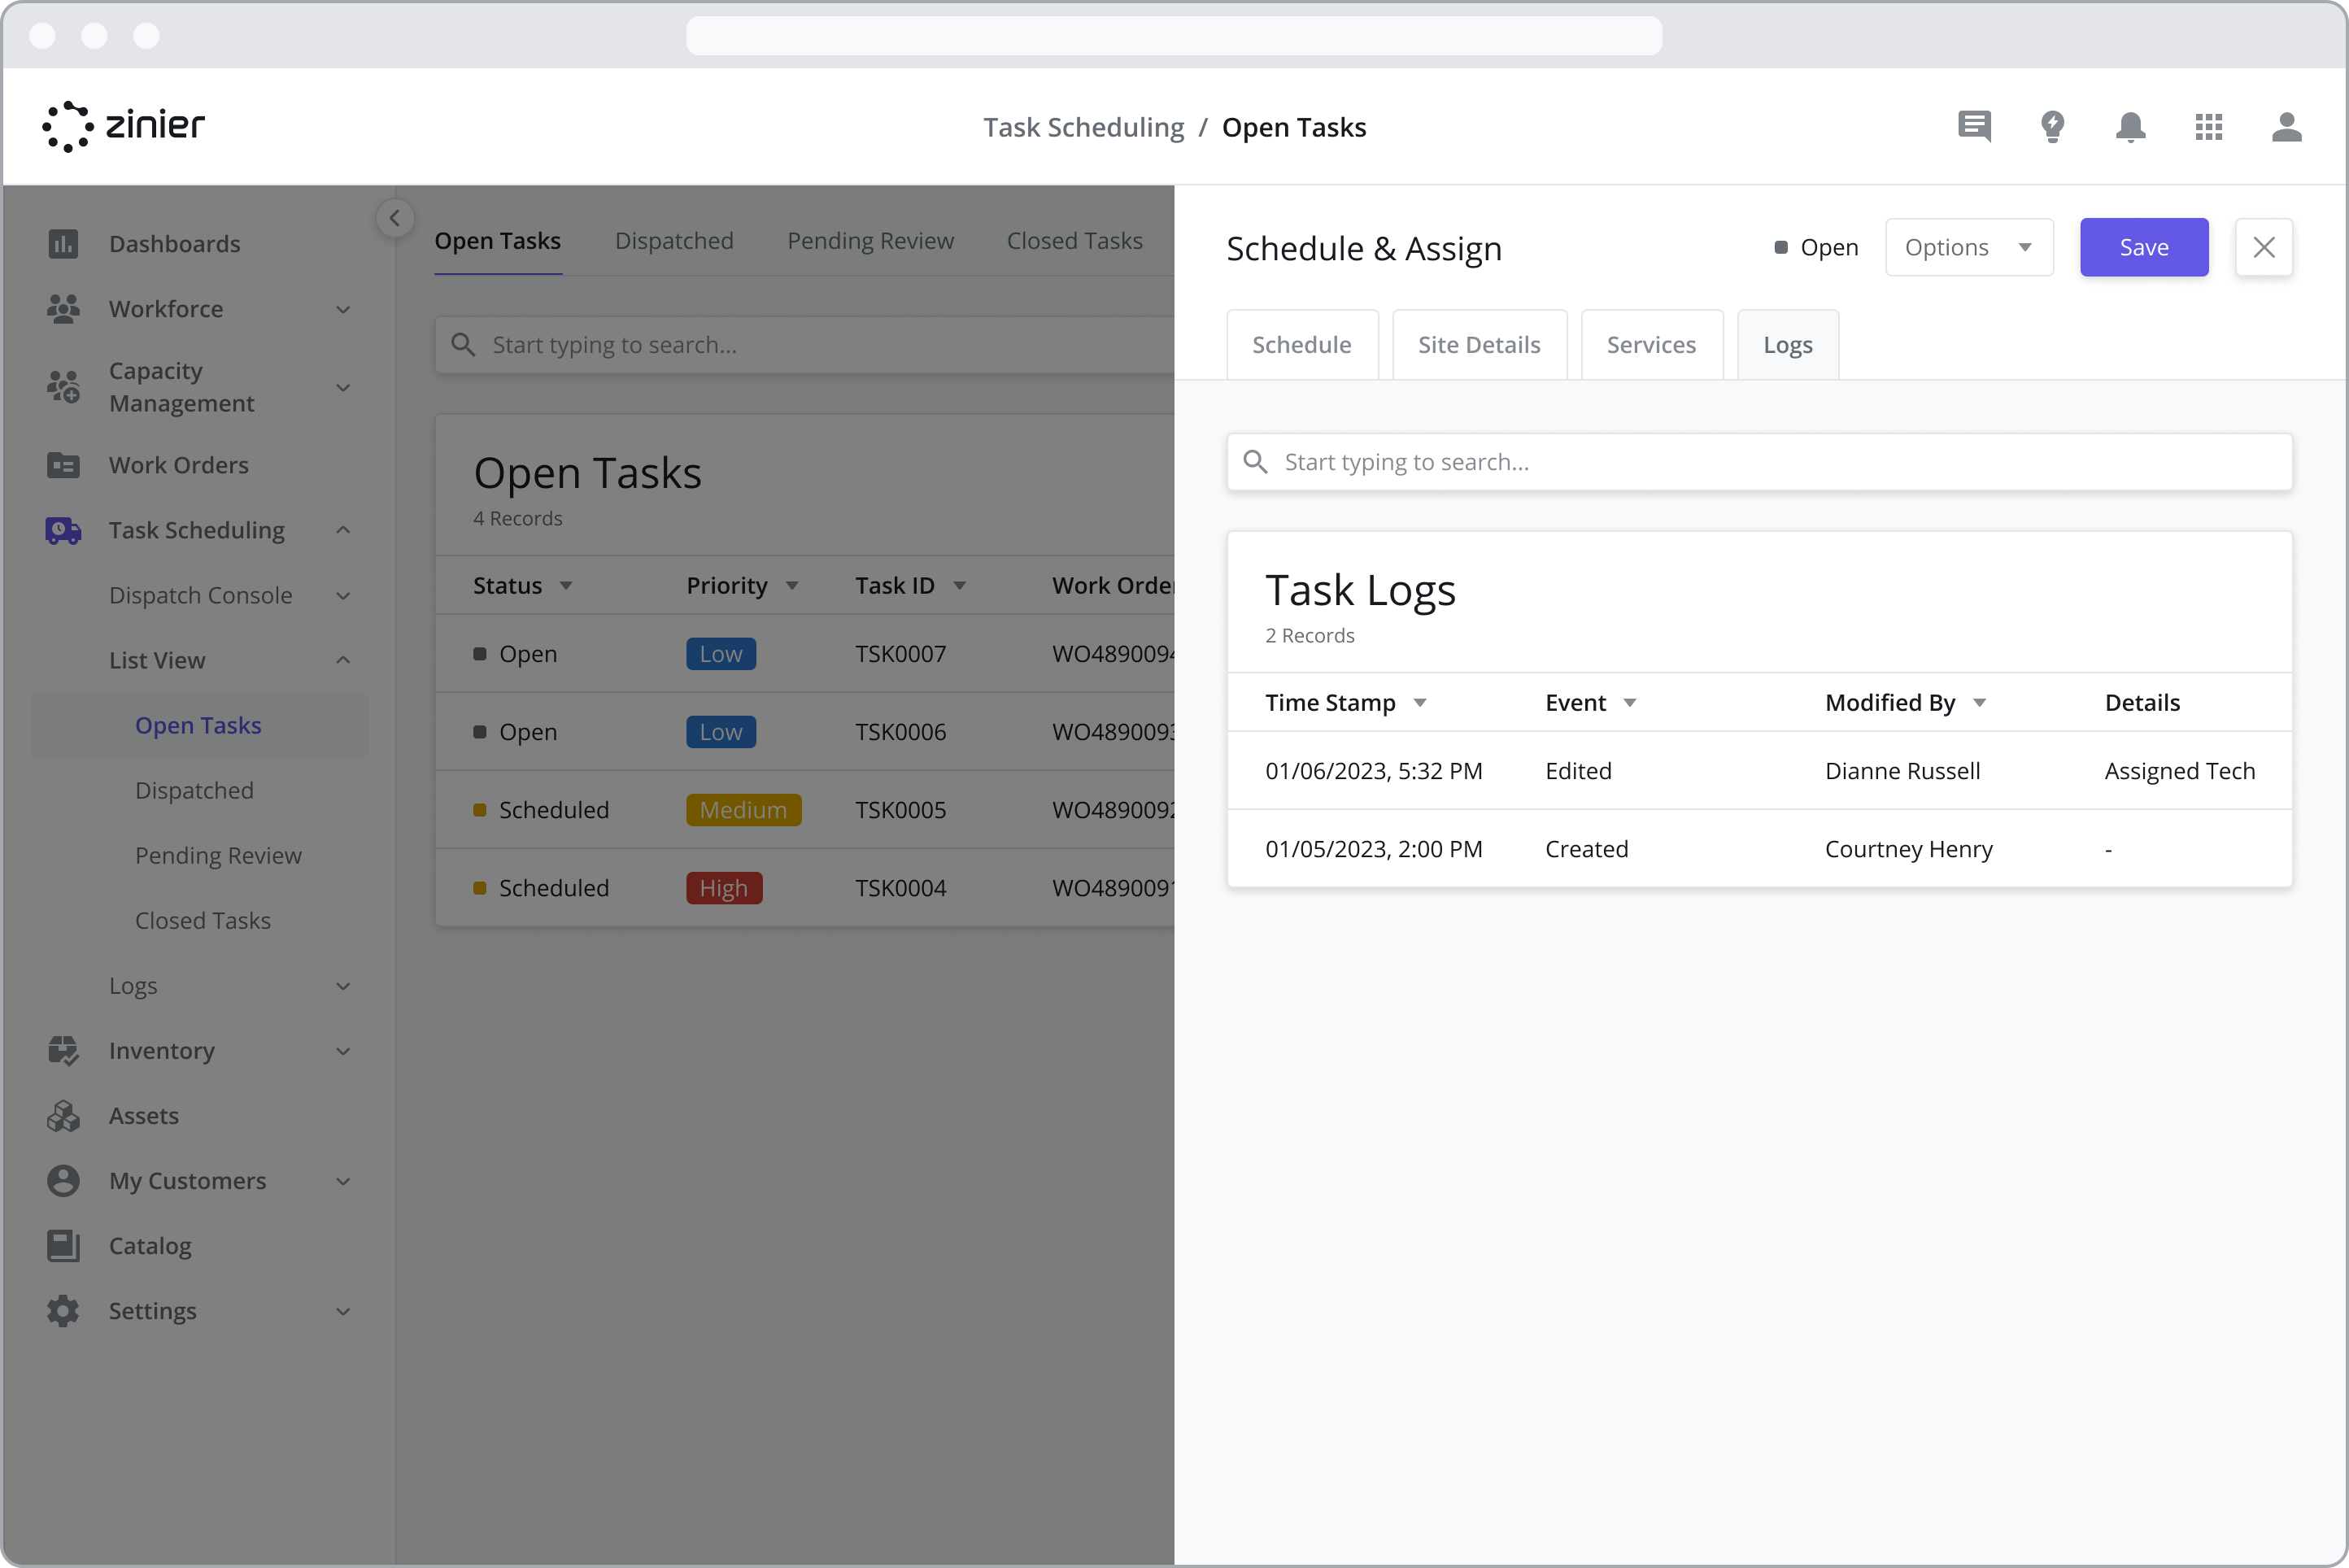
Logs
Displays a list of time-stamped events associated with the task, such as the task creation date, assignment date, dispatch date, etc. Task Logs are particularly useful for audit purposes.
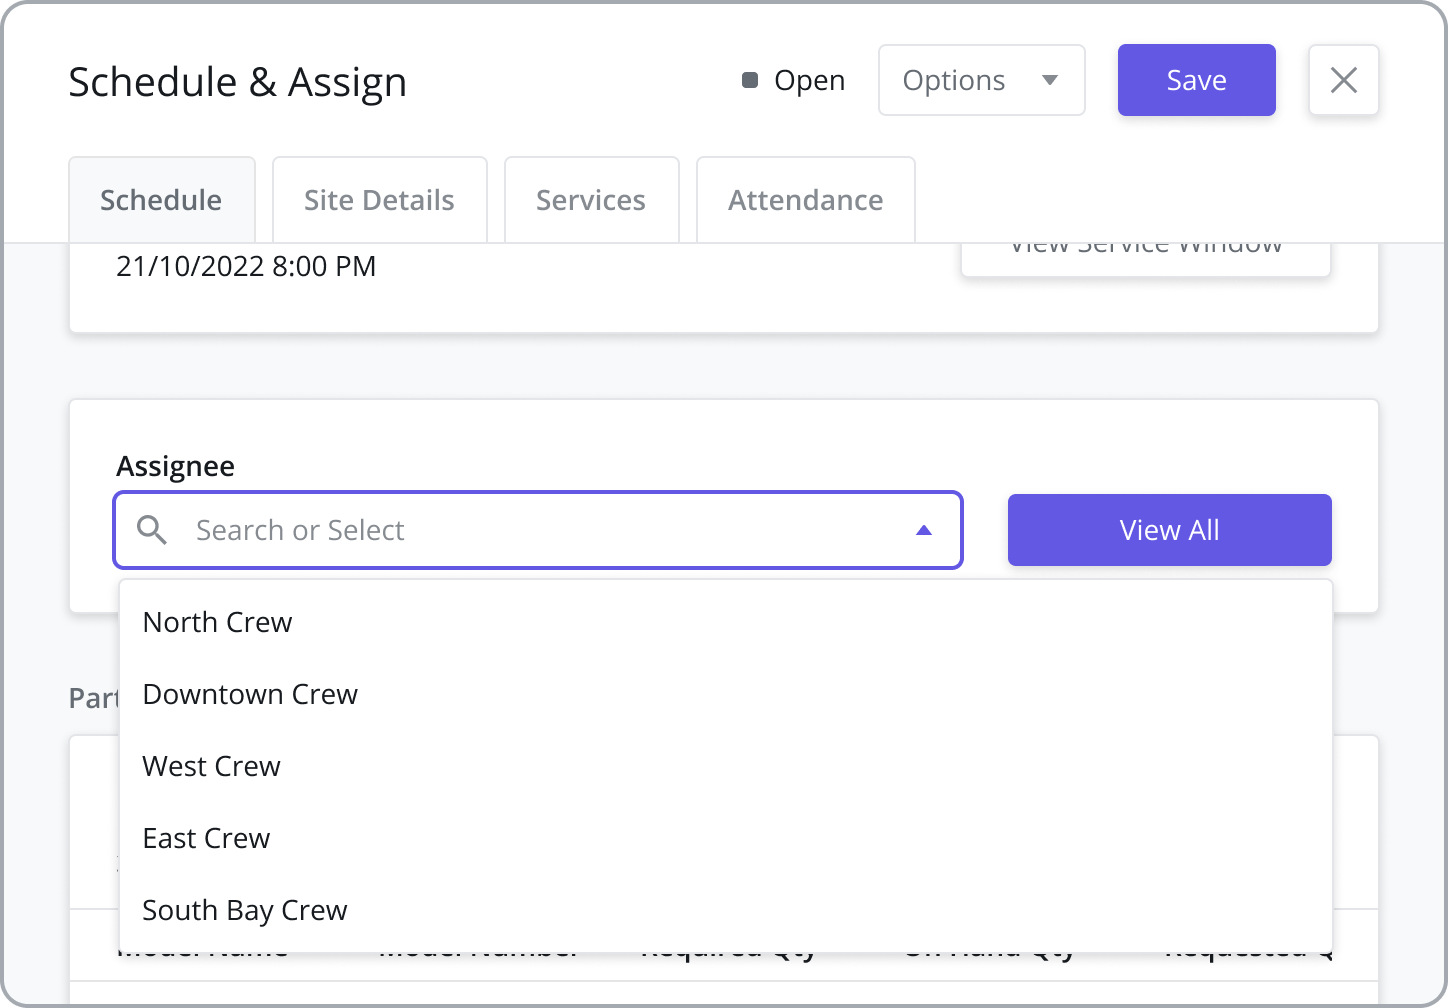
Assigning Tasks to Crews
When assigning tasks, the Assignee dropdown menu will either show a list of Technicians or a list of Crews. This assignee list is determined by selecting either Single Technician or Crews from the “This Task Can Be Assigned To” dropdown menu in the Task Type sidepanel for the Task Type associated with the task.
If you want to switch the assignment type from Single Technician to Crew, you must cancel the task and create it again as a Crew task. You cannot convert Single Technician tasks to Crew tasks without doing so.
Crew Tasks can only be assigned in Task Scheduling > List View. Calendar View still shows the list of technicians where crew tasks are copied to each member of the crew so each technician’s schedule appears accurately.
Go to Task Scheduling > List View > Open Tasks tab.
Hover over a task and click Schedule & Assign.
On the Schedule & Assign panel > Assignee list, select a crew.
Click Save.
If you are trying to assign a task to a Crew but only see individual technicians in the list of Assignees, this is likely because the Task Type has not yet been configured as a Crew Task Type but instead has been configured as a Single Technician Task Type. For more information on configuring Task Types, visit the Select Who This Task can be Assigned to (Crews or Single Technicians) section.
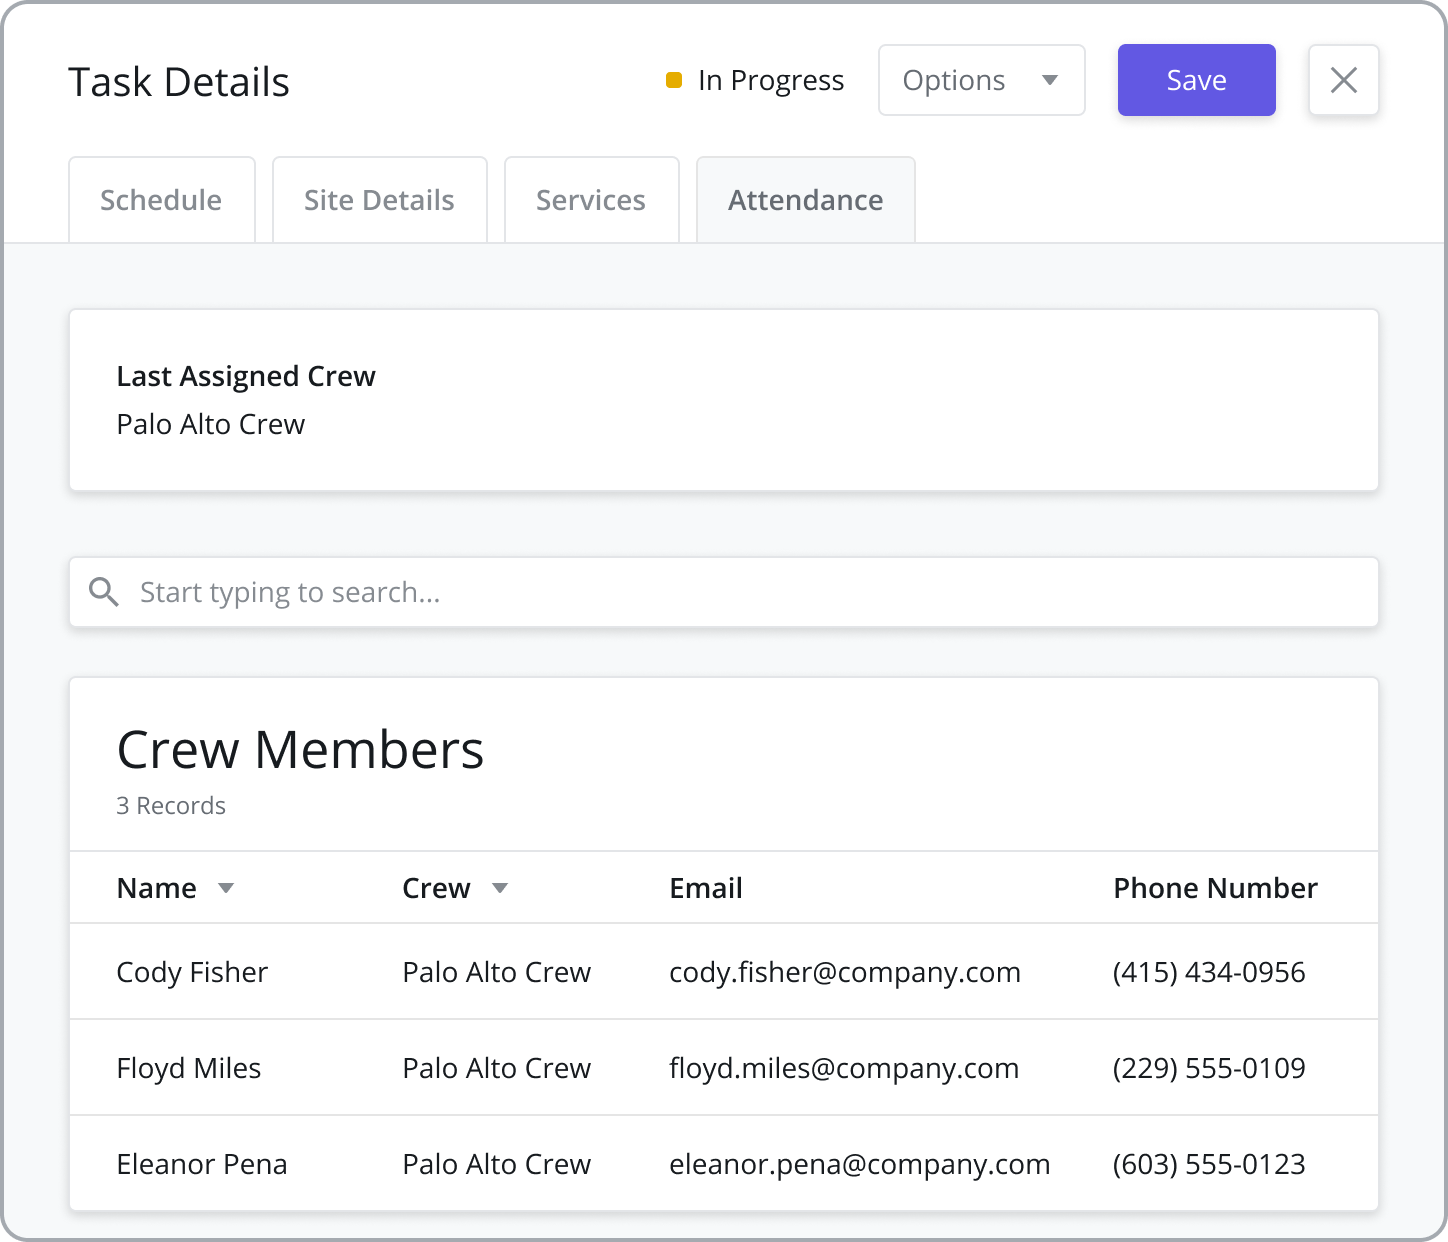
View Crew Attendance for Submitted Tasks
Web Users can view a crew’s attendance records once a task has been submitted.
In Task Details, there is now a new tab, Attendance, that displays the entire attendance history for a crew and also multiple check-ins and check-outs on the same task (i.e. multi-day task)
Go to Task Scheduling > List View and click any of the tabs except Open Tasks.
Hover over a task and click Edit.
To view attendance history, click the Attendance tab.
Scheduled vs. Dispatched Tasks
After assigning and scheduling a task as described above, clicking the “Save” button changes the status of the task from Open to Scheduled.
It is important to note that the task has not yet been Dispatched.
Dispatched tasks are those that have been sent to an assigned tech (and are viewable on the tech's mobile device) where the tech has yet to commence travel or check-in to the site. To dispatch a task, you have several options:
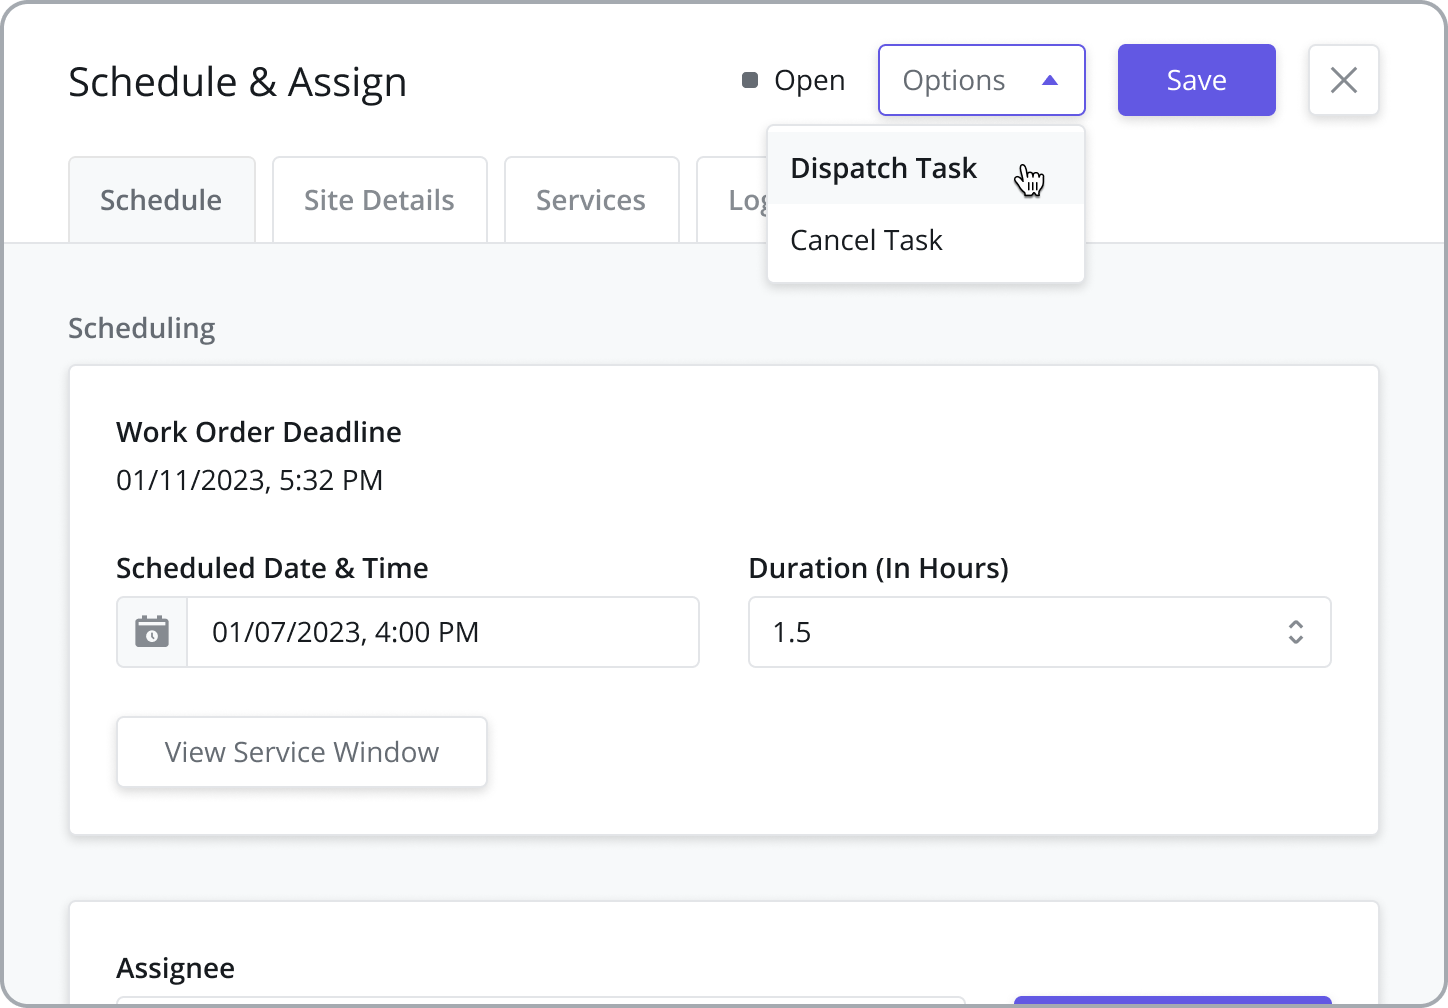
From the “Options” dropdown at the top of the side panel, select “Dispatch Task”
From the Open Tasks module, hover over the Scheduled task you wish to dispatch and click on the “Dispatch” icon.
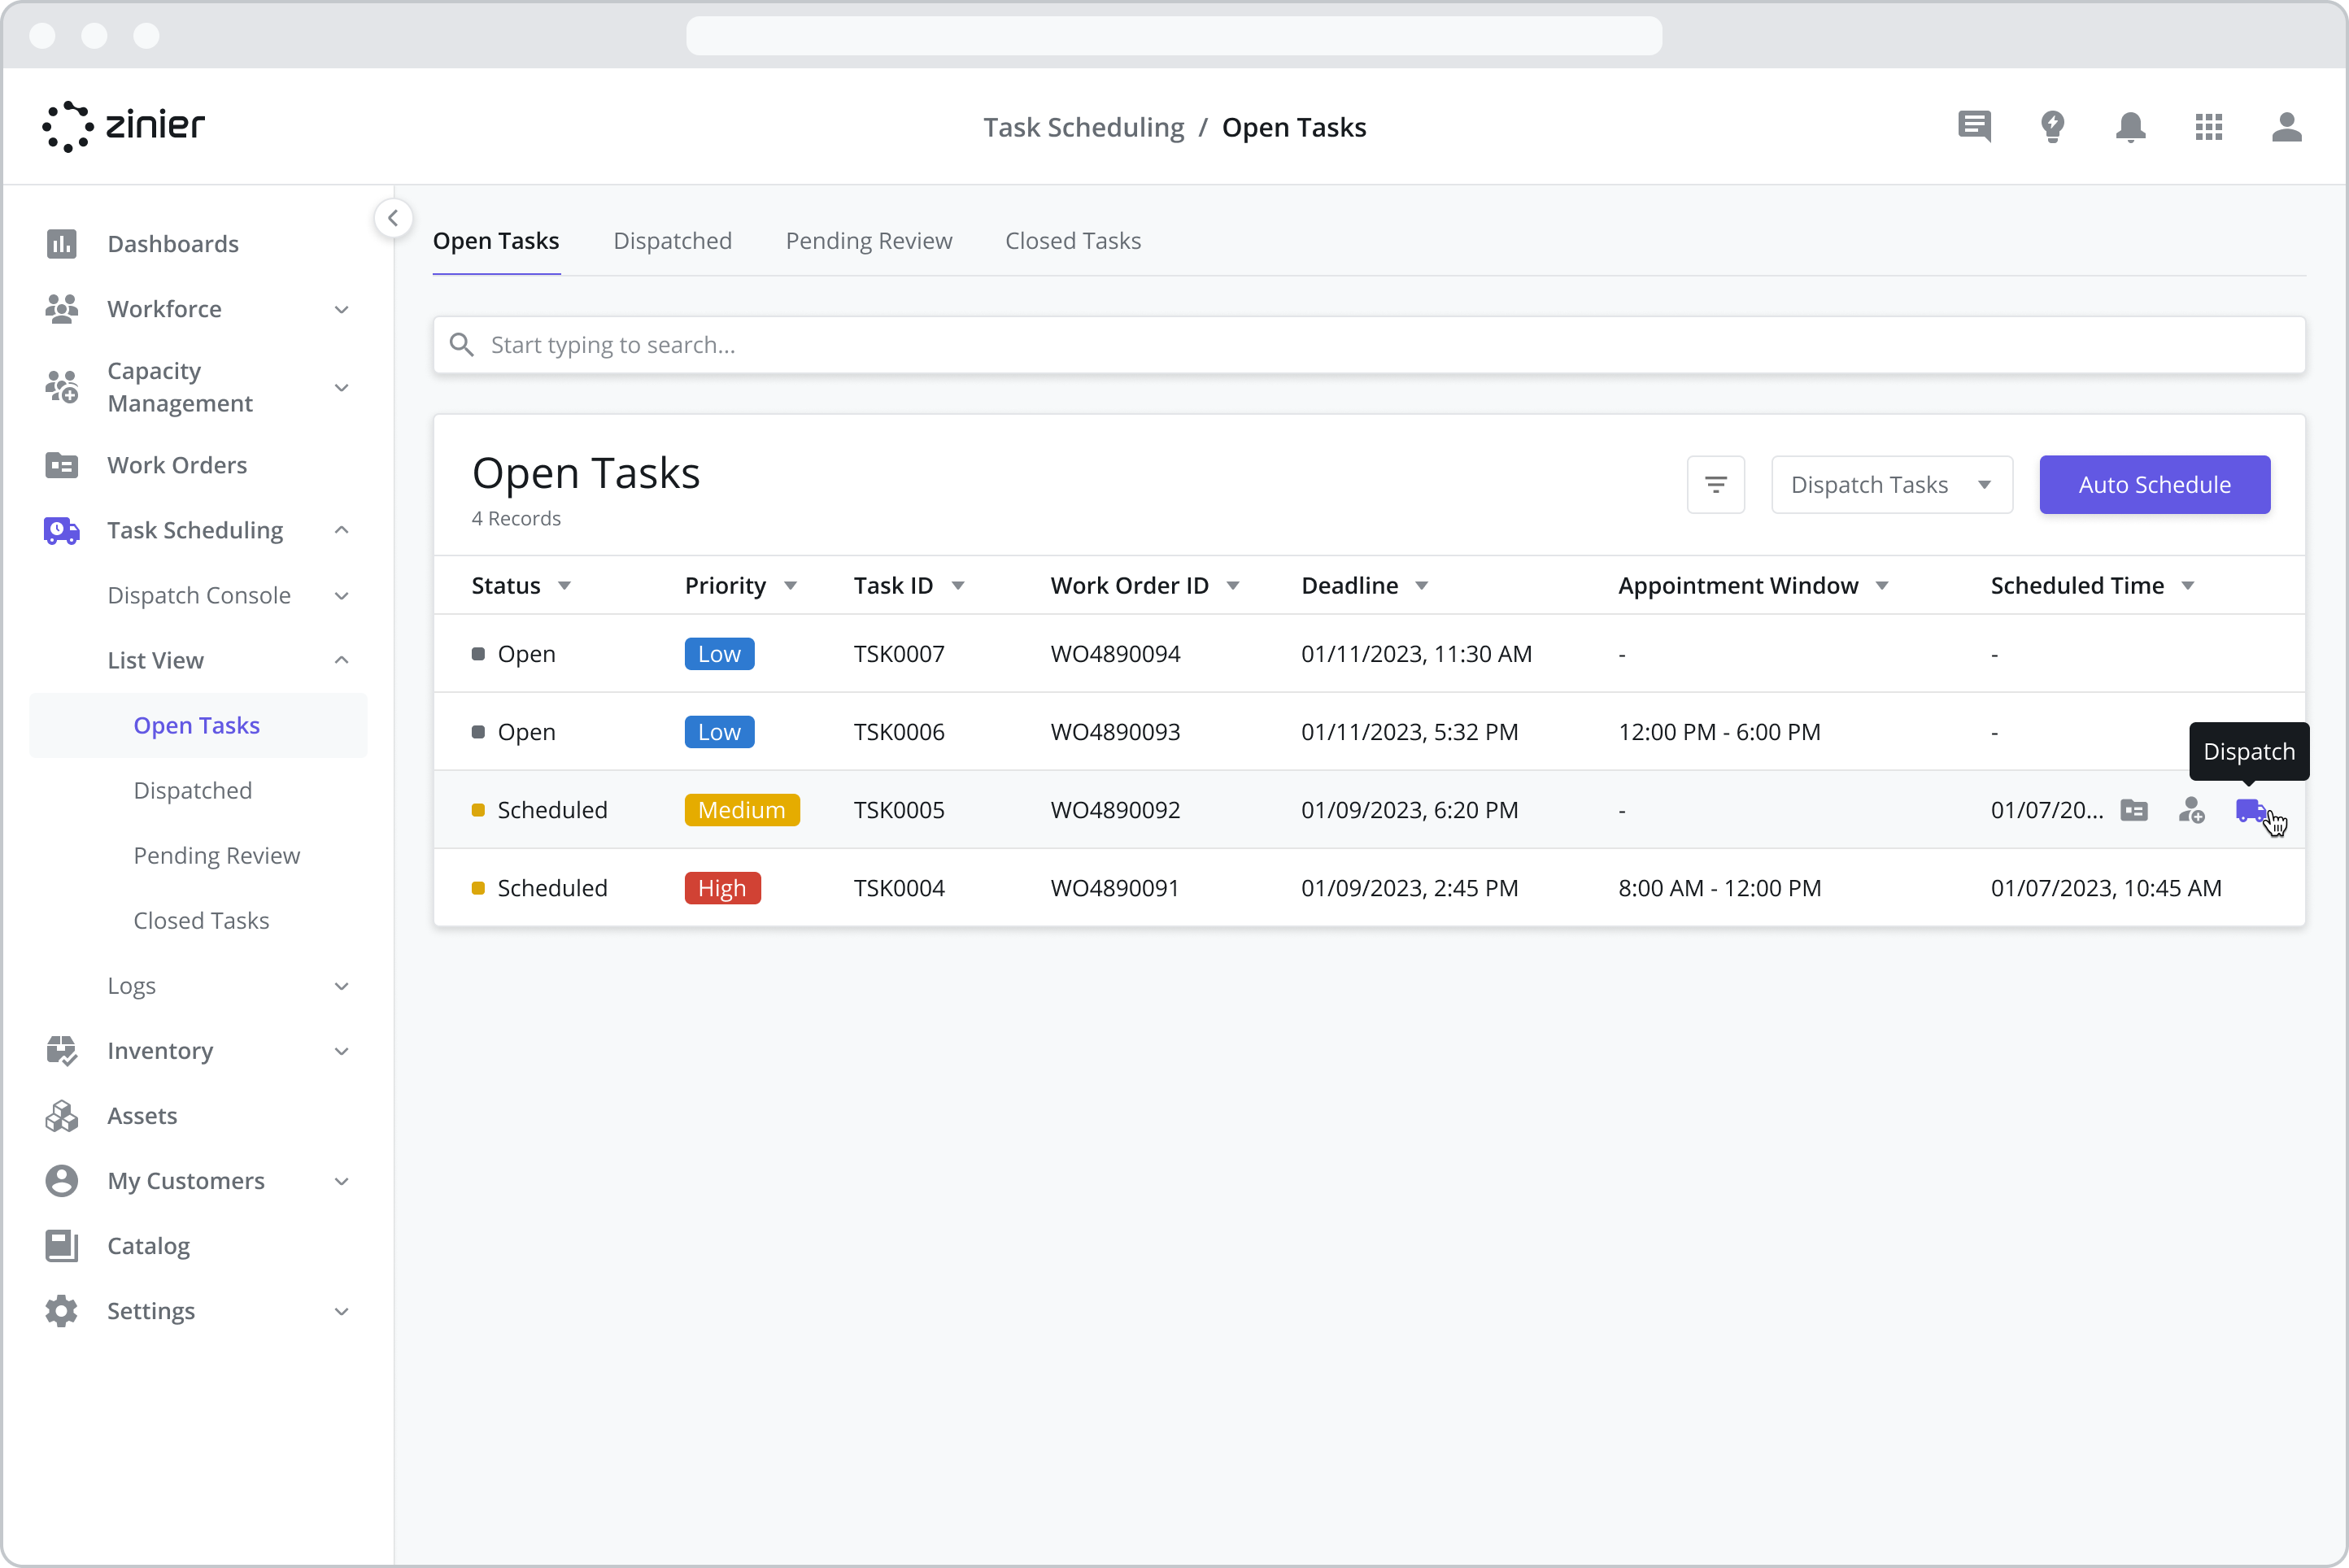
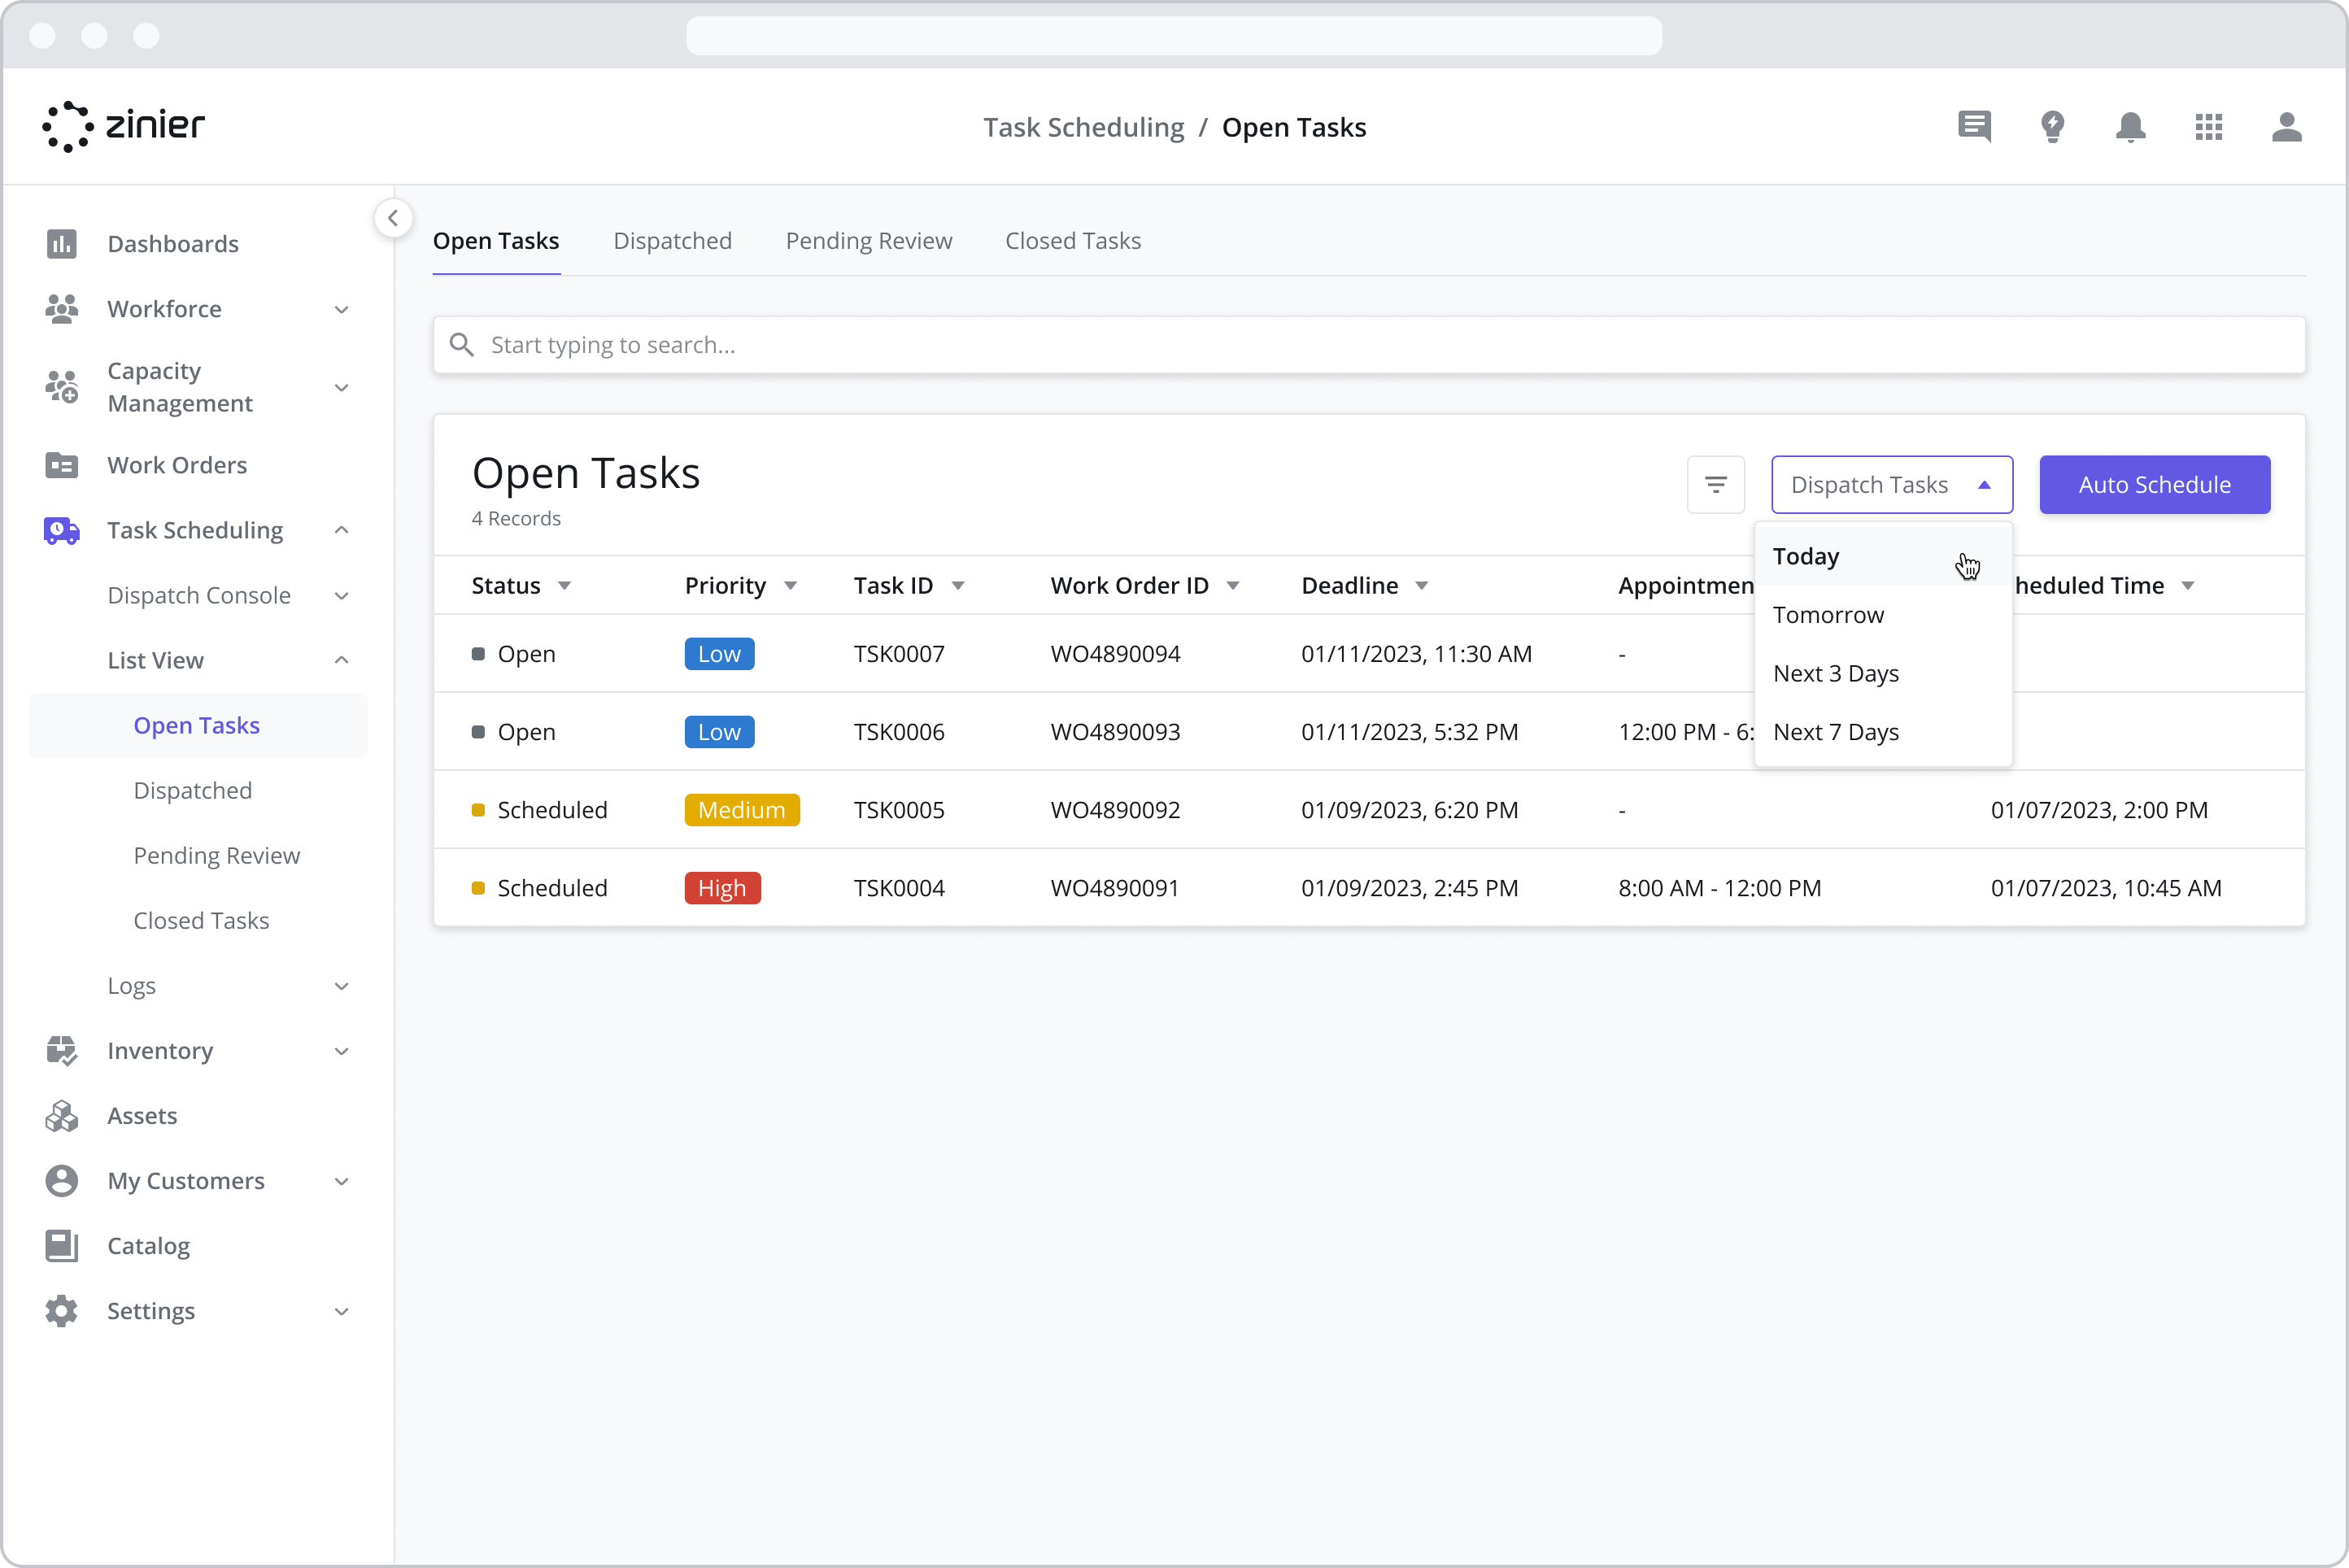
Bulk Dispatching Tasks
Dispatchers may find themselves with several tasks that have been scheduled but not yet dispatched to their assigned technicians – sometimes on purpose in the case where dispatching happens on a set schedule. To make the dispatching process easier, users can bulk dispatch multiple tasks at the same time.
To dispatch tasks in bulk, go to the Task Scheduling > List View > Open Tasks module and click on the “Dispatch Tasks” dropdown menu located at the top of the data grid. Next, select a timeframe (Today / Tomorrow / Next 3 Days / Next 7 Days). Doing so will dispatch all Scheduled tasks with Scheduled Start Times matching the criteria in the selected time frame.
Today - Dispatches all Scheduled tasks with a scheduled start time for the current calendar day based on the time zone of the Dispatcher. Example: It’s currently Feb 22nd, 17:10. All tasks are dispatched which are scheduled between 17:10 and 23:59 on the 22nd.
Tomorrow - Dispatches all Scheduled tasks with a scheduled start time for the next calendar day (between 00:00 and 23:59). Any tasks scheduled for the current day (Today) are not dispatched!
Next 3 days - Dispatches all tasks with a scheduled start time within the next 3 calendar days (including the current day). Today, Tomorrow, Day After Tomorrow.
Next 7 days - Dispatches all tasks with a scheduled start time within the next 7 calendar days (including the current day). Starting from the current date to 23:59 on the 7th day.
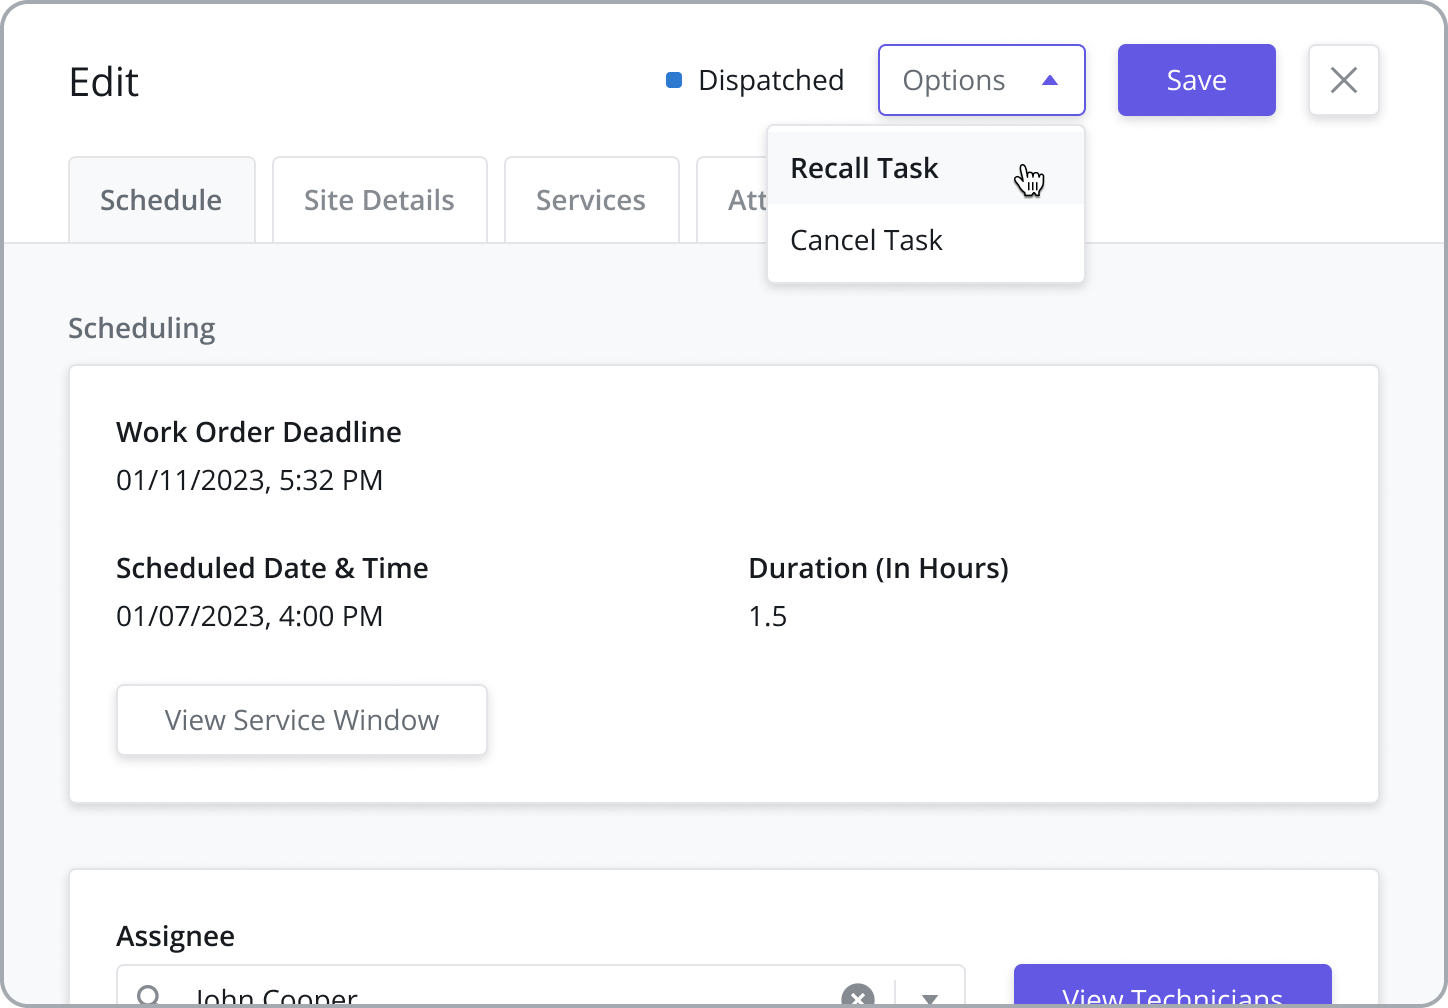
Recall a Dispatched Task
Web users can recall a dispatched task if they need to reassign it to another tech or change the scheduled time, etc. Doing so will notify the assigned technician, remove the task from the tech's task list on the mobile app and move the task to the "Open" module and change the task status to Open.
To recall a dispatched task, do the following:
Go to the Task Scheduling > List View > Dispatched module, hover over the task you wish to schedule, and click on the “Edit” icon to bring up the Scheduling side panel.
From the “Options” dropdown at the top of the side panel, select “Recall Task.”
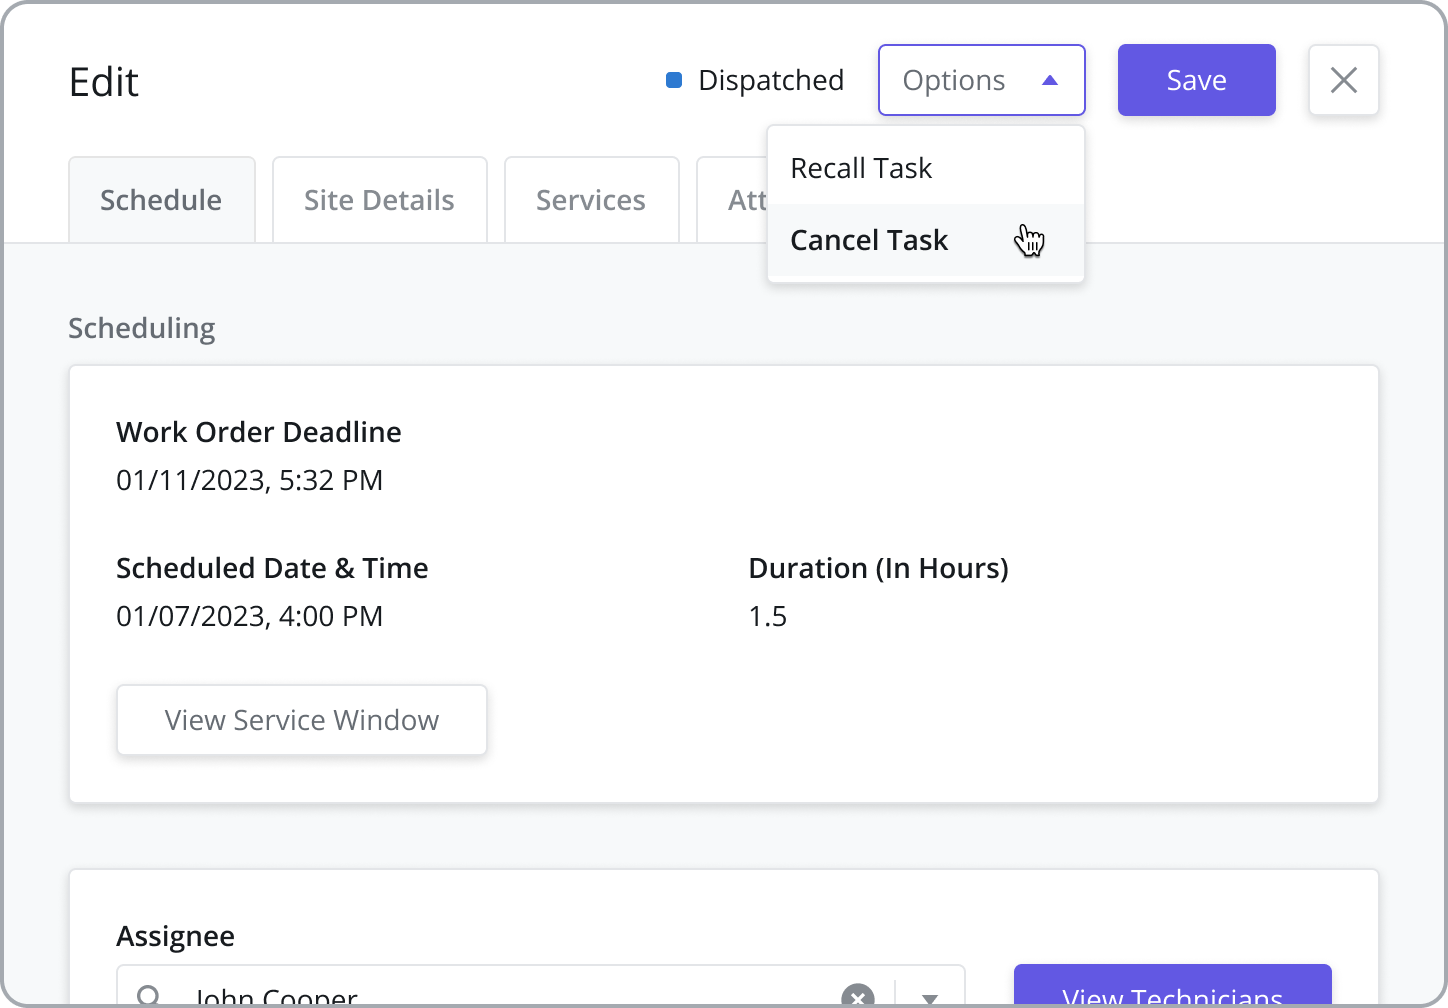
Cancel a Task
Web users can cancel a task that is no longer needed. Doing so will notify the assigned technician, remove the task from the tech's task list and move the task to the "Closed" module and change the task status to Cancelled.
To cancel an open or dispatched task, do the following:
Go to the Task Scheduling > List View > Open Tasks OR Dispatched module, hover over the task you wish to schedule, and click on the “Edit” icon to bring up the Scheduling side panel.
From the “Options” dropdown at the top of the side panel, select “Cancel Task.”
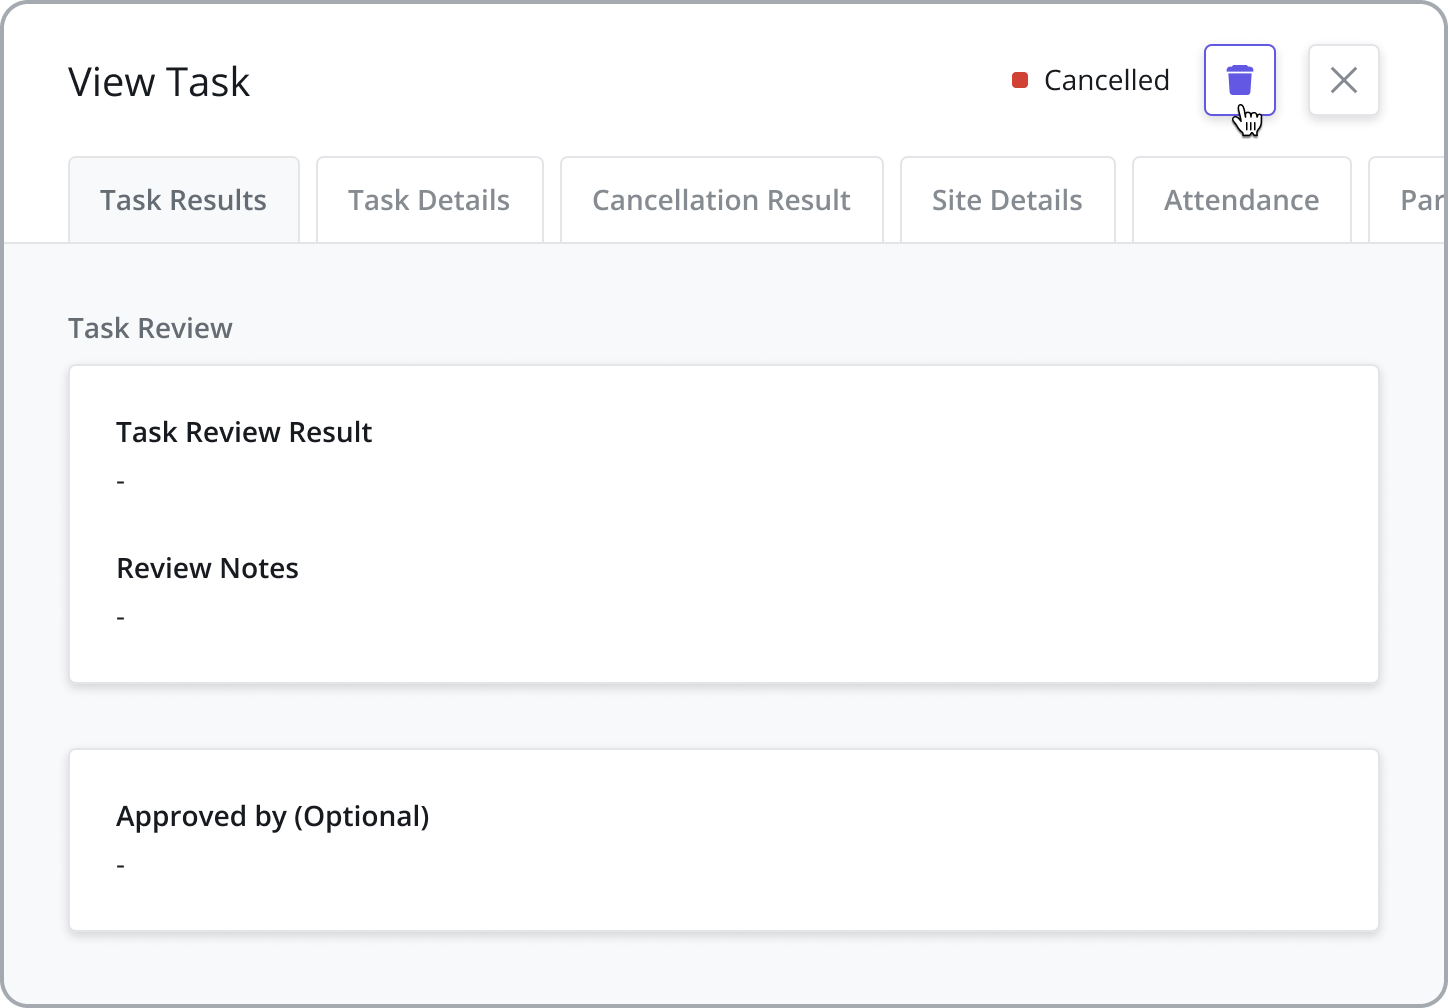
Delete a Task
If a task is no longer valid, web users can delete it. Delete functionality is only available for Cancelled or Completed Tasks. Doing so will remove the task from all Task modules.
View Site Details
The Site Details tab displays information about the Customer Site where the task will be performed, including the region, contact person, and location (map and address).
View Services
The Services tab shows the Services assigned to the task during the Work Order creation.
View Task Logs
The Logs tab displays a list of time-stamped events associated with the task, such as the task creation date, assignment date, dispatch date, etc. Task Logs are particularly useful for audit purposes.
View Attendance History and Address Updates
The Attendance tab displays the current assignee and a log of when the assignee performed Check-in or Check-out activities.
Address Updates
If the technician updated the address of the site upon check-in, this action and the updated address will be displayed in the Attendance History table.
Attendance with Crews
Tasks assigned to Crews will display the full list of crew members and their respective check-in and check-out times.
The Attendance tab is not visible in the sidepanel when viewing and editing Open and Scheduled tasks.
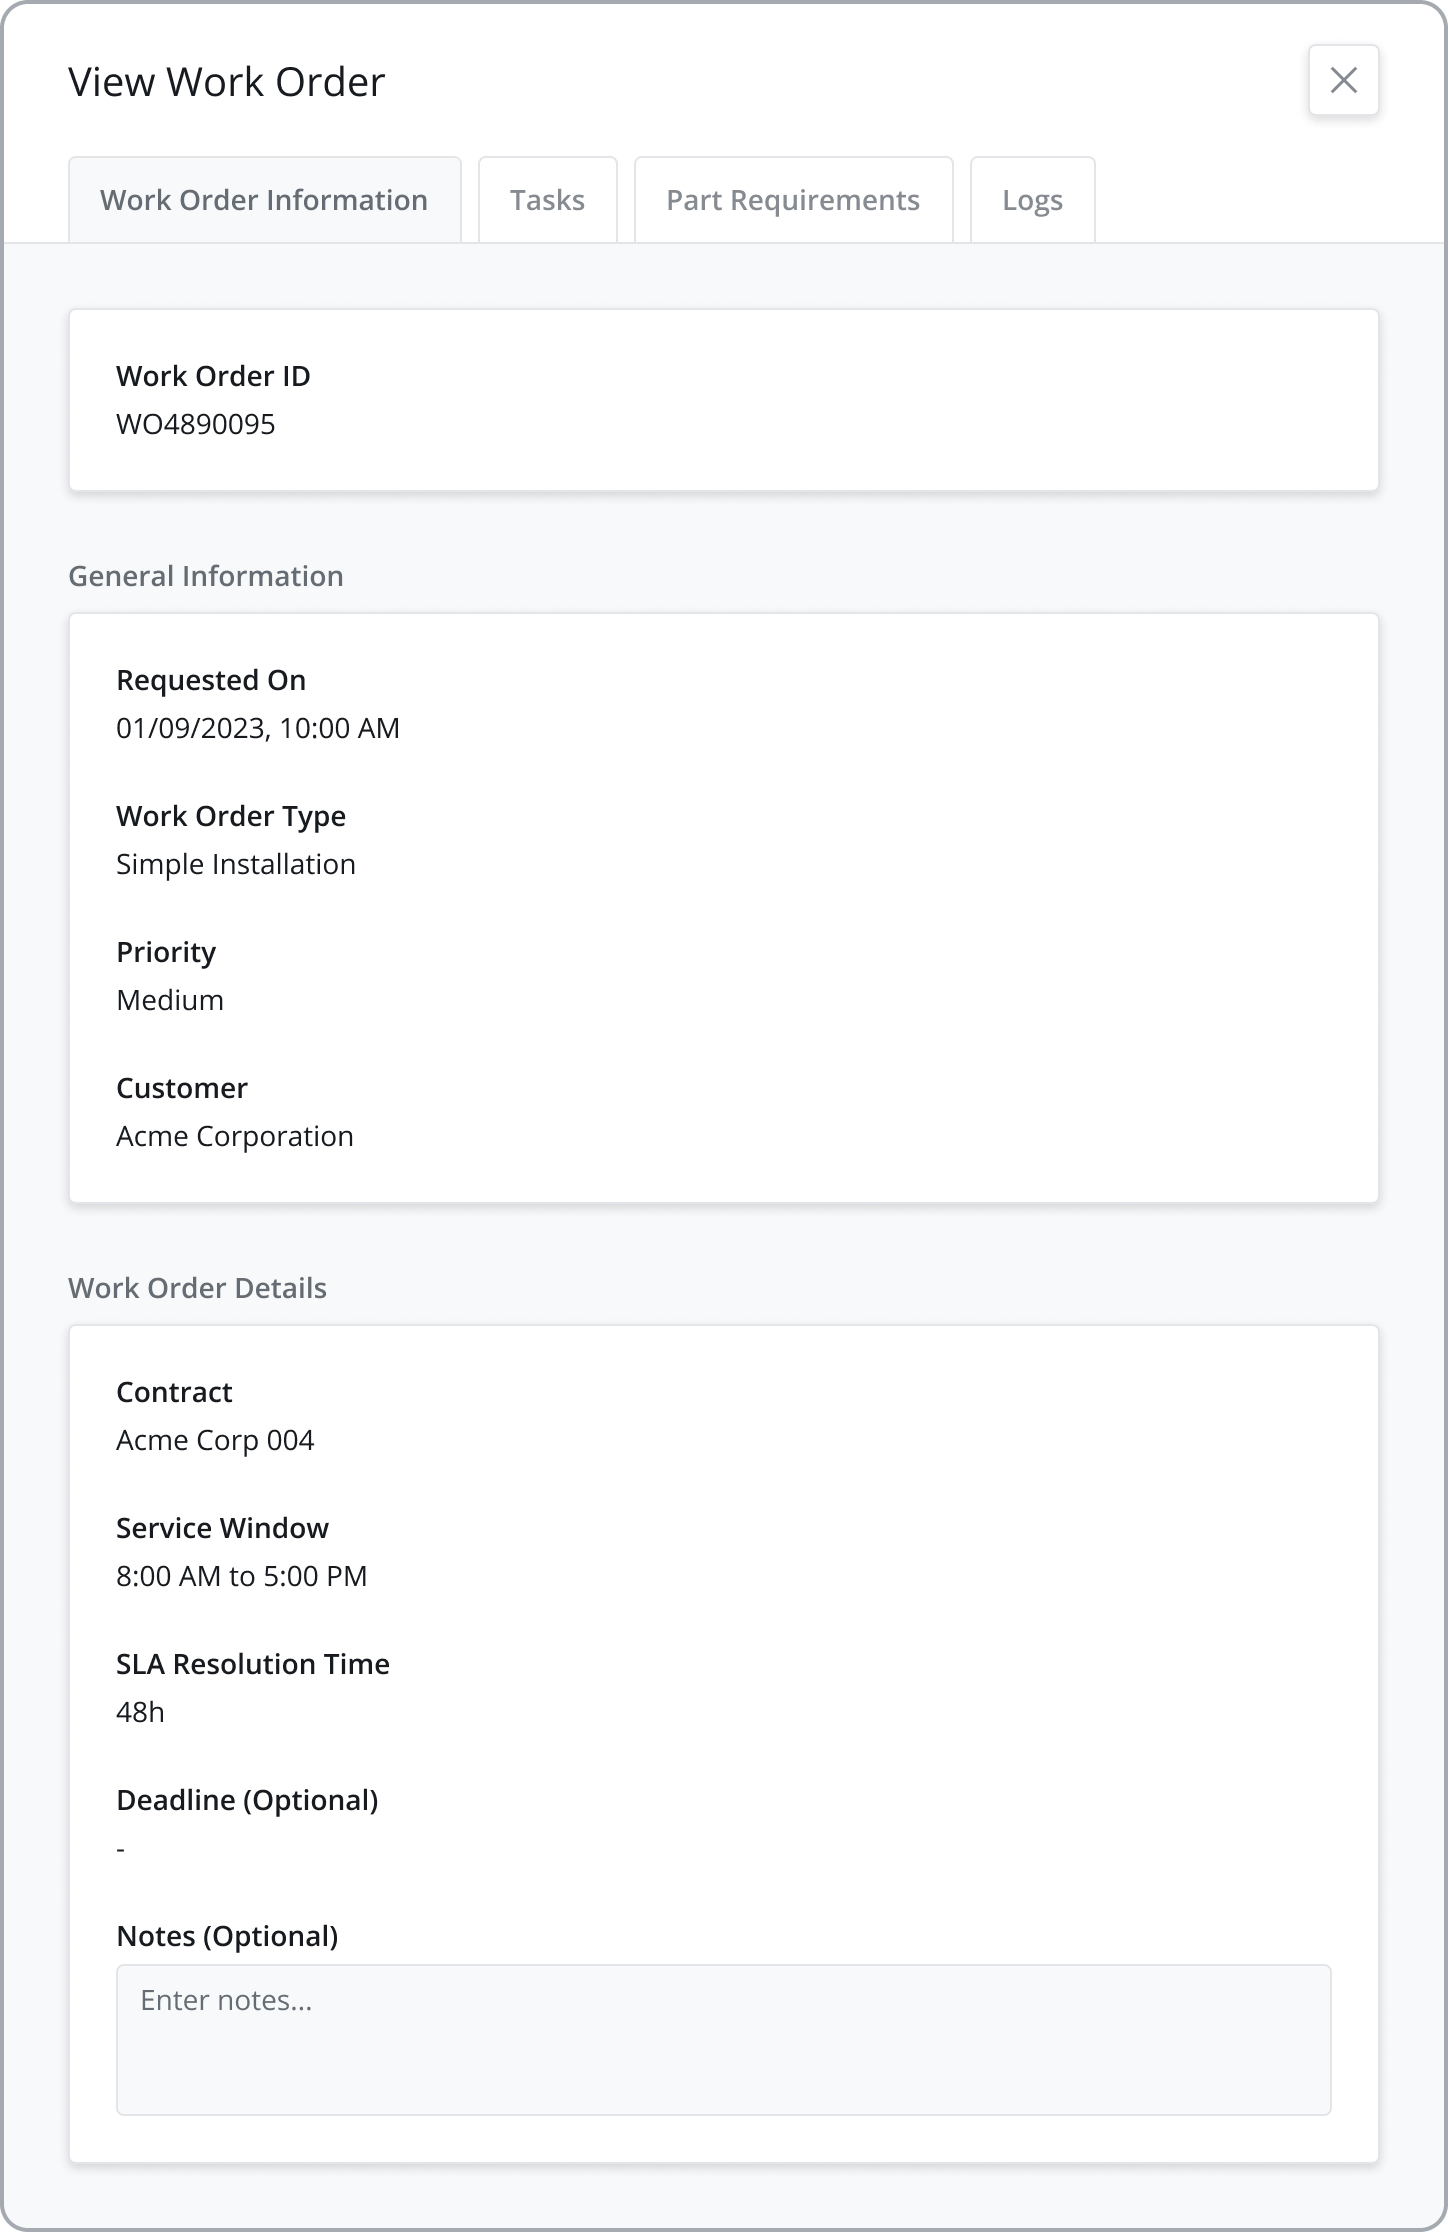
View Work Order Details
To view the Work Order details associated with any task, hover your mouse over the task from the data grid and click the View Work Order icon that appears on hover.
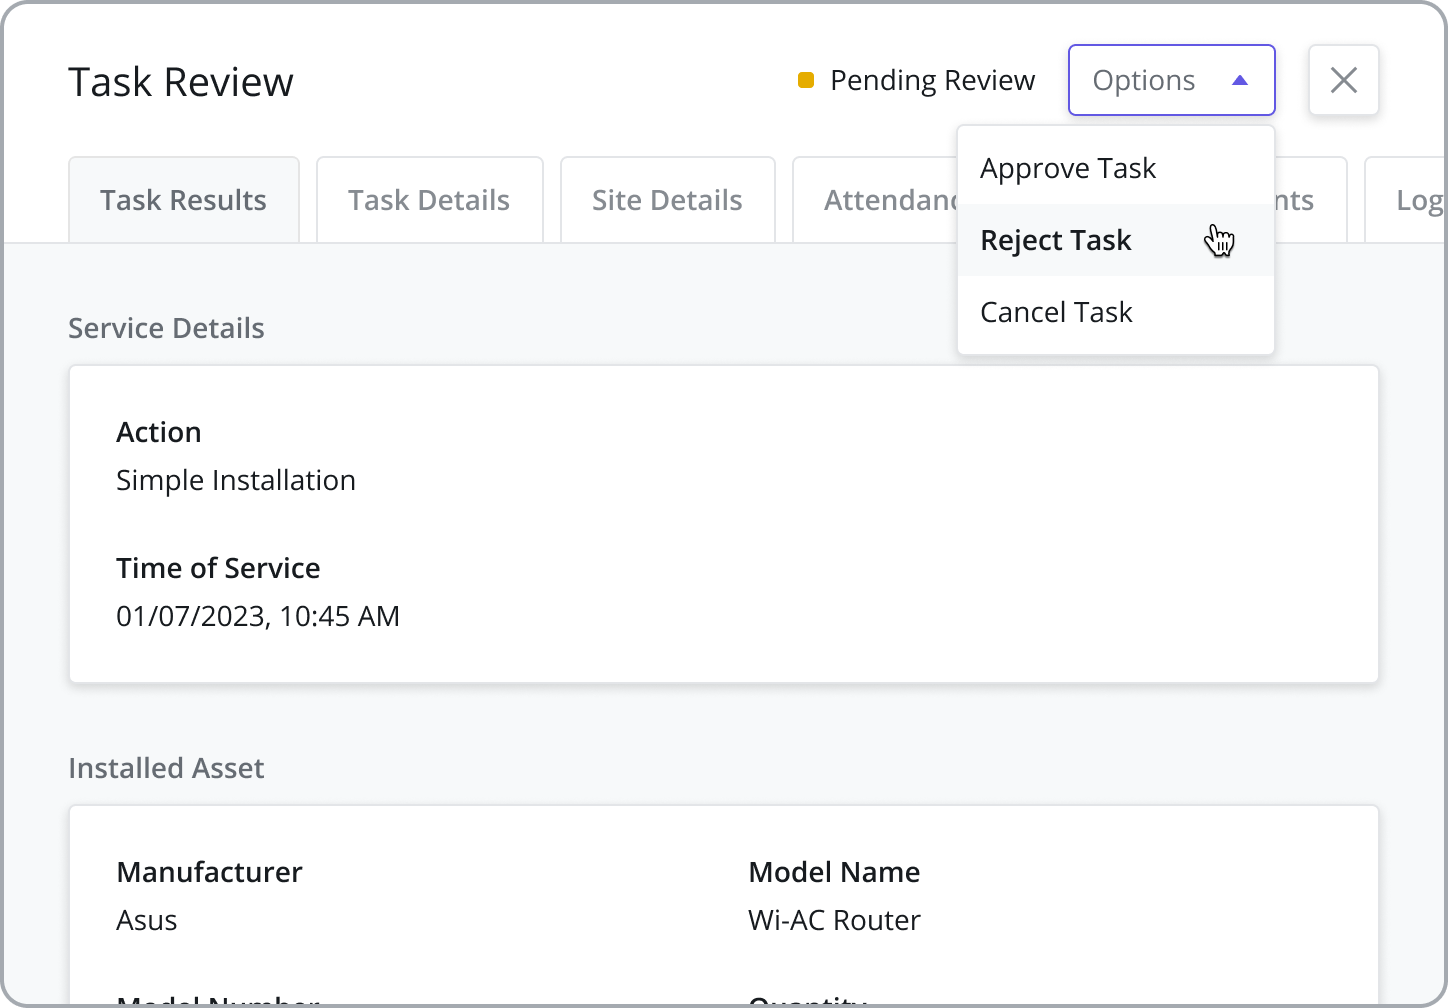
Approving or Rejecting Completed Tasks
From the Pending Review module, reviewers can see tasks that have been completed in the field and submitted for review. The Review side panel shows all of the data captured in the field as part of the task workflow (photo evidence, data captured in input fields, notes, customer signature, etc.). From here the reviewer has the option to Approve or Reject a task.
Approving Tasks
If a task is marked as "Approved" it will move to the Completed module with the status = "Completed"
Site Change Requests
If a technician arrives on site and finds the address of the customer site to be inaccurate, they may submit a Site Change Request to alert web users who can approve to auto-update the address of the customer site or reject to dismiss the request.
Corrective Maintenance Requests
If a technician has a task underway in the field but identifies additional corrective maintenance to be done, they can submit a Corrective Maintenance Request to web users in the back office. If approved, an additional Corrective Maintenance task is added to the Work Order that can be assigned to the same technician or another.
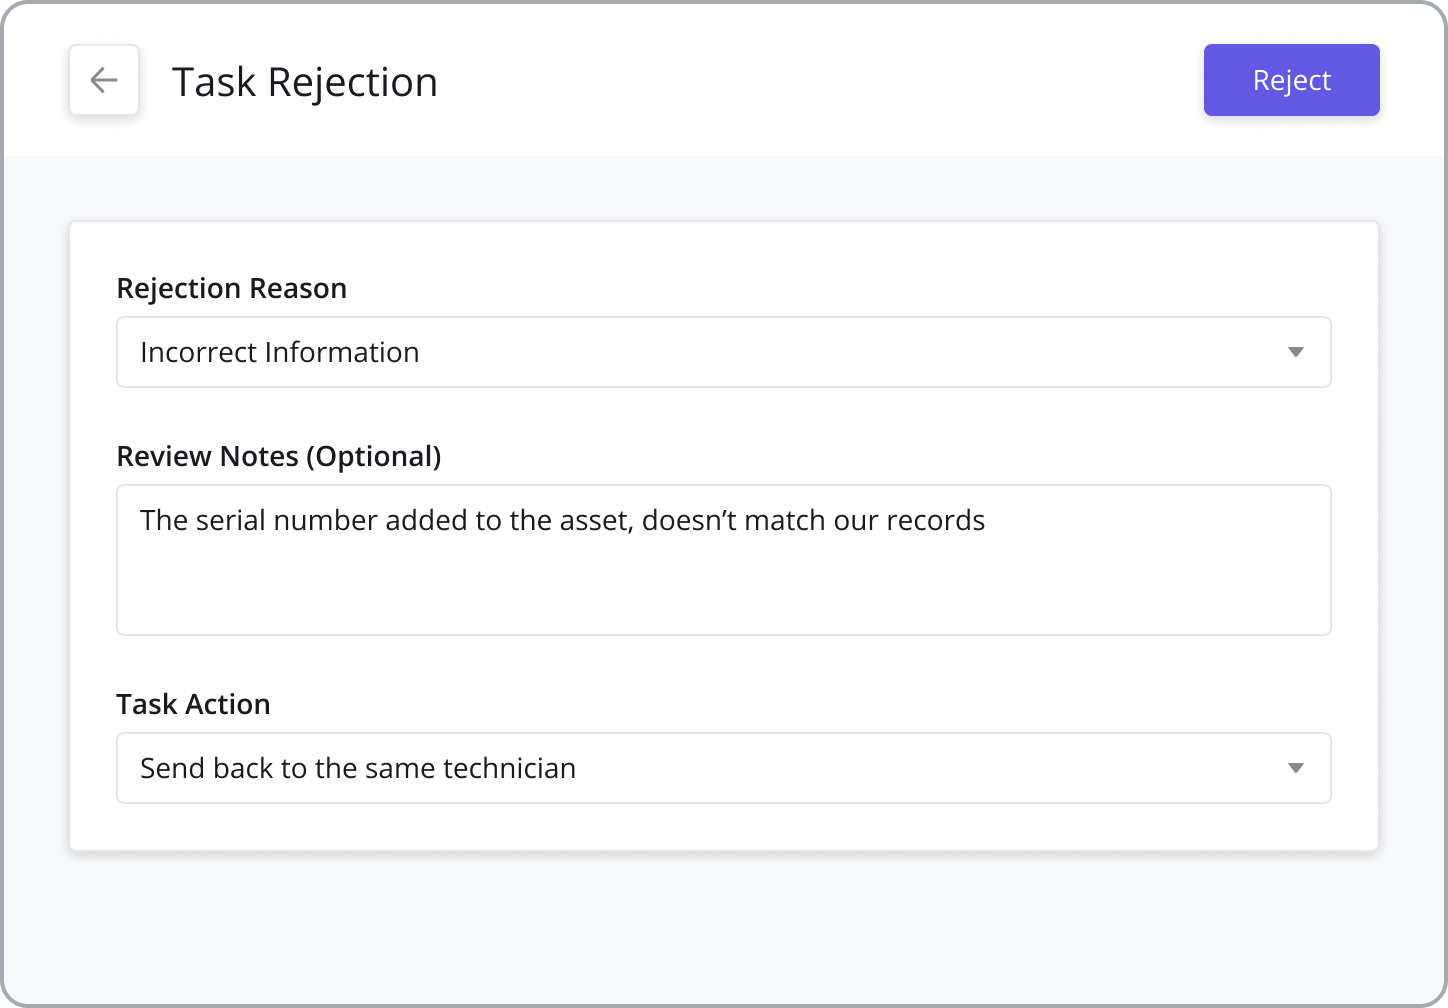
Rejecting Tasks and Sending Back to the Same Tech
Reviewers have the option to reject a task and send it back to the same technician with notes to correct any issues preventing the task from being approved, such as insufficient photo evidence or notes
Rejecting Tasks and Re-opening for Assignment
Reviewers also have the option to reject a task and re-open it for scheduling and re-assignment. Selecting this option changes the task status to "Reopened" and moves it to the Open module where it will need to be reassigned to another technician at a later date to correct issues preventing the task from being approved and completed.
Providing Rejection Reasons and Notes
When rejecting a task, reviewers can select from a pre-defined list of rejection reasons as well as optionally provide additional notes.
Selecting the list of Rejection Reasons is done for each Task Type from Settings > Work Order Settings > Task Types module. The lists themselves can be created and edited from the Settings > General Settings > List Options module.