Parts & Material Inventory
The Inventory module tracks Parts and Materials used in Work Orders and the Stock Location and quantities of inventory at each location.

Viewing Inventory at a Stock Location
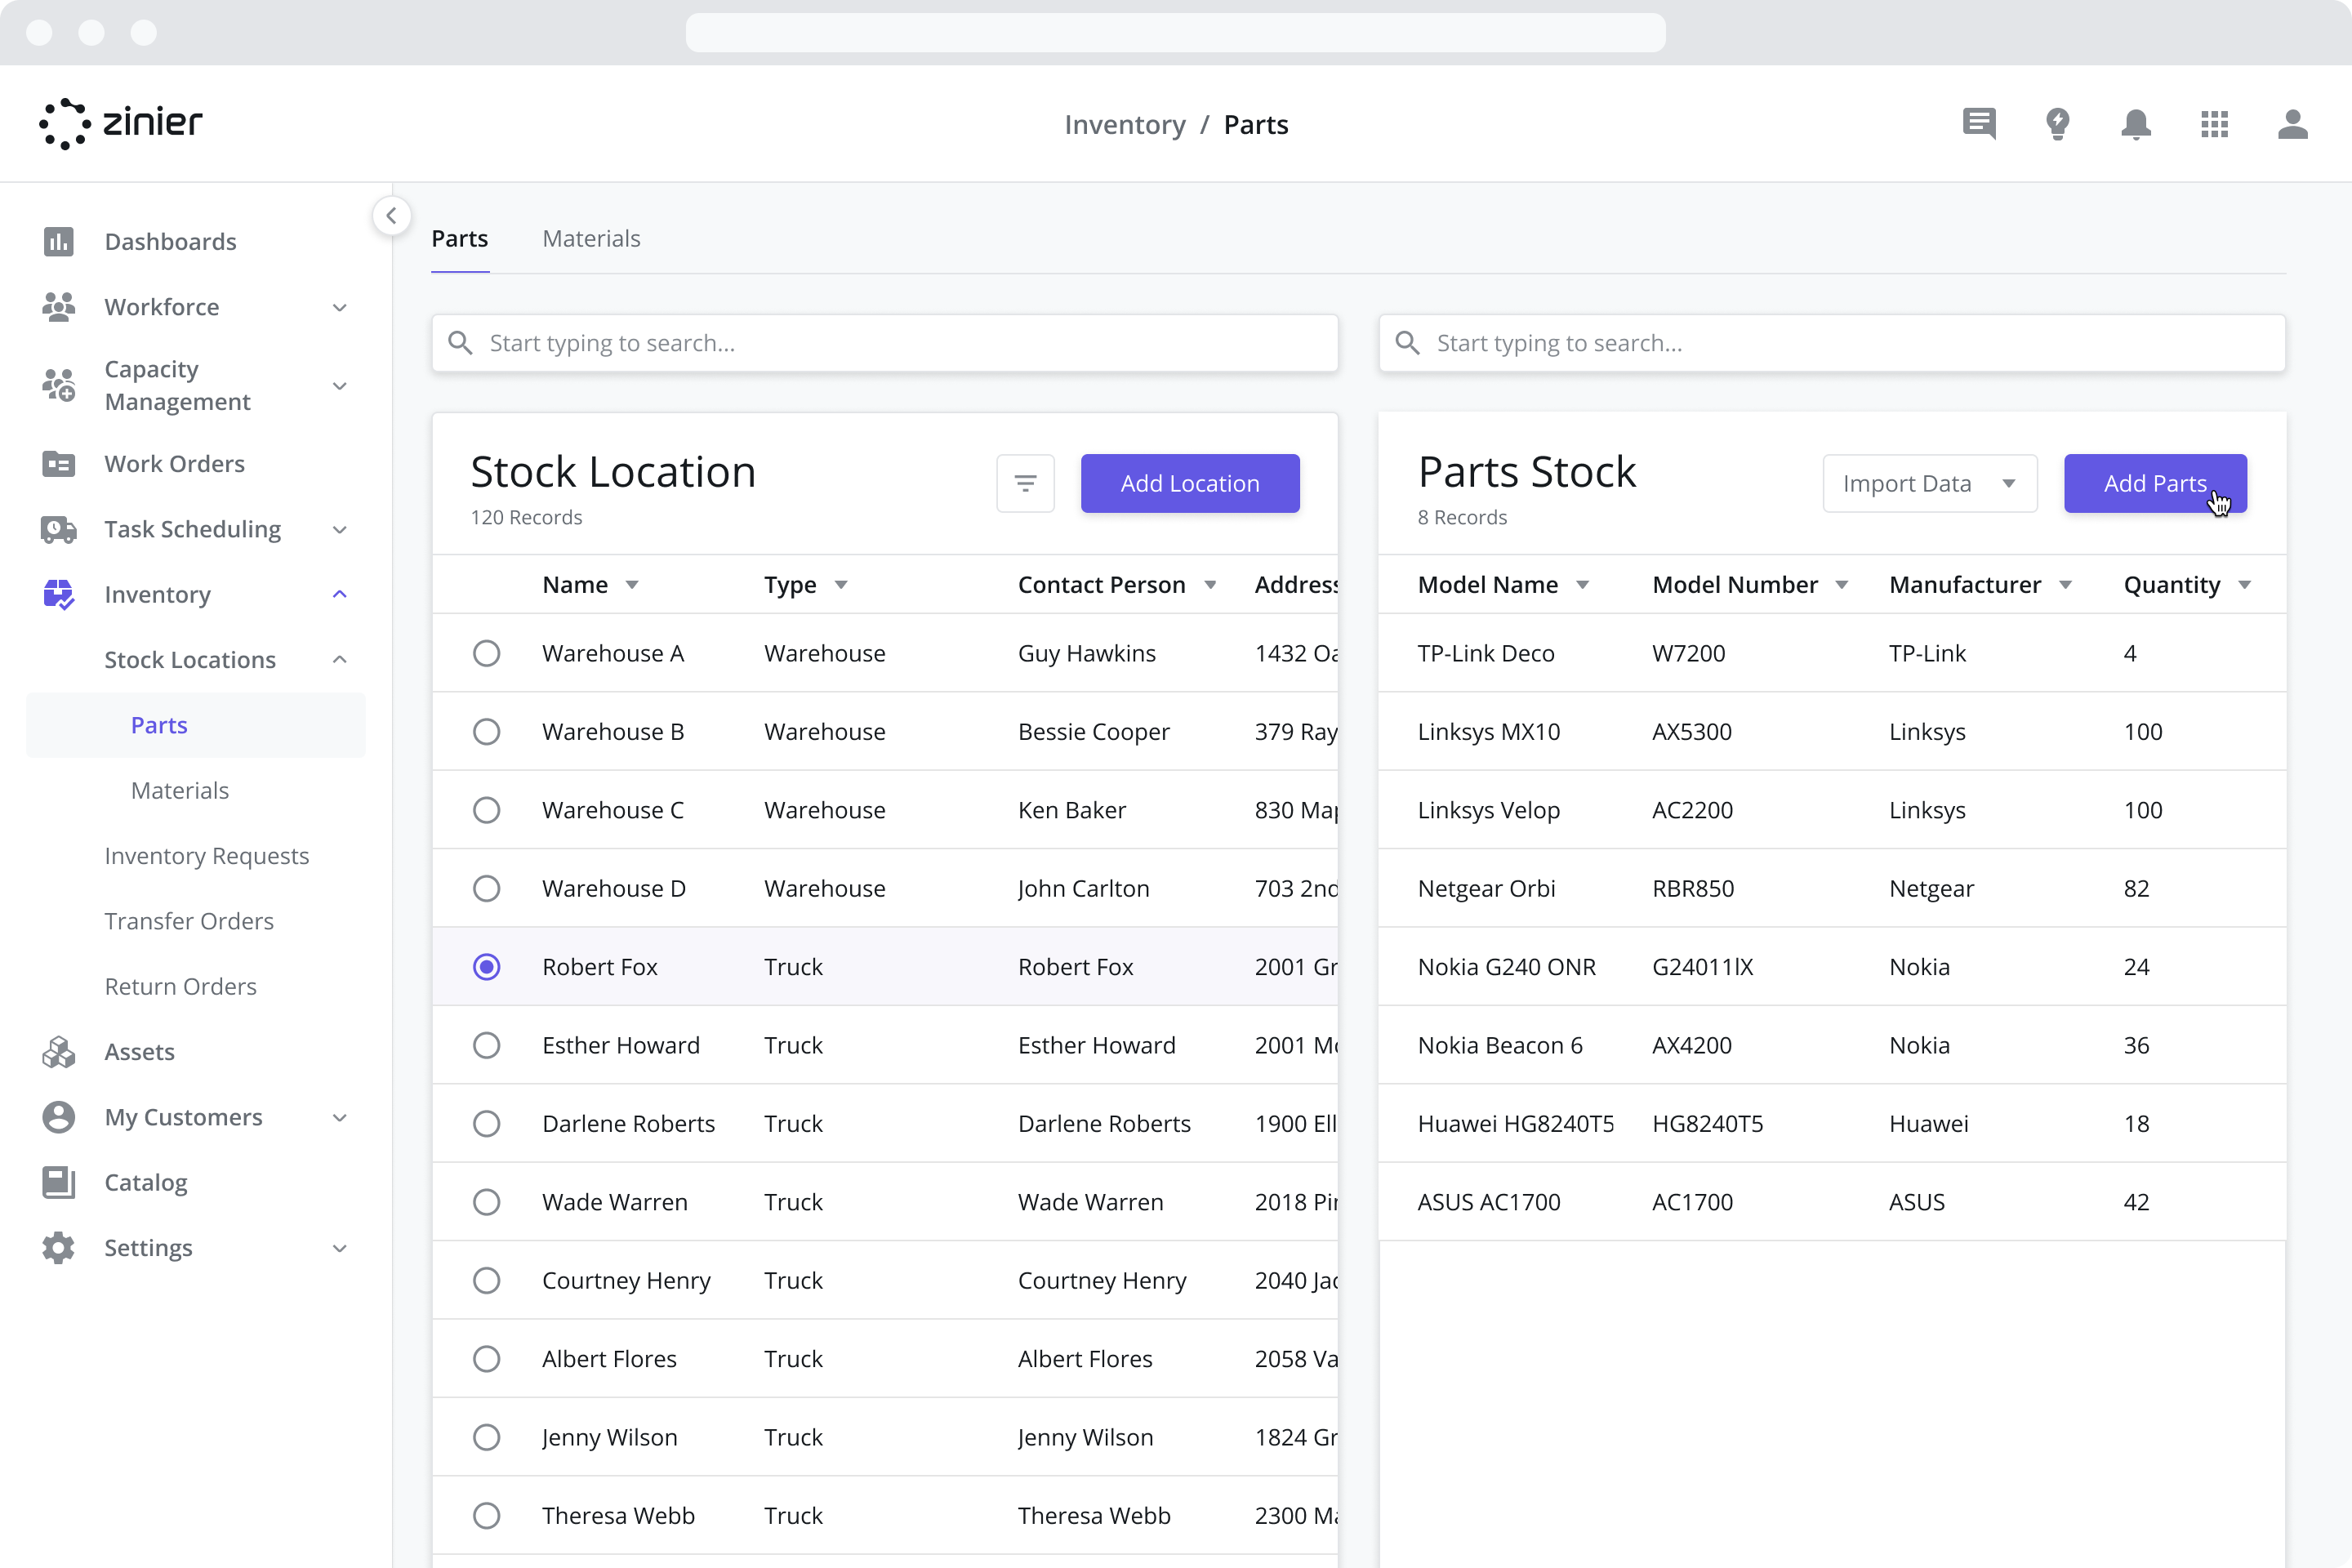
To view the Parts or Materials inventory at a location, go to the Inventory > Stock Locations > Parts OR Materials module and select the stock location from the left datagrid. The right datagrid will then be populated with the inventory at that location.
Viewing Inventory by Serial Number
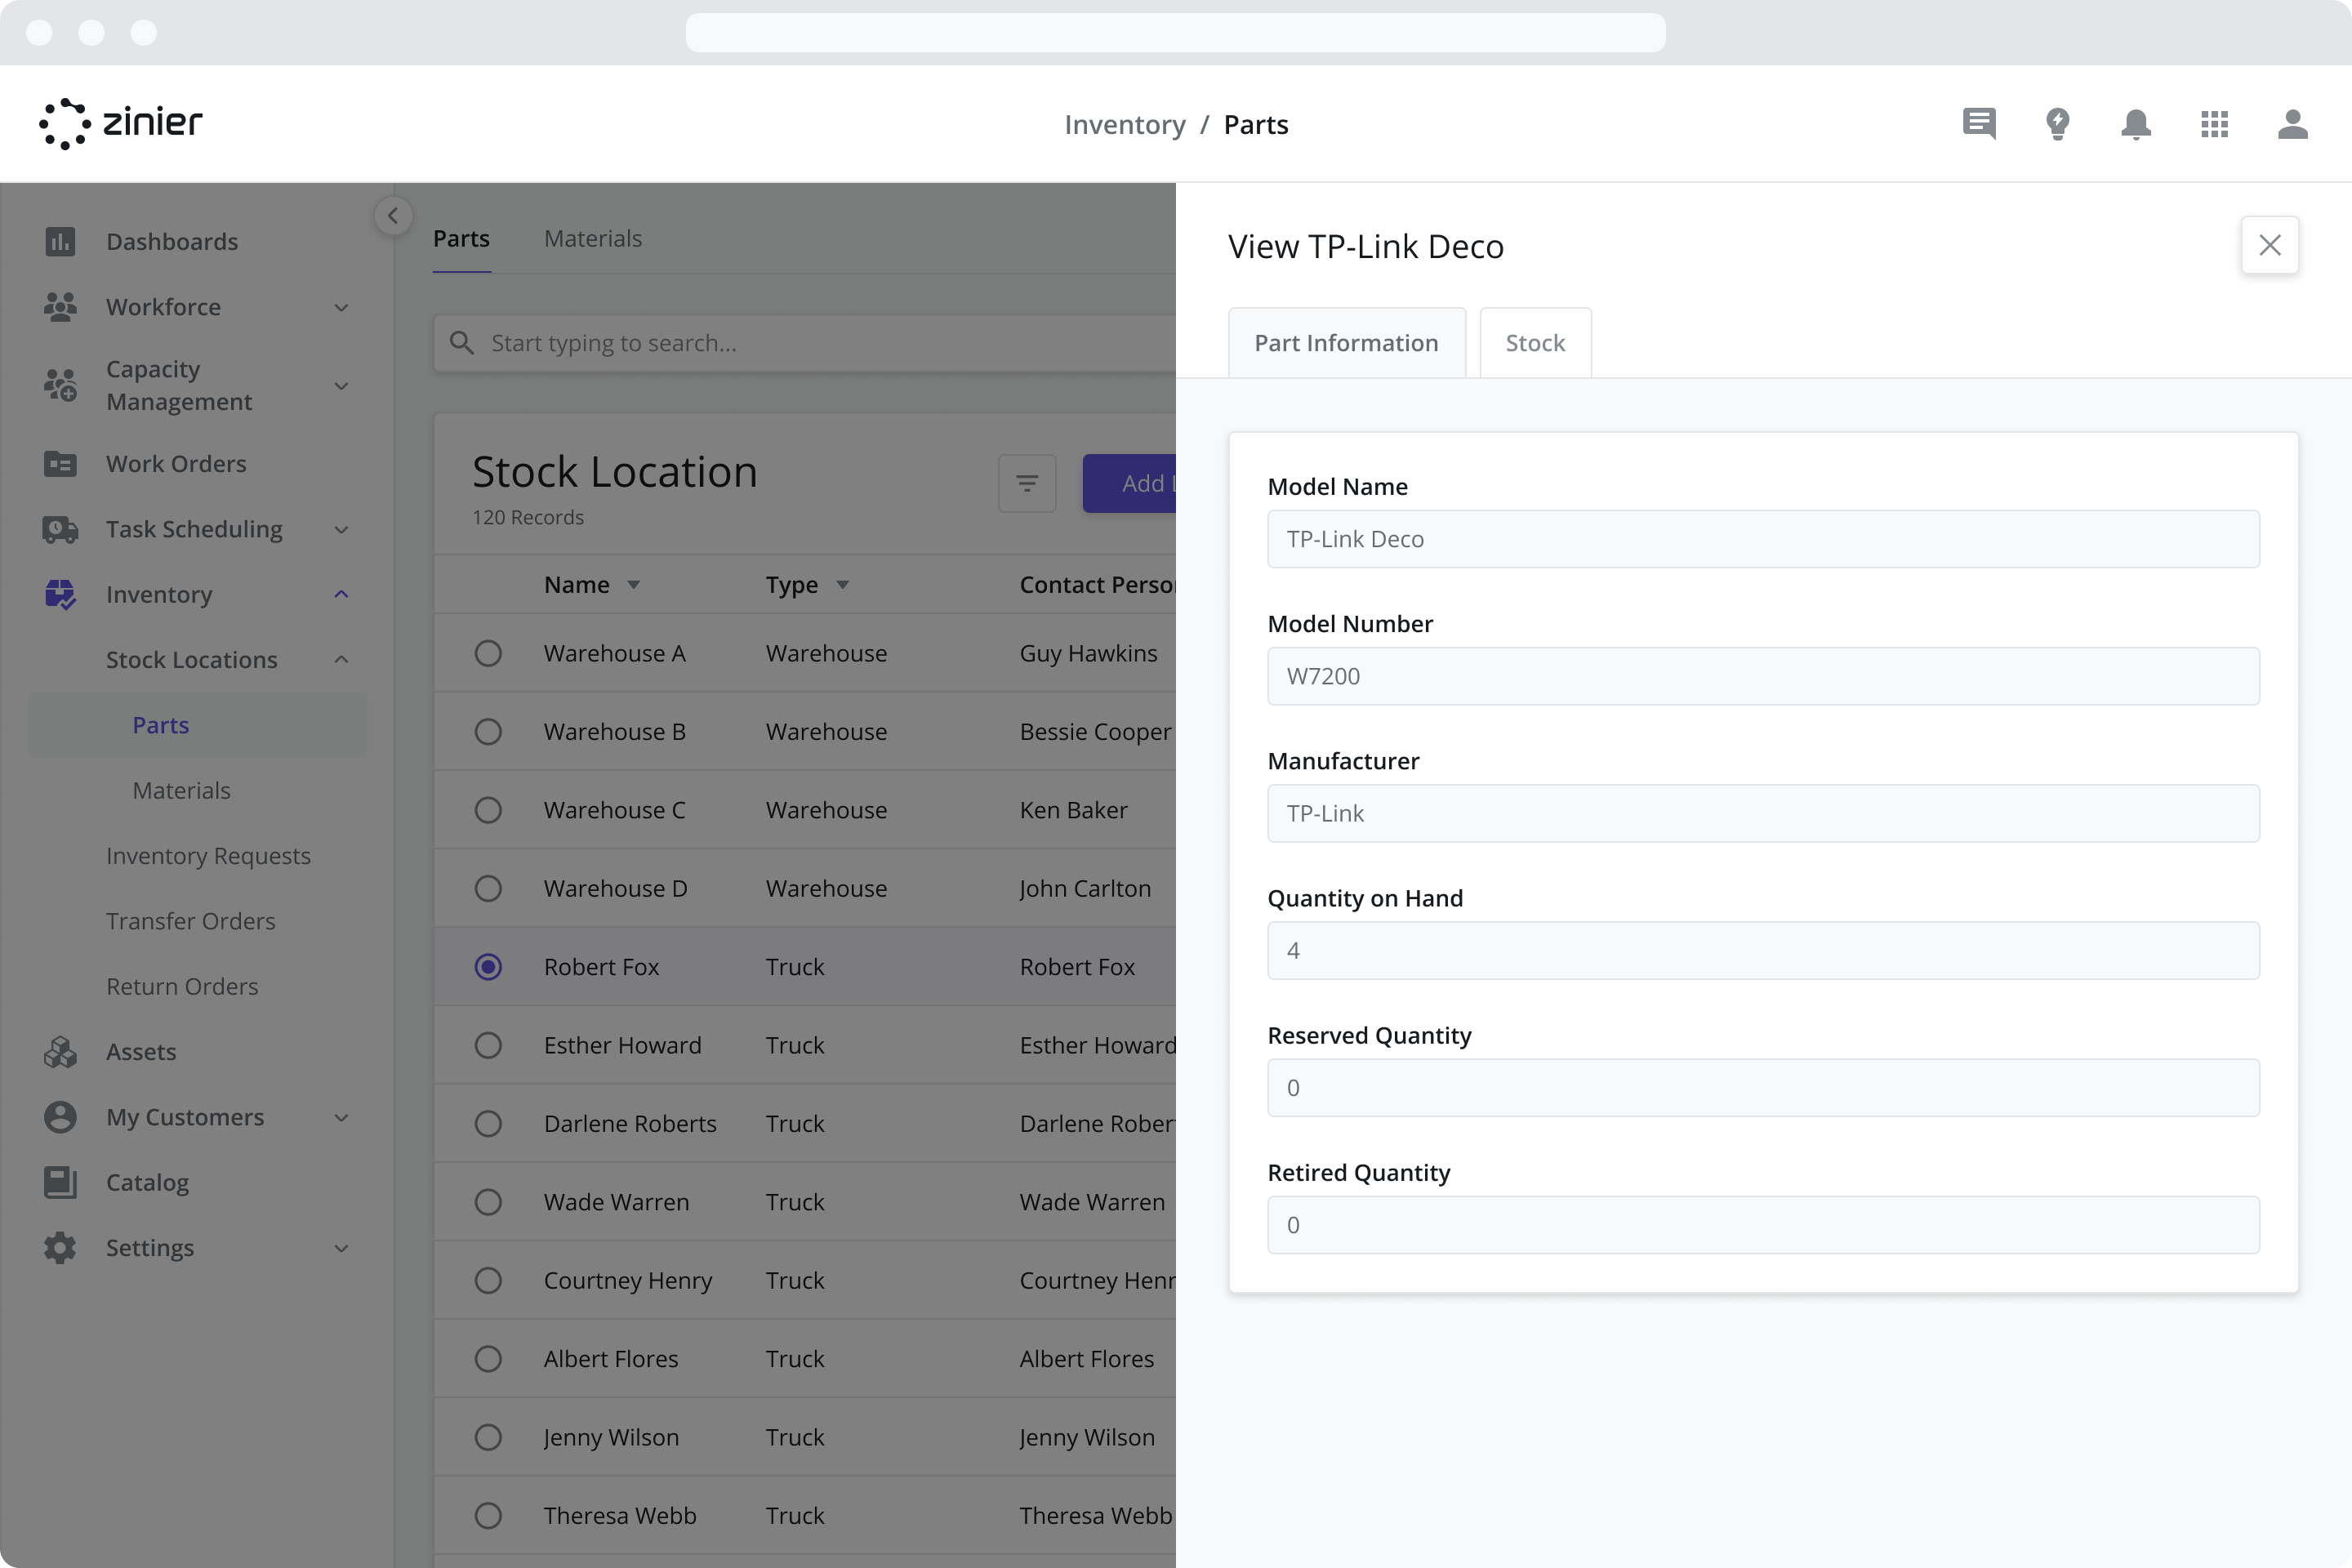
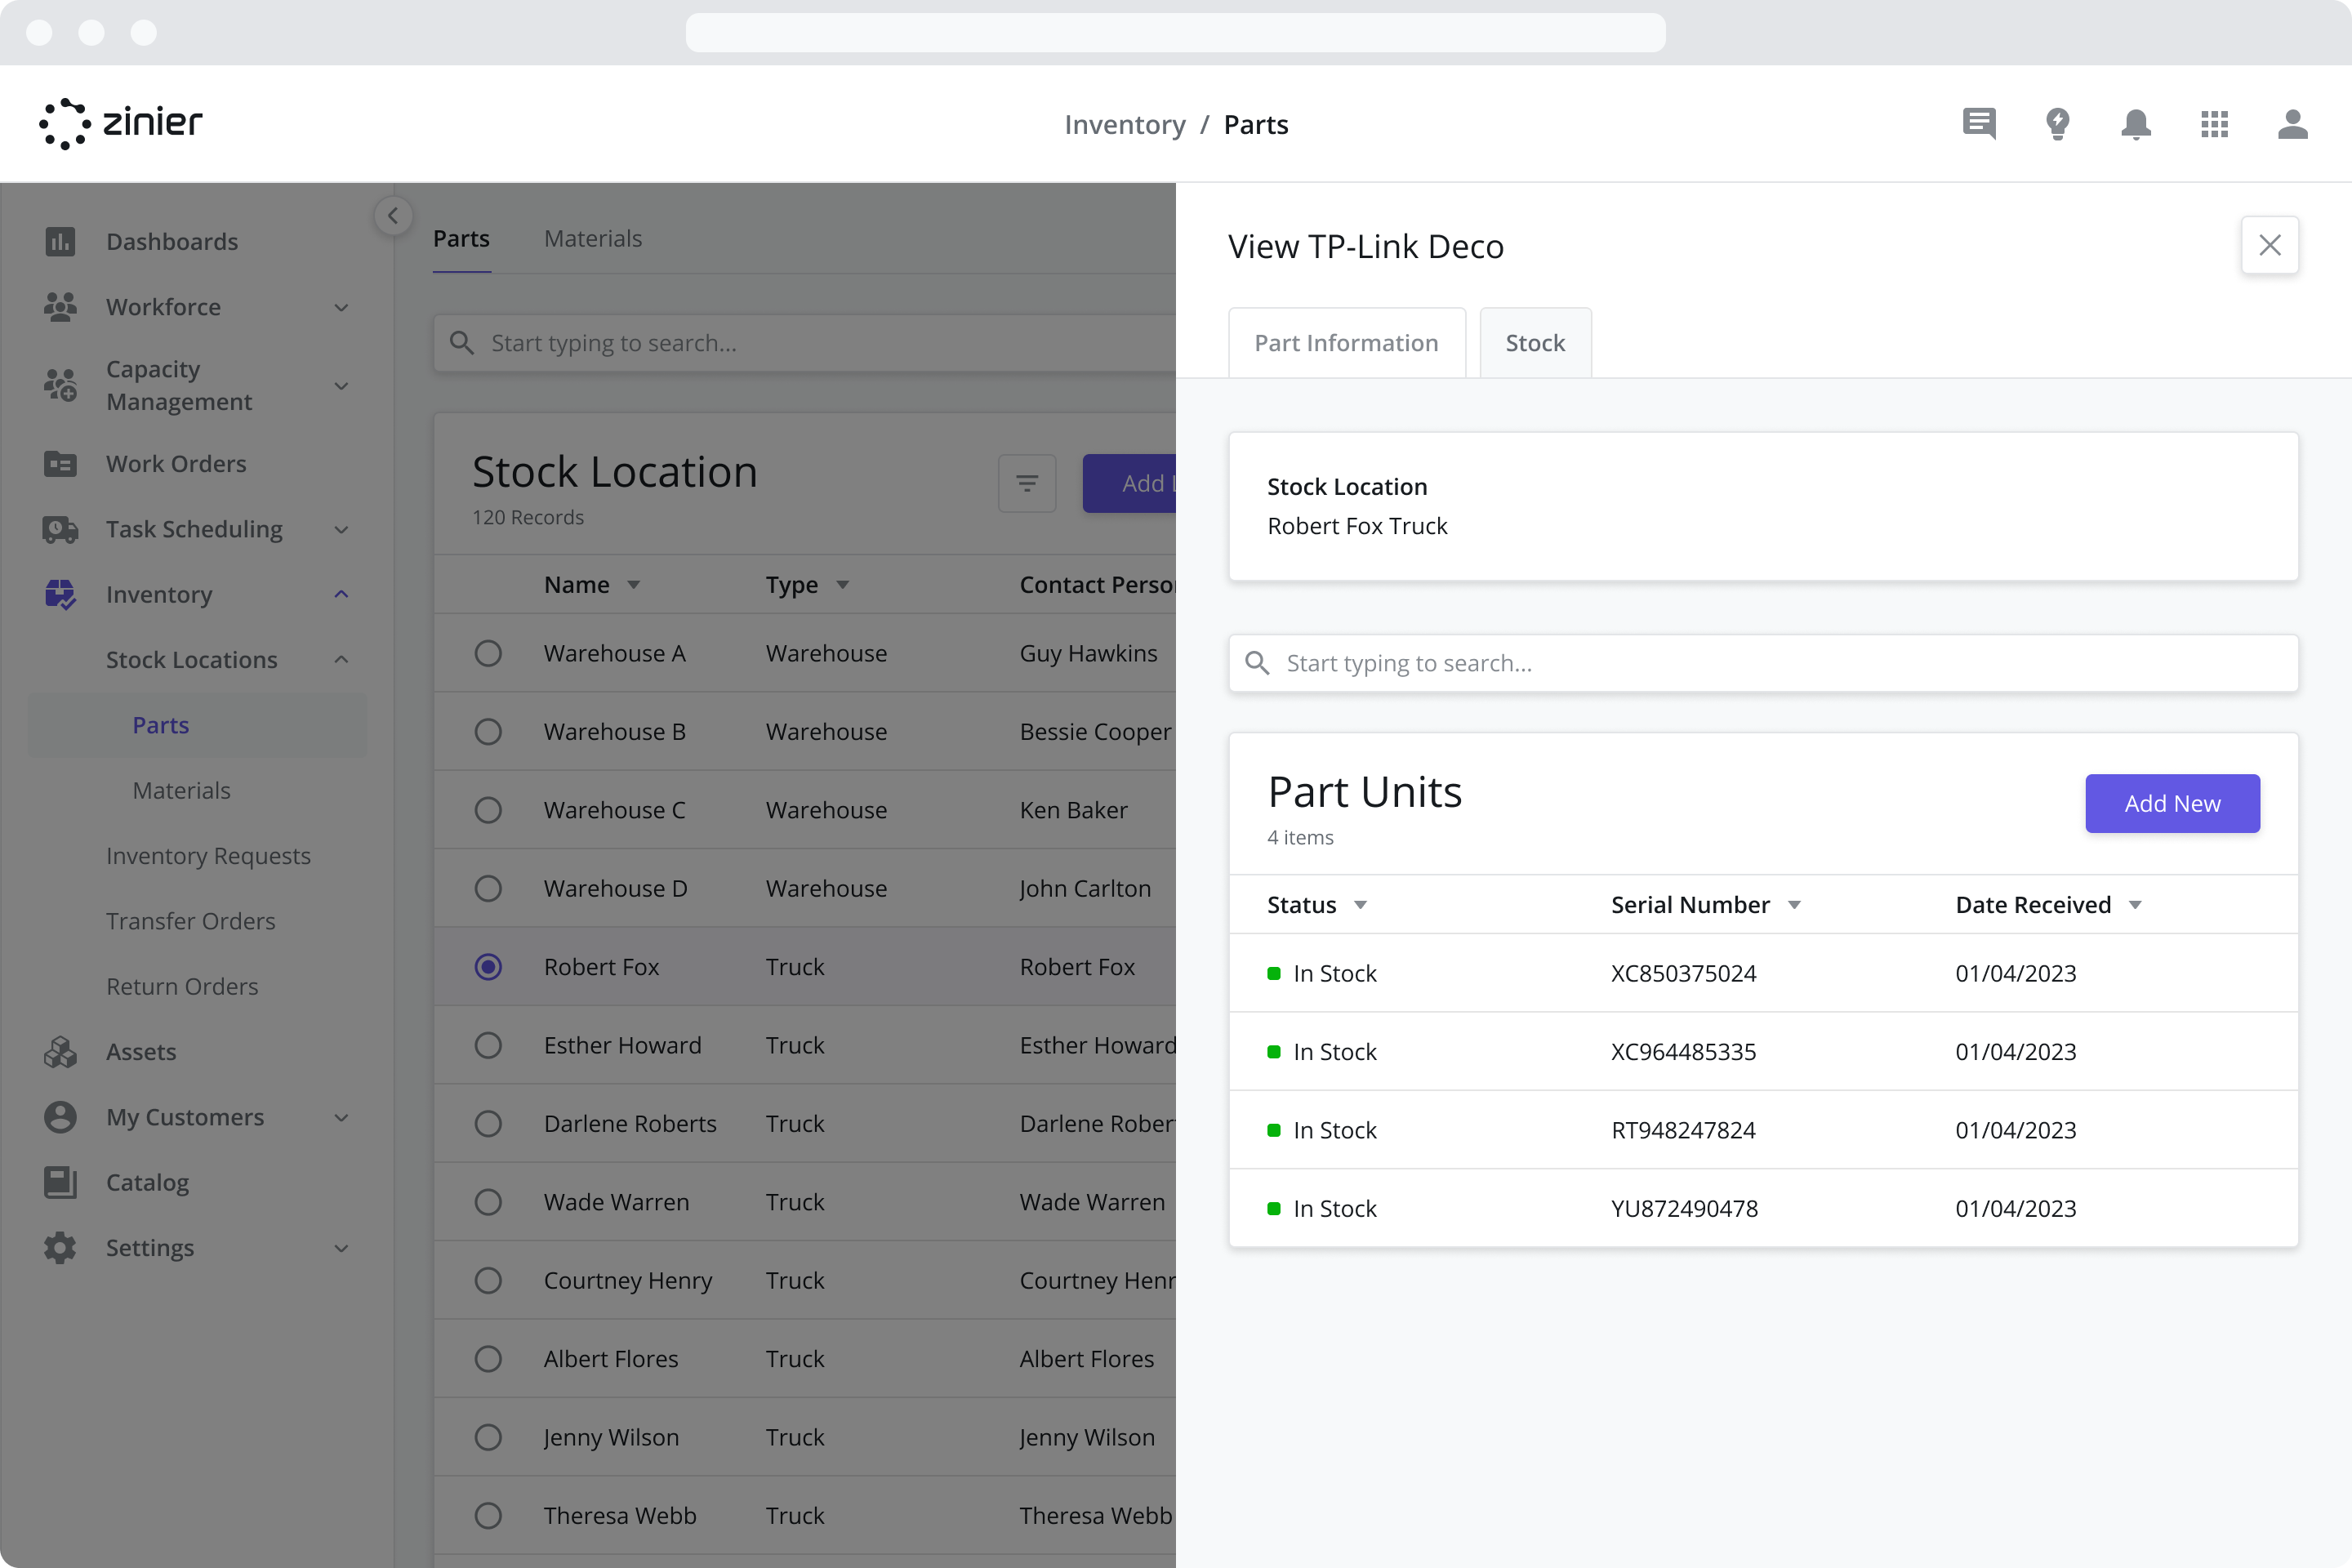
If you are tracking inventory at the unit level, you can view the individual serial numbers at a location. To do so, hover over the inventory item from the Parts Stock datagrid and click on the “Open” icon to open the sidepanel. Next, click on the “Stock” tab to view a list of inventory items.
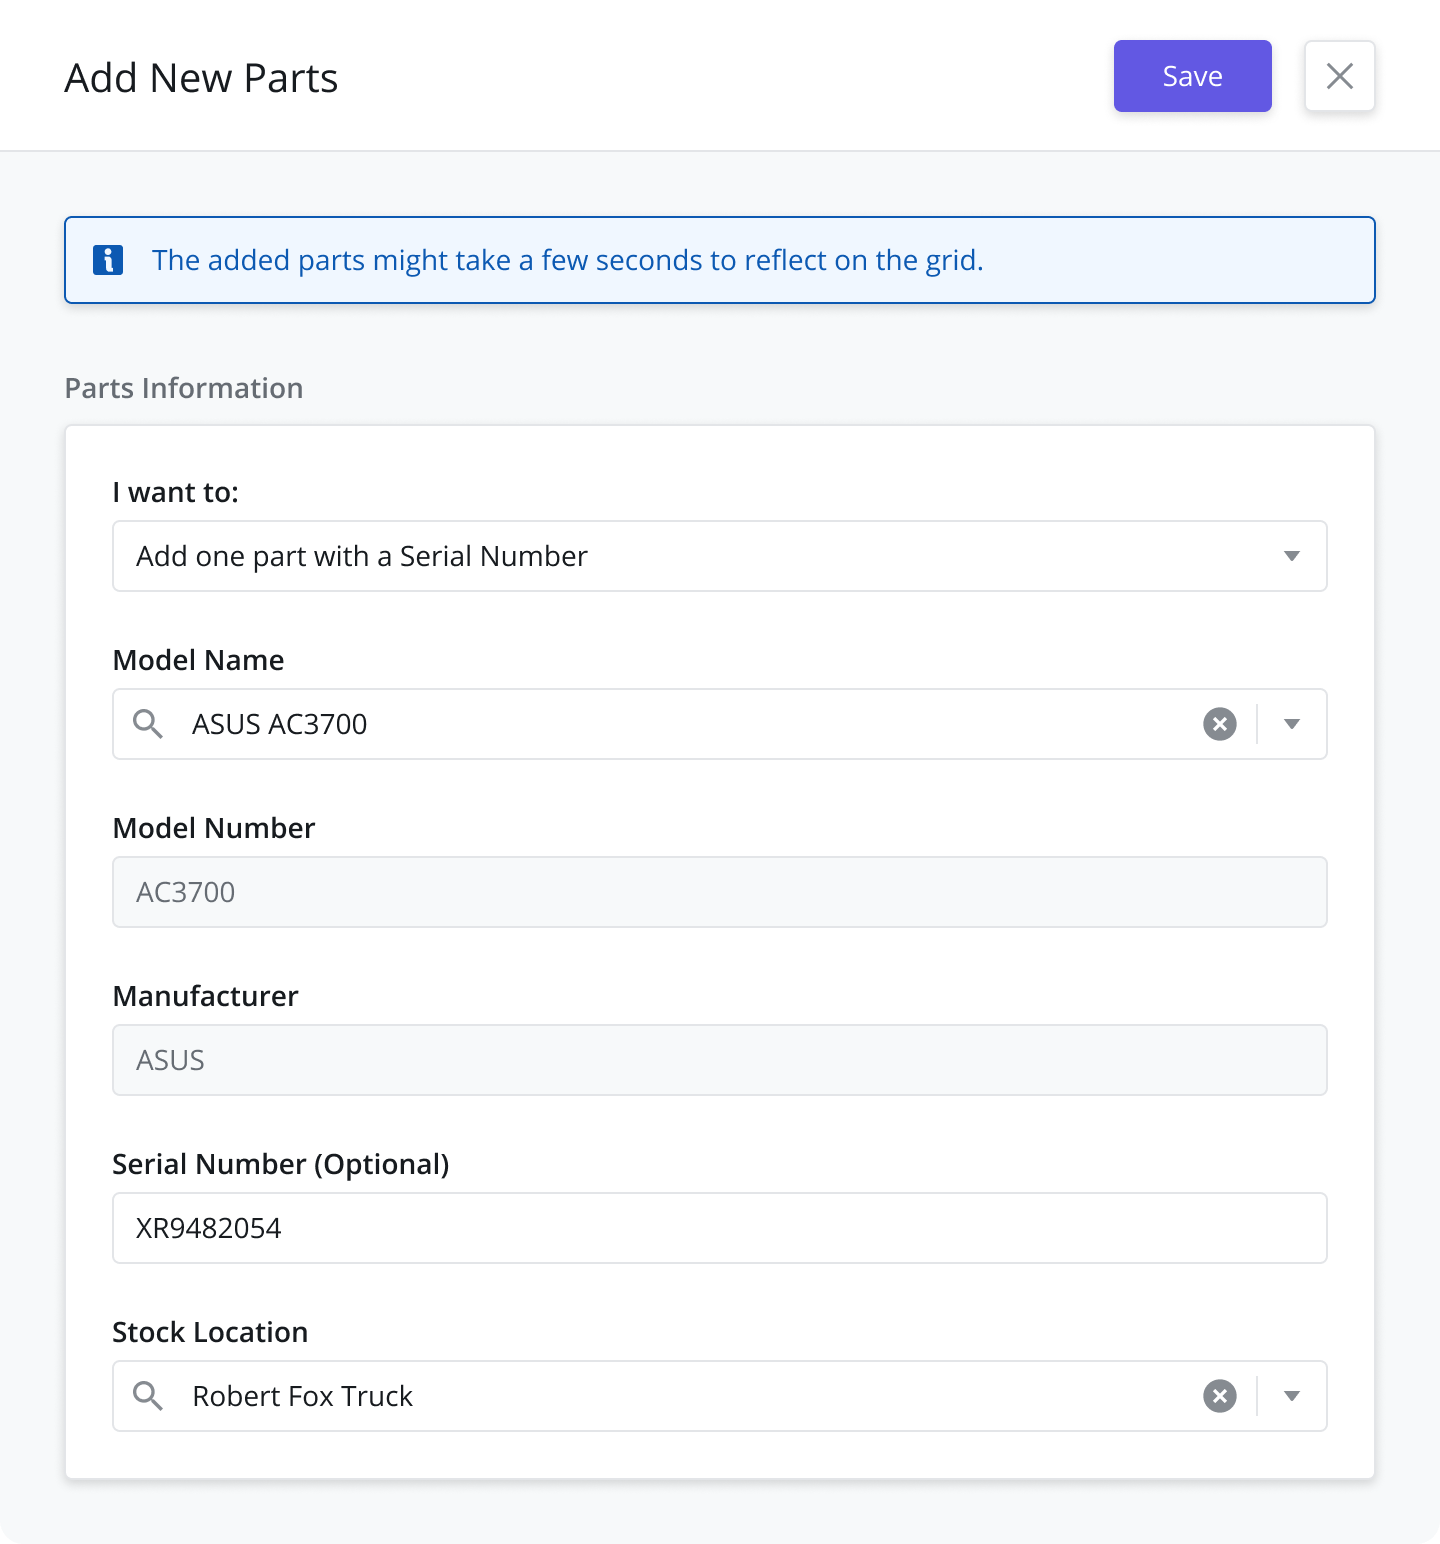
Add Parts at the Unit Level (with Serial Numbers)
Users can add Parts at the unit level when they want to track the location of individual parts.
To add parts at the Unit level, go to the Inventory > Stock Locations module and click on the “Add Parts” button in the “Parts Stock“data grid.
Fill in the details in the side panel as follows:
I want to - Select the operation that you want to perform. In this case, select “Add one part with a Serial Number“
Model Name - Select the part that you want to add.
Model Number - This is auto-populated based on the part that you select.
Manufacturer - This is auto-populated based on the part that you select.
Serial Number - Add the Serial Number of the part that you want to add.
Stock Location - Select the Stock Location where you want to add the part. In case you selected a Stock Location in the datagrid on the Main Page, it will be populated for you.
To add a Part to a Stock Location, it must first be created from the Catalog > Parts and Assets module. For more information, see the Parts and Assets page.
Add Multiple Parts (without Serial Numbers)
Users can add Parts in bulk when it is not necessary to track the individual units.
To add multiple parts, go to the Inventory > Stock Locations module and click on the “Add Parts” button in the “Parts Stock“data grid. Fill in the details in the side panel as follows:
I want to - Select the operation that you want to perform. In this case, select “Add multiple parts without a Serial Number“
Model Name - Select the part that you want to add. This will auto-populate the Model Number and Manufacturer fields.
Stock Location - Select the Stock Location where you want to add the part. In case you selected a Stock Location in the datagrid on the Main Page, it will be populated for you.
Quantity - Add the quantity of the part that you want to add.
To add a Part to a Stock Location, it must first be created from the Catalog > Parts and Assets module. For more information, see the Parts and Assets page.

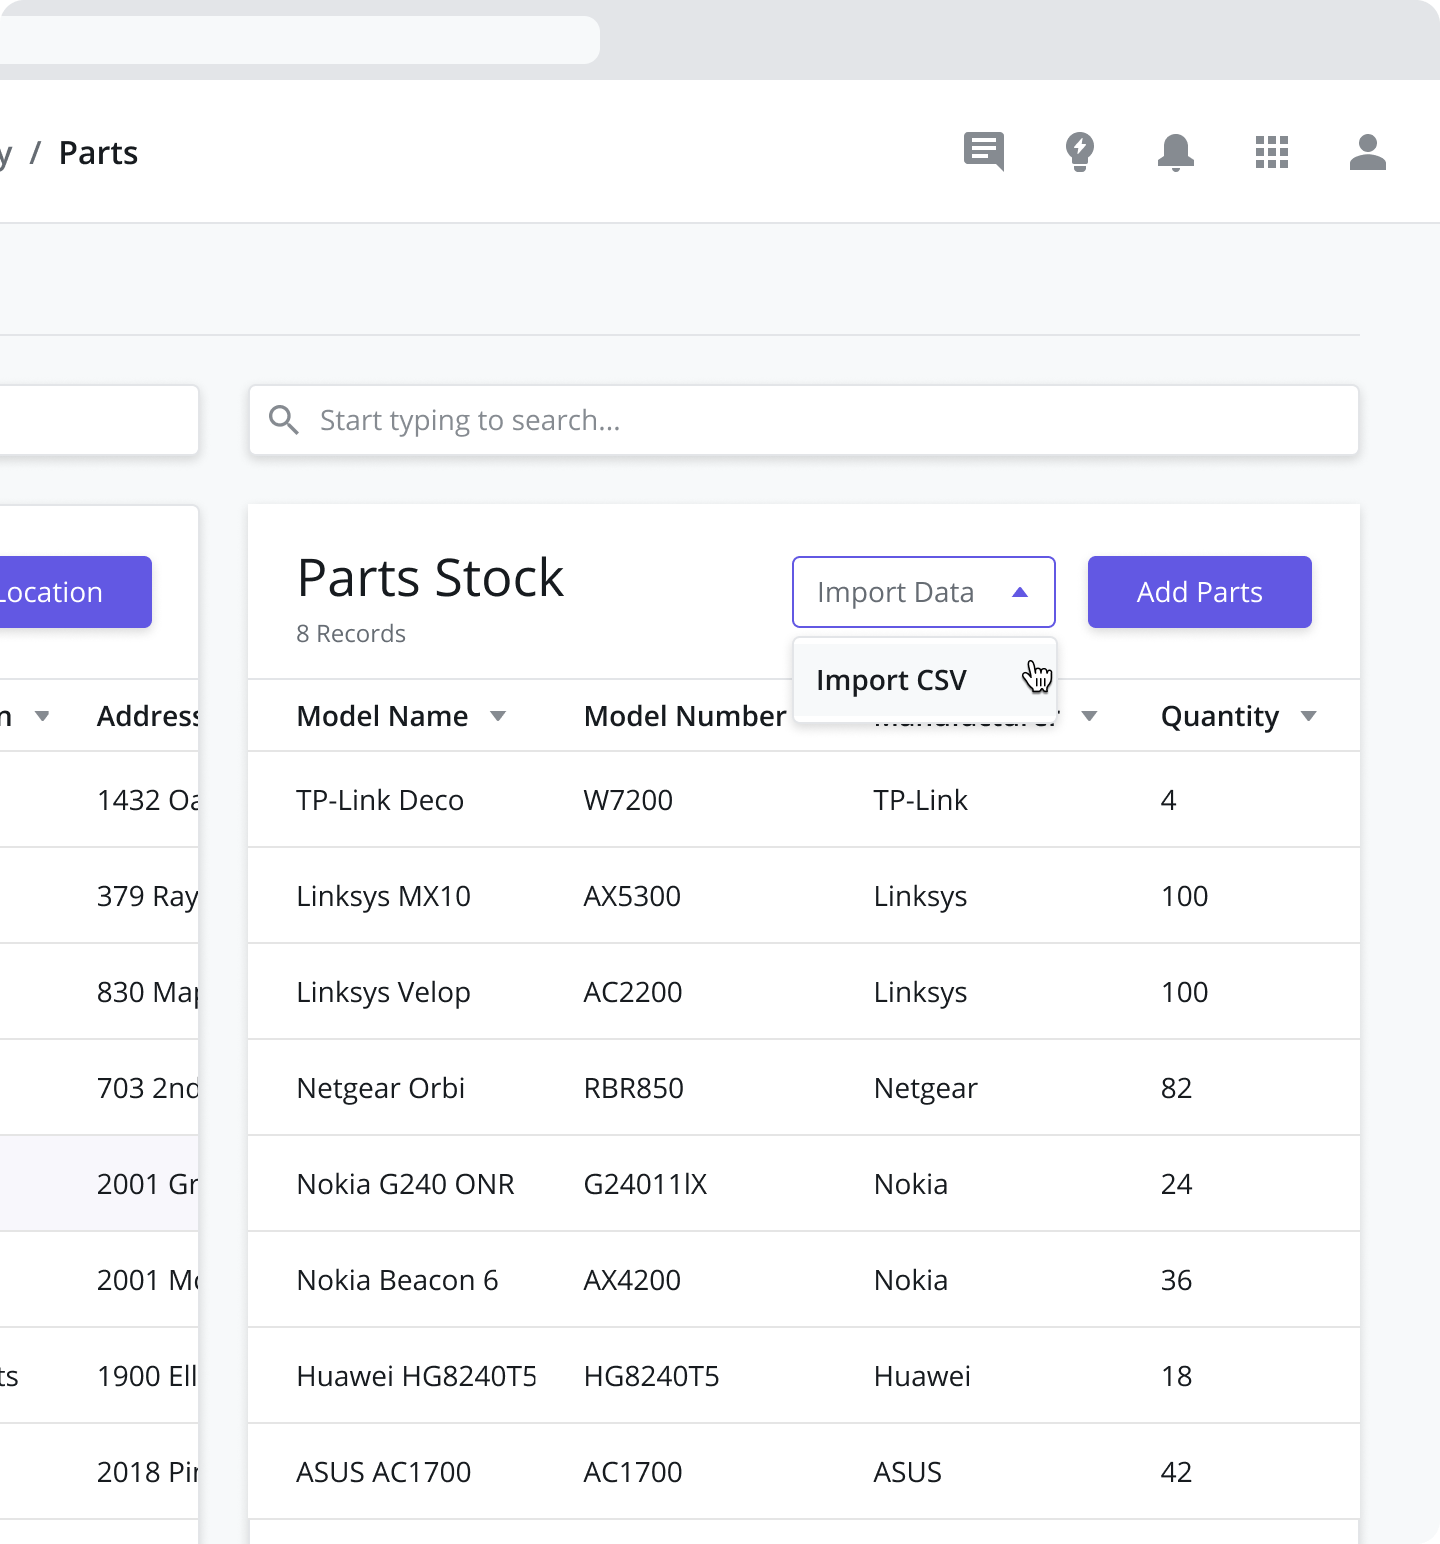
Importing Inventory using a CSV file
Users can import a large number of Inventory items using the Inventory Import capability.
To import parts, go to the Inventory > Stock Locations module, click on the “Import Data” button in the “Parts Stock“ datagrid, and select “Import CSV“.
Download the CSV template and prepare the CSV to import the parts as follows:
Catalog ID (Optional) - ID of the part/material model (if available)
Catalog Name - Name of the part/material model
Model Number - Model number of the part/material model
Serial Number (Optional) - Serial number of the part
Quantity (Materials Only) - Quantity of materials to be imported
Stock Location ID (Optional) - ID of the Stock Location where the part/material should be added
Stock Location Name - Select the Stock Location where you want to add the part. If you previously selected a Stock Location in the datagrid on the Main Page, this field will be populated for you.

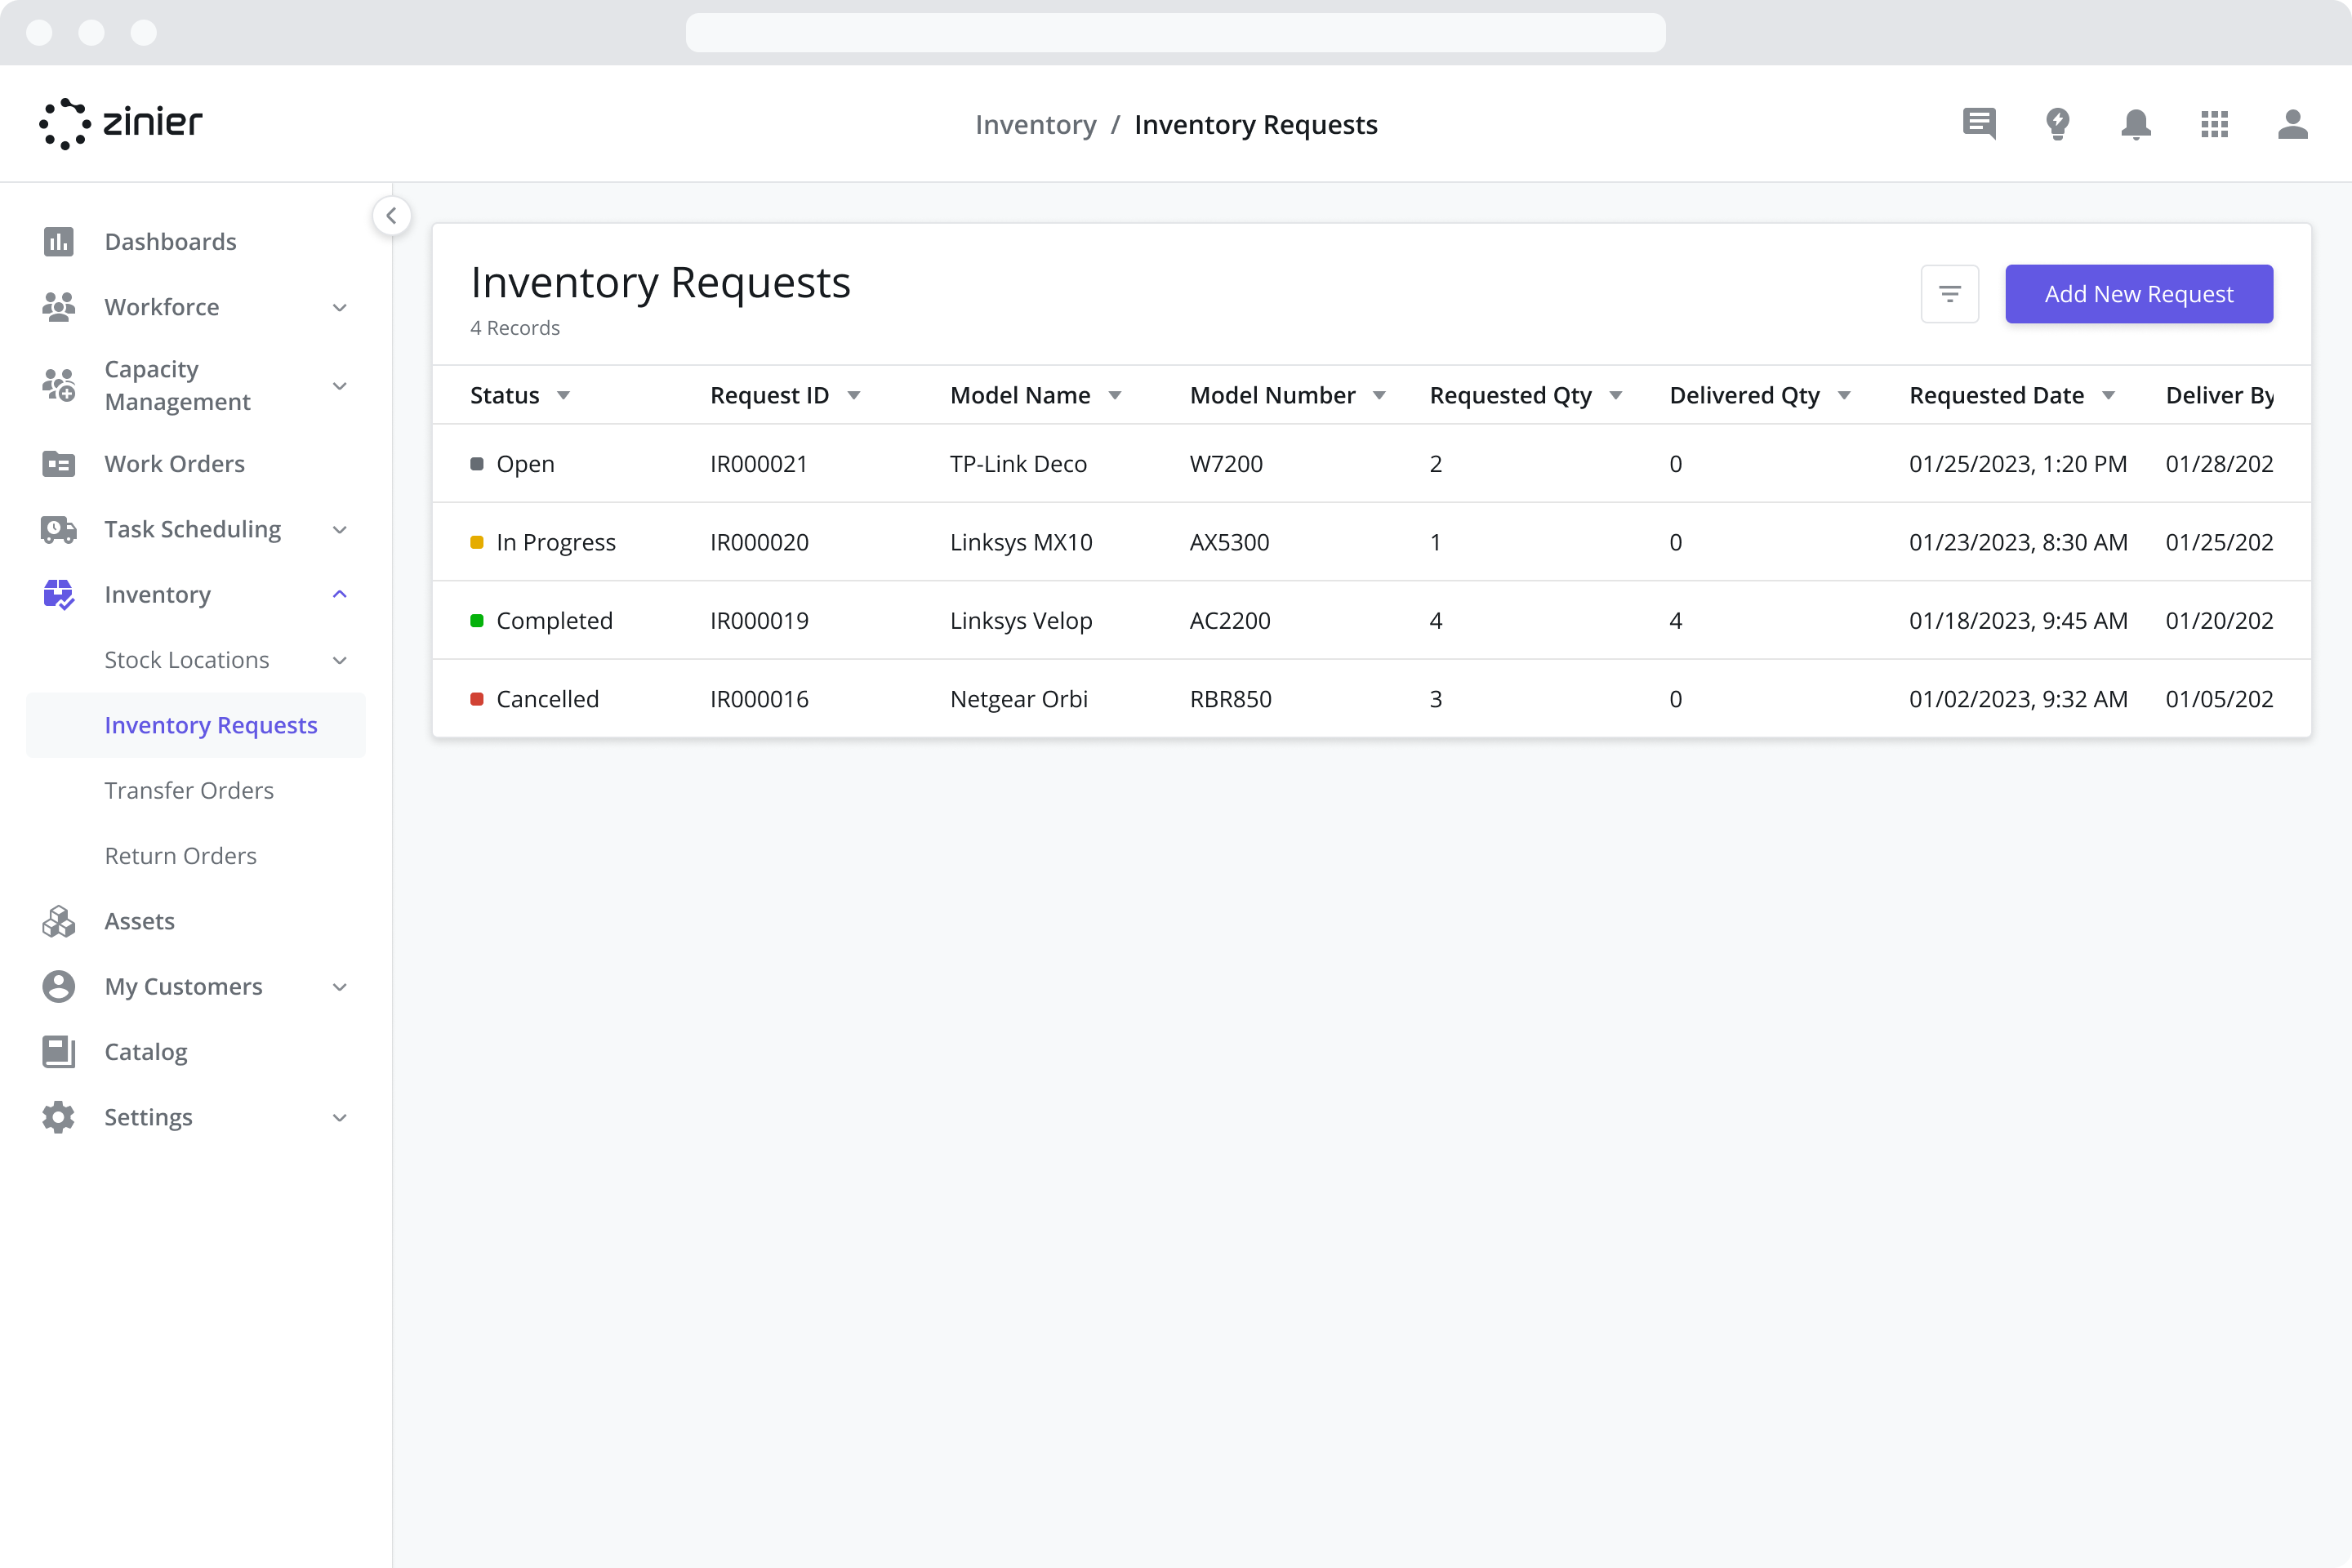
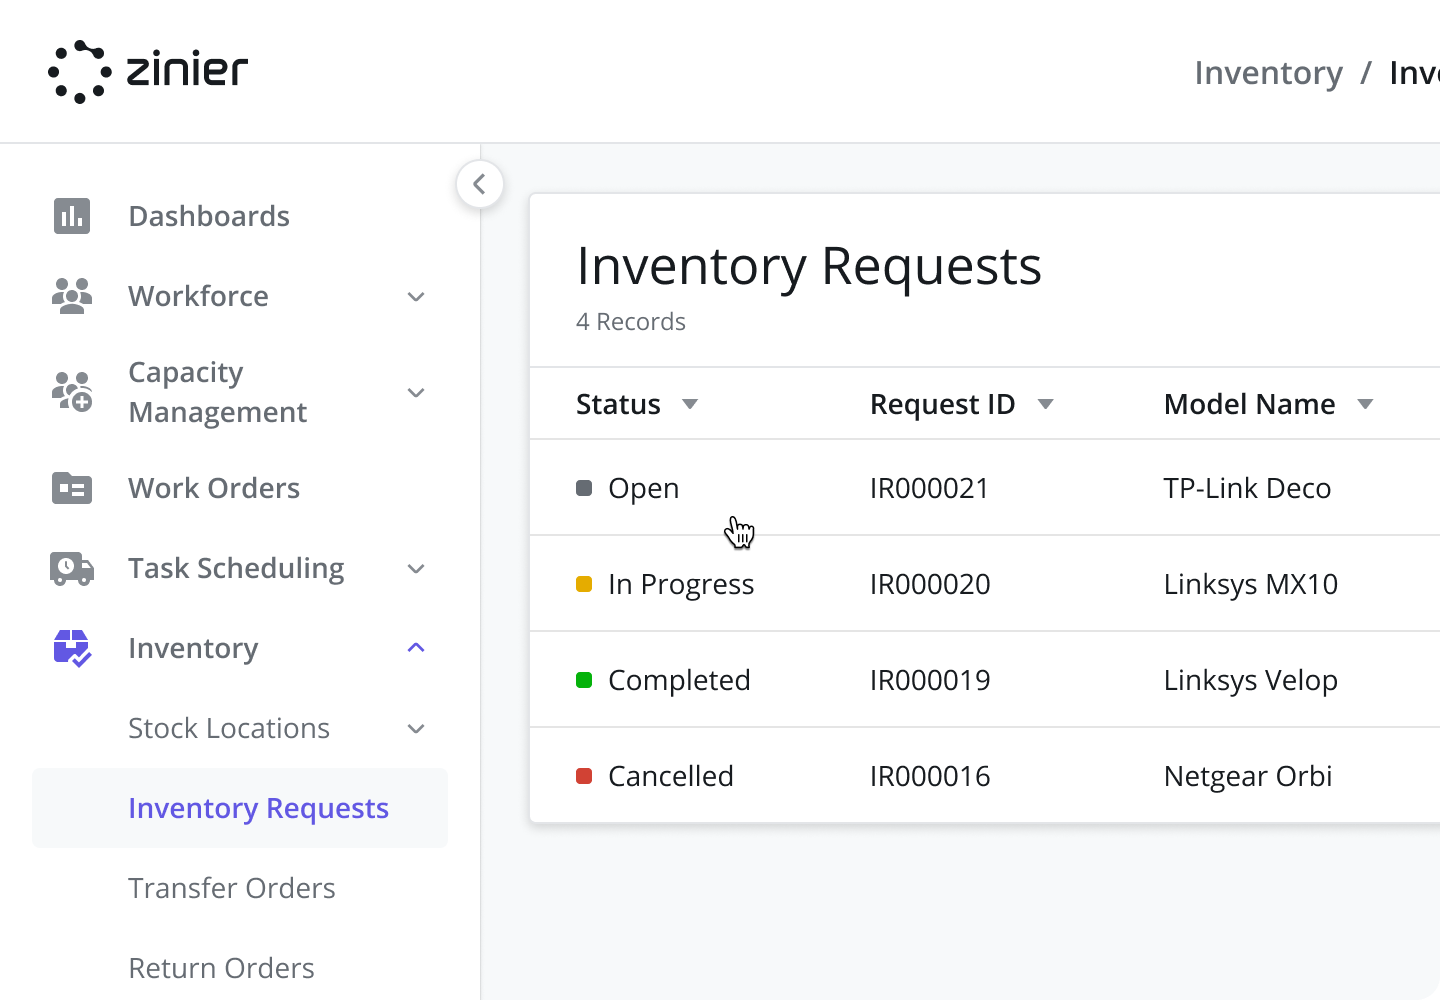
Making Inventory Requests
Users can request for inventory to be delivered to a stock location using the Inventory Requests capability.
To create a new Inventory Request, go to the Inventory > Inventory Requests module and click on the “Add New Request“ button on the datagrid.
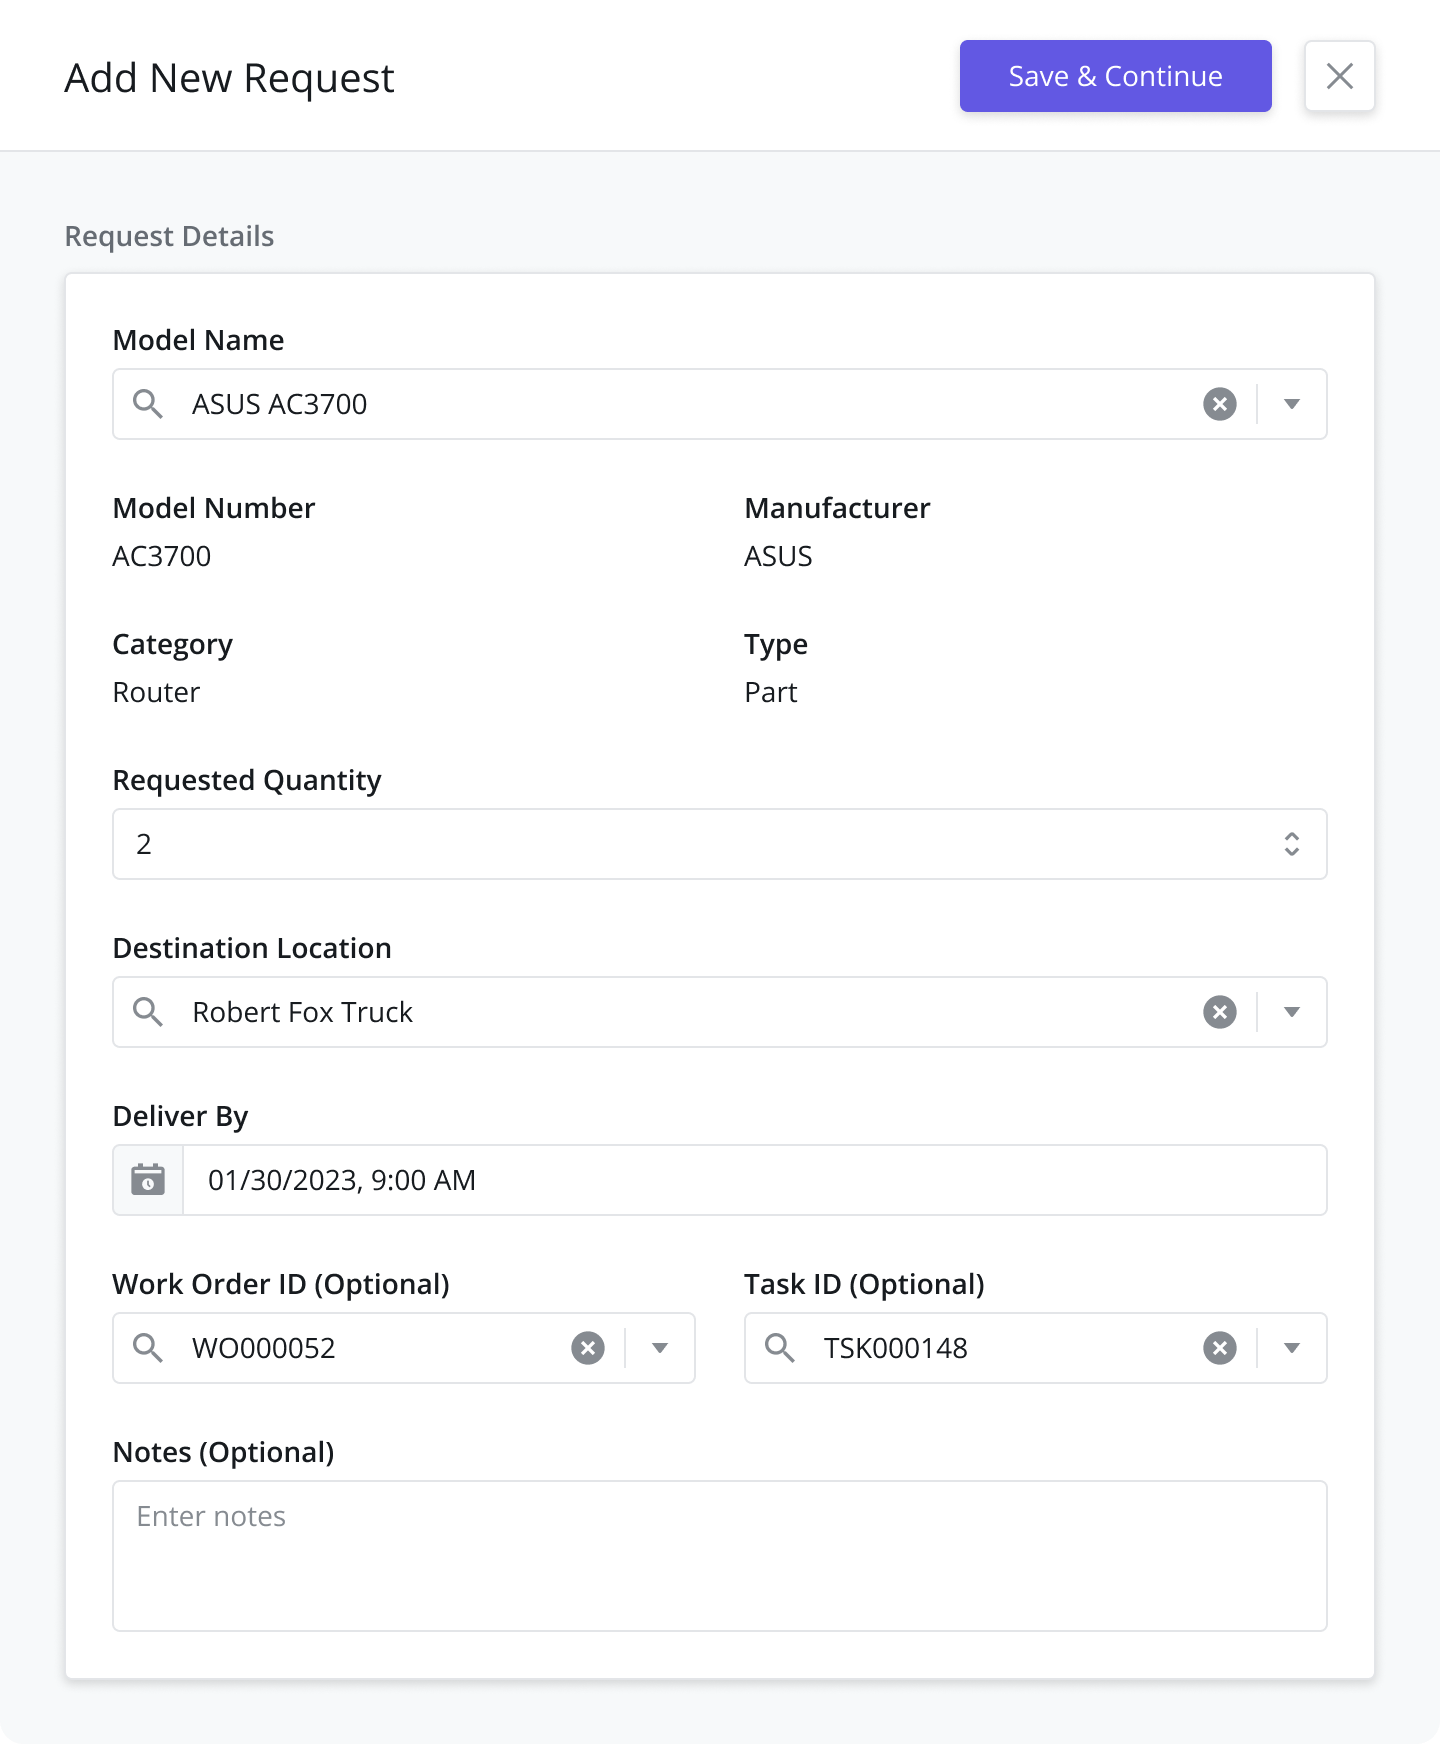
Fill in the details in the side panel by following the steps below:
Model Name - Select the name of the part/material that is being requested. This will auto-populate the Model Number, Manufacturer, Category, Type, and Stock unit fields.
Requested Quantity - Enter the quantity of the part/material you are requesting
Destination Location - Select the Warehouse or Truck where the requested inventory needs to be delivered
Deliver By - Select the Date/Time by which the requested inventory needs to be delivered
Work Order ID (Optional) - If relevant, select the ID of the Work Order for which the Inventory is being requested
Task ID (Optional) - If relevant, select the ID of the Task for which the Inventory is being requested
Notes (Optional) - Add any additional notes that may be needed
Inventory Requests can also be made from the Scheduling sidepanel. To do so, open the scheduling sidepanel for any task from Task Scheduling > List View or Task Scheduling > Dispatch Console and click the Inventory Requests button from the Parts Requirements data grid. Then follow the same steps outlined above.
Inventory Requests Statuses
Inventory Requests can have one of the following statuses:
Open: The Inventory Request is saved and Transfer Orders can be added. In Open status, the Inventory Request can be updated and/or cancelled.
In Progress: At least one Transfer Order in the Inventory Request is still In Progress. In this state, only Notes can be updated. The Inventory Request can be moved to Completed or Cancelled statuses.
Completed: When all the Transfer Orders within the Inventory Request are completed, the Inventory Request automatically transitions to Completed status. Completed Inventory Requests may contain one or more Transfer Orders that have been cancelled, but at least one was completed.
Cancelled: This status indicates the Inventory Request was cancelled by a web user. All Transfer Orders which were not previously completed are also cancelled by default when the parent Inventory Request is cancelled. Cancelled Inventory Requests and Transfer Orders cannot be reopened.
Transferring Inventory between Stock Locations
Users can transfer inventory from one stock location to another by creating a Transfer Order.
To create a new Transfer Order, go to the Inventory > Transfer Order module and click on the “Add New“ button on the datagrid.
Fill in the details in the side panel by following the steps below:
Step 1: Select Inventory Request ID (if applicable)
Inventory Request ID (Optional) - Select the ID of the Inventory Request for which the Inventory is being transferred. Doing so will auto-populate the Model Name, Delivery Quantity, Delivery By date and Destination Location of the part requested. If the Transfer Order is not associated with a previously created Inventory Request, leave this field blank and fill in the fields below.
Model Name - Select the name of the part/material that is being requested. This will be pre-populated if the transfer is based on an Inventory Request ID. This will auto-populate the Model Number, Manufacturer, Category, Type, and Stock unit fields.
Requested Quantity - Enter or adjust the quantity of the part/material that is requested. This will be pre-populated if the transfer is based on an Inventory Request ID.
Step 3: Enter the Destination and Delivery Details
Destination Location - Select the Warehouse or Truck where the inventory needs to be delivered. This will be pre-populated if the transfer is based on an Inventory Request ID (See Step 1).
Destination Address - Address of the destination location. This is auto-populated based on the Destination Location selected
Deliver By - Select the Date/Time by which the transferred inventory needs to be delivered. This will be pre-populated if the transfer is based on an Inventory Request ID.
Courier - Select the courier by which the inventory will be transferred
Tracking Number (Optional) - Enter the tracking number of the courier
Notes (Optional) - Add any additional notes that may be needed
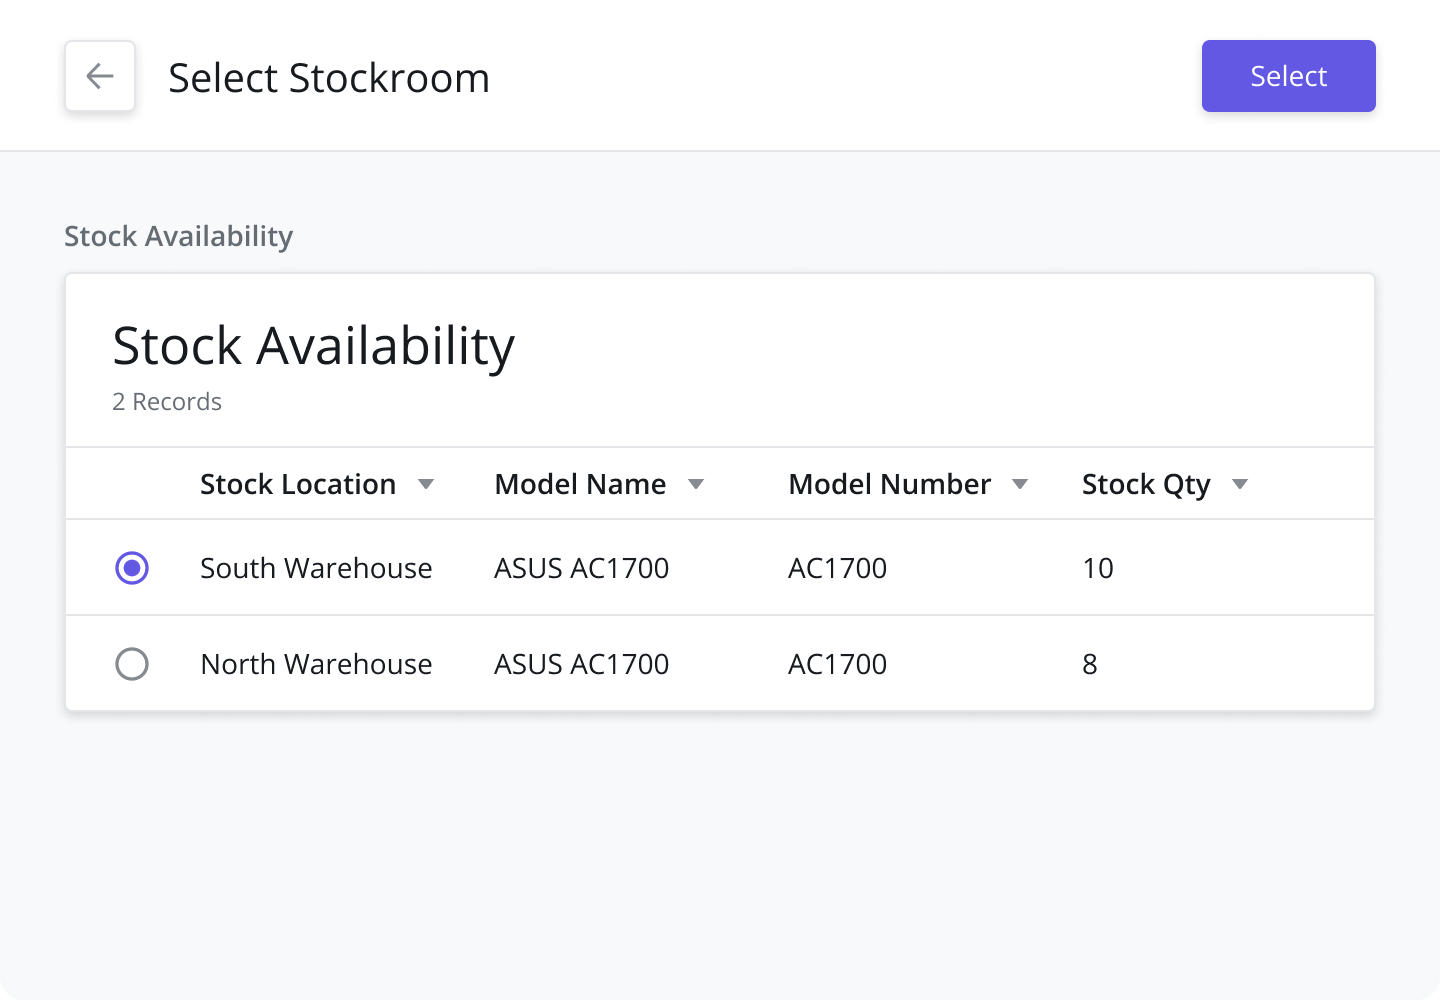
Step 4: Select a Source Location
Source Location - Click the Select Source Location button to bring up the Source Location Sidepanel. The Select Source Location sidepanel will help you pick an optimal Stock Location (Truck or Warehouse) from which to transfer the inventory to meet the requirements of the Inventory Request.
Stock Availability - You will be presented with several different Stock Locations to choose from showing the available stock quantity at each location. Select the stock location that serves the requirement and click the Select button to continue
Click the Save and Continue to finish creating the Transfer Order
Transfer Order Statuses
Transfer Orders can have one of the following statuses:
Open: The Transfer Order has been created and the inventory added to the Transfer Order is reserved for transfer. In Open status, the Transfer Order can be updated and/or cancelled.
In Progress: In this state, Notes and Delivered Quantities for the Transfer Order can be updated, and the Transfer Order status can be moved to either Fulfilled or Cancelled.
Fulfilled: This status represents the successful completion of a Transfer Order. All inventory delivered as part of the Transfer Order has been updated/added to the destination stock location.
Fulfilled (Partially): If any of the inventory associated with the Transfer Order is marked as not delivered, the status of the Transfer Order will change to Fulfilled (Partially). Only the inventory marked as delivered has been updated/added to the destination stock location.
Cancelled: The Transfer Order was cancelled by a web user. All inventory that was reserved for the Transfer Order is released. Cancelled Transfer Orders cannot be reopened.
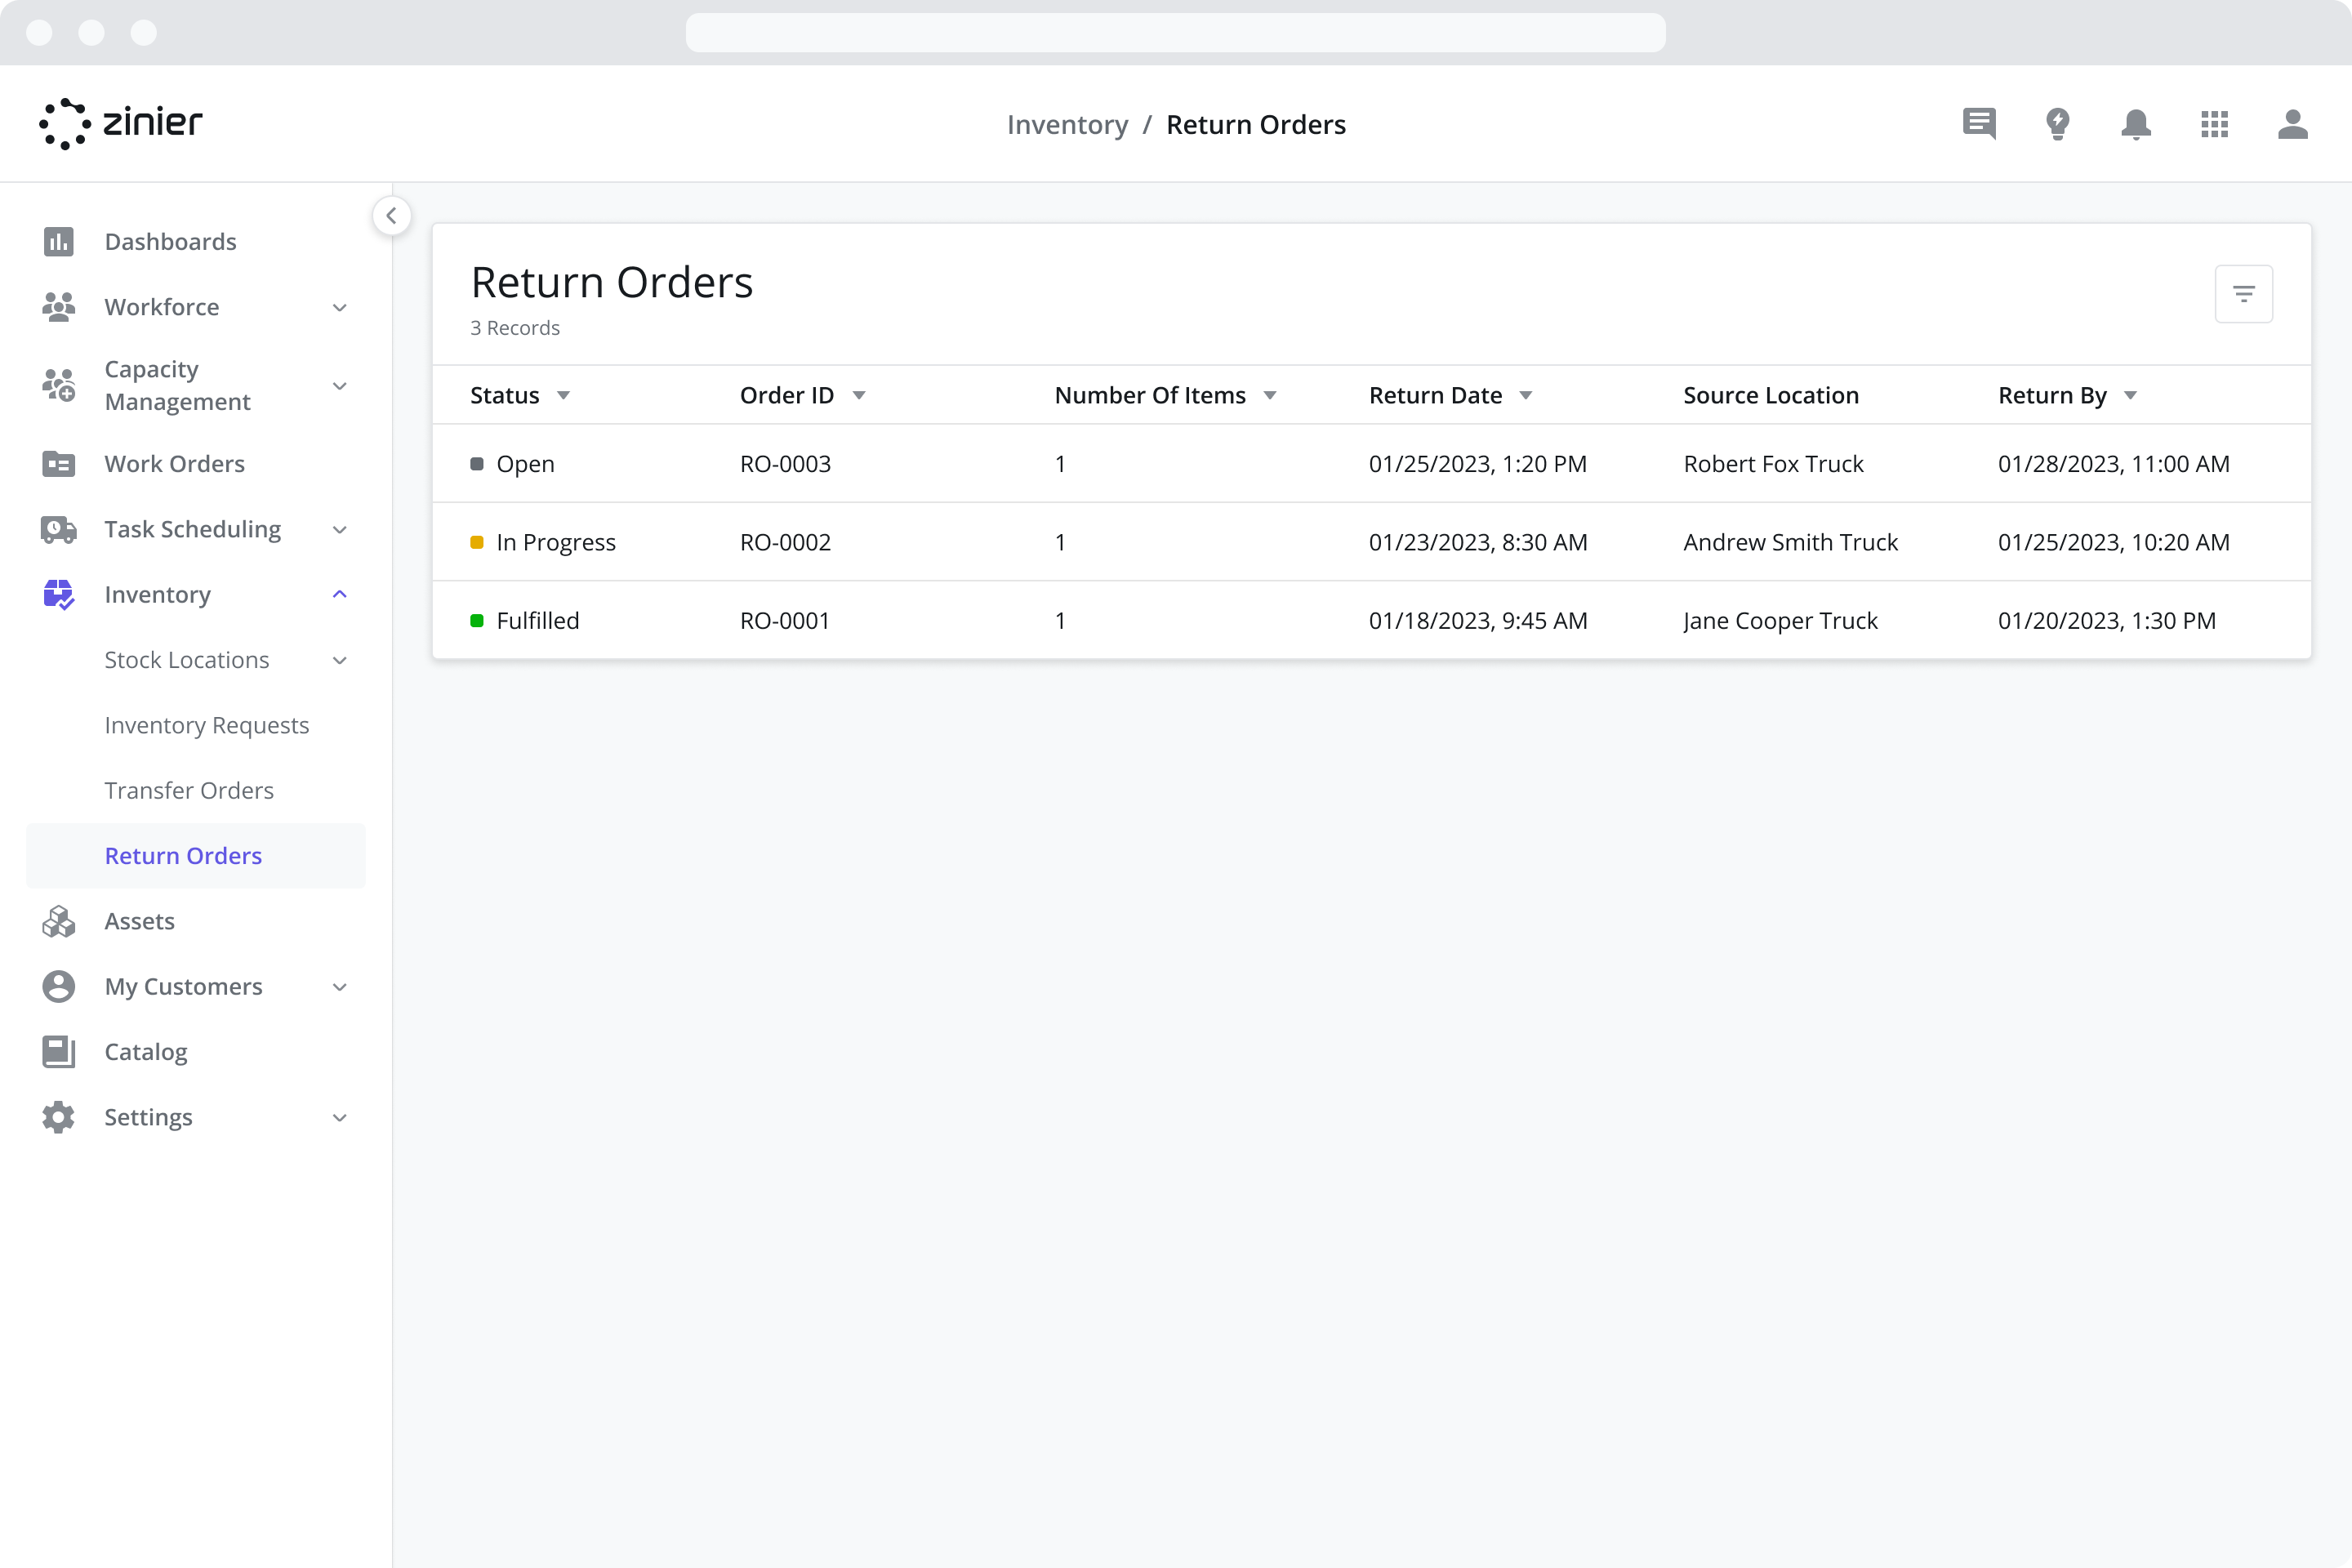
Returning Inventory from the field
Users can return inventory from their Truck to a Warehouse using the Return Orders capability. For more information on returning inventory using the mobile app, visit the Returning Inventory from the field page in Mobile Inventory Management.