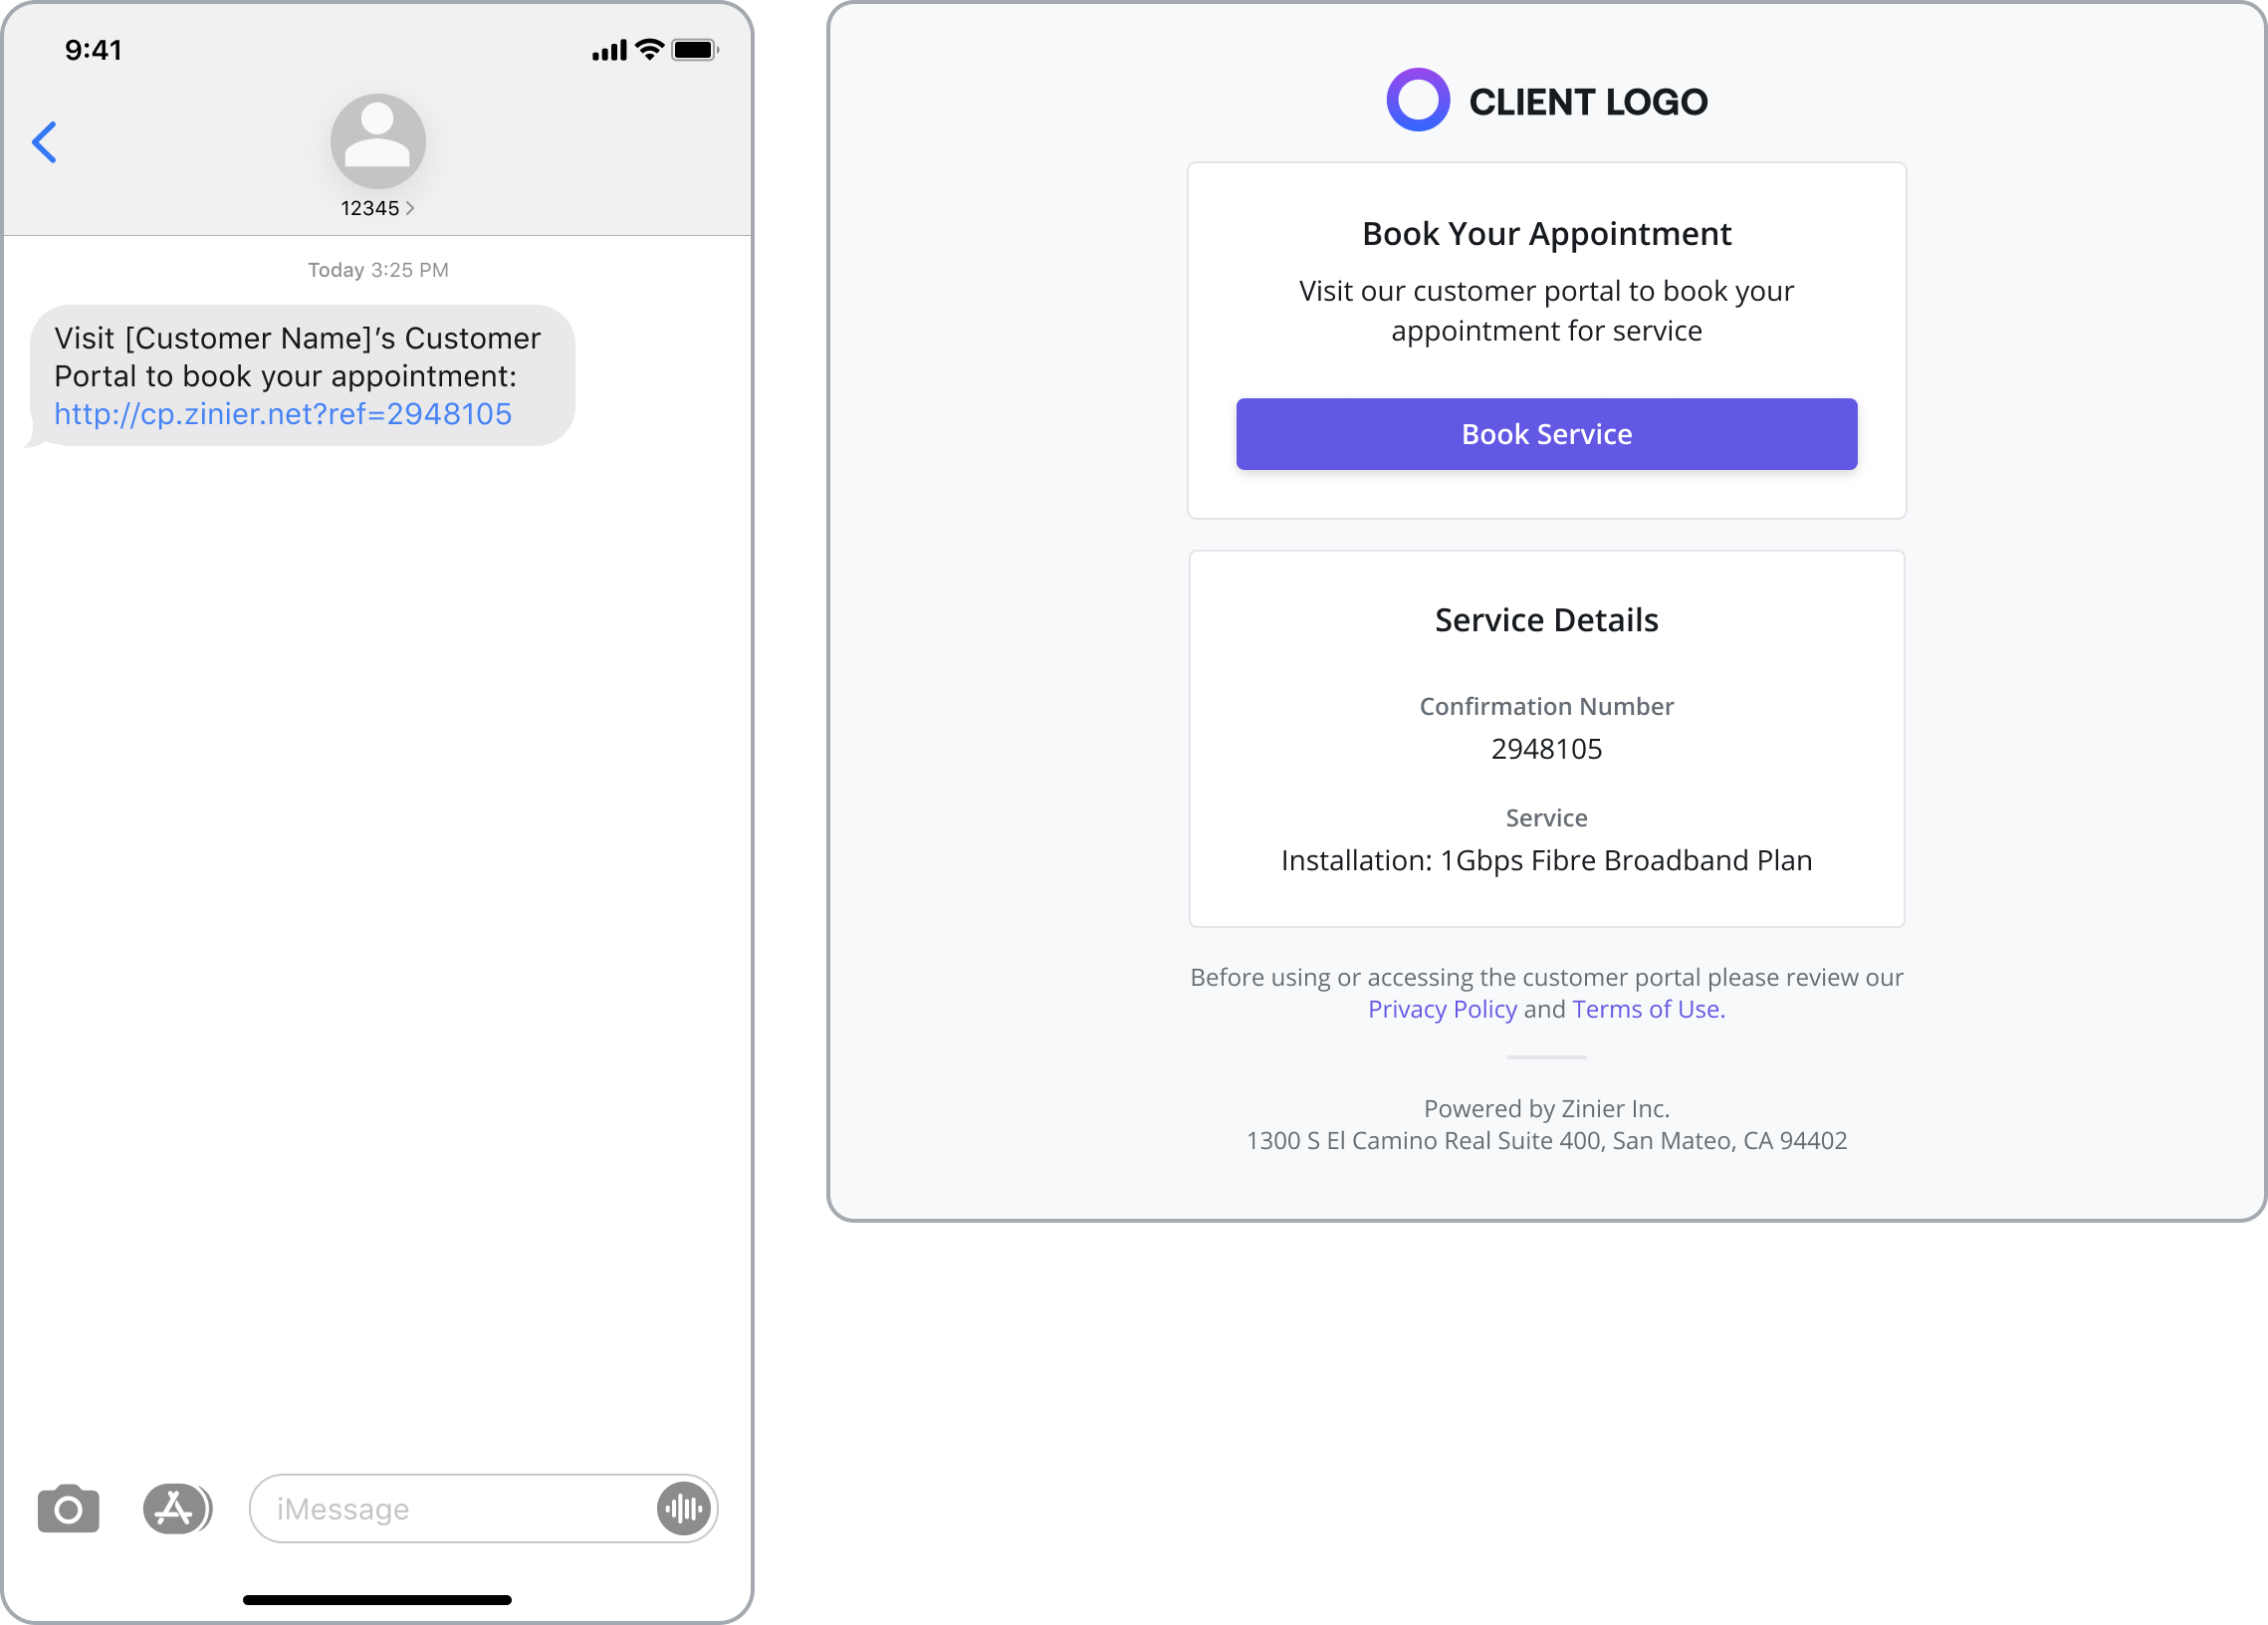
Using the Customer Portal
Tightly integrated with other products in the Zinier Productivity Suite, the Customer Portal is a responsive and secure, self-service tool that allows end-customers to book and track appointments for service calls, installations, and any other workflow built using Studio Z.
Note: The Customer Portal feature is not available out of the box and will need to be enabled for your organization. Please contact your Customer Success manager to learn more!
Scheduling an Appointment with the Customer Portal
Service providers who have configured the Customer Portal trigger booking requests from the Scheduling & Dispatch module (often an automated process integrated with the provider’s booking system). These requests are tied to the customer’s address (a Customer Site) and the Task associated with the request (with a particular Task Type, which determines the type of service being booked). Once the booking request is triggered, end-customers can then use Zinier’s Customer Portal to view open time slots and book appointments.
The Customer Portal uses Appointment Windows to display the available booking slots to end-customers and Capacity Management (if installed) to determine the availability of an Appointment Window during booking.
To schedule an appointment, end-customers would follow the steps below:
Step 1: Navigate to the portal via a personal Invite link
Login to your email or access the SMS messages on your mobile device to receive an invitation to the Customer Portal along with a request to select an appointment time.
Click on the unique link in the message to navigate to the Customer Portal login screen.
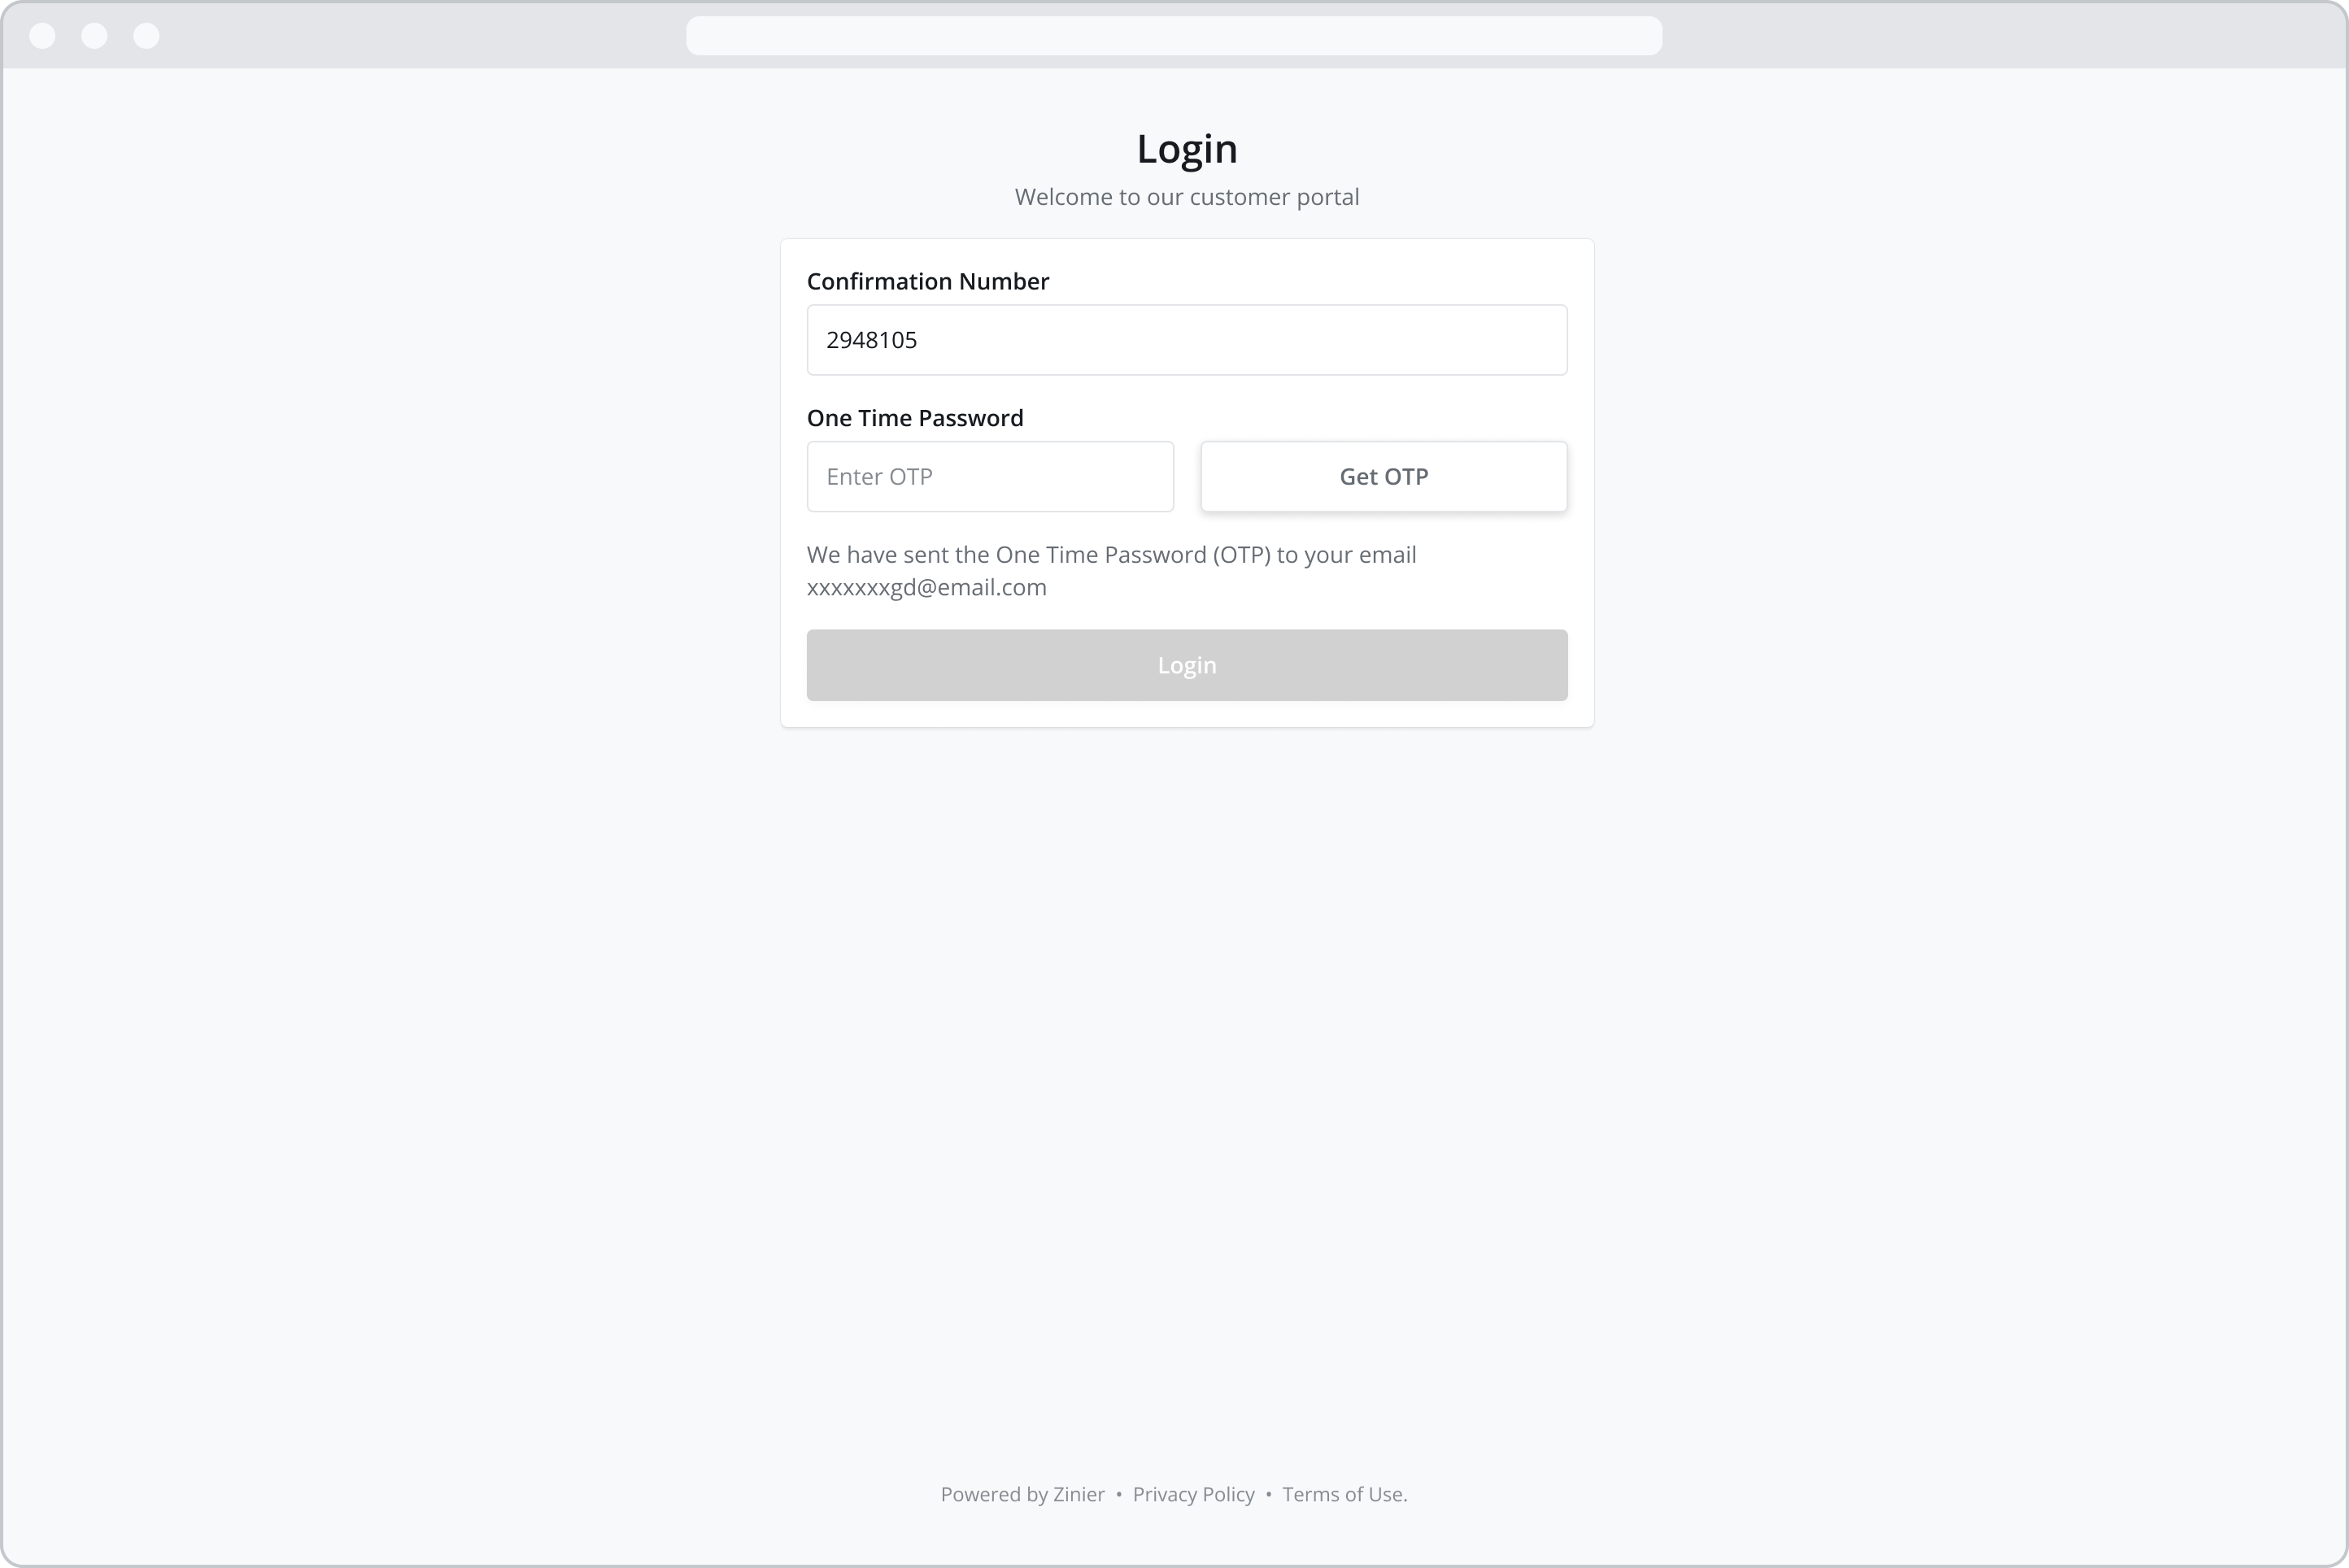
Step 2: Login to the Customer Portal (if OTP is enabled)
NEW (24.4)
If your org has configured OTP for login, follow this step. If your org has been configured without OTP login, skip to Step 3.
For more information on configuring the customer portal to use or not use OTP at login, visit the Configuring the Customer Portal for your Organization | Customer-Portal-Login-with-or-without-OTP page.
The confirmation number for your appointment should be pre-filled.
Select Get One Time Passcode.
Navigate back to your email or mobile device and copy the alphanumeric code sent to you.
Enter the code into the field and select Login
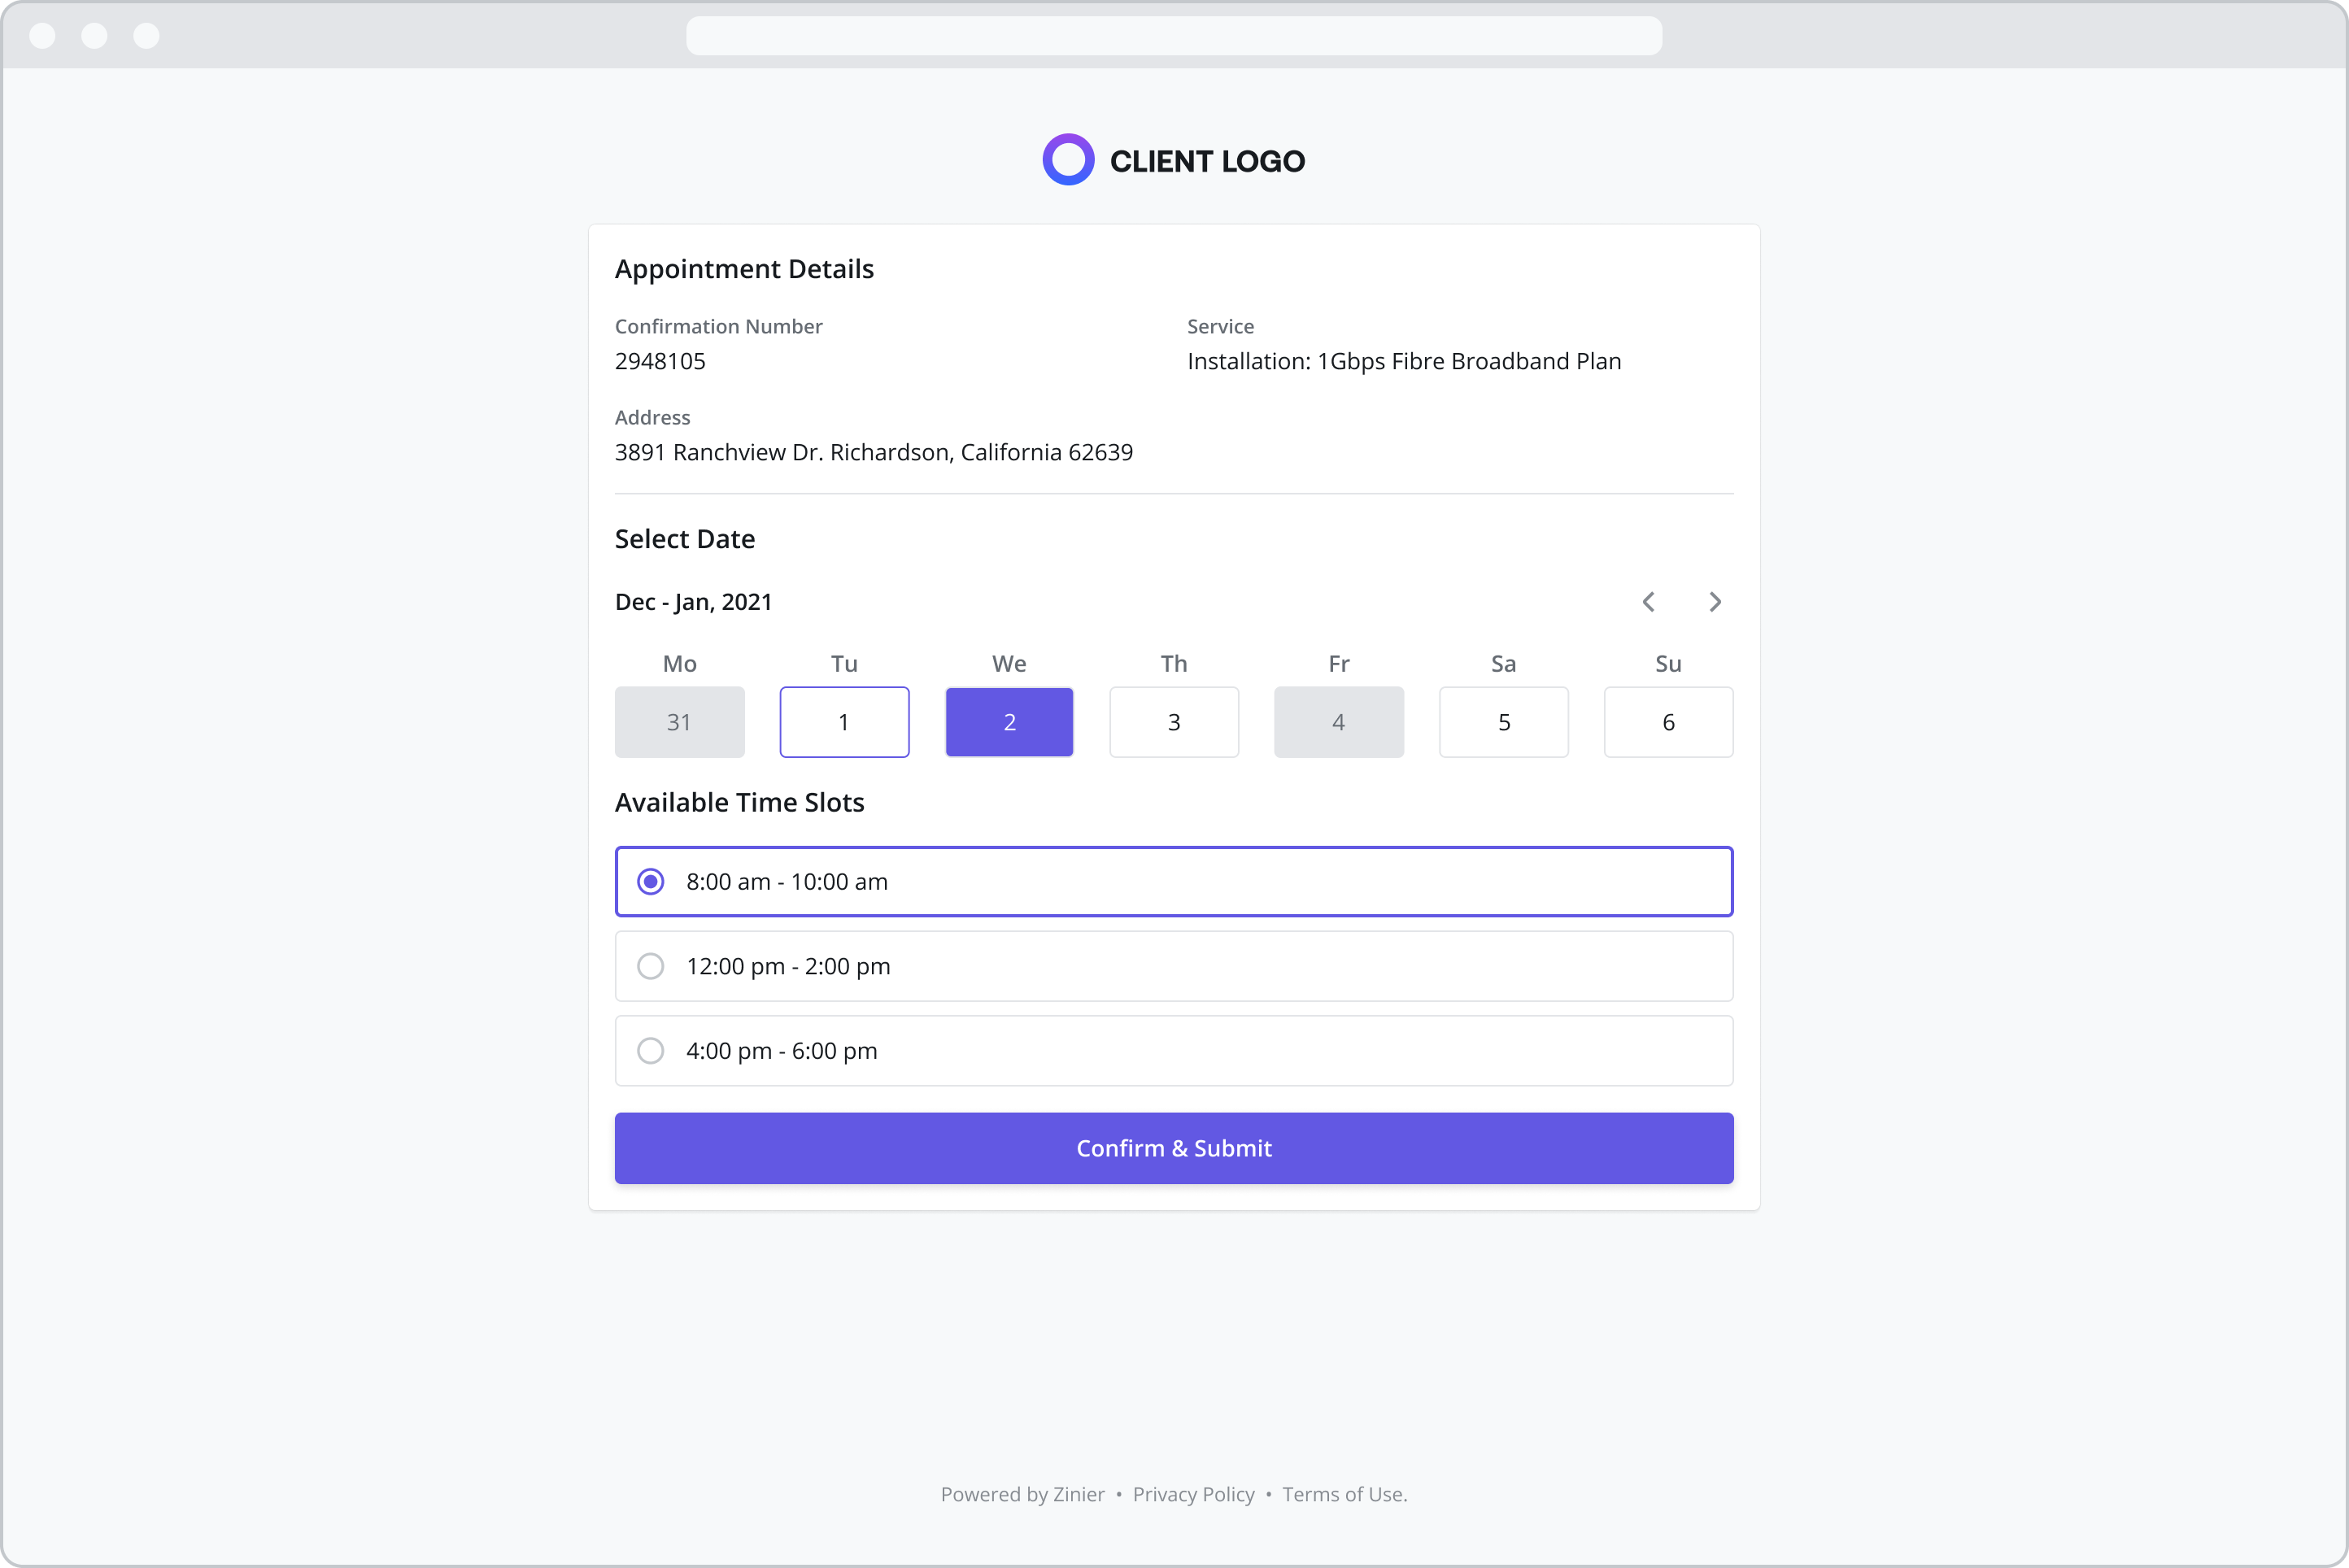
Step 3: Select an Appointment Time
Note: This step will only apply if a time was not pre-selected for your appointment. If a preselected time is included in your invitation, you can skip directly to Step 4.
You can view the Service details and Appointment address
Select a date to view available time slots. You can use the arrows to move between different weeks.
Once you select a date, choose one of the available time slots.
Select Confirm & Submit
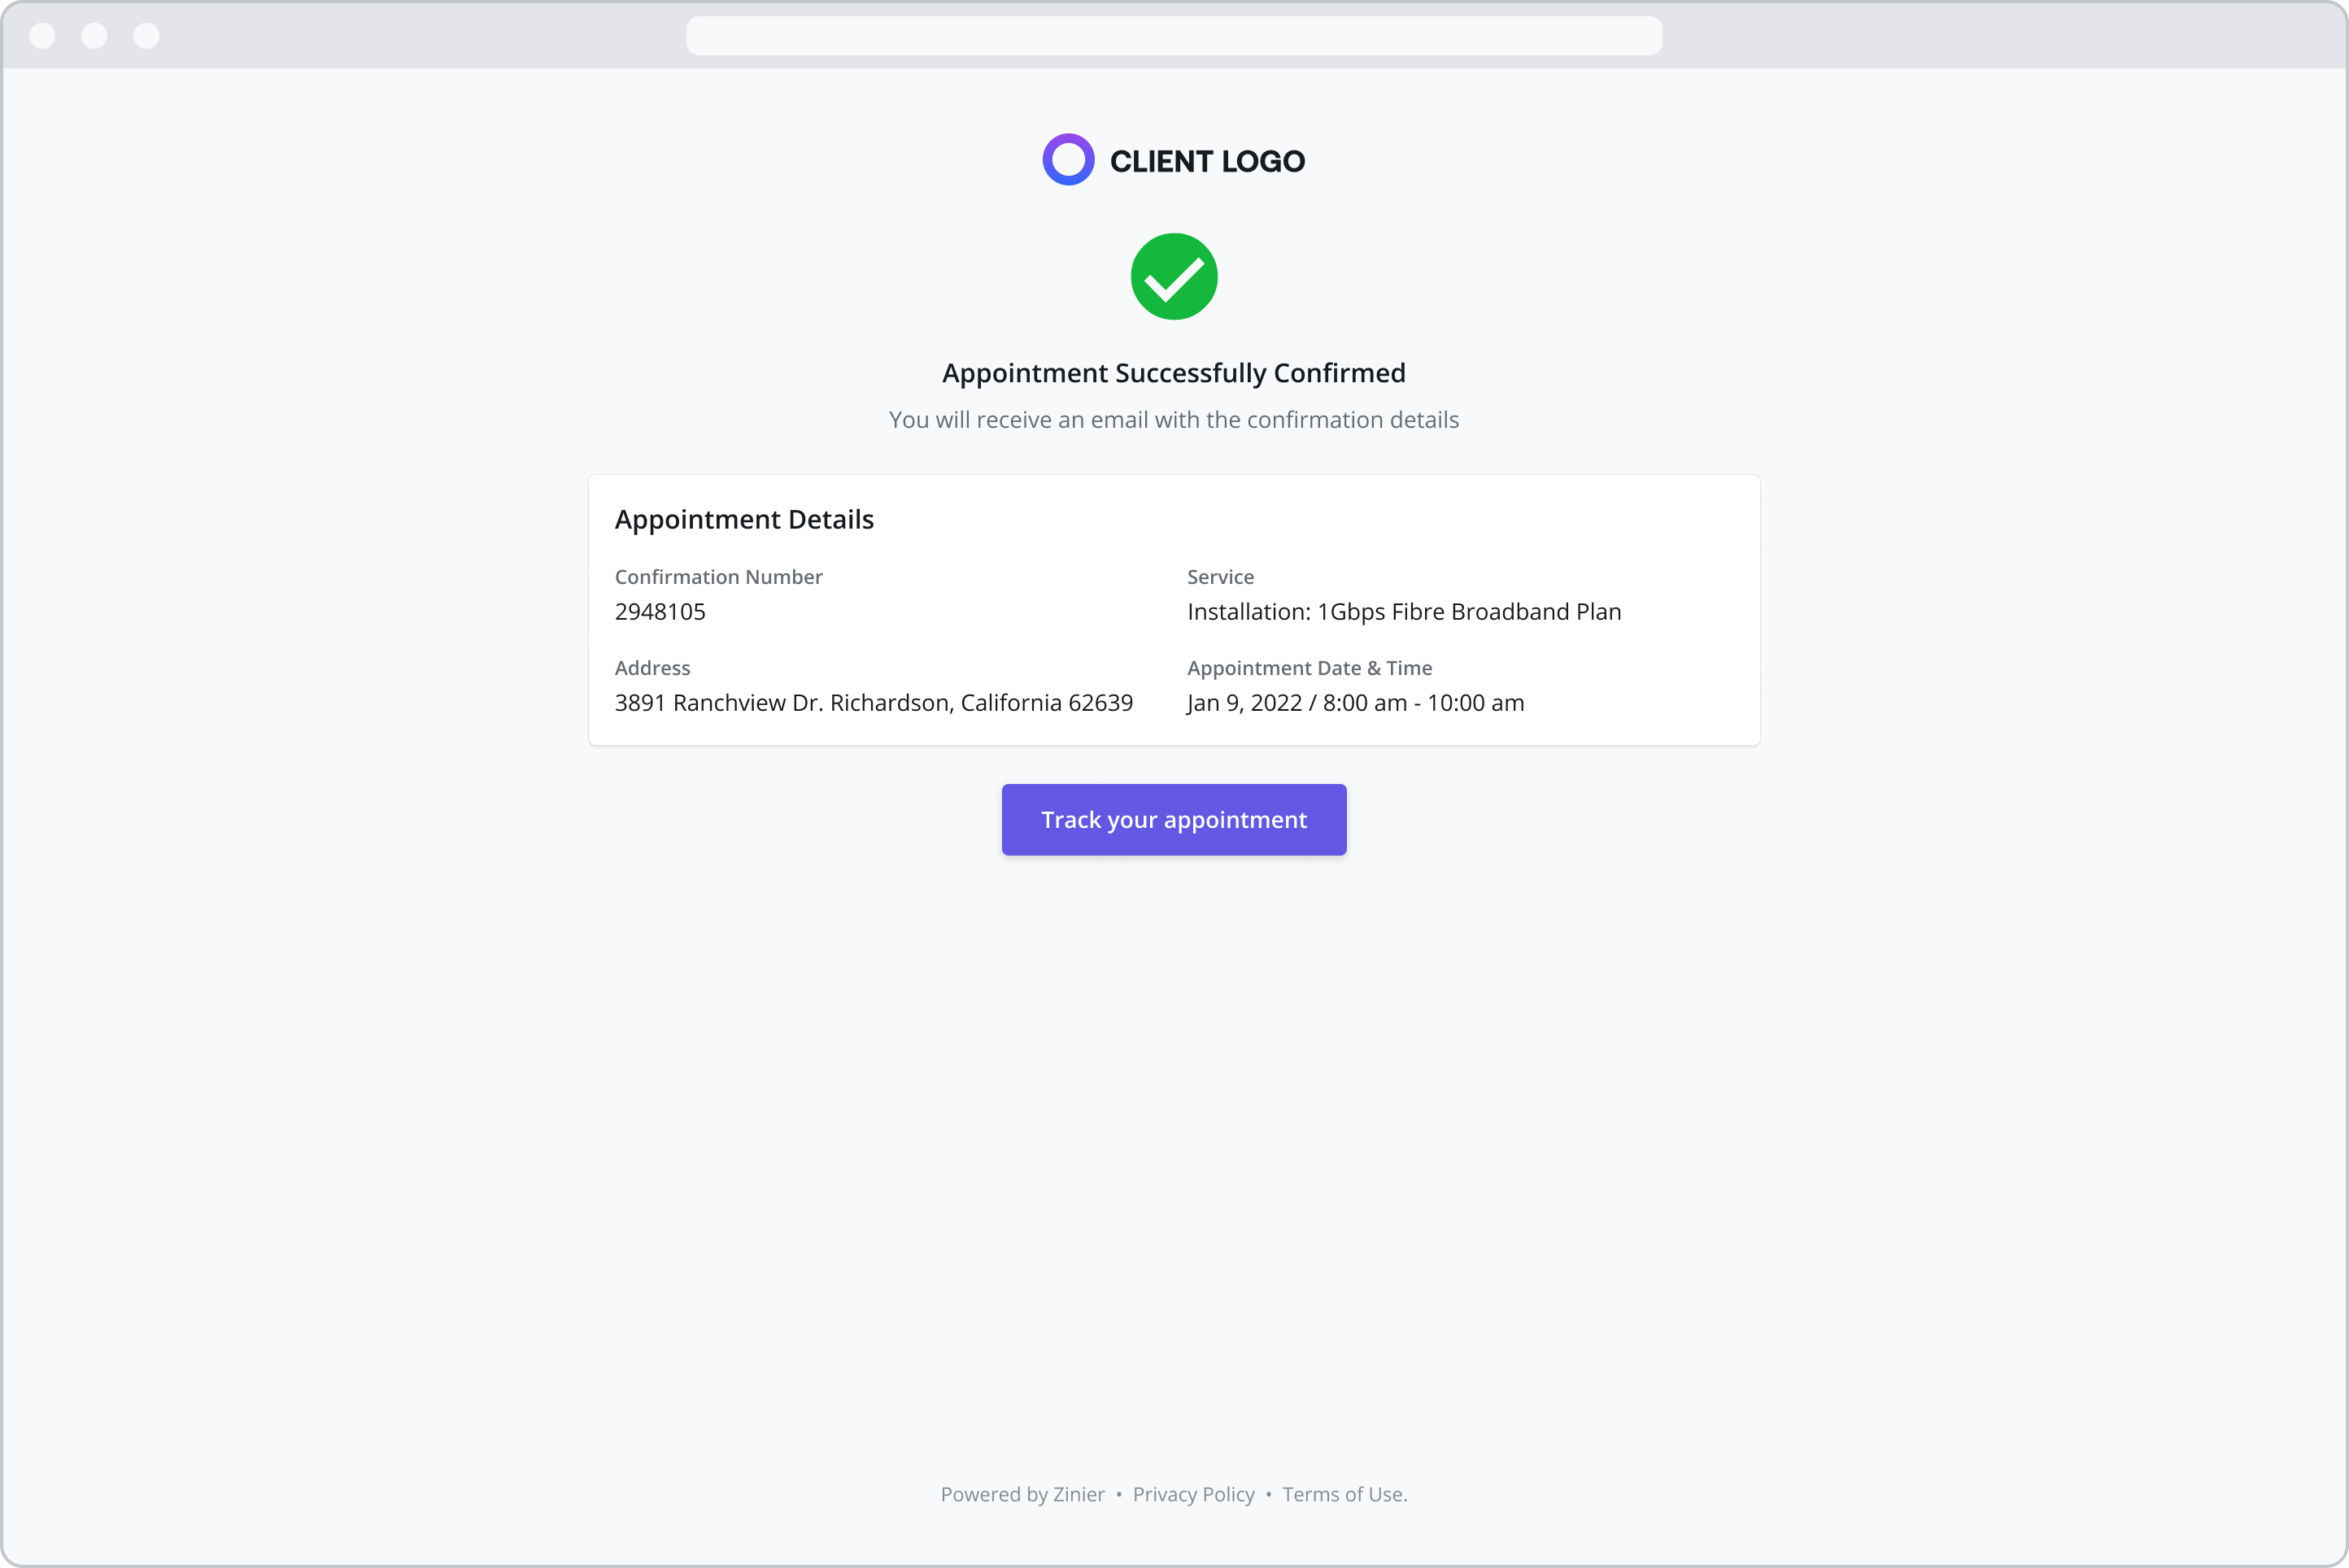
View your Appointment Confirmation details
Select Track your appointment to view your Appointment Details page
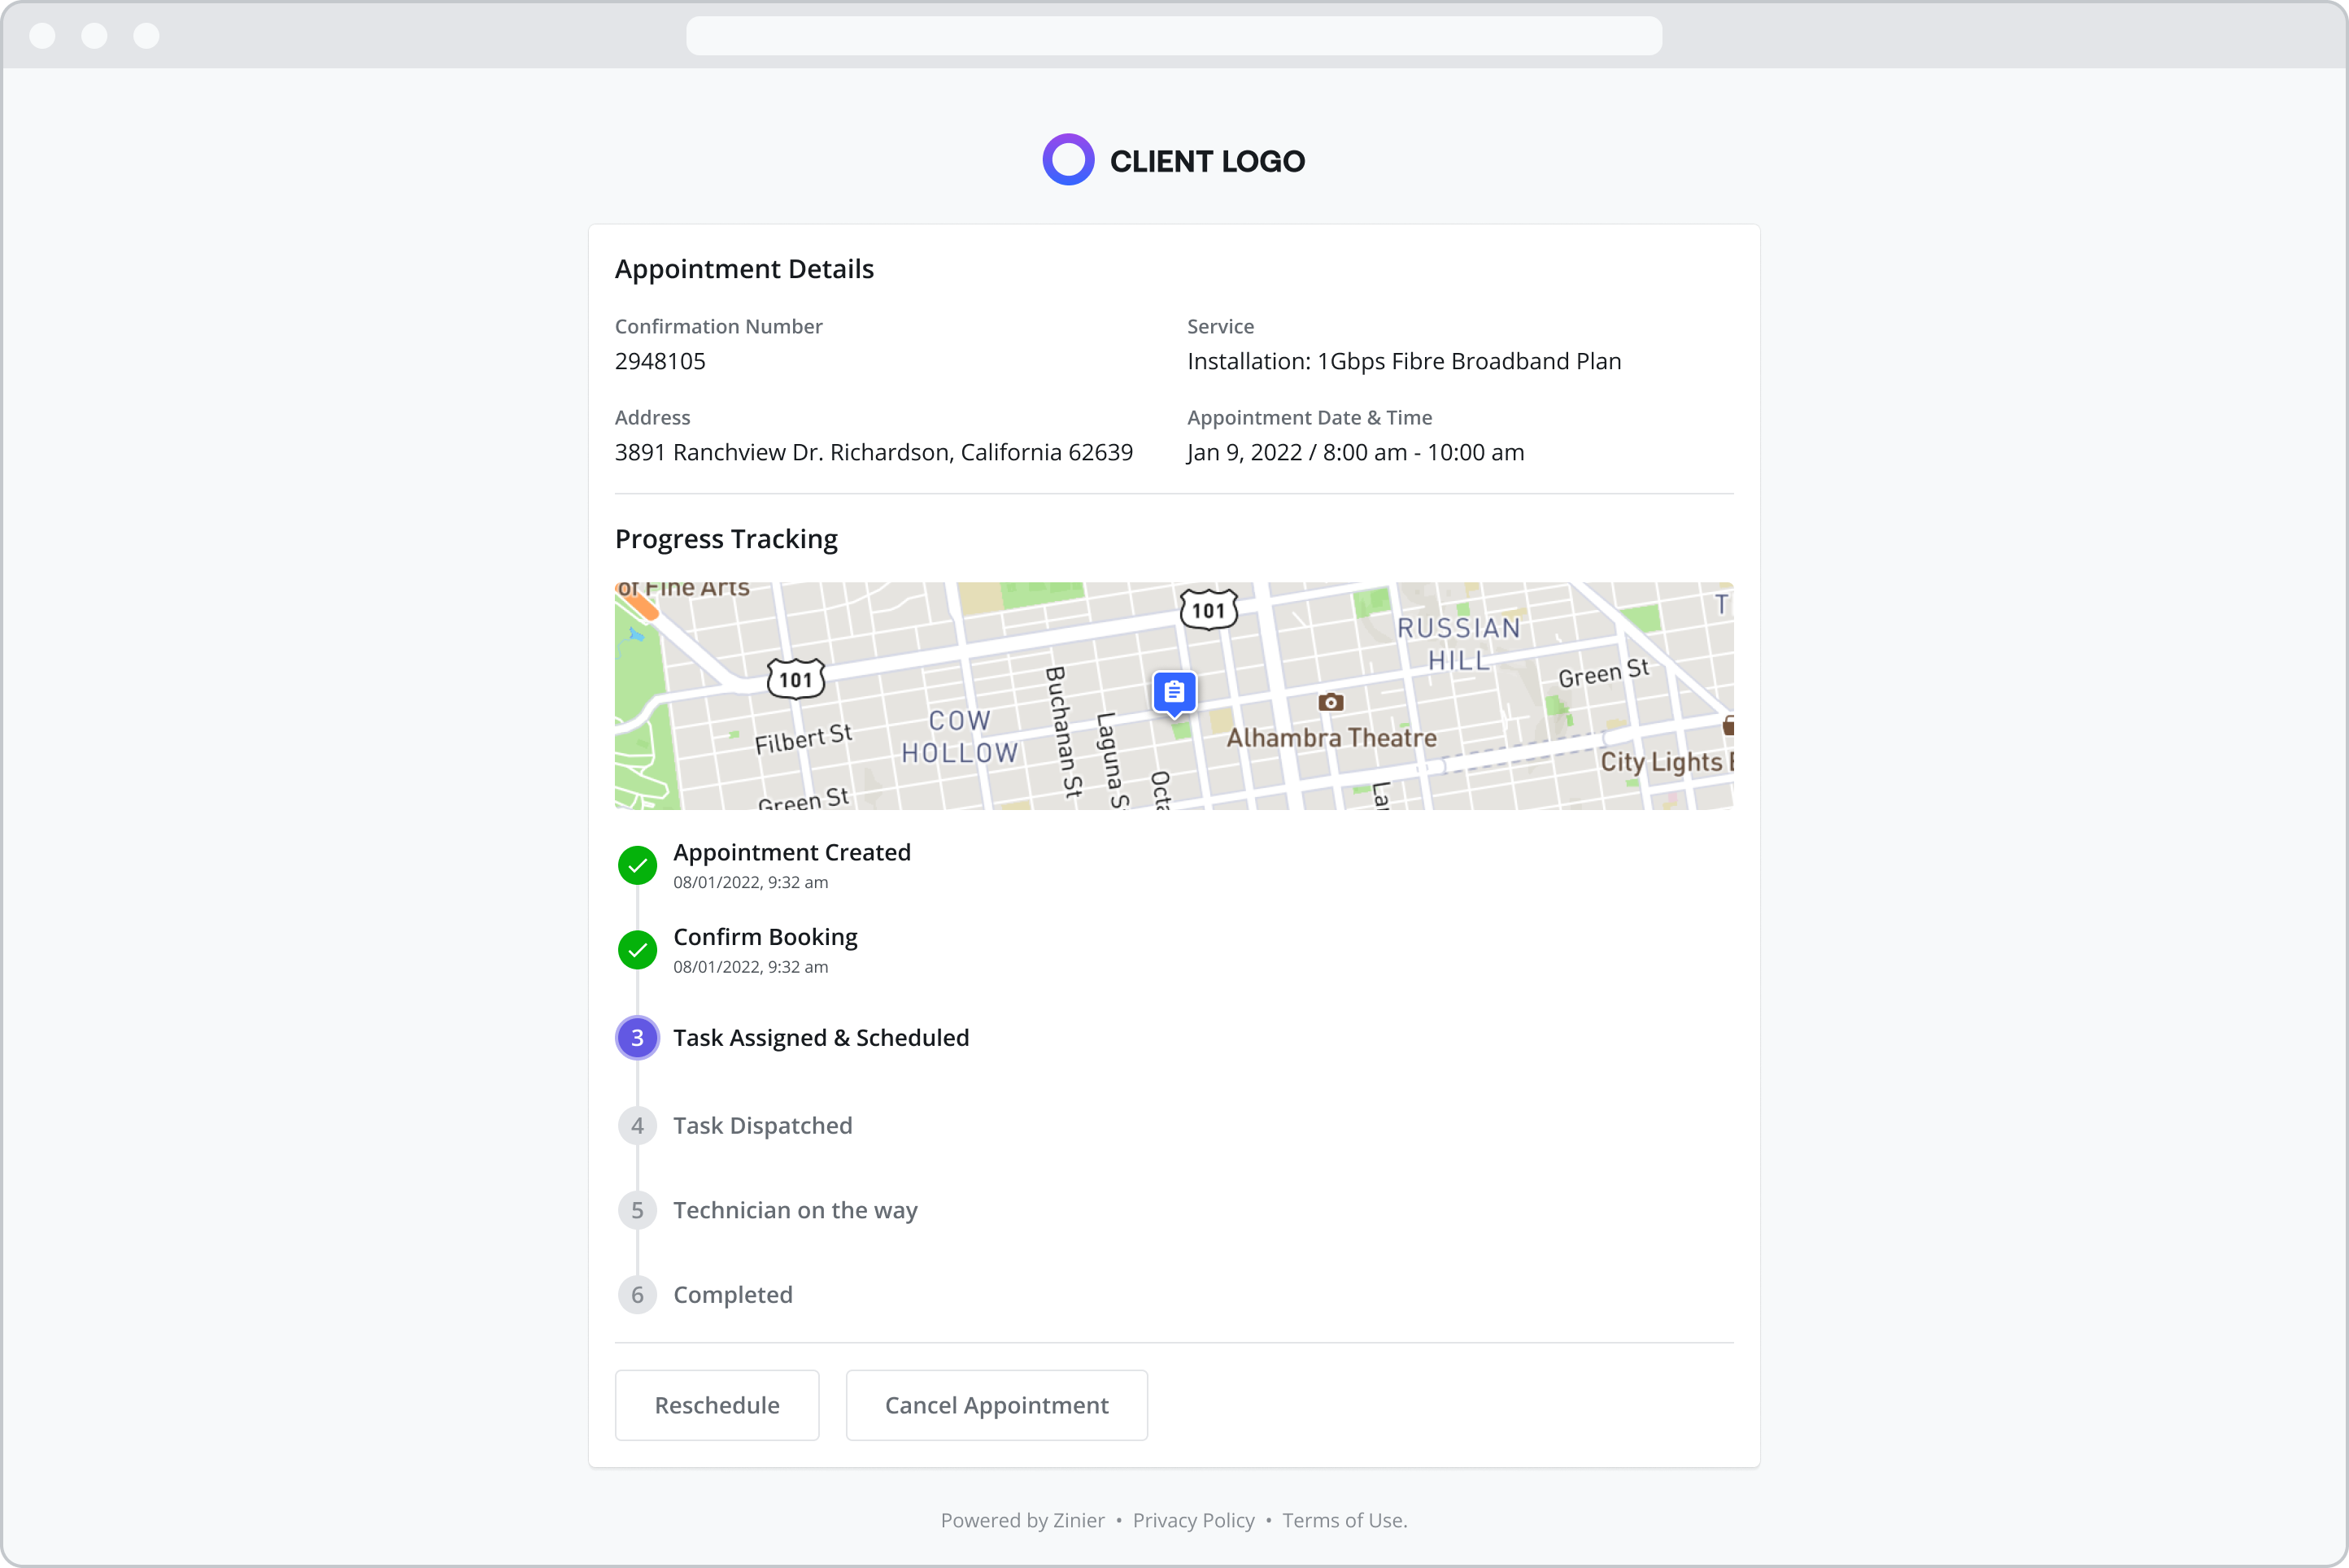
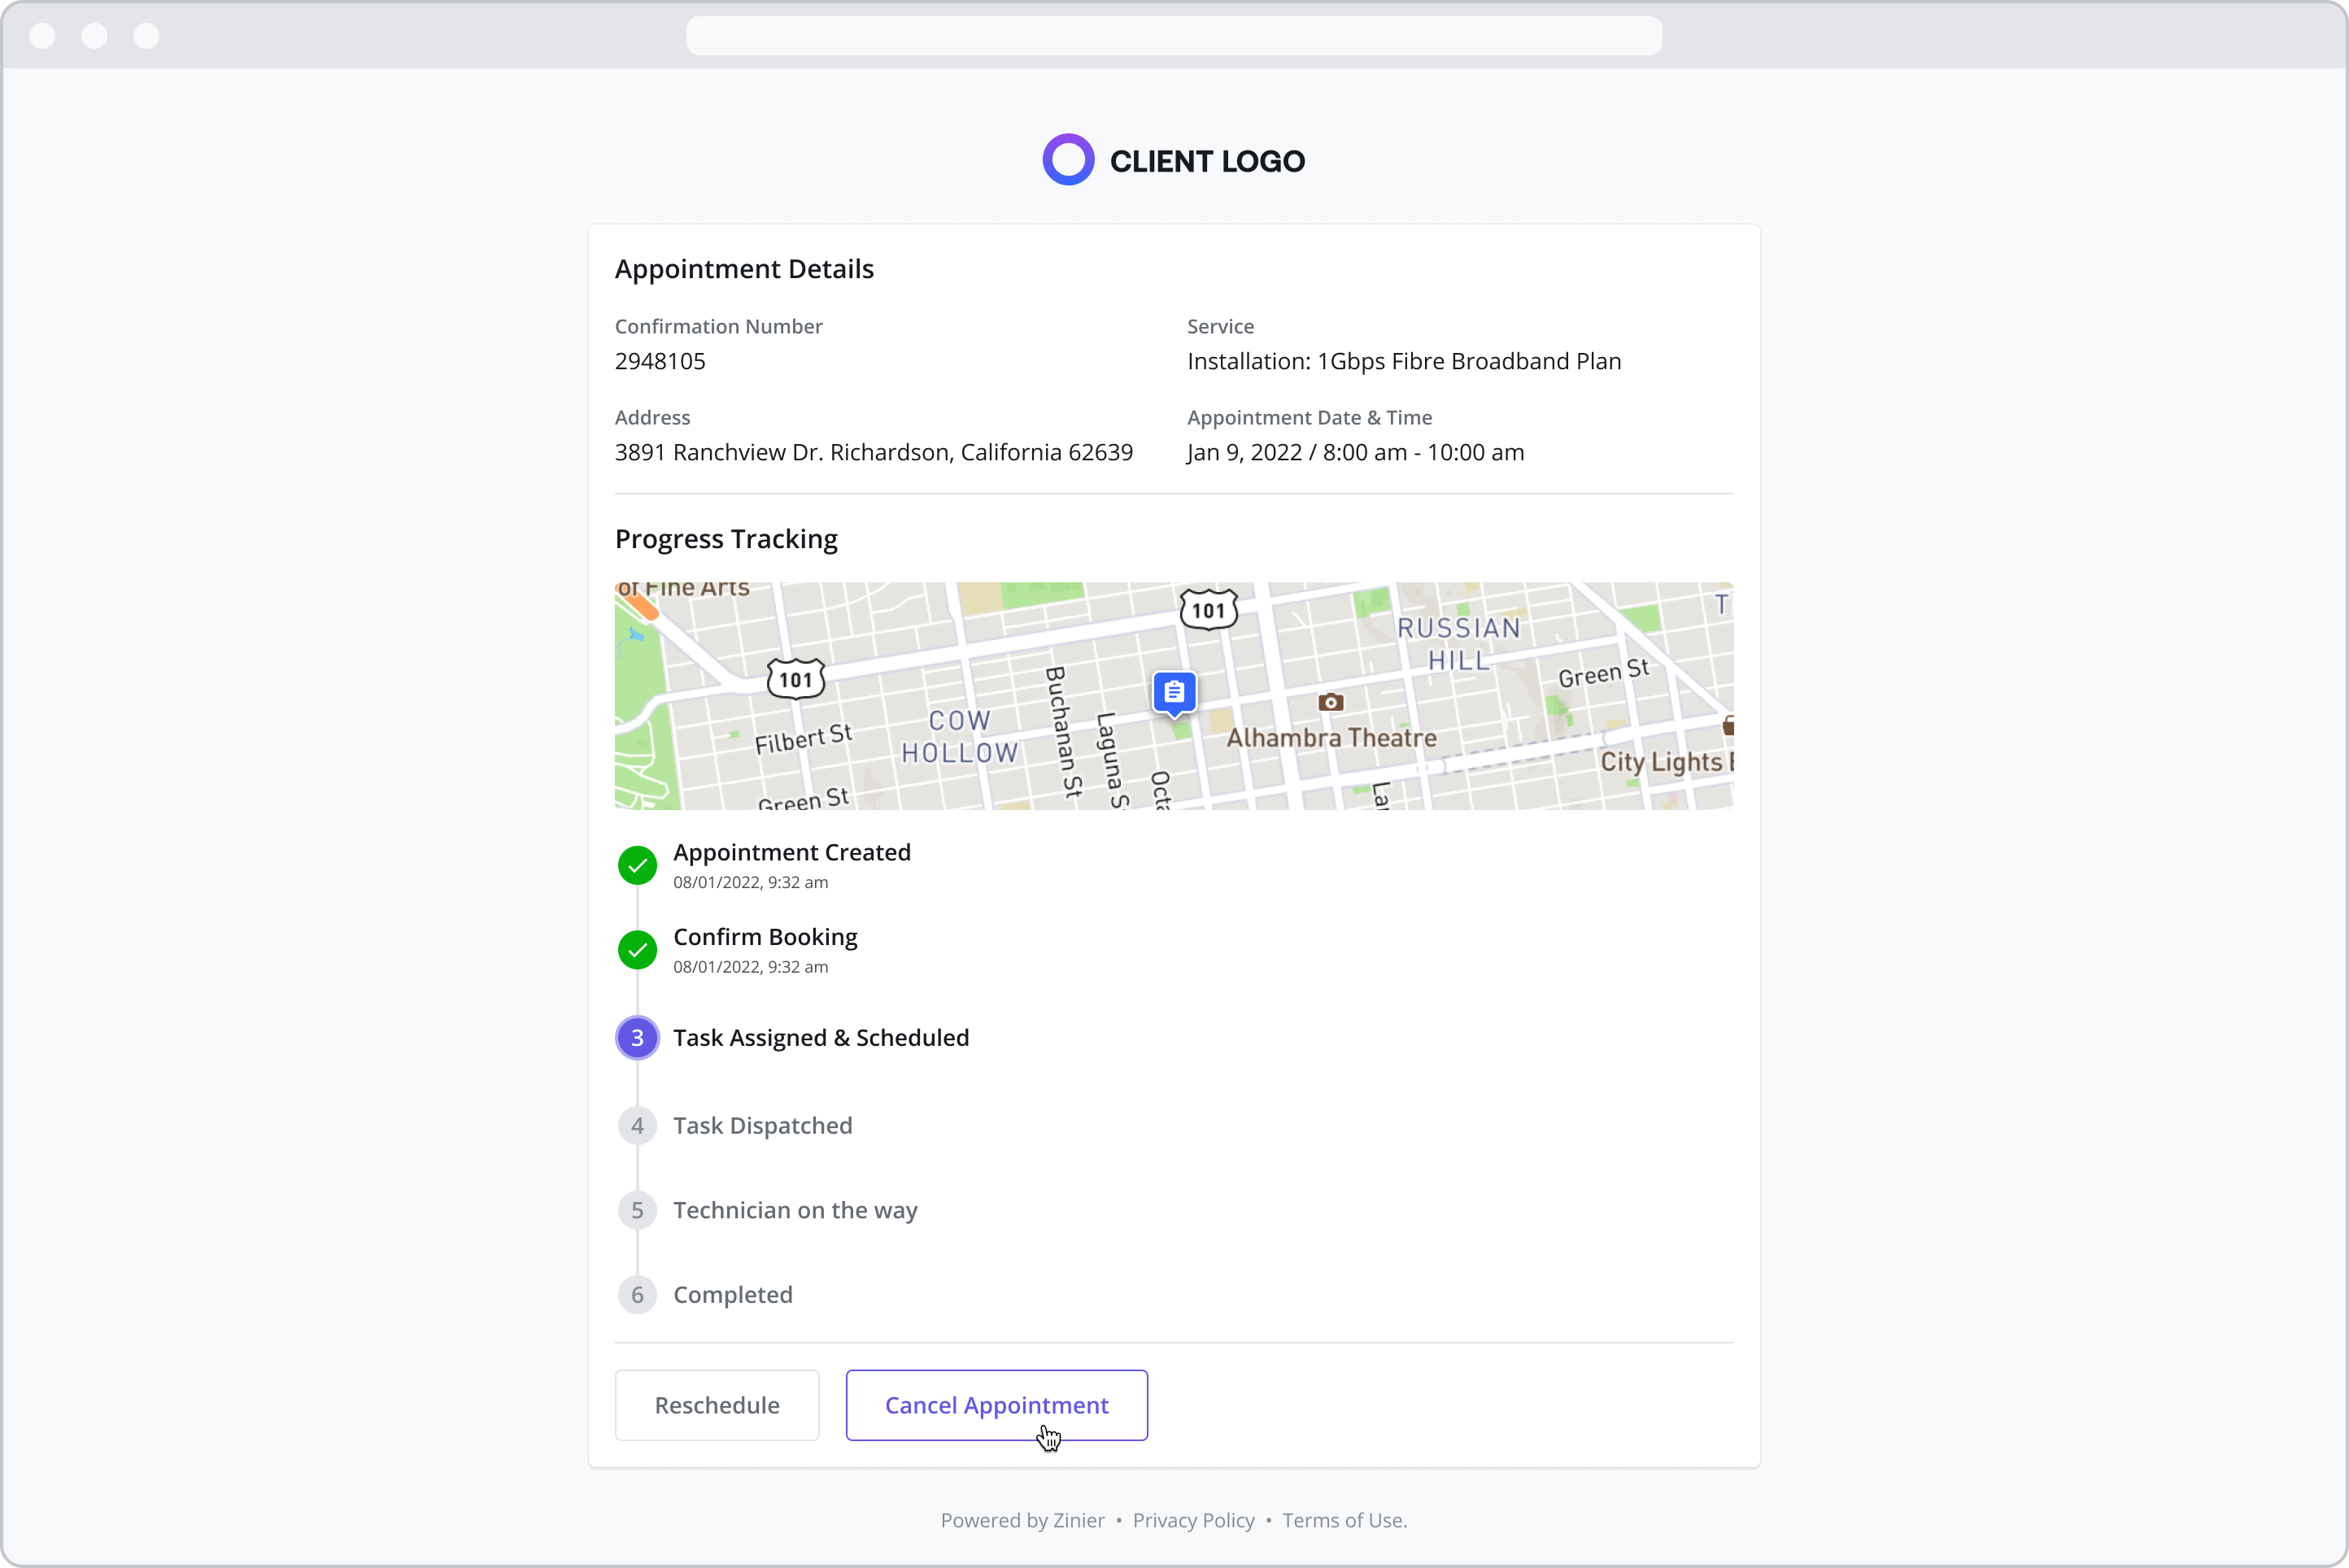
Viewing Appointment Details
Once an appointment has been scheduled, you can view the details and progress of the appointment at any time. To do so, follow the steps below:
Navigate to the Portal at any time via the unique link that’s included in your email or SMS.
Each new login will require you to enter a One-Time Passcode.
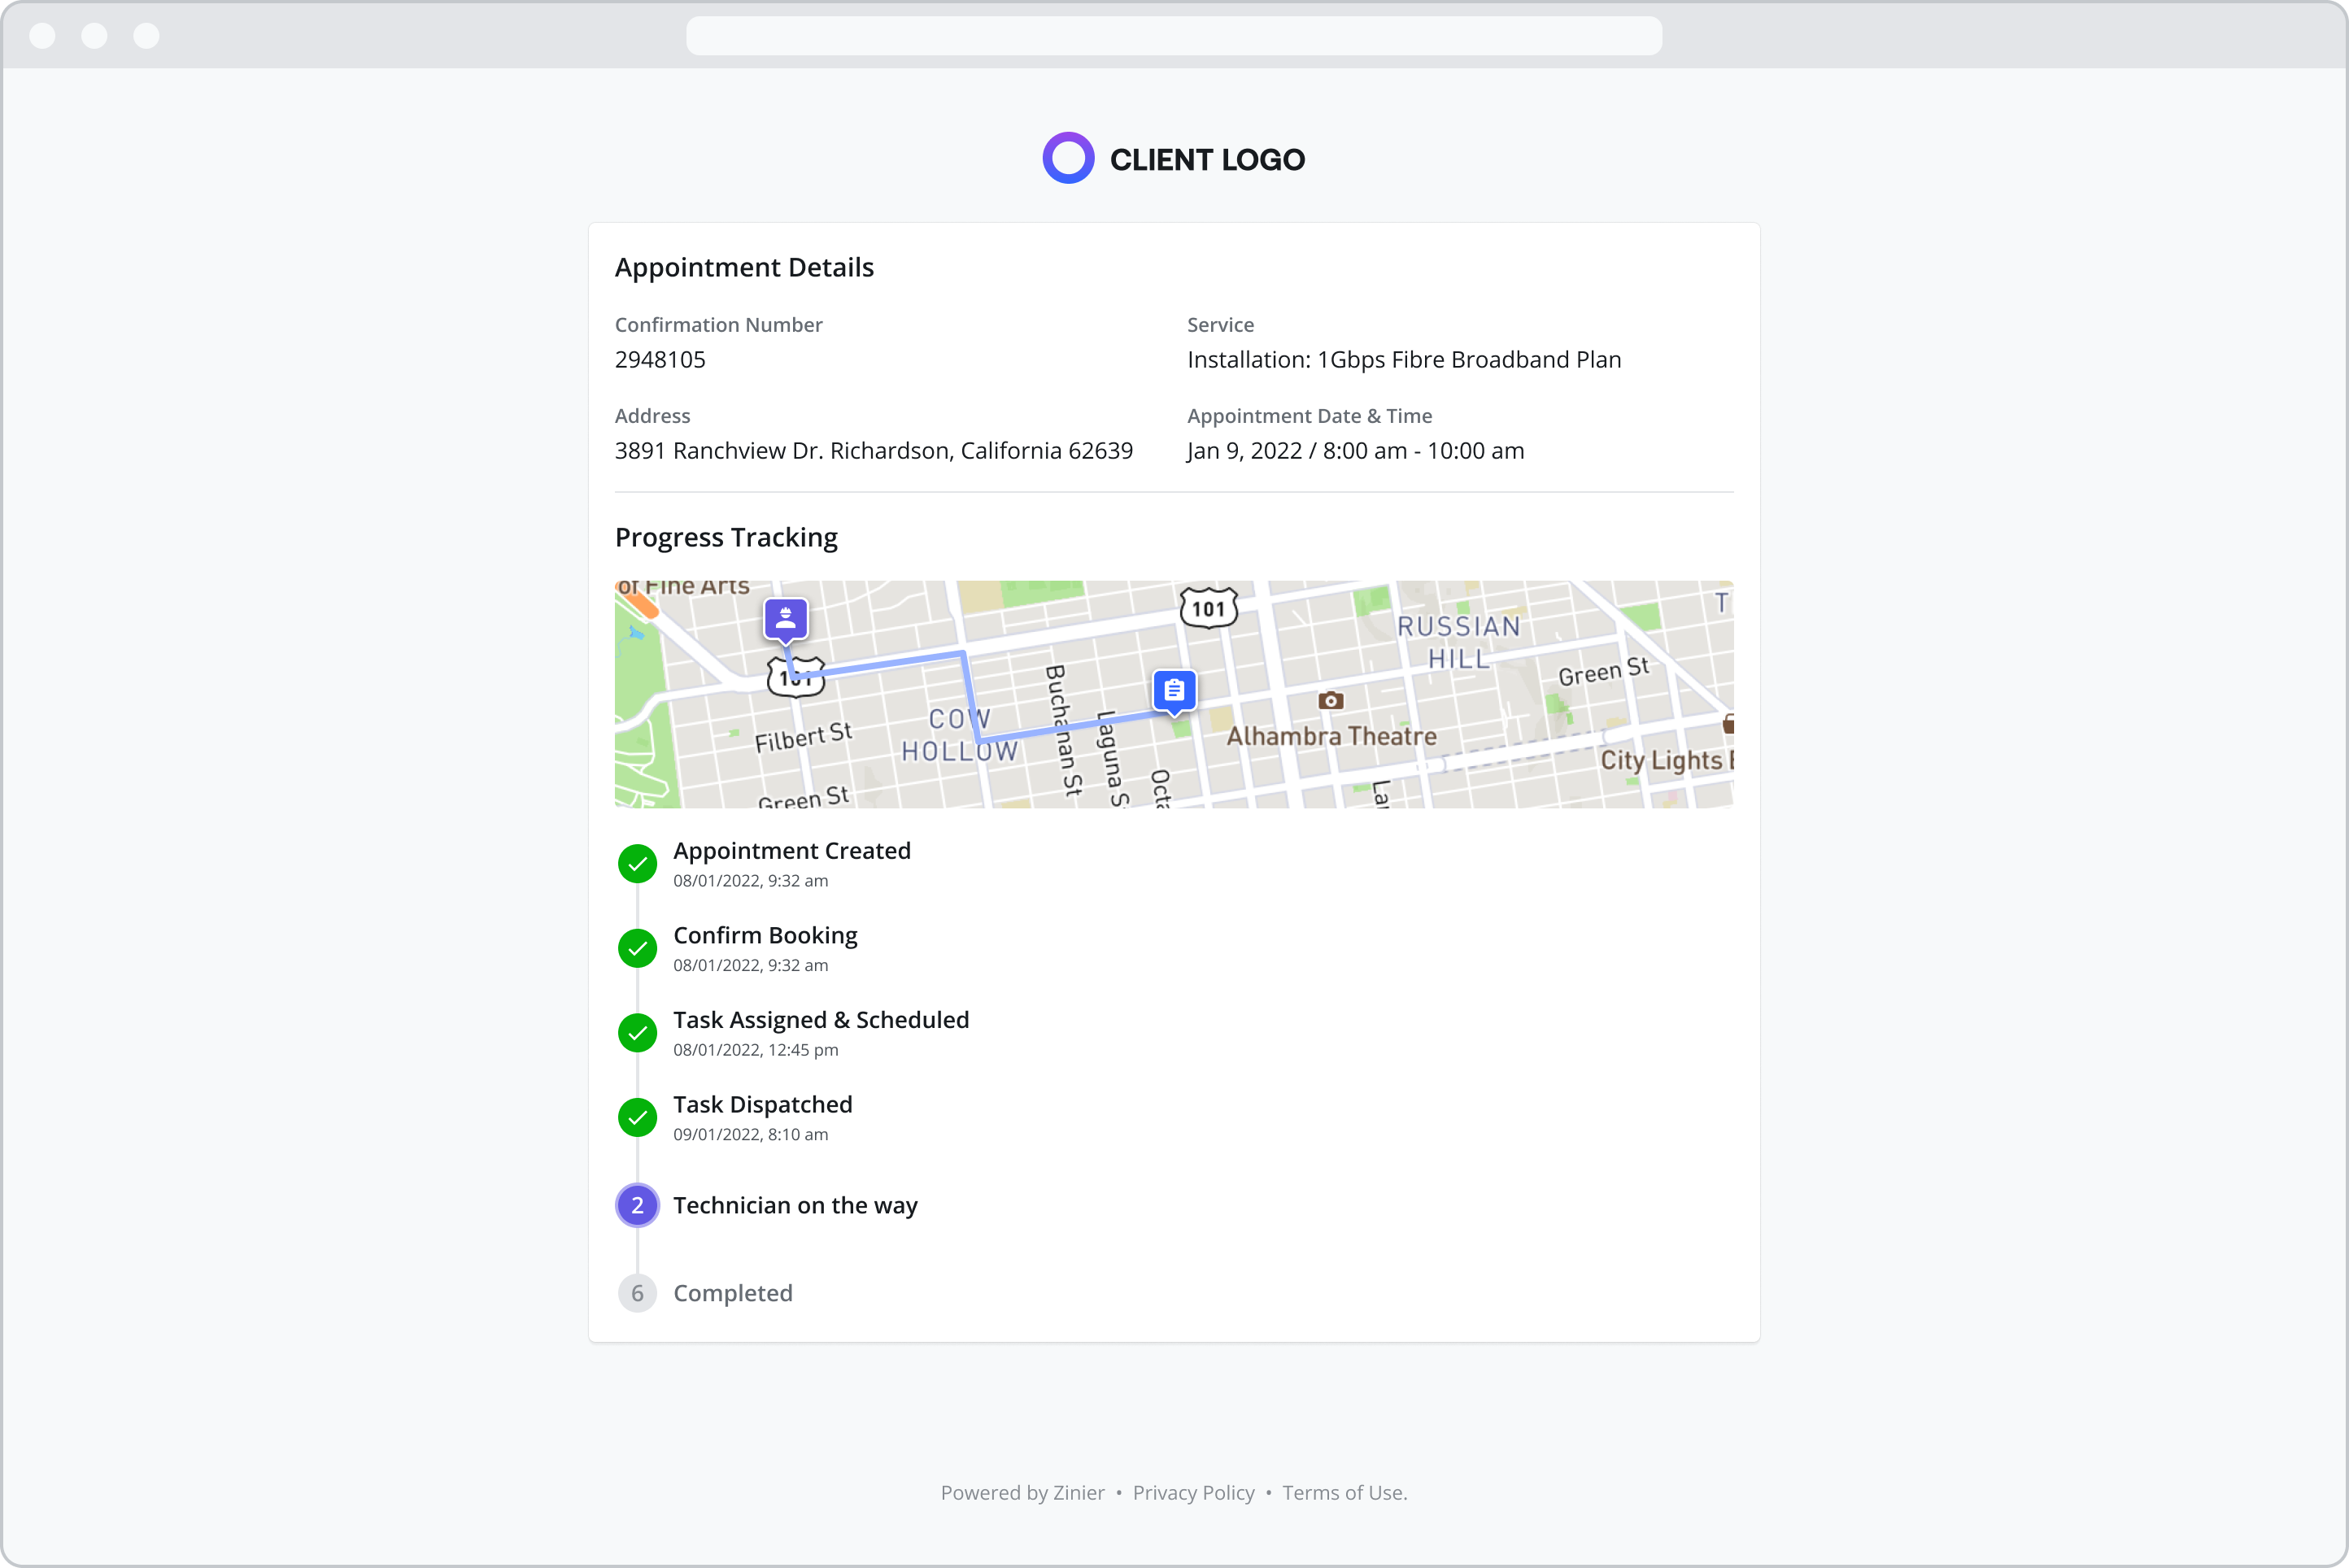
Once you are logged in, you will be able to view all your appointment details including the Confirmation number, Service Type, Appointment Address, and Appointment Date & Time
You will also be able to track which your appointment progress via the Progress Tracking section.
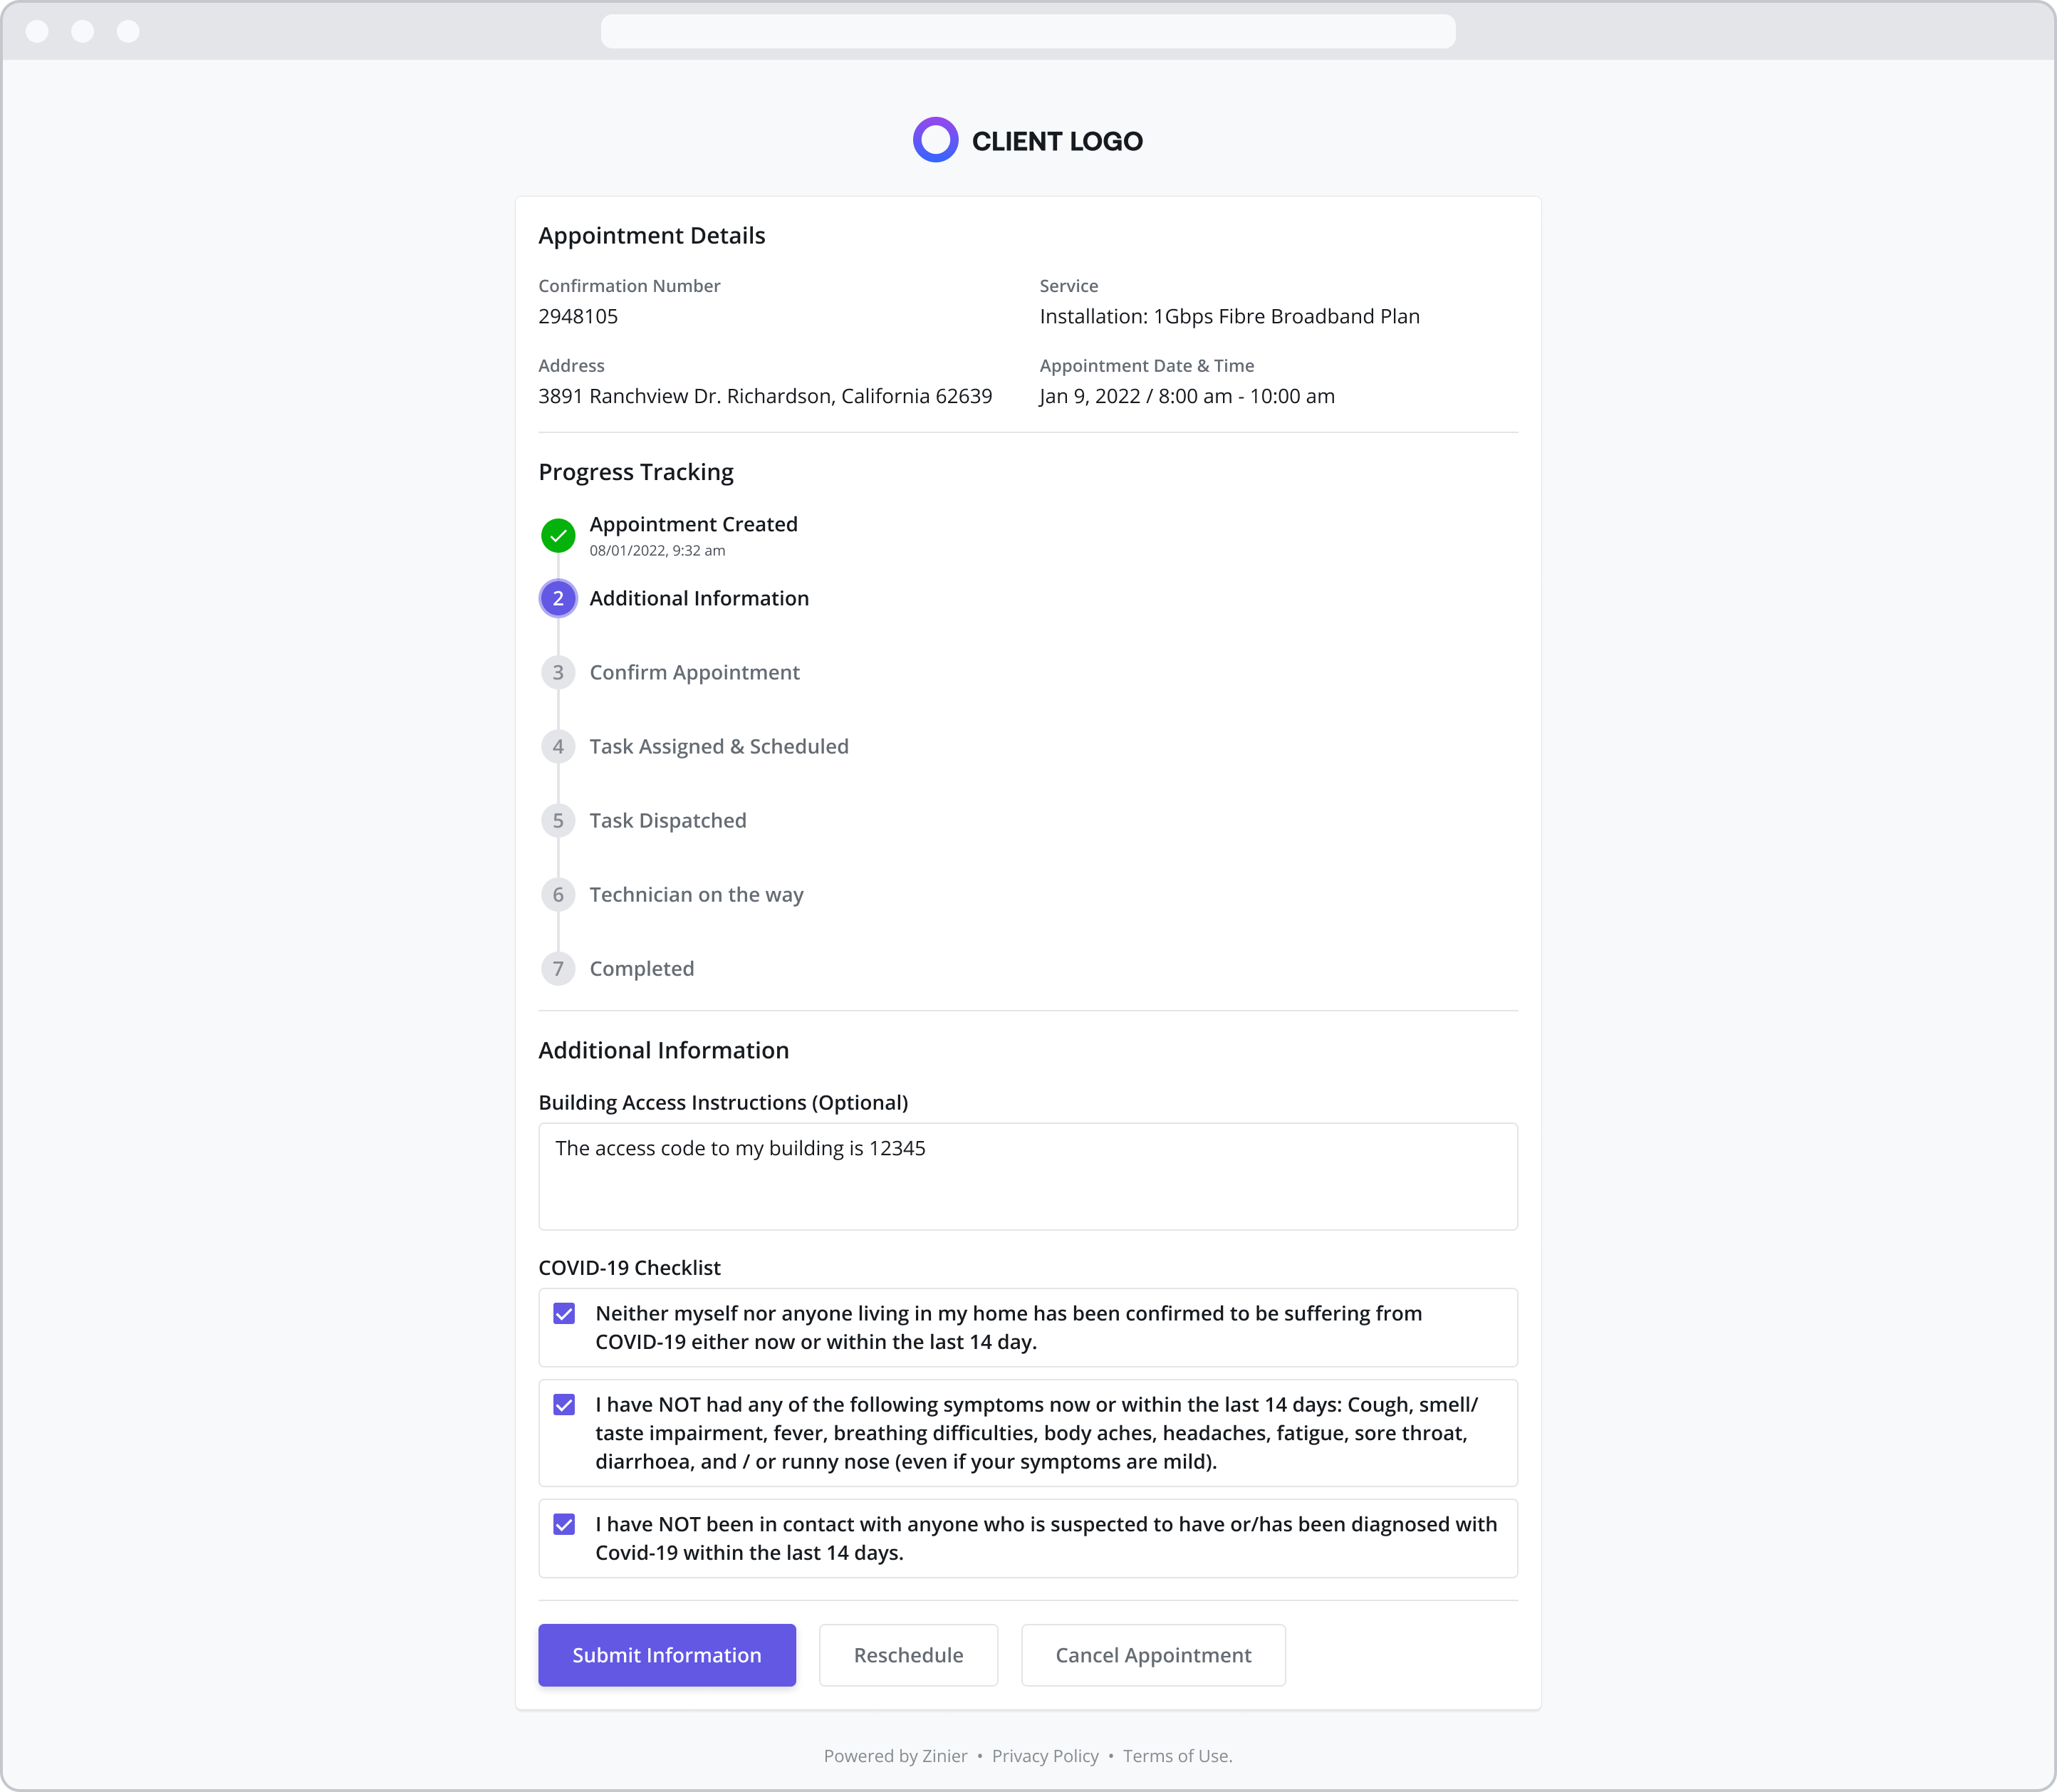
Additional Fields
If your technician requires additional information to complete your service, an Additional Fields section will appear below the Progress Tracking section
Enter the required information and select Submit. Note: Once you submit you will not be able to edit your answers.
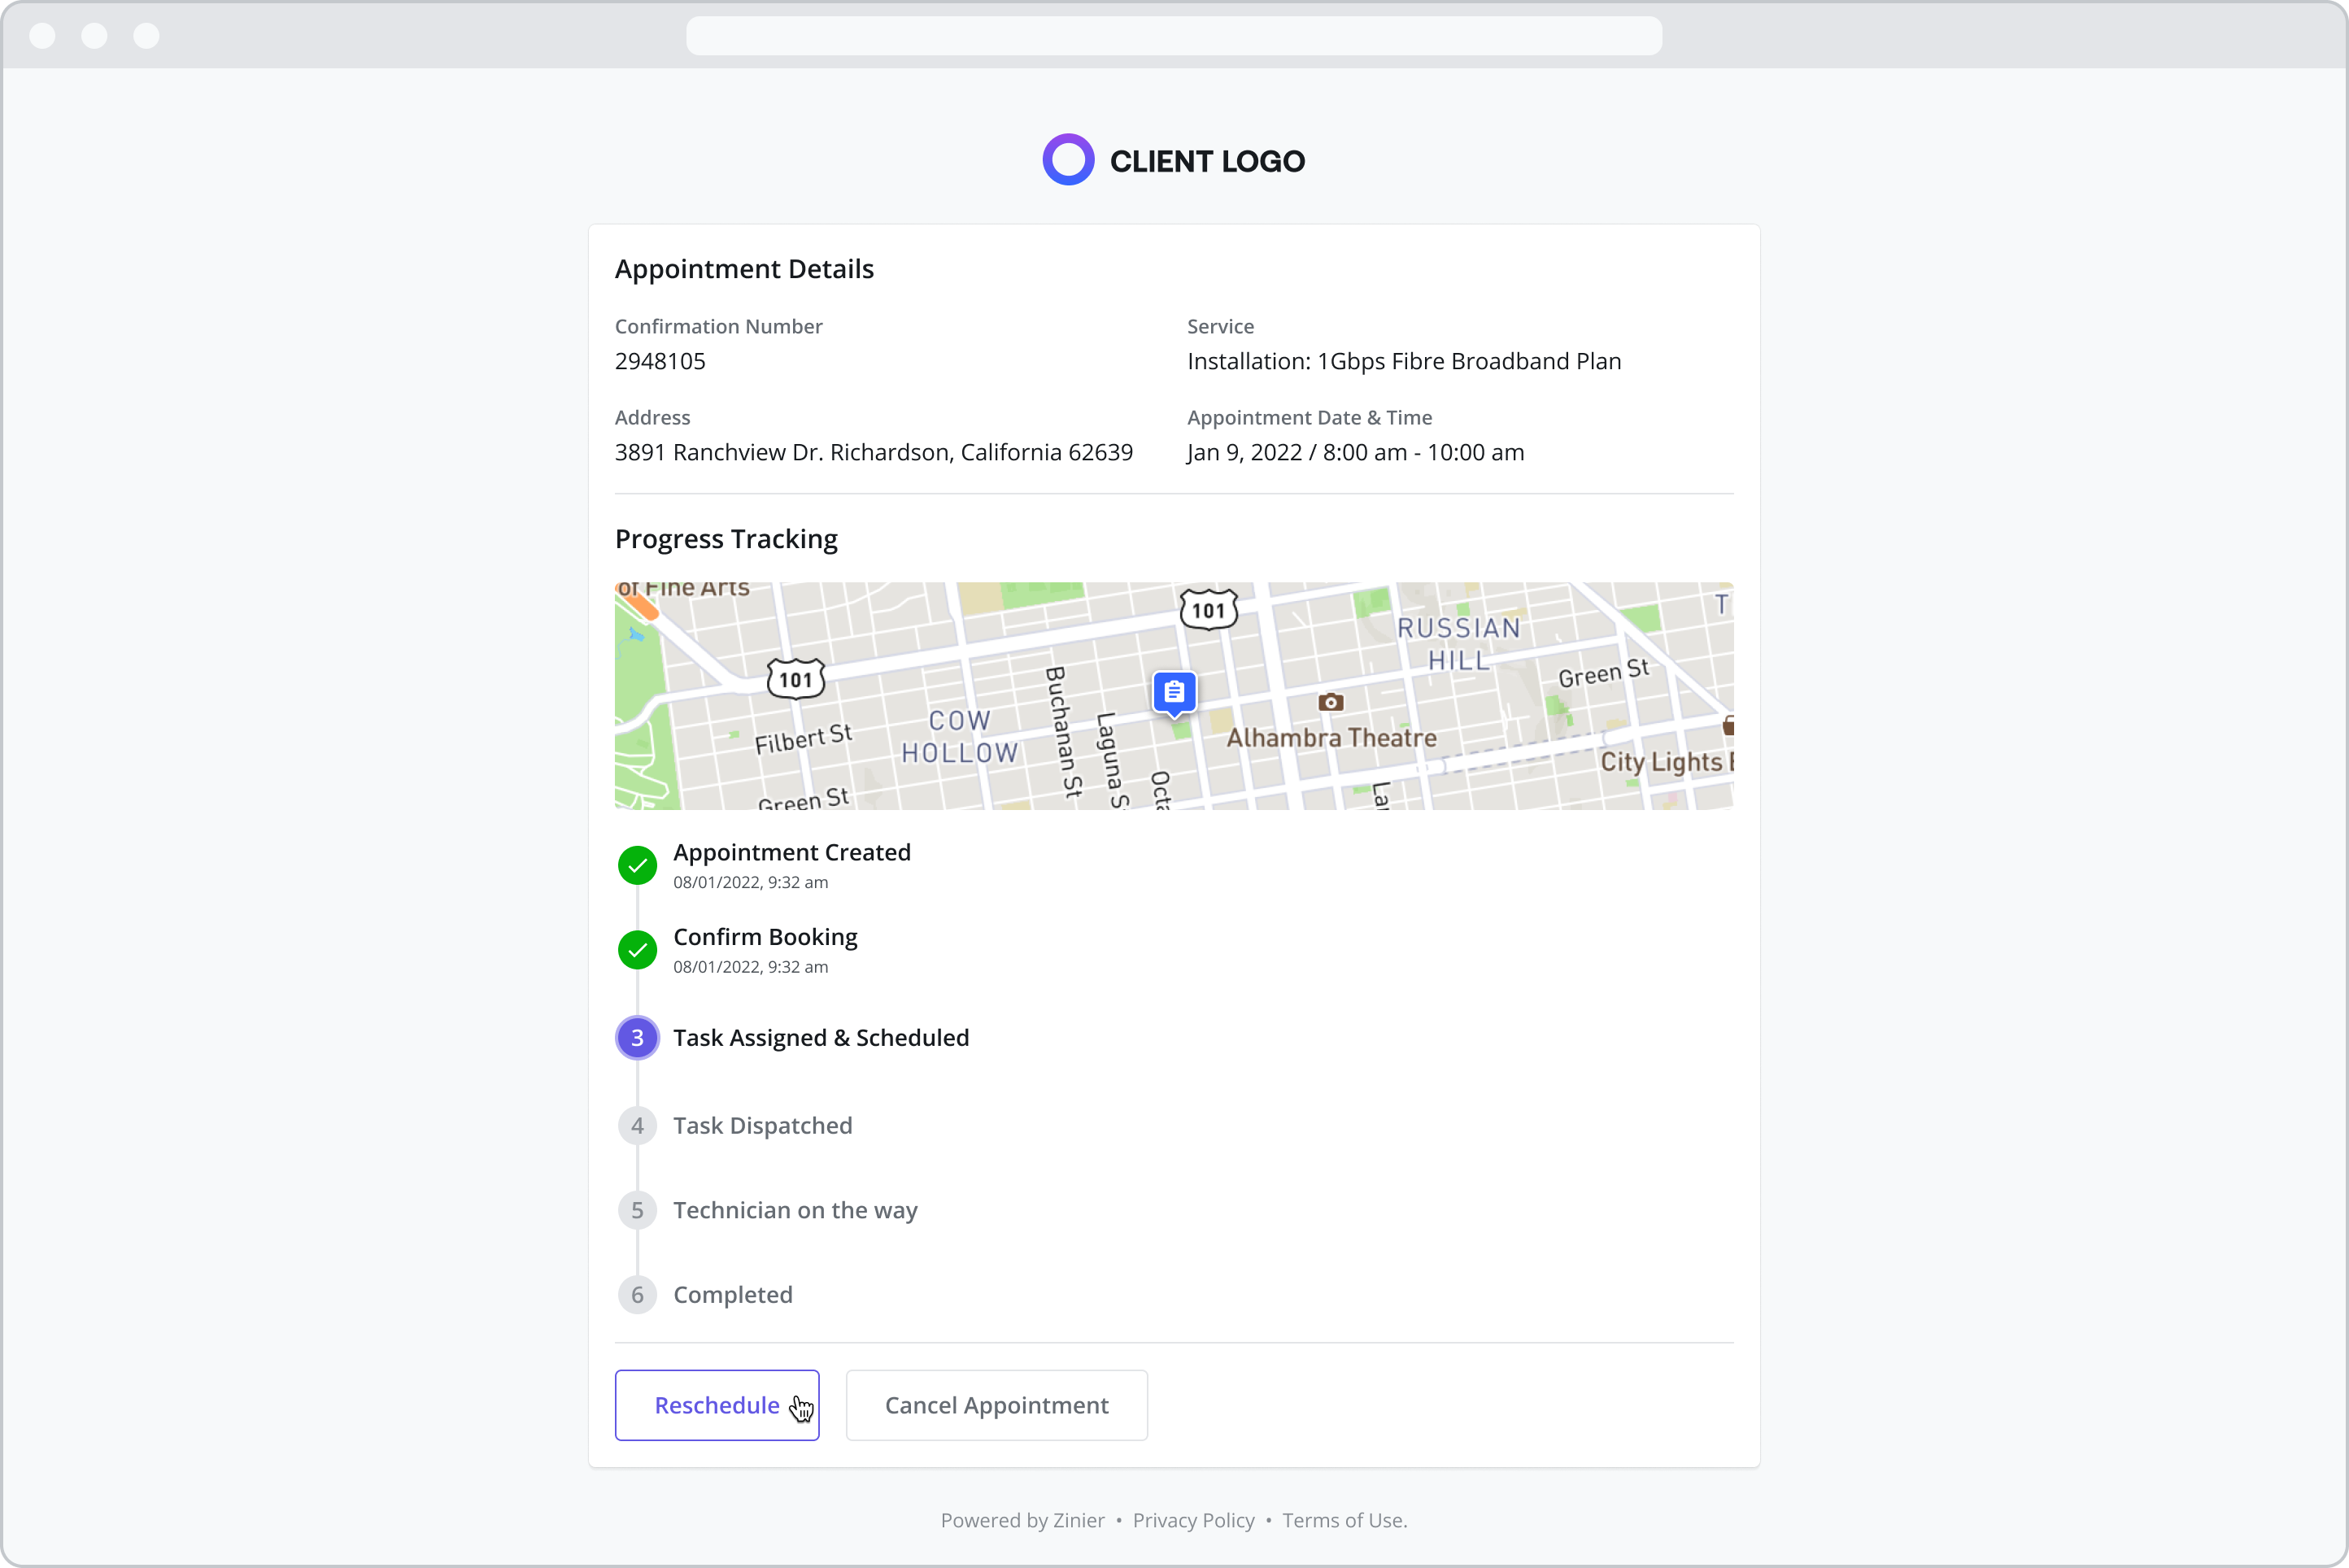
Rescheduling your Appointment
You can reschedule an appointment at any time. To do so, follow the steps below:
If you would like to reschedule your appointment, select the Reschedule button at the bottom of your details page.
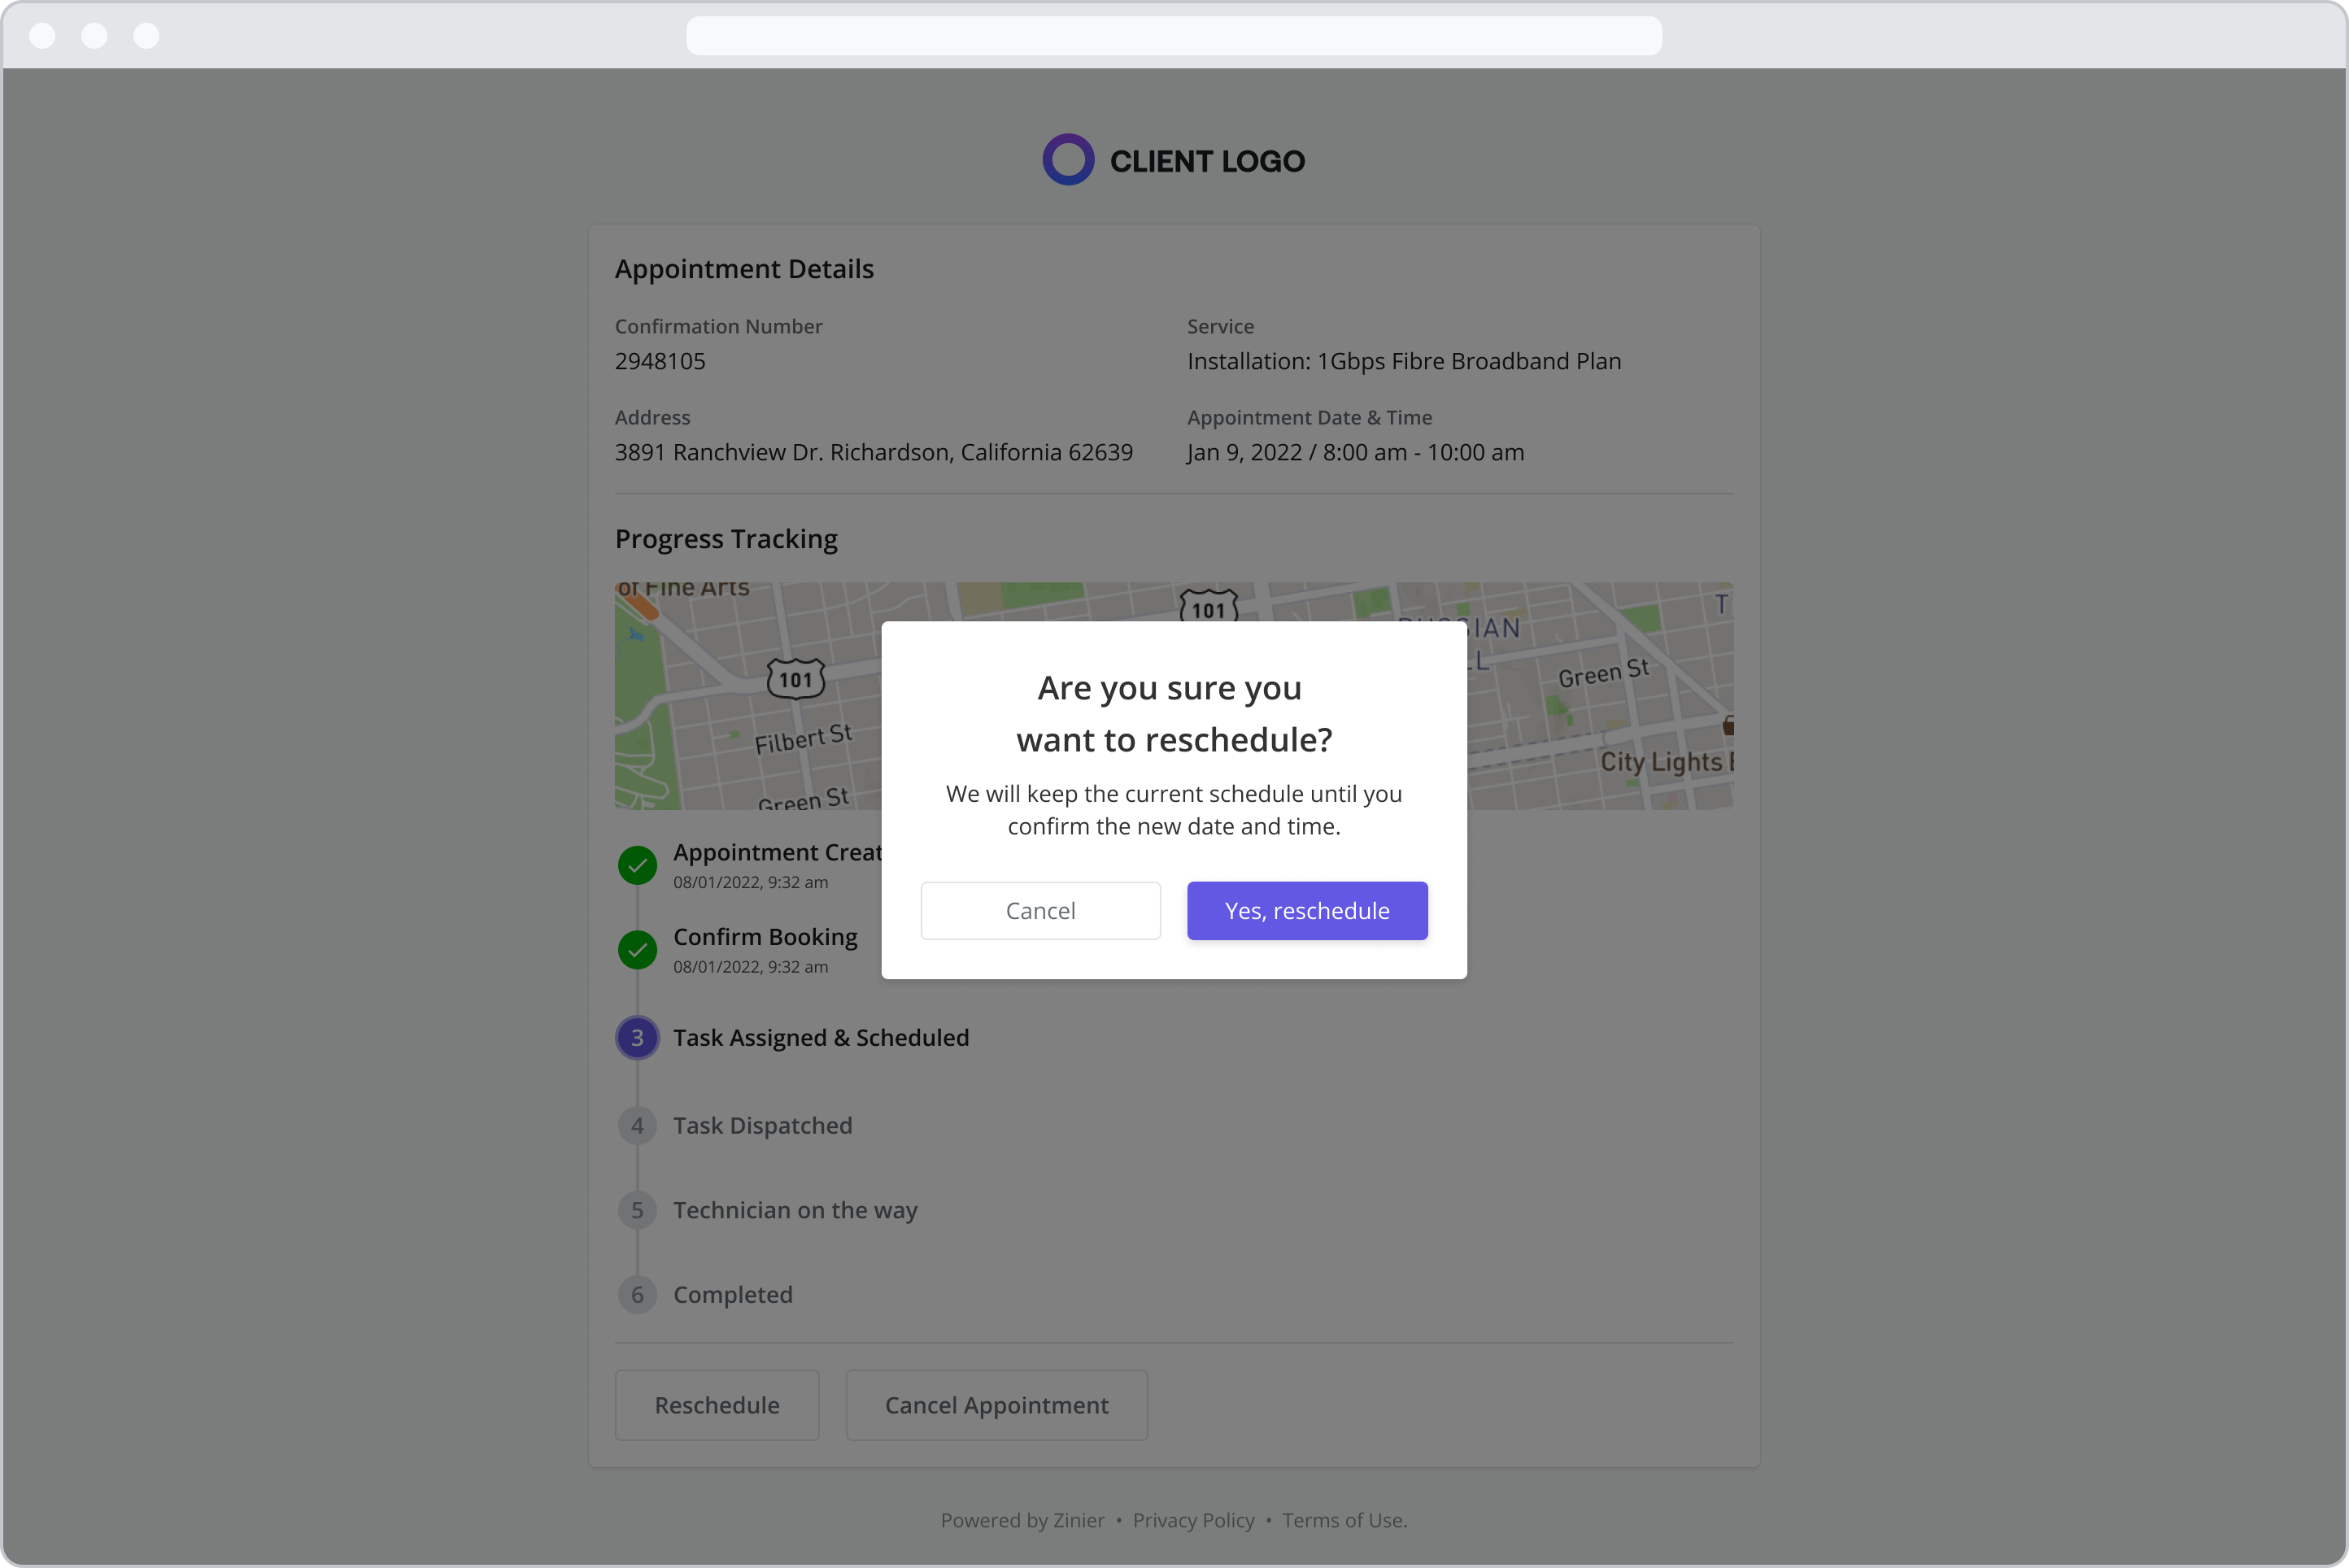
Confirm you would like to reschedule by selecting Yes, reschedule.
Select a date to view available time slots. You can use the arrows to move between different weeks.
Once you select a date, choose one of the available time slots.
Select Confirm & Submit
View your Appointment Confirmation details
Select Track your appointment to return back to the Appointment Details page
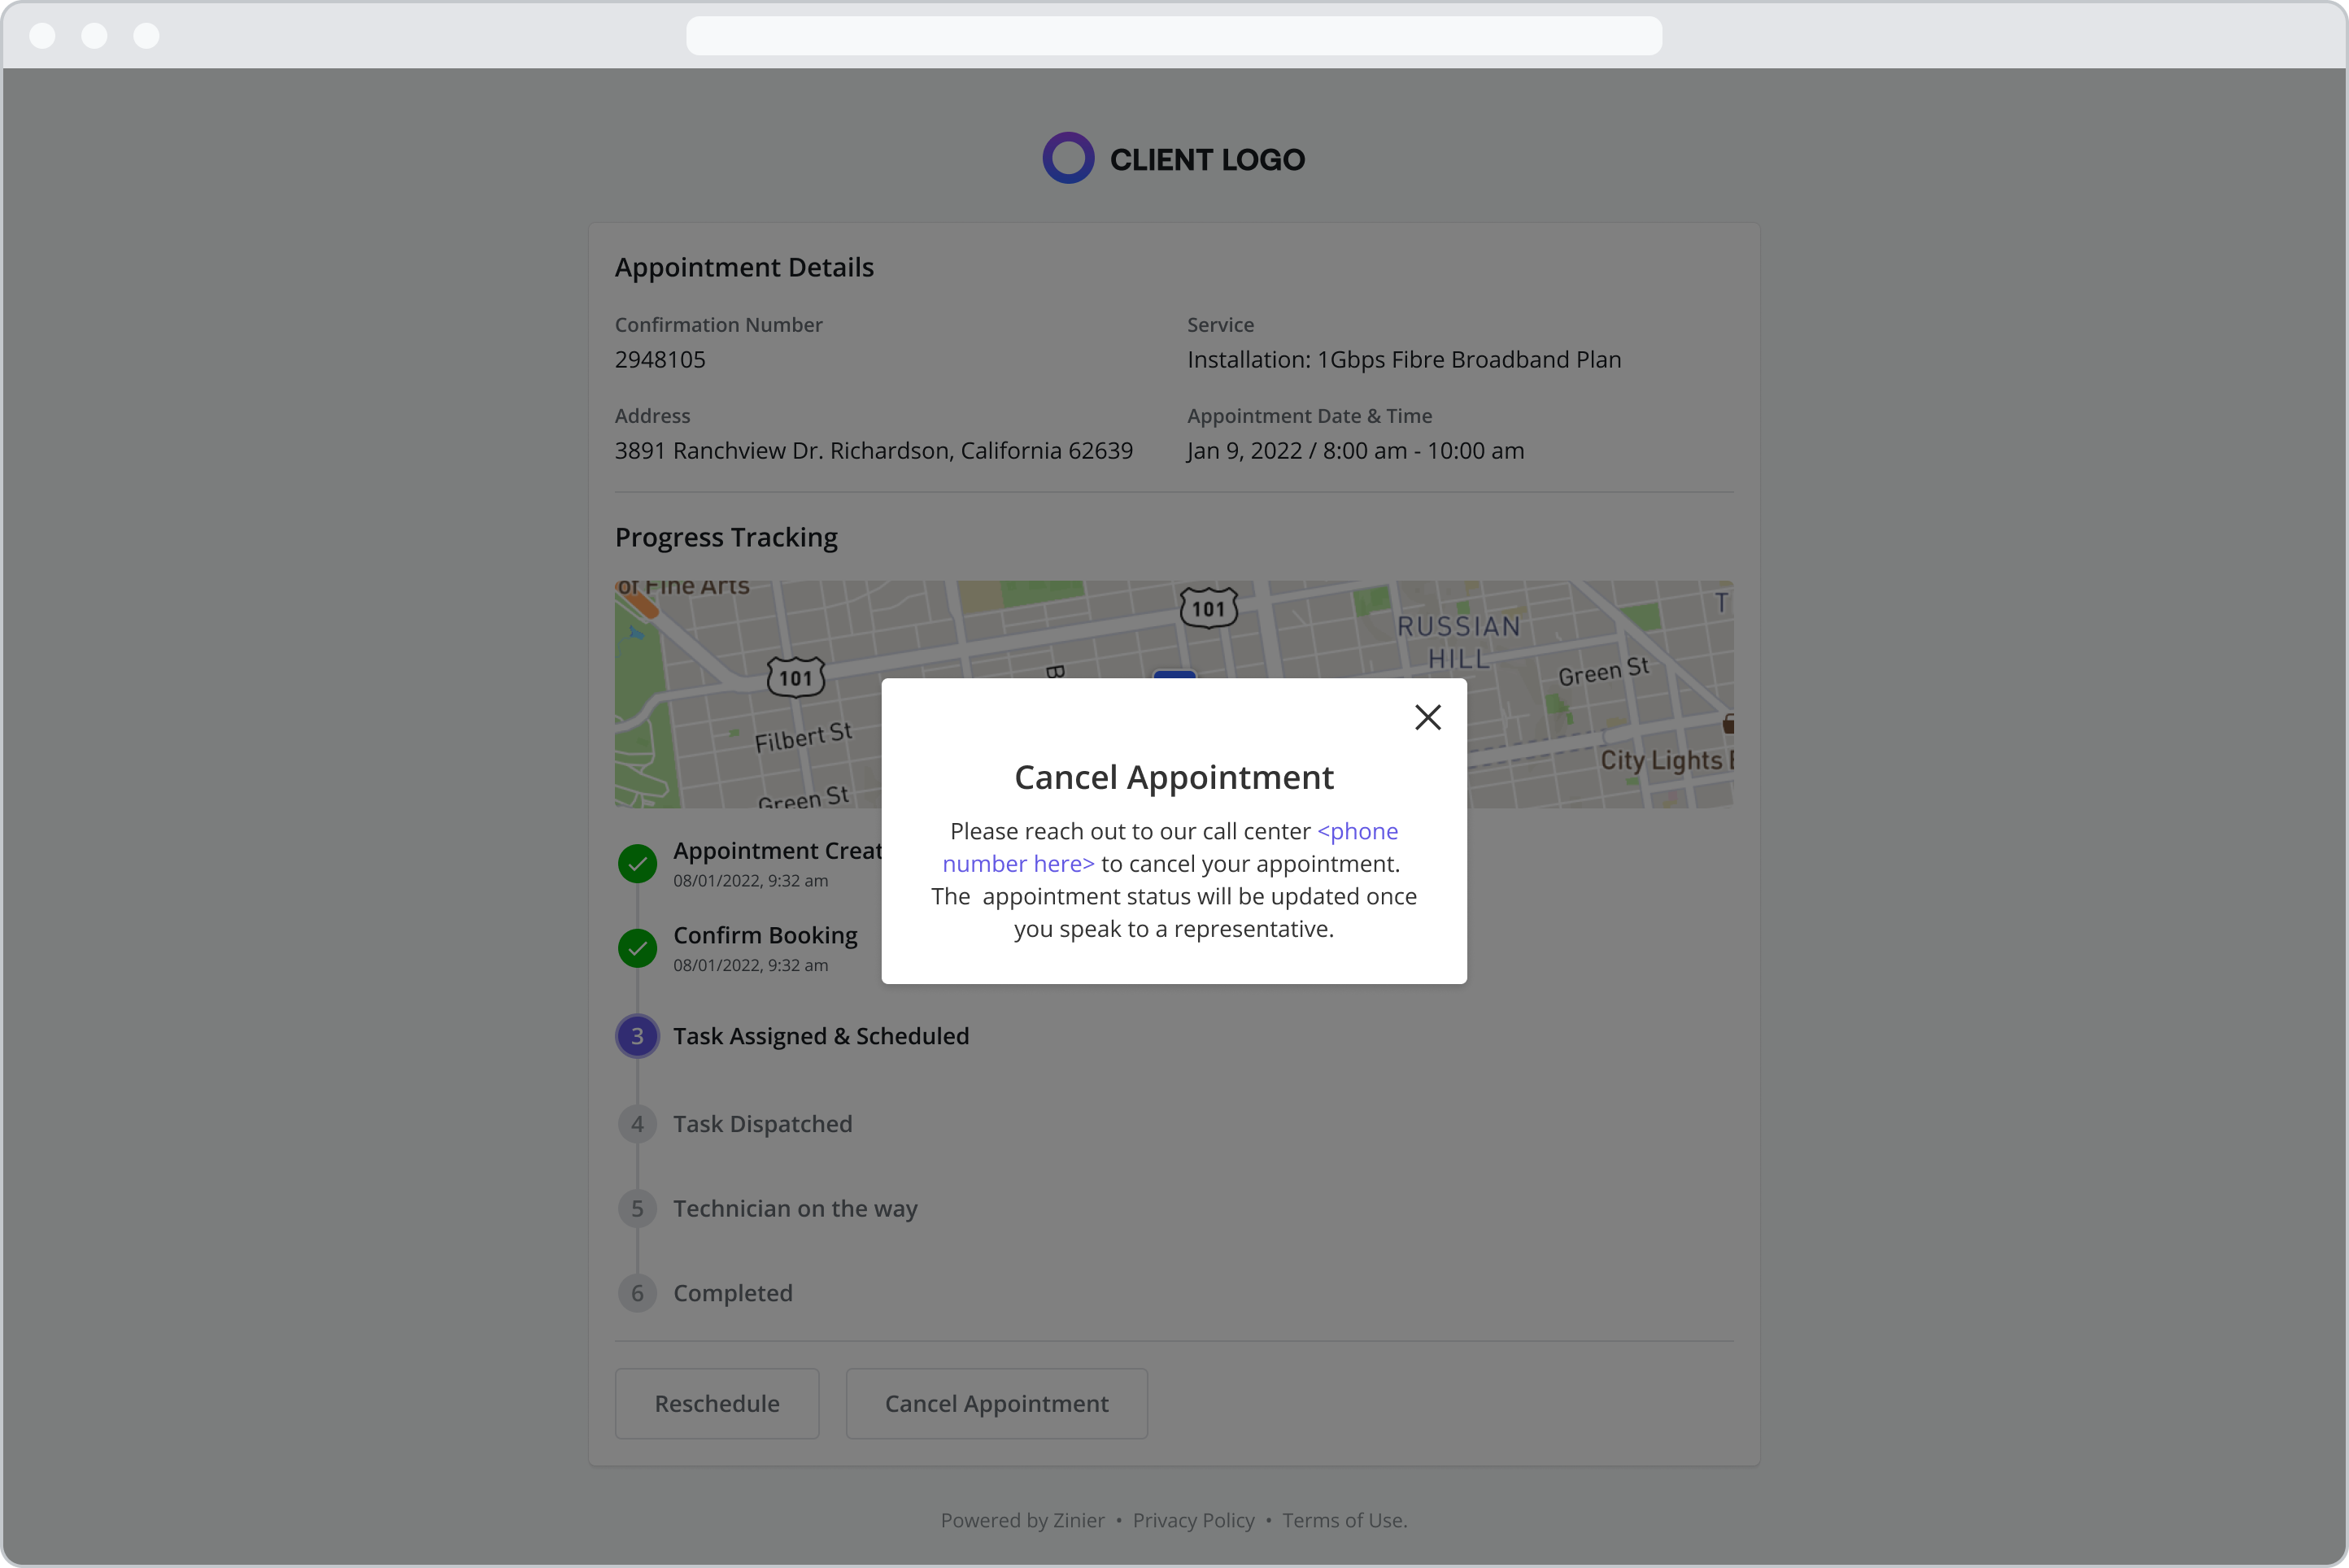
Cancelling your Appointment
You can also cancel an appointment at any time. To do so, follow the steps below:
To cancel your appointment, select the Cancel Appointment button at the bottom of the Appointment Details Page
If cancellation directly through the portal is available, you will be redirected to a confirmation page regarding the cancellation
If cancellation through the portal is unavailable, a pop-up will provide you with a help number to contact and manage your appointment.
Tracking your Technician on the Day of the Appointment
On the day of your appointment, you will receive a notification (via SMS or email) letting you know that your Technician is on the way to the appointment address. To track your technician, follow the steps below:
Access the notification (via SMS or email) that informed you that your Technician is on the way to the appointment address
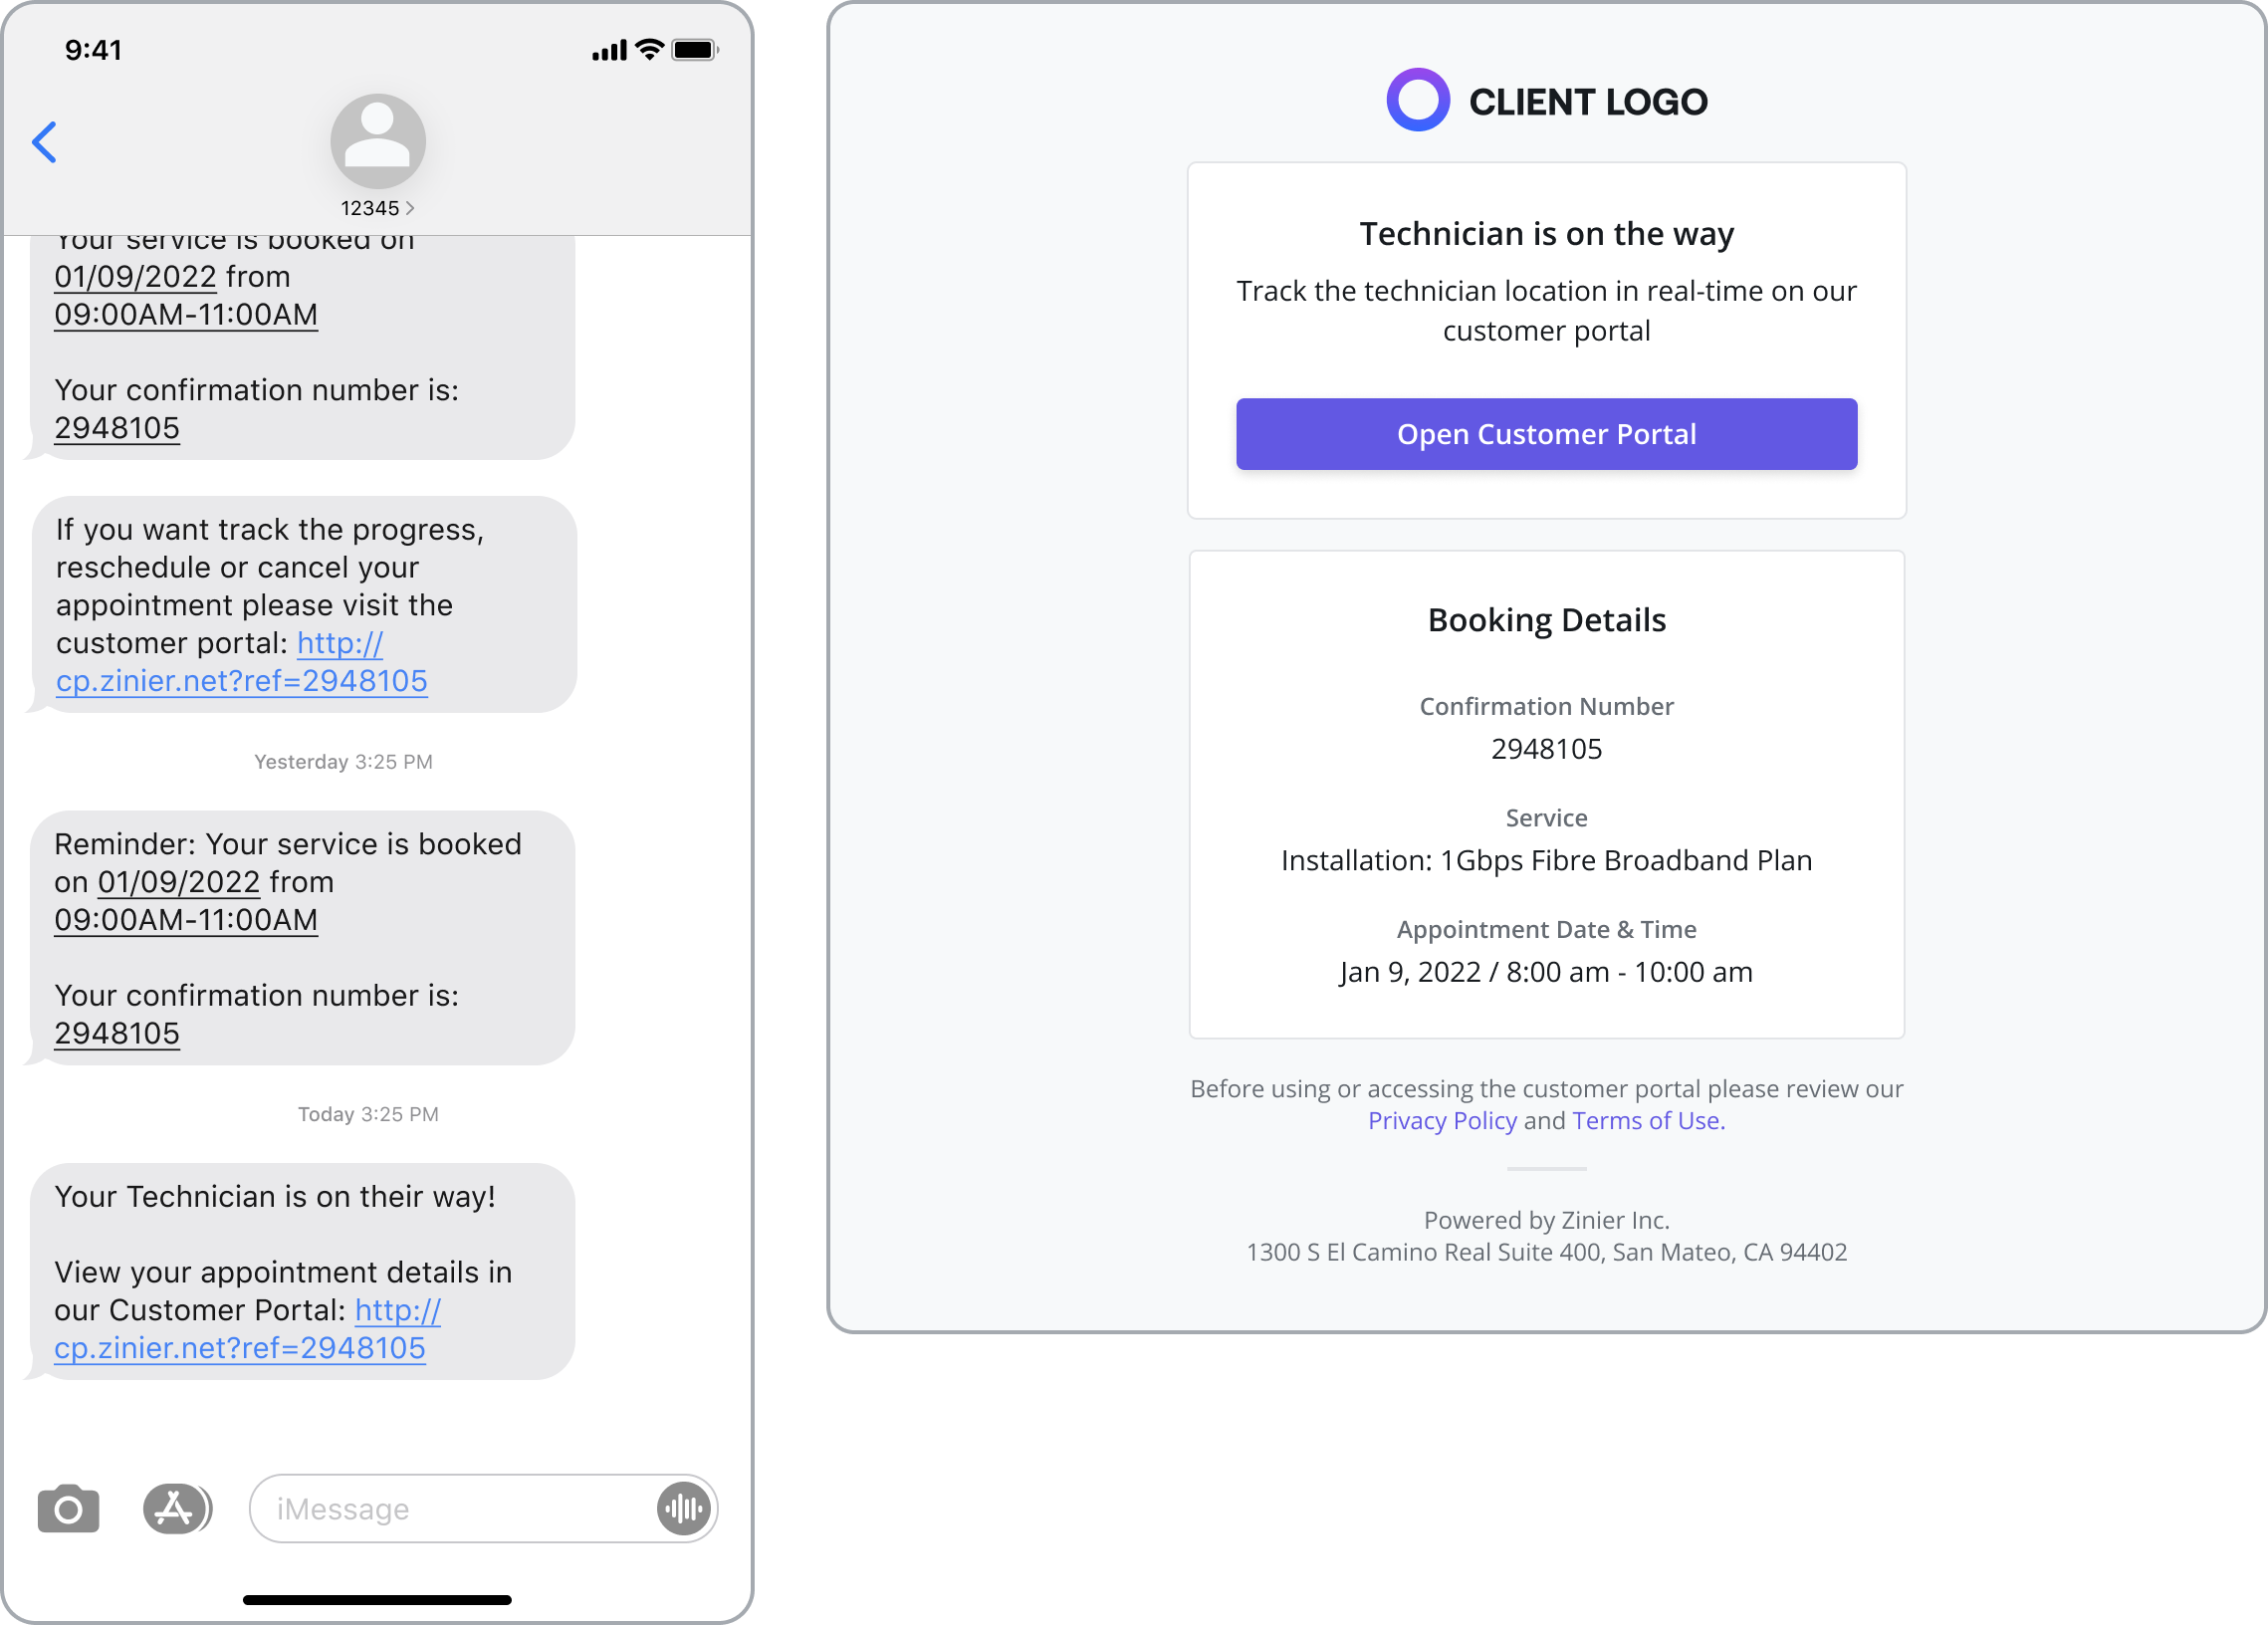
Click on the unique link in the notification to navigate to the portal.
If your org has configured with OTP for login, follow this step. If your org has been configured without OTP login, skip the next step.
Select Get One Time Passcode.
Navigate back to your email or mobile device and copy the alphanumeric code sent to you.
Enter the code into the field and select Login
On your Appointment Details page, a Map will appear above the Progress Tracking bar showing you the route your technician is taking to the appointment address.
Summary of Key Capabilities
Secure Link Access
The customer portal is accessed via SMS or email via a secure link responsive to the mobile phone factor.
One-Time Password Authentication
To secure sensitive Customer data, the Portal by default uses a One-Time Password Authentication flow to confirm the identity of anyone trying to access the portal. An alphanumeric code is sent to the Customer via SMS or Email once requested on the OTP screen. The use of OTP for login is not required and can be turned off.
For more information on configuring the customer portal to use or not use OTP at login, visit the Configuring the Customer Portal for your Organization | Customer-Portal-Login-with-or-without-OTP page.
Notifications
By default, customers receive the following notifications:
Booking Invite: An invite to the Customer Portal that allows your customers to select an appointment time that works for them
Appointment booking confirmation: Once customers have selected an appointment time, they’ll receive a confirmation message to know that their appointment is scheduled.
24-Hour Reminder: Customers will get a reminder notification 24 hours before their appointment.
Technician Enroute: Customers will also know when the assigned Technician is en route to the customer site.
Task Completion: The Customer will receive a notification once the appointment/task is complete.
Manage Your Appointment
Book an Appointment: The customer will have the option to select an appointment window directly from the customer portal.
Reschedule an Appointment: The customer will have the option to select a new appointment window directly from the customer portal. Reschedule will be blocked 1 hour before the selected Appointment Window time by default.
Cancel an Appointment: By requesting the customer to reach out to the call center for installations or directly in the portal (depending on your organization’s configuration)
View Task Details
Confirmation Number: Each customer will receive a unique confirmation number to look up their appointment details and securely access the customer portal
Service Type: Customers will see exactly what work is being done during the appointment, ex: “Installation”
Appointment Information: Details on the customer site address, date and time of the appointment
Track Appointment Progress: An overview of the appointment lifecycle, the customer will be able to use this to track where they are in the process
Appointment Created
Task Assigned & Scheduled
Task Dispatched
Technician on the way
Task Completed
View Tech on a Map
The customer will be able to track where their technician is on a map view once the technician starts traveling to the appointment location.
Additional Information
If the portal has been configured to collect additional information, the Customer will see additional fields in their Appointment Details Page to enter the relevant information.