Work Order & Task Settings
The following section outlines several different settings associated with properly configuring Work Orders and Tasks.
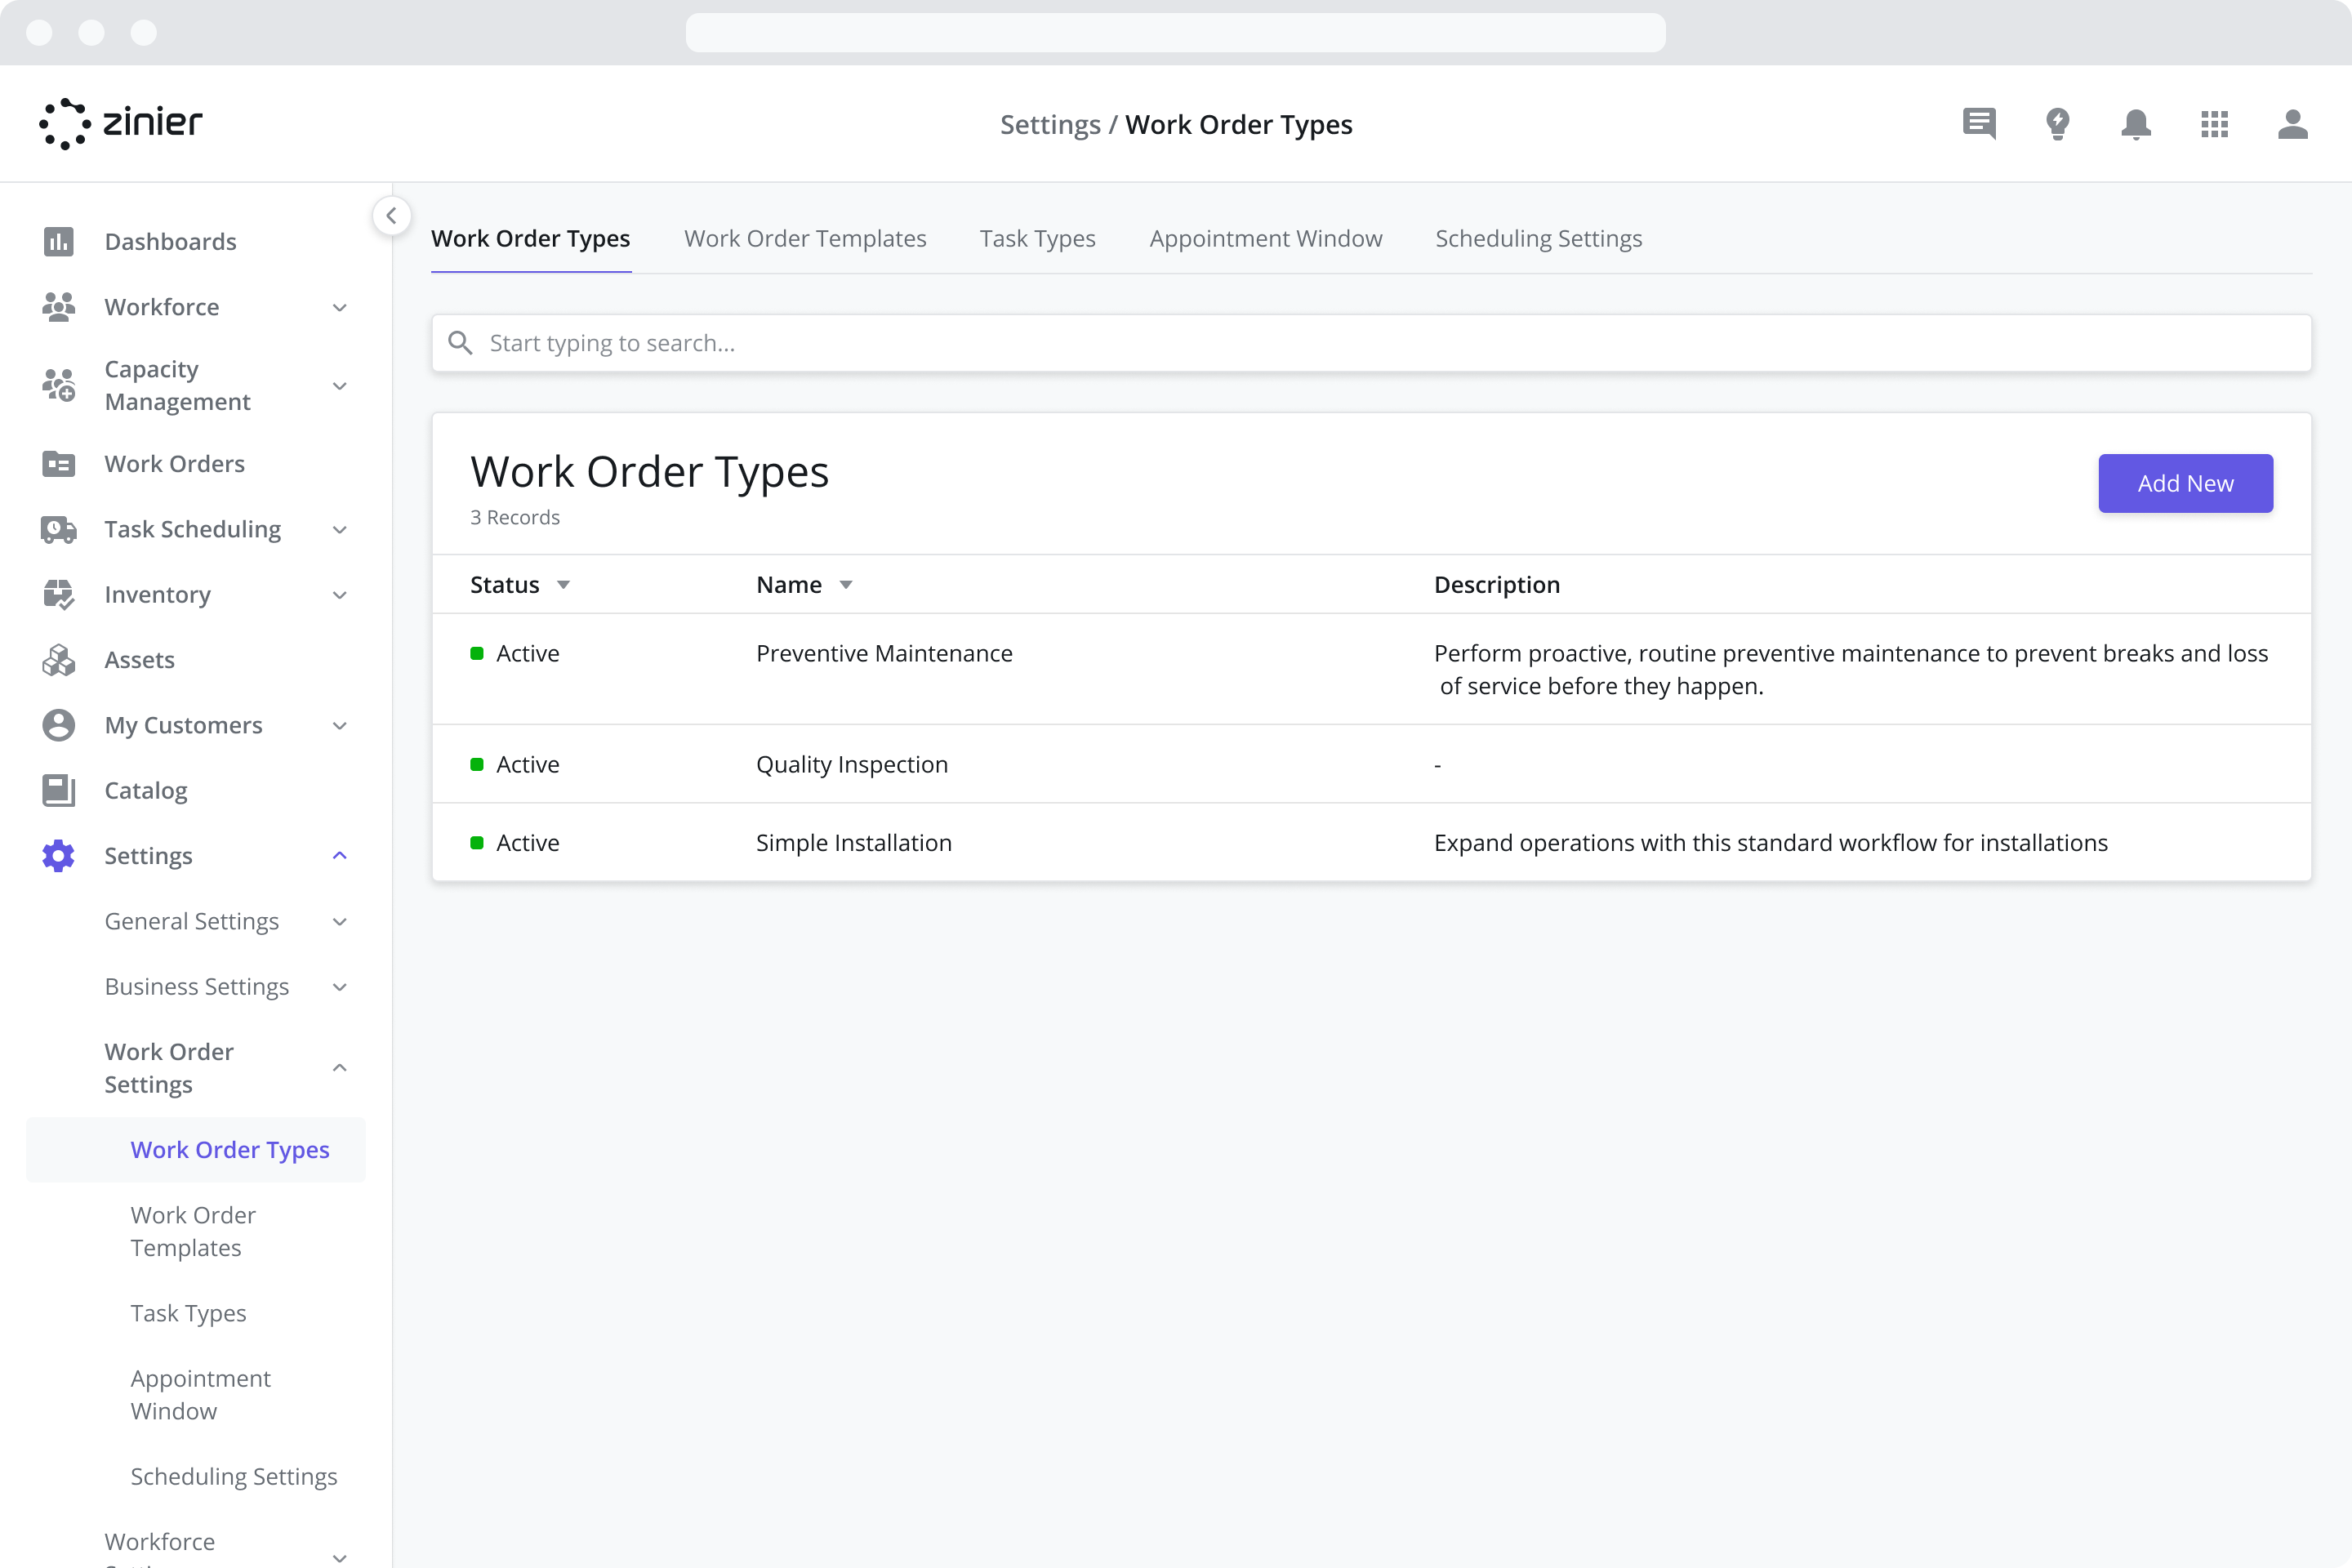
Configuring Work Order Types
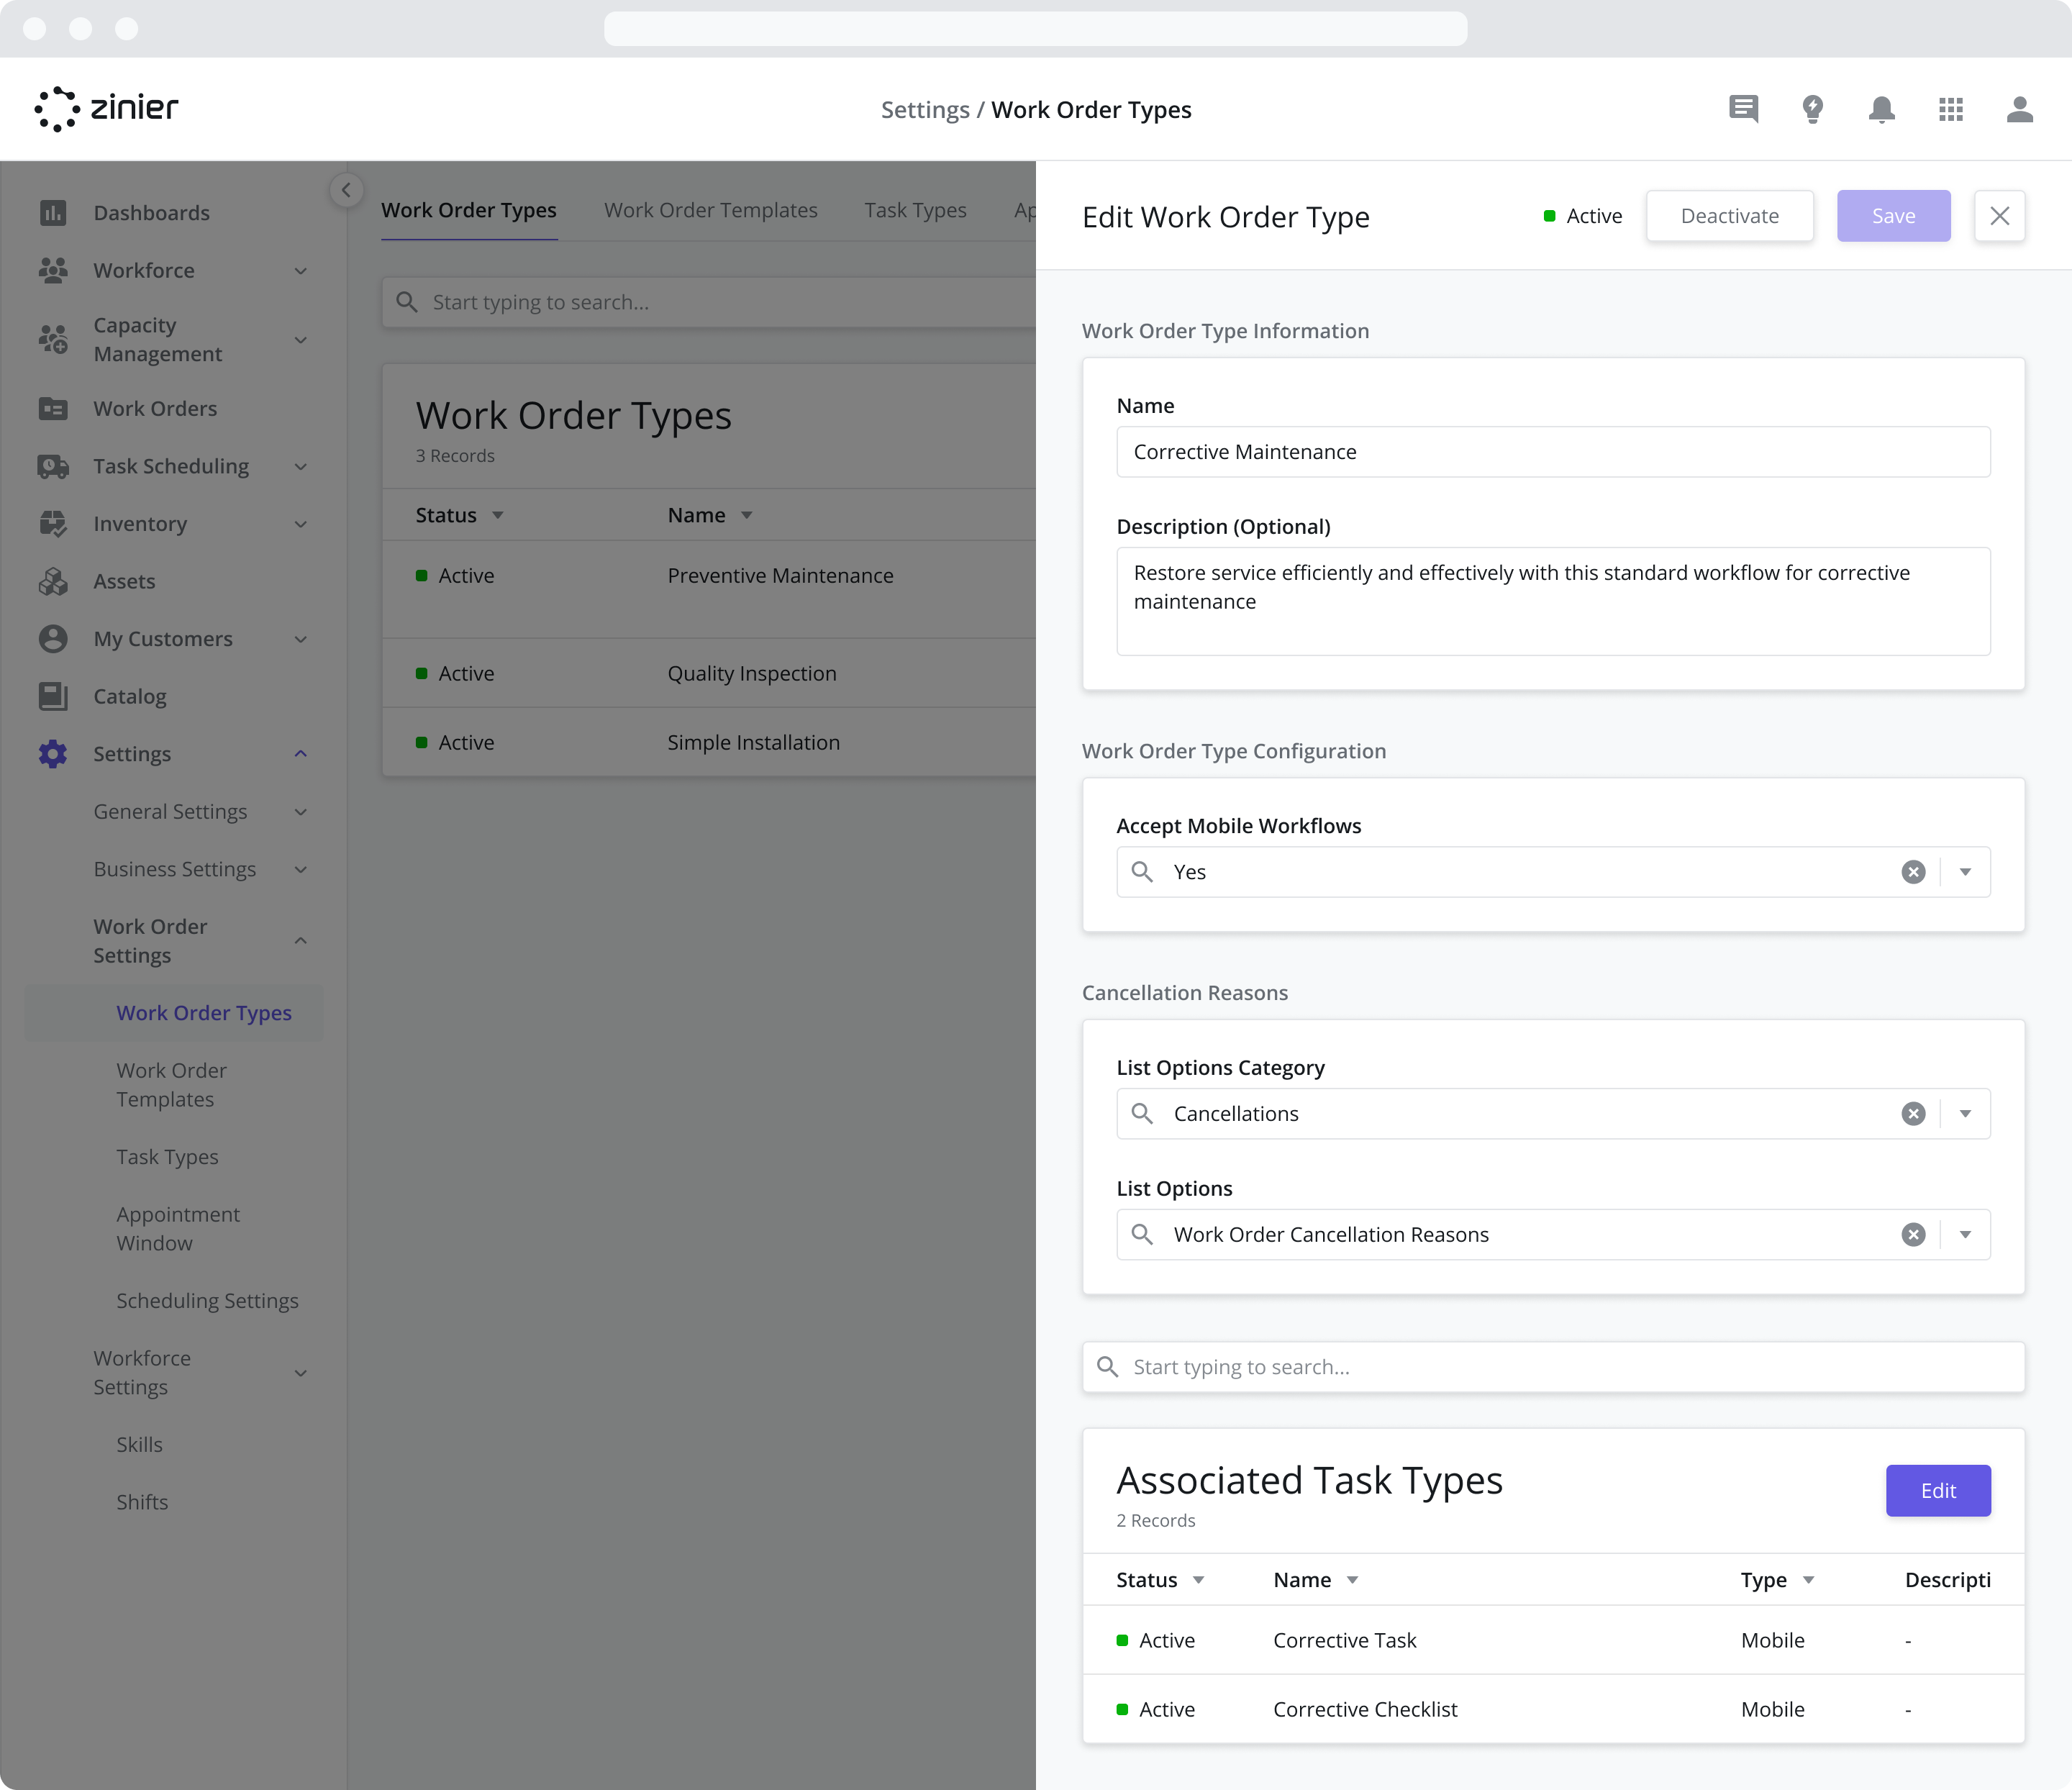
Work Order Types are used to configure settings such as which List Option to use when canceling a Work Order and defining which Task Types can be added to a Work Order.
To add a new Work Order Type, go to the Settings > Work Order Settings > Work Order Types module, click the “Add New” button in the top right of the data grid, and enter the information shown in the sidepanel.
Pre-configured Work Order Types
The Zinier Productivity Suite comes with three pre-configured Work Order Types associated with the Standard Mobile Workflows that come out of the box: Corrective Maintenance, Preventive Maintenance, and Simple Installation. For more information, view the Standard Mobile Workflows section.
Accept Mobile Workflows
This field has been deprecated and has no functional use for new implementations.
Cancellation Reasons
Select the List Option you would like to use when Cancelling a Work Order.
Associated Task Types
When adding tasks to a work order, the list of available tasks comes from this list of Associated Task Types. So make sure you add the relevant tasks here or they won’t be available for use when adding tasks to this Work Order Type.
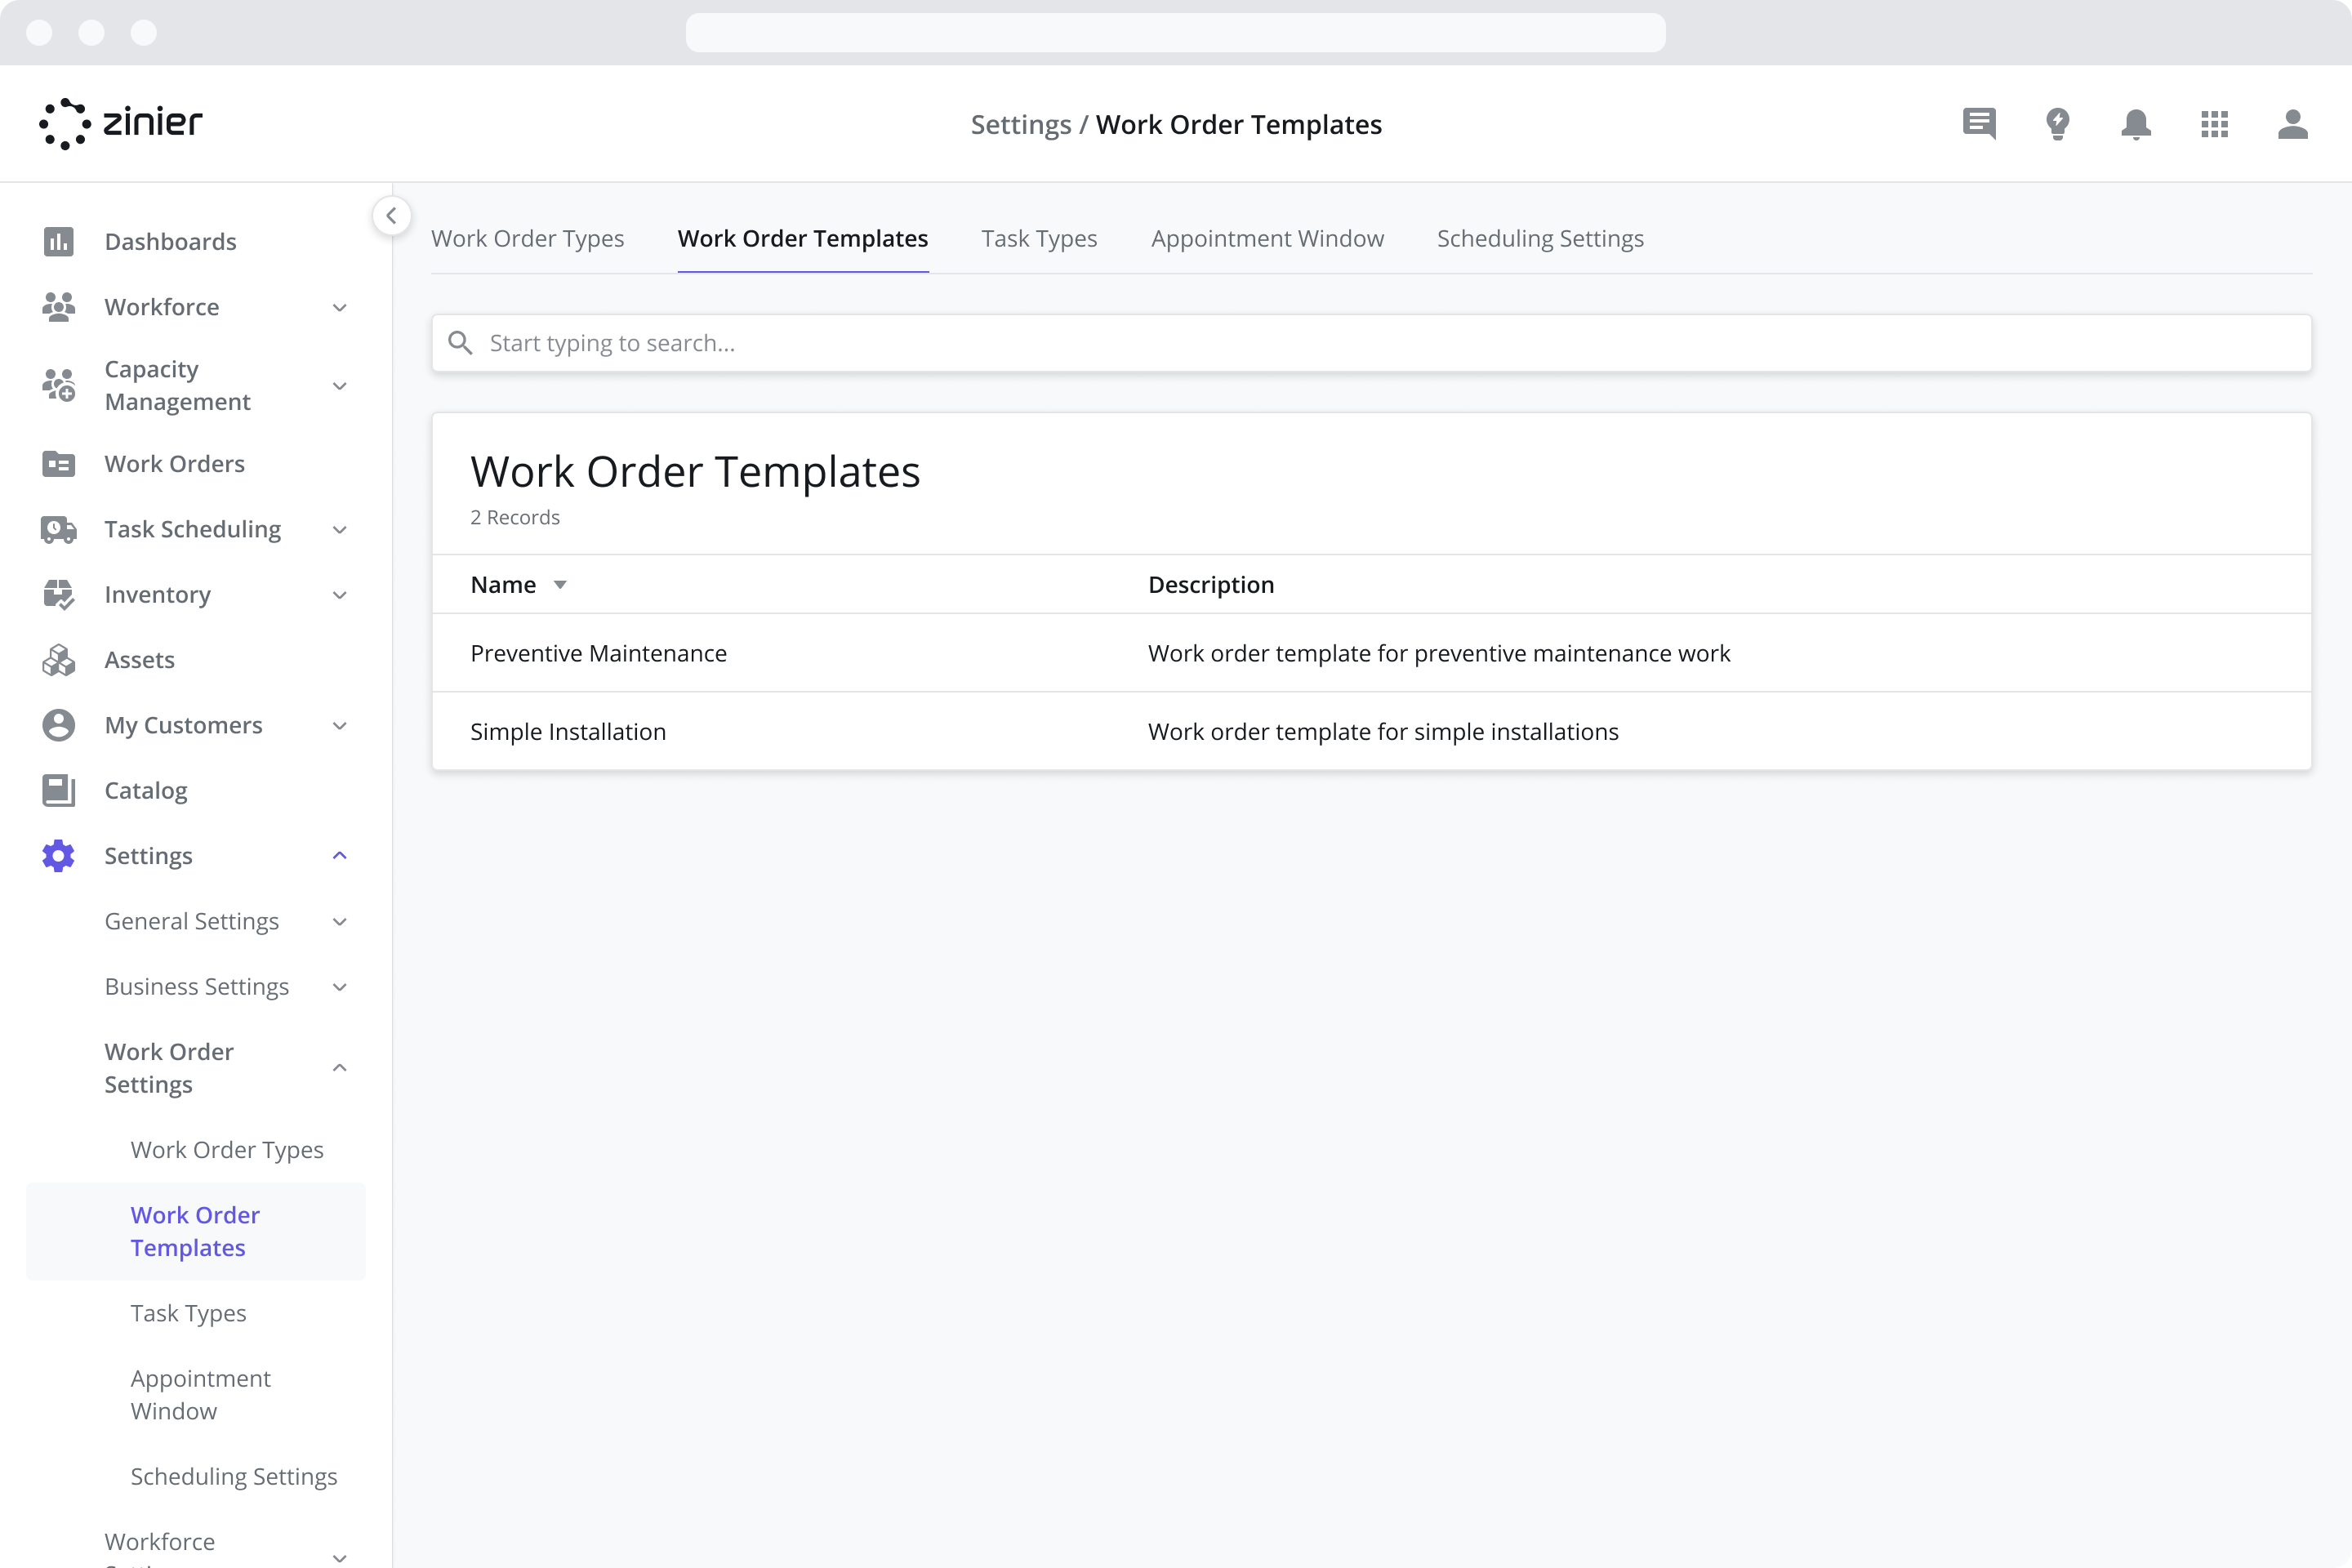
Manage Work Order Templates
Work Order Templates make it faster and easier to create Work Orders by pre-populating the fields with frequently used configurations.
Work Order Templates are created when building a new Work Order. To do so, create a new Work Order and select “Save as Template” from the “Options” dropdown menu in the sidepanel. For more information, go to the Save as a Work Order Templates section
To edit a previously created Work Order Templates, go the the Settings > Work Order Settings > Work Order Templates module, hover over the template you wish to edit from the datagrid and click the Edit icon.
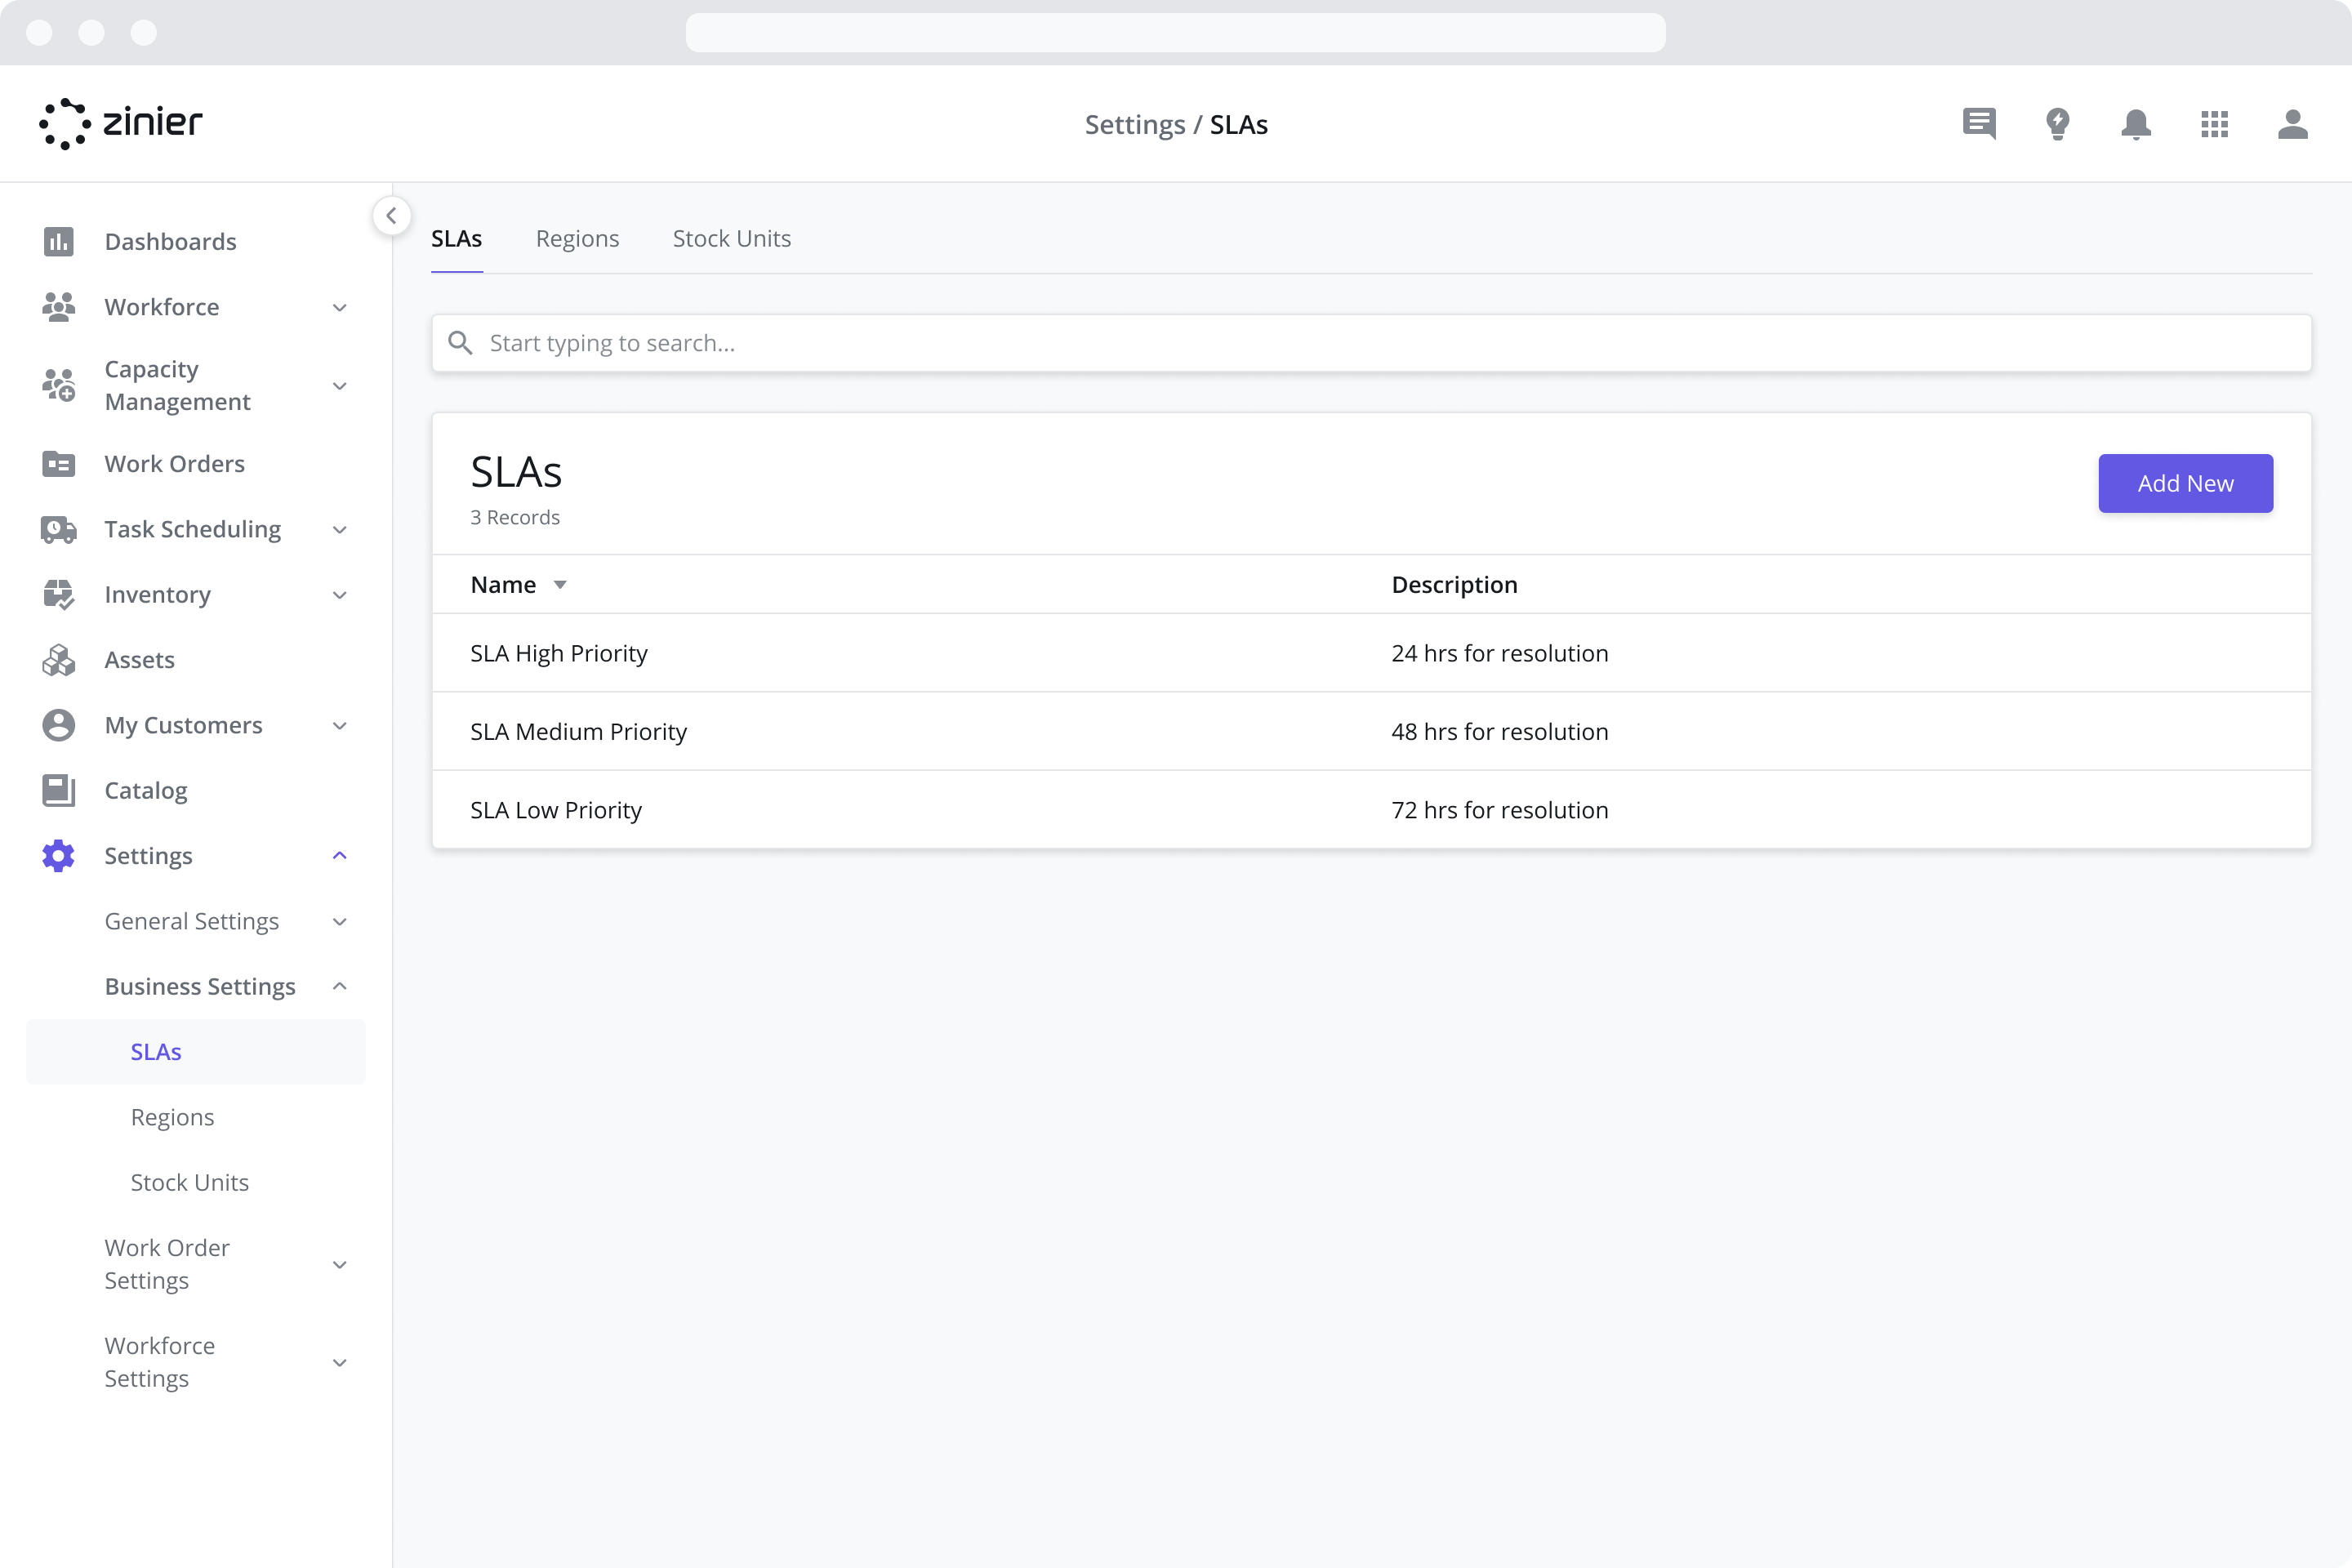
Managing SLAs
The SLAs module is where you configure different SLA Resolution Times for each Work Order Priority (Low, Medium, High, etc.) to enforce specific contract terms and assist with scheduling and dispatch. SLAs are tied to Work Orders by Customer Contracts. SLA Resolution Time and Default Deadline are pre-populated based on the Contract assigned to the Work Order.
SLAs use the concept of Priority Time Frames which tie a particular SLA Resolution Time to the particular Priority you set when creating a Work Order. When you select a Priority for the Work Order, it will take the SLA Resolution Time and use that to calculate the default Deadline for the Work Order and Tasks added to the Work Order.
For more information on adding SLAs to Contracts, refer to the Contracts page.
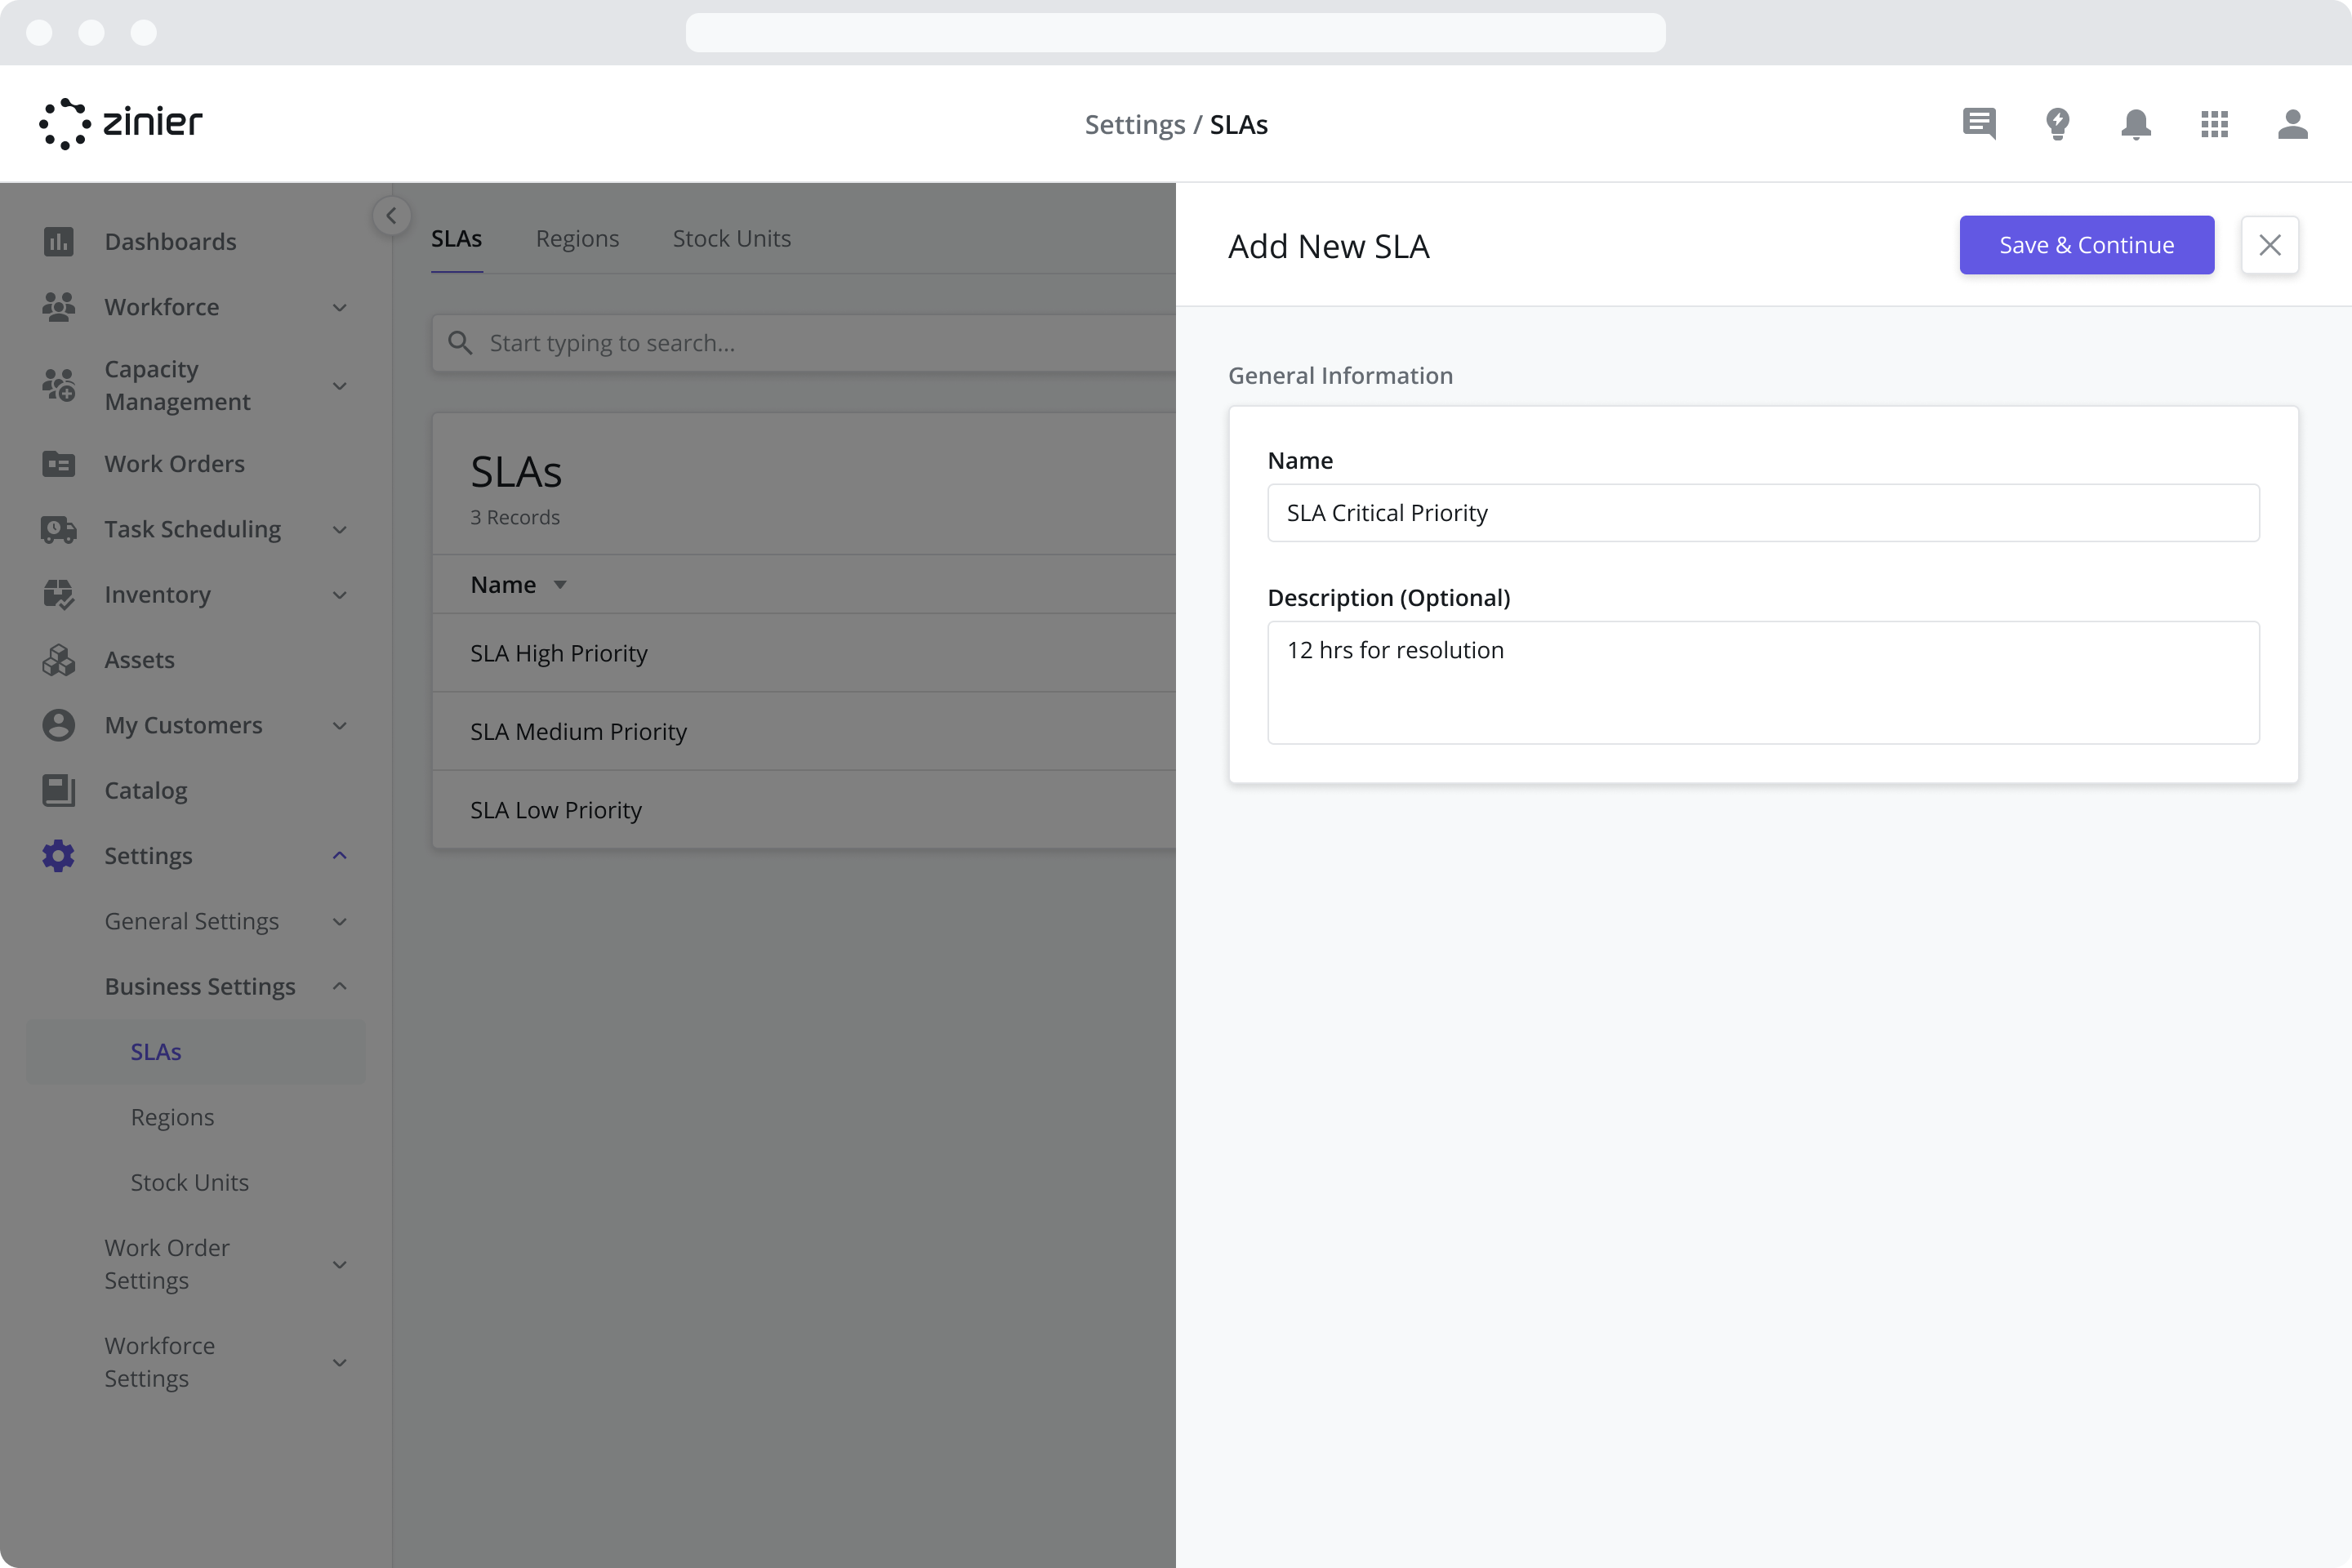
To add a new SLA, follow the steps below:
Go to the Settings > Business Settings > SLAs module
Click the “Add New” button from the data grid
Enter a Name and Description (Optional)
Click Save and Continue
Next, add at least one SLA Time Frame by clicking the “Add New” button from the SLA Time Frames data grid.
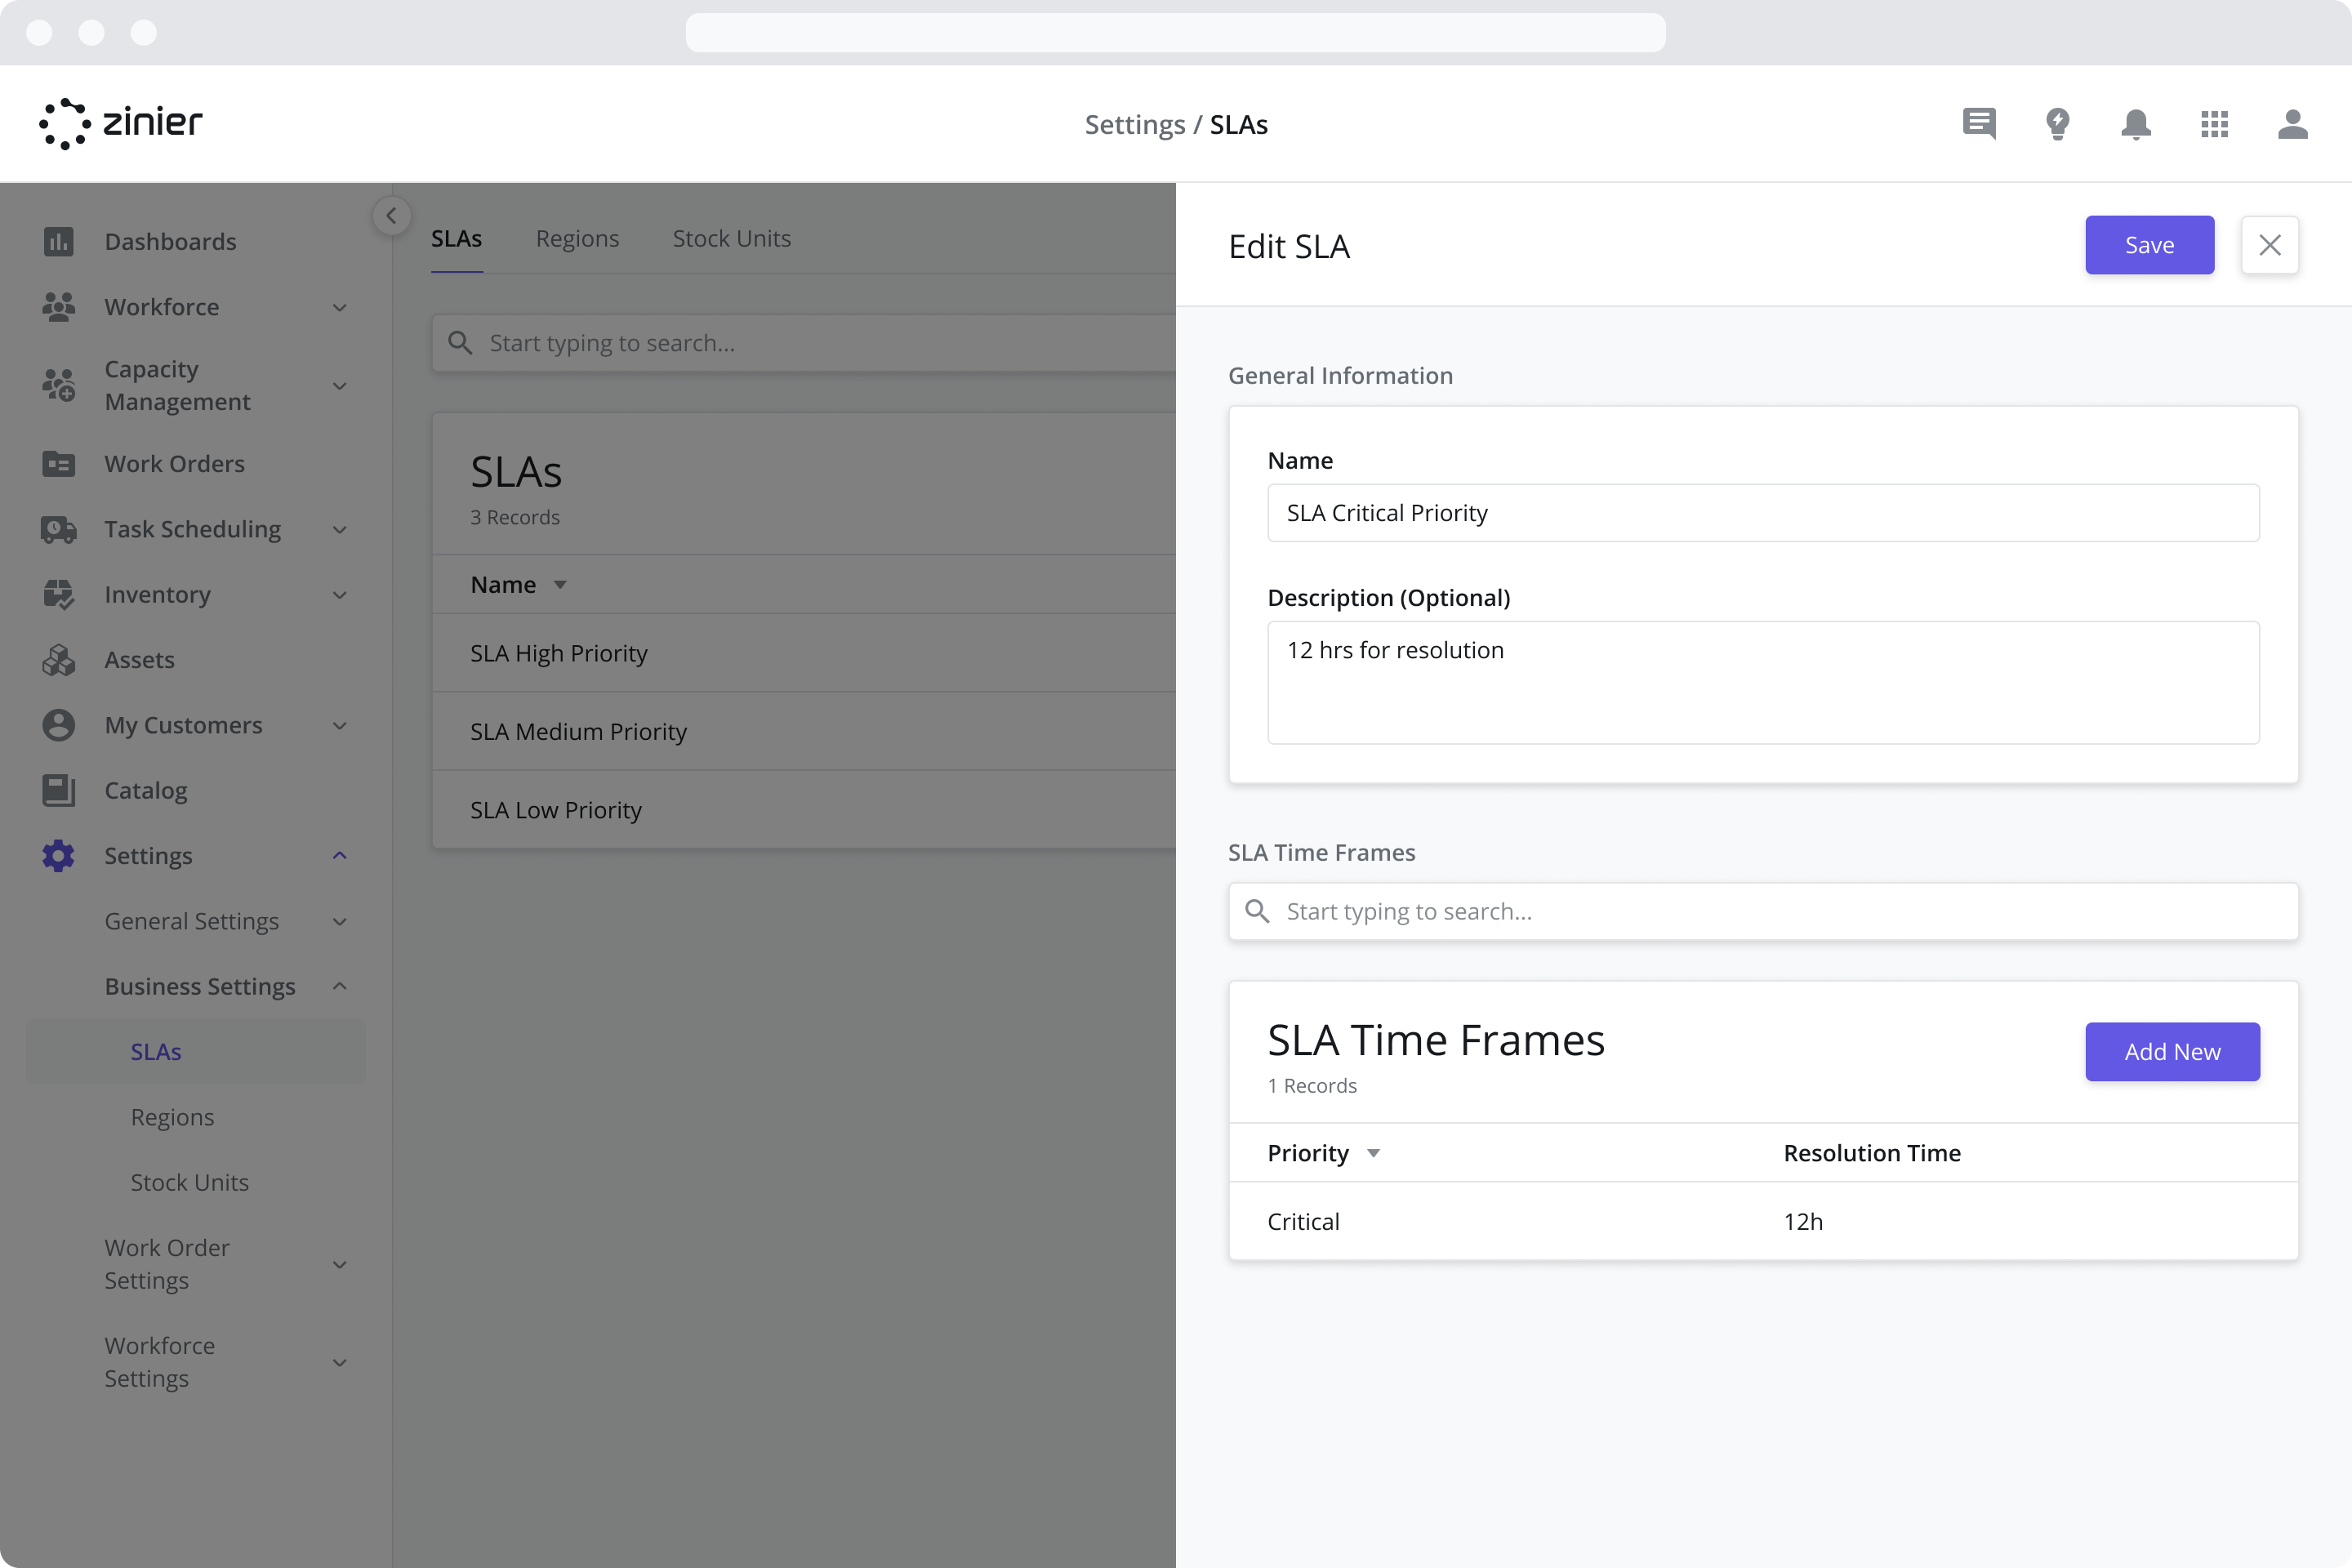
Select the Priority you want to associate the Time Frame with. Work Orders created with this same priority will pick up this associated time frame for use in the SLA calculation.
Enter the Resolution Time from and time units to use in the calculation (Minutes, Hours, or Days)

Click Save
Repeat steps 5-8 to add as many SLA Time Frames as needed
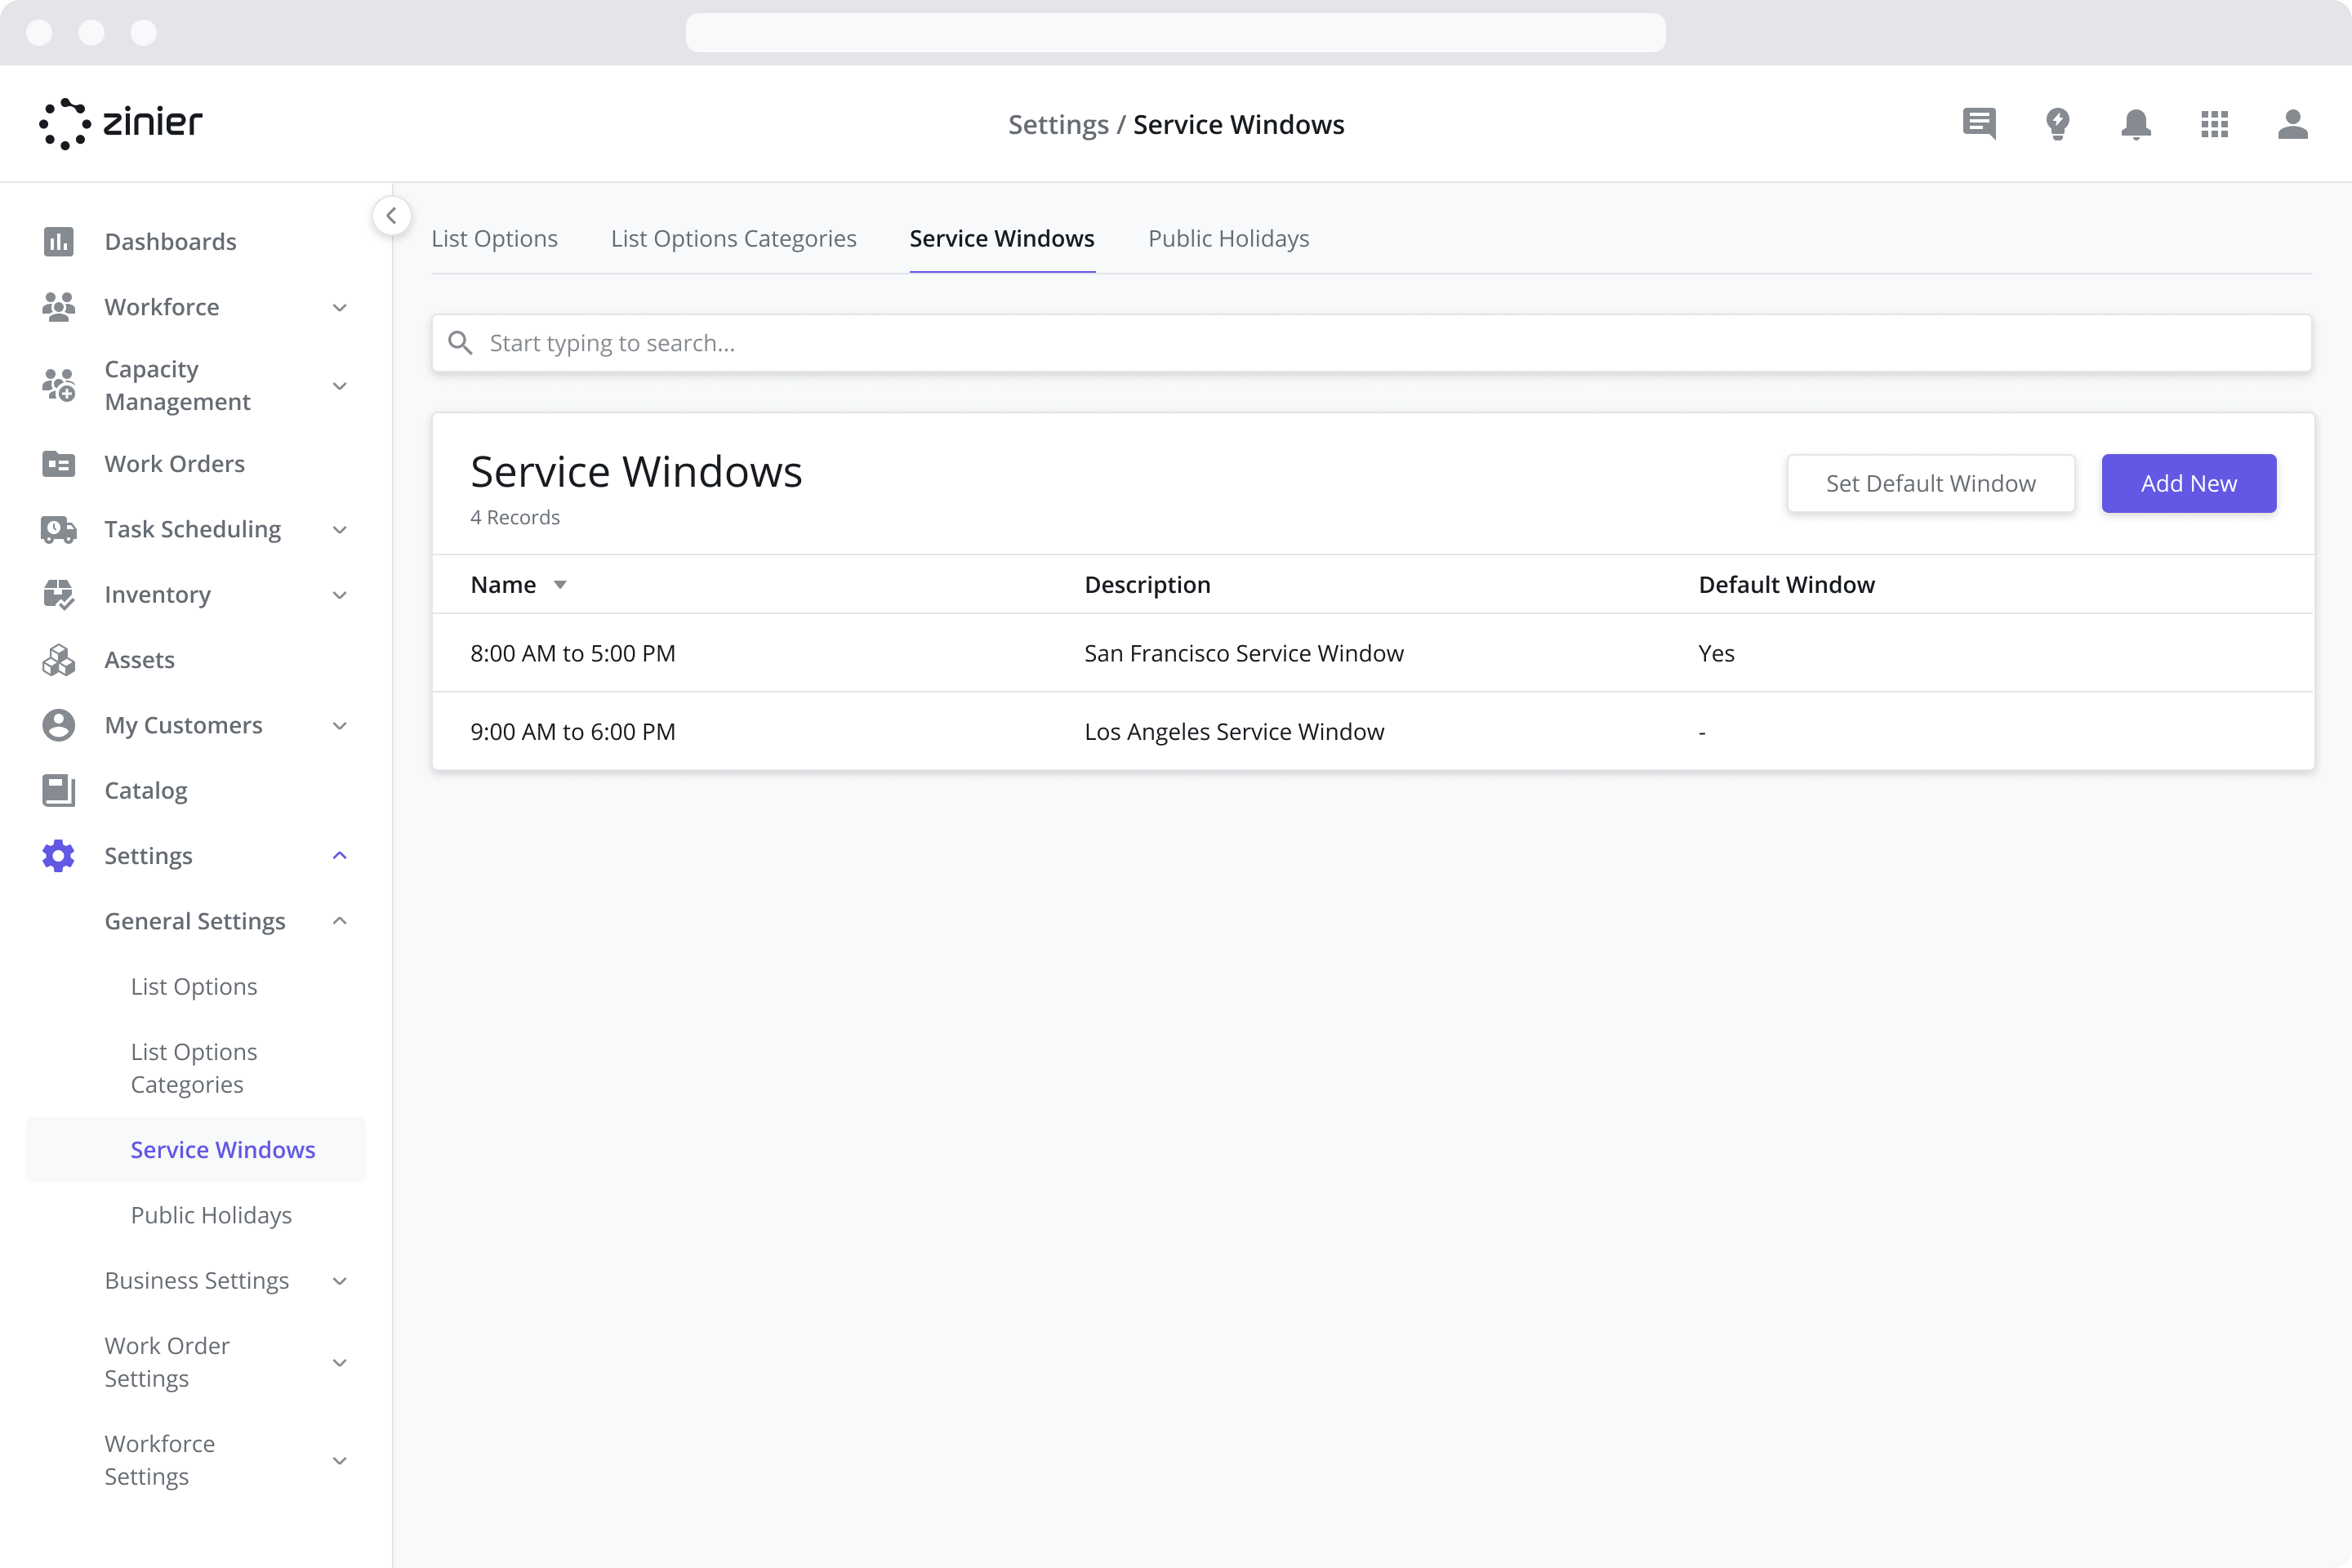
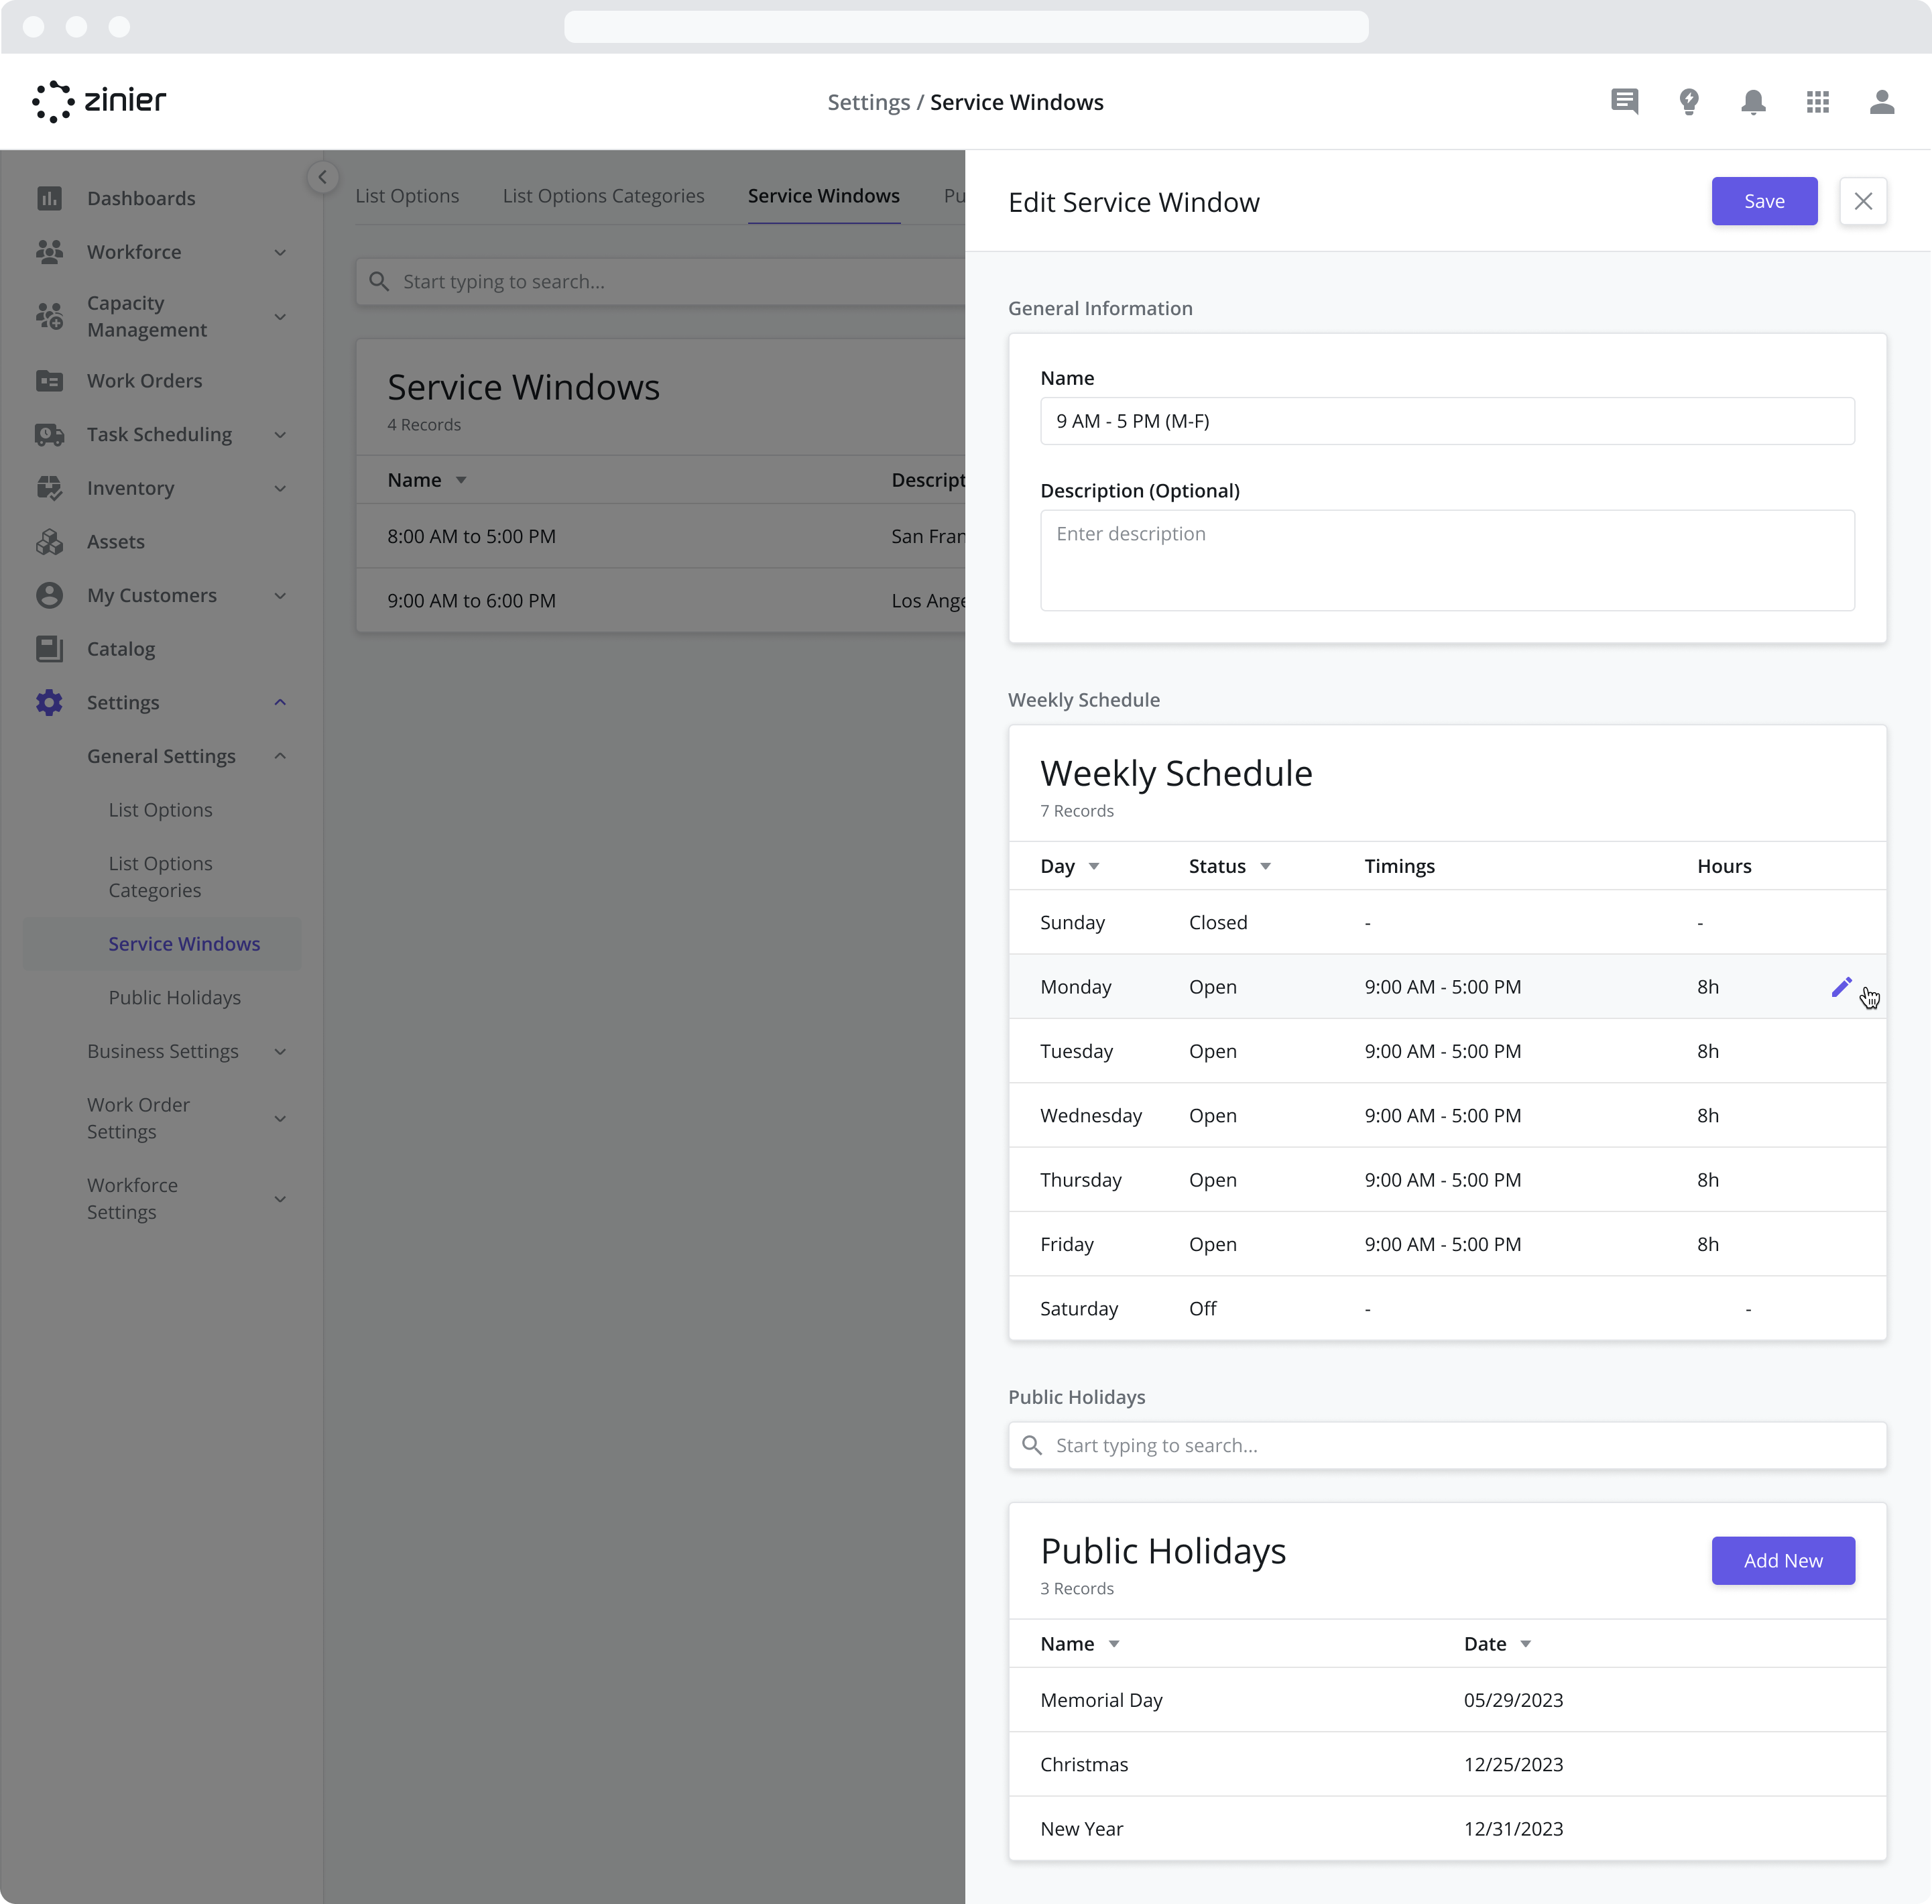
Managing Service Windows
Service Windows determine the hours of operation for when a Task can be scheduled with a specific Customer. This is determined by which Contract / Service Window is used when creating the Work Order.
For example, Customer A has normal operating hours at their various customer sites of 9 am - 5 pm (M-F) and no Public Holidays.
To enable Service Windows in a Work Order, I would take the following steps:
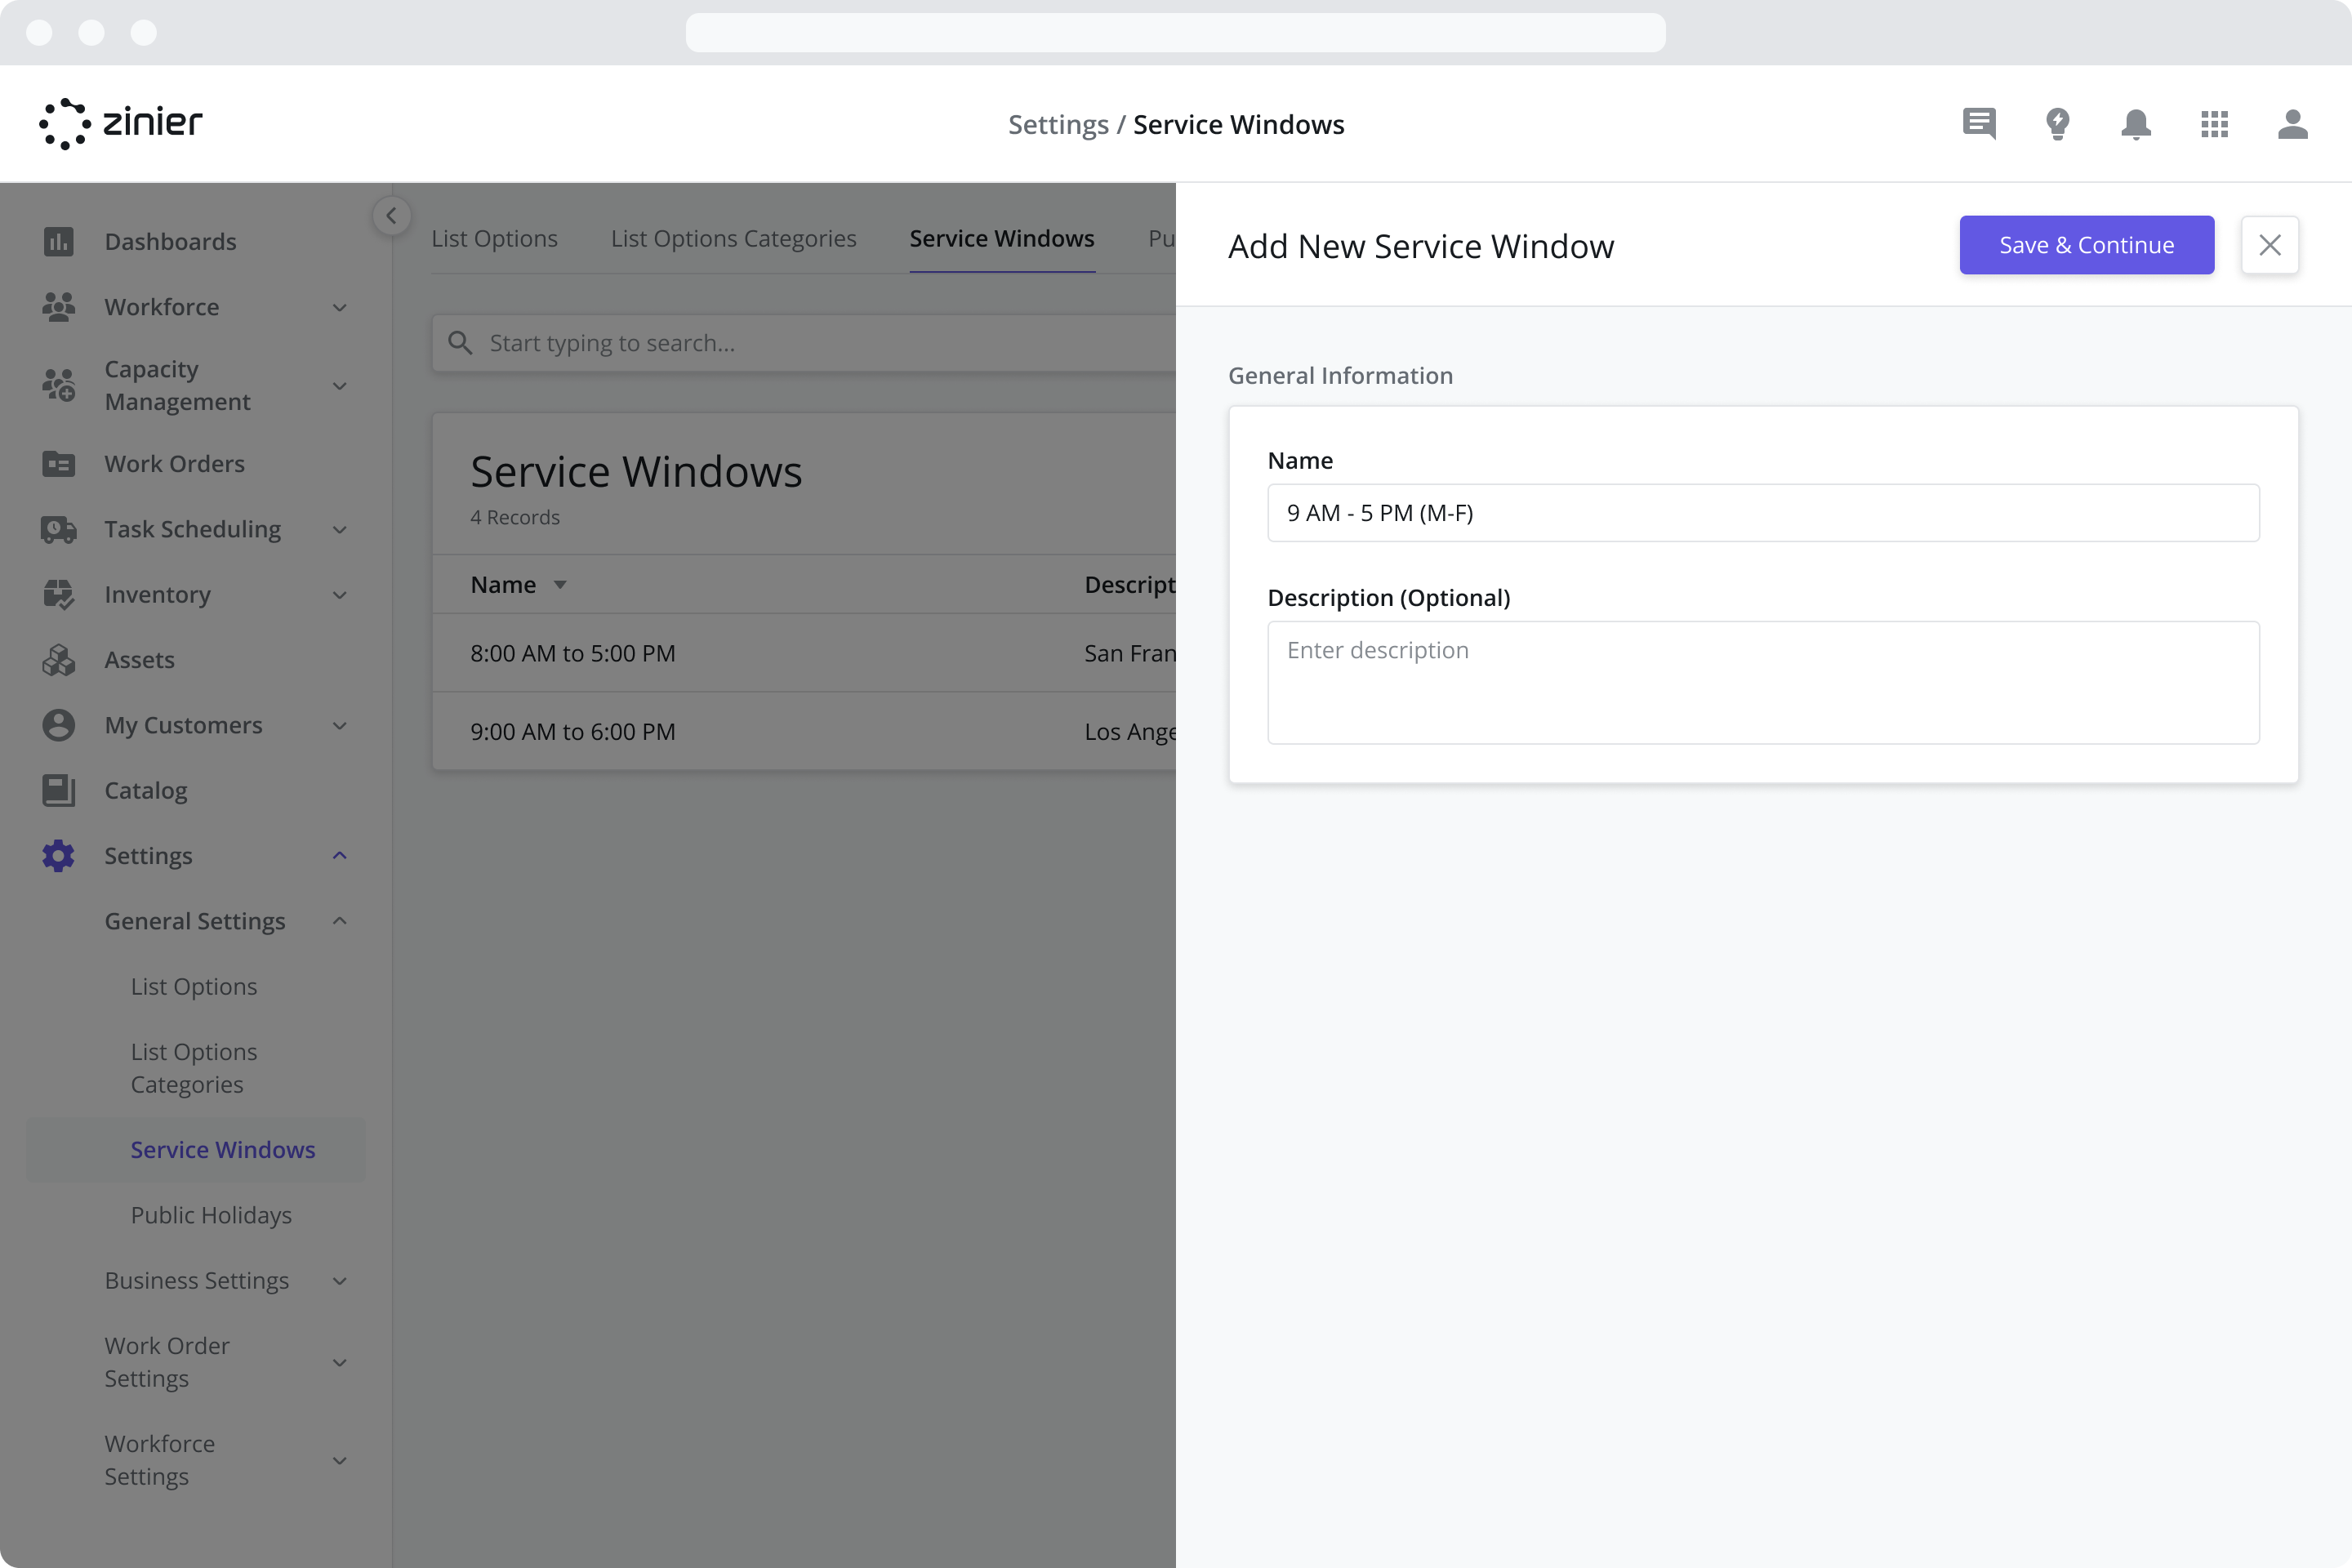
Step 1: Create a Service Window
I would first add this Service Window by going to the Settings > General Settings > Service Windows module.
Click the “Add New” button from the data grid
Enter a Name and Description (Optional). In this case, I’ve used the name “9am to 5pm M-F”
Click Save and Continue
Edit the Weekly Schedule so that it has and add any Public Holidays as desired
Click Save to create the Service Window
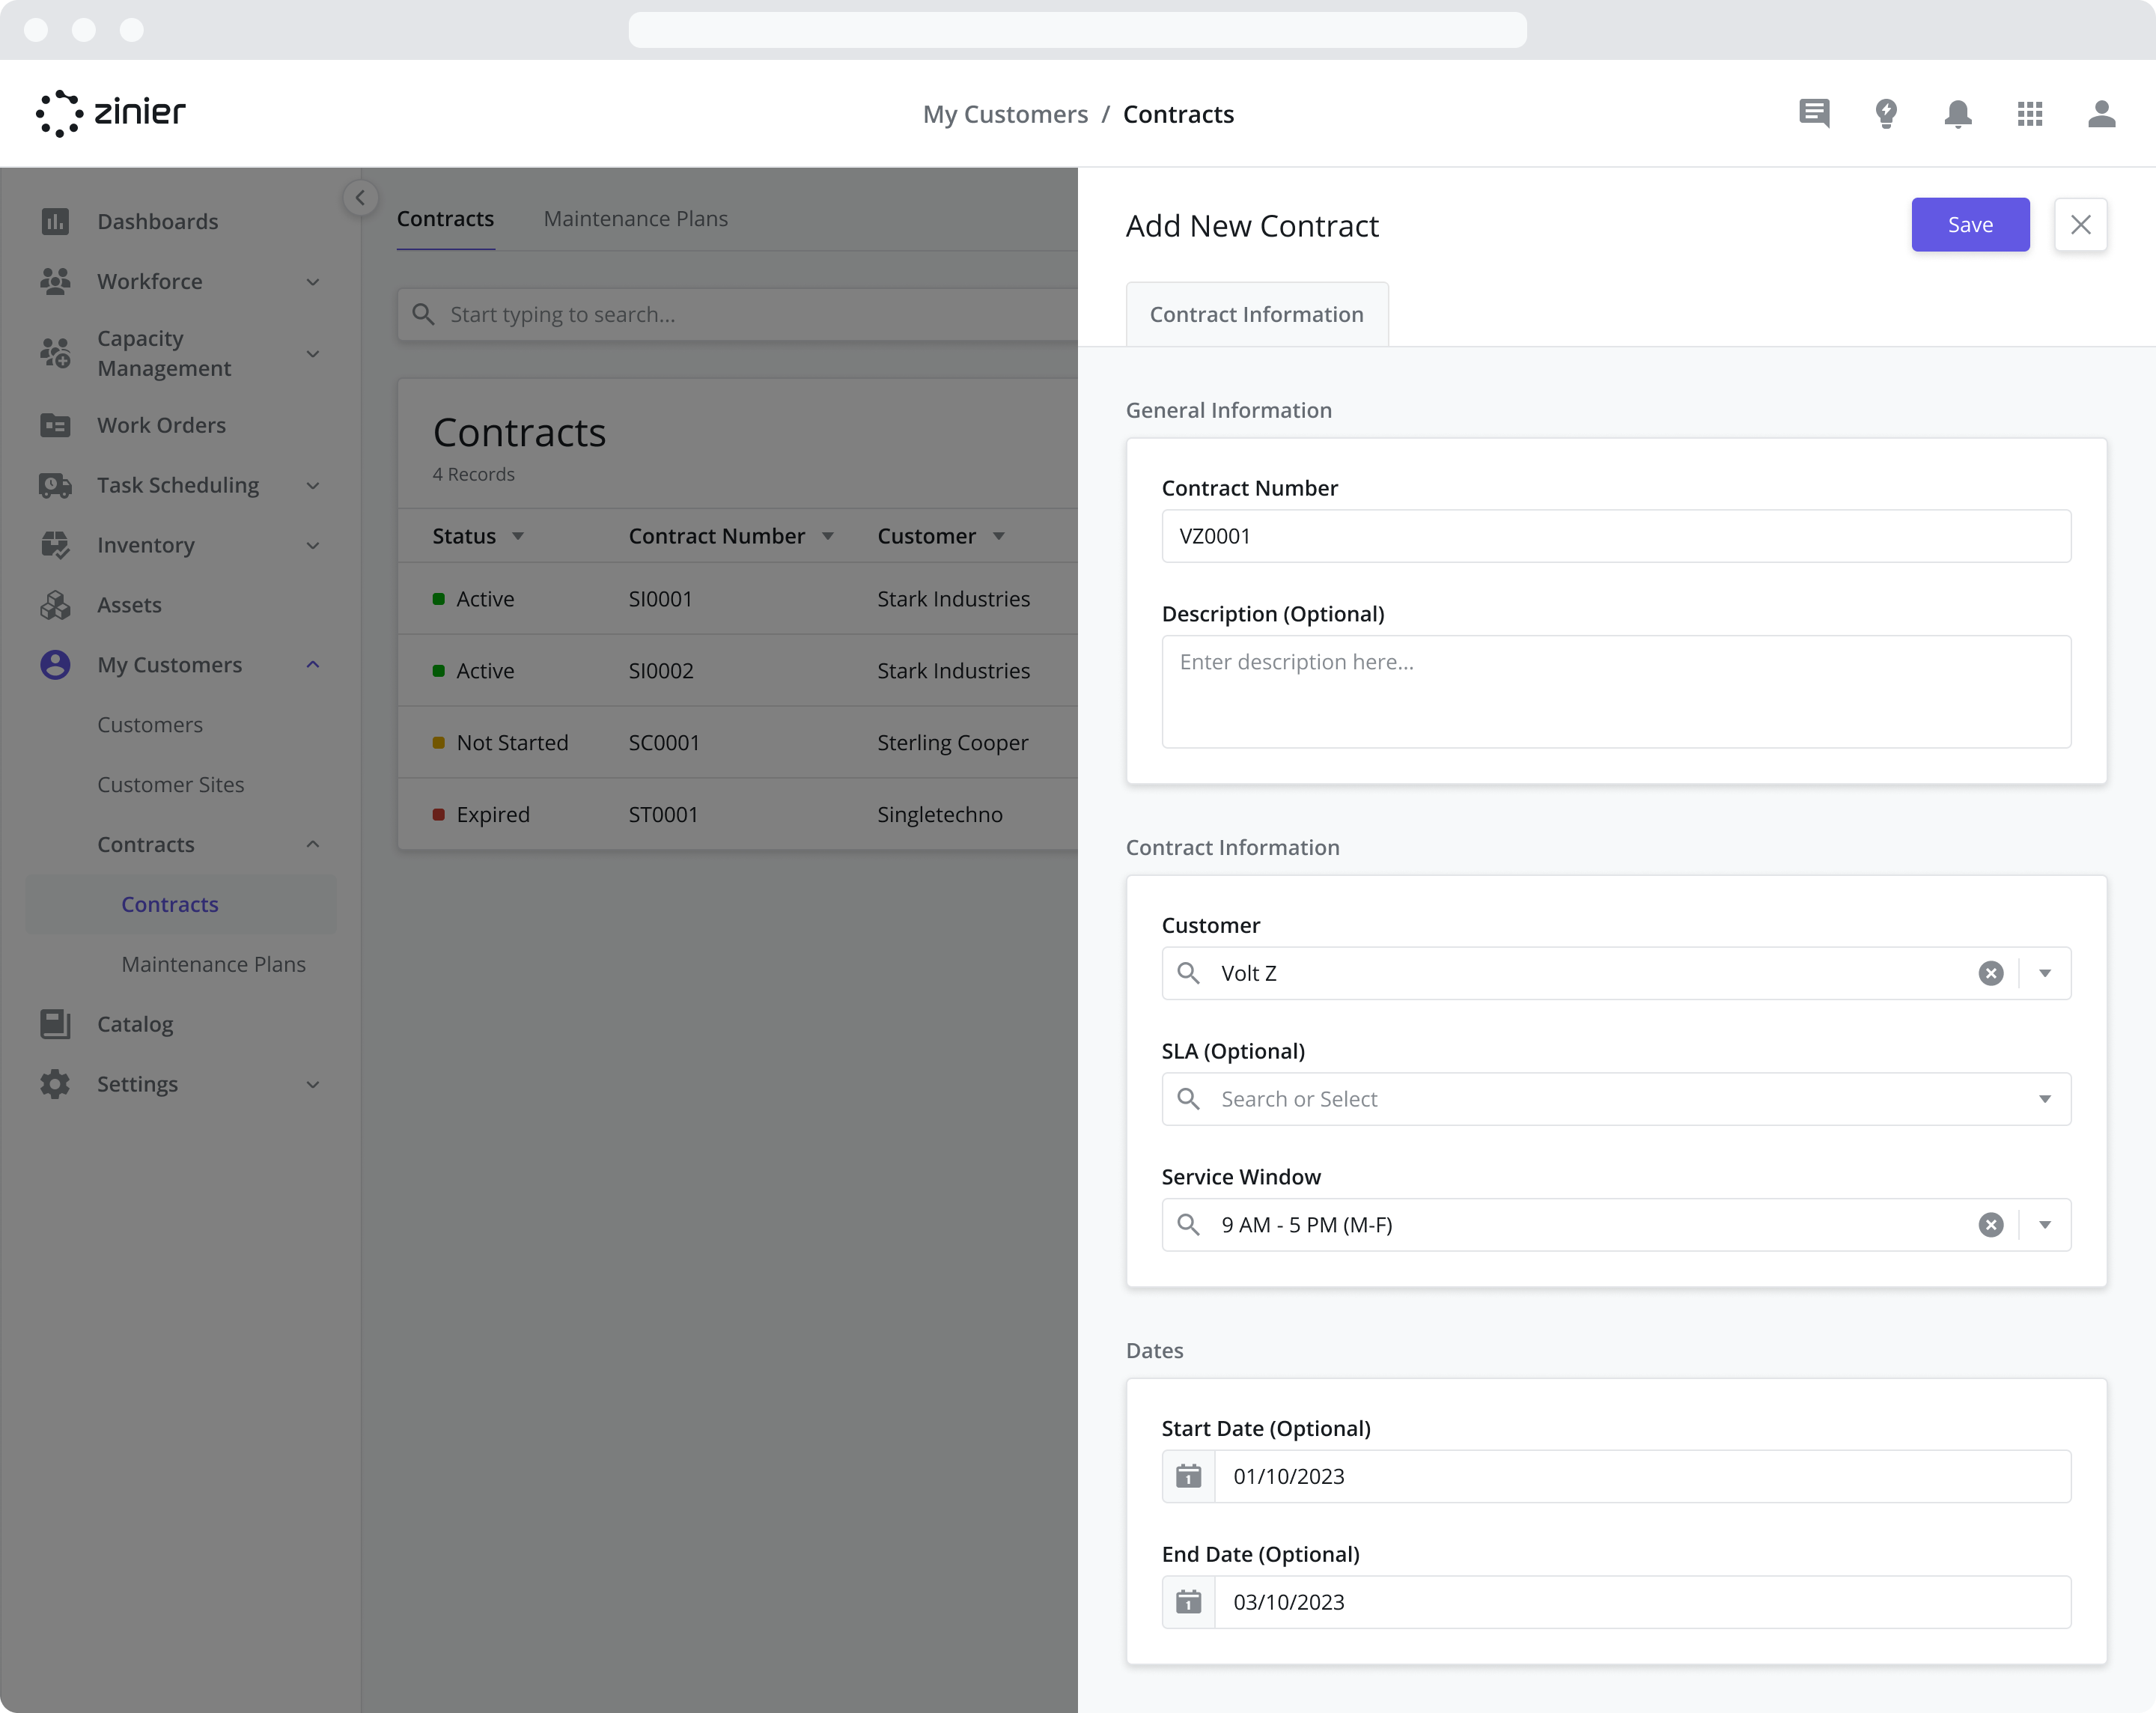
Step 2: Create a Customer Contract using the Service Window
Create a Customer Contract by going to the My Customers > Contracts module
Click the “Add New” button from the data grid
Select “Customer A” from the Customers dropdown (or create it first if it does not exist)
Select “9am to 5pm M-F” from the Service Windows dropdown – the Service Window created in Step 1.
Fill in the remaining information in the sidepanel and Click Save
Step 3: Use the Contract in a Work Order
Create a Work Order by going to the Work Orders > Active Work Orders module
Click the “Add New” button from the data grid
Select “Customer A” from the Customers dropdown
Select “9am to 5pm M-F” from the Service Windows dropdown
Fill in the remaining information in the sidepanel and Click Save
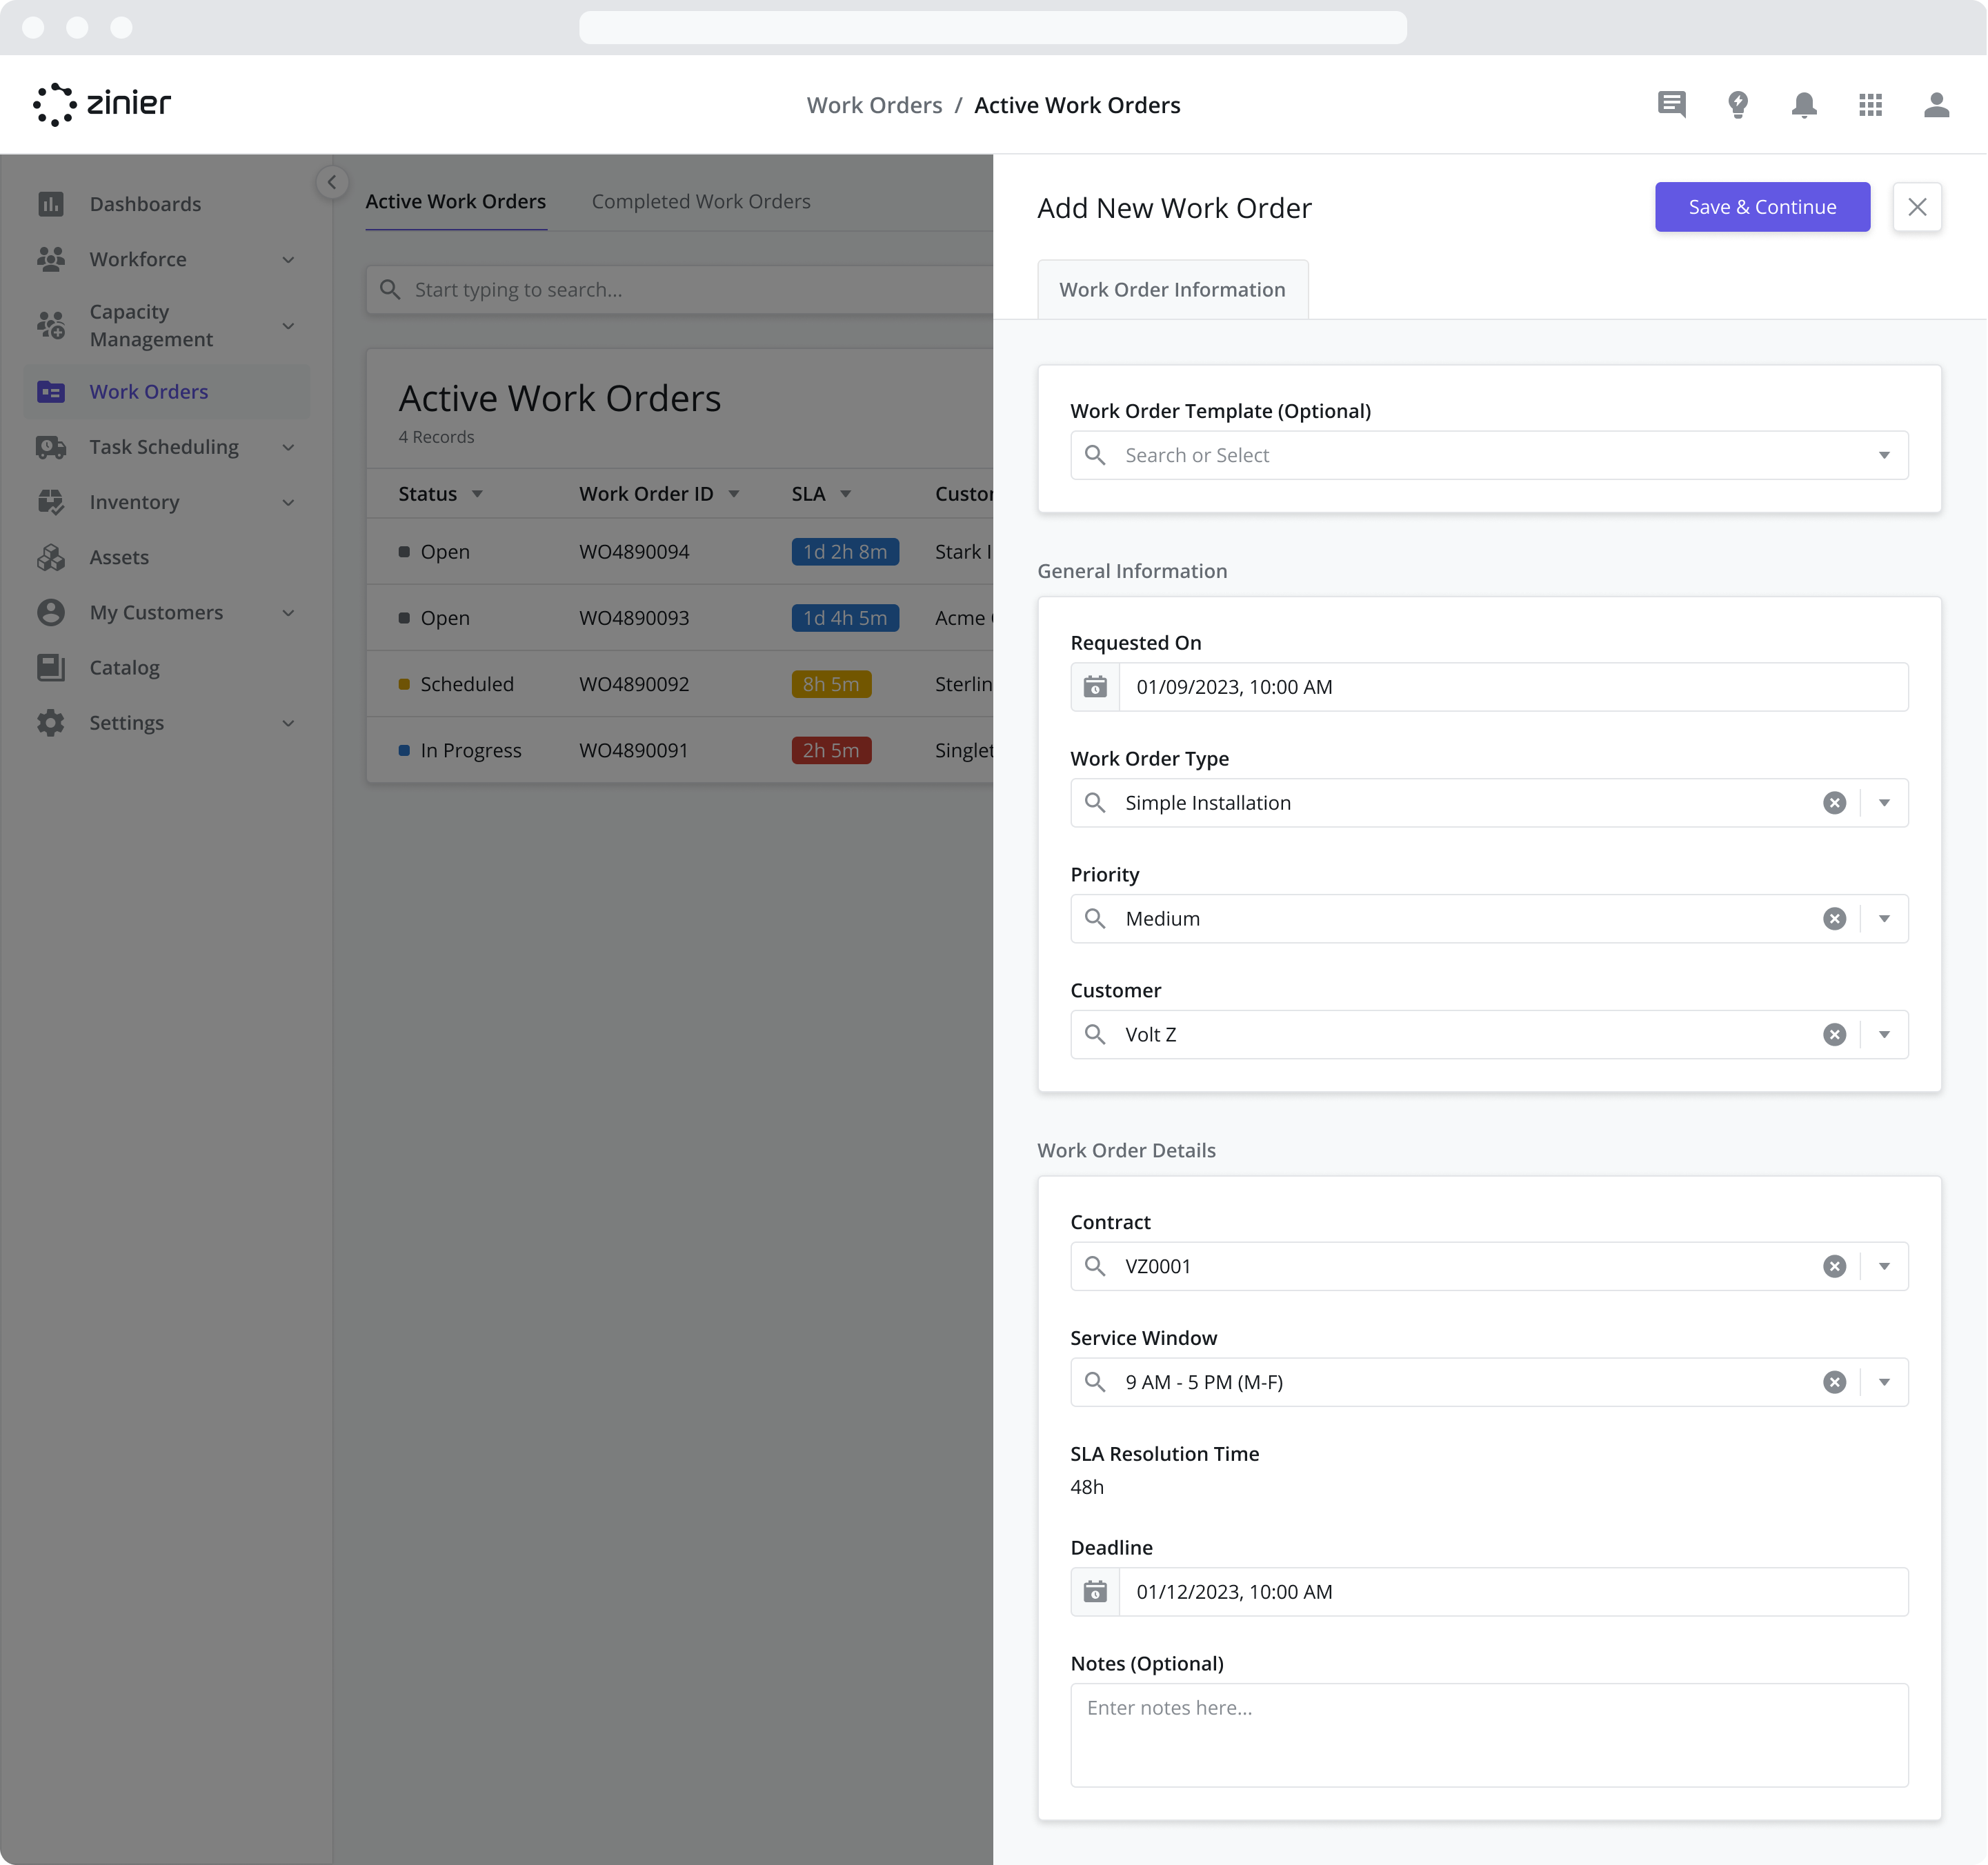
When creating a Work Order, the Service Window is pre-populated based on the Contract assigned to the Work Order. But if you have not created a Contract for that specific Customer, you can still use Service Windows by selecting the desired option from the Service Window dropdown.
For more information on adding Service Windows to Contracts, refer to the Contracts page.
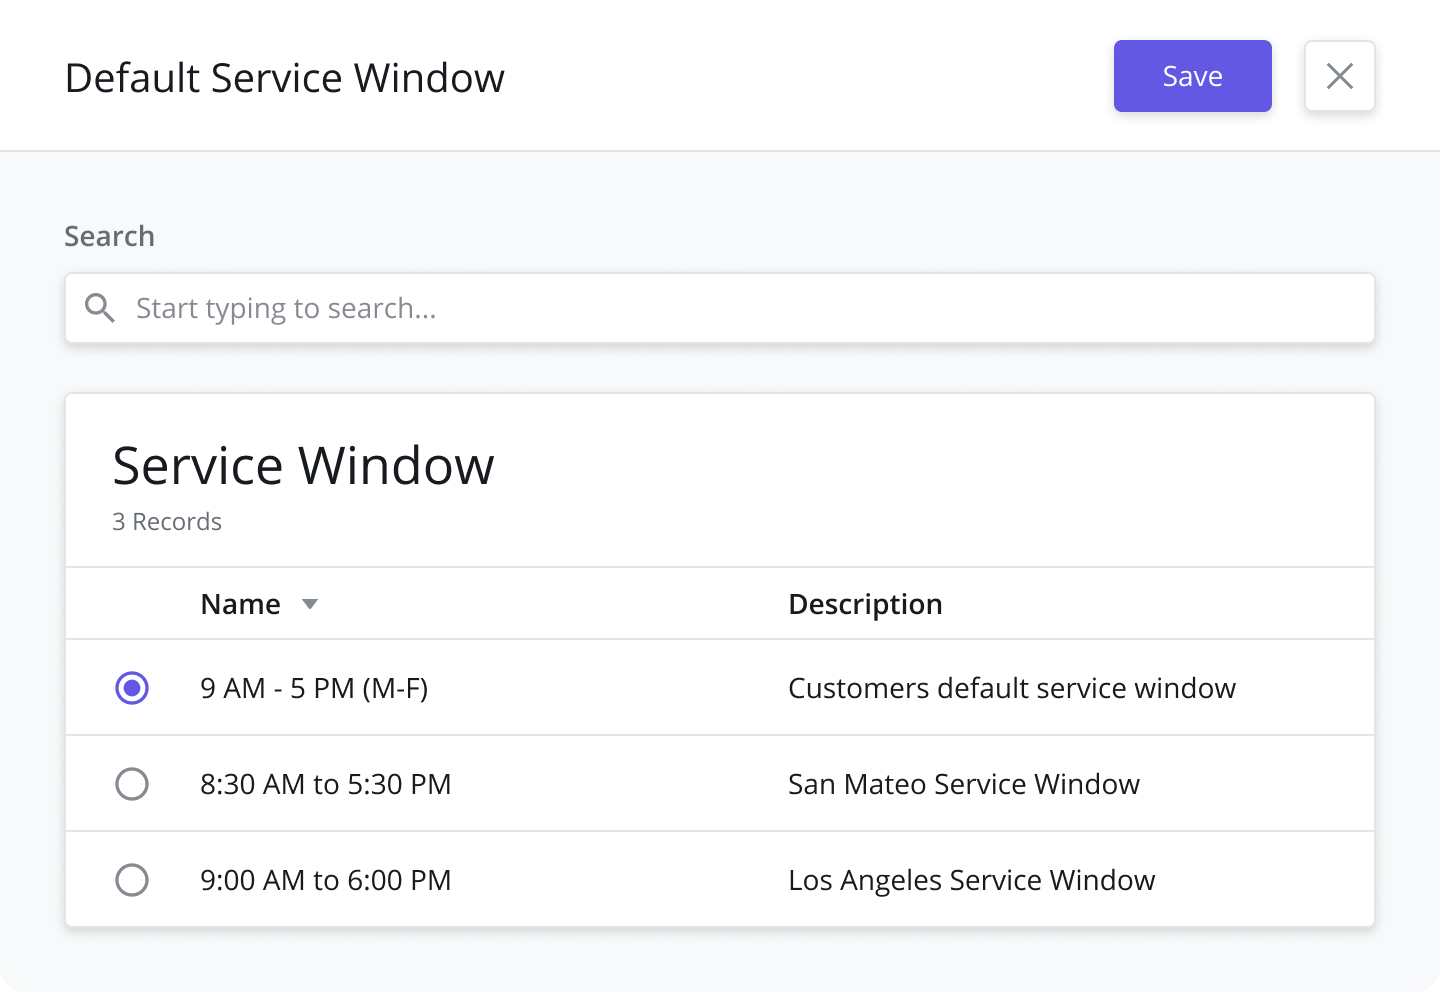
Set a Default Service Window
You also have the option of setting the Default Service Window used when creating Work Orders and Contracts. To set the Default Service Window, follow the steps below:
Navigate to the Settings > General Settings > Service Windows module.
Click the “Set Default Window” button from the data grid
Select the Service Window from the data grid in the sidepanel
Click Save
Managing Appointment Windows
For service organizations that use appointment-based scheduling with their end-customers, Appointment Windows play an important role. With appointment-based booking, service operators offer – or allow the end-customer to select – a specific time slot or “Appointment Window” during which the task will be completed. These timeframes usually span a period of time greater than the expected duration of the task in order to provide the operator with some level of flexibility when scheduling.
Appointment Windows are used by a number of different modules across the Zinier Productivity Suite:
Work Order Creation
If you receive a request from a customer for the task to be completed within a specific time frame, you can use Appointment Windows to select that time when adding a Task to a Work Order. Once you select the Appointment Window, this information is passed to the Dispatcher for reference during Scheduling & Dispatch.
For more information on assigning Appointment Windows to Tasks, navigate to the Adding Tasks to Work Orders section.
Customer Portal
End-customer that use the Customer Portal to book appointments are select from a list of Appointment Windows.
For more information on booking appointment, visit the Customer Portal page.
Capacity Management
Increasing or decreasing capacity from the Capacity Management module adds or removes the number of available time slots that can be booked within a specific Appointment Window.
For more information on how capacity leverage Appointment Windows, visit the Capacity Management page.
Adding new Appointment Windows
UPDATED (24.4)
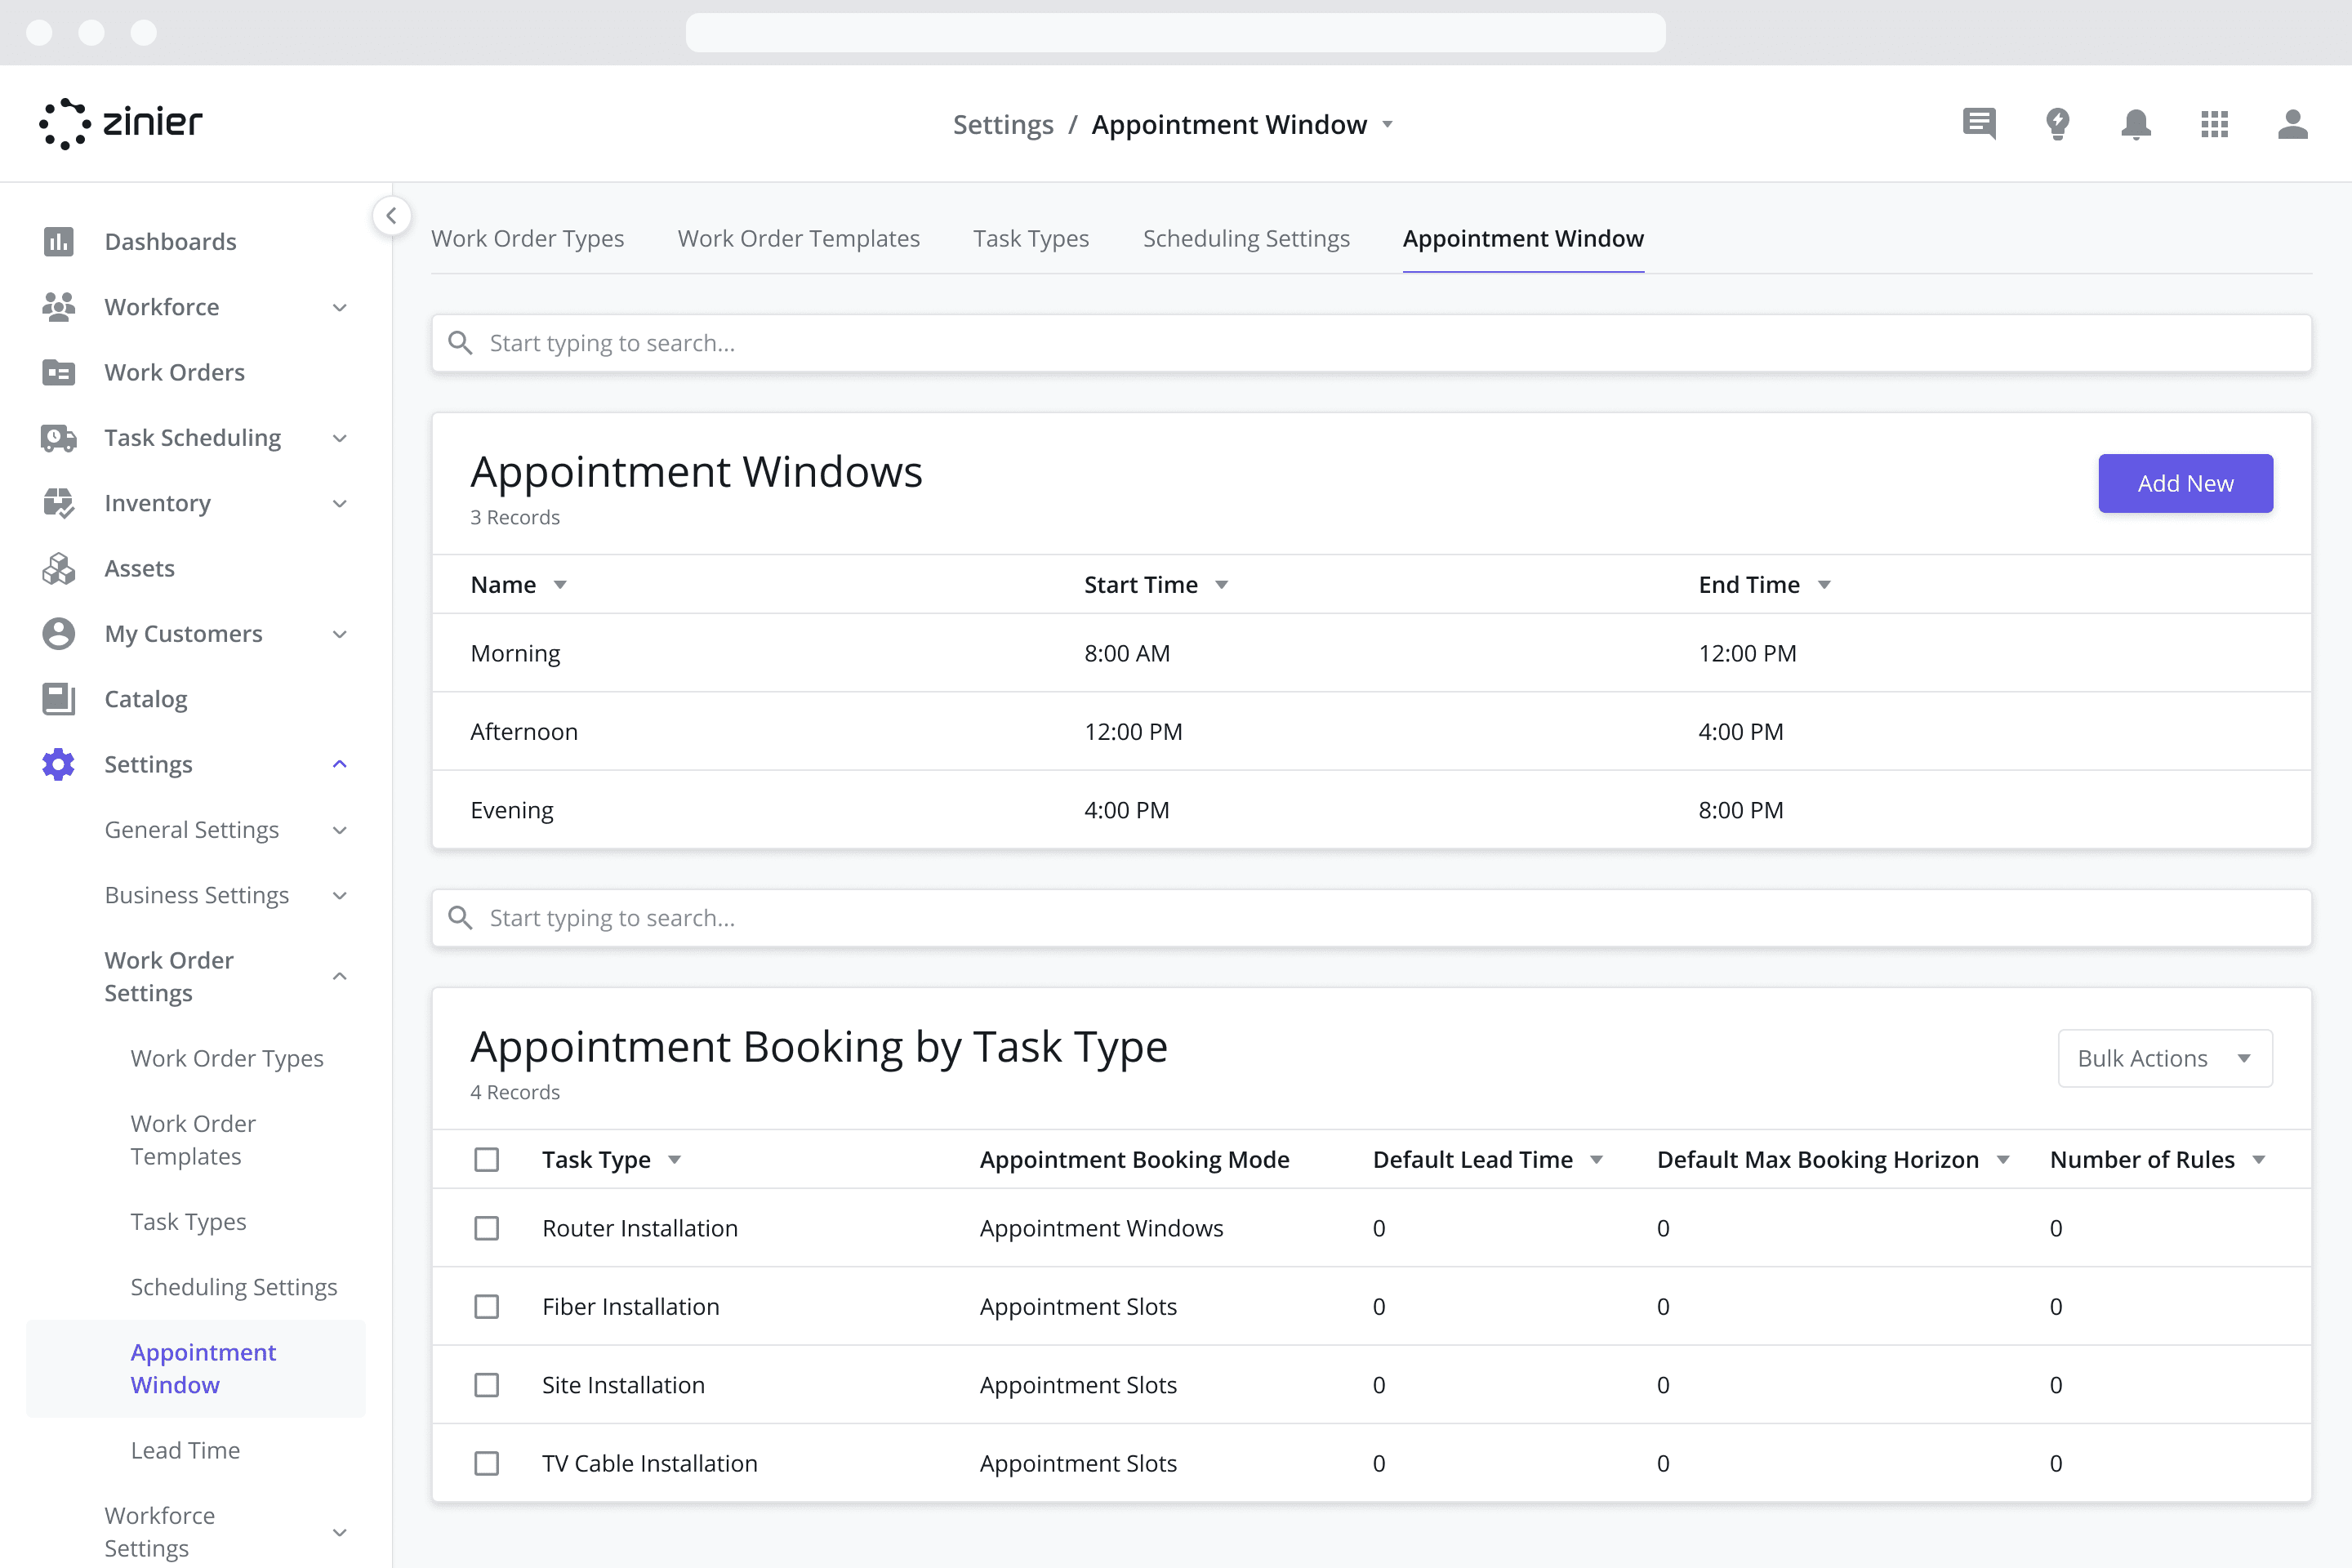
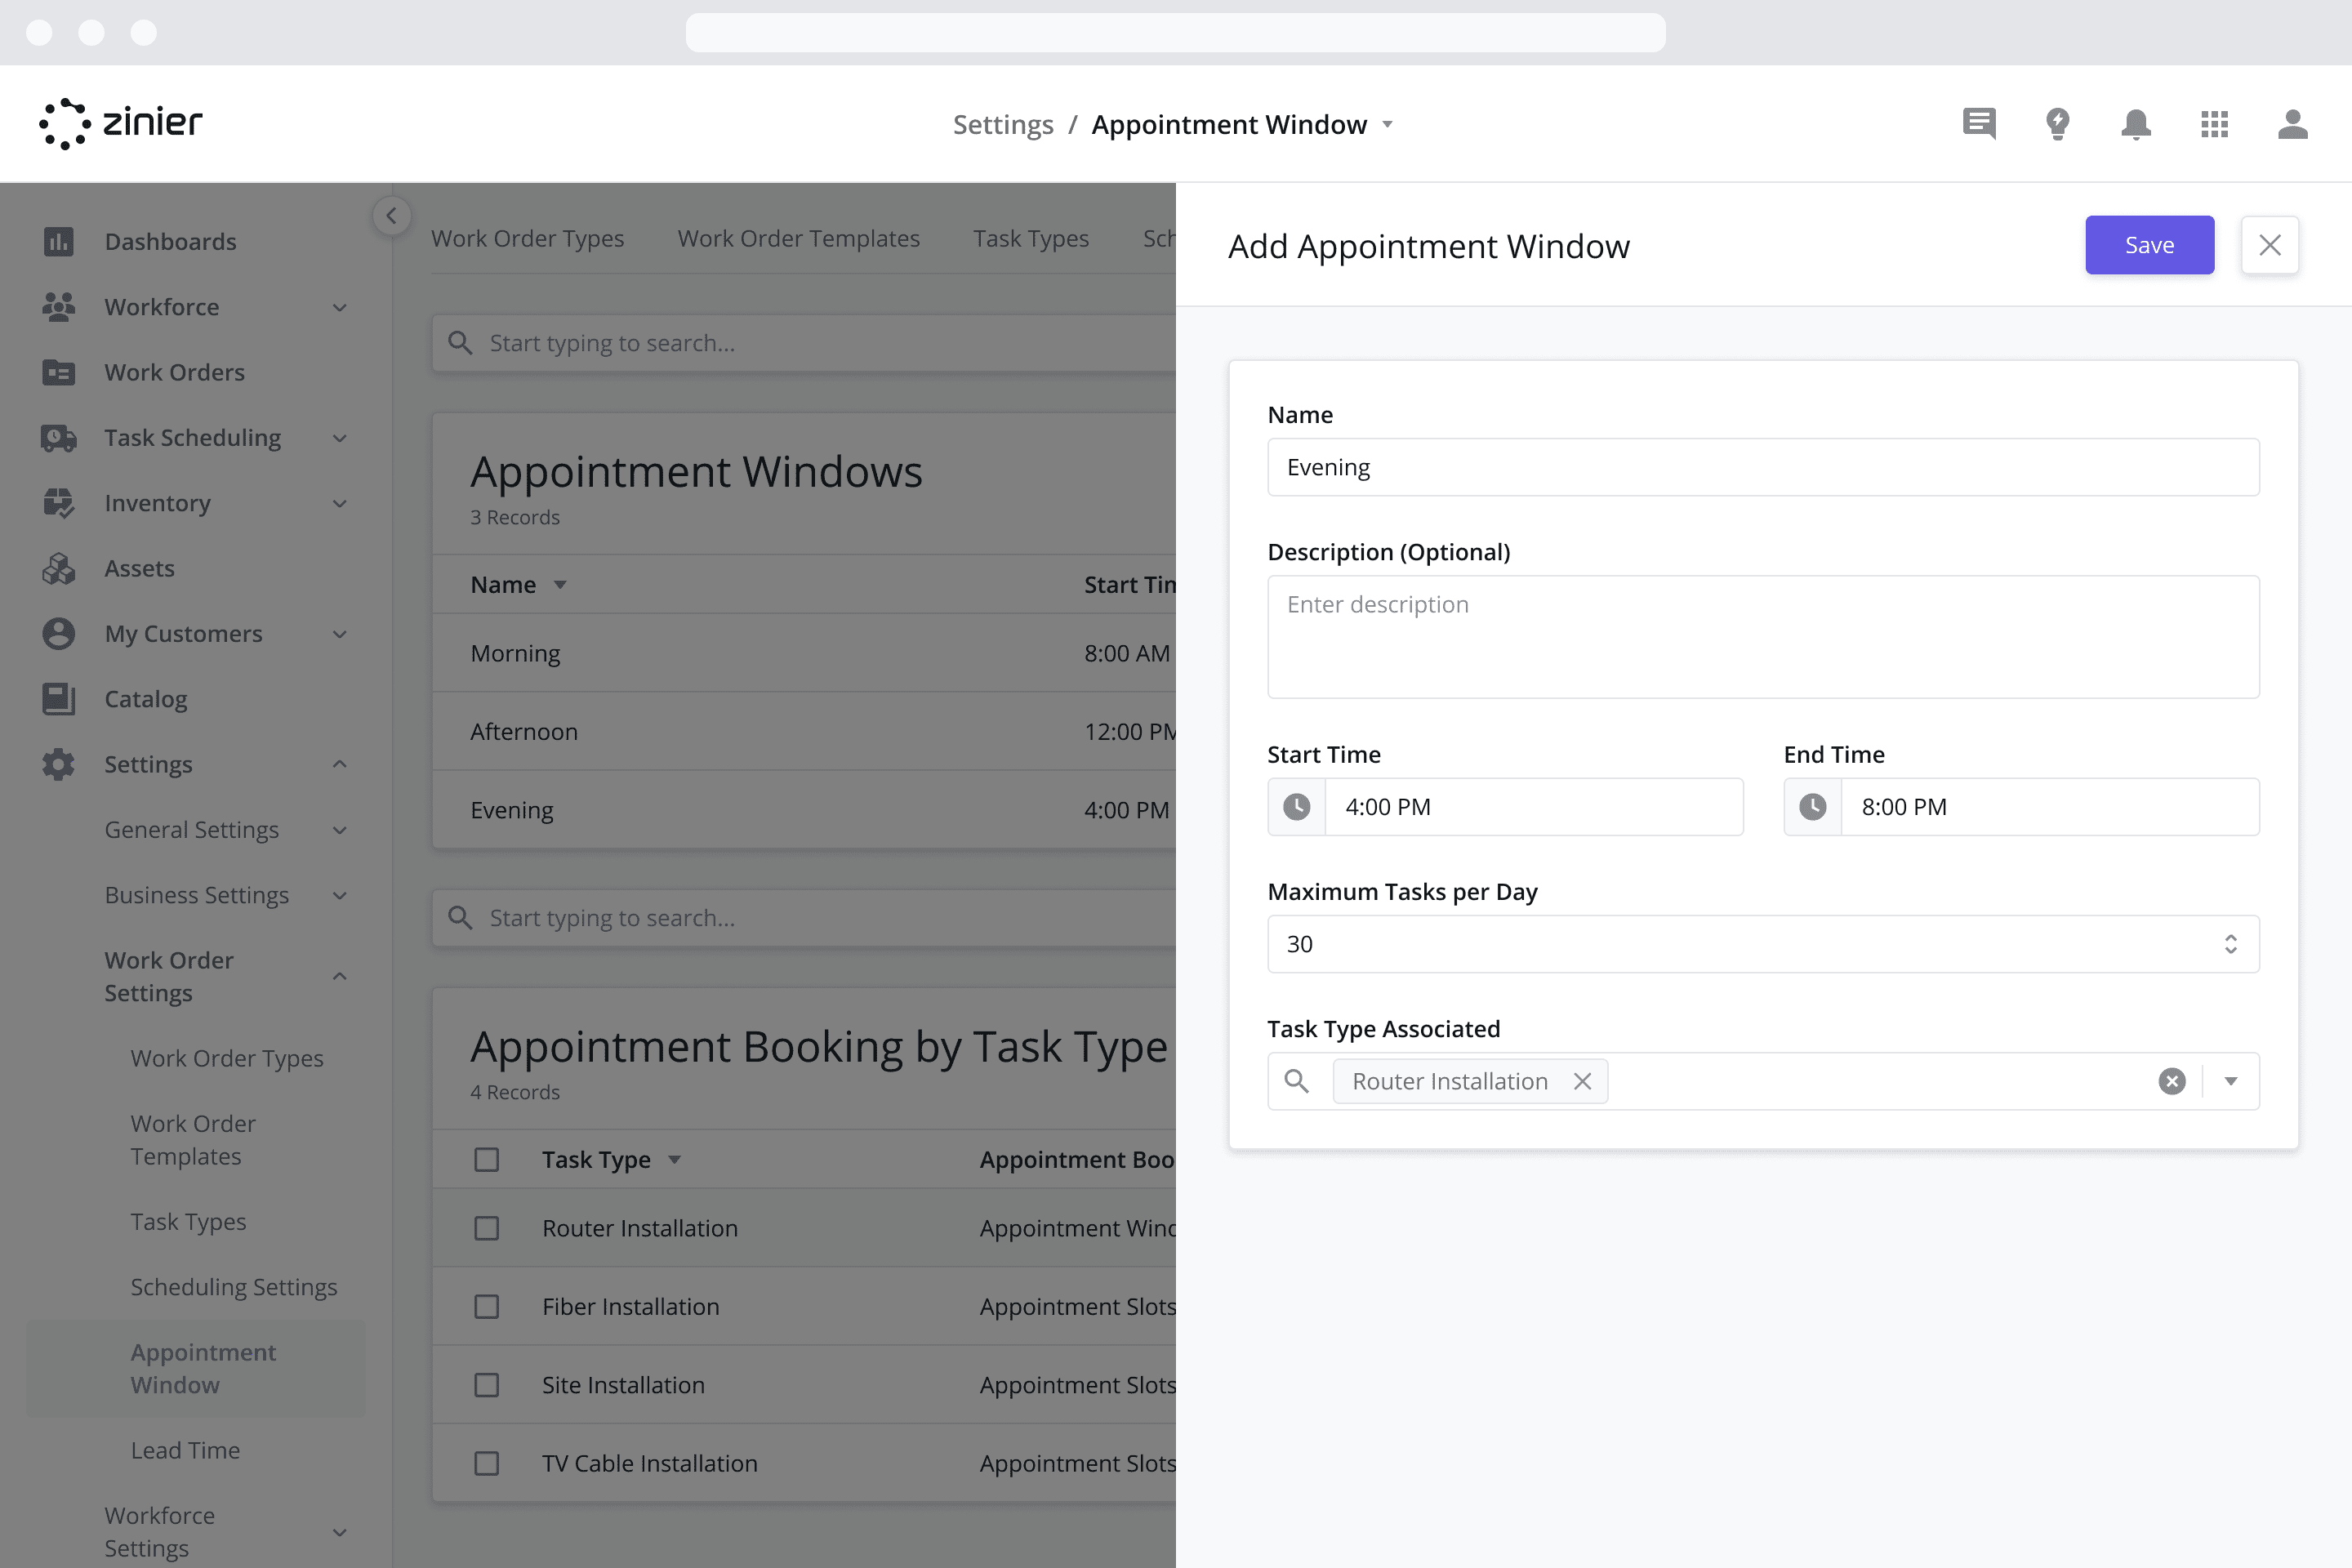
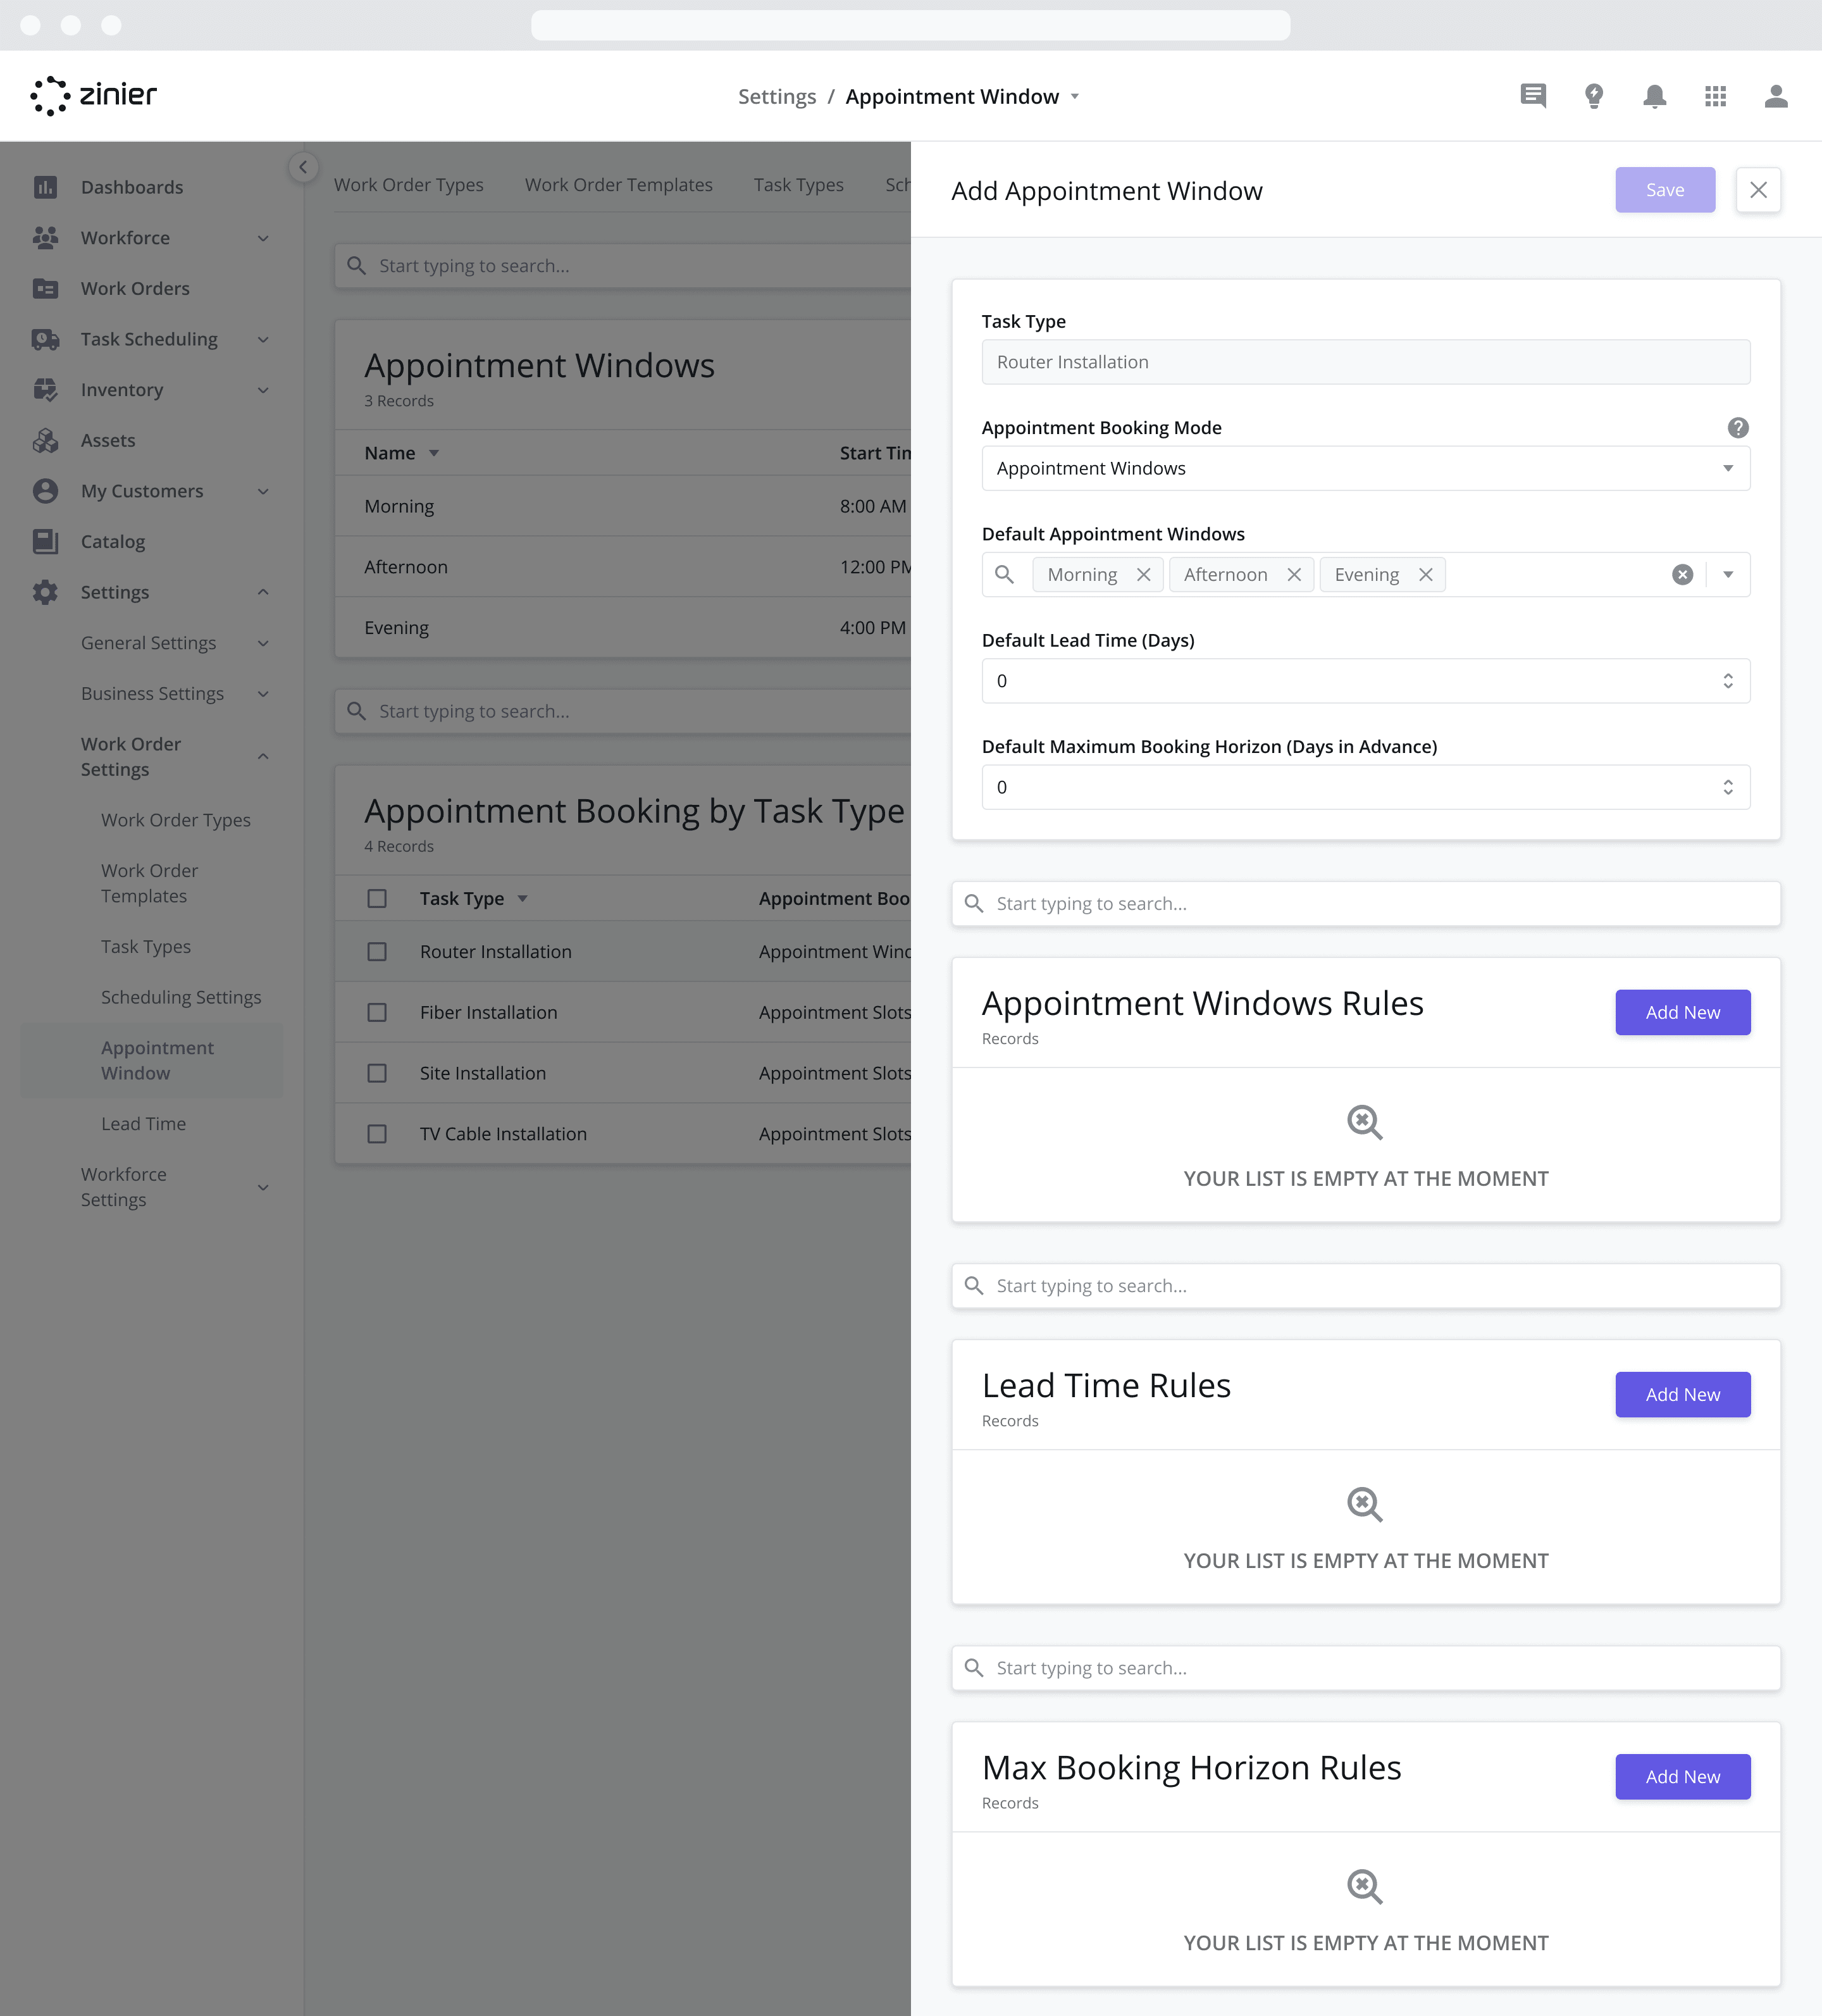
To add a new Appointment Window, follow the steps below:
Go to the Settings > Work Order Settings > Appointment Windows module
Click the “Add New” button from the data grid
Enter a Name and Description (Optional). The is used to identify the time slot to end-customers booking appointments (i.e. Morning, Afternoon, Evening etc.)
Select a Start Time and End Time. These represent the time slots that end-customers can choose from when booking an appointment.
Select a Maximum Tasks per Day. This field allows you to set the maximum number of tasks or capacity for the time slot. While some older implementations still use this field, this field is no longer in use.
Optionally add the Task Types Associated with the Appointment Window. Doing so will result in the following:
Customer Portal: Customers using the Customer Portal to book appointments associated with these Task Types will be able to select this Appointment Window and any other Appointment Windows associated with the Task Type (if capacity is available). For more information on how Appointment Windows impact capacity, visit the Capacity Management page.
Capacity Points View: When viewing the capacity for the Task Types associated with the Appointment Window from the Points View, the time slot representing this Appointment Window (i.e. 4pm - 8pm) will be visible in the capacity tables and show the various capacity calculations for this Appointment Window (Available Capacity, Used Capacity, Forecasted Capacity etc.).
Appointment Booking by Task Type: When a Task Type is added to the Appointment Window, this will also update the corresponding record in the Appointment Booking by Task Type table (see below for more details). For example, if I add a “Router Installation” Task Type to the “Evening” Appointment Window, when I click on the “Router Installation” record from the Appointment Booking by Task Type table, it will be autofilled with the following details:
Appointment Booking Mode = “Appointment Window”
Default Appointment window = “Evening”
Default Lead Time (Days) = 0 (default value)
Default Maximum Booking Horizon (Days in Advance) = 0 (default value)
Click Save
Configuring Appointment Bookings by Task Types
NEW (24.4)
If your organization utilizes Capacity Management, associating Task Types to Appointment Windows / Time Slots is an important step to ensure capacity is calculated accurately for each Task Type so that customers using the customer portal to book appointments can only view time slots with available capacity.
Before explaining this further, it’s important to note that there are two possible Appointment Booking modes, and each Task Type can be configured to work on one of the modes:
Appointment Slots: With this method, when a customer books an appointment through the Customer Portal, the task is scheduled at the start of the time slot. Typically, you would use Appointment Slots when it is important for your organization to to use a specific start time for a task.
Appointment Windows: With this method, when a customer books an appointment through the Customer Portal, the task is not actually scheduled – instead it is tied to the appointment window selected. Typically, you would use Appointment Windows when the start time of the task is more flexible, as this also provides a bit more flexibility if the auto-scheduler is being used.
For more information on how capacity is calculated for each appointment slot / window on a given day, see the Capacity Management section of the documentation.
Configuring Appointment Slots by Task Type
If your organization is using the Appointment Slots method, you will need to configure the appointment slot settings for each Task Type that you want to utilize in the Customer Portal and see capacity for within the Capacity Management > Points View module. To do so, follow the steps below:
Go to the Settings > Work Order Settings > Appointment Windows module
Hover over the Task Type you wish to edit in the Appointment Booking by Task Type data grid and click the “Edit” icon to open the sidepanel.
From the Appointment Booking Mode dropdown, select “Appointment Slots”
Enter a Slot Duration (in number of minutes). This represents the amount of time for each timeslot.
Select the Appointment Booking Start Time and Appointment Booking End Time. This represents that overall availability in which timeslots can exist in a given day when booking an appointment. For example, if I’ve selected 60 minutes as the Slot Duration and have a start time of 8:00 am and an end time of 5:00 pm, then there will be 10 timeslots available for each day: the first one will be from 8:00 am - 9:00 am and the last one will be from 5:00 pm - 6:00 pm. These 10 timeslots will then be represented in the Customer Portal as booking times and in the Capacity Management > Points View module, where users can view the capacity for each timeslot on a given day, in a specific region, for this Task Type.
Enter the Default Lead Time (Days). This represents the minimum number of days required between the time a task is created and the time it can be scheduled/booked using the customer portal. For example, if a task is created on Monday at 9:00am and Default Lead Time = 2 days, appointment slots in the customer portal will not start showing availability for selection until Wednesday at 9:00am (assuming capacity is available). This configuration is useful for service teams that require a buffer between task creation and execution – to source / pick-up parts and materials or organize contractors for a job for example.
Enter the Default Maximum Booking Horizon (Days in Advance). This represents the maximum number of days in advance that a task can be scheduled/booked using the customer portal (starting from the task creation date). For example, if a task is created on Monday, May 1st at 9:00am and Default Maximum Booking Horizon = 7 days, appointment slots in the customer portal will stop showing availability for selection after Monday, May 8th at 9:00am. This configuration is useful for service teams that require task execution within a certain timeframe. Note that this settings is independent of any SLA agreement.
Click the “Save” button.
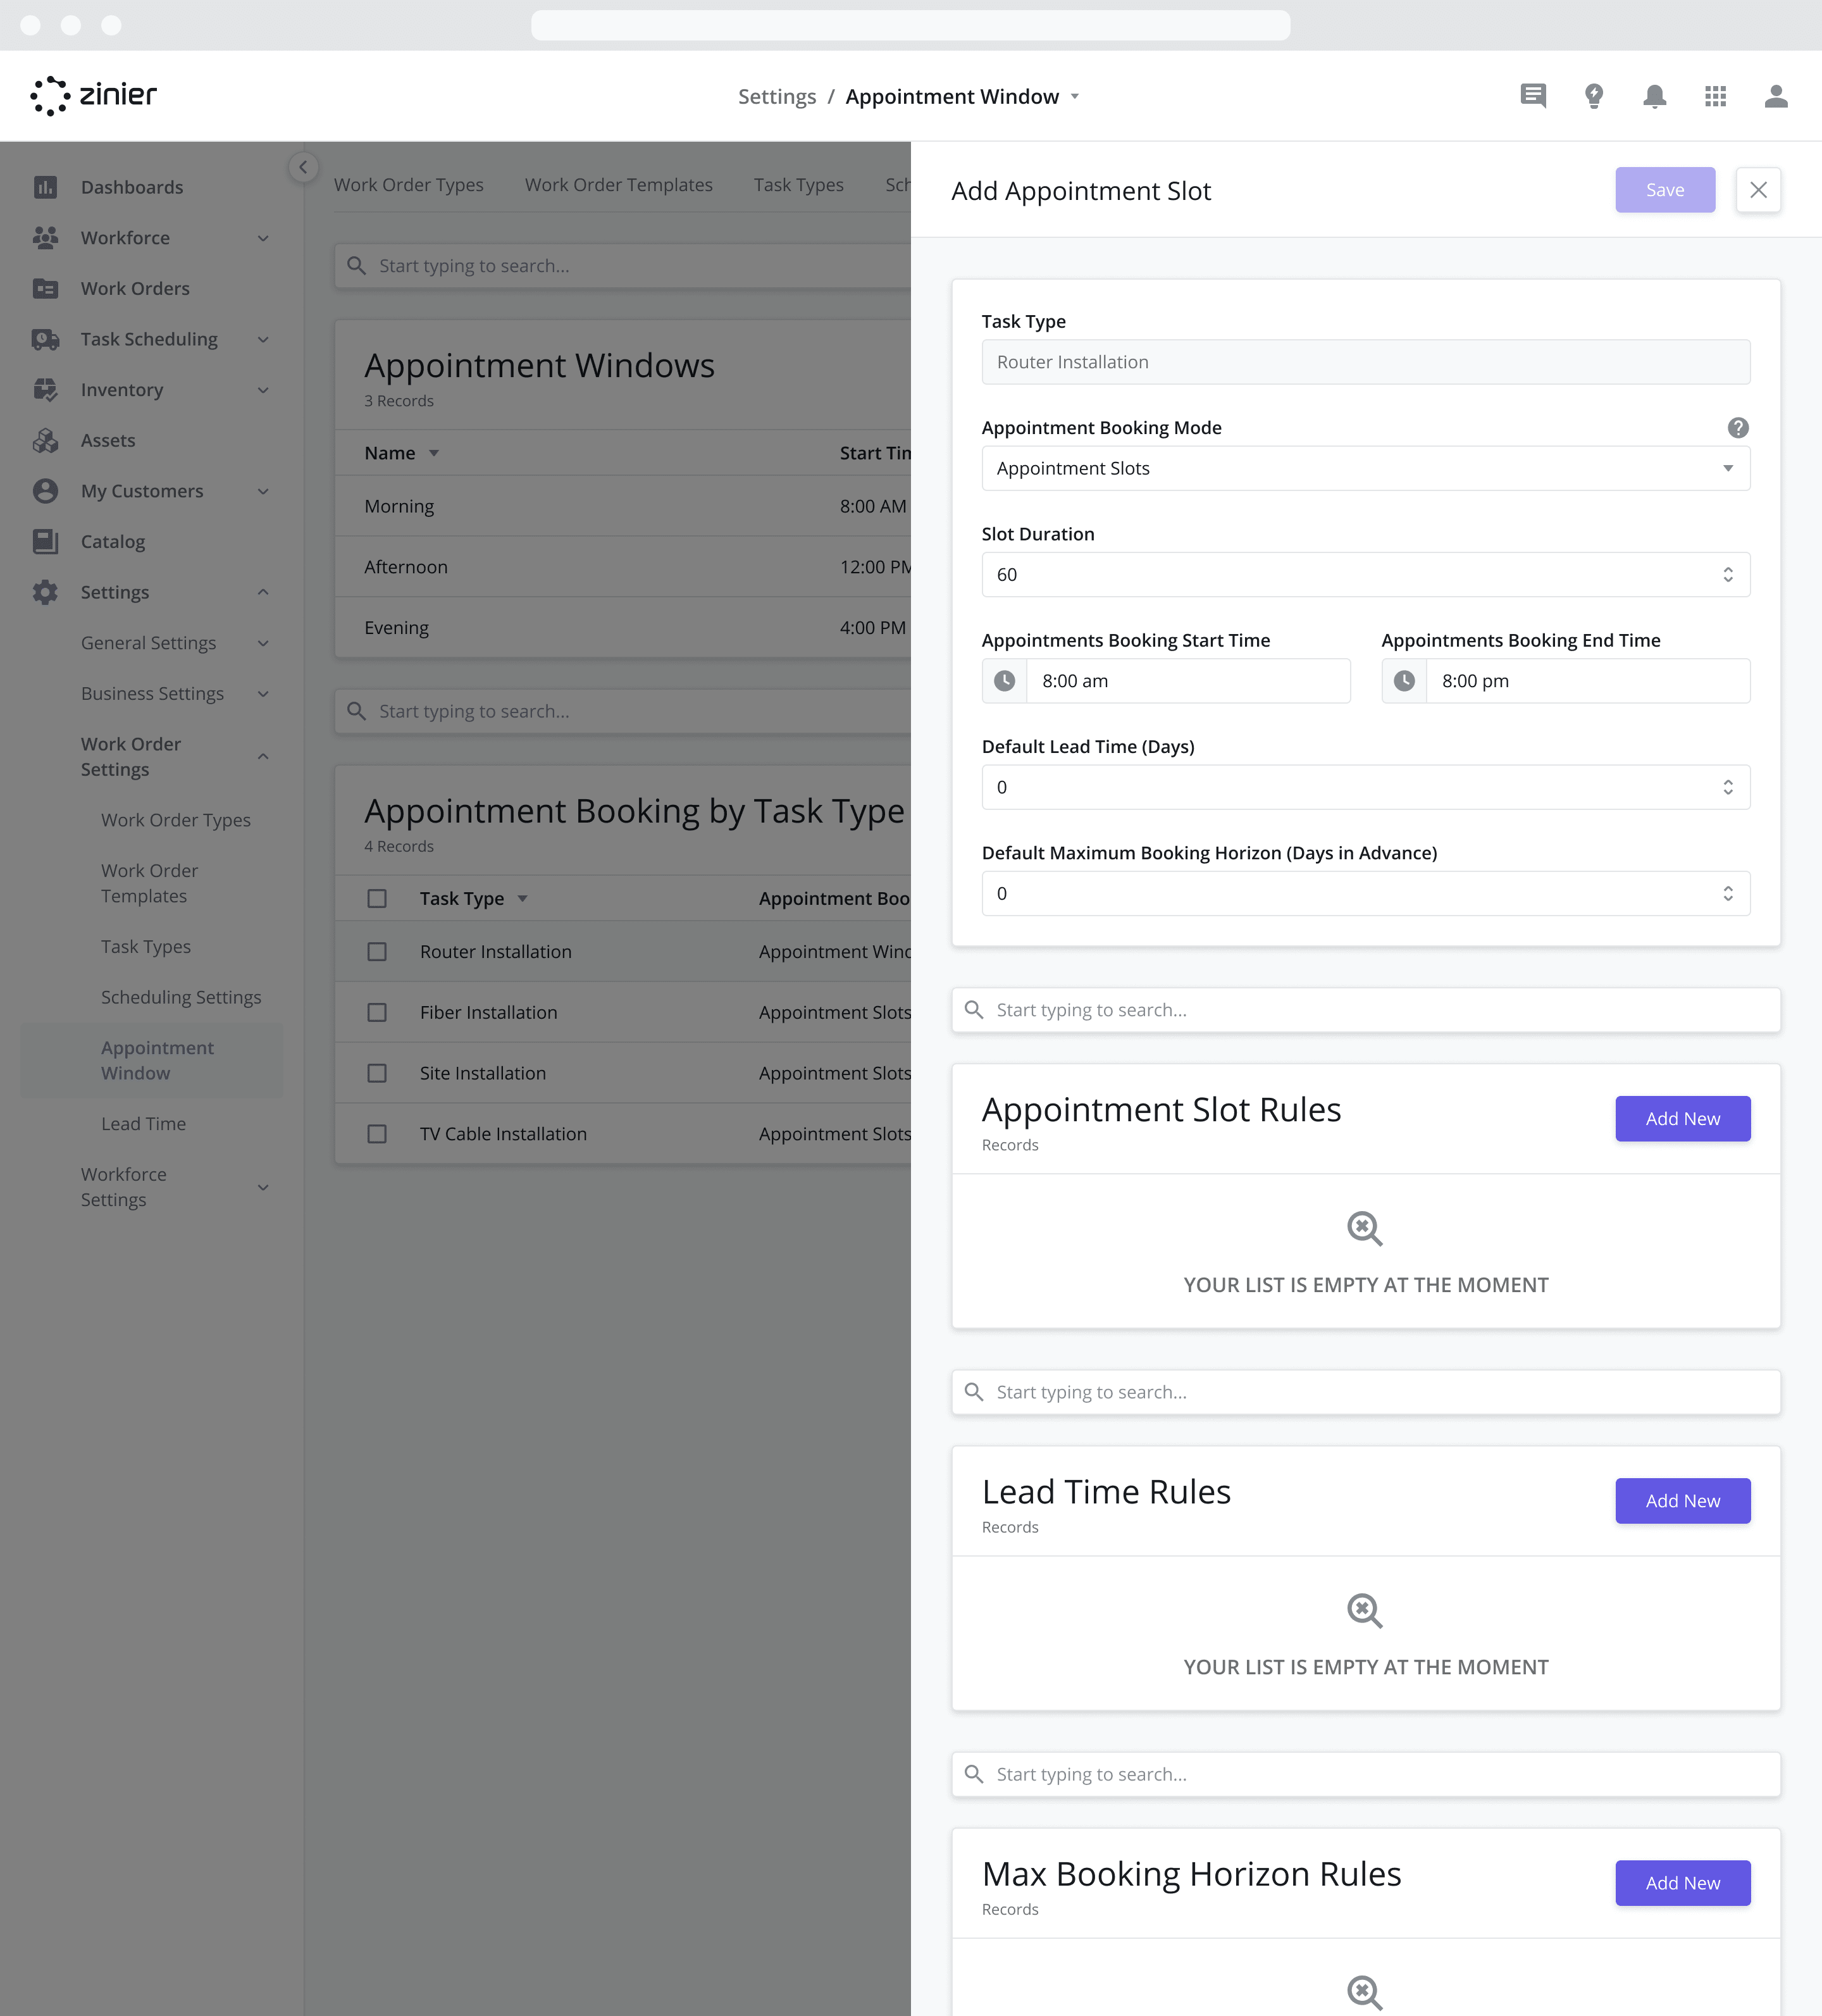
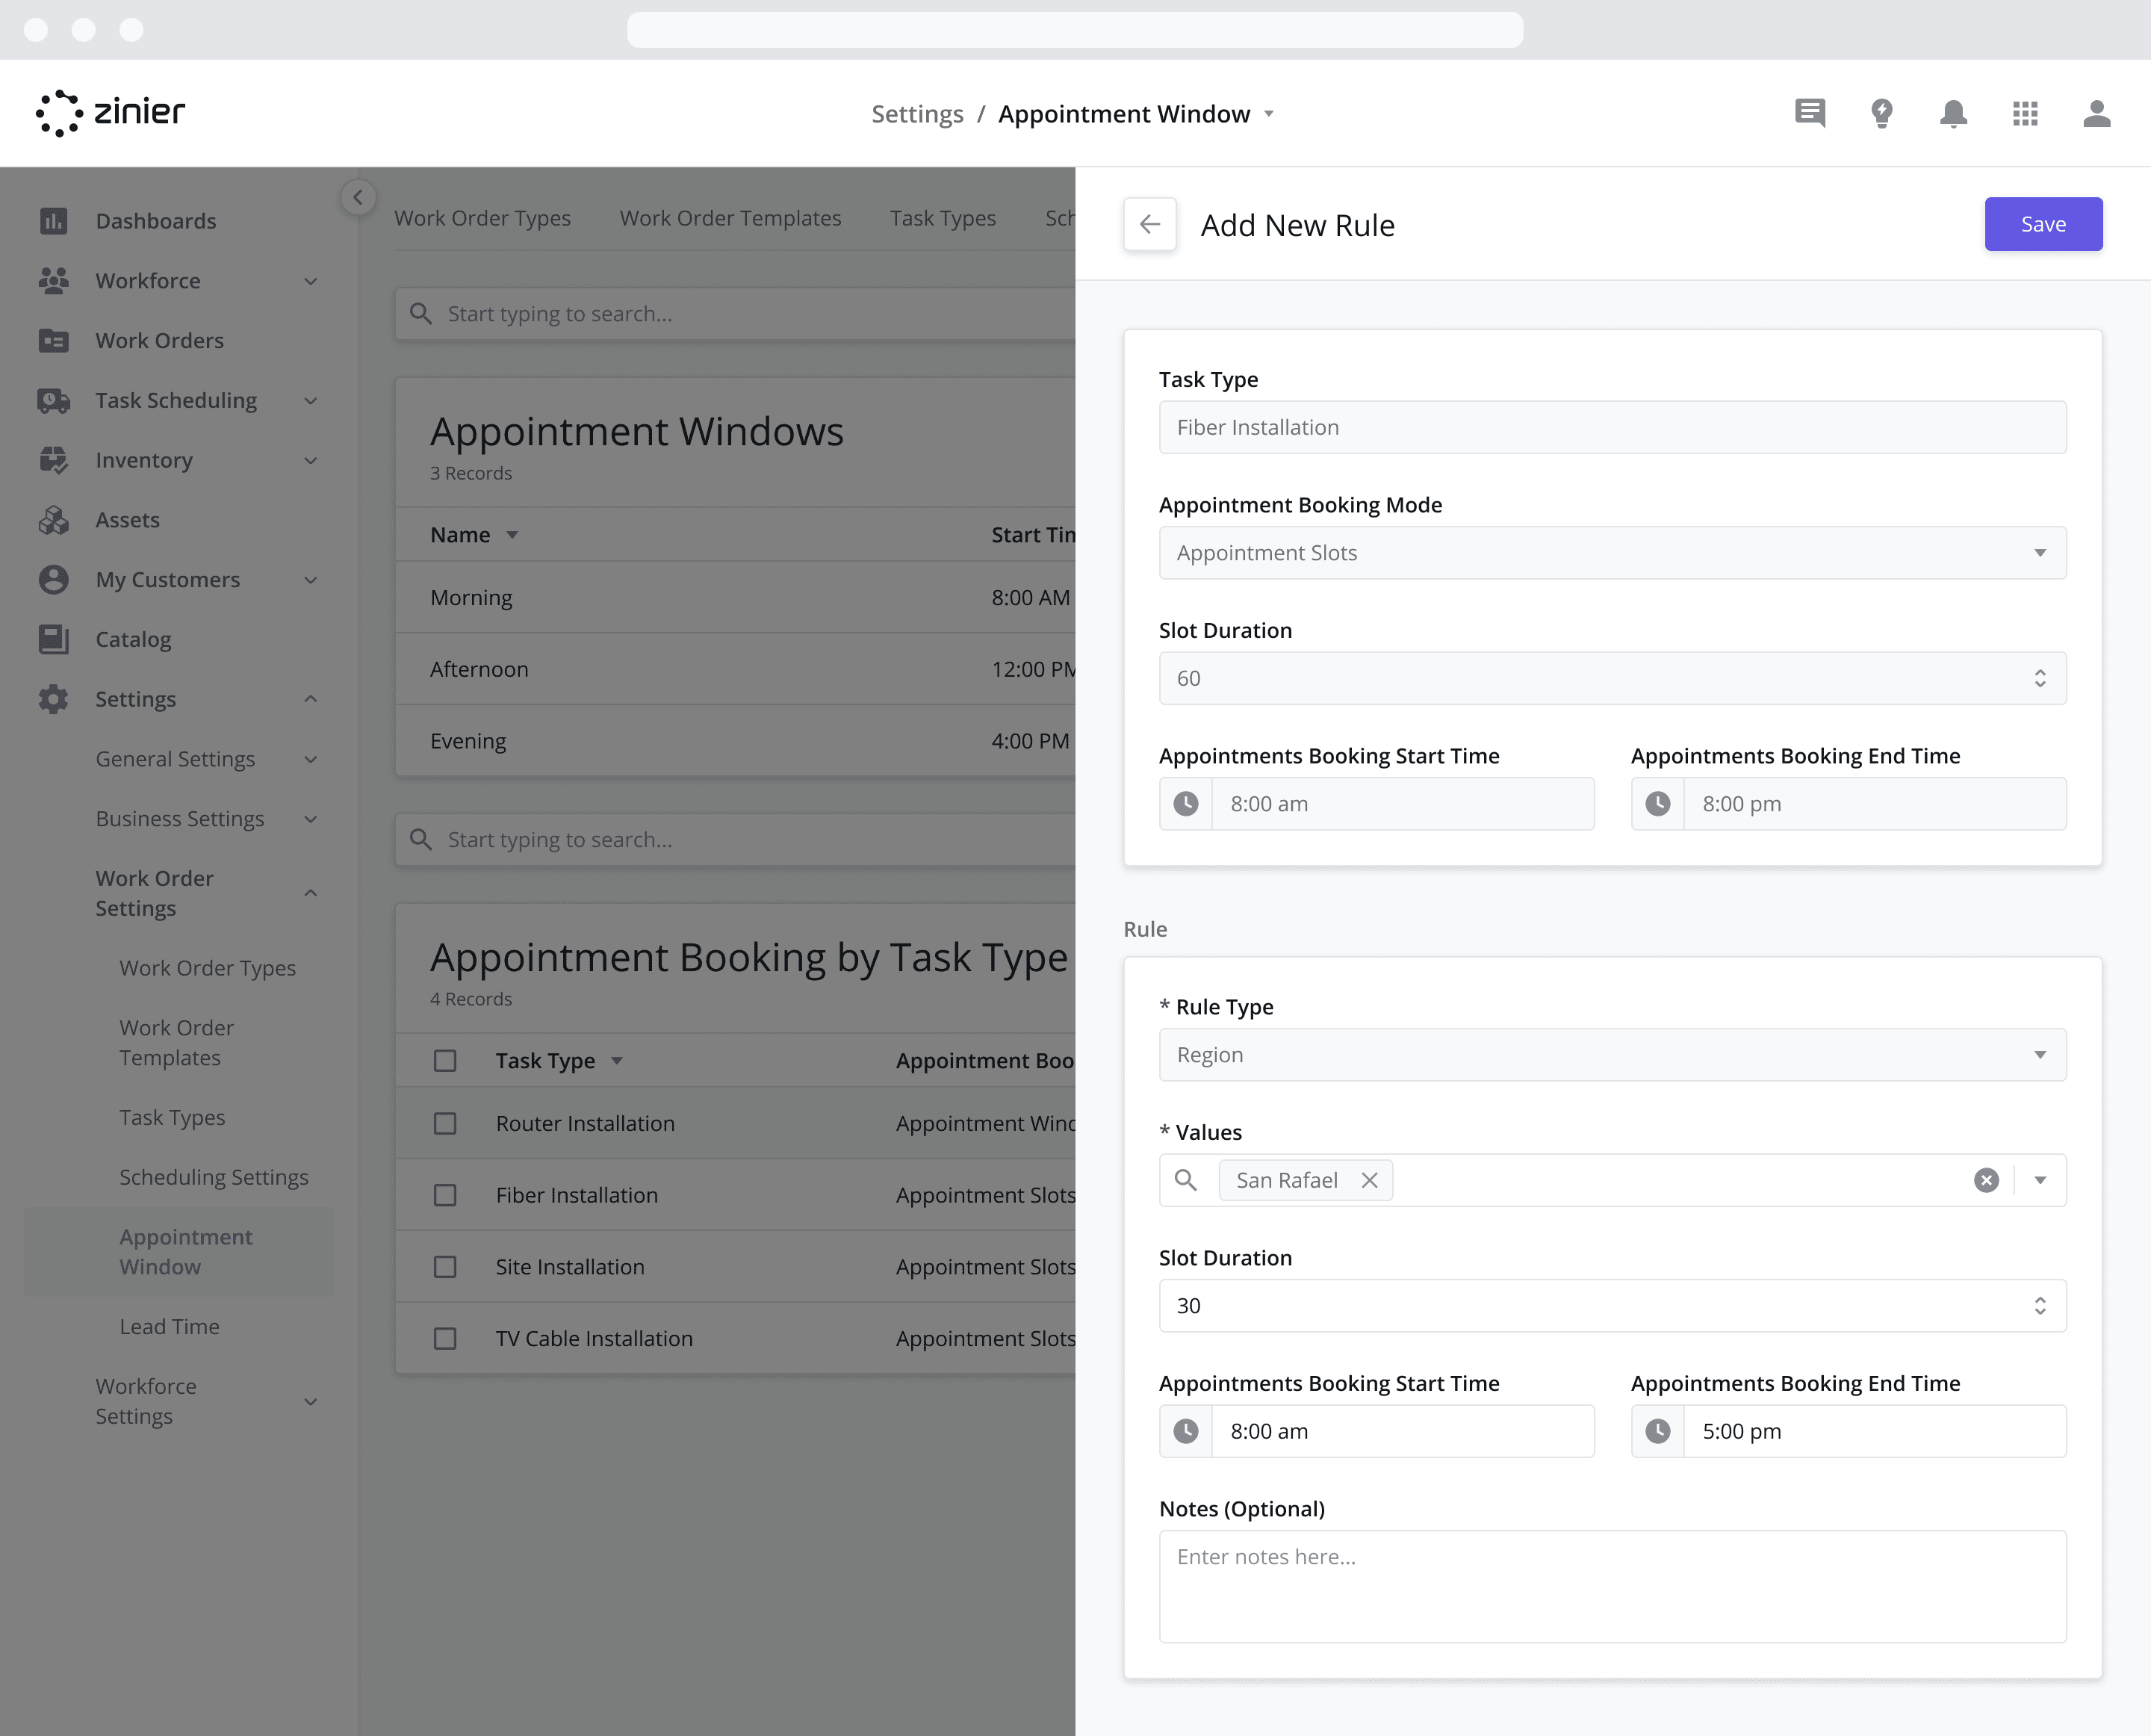
Adding Appointment Slot Rules
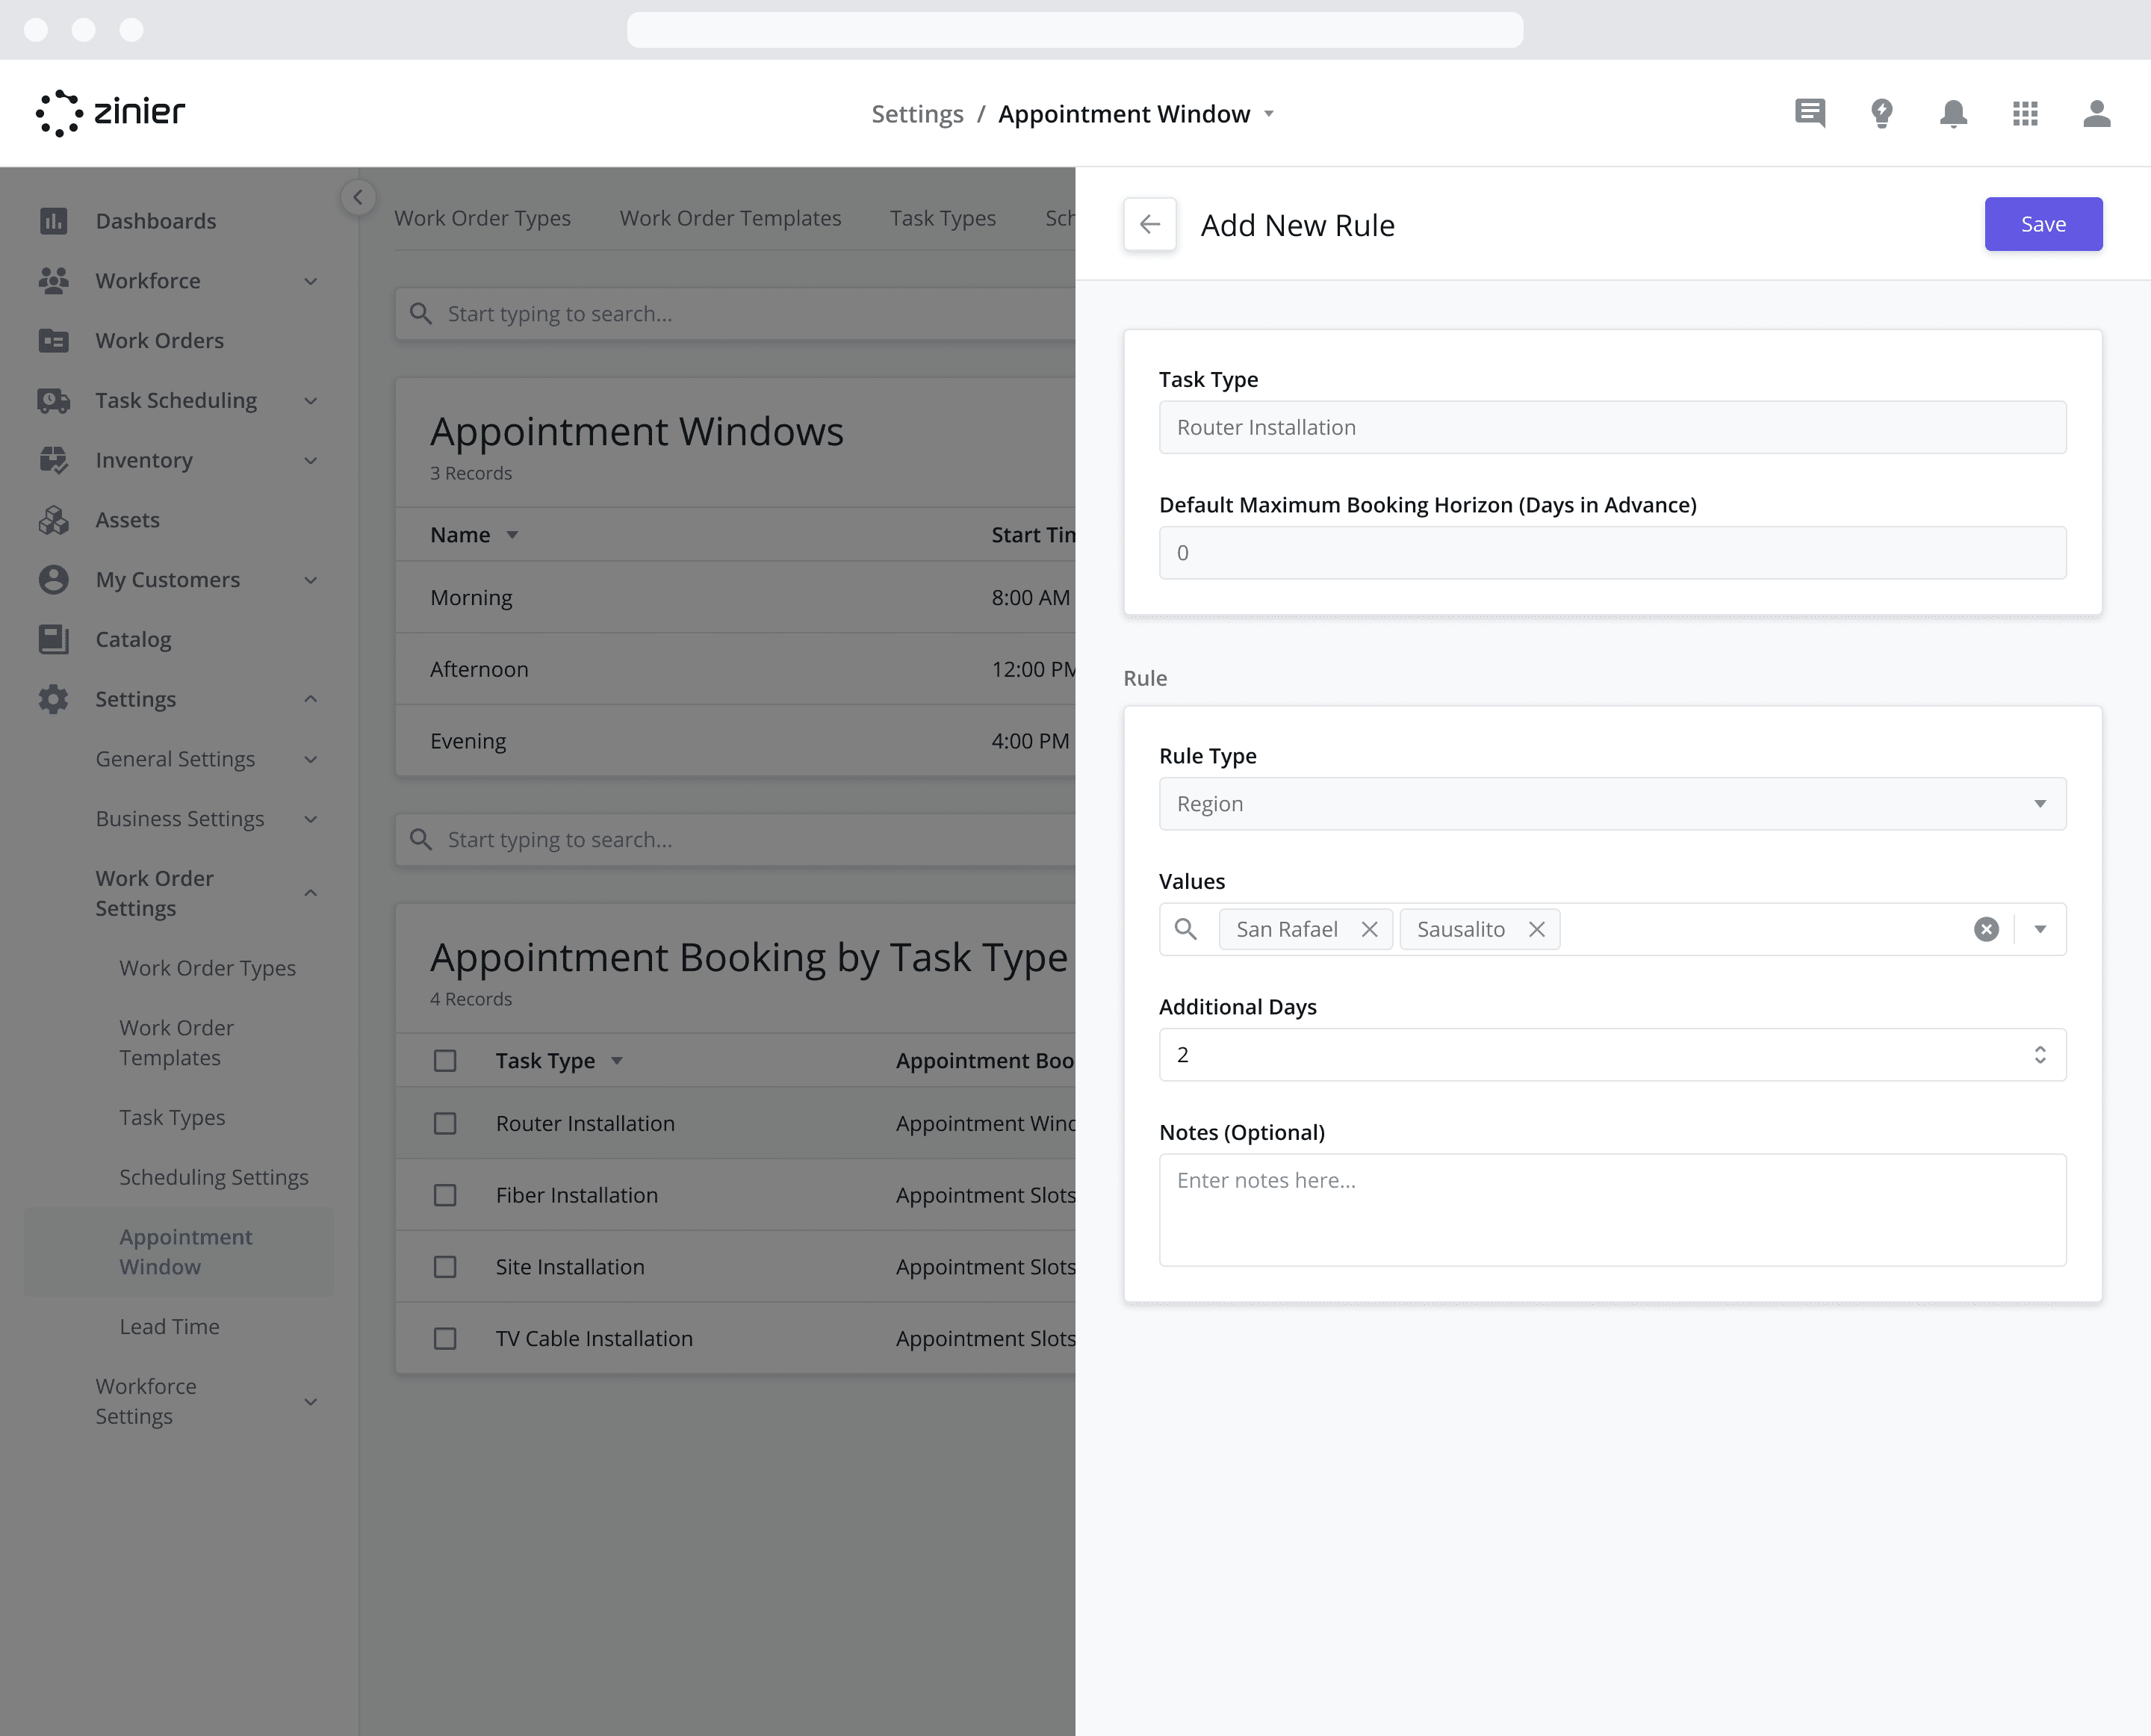
There may be scenarios where you’d like to create rules/exceptions which allow the Appointment Slot times to differ depending on task attributes such as the Region where the task is performed. For example, in a particular rural region (let’s call it “Rural Region”), you may wish the appointment slots to be greater to allow for more travel time to sites in that Region. To do so, follow the steps below:
Hover over the Task Type you wish to edit in the Appointment Booking by Task Type data grid and click the “Edit” icon to open the sidepanel.
Click the “Add New” button from the Appointment Slots Rules datagrid.
By default, the “Rule Type” will be set to “Region”. More Rule Types will be added in the future, but for now, applying rules to the Region is the only task attribute that can be configured using rules.
From the Region(s) dropdown menu, select the regions you wish to create the rule for. In the example above, you would select “Rural Region”.
Enter a new Slot Duration if required.
Enter a new Appointment Booking Start Time and Appointment Booking End Time if required.
Add any Notes (Optional) to provide any context you wish to explain.
Click the “Save” button.
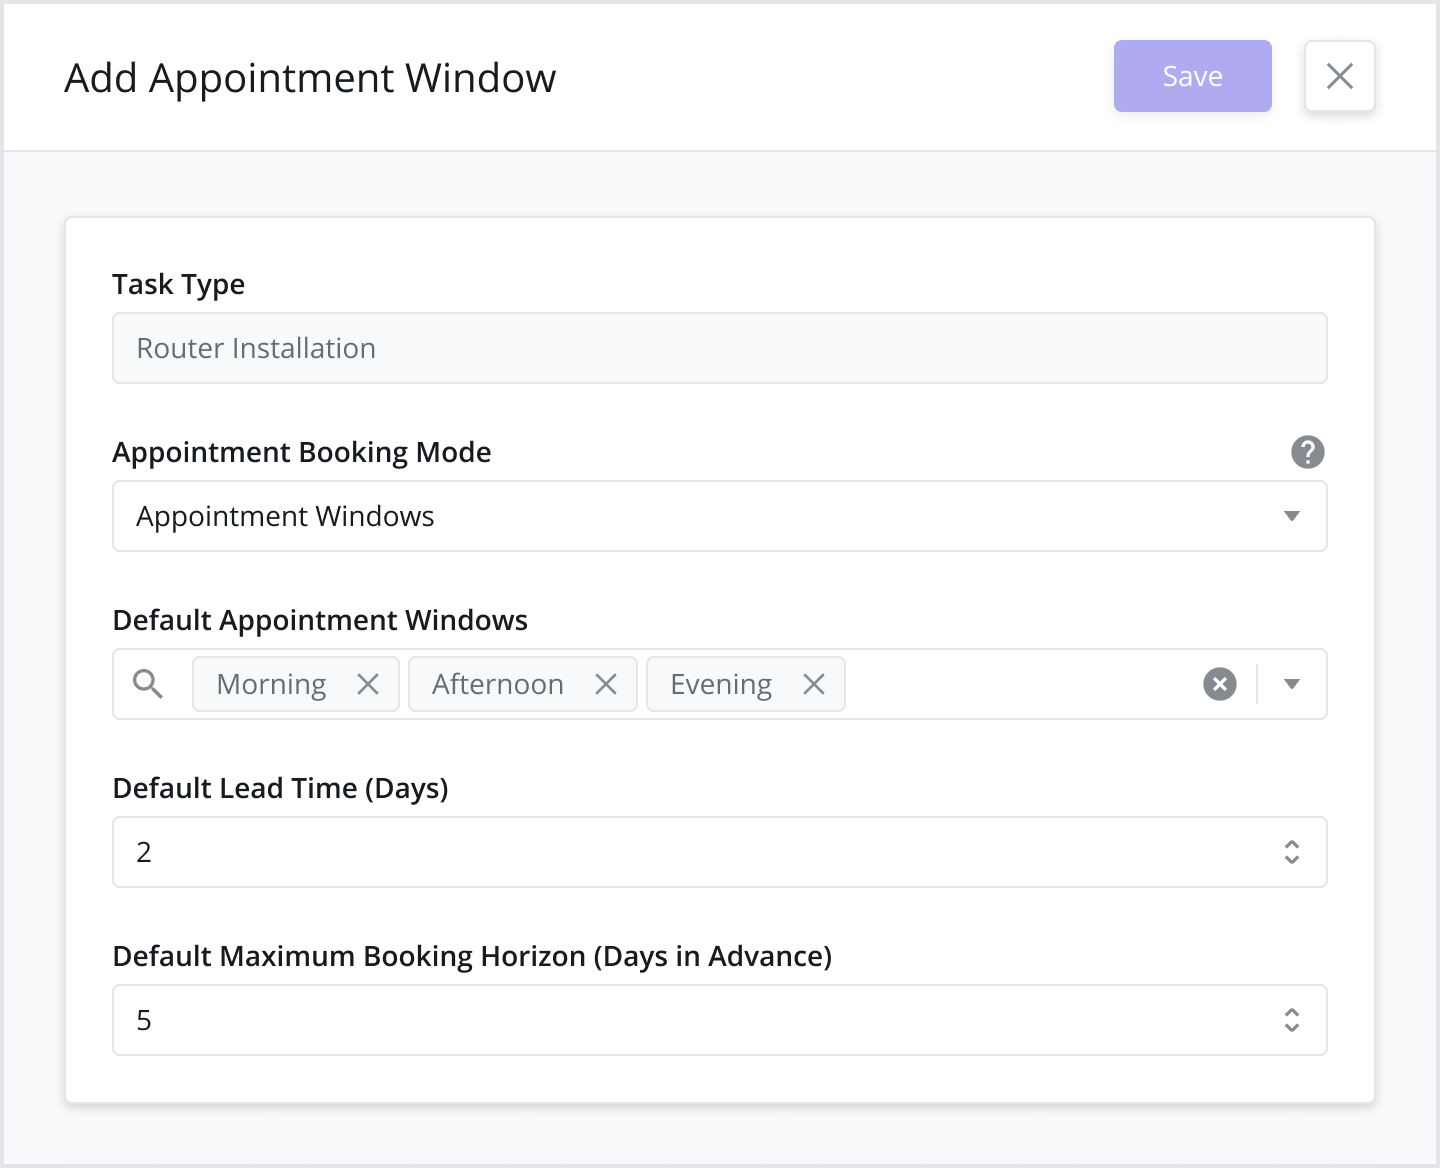
Configuring Appointment Windows by Task Type
If your organization is using the Appointment Windows method, you will need to configure the appointment window settings for each Task Type that you want to utilize in the Customer Portal and see capacity for within the Capacity Management > Points View module. To do so, follow the steps below:
Step 1: Define the Booking Mode and Settings
Go to the Settings > Work Order Settings > Appointment Windows module
Hover over the Task Type you wish to edit in the Appointment Booking by Task Type data grid and click the “Edit” icon to open the sidepanel.
From the Appointment Booking Mode dropdown, select “Appointment Windows”
Select the Default Appointment window(s) you wish to use from the dropdown menu. Note that the Appointment Windows must first be created for them to show up here. To create a new Appointment Window, see the “Adding New Appointment Windows” section above.
Enter the Default Lead Time (Days). This represents the minimum number of days required between the time a task is created and the time it can be scheduled/booked using the customer portal. For example, if a task is created on Monday at 9:00am and Default Lead Time = 2 days, appointment slots in the customer portal will not start showing availability for selection until Wednesday at 9:00am (assuming capacity is available). This configuration is useful for service teams that require a buffer between task creation and execution – to source / pick-up parts and materials or organize contractors for a job for example.
Enter the Default Maximum Booking Horizon (Days in Advance). This represents the maximum number of days in advance that a task can be scheduled/booked using the customer portal (starting from the task creation date). For example, if a task is created on Monday, May 1st at 9:00am and Default Maximum Booking Horizon = 7 days, appointment slots in the customer portal will stop showing availability for selection after Monday, May 8th at 9:00am. This configuration is useful for service teams that require task execution within a certain timeframe. Note that this settings is independent of any SLA agreement.
If you’d like to create rules/exceptions to modify the Appointment Windows used, or the Default Lead Times / Max Booking Horizons based on the Region or Priority of the task, continue to Step 2. If these settings should stay constant no matter the Regions or Task Priorities when customers book appointments, you are done and can click the “Save” button.
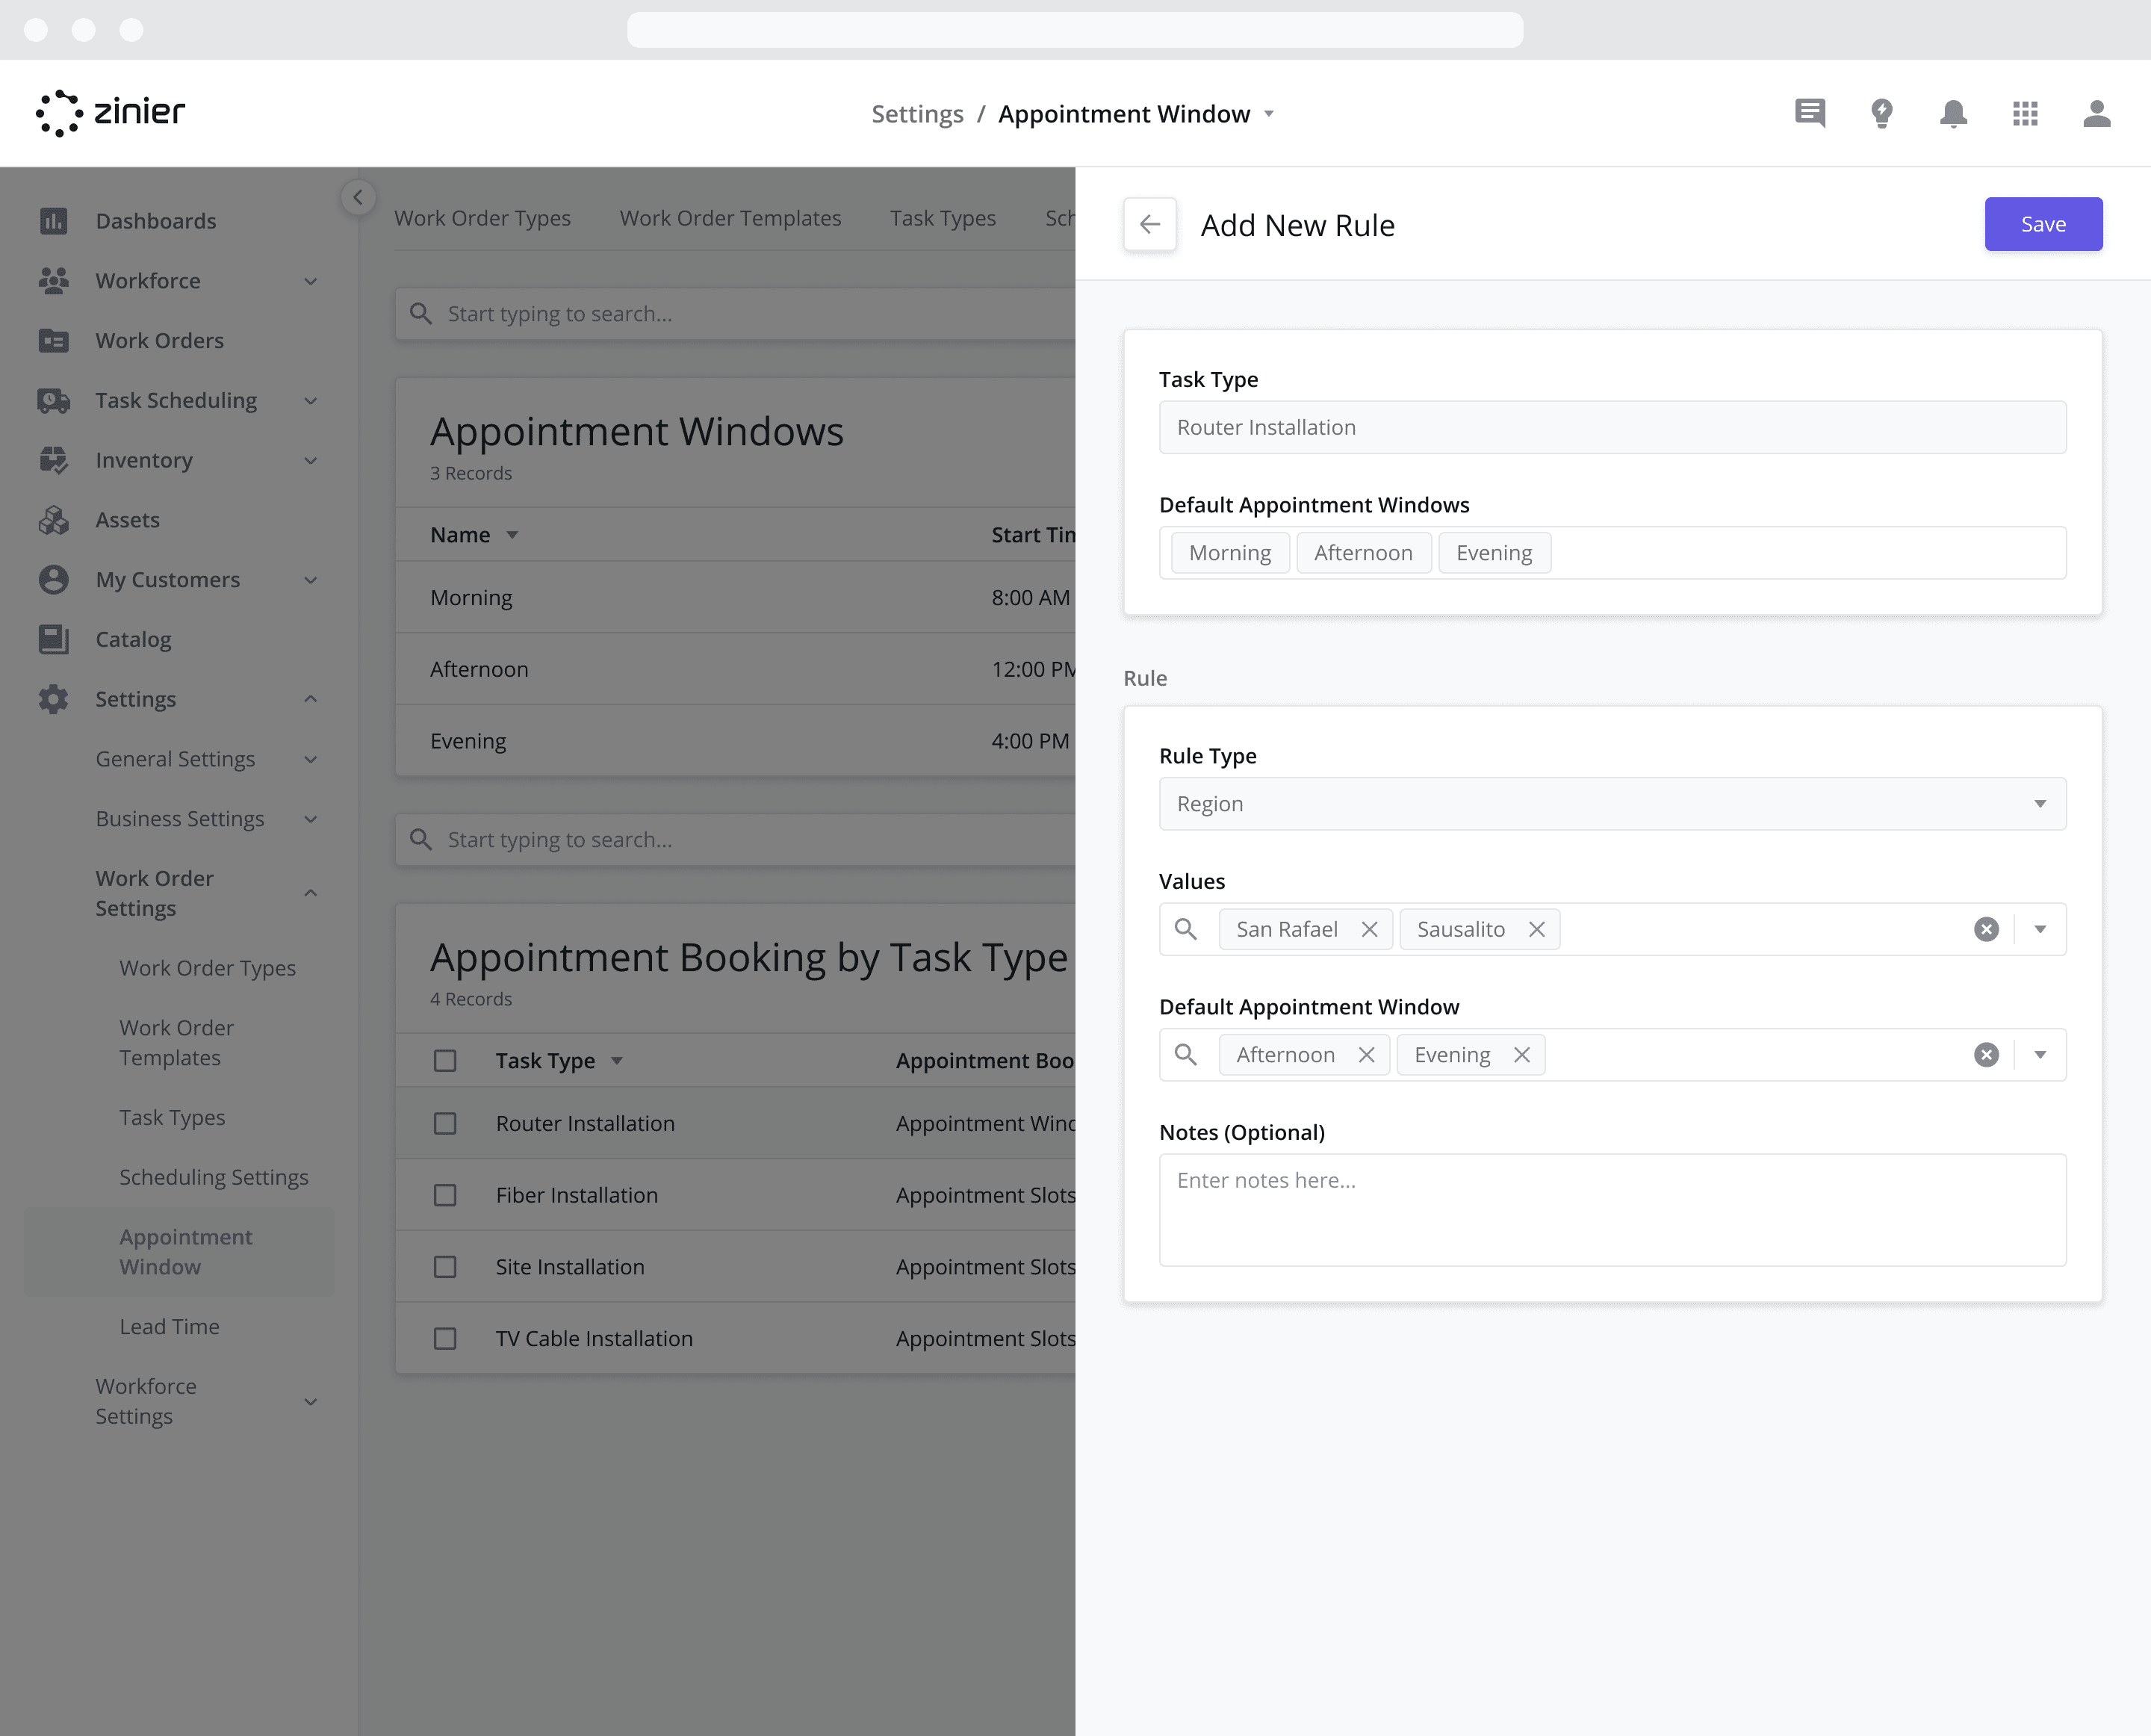
Adding Appointment Window Rules
There may be scenarios where you’d like to create rules/exceptions which allow the Appointment Windows used to differ depending on task attributes such as the Region where the task is performed. For example, in a particular region with a high number or tasks (let’s call it “Busy Region”), you may wish to offer an additional “Evening” appointment window in order to give customers more scheduling options. To do so, follow the steps below:
Hover over the Task Type you wish to edit in the Appointment Booking by Task Type data grid and click the “Edit” icon to open the sidepanel.
Click the “Add New” button from the Appointment Windows Rules datagrid.
By default, the “Rule Type” will be set to “Region”. More Rule Types will be added in the future, but for now, applying rules to the Region is the only task attribute that can be configured using rules.
From the Values dropdown menu, select the regions you wish to create the rule for. In the example above, you would select “Busy Region”.
Add any Notes (Optional) to provide any context you wish to explain.
Click the “Save” button.
Default Settings for New Task Types
When a new Task Type is created, it will automatically populate the record with settings that come from the Entity Config key named “capacityManagement”. To change these settings, contact your account admin. The default values are as follows:
Default Lead Time (Days) = 0
Default Maximum Booking Horizon (Days in Advance) = 0
Appointment Booking Mode = “Appointment Windows”
Default Appointment window = None
If the Appointment Booking Mode is changed to “Appointment Slots”, they will take the following settings be default:
Slot Duration = 60 mins
Appointment Booking Start Time = 8:00 am
Appointment Booking End Time = 8:00 pm
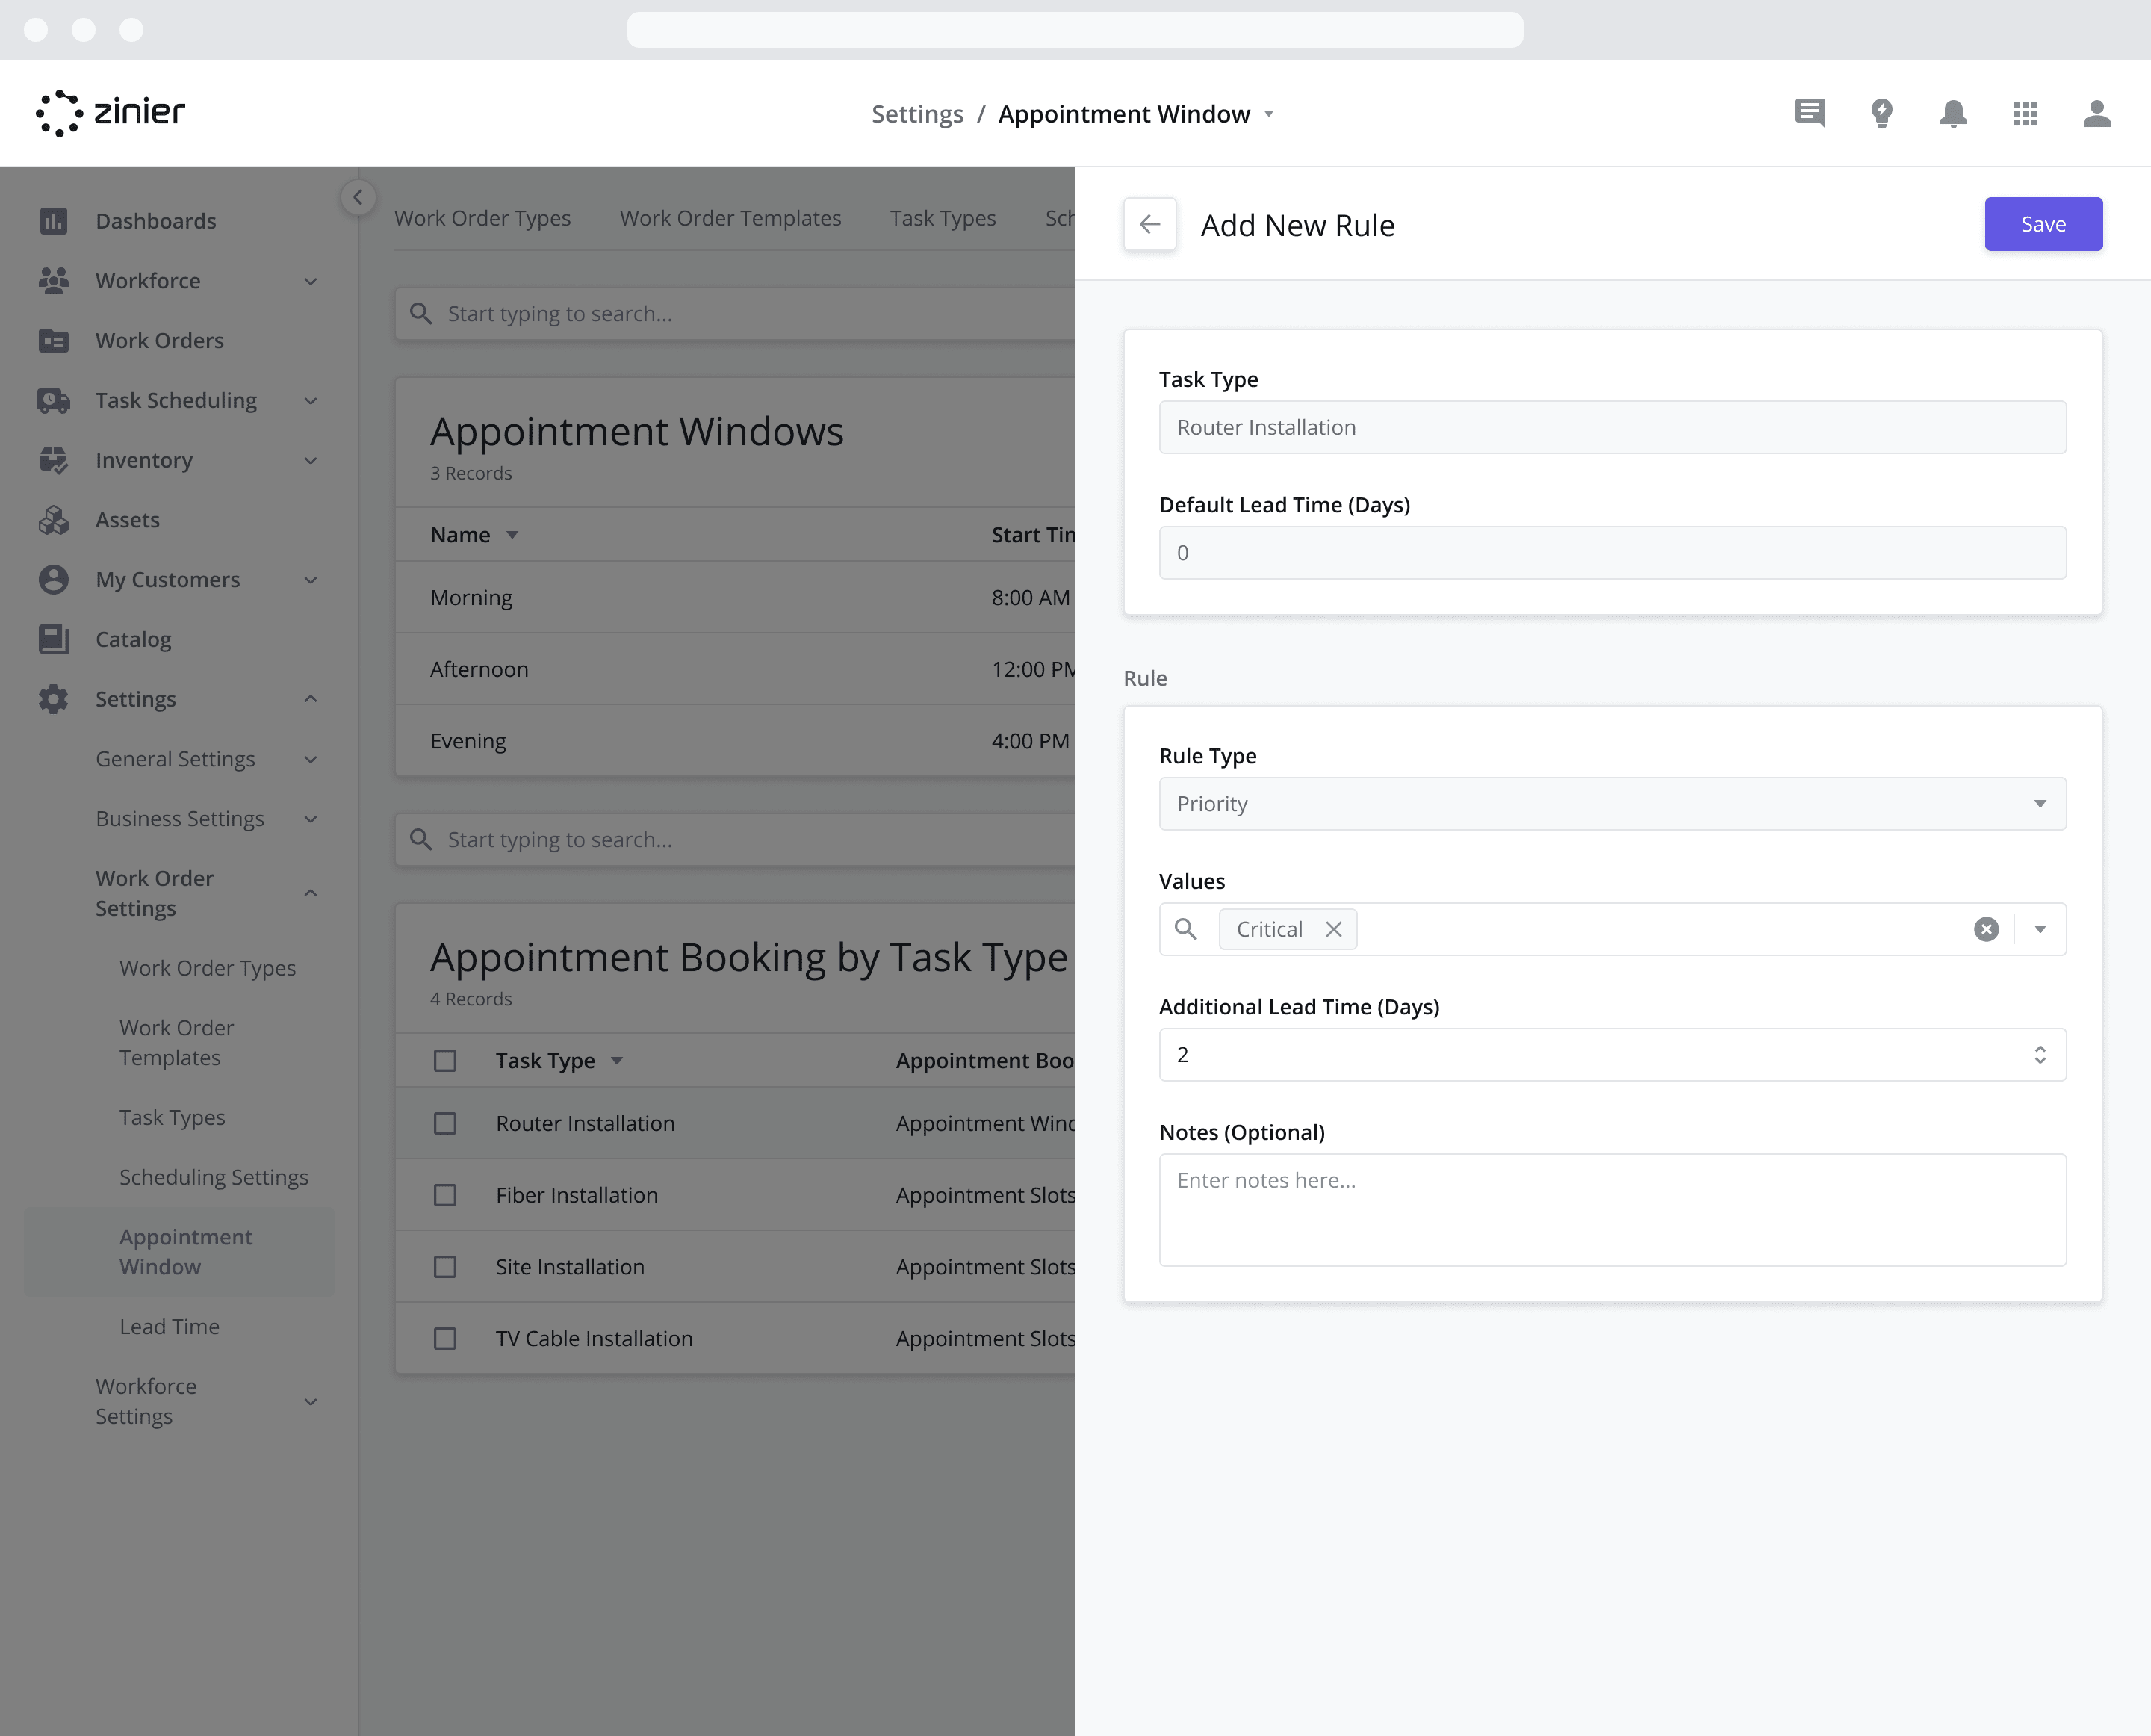
Adding Lead Time Rules
There may be scenarios where you’d like to create rules/exceptions which allow the Default Lead Time (Days) to differ depending on task attributes such as its Priority or the Region where the task is performed. For example, in a particular rural region (let’s call it “Rural Region”), you may wish to increase the lead time to allow for parts delivery from a distant warehouse. Or, for “Critical” priority break/fix tasks, you may wish to decrease the lead time so that the appointment can be booked faster. To do so, follow the steps below:
Hover over the Task Type you wish to edit in the Appointment Booking by Task Type data grid and click the “Edit” icon to open the sidepanel.
Click the “Add New” button from the Lead Time Rules datagrid.
Select he “Rule Type” you wish to use – either “Region” or “Priority”. More Rule Types will be added in the future.
Select the Region(s) and/or Priorities you wish to create the rule for. In the example above, you might do a combination of the two and select “Rural Region” for the Region(s), and then switch the Rule Type to “Priority” and select “Critical”.
Enter the Additional Lead Time (Days). Adding a positive number will increase the Default Lead Time (Days) by the number entered. Entering a negative number will decrease the Default Lead Time (Days) by the number entered. For example, if the Default Lead Time (Days) = 2 days, putting “2” will increase the lead time to 4 days, while putting “-1” will decrease the lead time to 1 day.
Add any Notes (Optional) to provide any context you wish to explain.
Click the “Save” button.
Adding Max Booking Horizon Rules
There may be scenarios where you’d like to create rules/exceptions which allow the Default Maximum Booking Horizon (Days in Advance) to differ depending on task attributes such as its Priority or the Region where the task is performed. For example, in a particularly busy region (let’s call it “City Region”), you may wish to decrease the Default Maximum Booking Horizon so that future capacity is not locked in too far in advance. Or, for “Low” priority scheduled maintenance tasks, you may wish to increase the Default Maximum Booking Horizon to allow appointments to be booked further into the future. To do so, follow the steps below:
Hover over the Task Type you wish to edit in the Appointment Booking by Task Type data grid and click the “Edit” icon to open the sidepanel.
Click the “Add New” button from the Max Booking Horizon Rules datagrid.
Select he “Rule Type” you wish to use – either “Region” or “Priority”. More Rule Types will be added in the future.
Select the Region(s) and/or Priorities you wish to create the rule for. In the example above, you might do a combination of the two and select “City Region” for the Region(s), and then switch the Rule Type to “Priority” and select “Low”.
Enter the Additional Days. Adding a positive number will increase the Default Maximum Booking Horizon (Days in Advance) by the number entered. Entering a negative number will decrease the Default Maximum Booking Horizon (Days in Advance) by the number entered. For example, if the Default Maximum Booking Horizon (Days in Advance) = 7 days, putting “7” will increase the booking horizon to 14 days, while putting “-1” will decrease the booking horizon to 6 days.
Add any Notes (Optional) to provide any context you wish to explain.
Click the “Save” button.
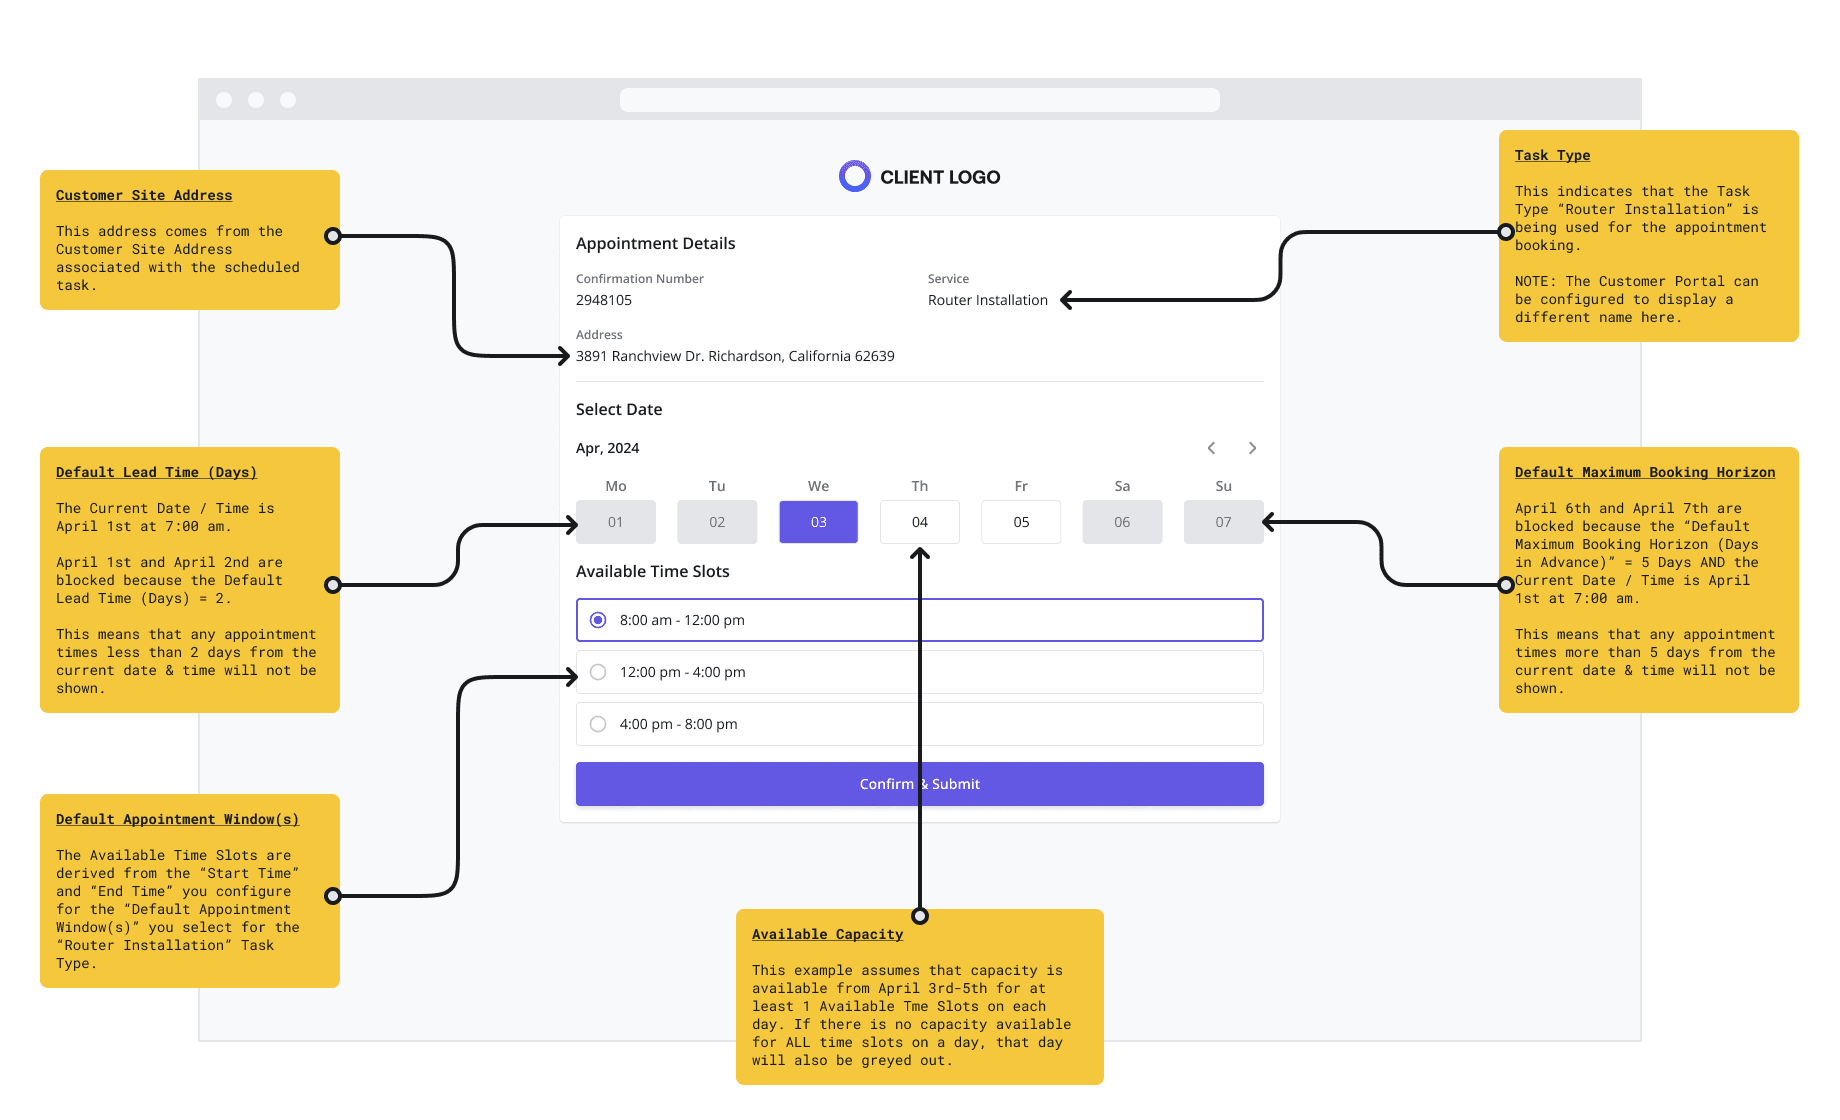
What customers will see in the Customer Portal
Appointment Windows by Task Type Settings
Consider this example with the configuration below:
Appointment Window by Task Type Settings | Value |
|---|---|
Task Type | Router Installation |
Appointment Booking Mode | Appointment Windows |
Default Appointment Windows (Start - End Time) | Morning (8:00 AM - 12:00 PM) Afternoon (8:00 AM - 12:00 PM) Evening (8:00 AM - 12:00 PM) |
Default Lead Time | 2 days |
Default Maximum Booking Horizon | 5 days |
Appointment Booking Details | Value |
|---|---|
Current Date & Time | April 1st, 2024 at 7:00 AM |
Task Type | Router Installation |
Estimated Duration | 60 mins |
Customer Site Address | 3891 Ranchview Dr. Richardson, California 62639 |
Region of the Customer Site | North |
Resulting View when Booking the Appointment
With the configuration above, the Customer Portal would look as follows when customers book an appointment:
Configuring Task Types
Define Task Types that are used to manage the configuration of a task, including the Mobile Workflow, the results model and results sidepanel, the default estimated duration, the Skills and Skill Levels required, and the task approval settings. The Zinier Productivity Suite comes with several pre-configured Task Types associated with the Standard Mobile Workflows that come out-of-the-box: Corrective Maintenance, Corrective Task Request, Preventive Maintenance, Simple Installation, and Site Change Request. These task types also come with all of the associated objects required to make them function correctly (i.e. the mobile workflows, results sidepanels, results models, etc.). For more information on the different Task Types, see the section on Standard Mobile Workflows below.
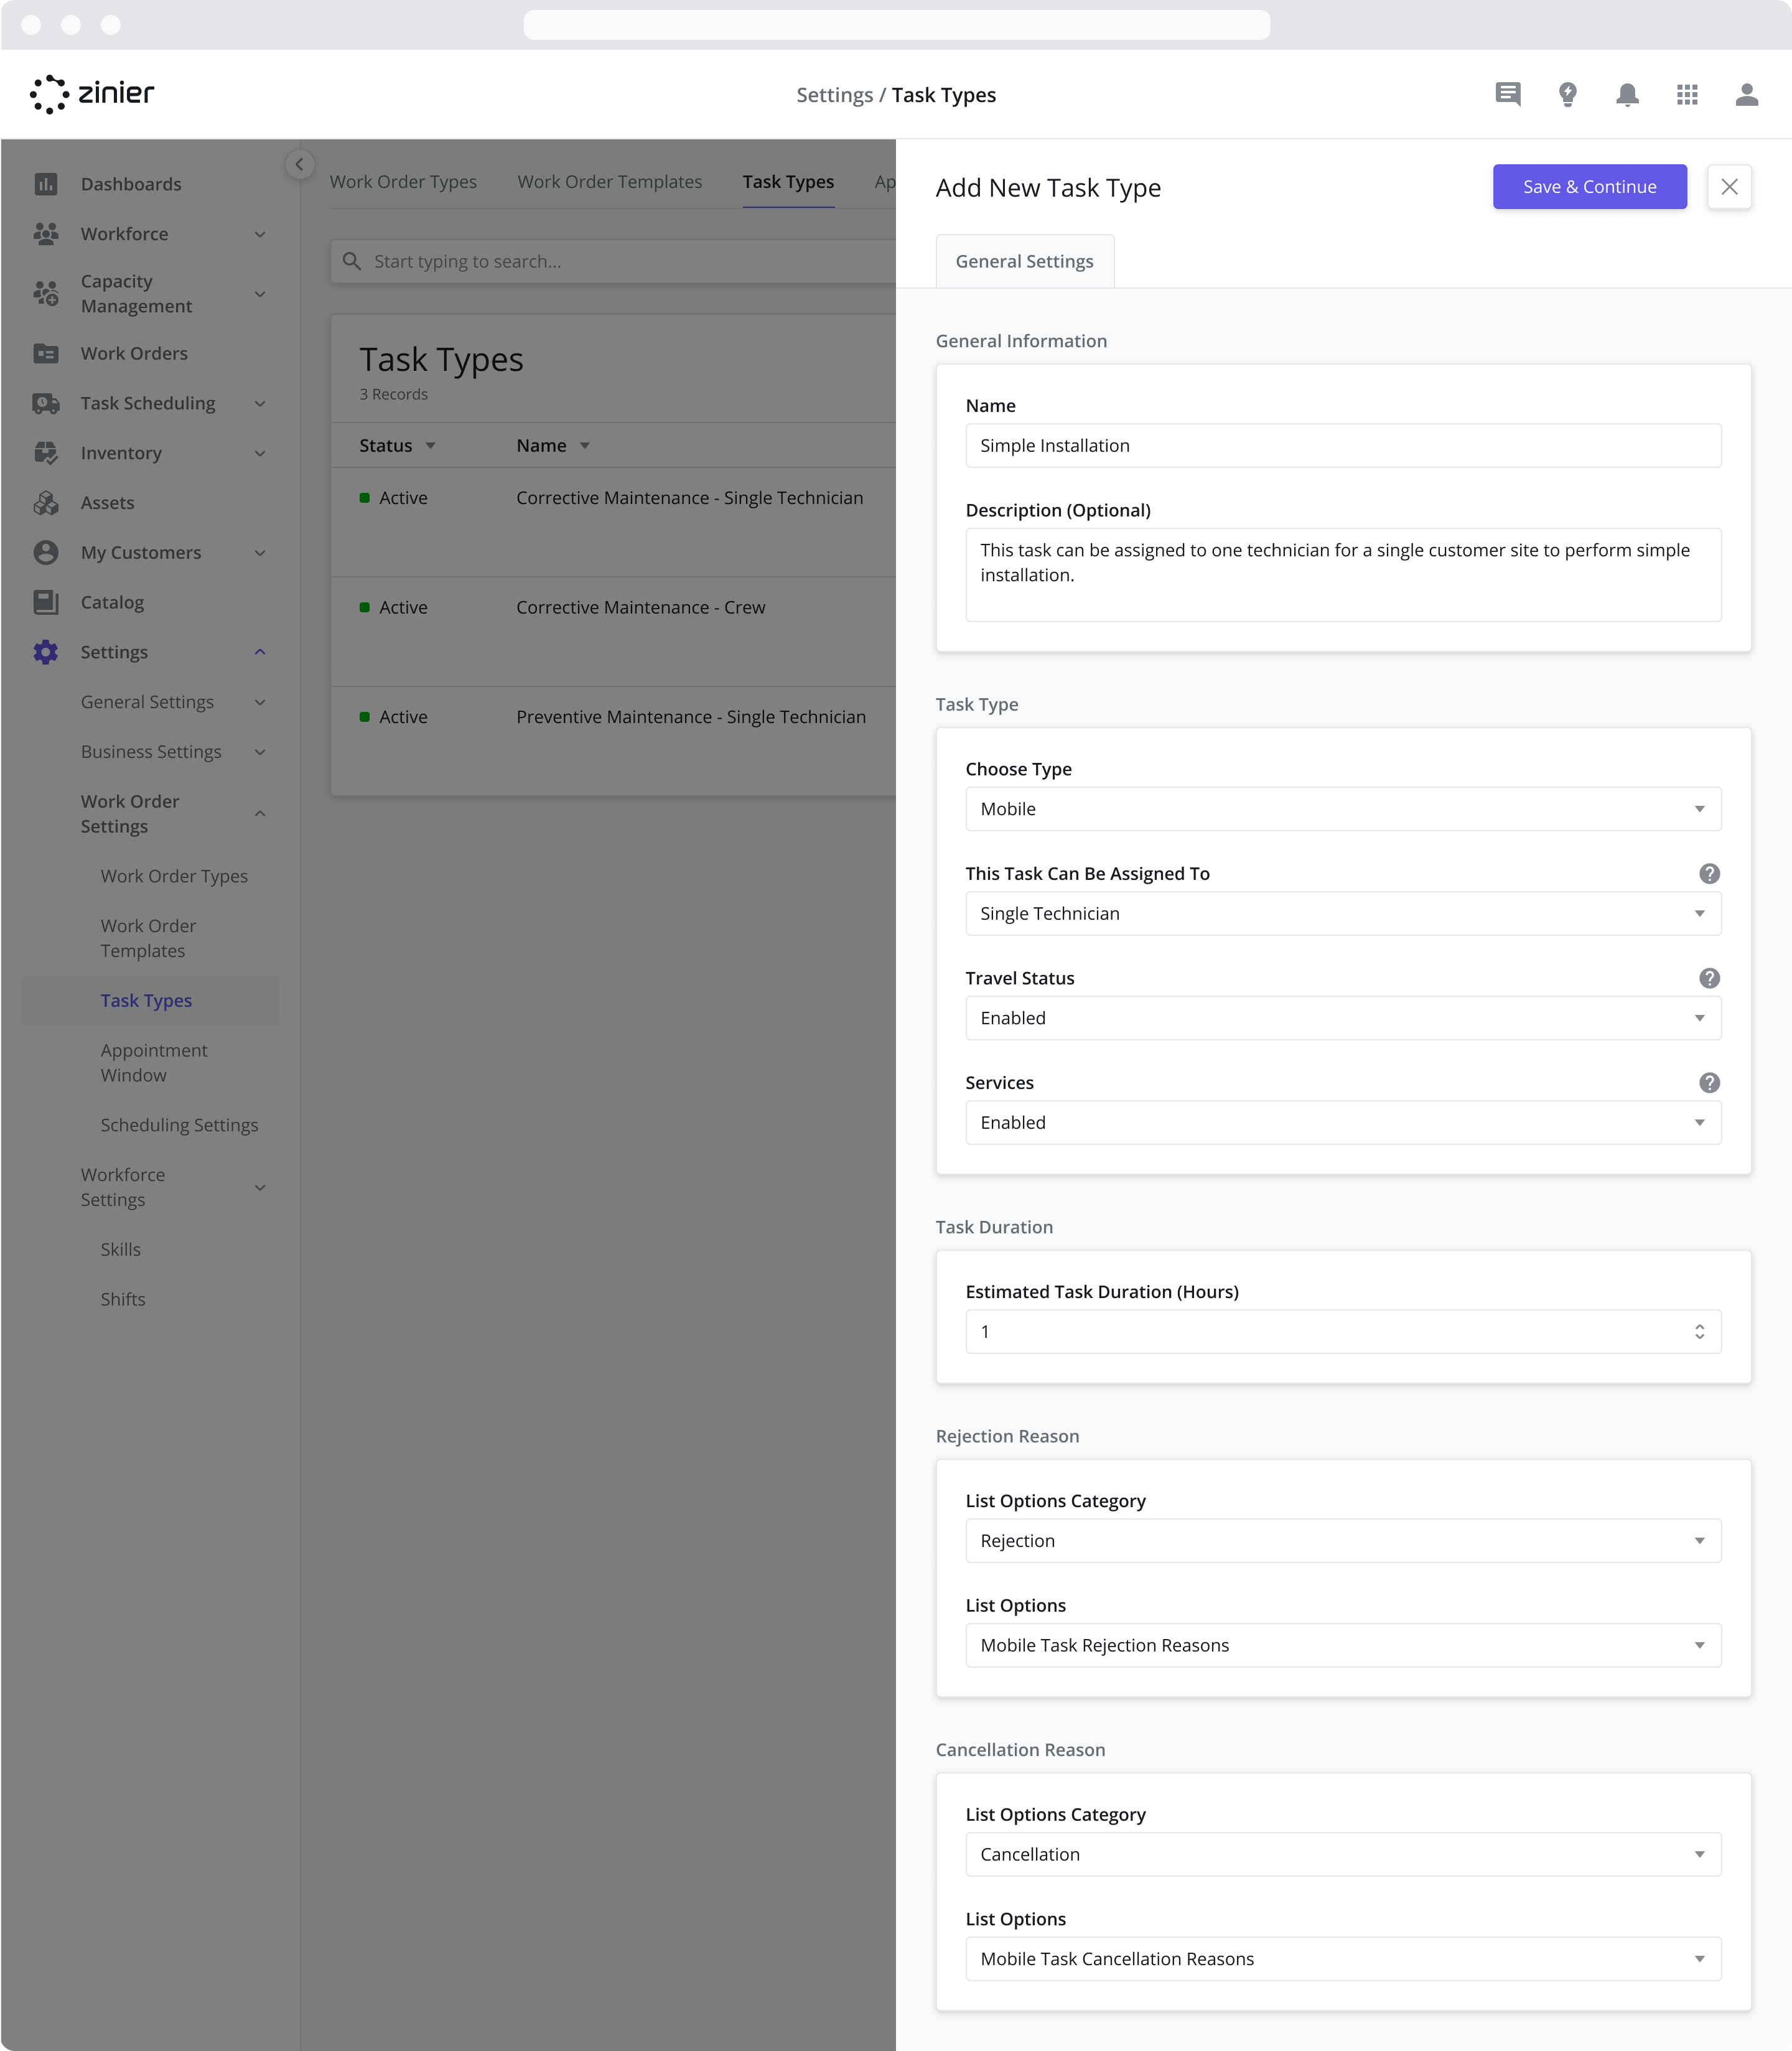
Adding new Task Type
To add a new Task Type, go to the Settings > Work Order Settings > Task Types module, click the “Add New” button in the top right of the data grid, and enter the information shown in the sidepanel.
Define a Task Type as a Web Task
Define a Task Type as a Web-only task. Web tasks are used for tasks completely entirely from the Web app and do not have a mobile workflow.
Select Who This Task can be Assigned to (Crews or Single Technicians)
Each task type can be dispatched to either a Single Technician or a Crew. This is determined by the selection you make from the “This Task Can Be Assigned To” dropdown menu:
Single Technician: The task can only be assigned to individual technicians. If selected, the Assignee dropdown menu in the Scheduling & Dispatch sidepanel will show a list of individual Technicians. The Assignee list will show a list of individual Technicians
Crews: The task can only be assigned to a Crew. If selected, the Assignee dropdown menu in the Scheduling & Dispatch sidepanel will show a list of Crews. For more information on assigning tasks to Crews, visit the Assigning Tasks to Crews section.
Select the Type of Mobile Access for Crew Members (Crews Only)
If the Task Type is being dispatched to a Crew (see above), the “Mobile Access for Crew Members” dropdown menu will be visible with the following options:
Partial Access: Send crew members a simplified mobile task to do things like view their schedule, see task details, and manage their attendance.
No Access: No mobile task will be sent to crew members when this task type is assigned to their crew.
In both cases above, Crew Leads will receive the Mobile Workflow for Main Task selected in the next dropdown menu
Select the Mobile Workflow for Main Task (Crews Only)
If the Task Type is being dispatched to a Crew (see above), this dropdown menu will be visible. This field allows you to define the Mobile Workflow associated with the Task Type and sent only to Crew Lead assigned to the task. When the task is dispatched to the Crew, the Mobile Workflow appears in the Task List in the Zinier Mobile App of the Crew Lead ONLY. The Mobile Workflow must first be created using Studio Z.
Define Mobile Workflows for a Task Type (Single Technician Tasks Only)
If the Task Type is being dispatched to a Single Technician (see above), this dropdown menu will be visible. This field allows you to define the Mobile Workflow associated with the Task Type. The Mobile Workflow is the workflow sent to a user assigned to the task. When the task is dispatched to the user, the Mobile Workflow appears in the Task List in the Zinier Mobile App. The Mobile Workflow must first be created using Studio Z.
Enable or Disable Travel Status for a Task Type
Enabling this option allows dispatchers to track when technicians are on their way to the customer site. If enabled, tasks will display a status = In Transit on the web after a Technician clicks the “Start Travel” button when starting a task from their mobile device. Note that the mobile workflow must be designed to capture this information from Technicians via a “Start Travel” button.
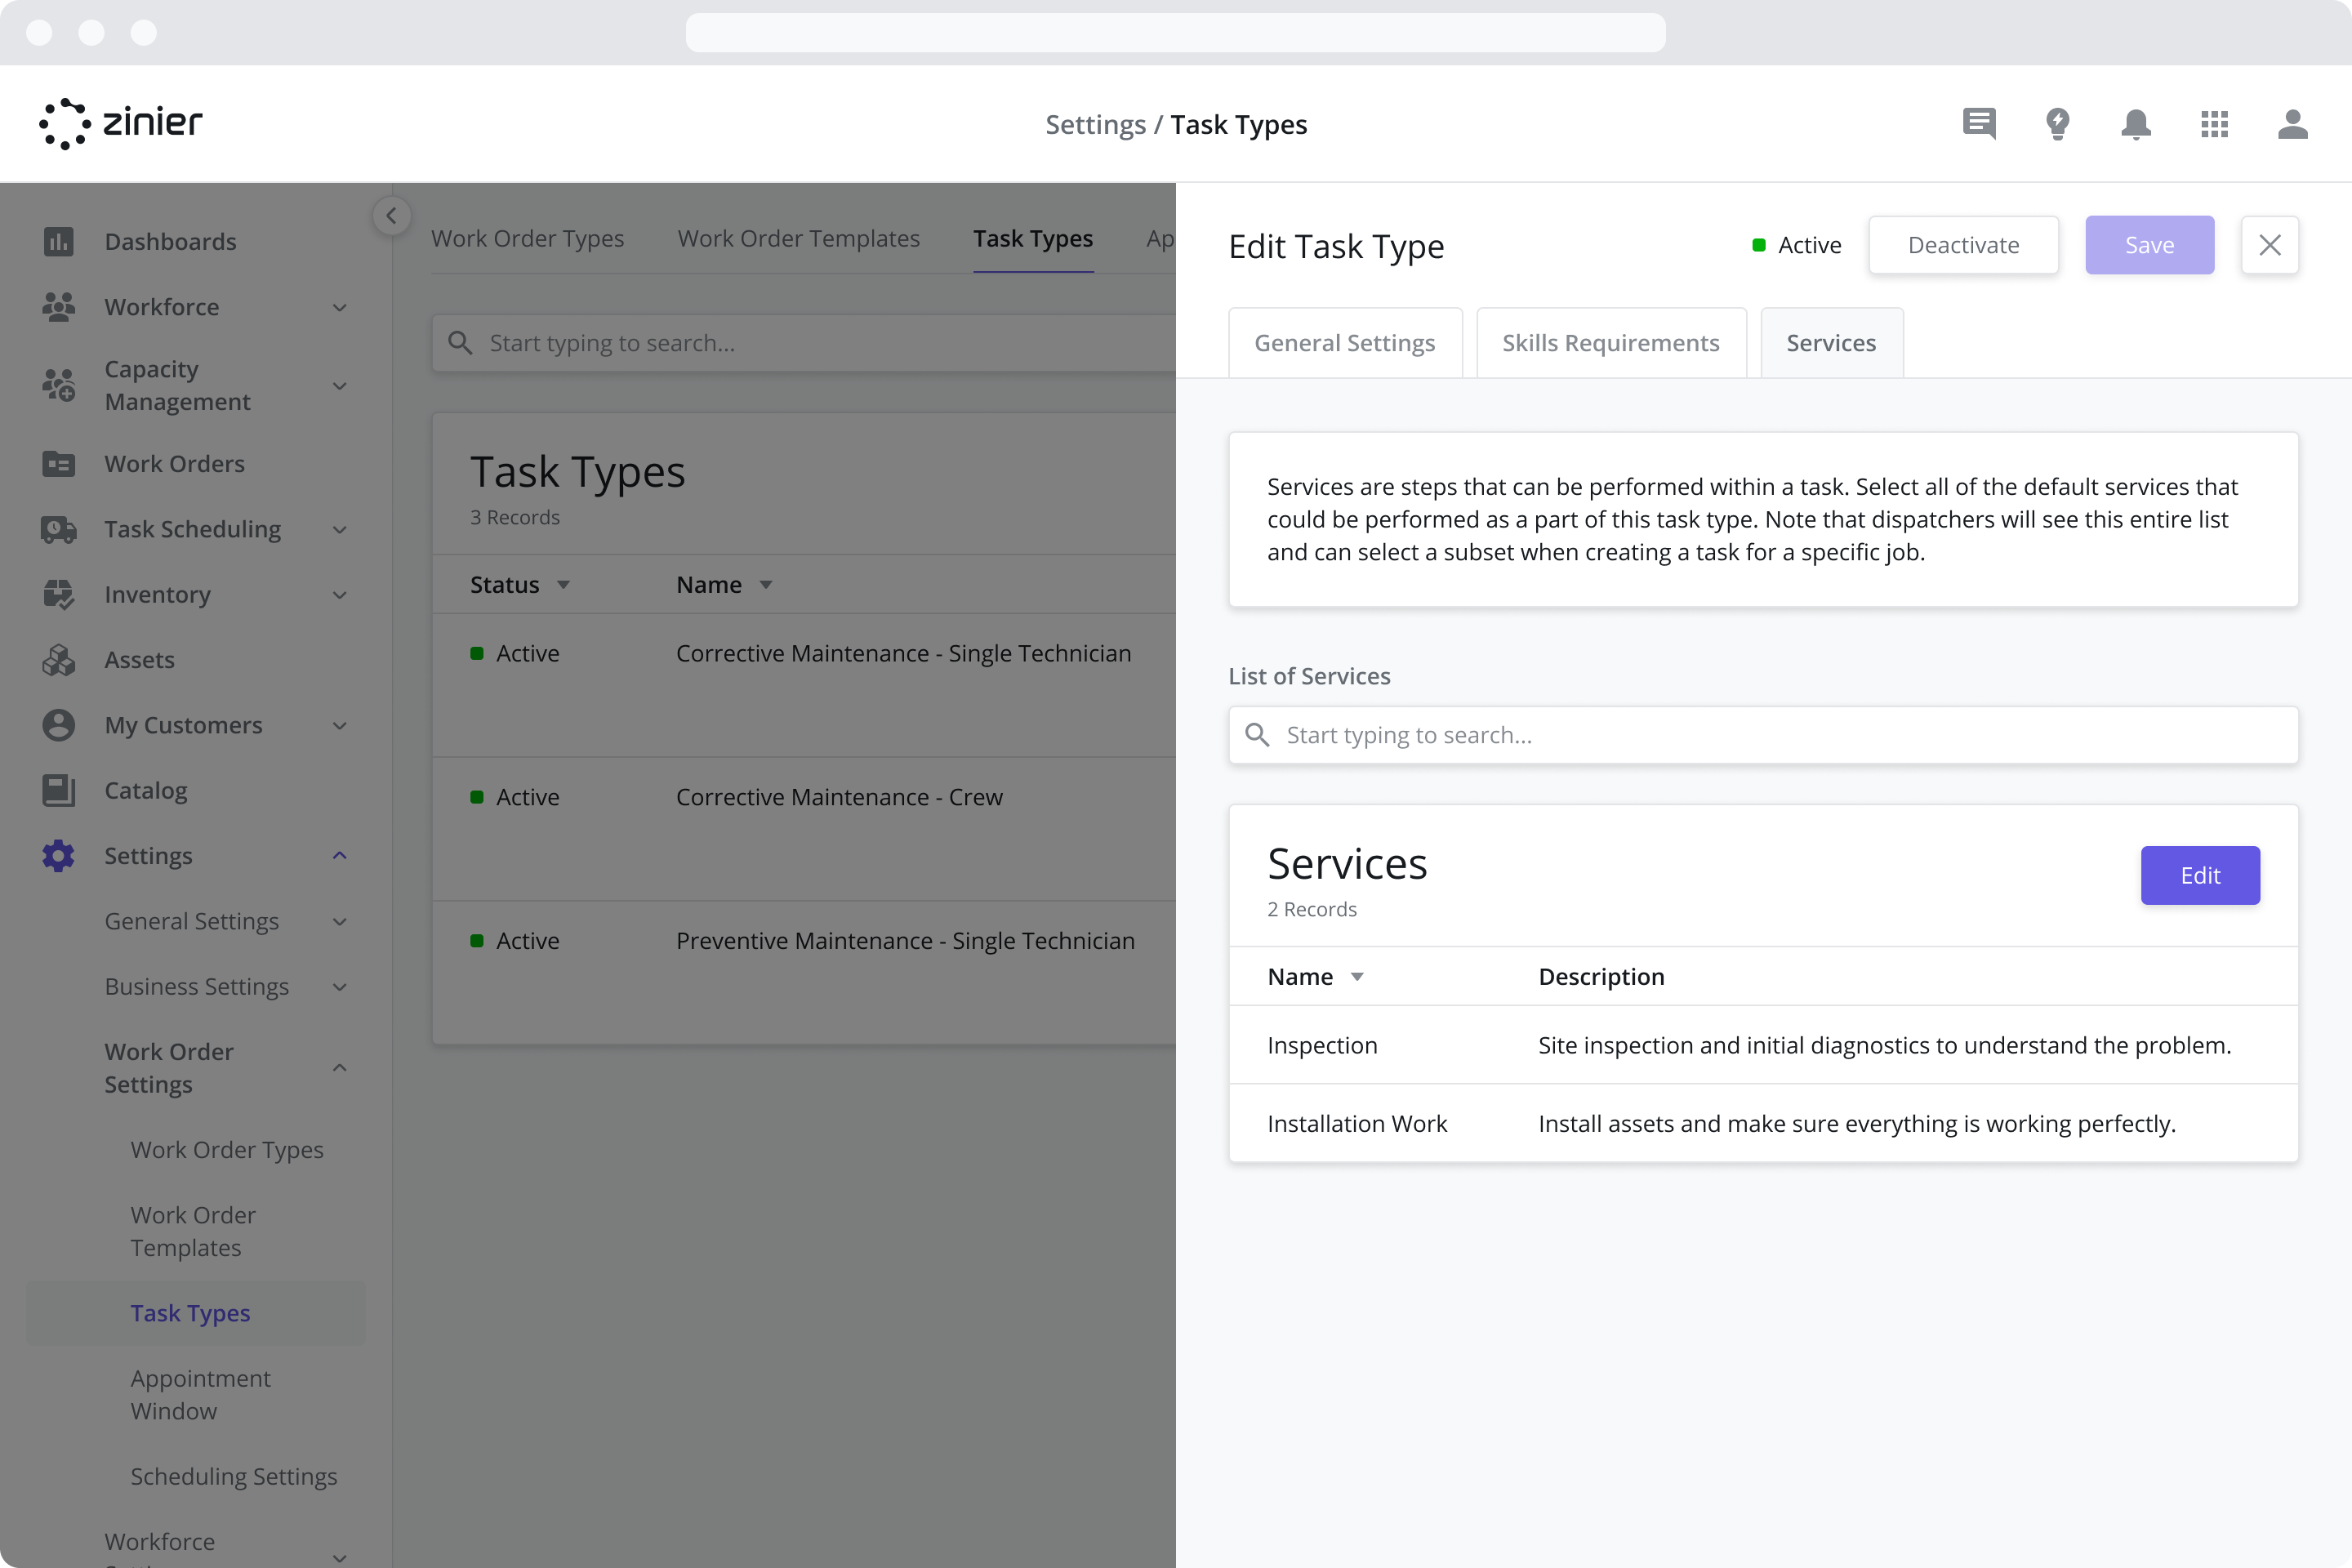
Enable or Disable Services for a Task Type
Services represent a set of smaller steps for the Technician to follow when performing a task.
Selecting Yes from the “Enable Services” dropdown menu will create a Services tab in the sidepanel from which you to define the default Services that can be added to that Task Type when adding the Task Type to a Work Order.
Services must first be created from the Catalog > Services module and configured as part of the Mobile Workflow in Studio Z. For more information on creating and configuring Services, refer to the Services page. For more information on adjusting Services for a Task when creating a Work Order, see the Work Orders page.
Define the Estimated Duration of a Task Type
Define the Estimated Duration for the Task Type. The estimated duration is used in Task Scheduling to determine the block of time a task takes to complete. The default value comes from the Task Type but can be overridden when added to a Work Order. It is also seen by technicians when they browse their task list on the mobile app. For example, if a user is assigned a task at 9:00 am and the duration is 60 minutes, the task will then show 9:00 am - 10:00 am in their task list.
Define the Results Model of a Task Type
Define which Results Model is used by the Task Type to capture the data collected in the Mobile Workflow. The Results Model must first be created using Studio Z.
Please note that in the latest version of the Zinier Productivity Suite, this field is no longer required and does not have any functionality associated with it.
Define the Results Sidepanel of a Task Type
Define which Results Sidepanel the Task Type will display. The Results Sidepanel dictates how the results stored in the Results Model are displayed when a task is submitted for approval and corresponds to the Web Page that was built for that specific Mobile Workflow. The Results Sidepanel page must first be created using Studio Z.
Please note that in the latest version of the Zinier Productivity Suite, this field is no longer required and does not have any functionality associated with it.
Define the list of Rejection Reasons for a Task Type
Define which dropdown menu options (List Options) to show in the Task Approval sidepanel when a user rejects a task.
Define the list of Cancellations Reasons for a Task Type
Define which dropdown menu options (List Options) to show when a dispatcher cancels a from the Task Scheduling module.
List Options must first be added from the Settings > General Settings > List Options module before they can be assigned here. For more information on adding and configuring List Options, refer to the List Options section.
Define the Services for a Task Type
Selecting Yes from the “Enable Services” dropdown menu will create a Services tab in the sidepanel from which you to define the default Services that can be added to that Task Type when adding the Task Type to a Work Order.
Services must first be created from the Catalog > Services module and configured as part of the Mobile Workflow in Studio Z. For more information on creating and configuring Services, refer to the Services page. For more information on adjusting Services for a Task when creating a Work Order, see the Work Orders page.
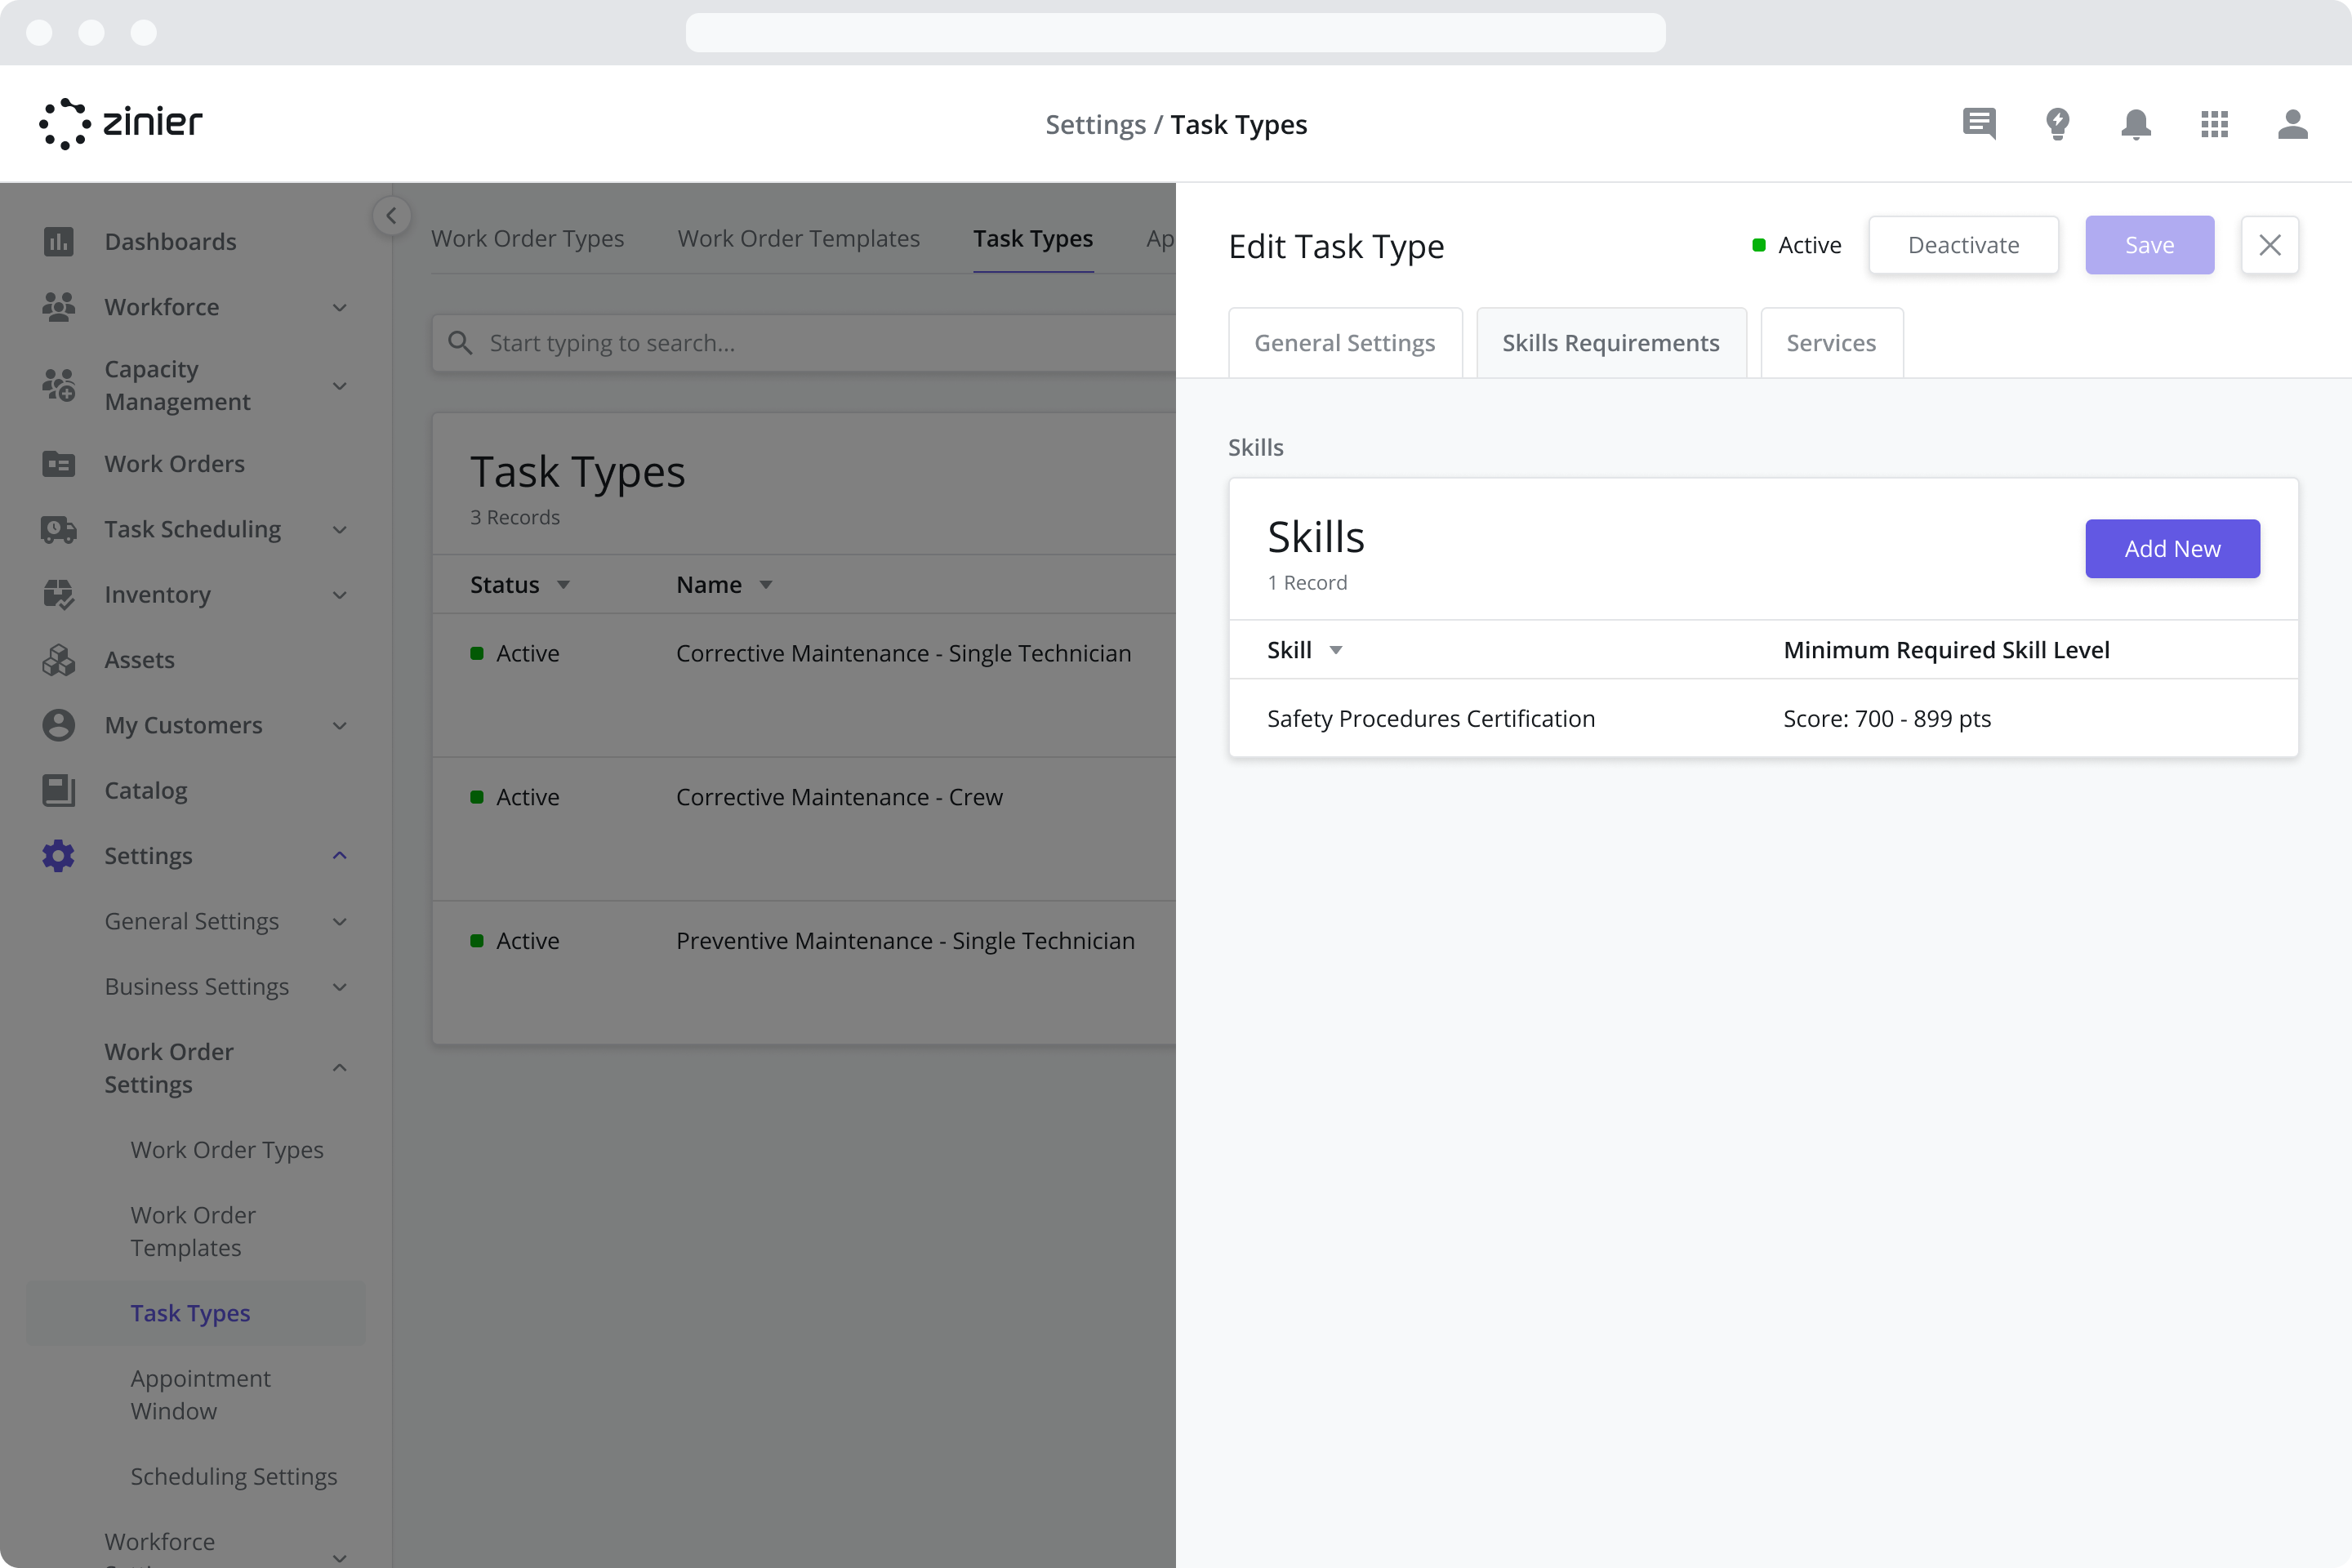
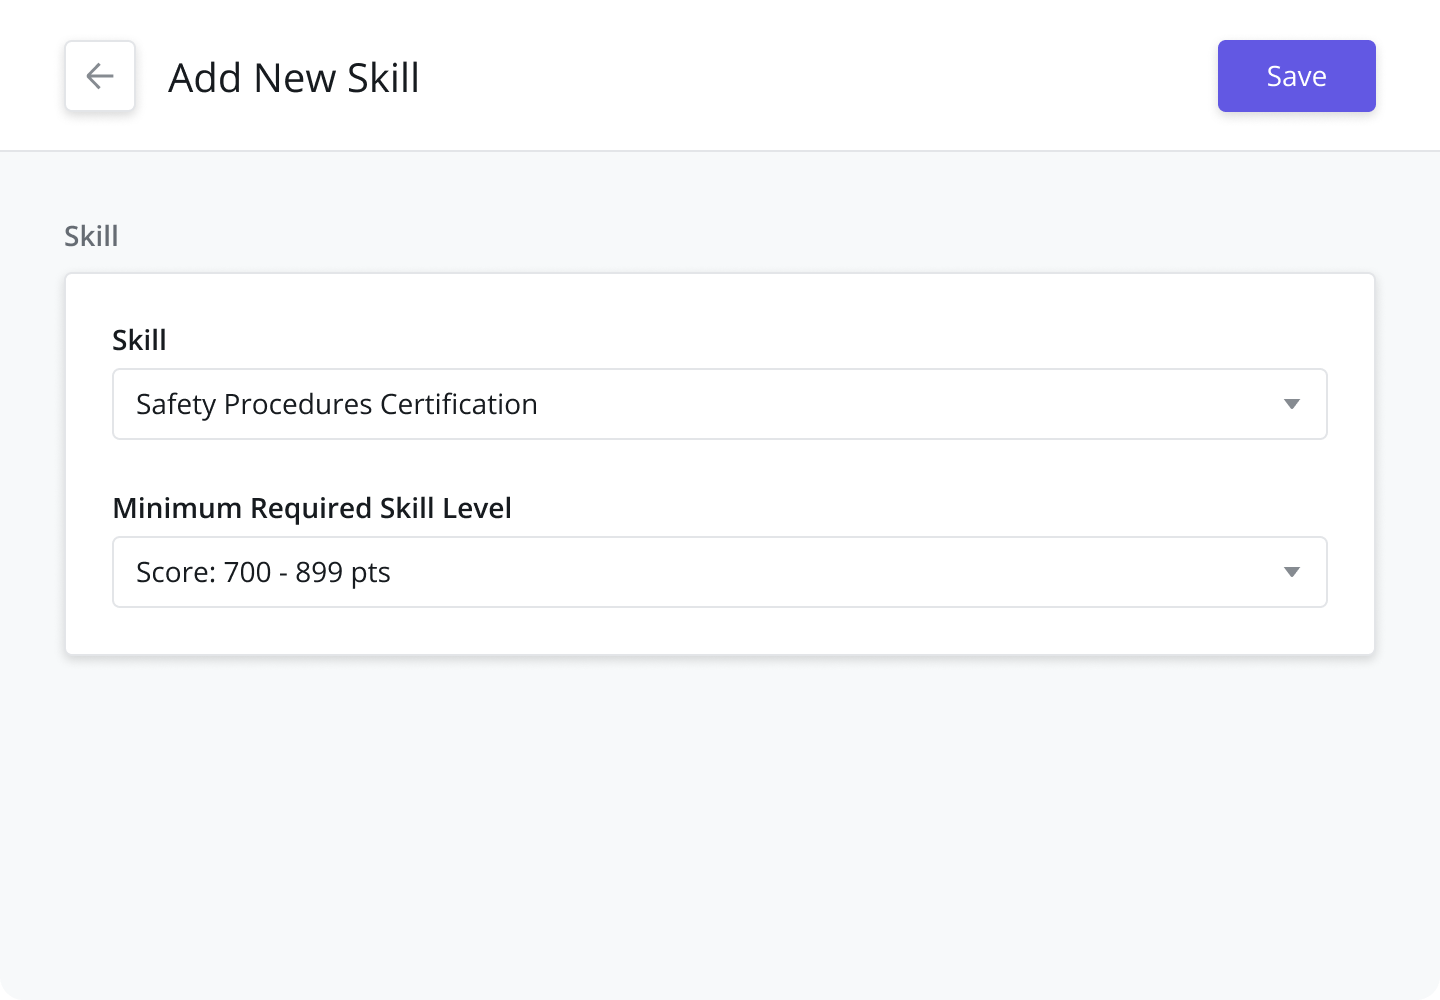
Define the Required Skills and Skill Levels for a Task Type
Define the Skills and Skill Levels requirements of the Task Type. These are then compared to the Skill and Skill Levels of a technician when the Tech Recommendation / Auto Scheduler is run.
Skills must first be created from the Settings > Workforce Settings > Skills module. For more information on creating and configuring Skills, refer to the Skills page.
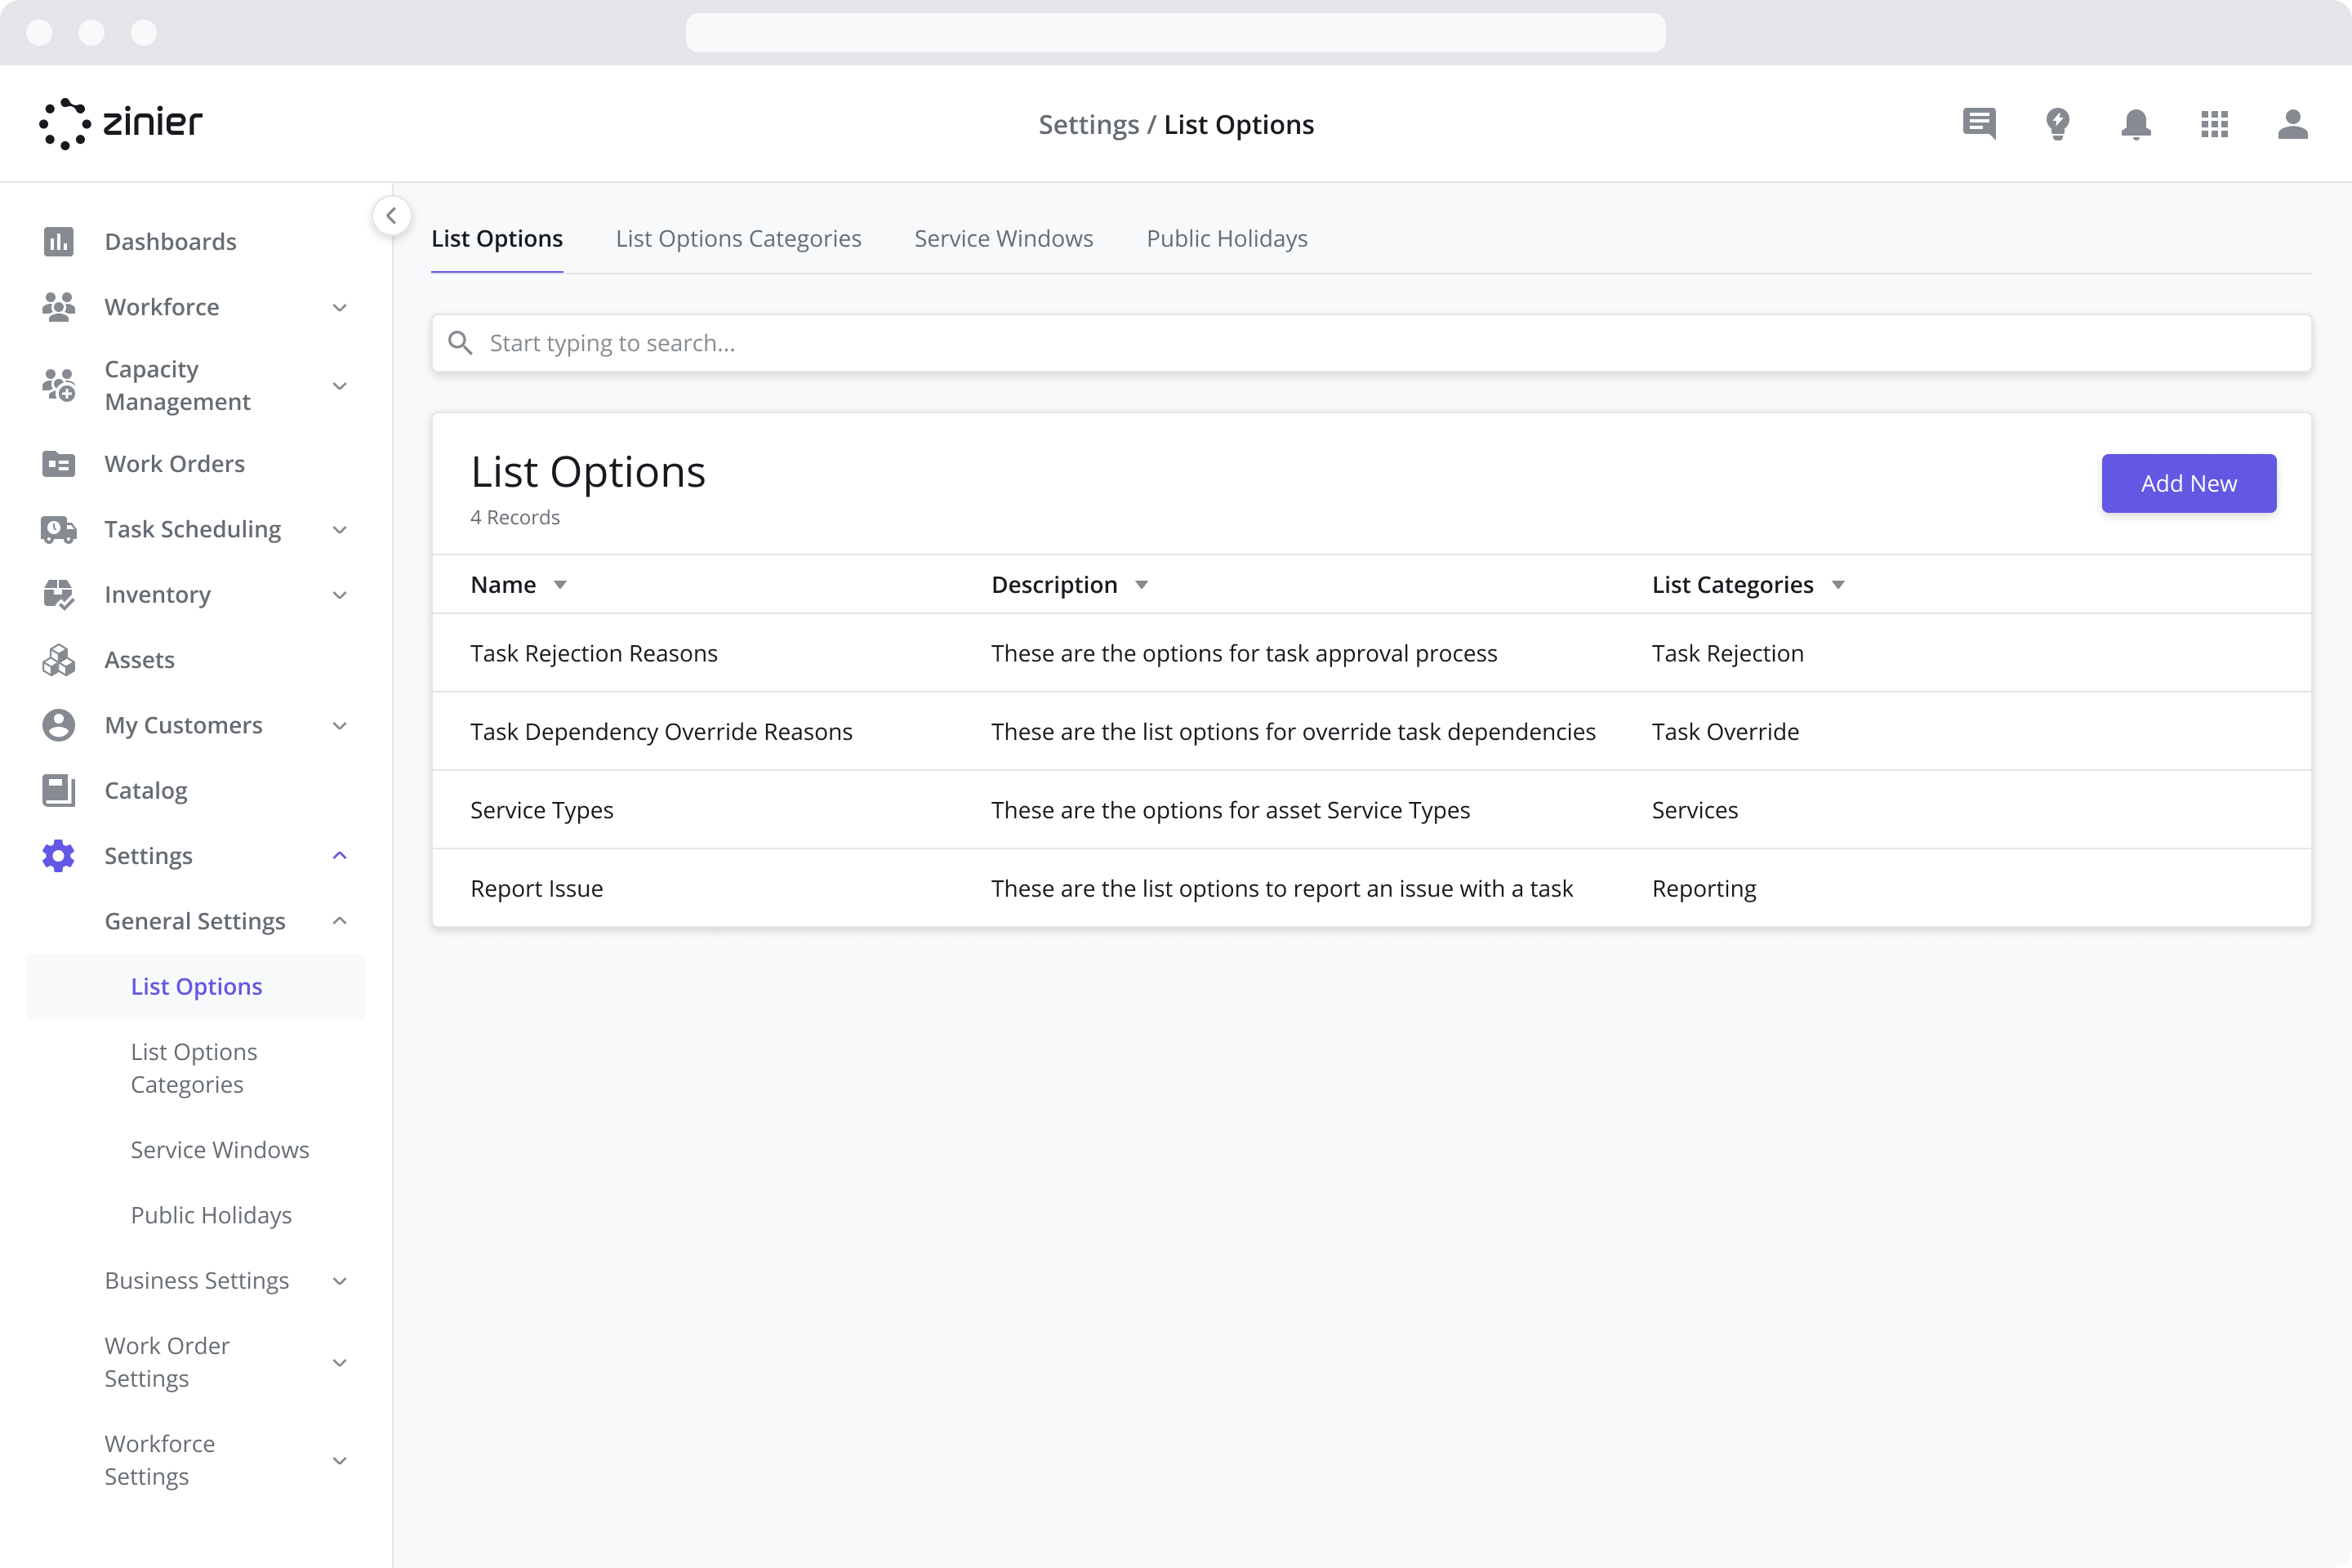
Managing List Options
List Options are used to create the options that can be chosen in drop-down menus across the Zinier web and mobile applications. For example, List Options are used to create a specific list of rejection reasons for use when Approving tasks.
Adding New List Options
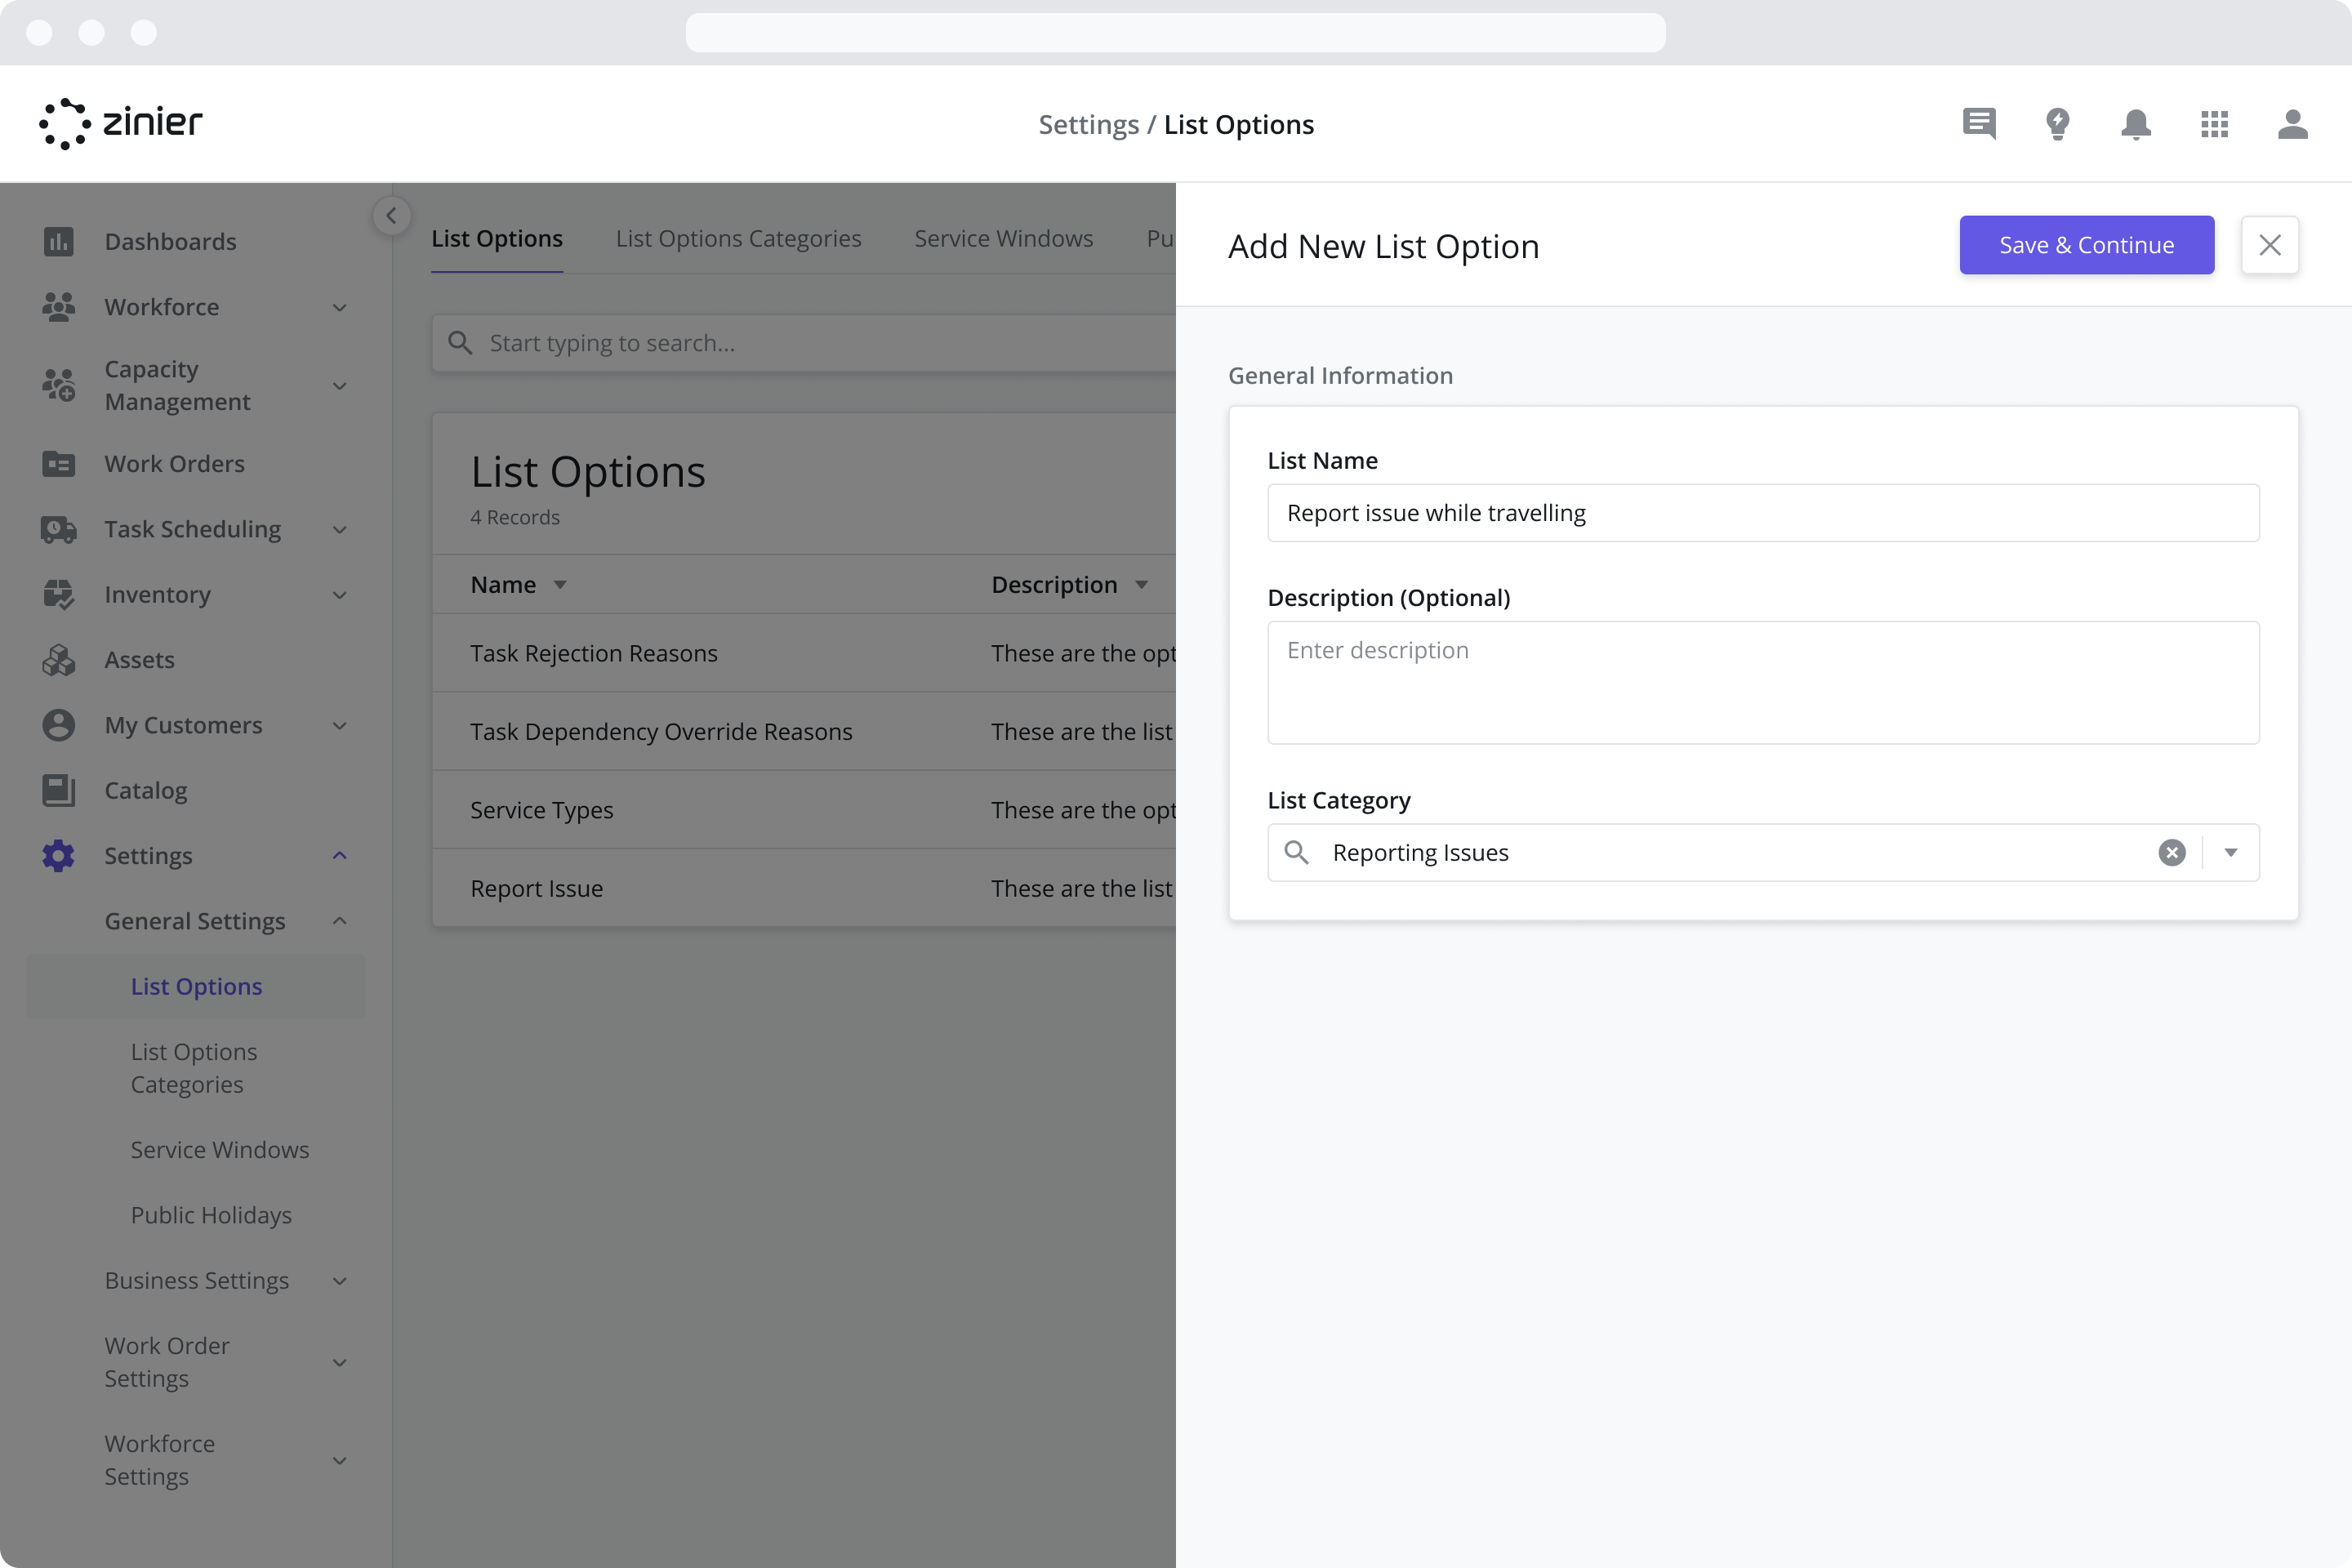
To add a new List Option, follow the steps below:
Step 1: Add a new List Option
Go to the Settings > General Settings > List Options module
Click the “Add New” button from the data grid
Enter a Name and Description (Optional)
Select the List Category from the dropdown menu. This option will help you organize your List Options by category
Click Save and Continue
Step 2: Add your Answer Options
Next, add at least one Answer Option by clicking the “Add New” button from the Answer Options data grid
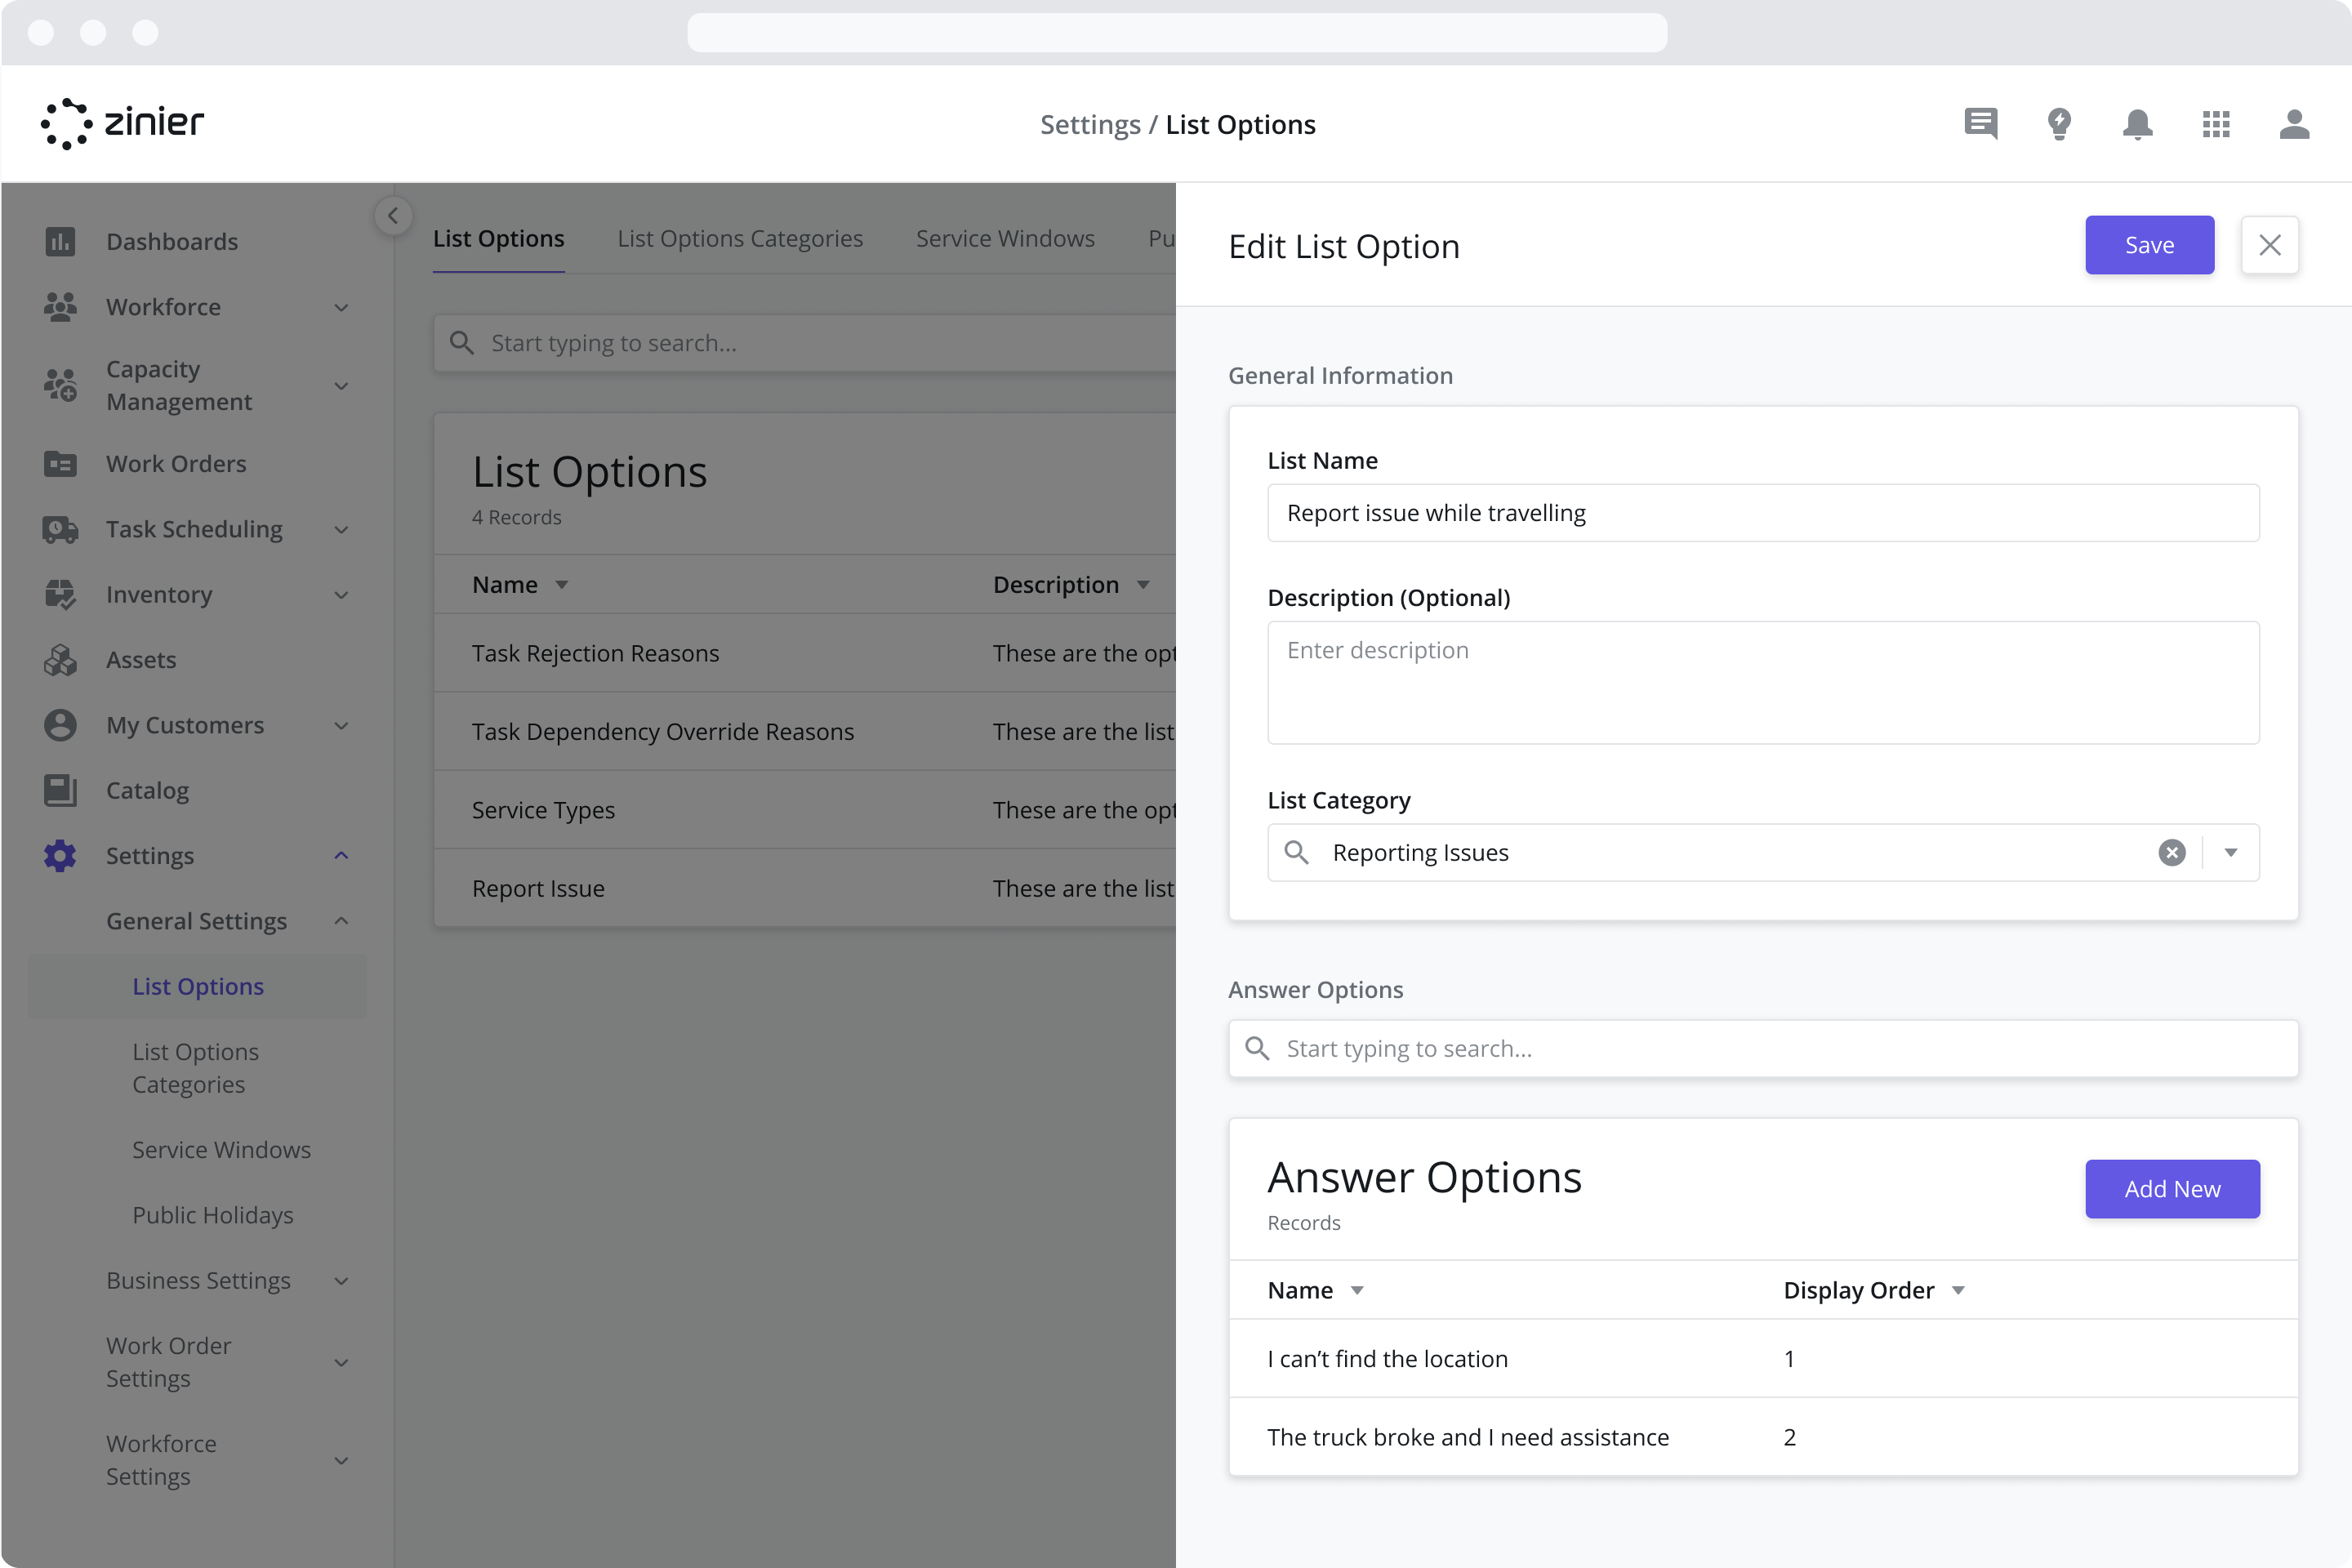
Give the Answer Option a Name and assign it a Display Order. The Display Order indicates the order in the dropdown menu / list the answer option will appear. For example, if I have three answer options and I assign them Display Orders of “Answer 1” = 1, “Answer 2” = 2, and “Answer 3” = 3, then they will be displayed in the dropdown menu with Answer 1 at the top of the list and Answer 3 at the bottom of the list.
Click Save
Repeat steps 1-3 to add as many Answer Options as needed

Default List Options
The Zinier Productivity Suite comes with several pre-built List Options which are used across modules and as part of the Standard Mobile Workflows.
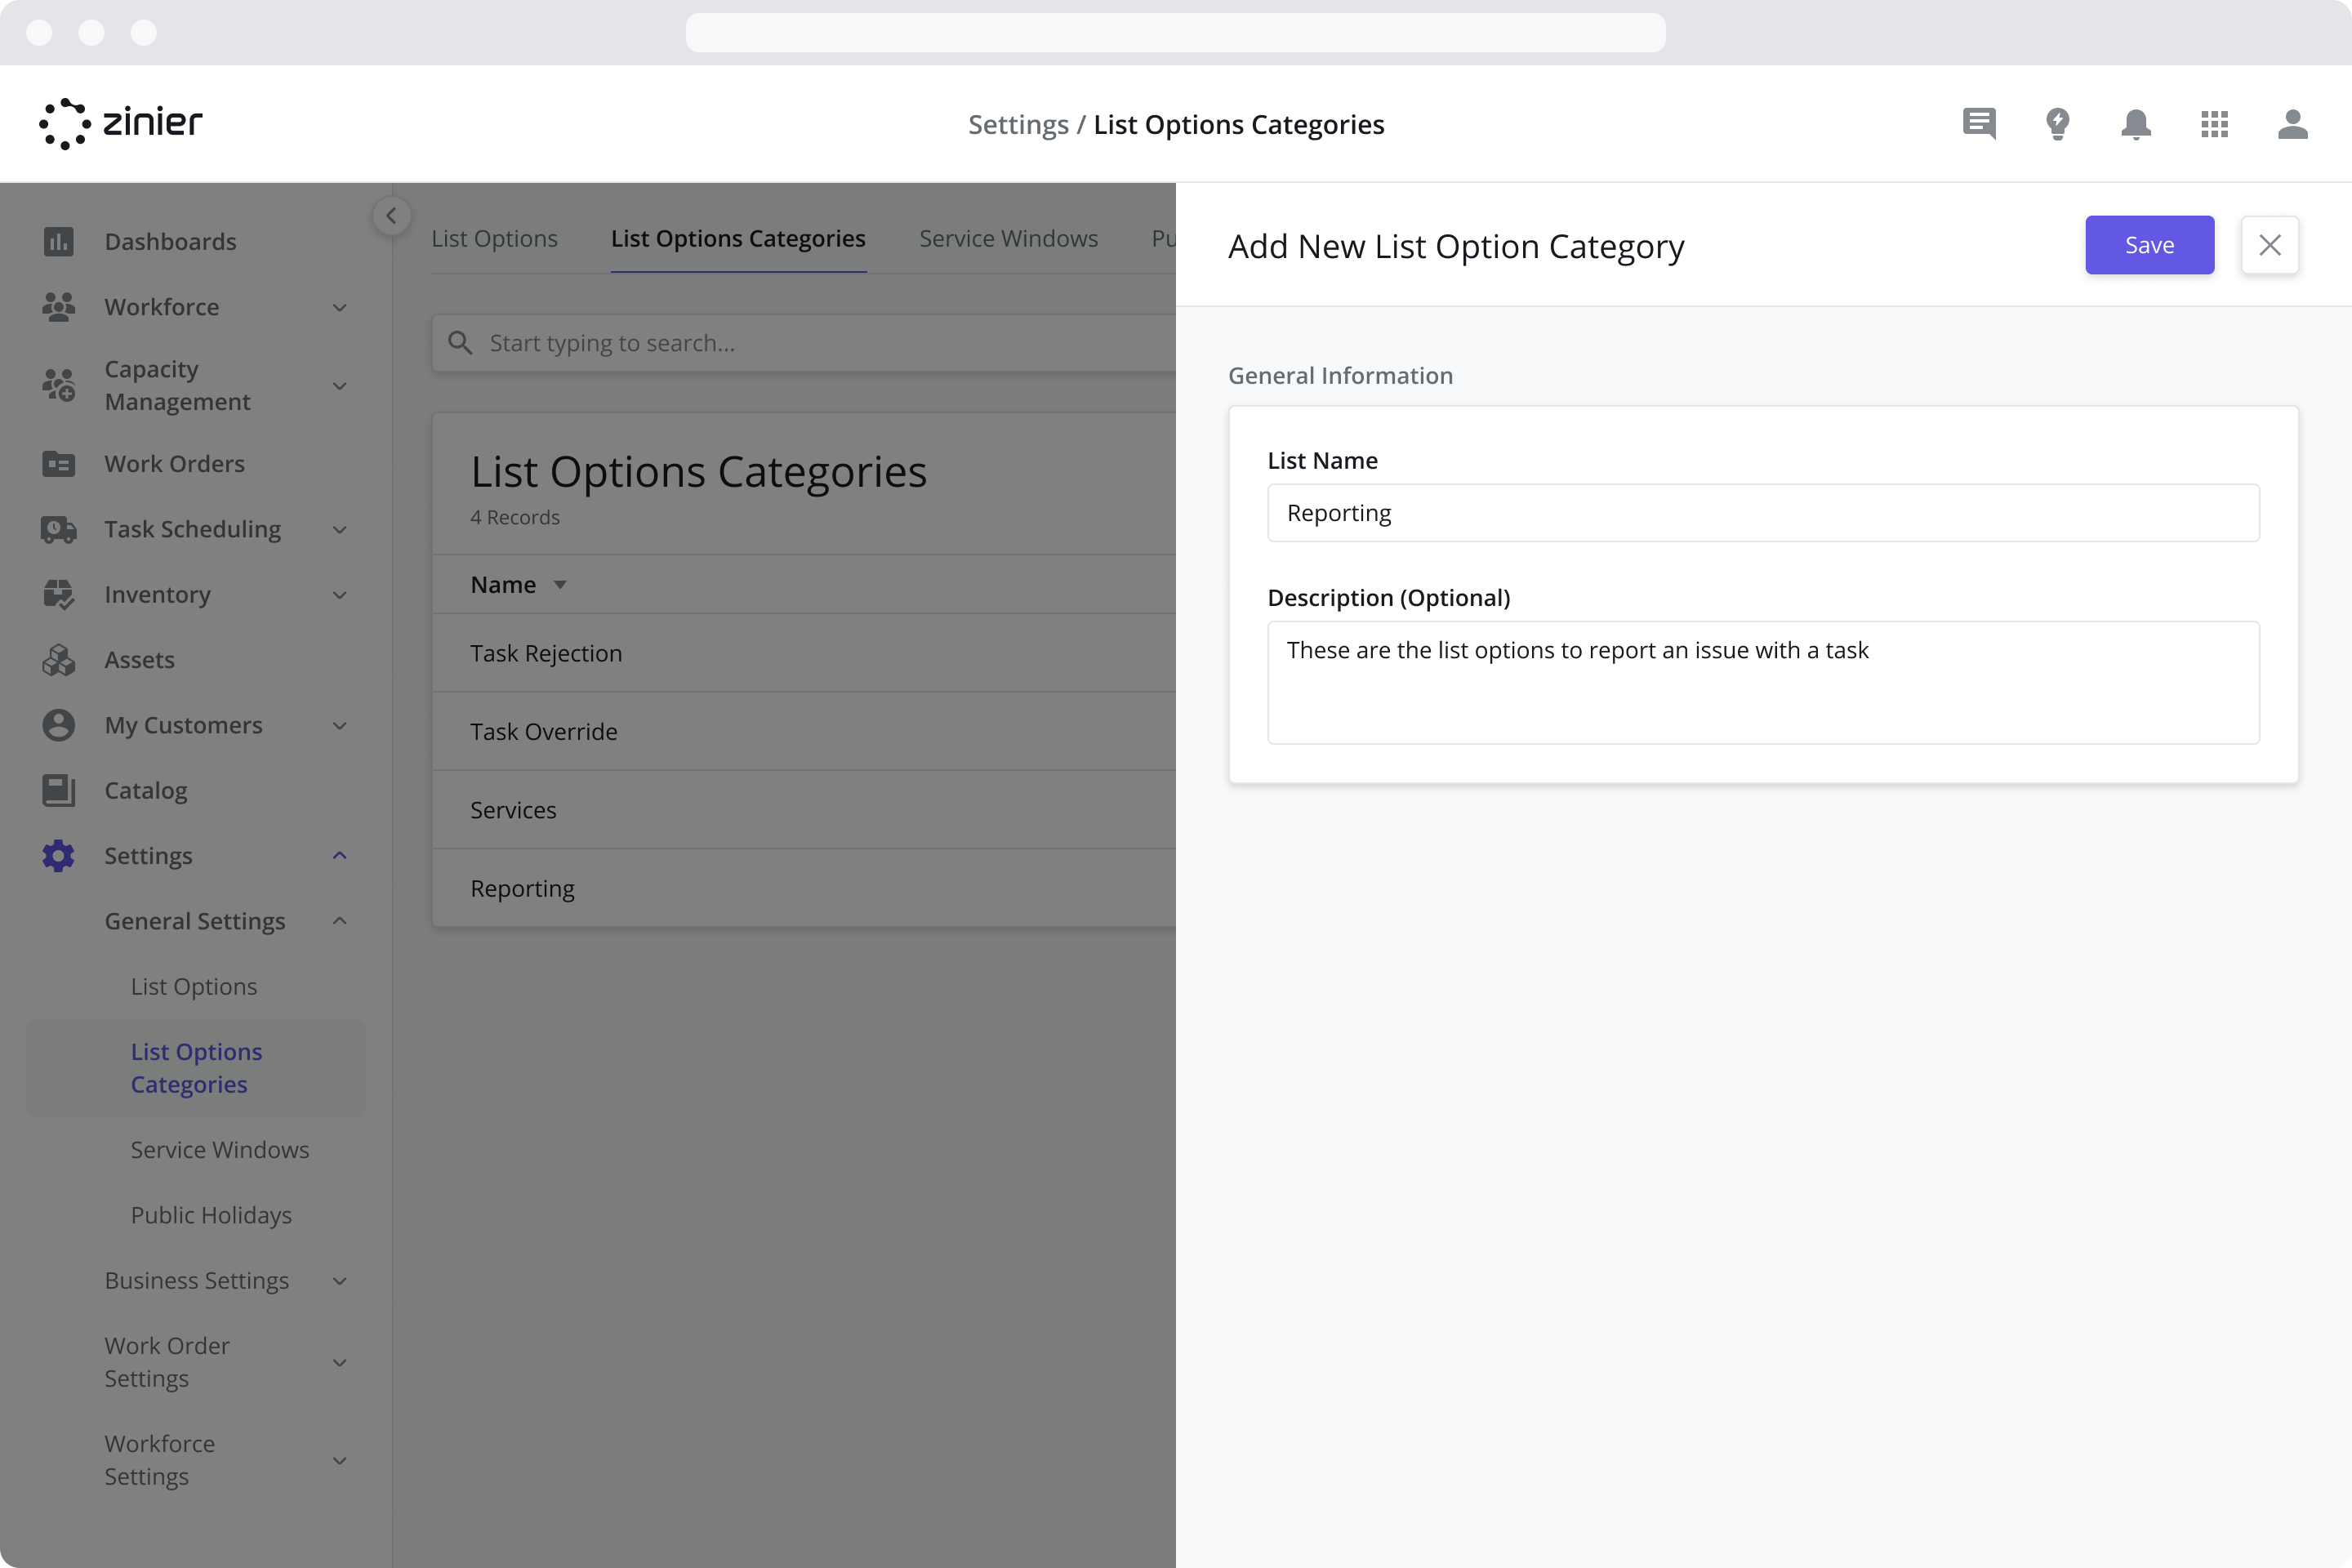
Manage List Option Categories
List Option Categories are organizational tags used to group List Options and make them easier to manage.
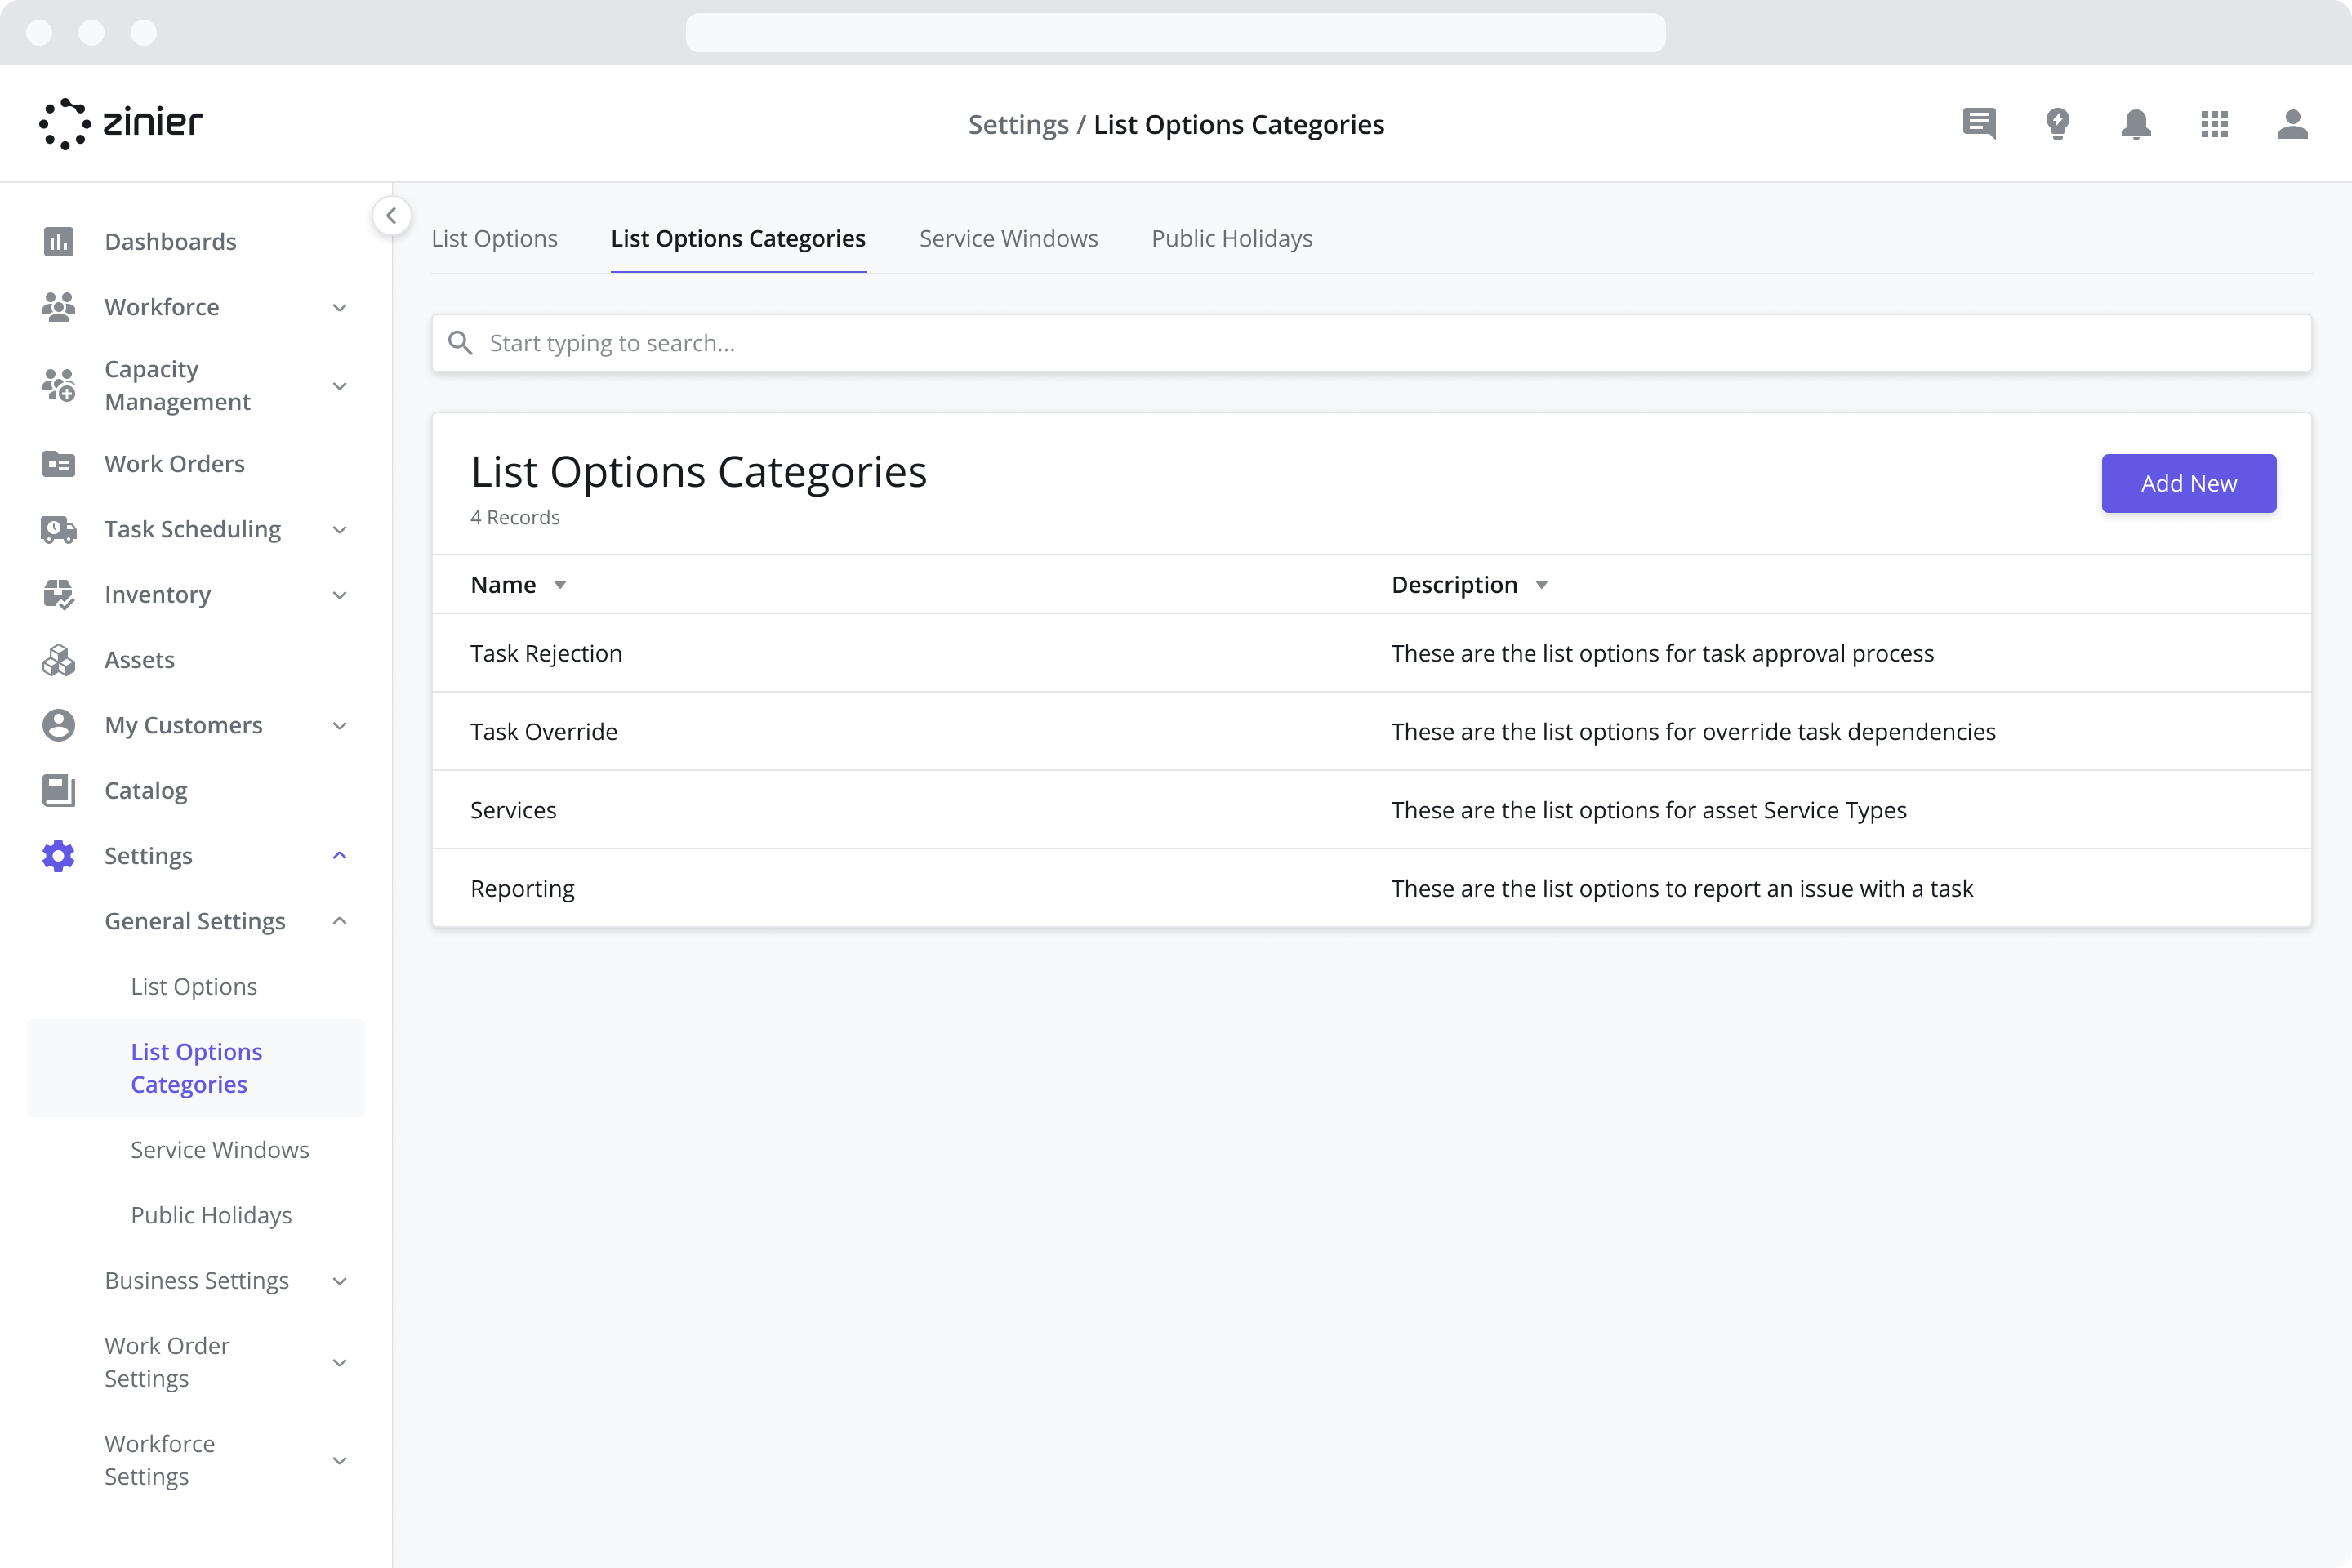
To add a new List Option Category, go to the Settings > General Settings > List Option Categories module, click the “Add New” button in the top right of the data grid, and enter the information shown in the sidepanel. Once added, List Option Categories can be tagged to List Options as described above.