Timesheets (Mobile)
NEW (24.4)
The My Timesheet mobile app allows Technicians to track, edit, and submit timesheets for approval from the Zinier mobile app.
In order to view and submit timesheets from the My Timesheets module, a technician must first be added to the “Timesheet Technician” User Group. For more information, see the Timesheets Configurations section.
Timesheets can also be completed by technicians using the My Timesheets module in the web application. For more information on using Timesheets on the web, see the My Timesheets (Technician View) section.
Track and Edit Timesheets
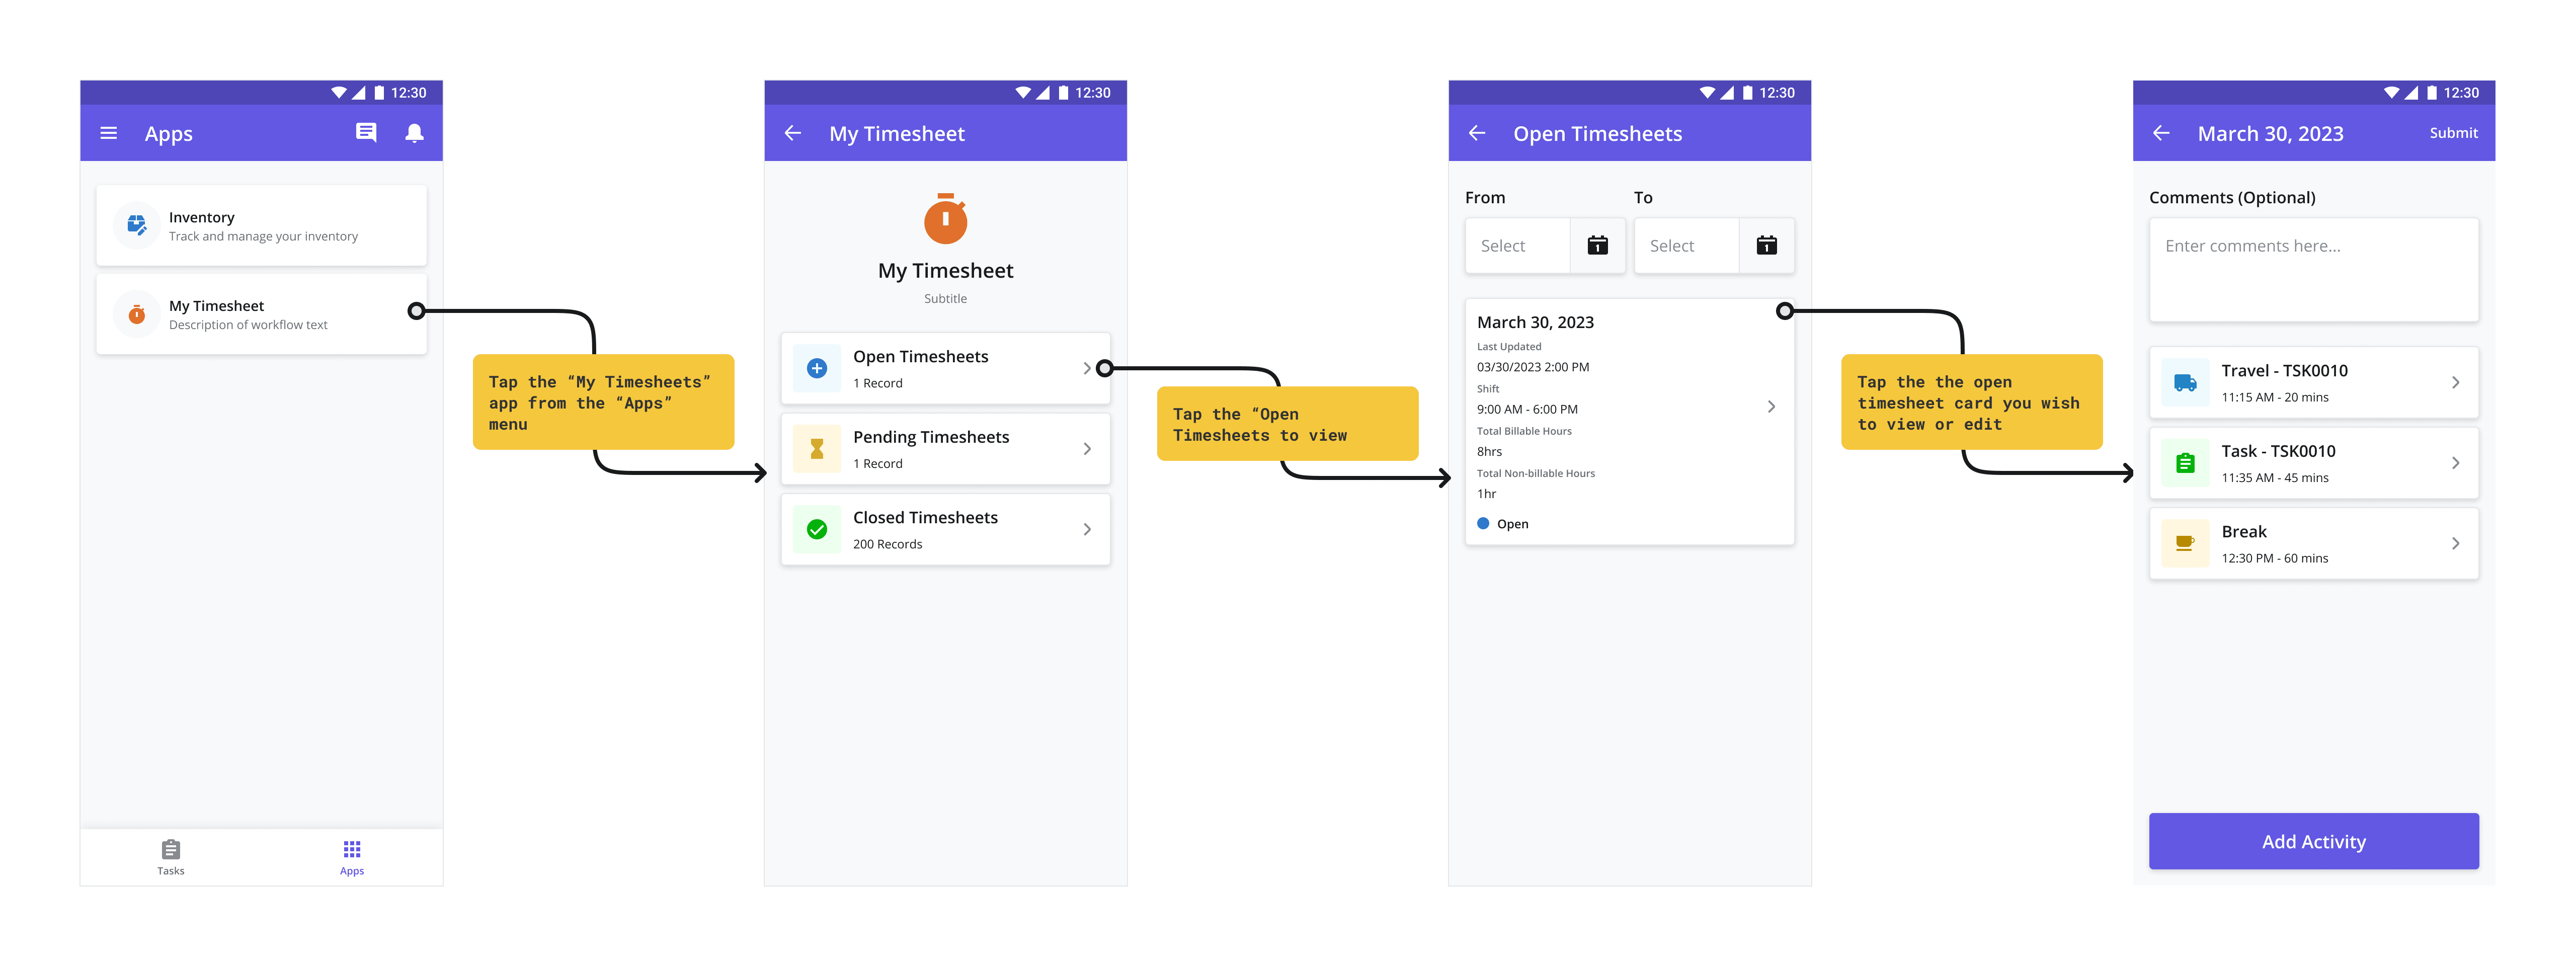
Technicians with access to the My Timesheet app can view all of their own open, pending, and closed timesheets. From here, they can also add or edit activities before submitting the timesheet for approval (if required).
To access and edit your open timesheets – timesheets that have not yet been submitted for approval – follow the steps below:
Go to the Apps > My Timesheet and select “Open Timesheets”
Select the timesheet you wish to view / edit by tapping on the Timesheet card.
To edit existing activity, tap the Activities card you wish to edit. Make any changes then tap the “Save” button.
To add a new activity to the timesheet, tap the “Add New” button from the same Activities page and follow the steps below:
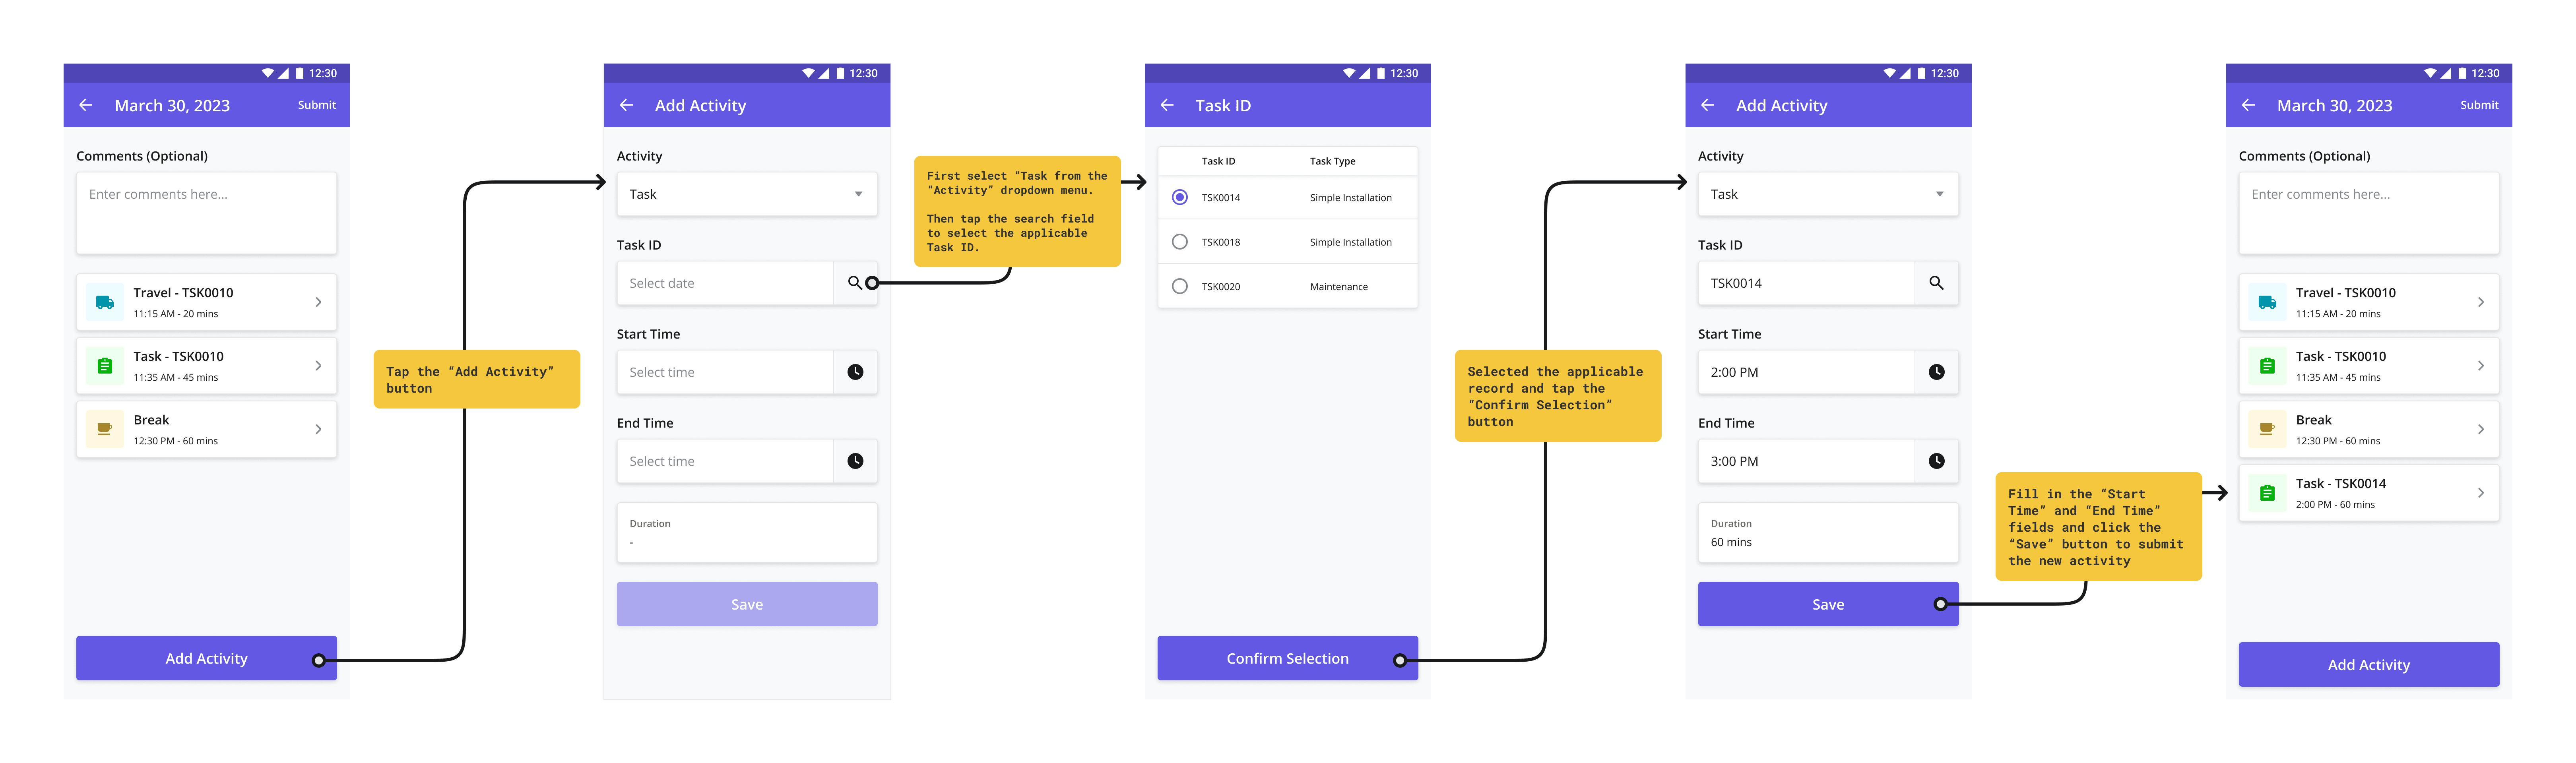
Adding a “Task / Work Order” Activity
Select “Task” or “Work Order” from the Activity dropdown menu.
Timesheet templates are configured to either be associated with Tasks OR Work Orders which will determine which field is visible from the Activity dropdown menu. For more information, see the Timesheets Configurations section.
Tap the Task ID (or Work Order ID) search field and select the applicable task from the datagrid.
Tap the “Confirm Selection” button.
Provide a Start Time and an End Time to log your time spent on the task. This will automatically calculate and show the Duration (minutes), which represents the number of minutes spent on the activity.
Click Save button.
If the Timesheet is complete, you now have the option to submit the Timesheet. To do so, tap the “Submit” button at the top right of the screen.
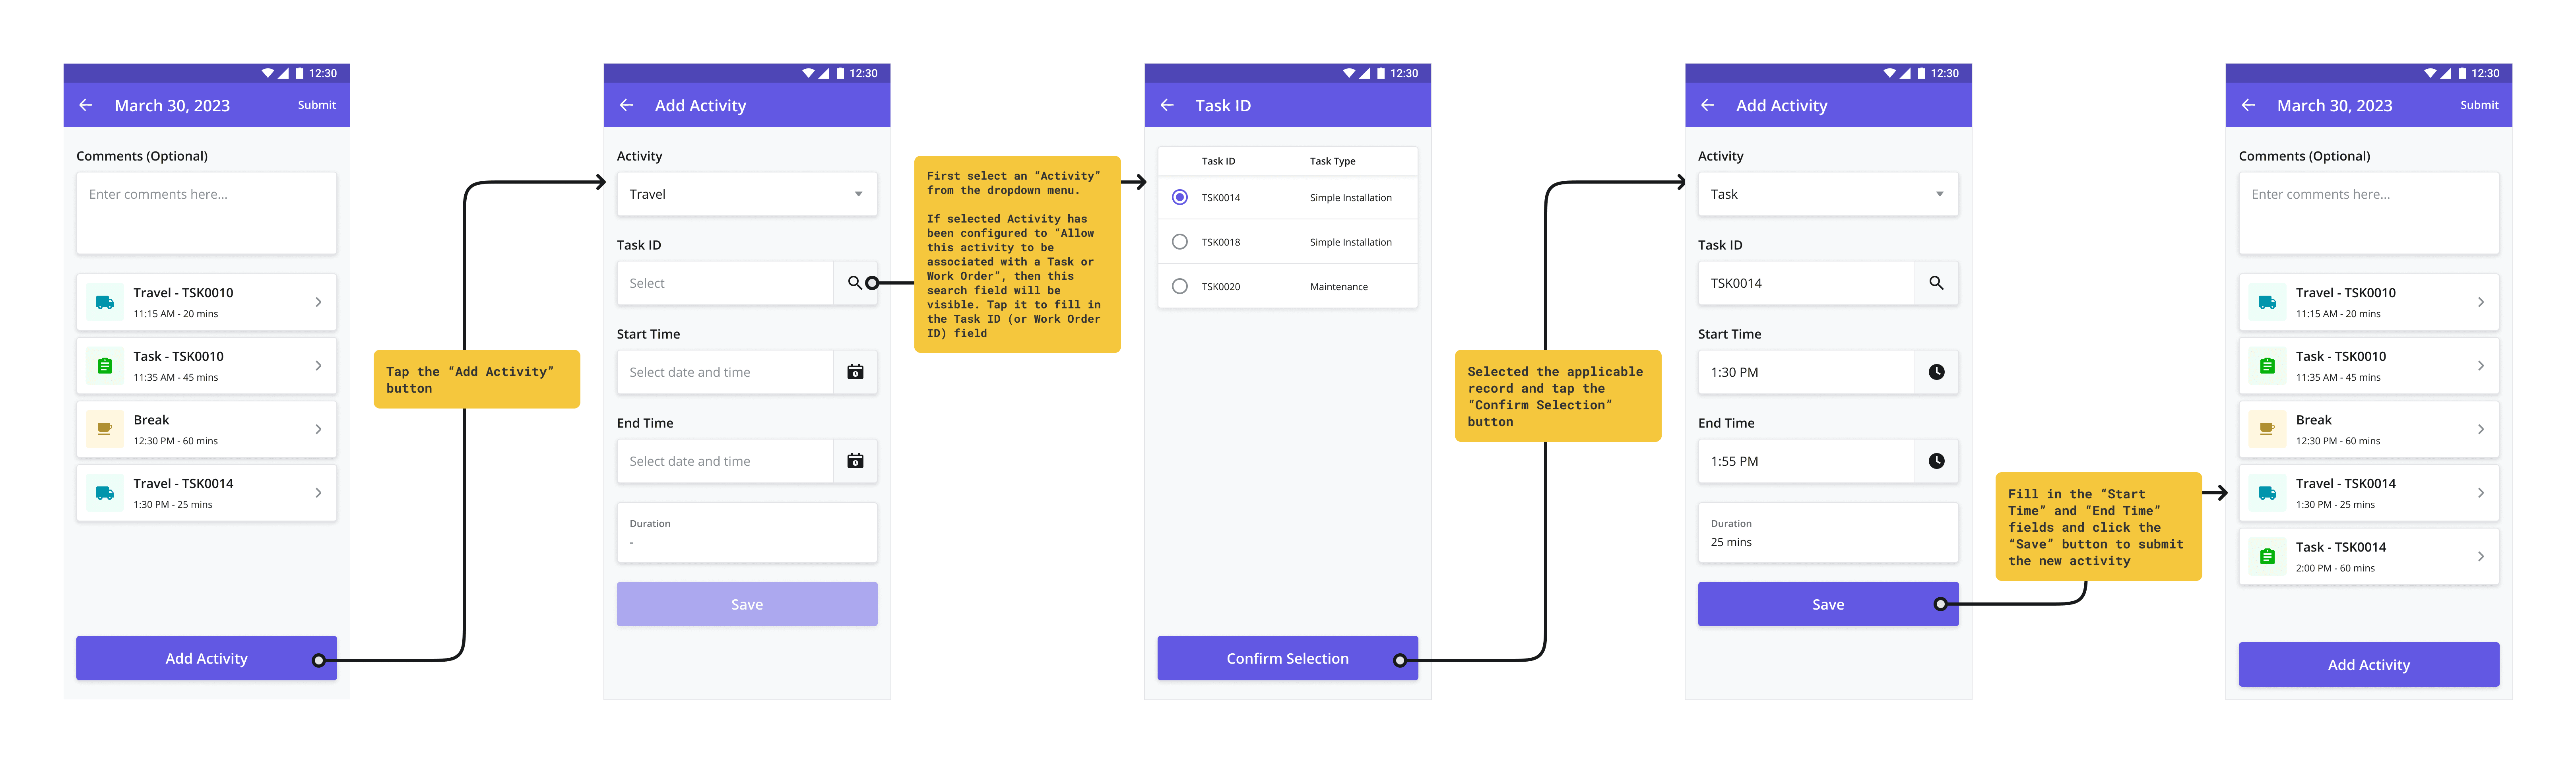
Adding a “Break”, “Leave”, “Overtime”, or other “Custom” Activity
From the Timesheet main page, tap the “Add New” button
Select the activity you wish to add from the Activity dropdown menu.
If selected Activity has been configured to “Allow this activity to be associated with a Task or Work Order”, then a Task ID OR Work Order ID search field will be visible below the Activities dropdown. If the Activity has NOT been configured to be associated with a Task OR Work Order, this dropdown menu will not be visible. Timesheet Templates are also configured to either be associated with either Tasks OR Work Orders which will determine which of the two field is visible. For more information, see the Timesheets Configurations section.
If visible, tap the Task ID (or Work Order ID) search field and select the applicable task from the datagrid.
Tap the “Confirm Selection” button.
Provide a Start Time and an End Time to log your time spent on the task. This will automatically calculate and show the Duration (minutes), which represents the number of minutes spent on the activity.
Click Save button.
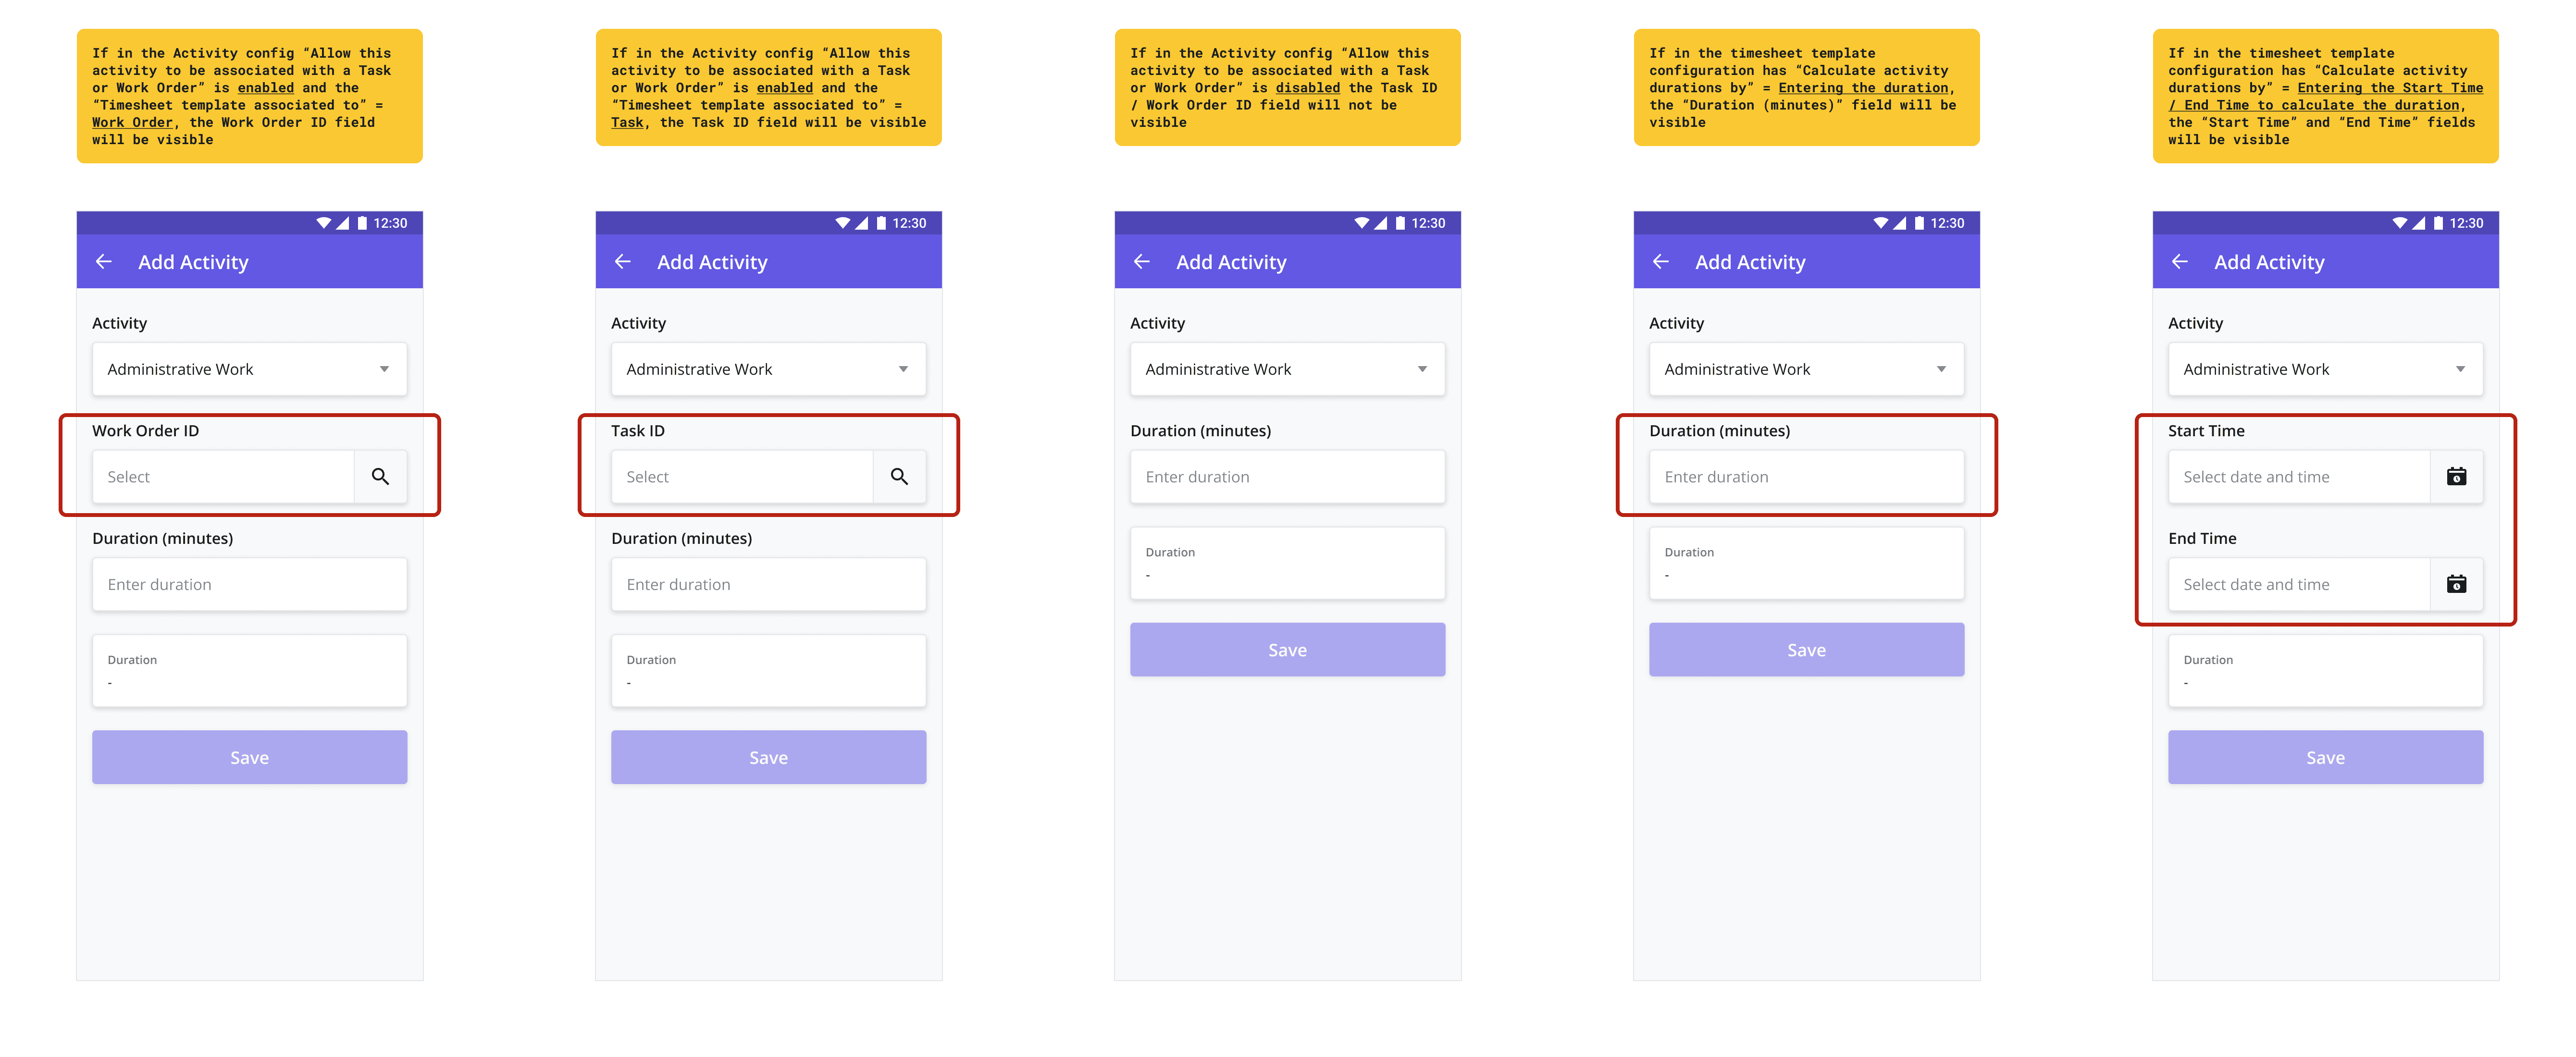
Variations due to Timesheet Template and Activity Configuration
Depending on how your Timesheet Template and it’s activities have been configured, you may see variations to the fields used to add an Activity. For more information, see the Timesheets Configurations section. Those variations are listed below:
Task ID / Work Order ID Field
If in the Activity config “Allow this activity to be associated with a Task or Work Order” is enabled and the “Timesheet template associated to” = “Work Order”, the Work Order ID field will be visible
If in the Activity config “Allow this activity to be associated with a Task or Work Order” is enabled and the “Timesheet template associated to” = ”Task”, the Task ID field will be visible
If in the Activity config “Allow this activity to be associated with a Task or Work Order” is disabled the “Task ID” / “Work Order ID” field will not be visible
Duration / Start & End Time Fields
If in the timesheet template configuration has “Calculate activity durations by” = “Entering the duration”, the “Duration (minutes)” field will be visible
If in the timesheet template configuration has “Calculate activity durations by” = “Entering the Start Time / End Time to calculate the duration”, the “Start Time” and “End Time” fields will be visible
Timesheet Validations and Conflicts
When adding Activity entries (either by creating a new one or editing an existing Activity), the system checks for conflicts using the following validation logic:
Time Conflicts for all Manual Activity: The Start and End Time for a manual activity entry can not overlap with any other activity in the same timesheet. If a conflict is found, the user is notified to either override the conflict or cancel and edit the entry.
Task Work Spanning Longer than the Task Duration: Task Work activities can not span for a during longer than the task duration
Overtime Activity During Shifts: The Start and End Time for manually added or edited Overtime activity can not overlap with the user’s Shift time. If a conflict is found, the user is notified to either override the conflict or cancel and edit the entry.
In all cases where a conflict is found, the users can select from two options:
Override: If the user selects this option, the entry will be saved but flagged to indicate the validation was overridden.
Cancel: If the user selects this option, the entry will NOT be saved – the user is taken back to the form where they can edit any fields to resolve the conflict.
Validations are only applicable to Timesheet Templates that are tracking via Tasks. Templates using Work Orders will not have any validation. For more information on configuring Timesheets for Task vs. Work orders, see the Timesheets Configurations section.
Exceeding the Max Billable Hours: One additional validation to keep in mind – technicians cannot submit a timesheet if it exceeds the total working hours defined by the Timesheet Template assigned to the technician. For more information on configuring Timesheet Templates, see the Timesheets Configurations section.
Submitting a completed Timesheets
If the Timesheet is complete, you now have the option to submit the Timesheet. To do so, add any comments you wish the approver to see in the Comments (Optional) field and then tap the “Submit” button at the top right of the screen.
If the Timesheet Template has been configured to require approval, it will immediately move to the Pending Timesheets module accessible from the main Timesheets module with the status = "Pending Review".
If the Timesheet Template has NOT been configured to require approval, it will move to the Closed Timesheets module accessible from the main Timesheets module with the status = "Approved".
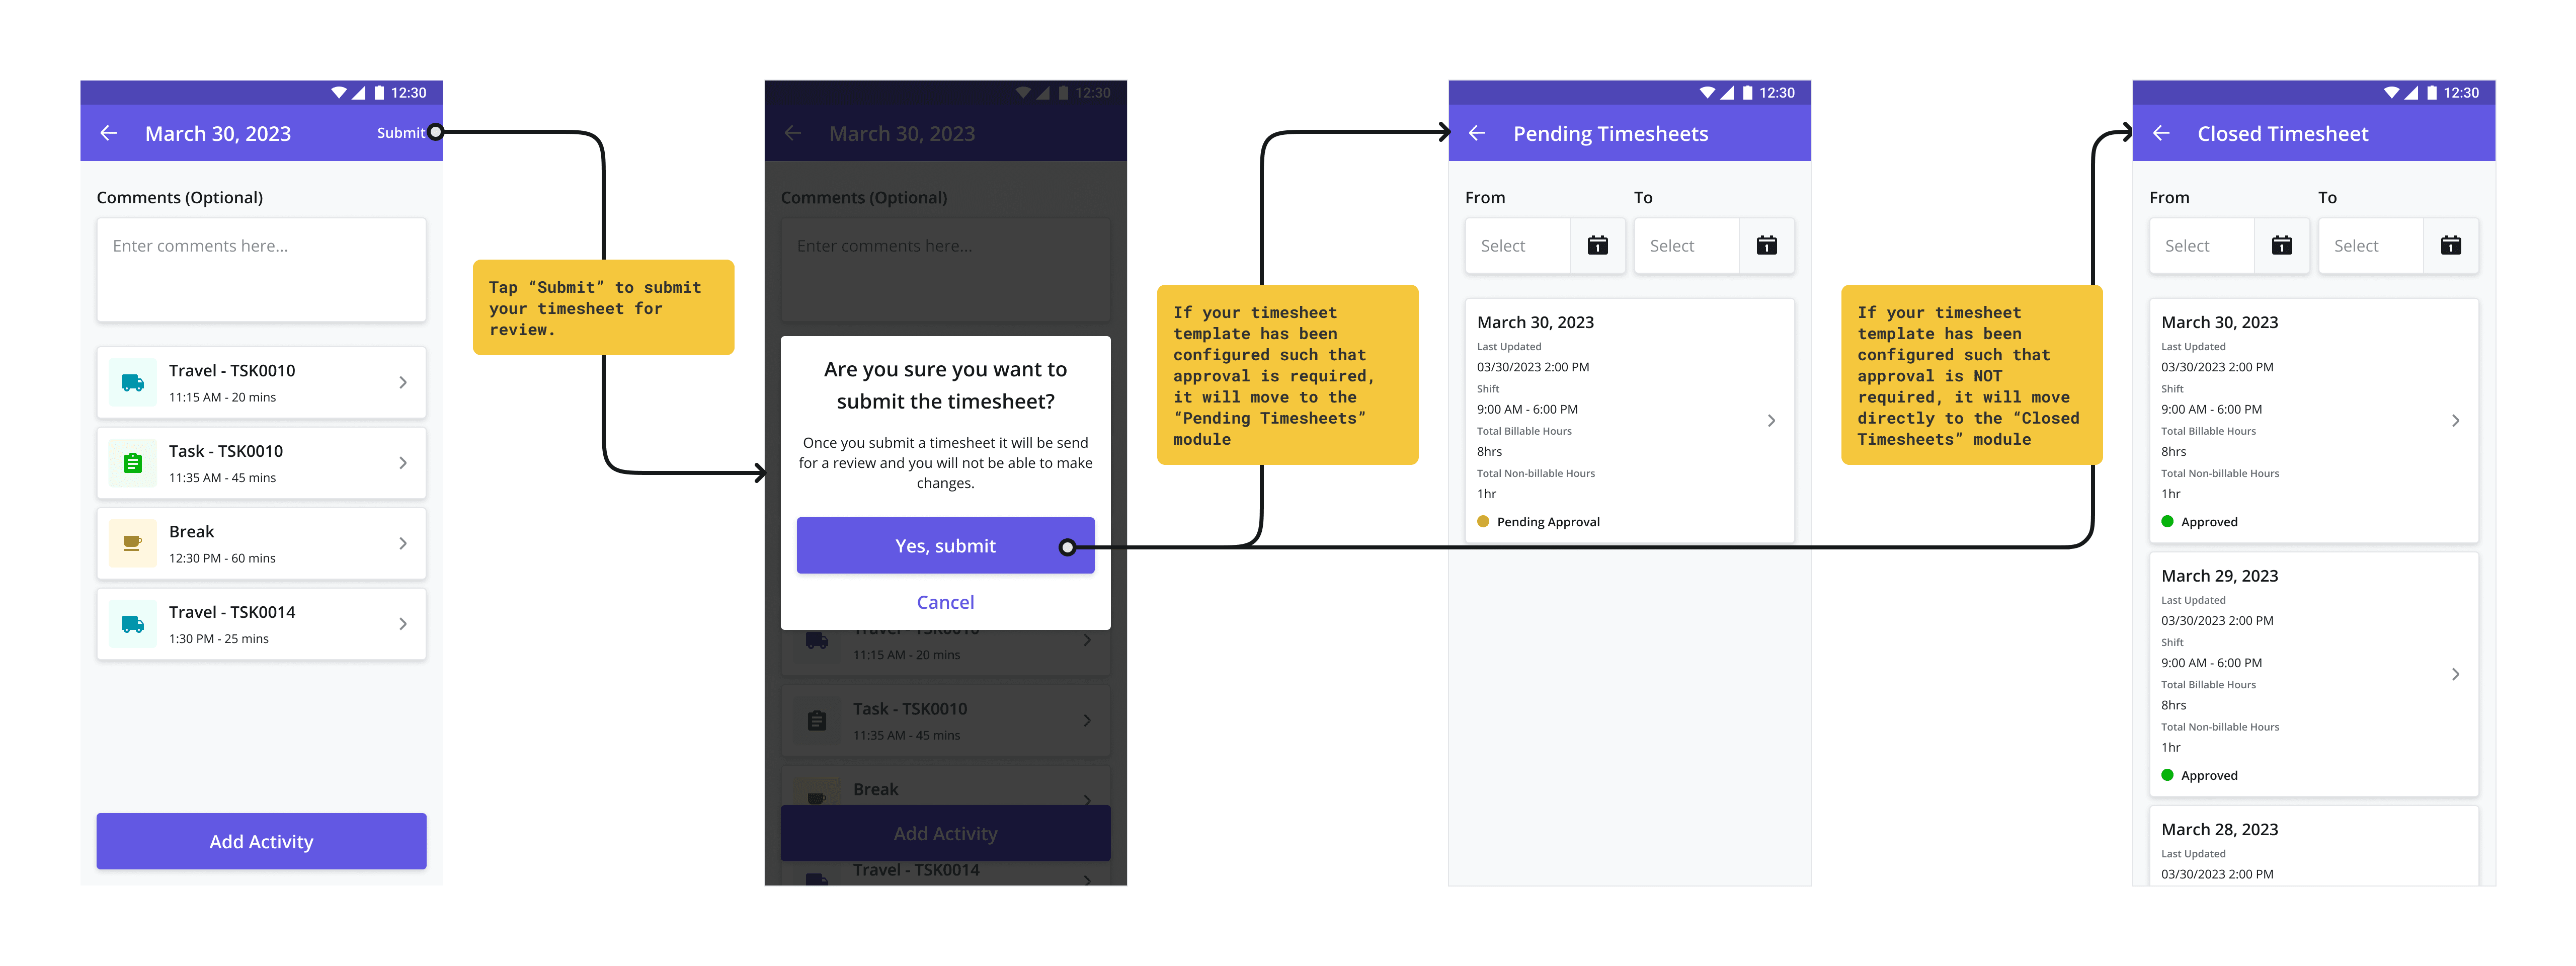
Tracking Timesheet Approval
After submitting a timesheet, you can track the approval process and status flow of the timesheet as follows:
Pending Timesheets: If the Timesheet Template has been configured to require approval, Dispatchers are required to review each submitted timesheet and either approve or reject it. While the timesheet is pending review, it can be viewed from the Pending Timesheets* module which shows all timesheets which have been submitted for review but have not yet been approved or rejected.
Approved Timesheets: If the Timesheet Template has been configured to NOT require approval, it will move to the Closed Timesheets module with the status = "Approved". If approval is required, once it is approved it will also move to the the Closed Timesheets module with the status = "Approved", and the technician who submitted the timesheet will receive a mobile notification that the timesheet was approved.
Rejected Timesheets: If the Timesheet is rejected it will move back the the Open Timesheets module with the status = "Open (Rejected)" and the technician who submitted the timesheet will receive a mobile notification that the timesheet was rejected.
*If the Timesheet Template has been configured to NOT require approval, the Pending Timesheets module will NOT be visible from the main screen