Step 2: Configuring the Check-in / Check-out Pages
After filling out the Task Settings page, click the Next button on the top navigation bar of the wizard. Doing so takes you to the second step of the process where you will be asked to configure the Check-in / Check-out Pages.
The settings in this step allow you to enable and disable specific mobile template pages that appear at the beginning and end of the task and specify the task as a “Crew” task if required. For reference, you can also view a Preview of the mobile screen that will become visible to mobile users when the page setting is enabled.

To configure the Check-in / Check-out Pages for the task, follow the steps below to enable and disable the mobile template pages that appear at the beginning and end of the task:
1. Require user to record the moment they start traveling to the site
Enabling this setting allows dispatchers to capture the time and place from which the technician starts the trip to the customer site associated with the task. This gives dispatchers visibility that the technician has started traveling to the customer site/location of the task and records the time and location from which the technician started traveling.
Enabled: If enabled, the “Start Travel Pages” in the mobile template will be visible as the first pages in the workflow. When a technician taps the “Start Travel” button from the first screen on mobile, the task status changes to “In Transit”, signifying to dispatchers that the technician has started traveling to the customer site/location of the task.
Disabled: If left disabled, this “Start Travel Pages” in the mobile template will not be visible to mobile users.
The diagram below shows you the first few screens at the beginning of the task when “Require user to record the moment they start travelling to the site” is enabled and all other Check-in / Check-out Page settings are disabled. Refer to the Mobile Workflow Template Diagram section for more information.

2. Require user to geo-check-in before starting the task
Enabling this setting will require mobile users to check in to the customer site using the the geo-fencing capabilities of the mobile app. Doing so allows you to verify that the technician has arrived at the right location to start work. This information is useful for audit and tracking purposes.
Enabled: If enabled, the “Geo Check-in Page” in the mobile template will be visible as the first page in the workflow. When a technician taps the “Checkin” button from the first screen on mobile, he or she will perform a geo-check-in. After checking in, the task status changes to “In Progress”, giving dispatchers visibility that the technician has started traveling to the customer site/location of the task.
Disabled: If left disabled, this “Geo Check-in Page” in the mobile template will not be visible to mobile users.
The diagram below shows you the first few screens at the beginning of the task when “Require user to geo-check-in before starting the task” is enabled and all other Check-in / Check-out Page settings are disabled. Refer to the Mobile Workflow Template Diagram section for more information.

3. Allow user to report and track crew attendance
Enabling this setting will do two things. First, it will make the task assignable to Crews only (as opposed to a single technician task). Second, it will enable a workflow action allowing Crew members to report their attendance. This workflow action is called “Crew Attendance” and can be accessed from the workflow action dropdown menu.
Enabled: If enabled, the task can only be assigned to Crews and the “Crew Attendance” workflow action will become visible from the workflow action dropdown menu.
Disabled: If left disabled, the “Crew Attendance” workflow action in the mobile template will not be visible to mobile users and the task will only be assignable to a single technician.
The diagram below shows the screens at the end of the task when “Require user to geo-check-in before starting the task” is enabled and all other Check-in / Check-out Page settings are disabled. Refer to the Mobile Workflow Template Diagram section for more information.
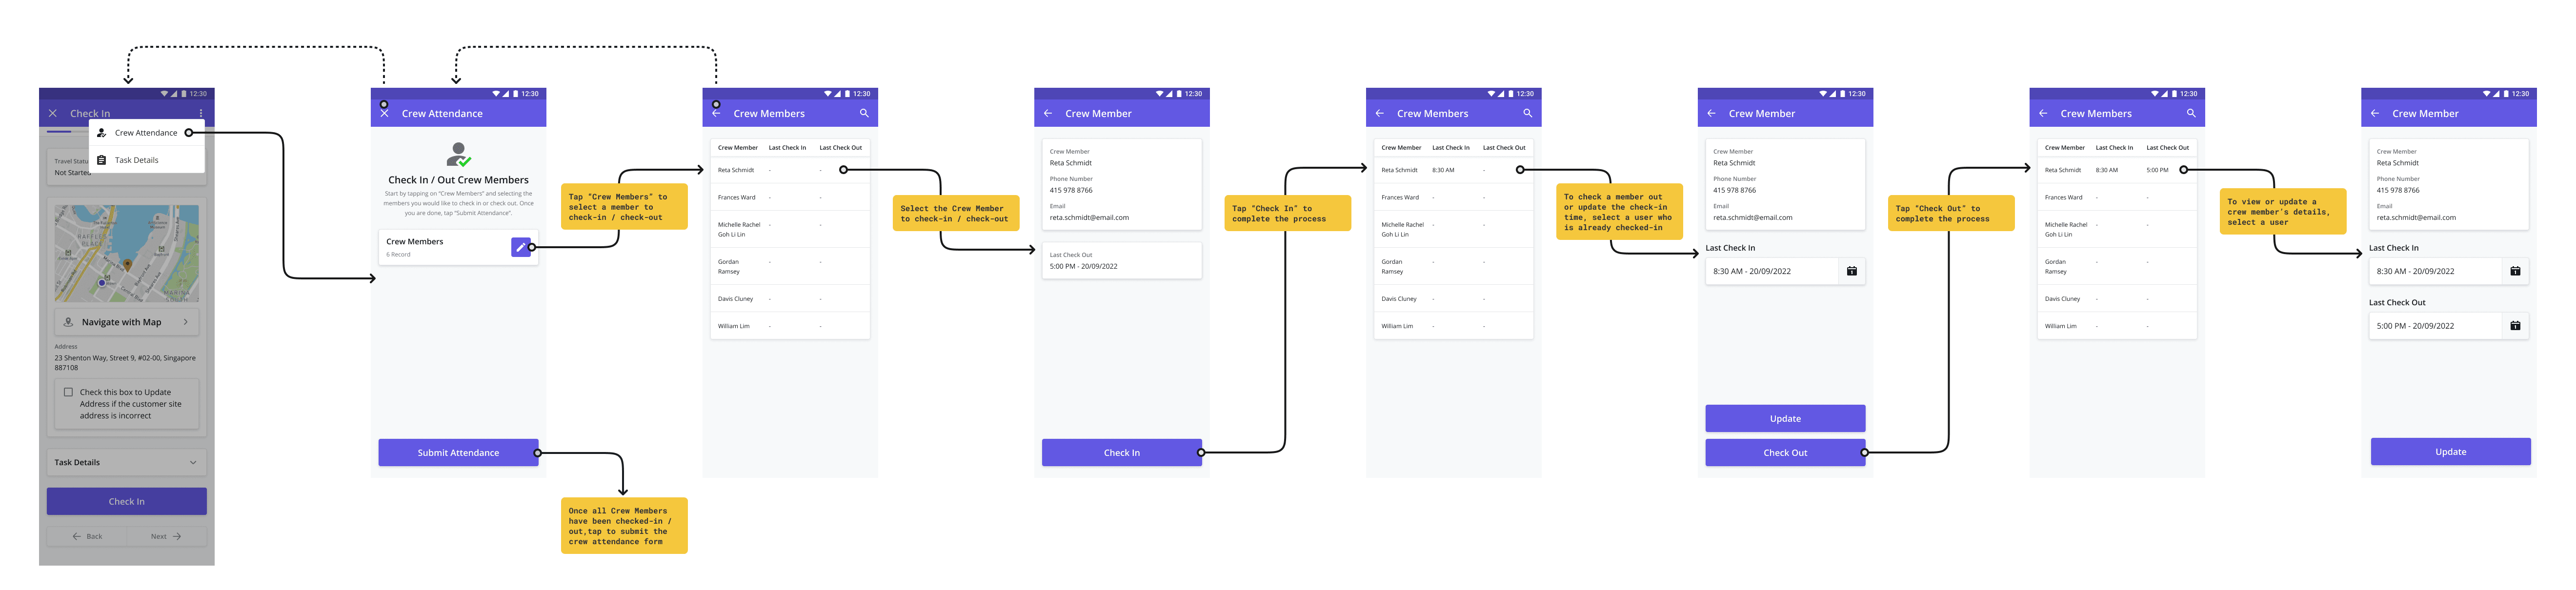
For more information on viewing Crew Attendance for submitted tasks, visit the View Crew Attendance for Submitted Tasks page.
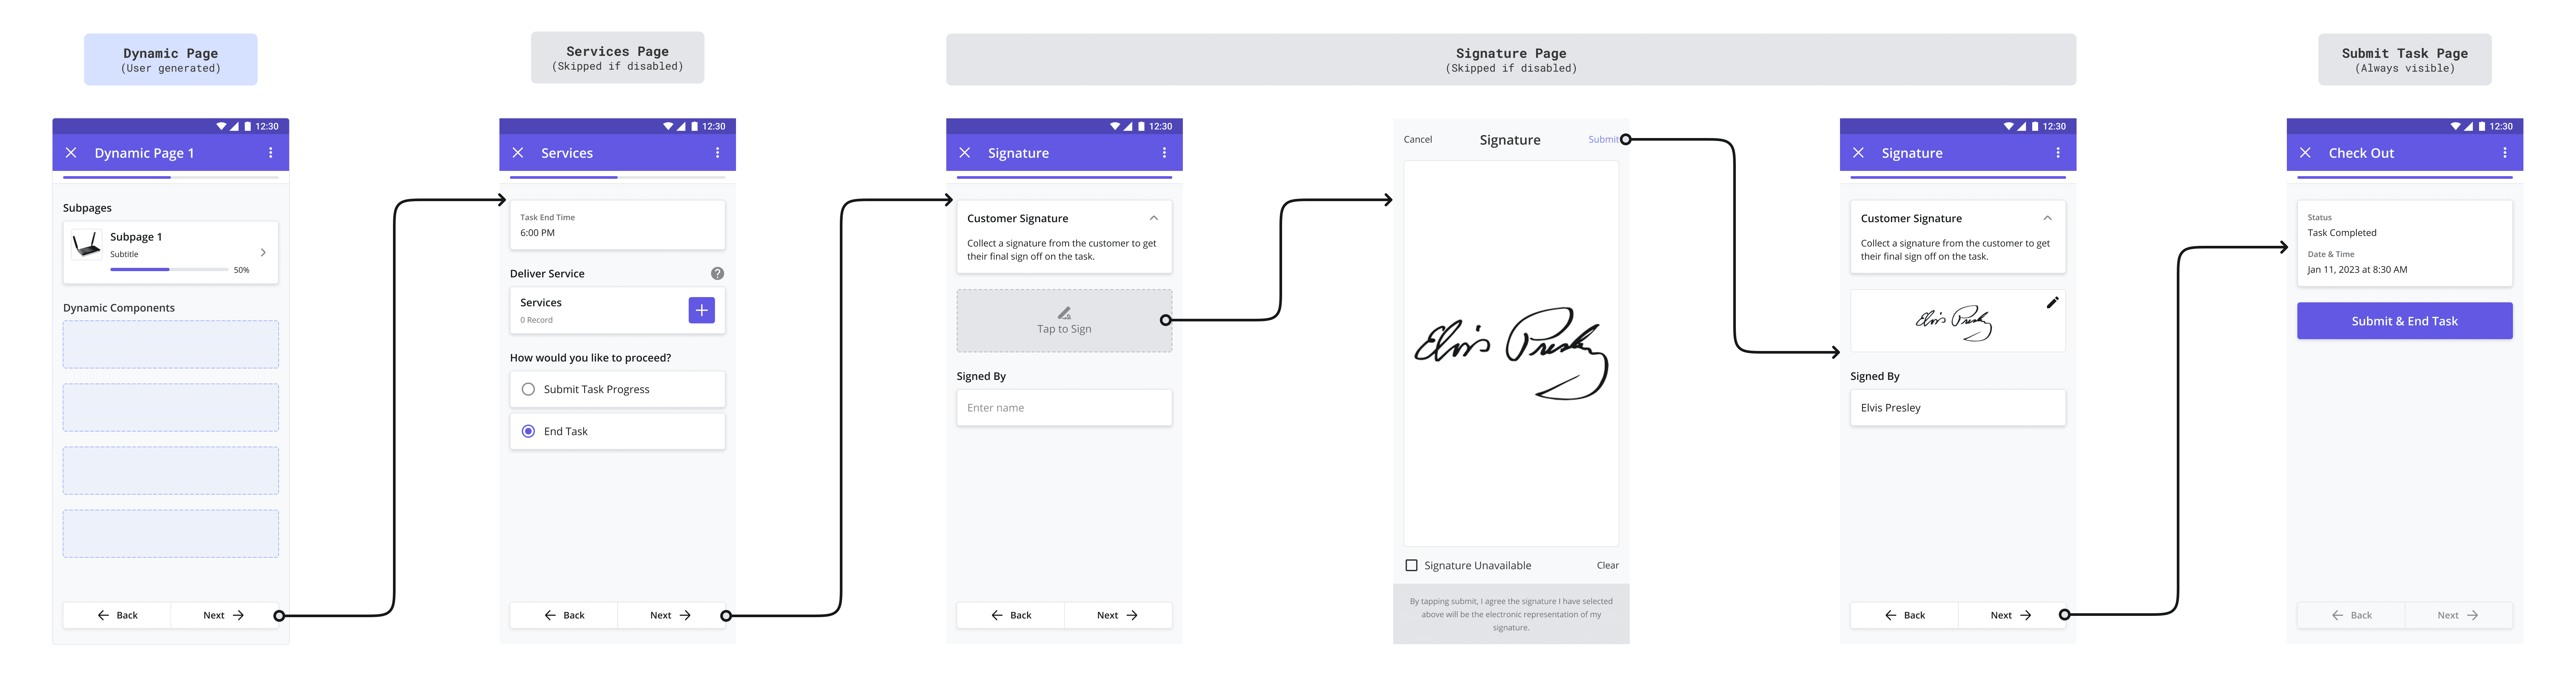
4. Require customer signature at the end of the task
Some service organizations require their technicians to collect a customer signature at the end of a job for audit and/or tracking purposes. Enabling this setting will allow technicians to do just that.
Enabled: If enabled, the “Customer Signature Page” in the mobile template will be visible before the “Submit Task Page”. Using the Signature component, the technician will be able to collect a digital signature on their mobile screen and input the name of the signatory.
Disabled: If left disabled, this “Customer Signature Page” in the mobile template will not be visible to mobile users.
The diagram below shows the screens at the end of the task when “Require customer signature at the end of the task” is enabled and all other Check-in / Check-out Page settings are disabled. Refer to the Mobile Workflow Template Diagram section for more information.
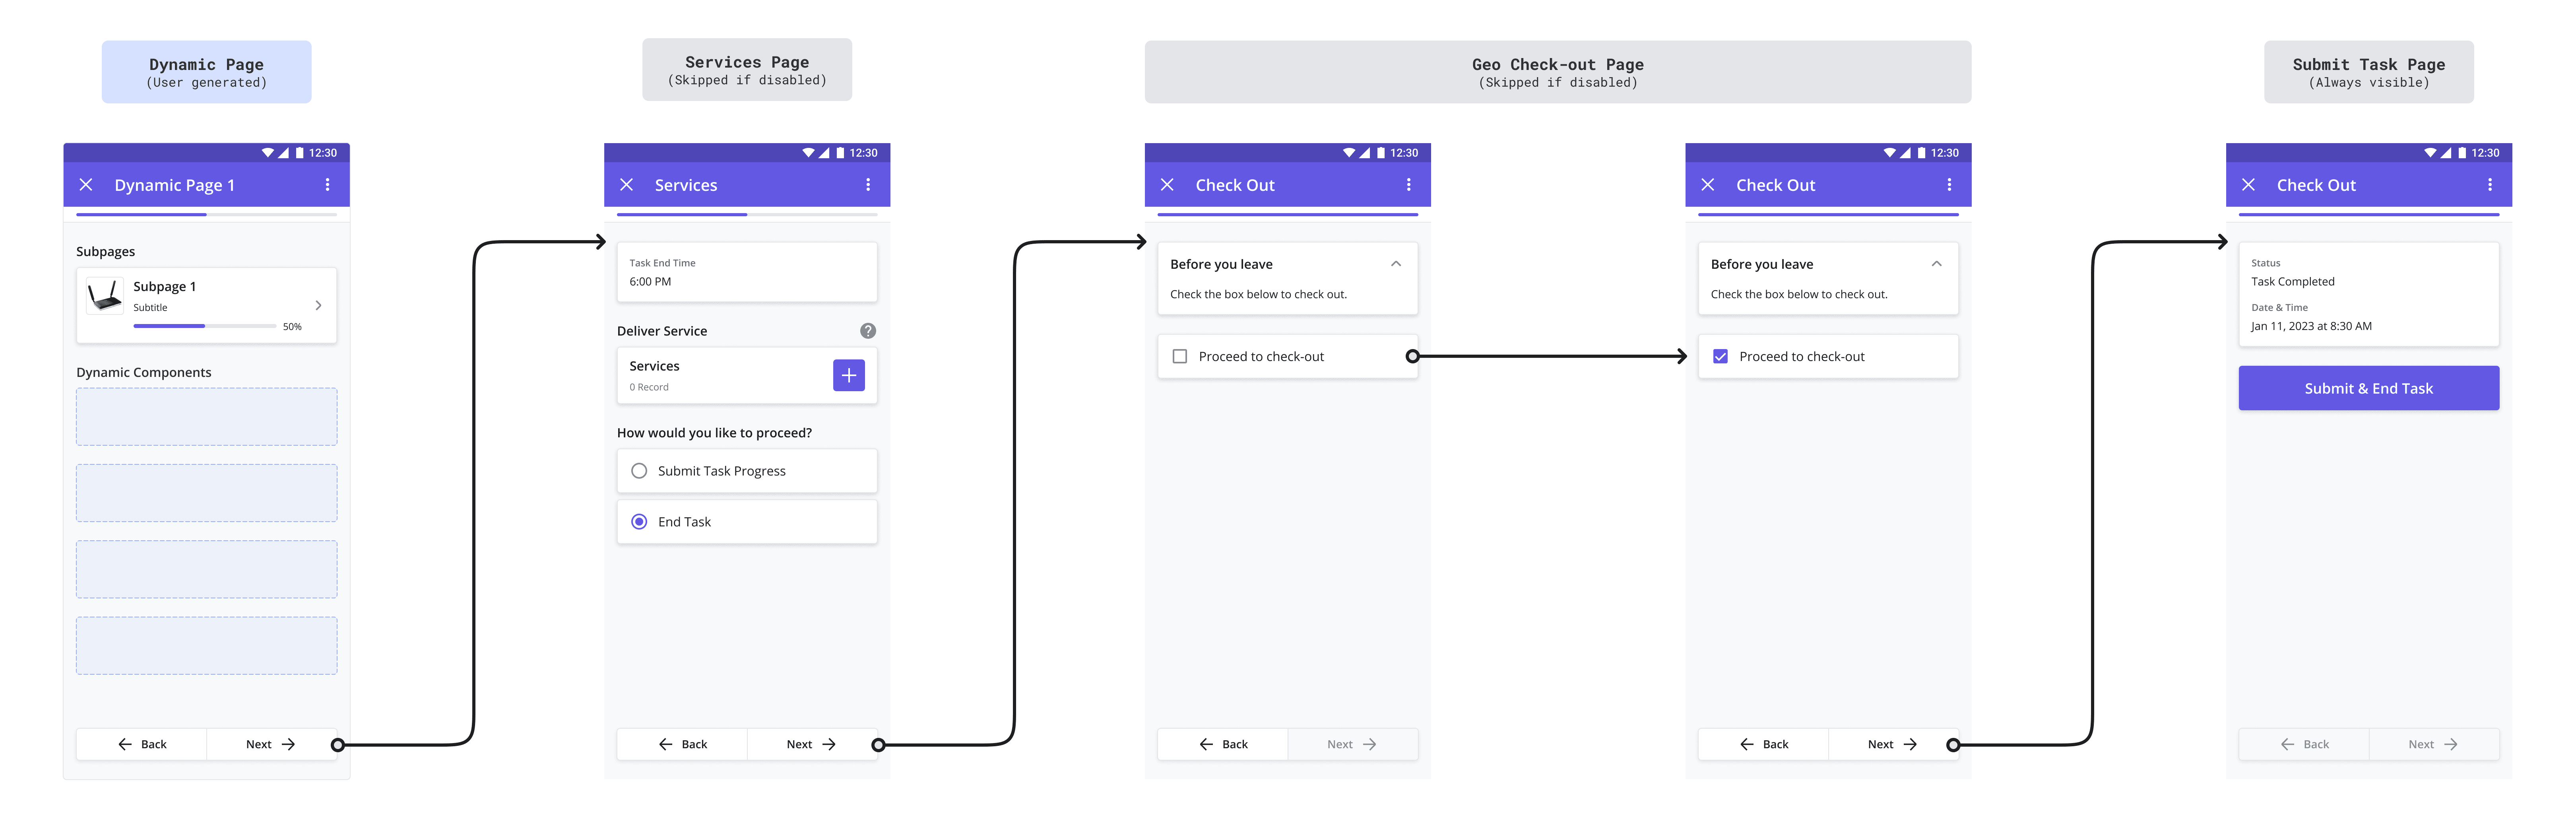
5. Require user to check-out before leaving the site
Enabling this setting will require mobile users to check out of the customer site using the the geo-fencing capabilities of the mobile app. Doing so allows you to verify that the technician has closed the task while still at the customer site. This information is useful for audit and tracking purposes.
Enabled: If enabled, the “Geo Check-out Page” in the mobile template will be visible before the “Submit Task Page”. Before leaving the customer site, the technician must check the “Proceed to check-out” checkbox. After doing so, the application will check to see whether or not the technician is within the check-in / check-out radius. If the user is outside the check-out radius, he/she will be unable to move to the next screen to submit the task.
Disabled: If left disabled, this “Geo Check-out Page” in the mobile template will not be visible to mobile users.
The diagram below shows the screens at the end of the task when “Require user to check-out before leaving the site” is enabled and all other Check-in / Check-out Page settings are disabled. Refer to the Mobile Workflow Template Diagram section for more information.
After completing Step 2, continue to Step 3: The Mobile Page Builder