Asset Management
The Assets module is used to track your Assets and details such as the serial number, contract, customer, and date of purchase of an Asset. Assets are also important inputs in Work Orders where tasks (such as preventive and corrective maintenance tasks) can be performed on and linked to particular Assets.
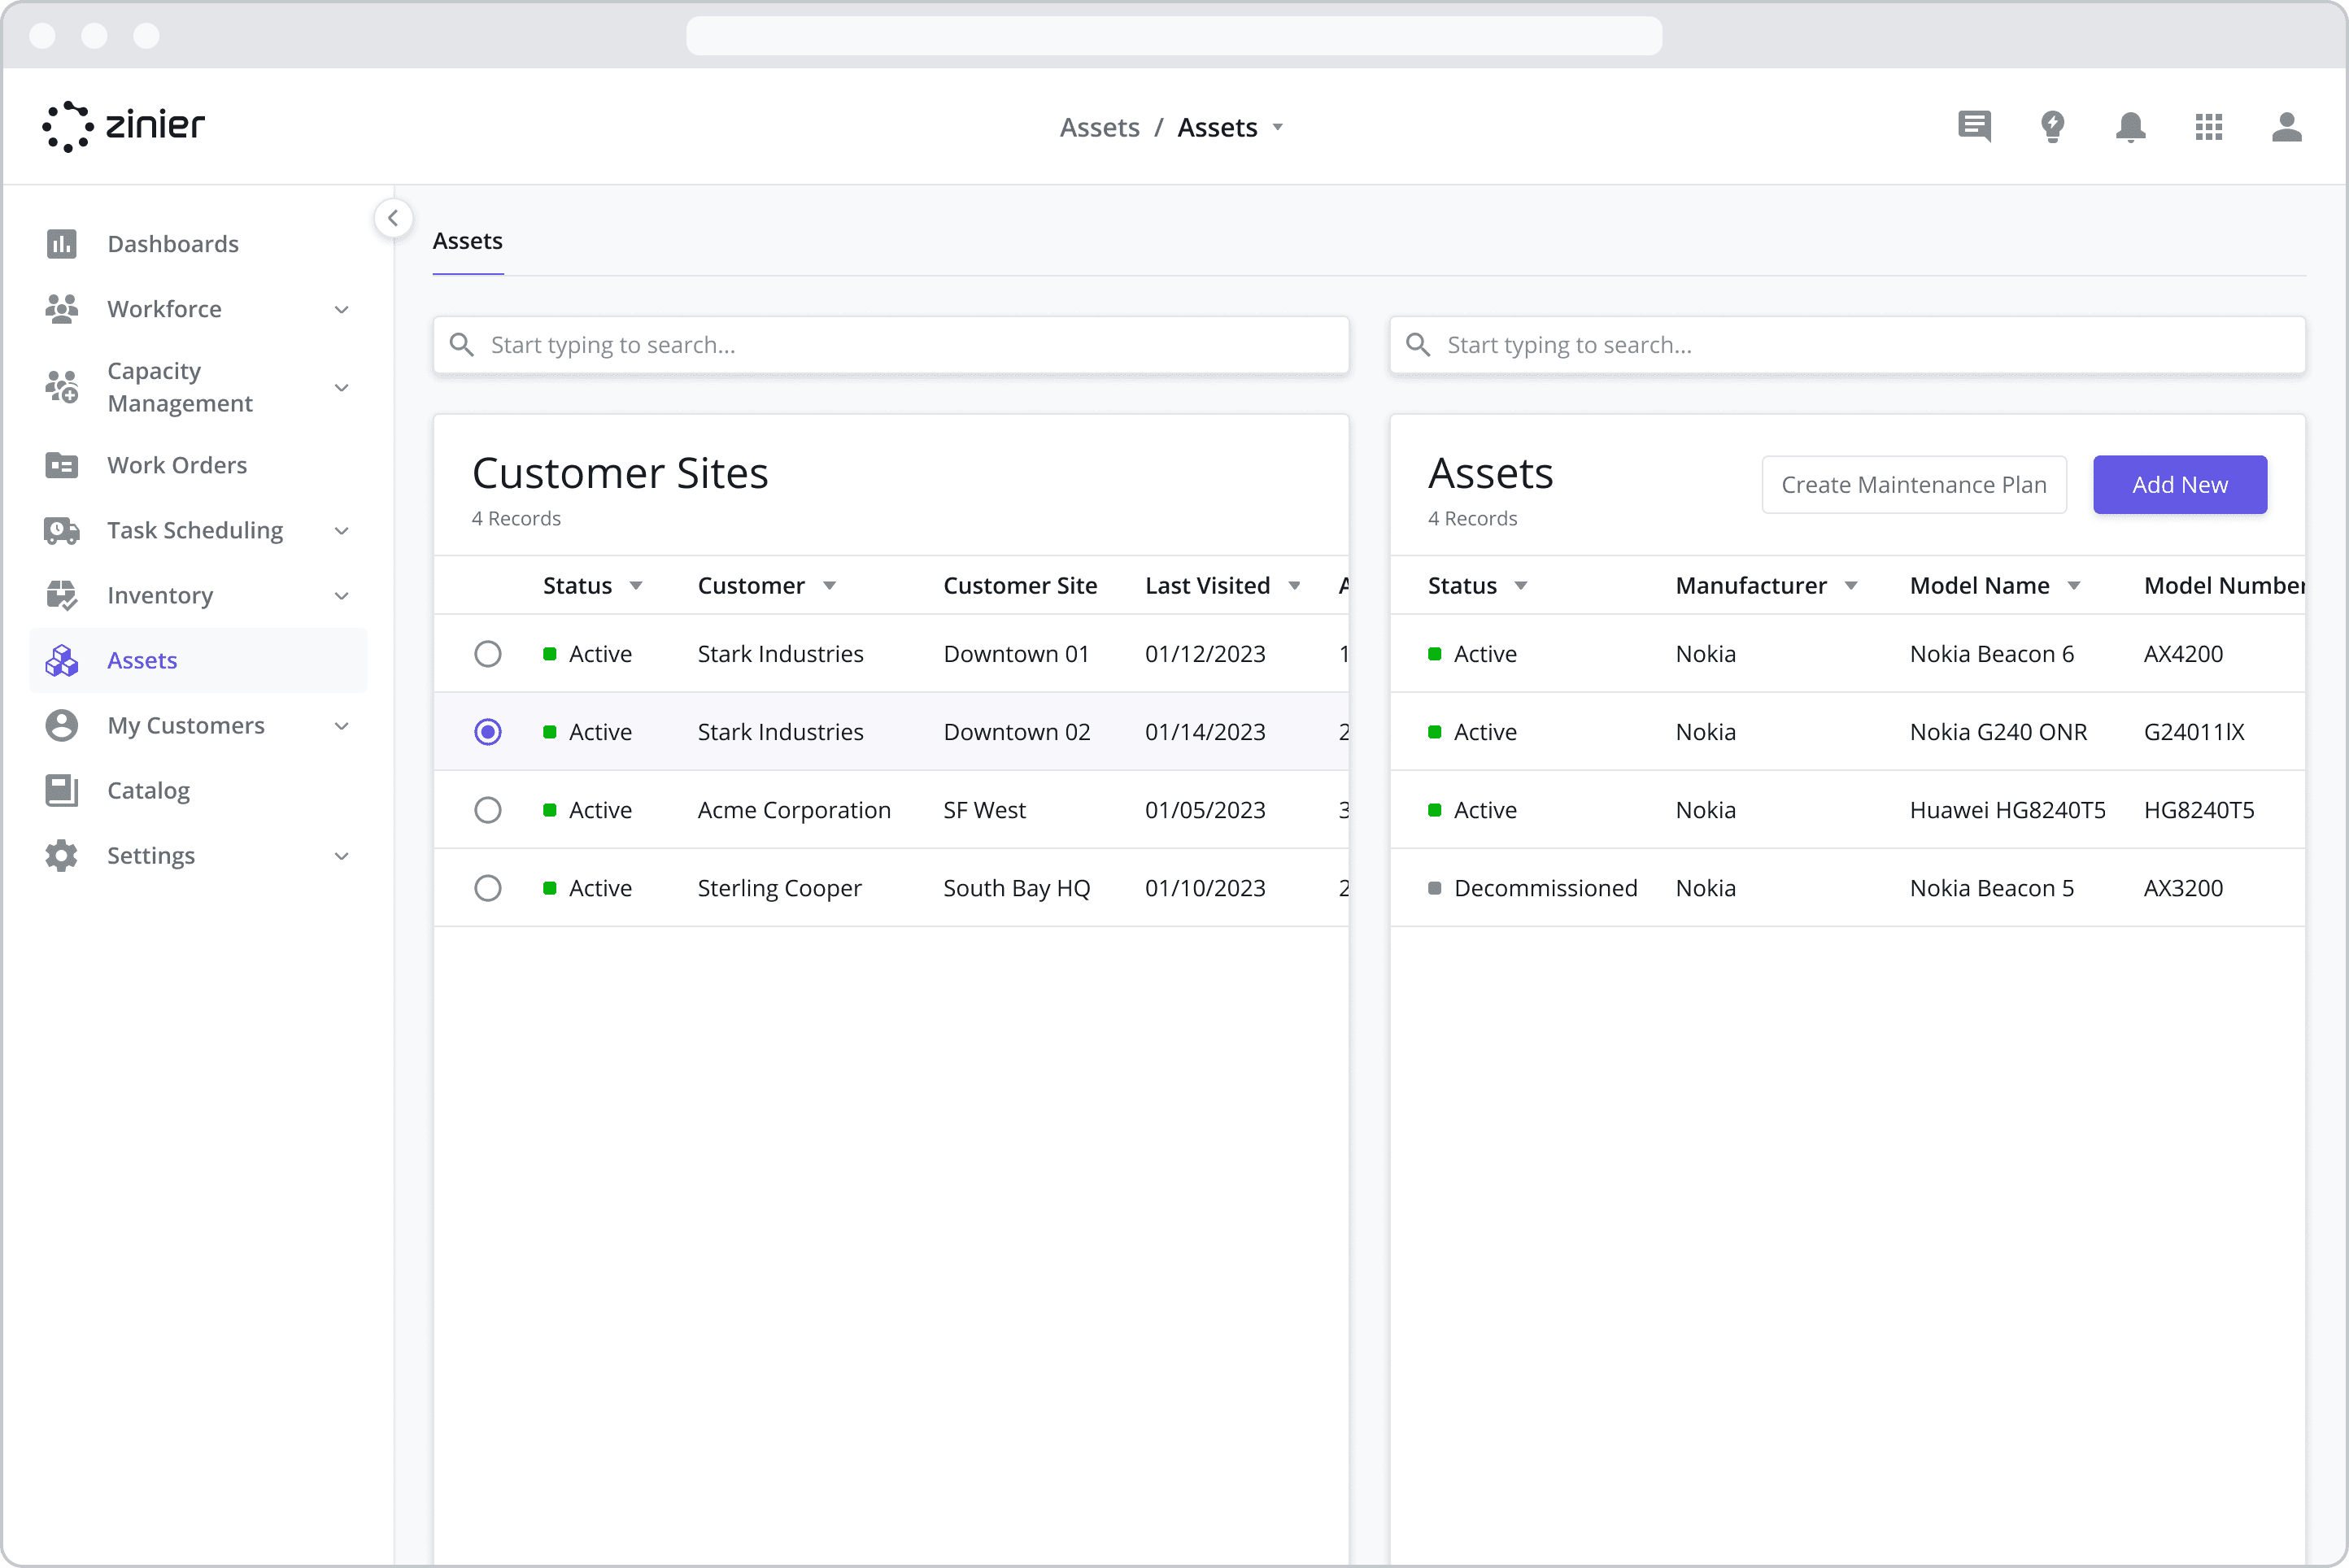
View Assets at Each Customer Site
From the main data grid of the Assets module, users can view a list of Assets installed at each Customer Site. To do so, simply select the Customer Site you wish to view.
Adding Assets to a Customer Site
To add an Asset to a Customer Site, follow the steps below:
Go to the Assets module
Select the Customer Site you wish to add the Asset to
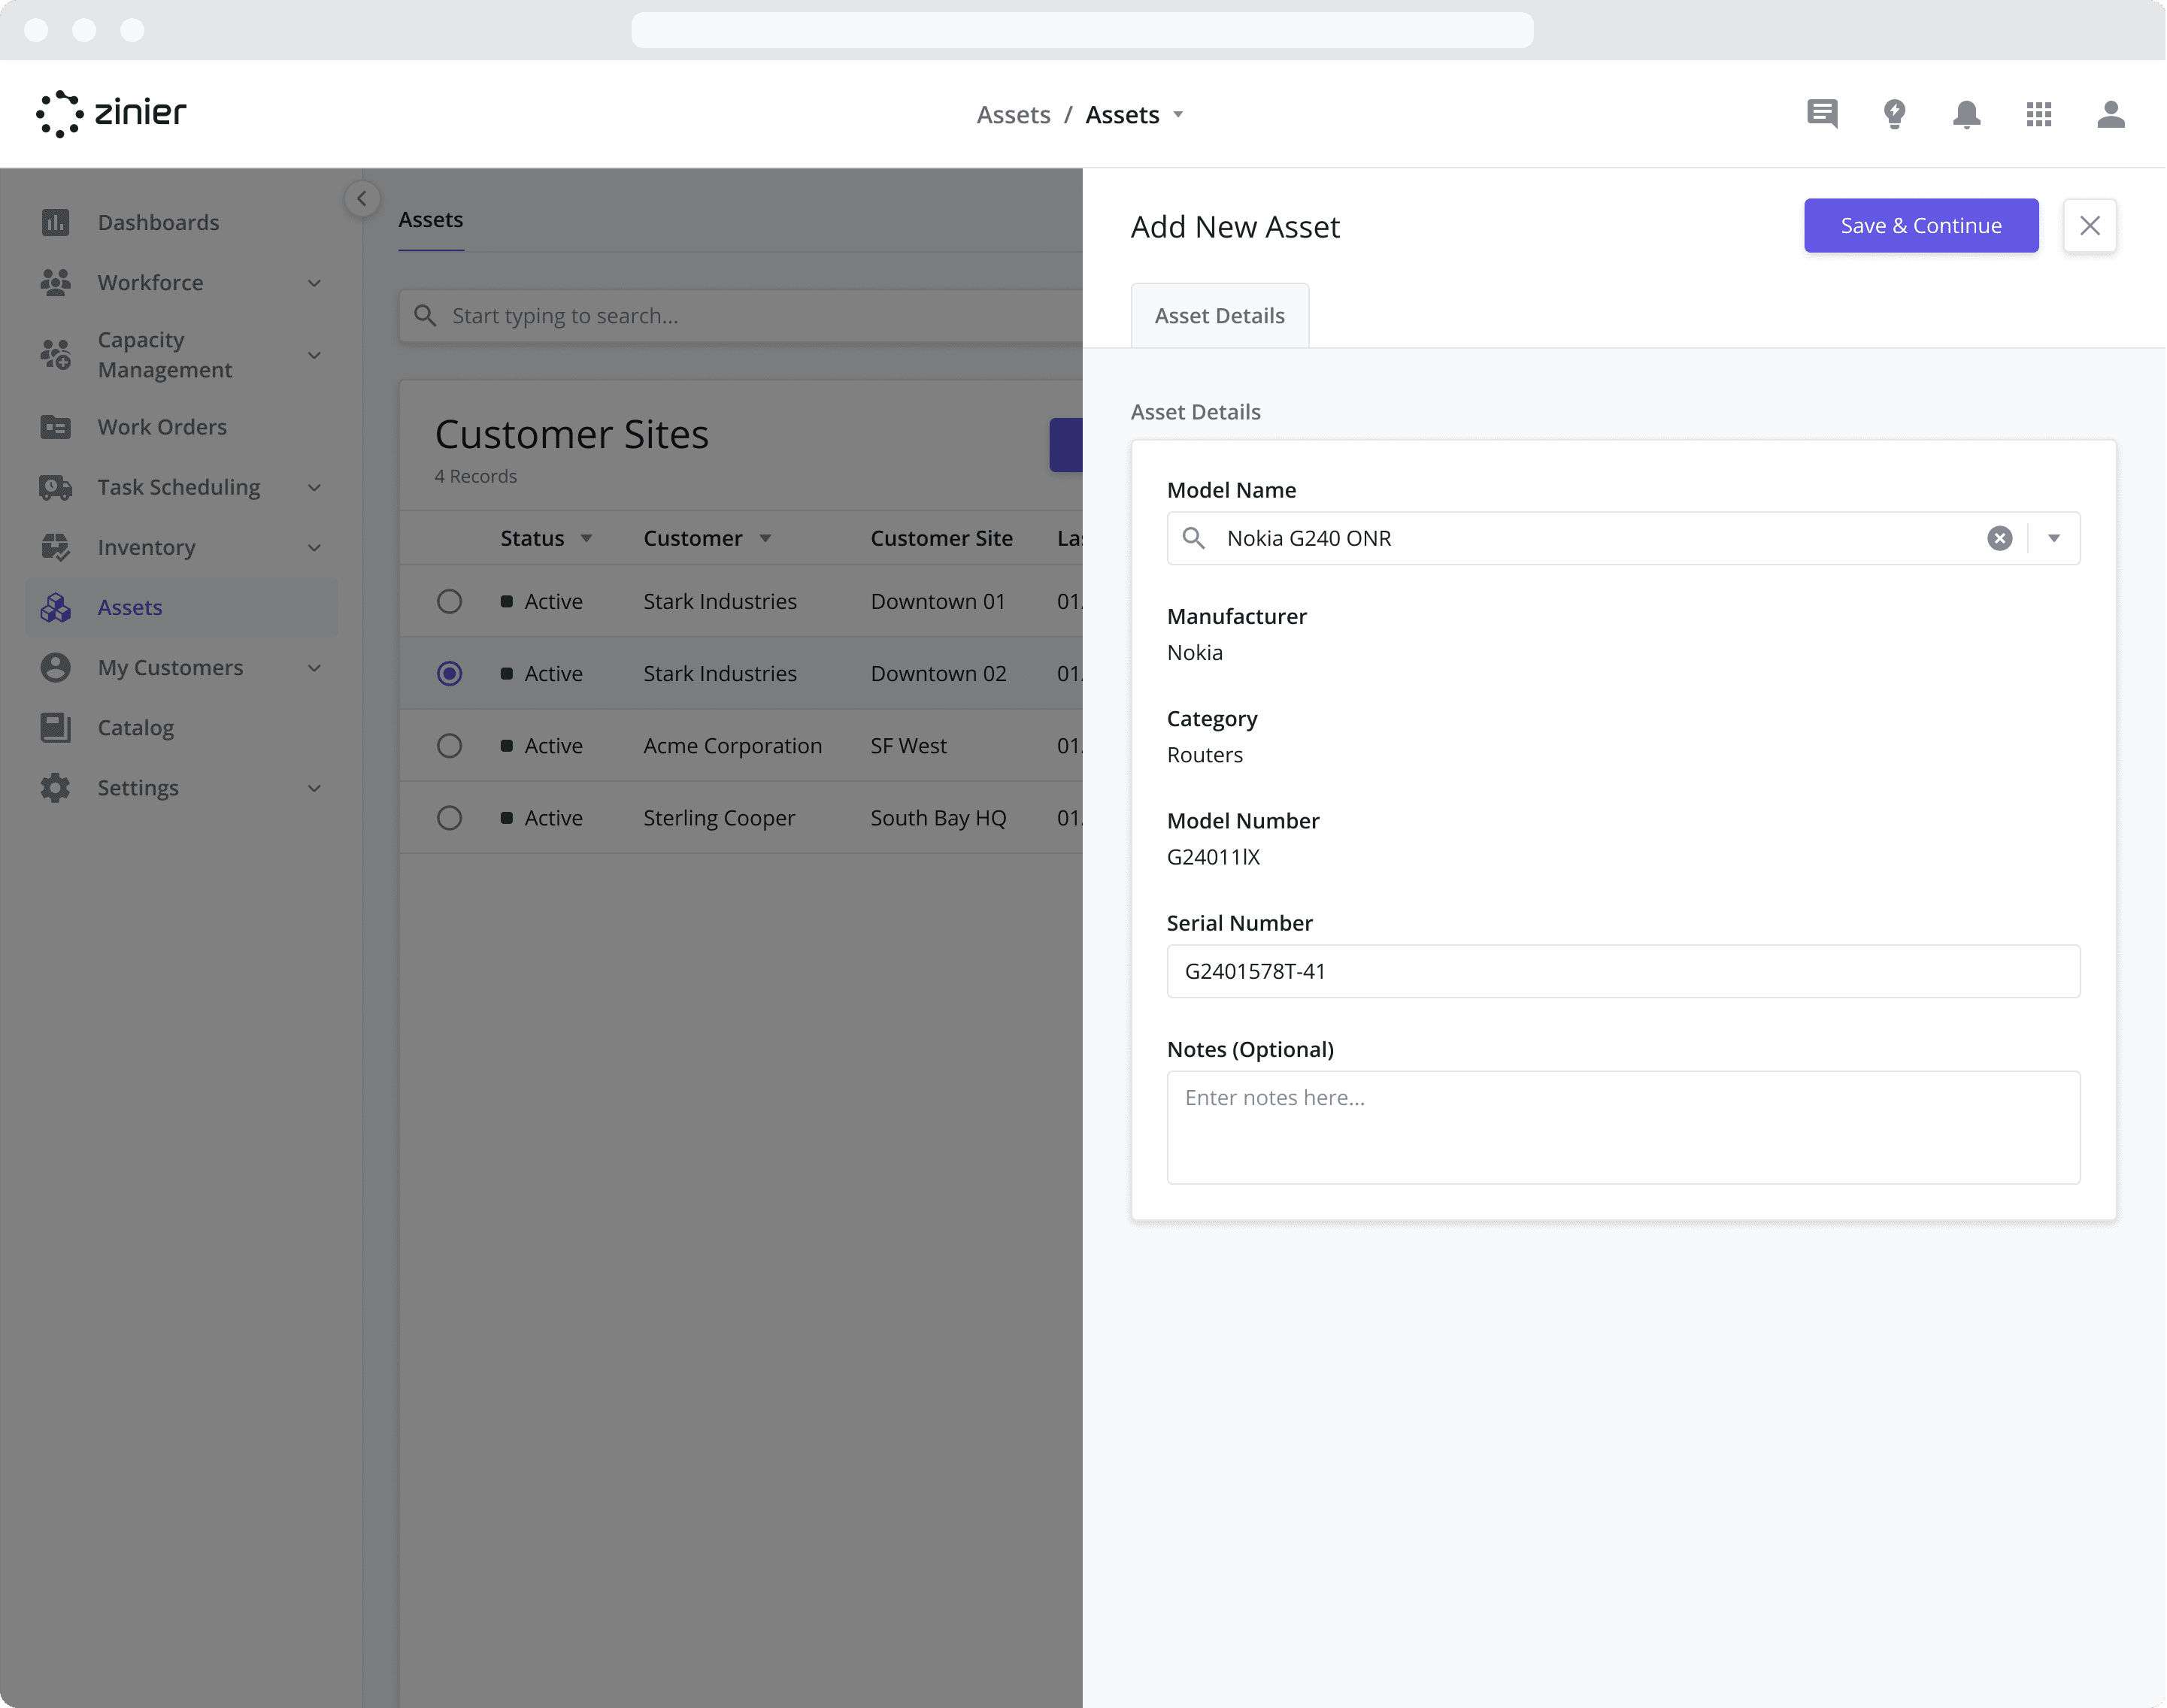
Click the “Add New” button from the data grid
Select the Model Name of the Asset you wish to add from the pre-populated list of Assets from the Parts & Assets Catalog. This will pre-populate the Manufacturer and Model Number fields.
Enter the Serial Number of the Asset
Optionally add any Notes
Click Save and Continue
To add an Asset to a Customer Site, the Customer Site must first exist and the Asset must exist in the Parts & Assets Catalog. For more information, see the Customer Sites section and Catalogs section.
Asset Status
Active: After adding an Asset to a Customer Site, the status of the Asset will automatically change to “Active.” This makes the Asset visible within the applicable modules across the Productivity Suite. For example:
Tasks in Work Orders: “Active” Assets can be assigned to Tasks when a Work Order is created
Maintenance Plans: “Active” Assets can be assigned Maintenance Plans in the Assets and Contracts modules
Services: “Active” Assets are available for Services on mobile as part of the Standard Mobile Workflows
Decommissioned: Assets can be “Decommissioned” at any time, which will hide the Asset from use (see above). To “Decommission” an Asset, open the Asset sidepanel and click the “Decommission” button. Assets can be recommissioned/reactivated at any time by clicking the “Reactivate” button on the same sidepanel.
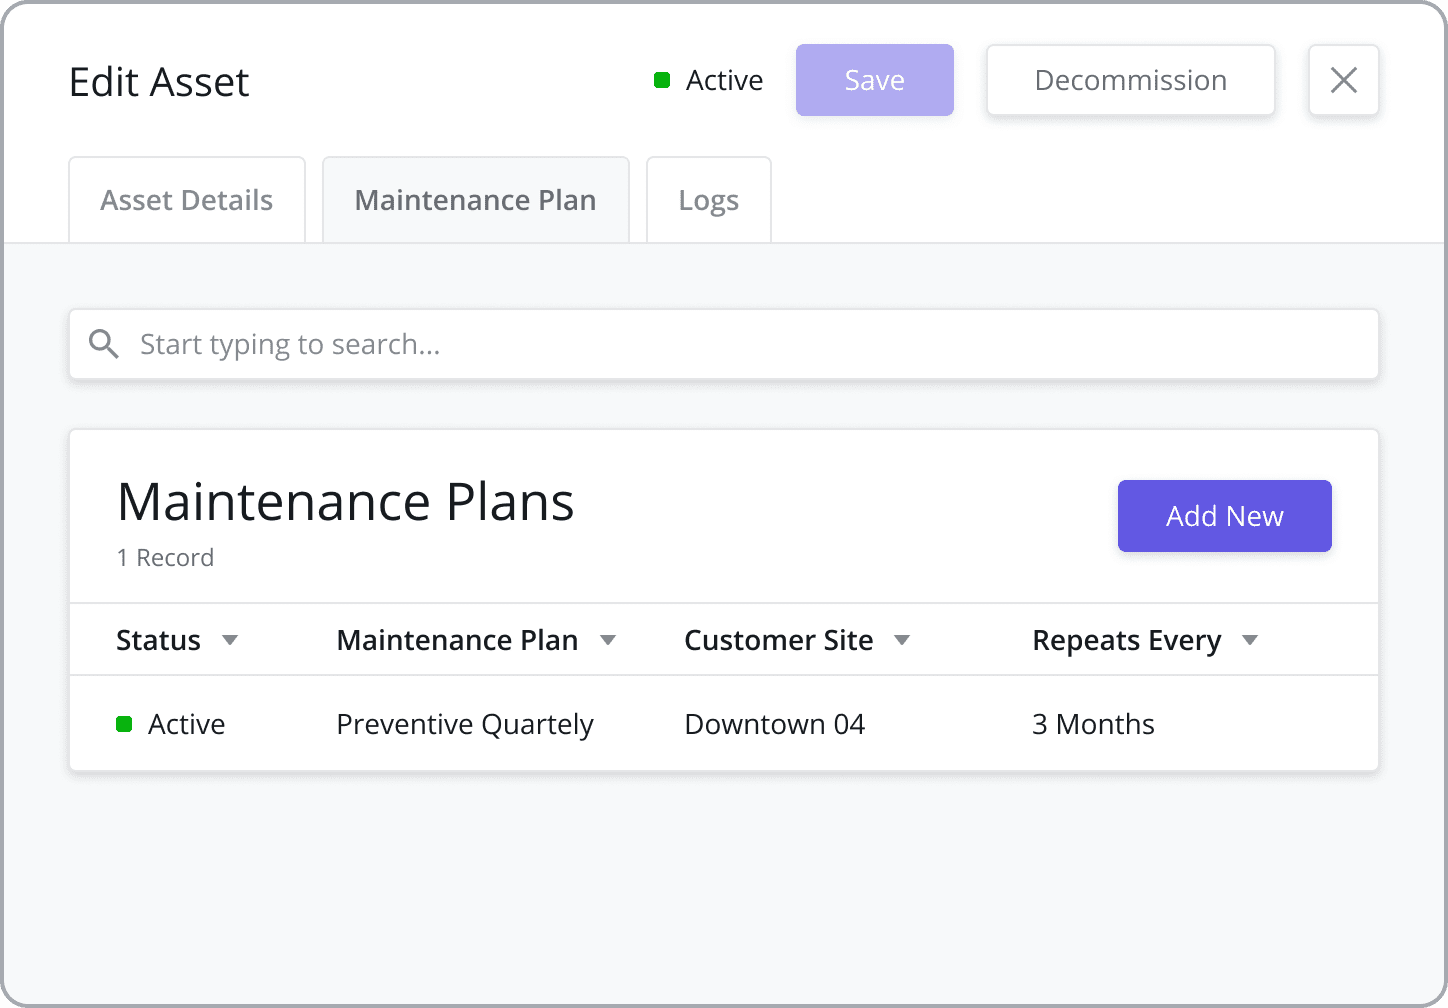
Viewing Asset Maintenance Plans
The Maintenance Plans tab displays a list of any Asset Maintenance Plans associated with the Asset. For more information, navigate to Adding Maintenance Plans to an Asset section below.
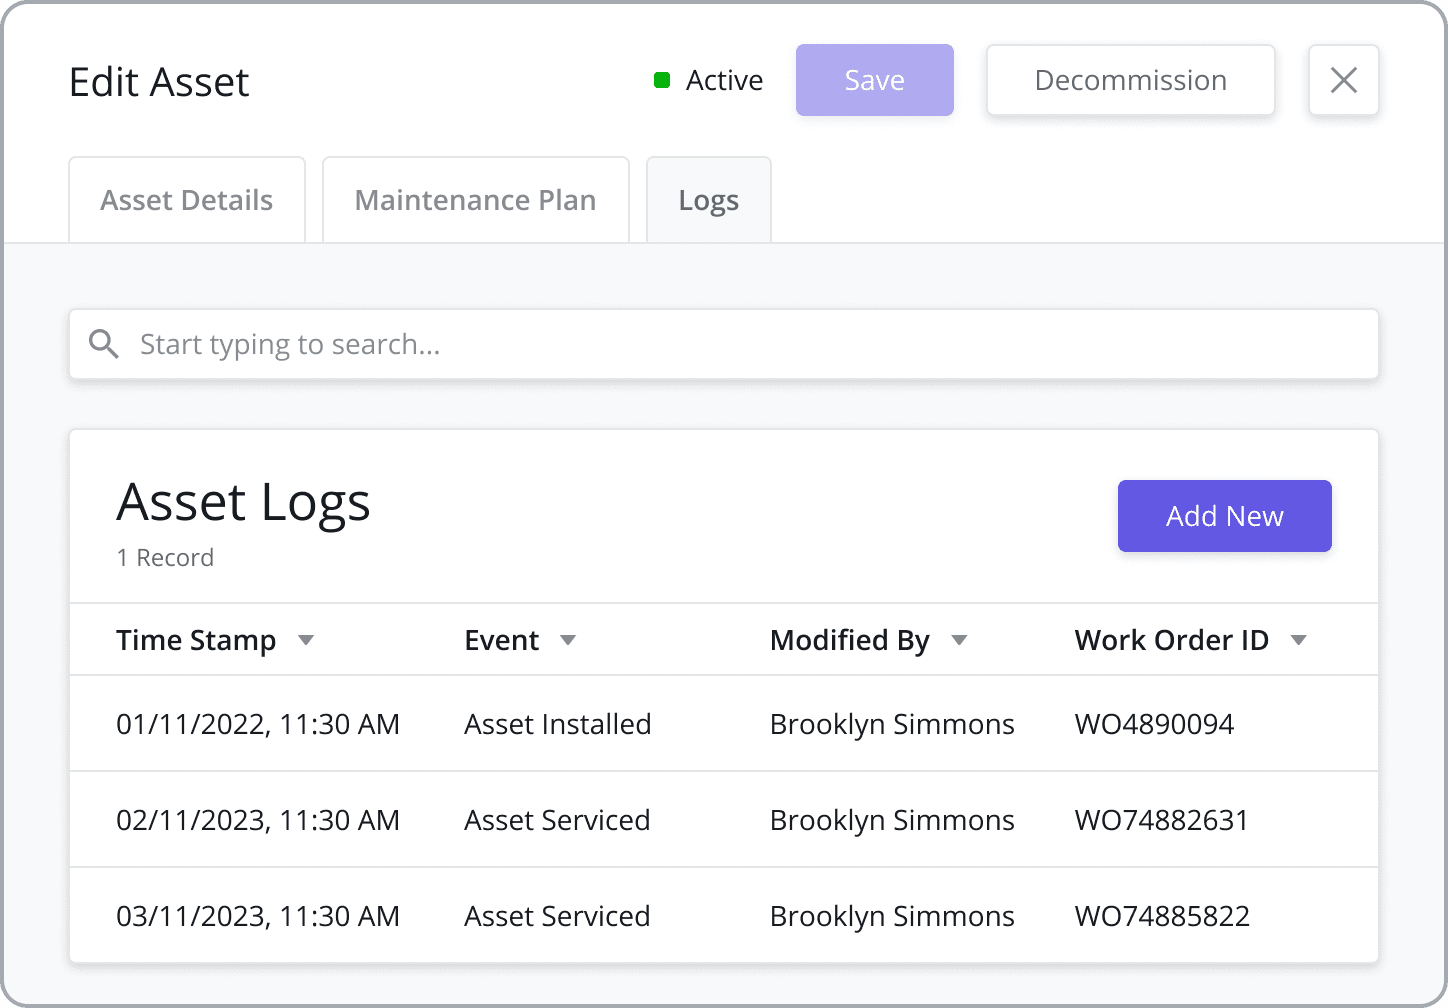
Viewing Asset Logs
The Logs tab displays a list of time-stamped events associated with the Asset, such as the Installation date or any completed service tasks on the Asset. Asset Logs are particularly useful for audit purposes.
Adding Maintenance Plans to an Asset
For many asset-based field service organizations, scheduling maintenance at regular intervals is common. These planned maintenance activities happen at a specific frequency to improve asset life and proactively address any potential issues.
With Zinier’s Maintenance Plans feature, users can create maintenance plans tied to a specific customer asset (and contract) to automate the process of generating work orders at timed intervals.
Maintenance Plans can be added to a customer Asset from the Assets module or within the Contracts module:
To add a Maintenance Plan to an Asset:
Go to the Assets module
Select the Customer Site associated with the Asset you want to add the plan to
Click on the “Create Asset Maintenance Plan” button on the top right of the data grid
Fill in the sidepanel data as described below
Click the “Save” button
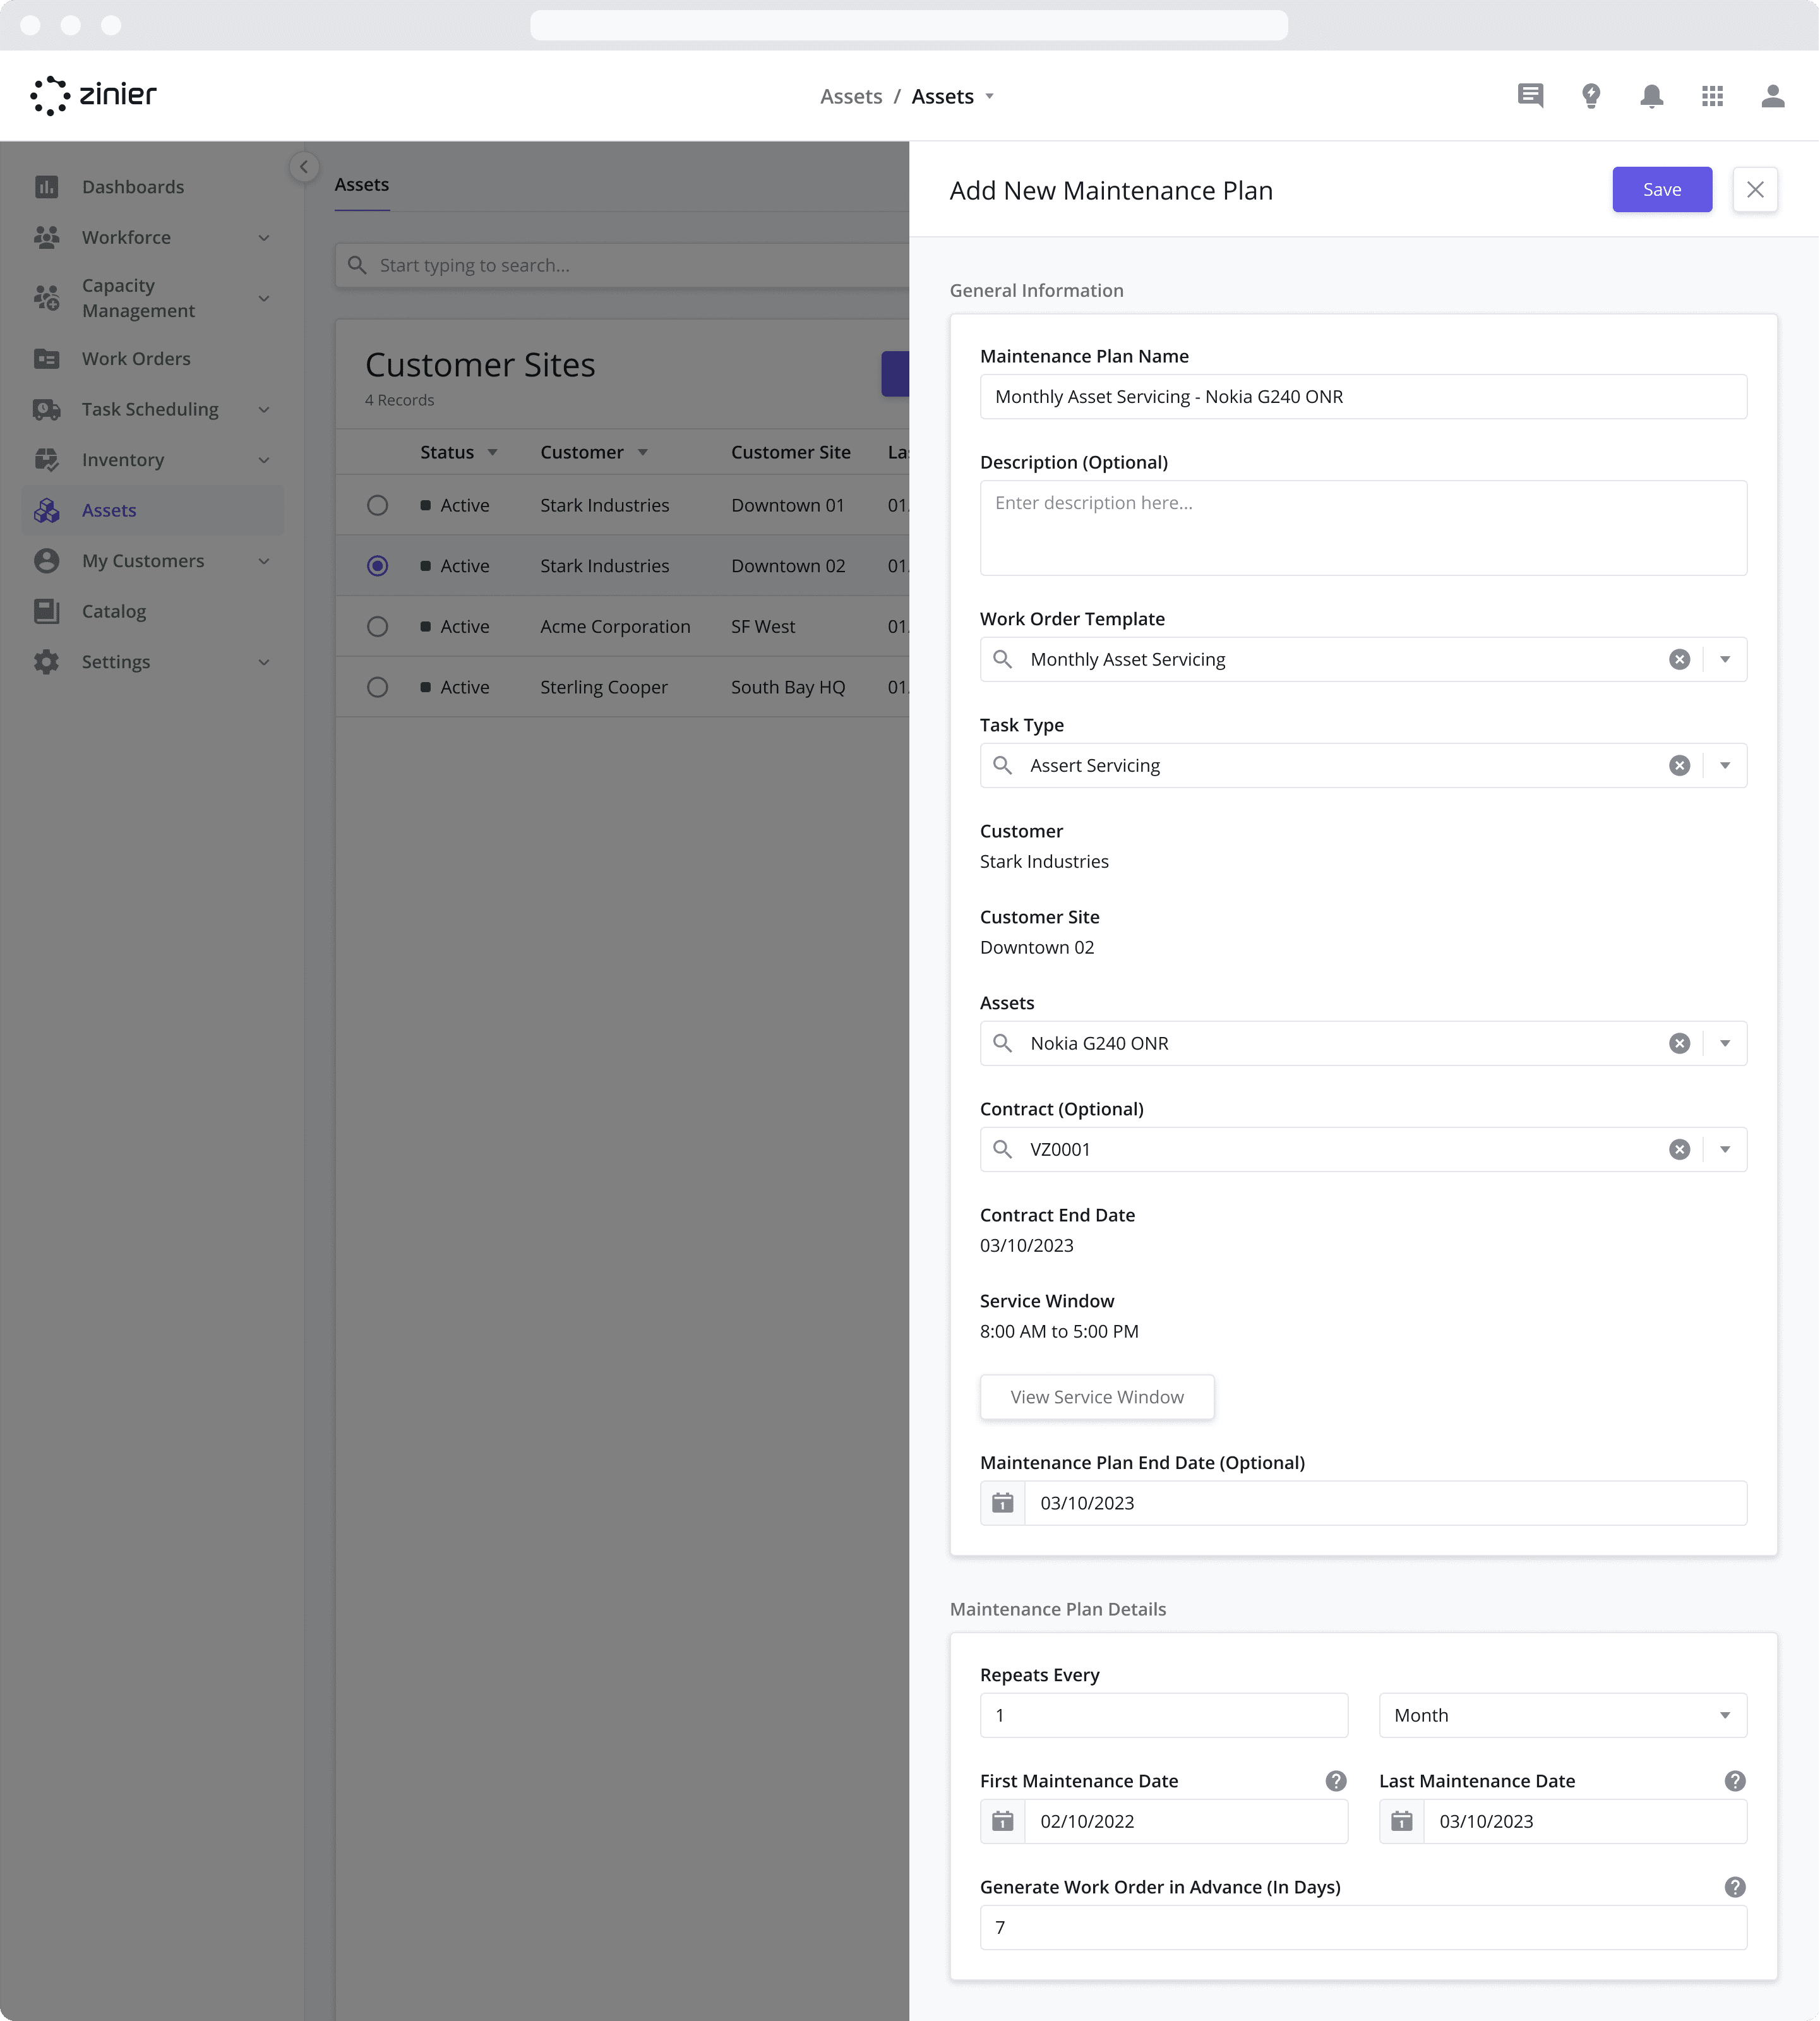
Work Order Template and Task Type
Select the Work Order Template and Task Type that needs to be created for each planned maintenance activity. This is the Work Order / Task Type that will be automatically generated.
Assets
Select the Asset(s) associated with the planned maintenance activity.
Contract (Optional)
Optionally select a Contract to tie the contract’s Service Window to the Work Orders generated by the maintenance plan. This dropdown menu will only show Contracts associated with the Customer tied to the Customer Site on which you have created the maintenance plan.
Maintenance Plan End Date (Optional)
Select an end date for the plan.
Enter the Plan Details and Timing
To explain the plan details fields, let’s assume the following example:
You’d like to perform preventative maintenance on an asset every 1 month;
You’d like the first servicing to occur 1 month after the asset was installed which occurred on 01/10/2022
You’d like the final servicing to occur on 03/10/2023
You’d like to have the work orders created 7 days in advance of each servicing to allow your dispatchers time to schedule the servicing with a technician.
To create this plan, I would enter the following information into the Maintenance Plan Details fields:
Repeats Every = 1; dropdown = Month
First Maintenance Date = 02/10/2022
Last Maintenance Date = 03/10/2023
Generate Work Order in Advance (In Days) = 7
Adding Assets to the Parts and Assets Catalog
To add an Asset to a Customer Site, the item must first be added to the catalog which contains information about the items cost, manufacturer, stock unit type, etc. To do so, follow the steps below:
Go to the Catalog > Parts and Assets module
Click on the “Add New” button on the top right of the data grid
Fill in the sidepanel data
Click the “Save” button
For more information on adding items to the Catalog, navigate to the Parts and Assets Catalog page.