Capacity Calendar View
The Calendar view module provides a visual representation of your workforce capacity so you can better understand your technicians' availability on a daily and weekly basis. Organized by Region, technician's working hours (represented by Shifts), non-working hours, and assigned tasks are all shown on the Calendar.
In addition to centralizing all the information about your workforce capacity, the Calendar View also allows you to take the following actions so you can better meet anticipated or actual demand:
Temporarily adjust your Technicians' working hours and/or move them to other Regions by adding Shift Overrides
Permanently adjust your Technicians' working hours by updating their default Shifts
Add Overtime (in bulk to multiple Technicians)
Add Breaks (in bulk to multiple Technicians)
Calendar View and Work Groups
UPDATED (24.4)
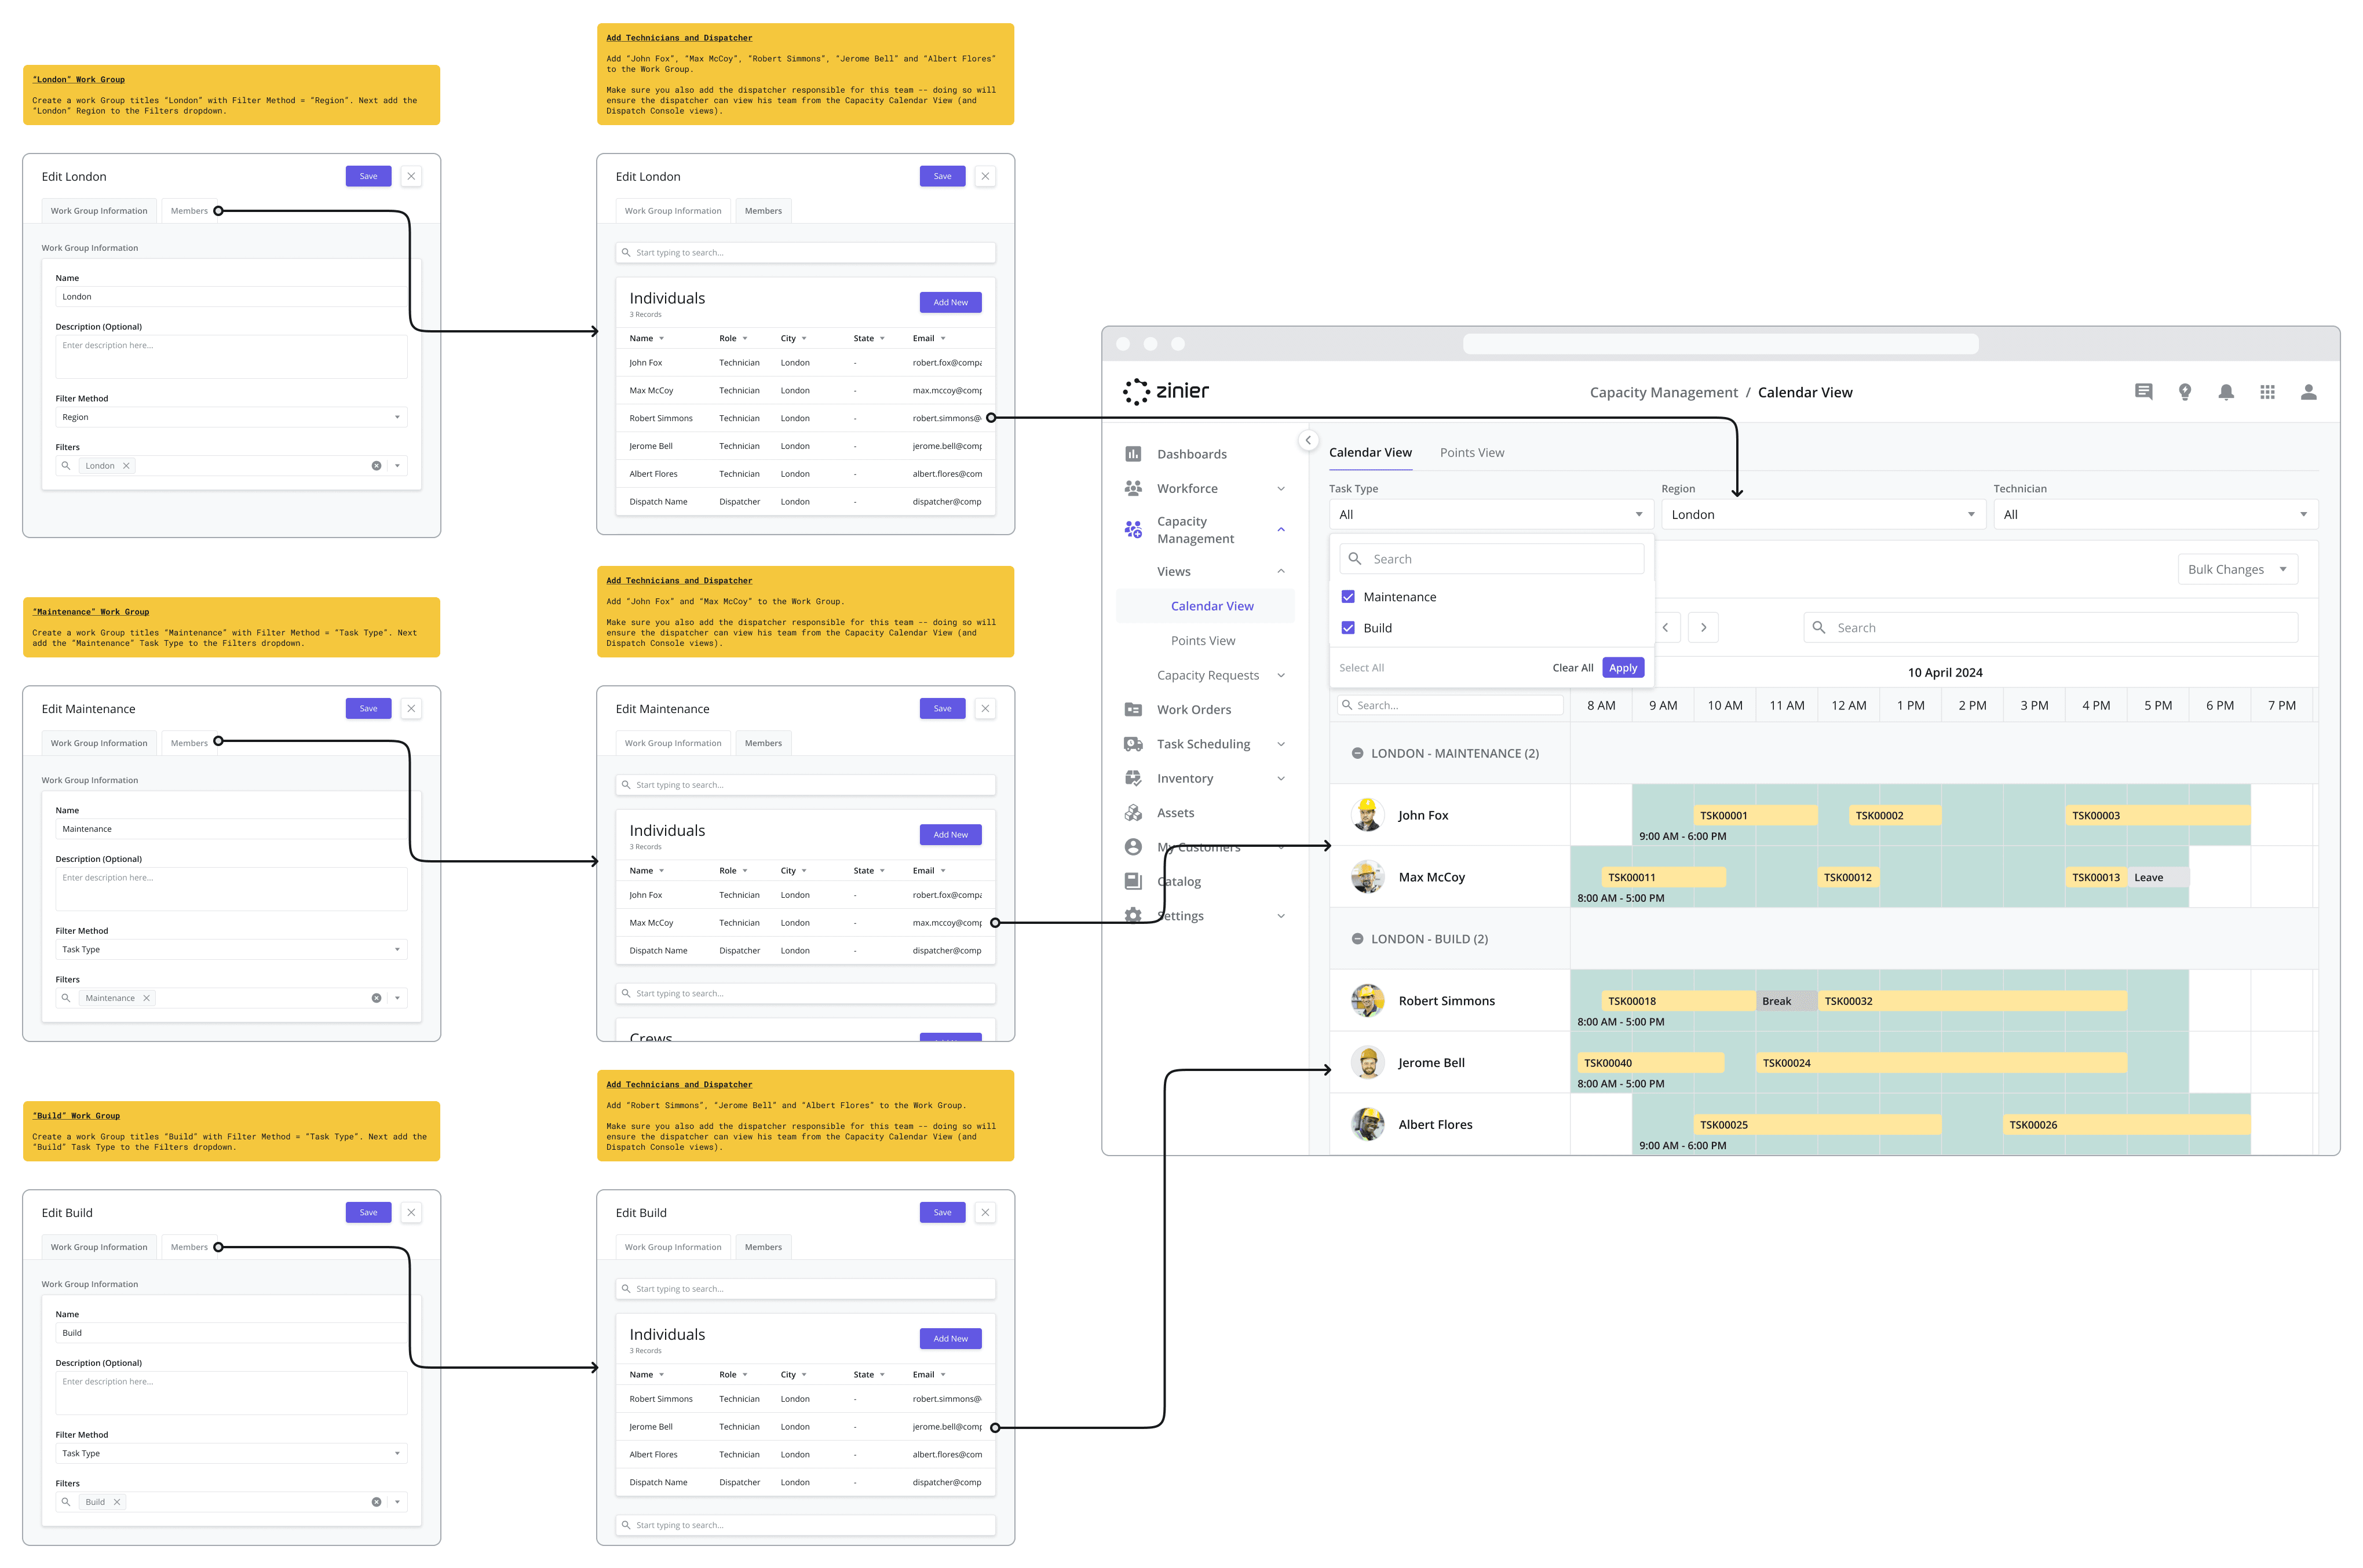
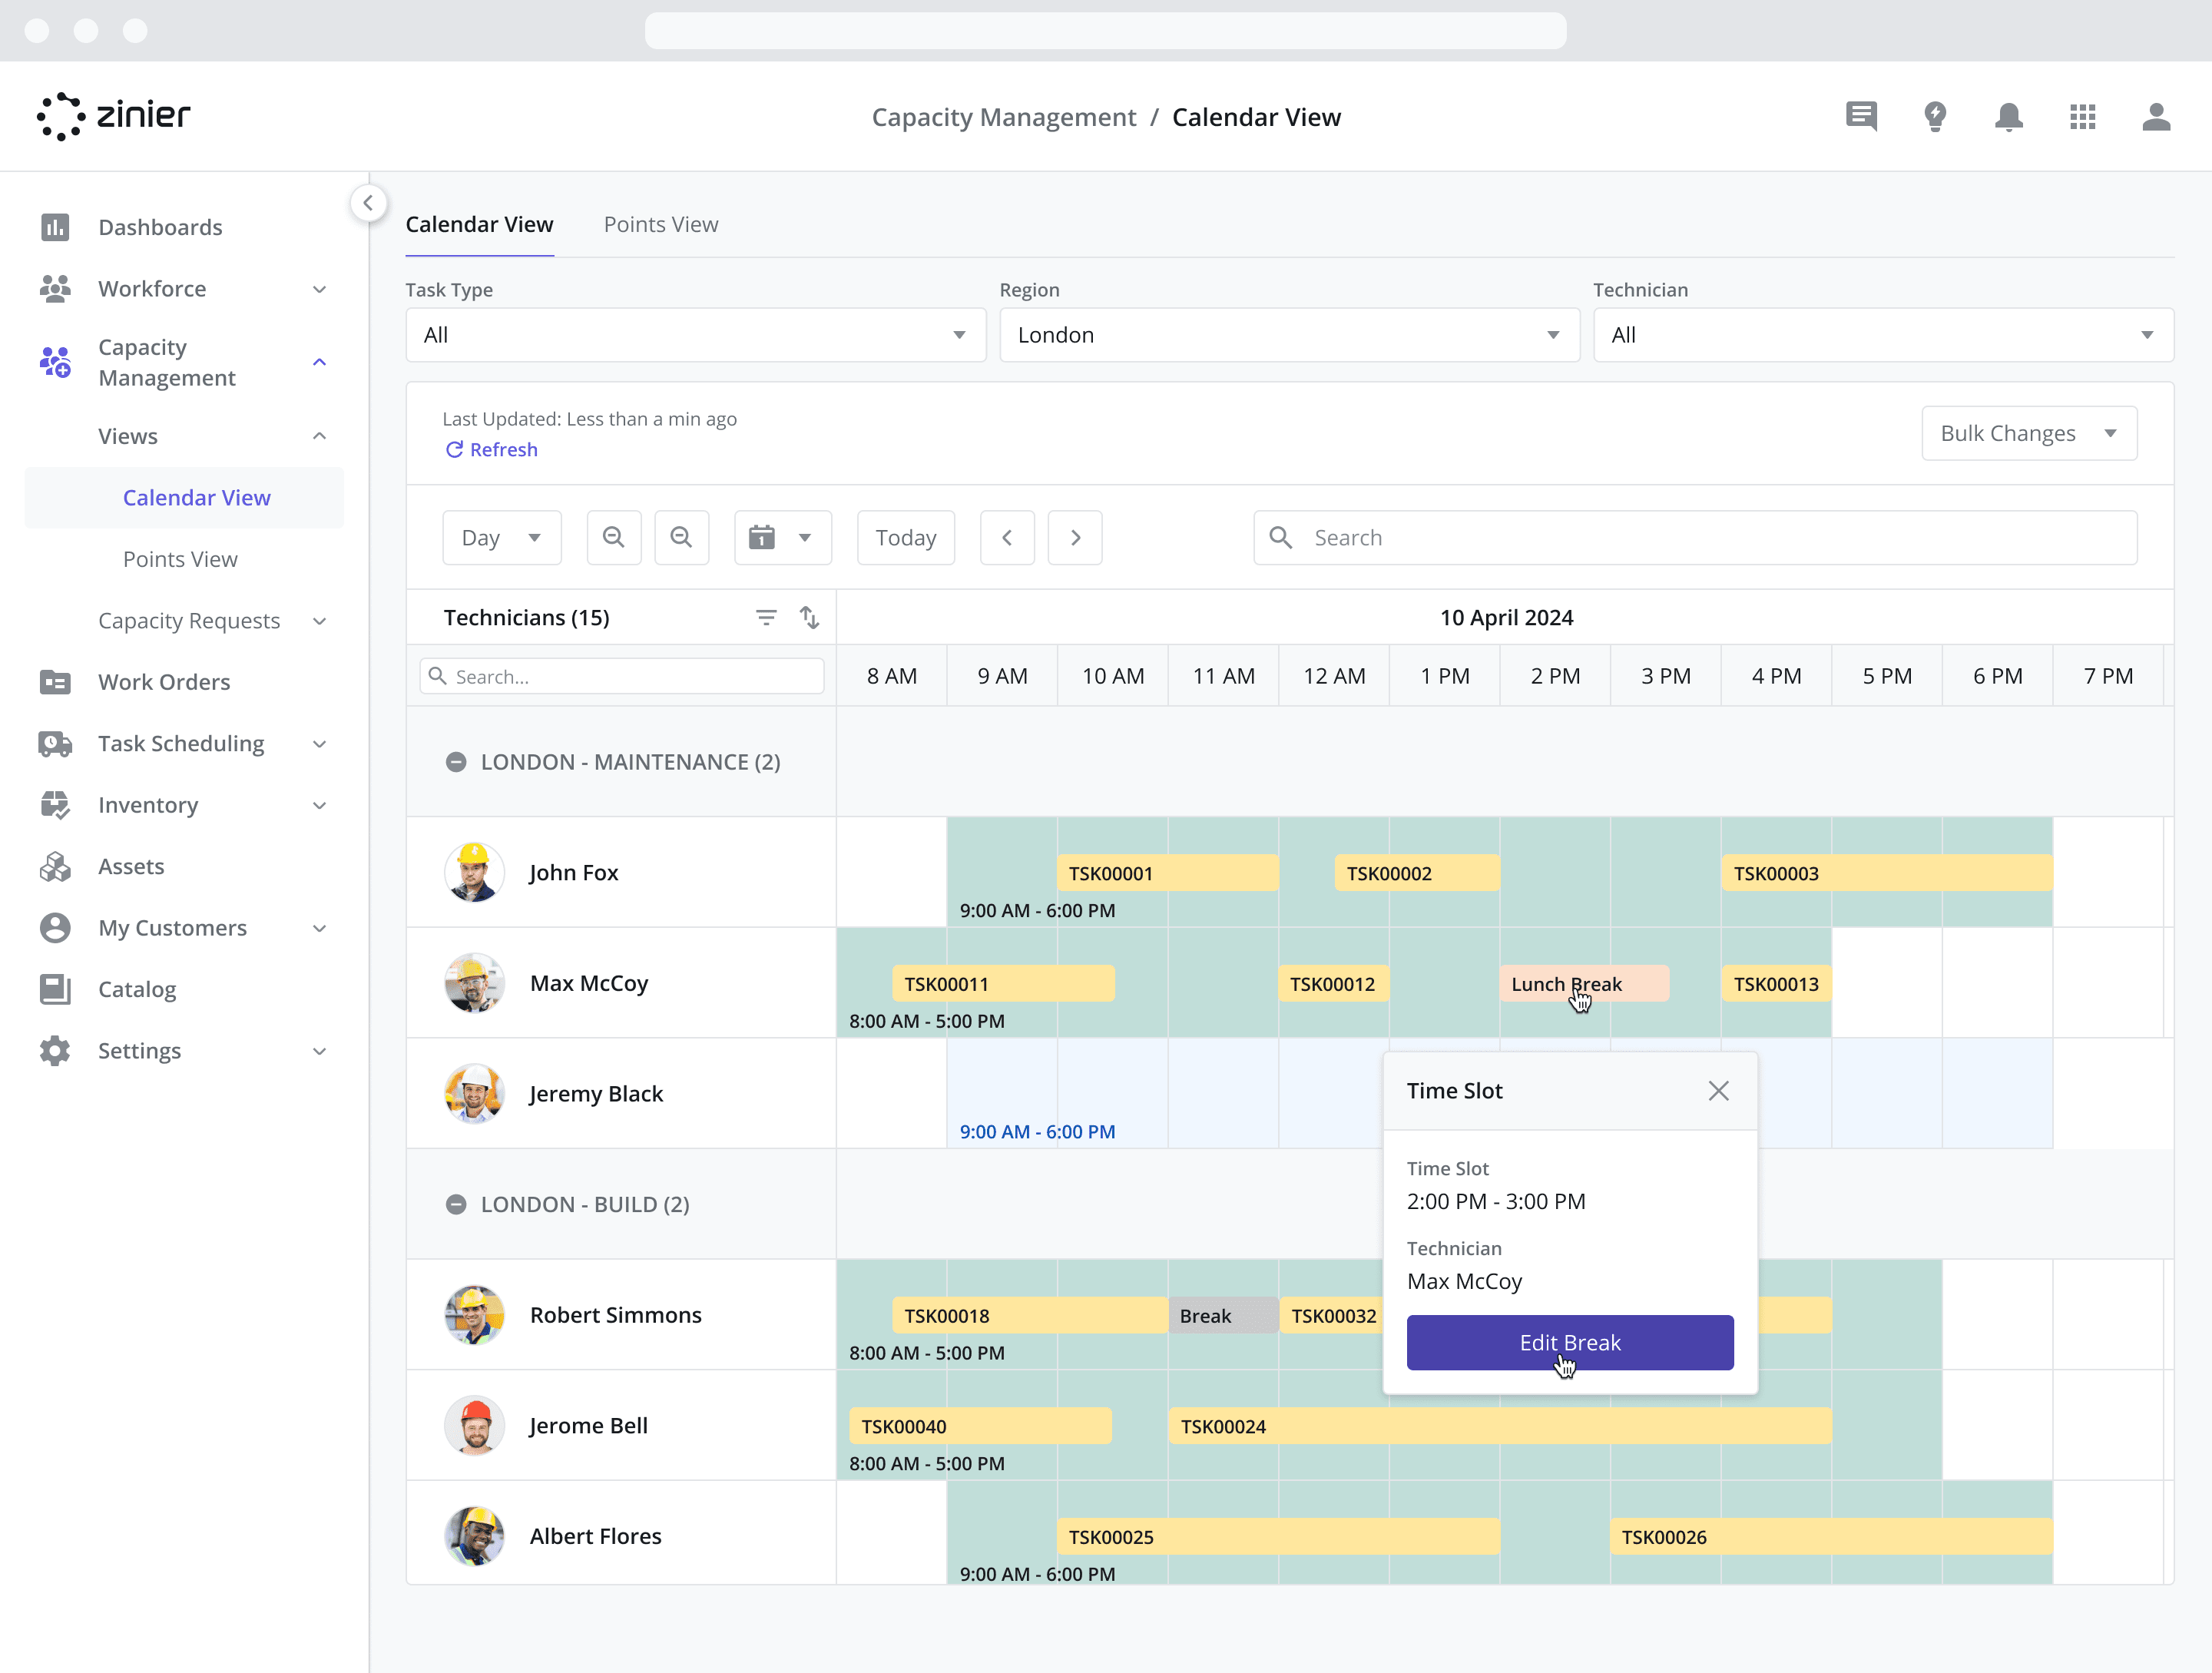
Work Groups play a critical role in determining Capacity and should be configured before using the Capacity modules. In the example on the screenshot above, you can see 3 groups of technicians: London/ Maintenance, London/ Build, and London/ Repair. What you are seeing is Region / Task Type pairings, where the Region = London and the different Task Types associated with technicians in this region are Maintenance, Build and Repair. So how did we get to this view? How was this originally configured? You guessed: Work Groups were used to create these groupings. Here’s how it works:
Workforce: Let’s assume I have a workforce consisting of 5 technicians as shown above, all belonging to the London Region. Let’s further assume I have 2 Task Types as shown above (Maintenance and Build).
Techs and Task Types:
Maintenance Task Types: Robert Fox and Max McCoy are capable of doing Maintenance Task Types
Build Task Types: Robert Simmons, Jerome Bell, and Albert Flores are capable of doing Build Task Types
Assigning by Region: To assign your workforce to a Region, I would create 1 Work Group, filtered by the London Region, and then assign all 5 technicians to that Work Group. This links the technicians to the London Region. Make sure you also add the dispatcher responsible for this Region -- doing so will ensure the dispatcher can view his team from the Capacity Calendar View (and Dispatch Console views).
Assigning by Task Type: To assign your workforce to a Task Type, I would create 2 different Work Groups, each filtered by the Task Types above, and then assign the appropriate technicians to each Task Type. This links the technicians to those Task Types. Make sure you also add the dispatchers responsible for these Task Types - doing so will ensure the dispatchers can view their teams from the Capacity Calendar View (and Dispatch Console views).
There you have it – Work Groups have now been used to organize your workforce into the different capacity groups as shown in the Calendar View.
For more information on configuring Work Groups, visit the Work Groups page. For more information on how to organize your Work Groups to work effectively with Capacity Management, visit the Capacity Management Setup Guide page.
Filter the List of Tasks and Technicians
Use filters at the top of the screen to display specific tasks and technicians. The Calendar View comes with the following filters:
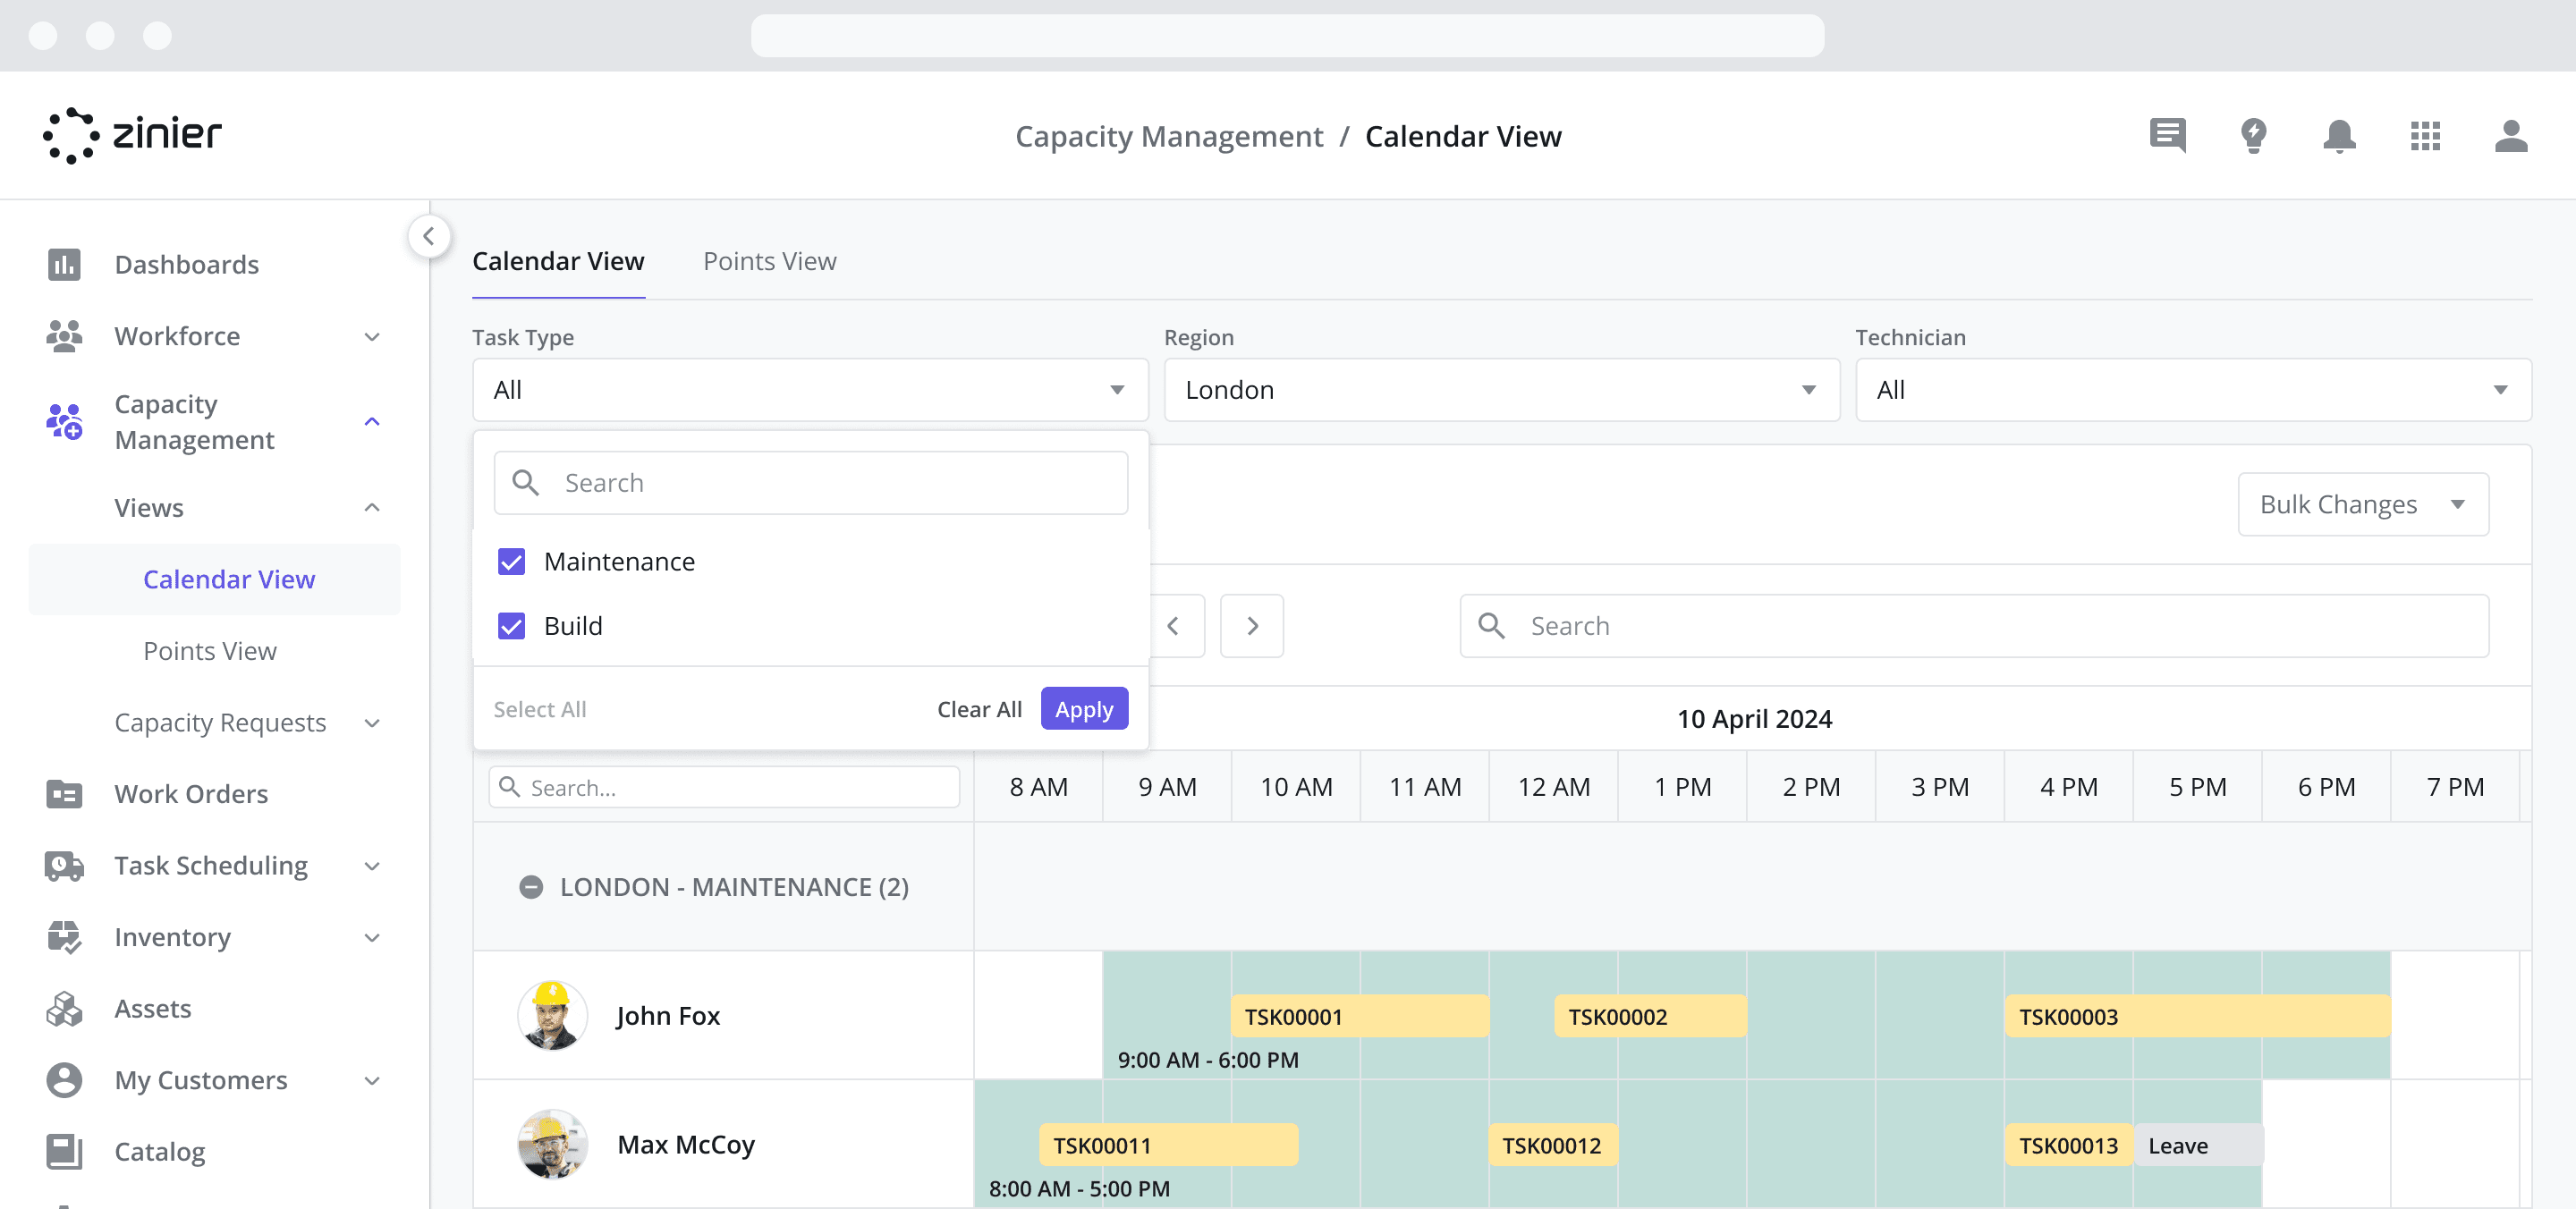
Task Type: Allows you to filter by Work Groups that use Task Type as the filter method. If selected, only technicians that have been added to the Work Group will be displayed in the Calendar.
Regions: Allows you to filter by Work Groups that use Region as the filter method. If selected, only the technicians that have been added to the Work Group will be displayed in the Calendar.
Technician: Allows you to filter by Technician. If selected, only the technicians you select will be displayed in the Calendar.
Filter Method for Task Types and Regions
The Task Type and Region filters are actually based on Work Groups – the dropdown menus are populated by Work Groups that have been configured using Task Type and Region as the filter methods respectively.
Using Shift Overrides to Temporarily Adjust Capacity
UPDATED (24.4)
What happens when you face a sudden surge in demand or a technician in your region falls sick? When the unexpected happens, operators need to be able to shift resources to meet the demand and keep their end customers happy. To meet these challenges, Shift Overrides allow you to temporarily shift the capacity of your workforce between Regions / Task Types so they can pick up additional work should demand or capacity change.
To accomplish this, Shift Overrides use the concept of a “temporary shift” which overrides the default Shift, Region, and Task Types (that a technician can perform) associated with a technician for a set period. Outside of the Shift Override timeframe, the Technician will revert to their default Shift and Region.
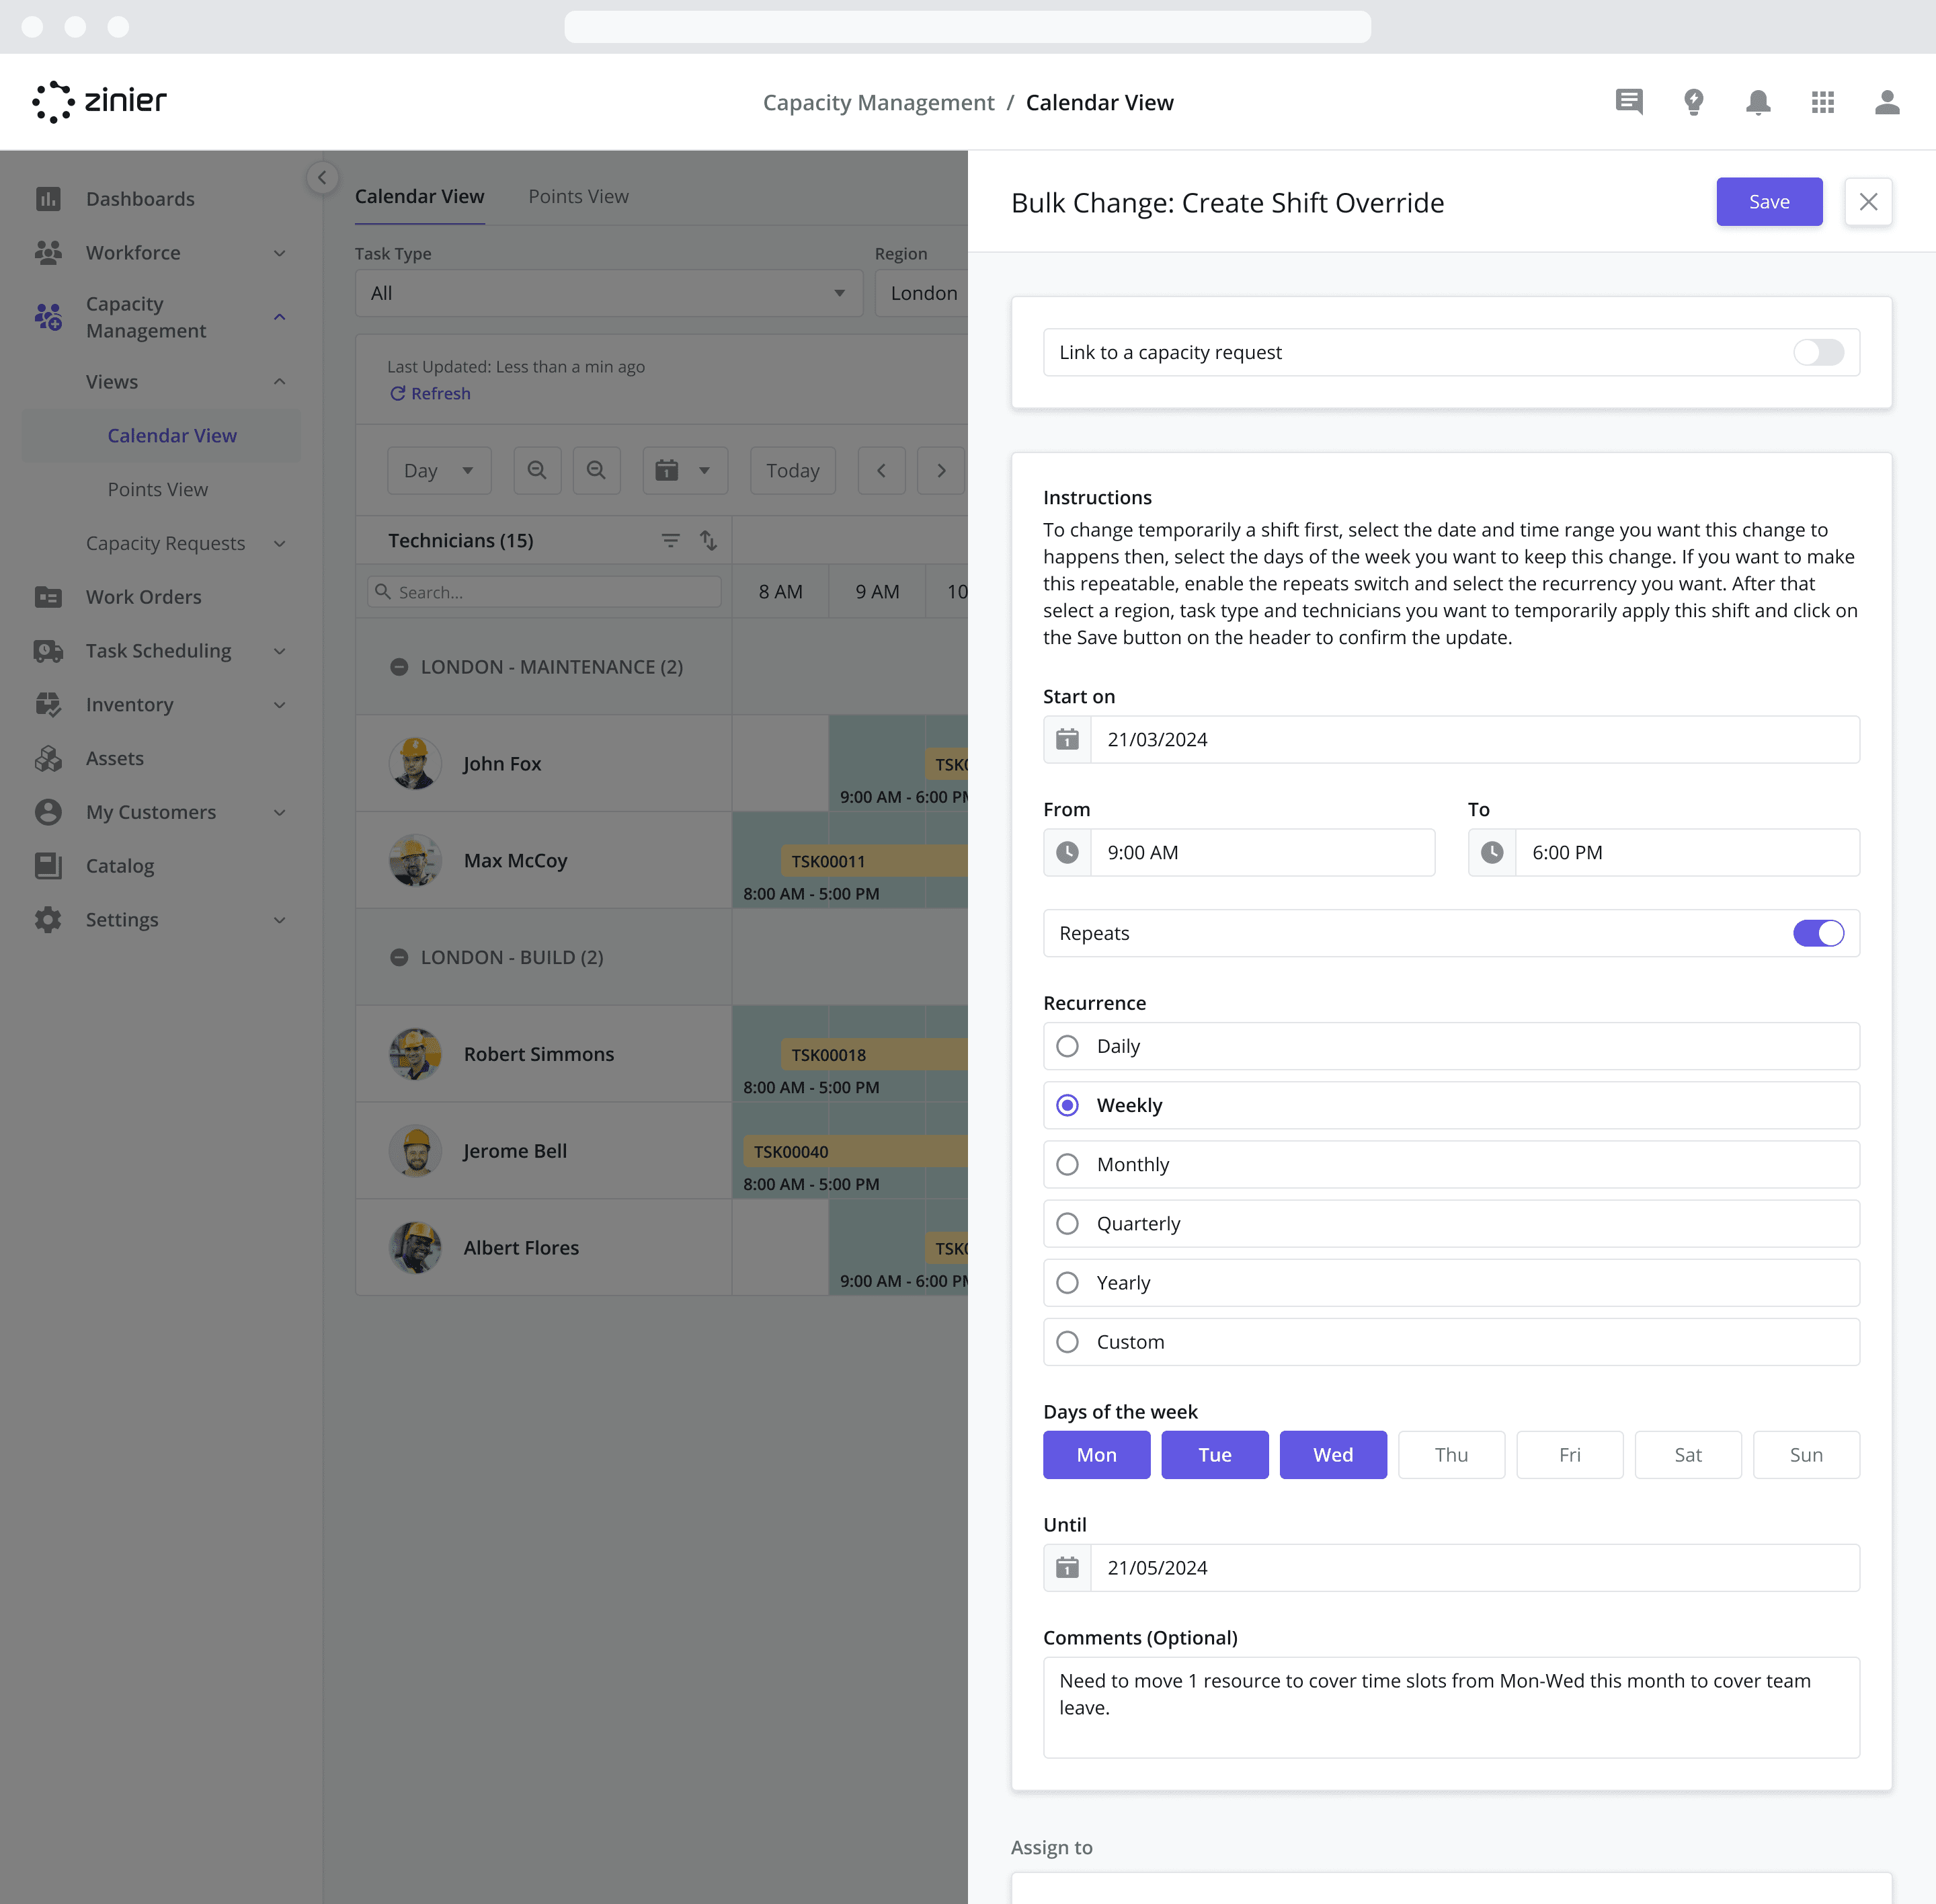
Creating Shift Overrides (in bulk)
To create a Shift Override in bulk, follow the steps below:
Step 1: Define the Shift Override time frame
Click on the “Bulk Actions” dropdown at the top of the datagrid and select “Create Shift Override”.
Decide whether or not to Link to a capacity request:
If Enabled: You will have the option to select the Capacity Request Id you wish to associate the Override with. Once selected, the form will display the “Number of Technicians Required based on Request” so that you know how many technicians to select in Step 2 below. Essentially, the Shift Override added is then used to “fulfill” the Capacity Request.
If Disabled: Nothing is required – the Shift Override will not be associated with a Capacity Request.
Select the Start On date, which is the date you wish the Shift Override to start.
Using the From dropdown, select the starting time for the Shift Override. This time is applied to the Start On date.
Using the To dropdown, select the ending time for the Shift Override. This time is applied to the Start On date.
To repeat the Shift Override so that it recurs on more than one day, enable the “Repeats” toggle and define the recurrence:
Define how often the override will repeat (Daily, Weekly, Monthly, etc)
Or, create a custom recurrence by entering the time unit and a number to define how often it will occur.
Using the Until dropdown, enter the ending date for the recurring Shift Override. After this date, the Technician(s) will revert to their default Shift.
Add and comments you wish to convey about the override to the Comments (Optional) field.
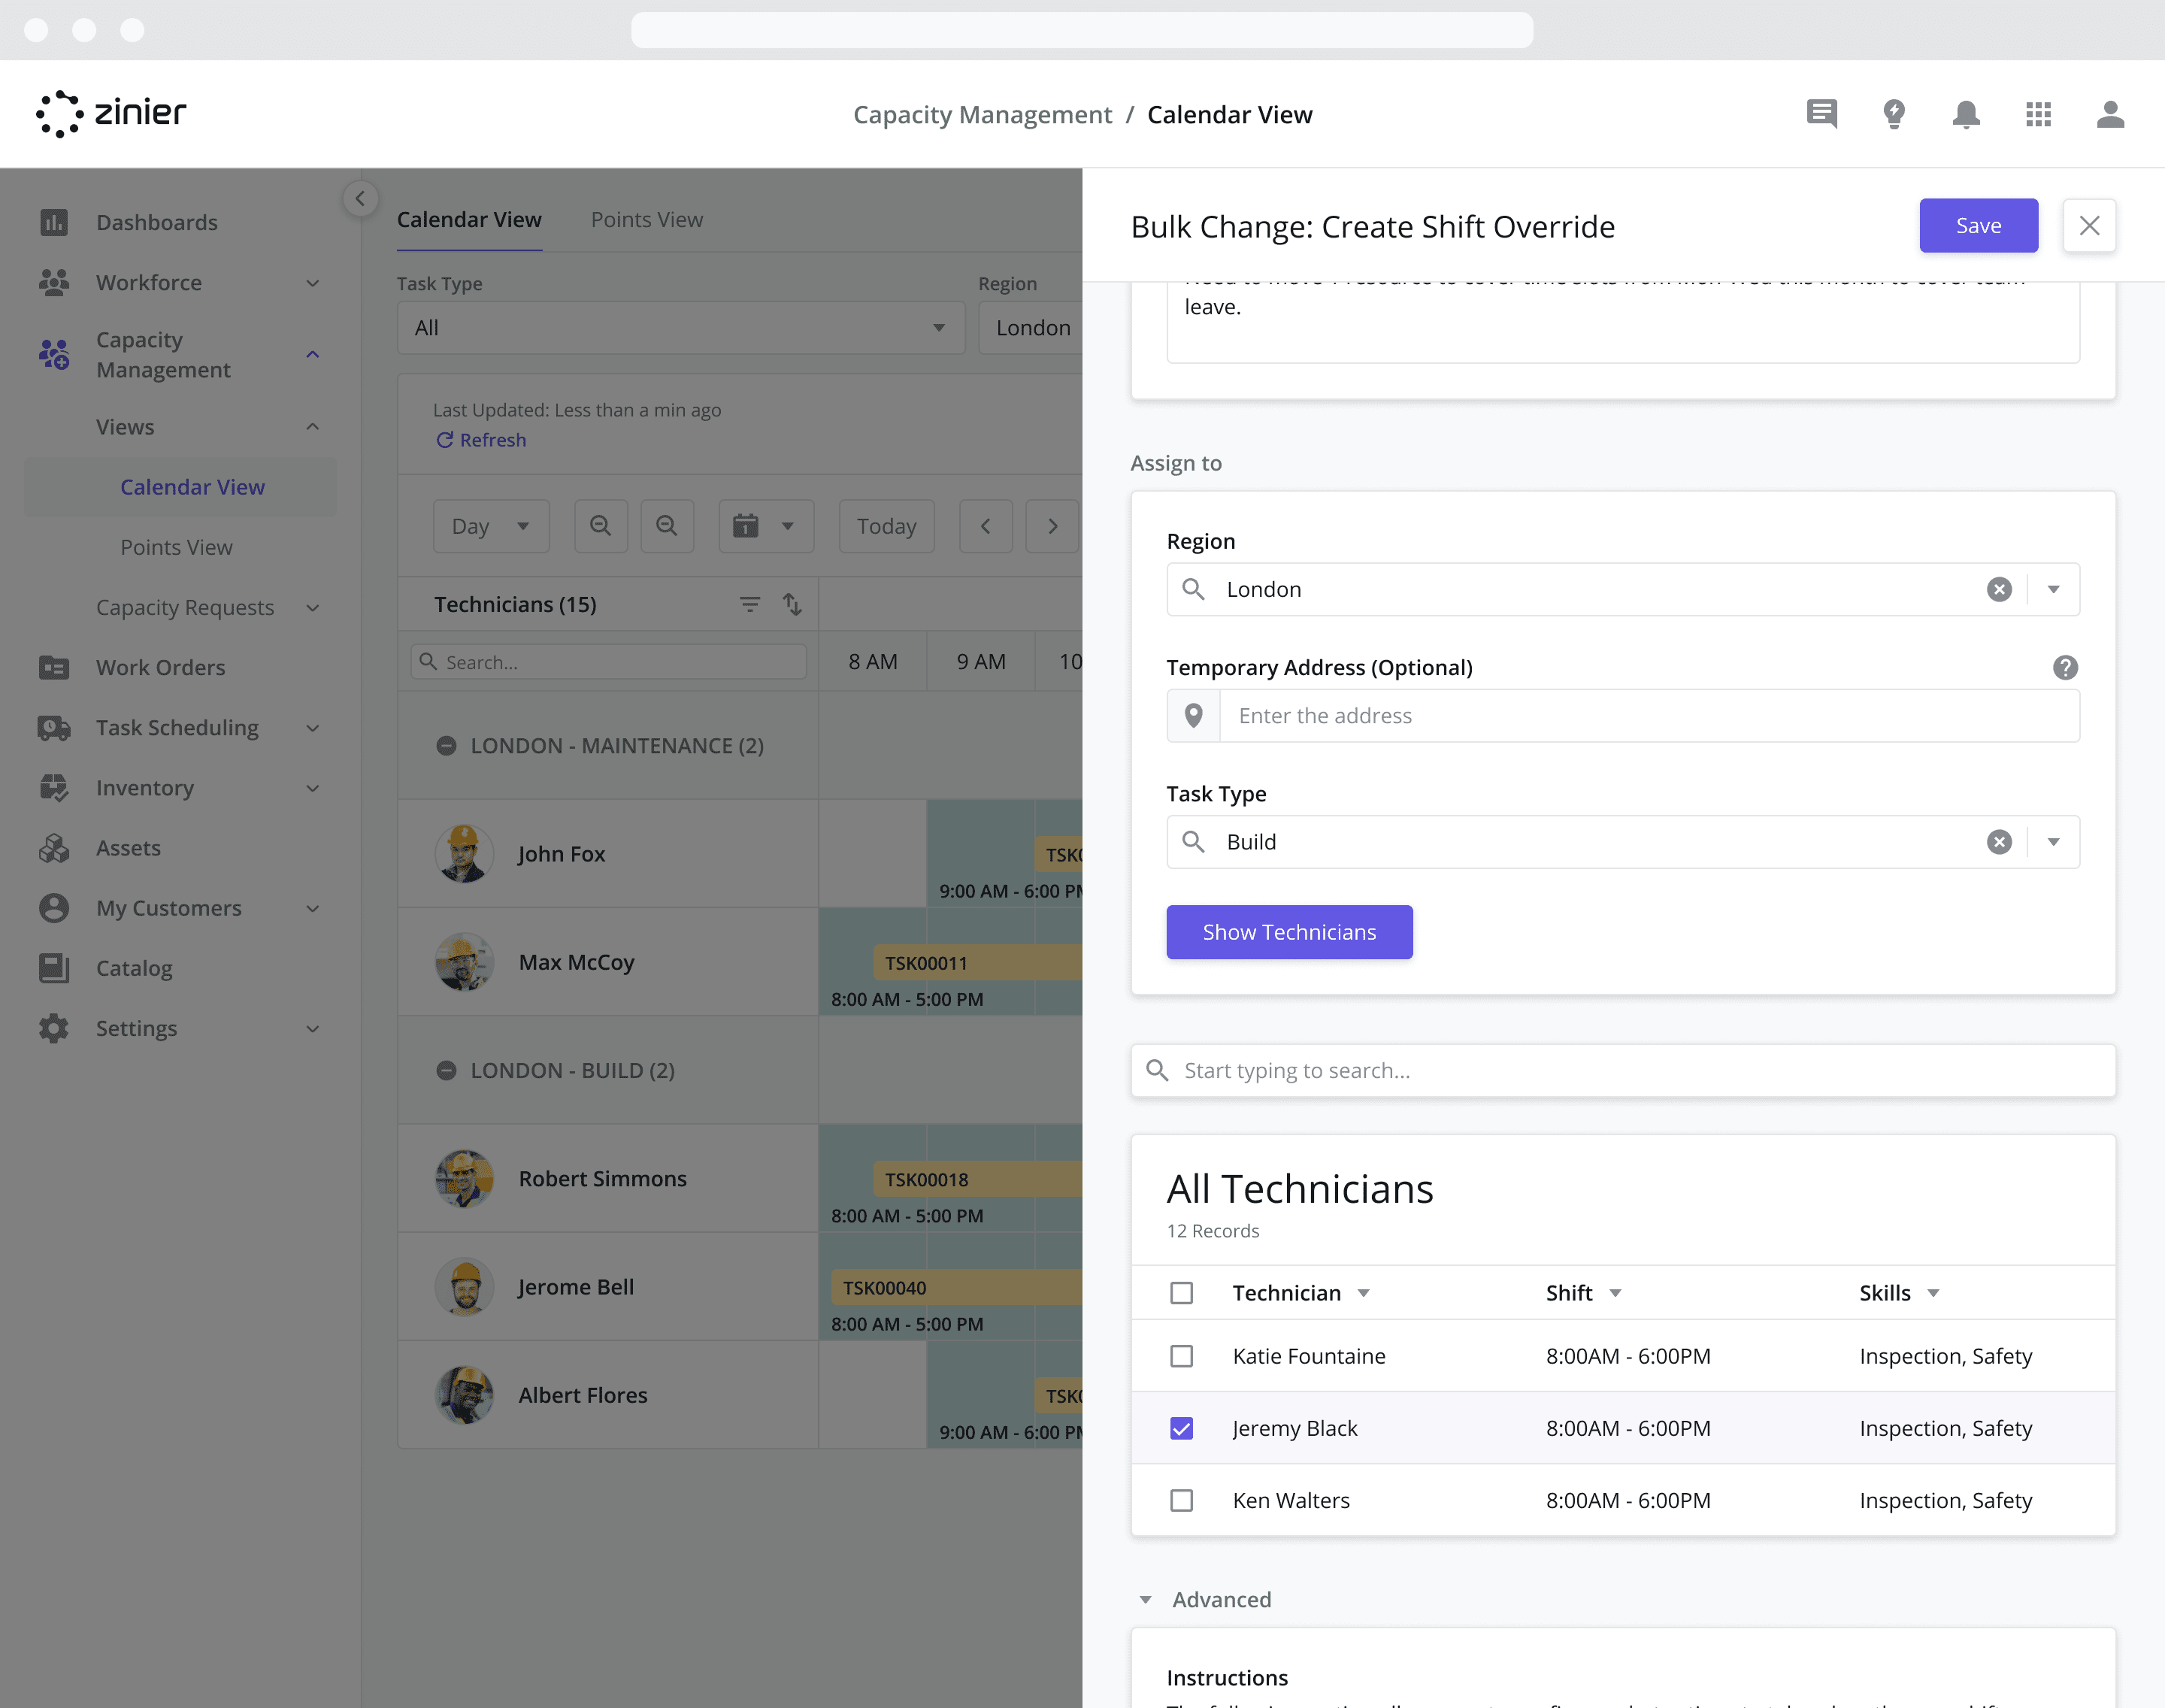
Step 2: Assign the Shift Override to technicians
Select the Region(s) that you’d like to assign the technicians to during the Shift Override. This will move the Technician temporarily to the Work Group associated with the selected Region(s).
Select the Task Type(s) that you’d like to assign the technicians to during the Shift Override. This will move the Technician temporarily to the Work Group associated with the selected Task Type(s).
Select a Temporary Address (Optional) if needed. This is useful if a technician is assigned to a distant region and would be starting work from a different home address. The Temporary Address will be considered as a starting point (the technician’s home base) during Scheduling and Dispatch.
Click the Show Relevant Technicians button to show a list of technicians relevant to the query.
Select the Technicians you’d like the Shift Override applied to from the list.
Click the Save button to apply the changes.
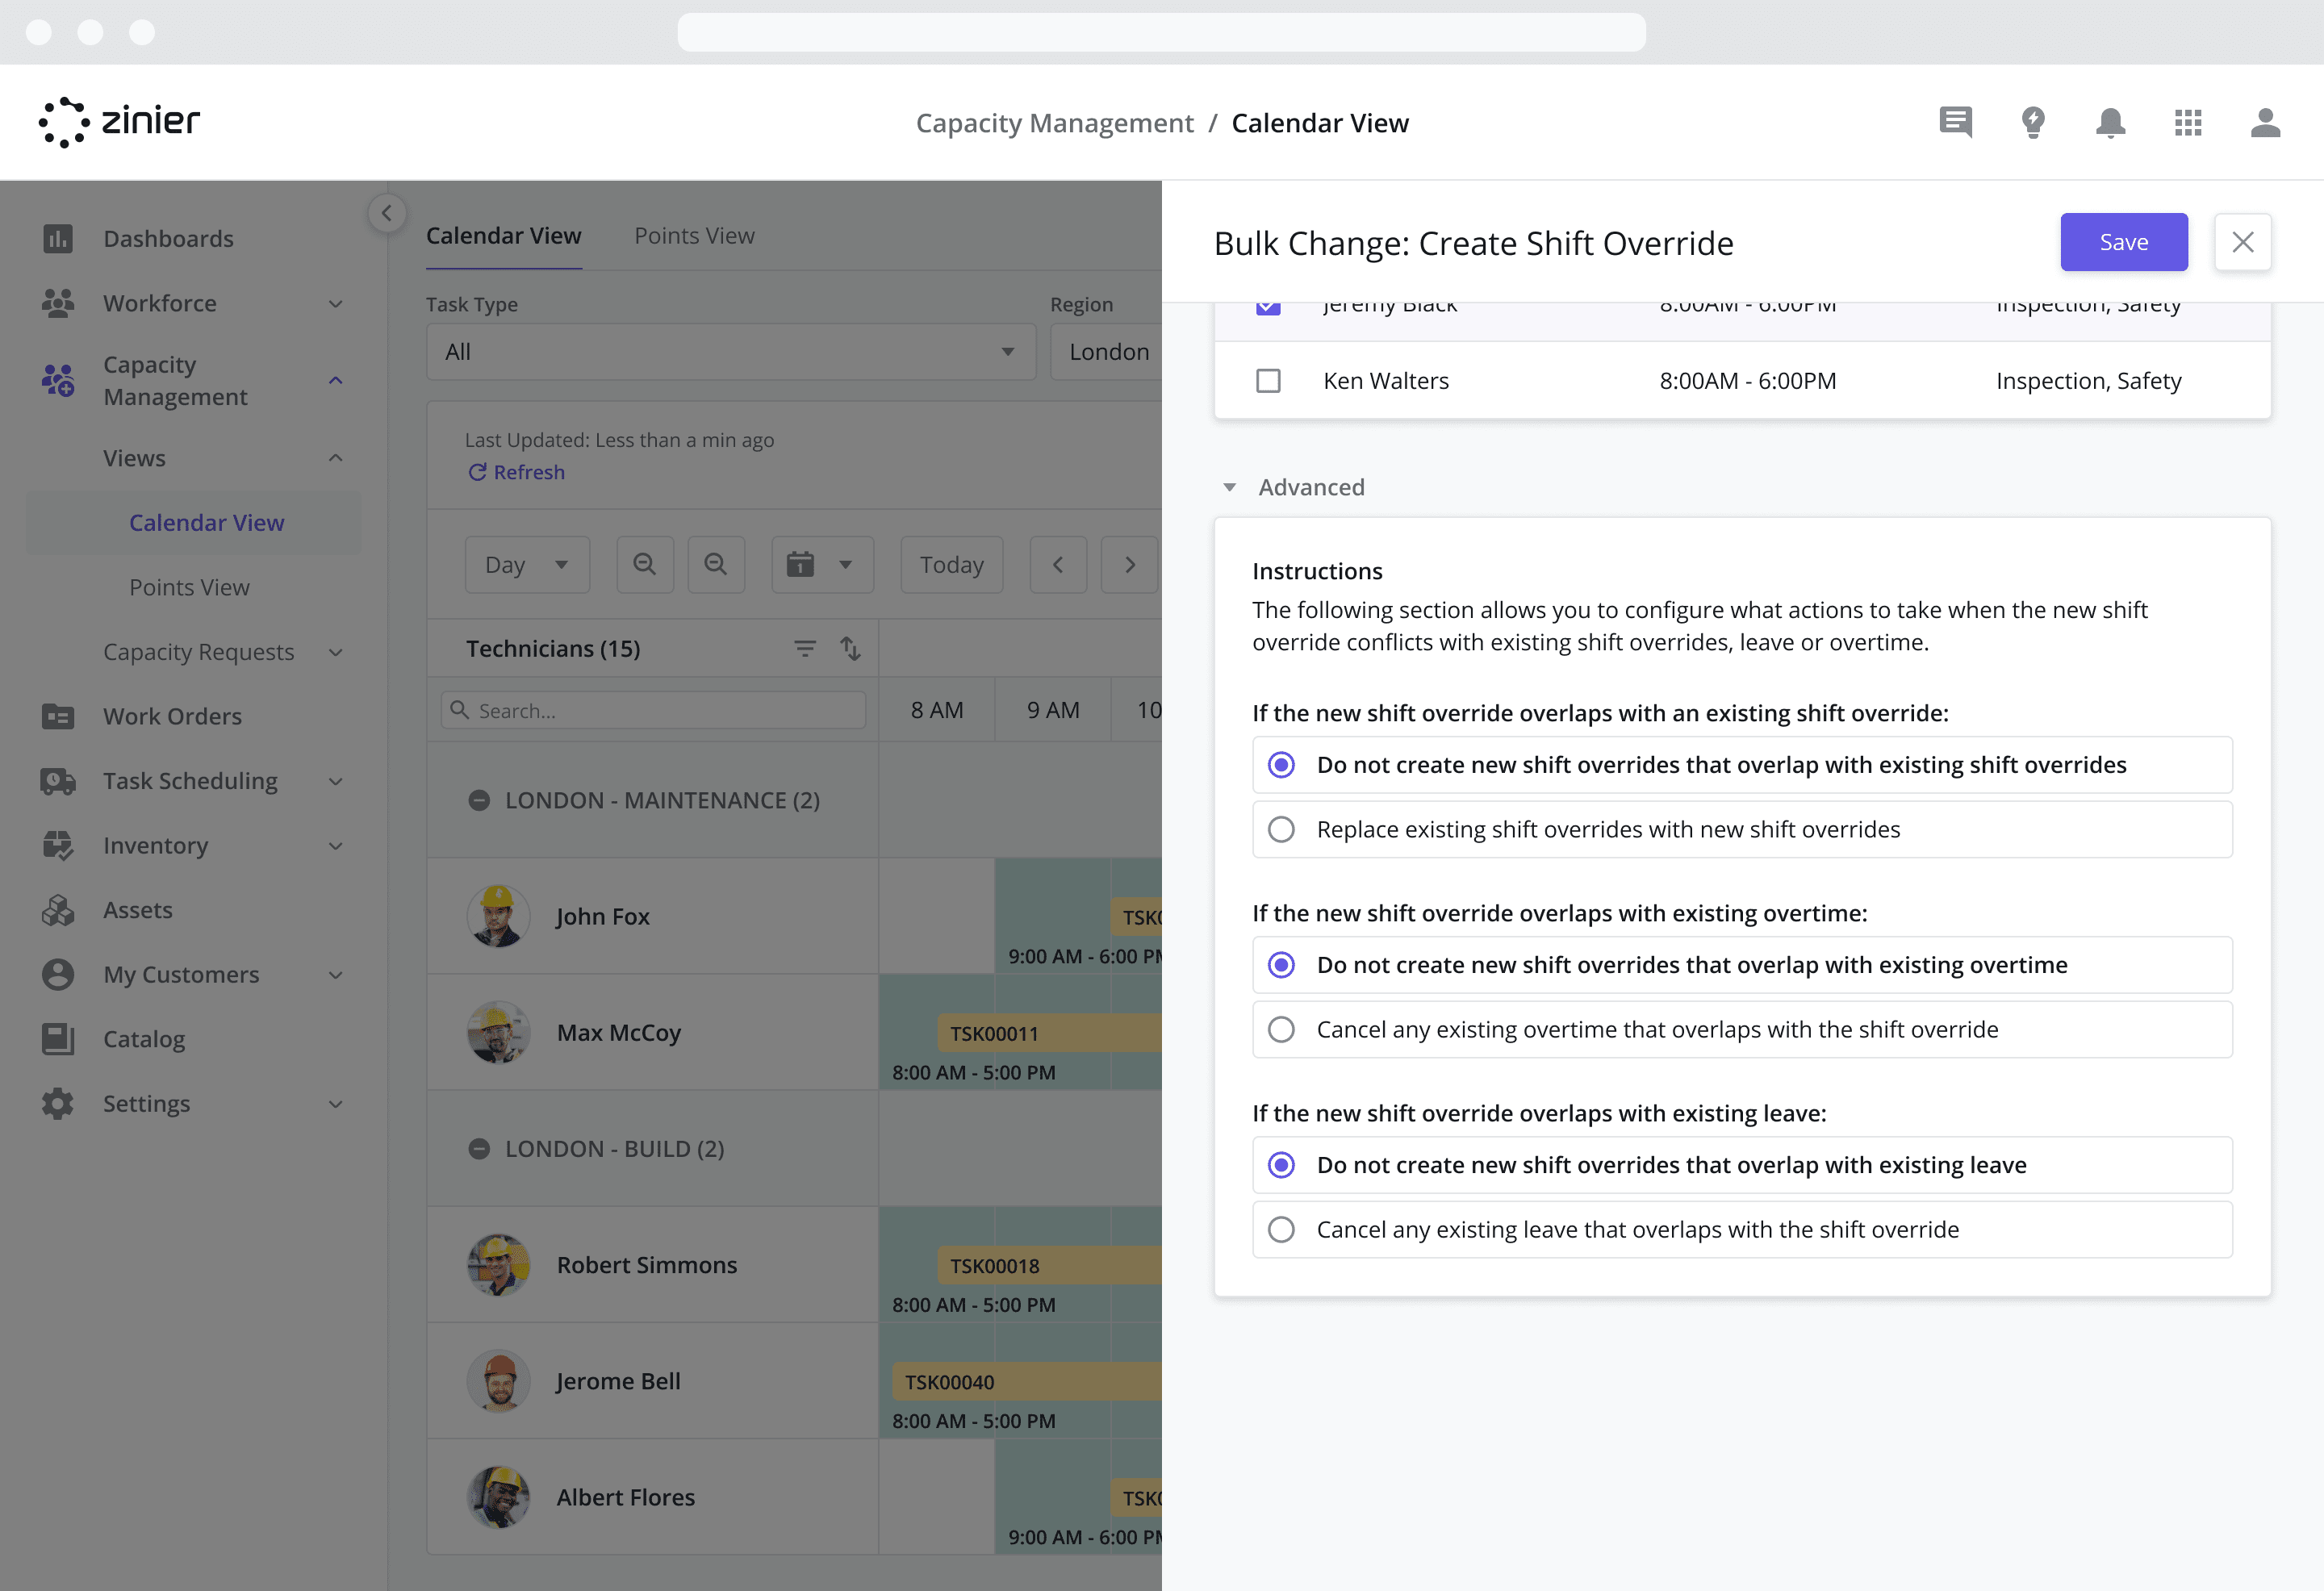
Step 3: (Advanced) Define how to manage conflicts
Creating a Shift Override can at times overlap with existing Shift Overrides, existing Overtime records and existing Leave records. The Advanced section allows you to define how to manage such conflicts:
Decide what to do If the new shift override overlaps with an existing shift override. Here you have two options:
Do not create new shift overrides that overlap with existing shift overrides
Replace existing shift overrides with new shift overrides
Decide what to do If the new shift override overlaps with existing overtime. Here you have two options:
Do not create new shift overrides that overlap with existing overtime
Cancel any existing overtime that overlaps with the shift override
Decide what to do If the new shift override overlaps with existing leave. Here you have two options:
Do not create new shift overrides that overlap with existing leave
Cancel any existing leave that overlaps with the shift override
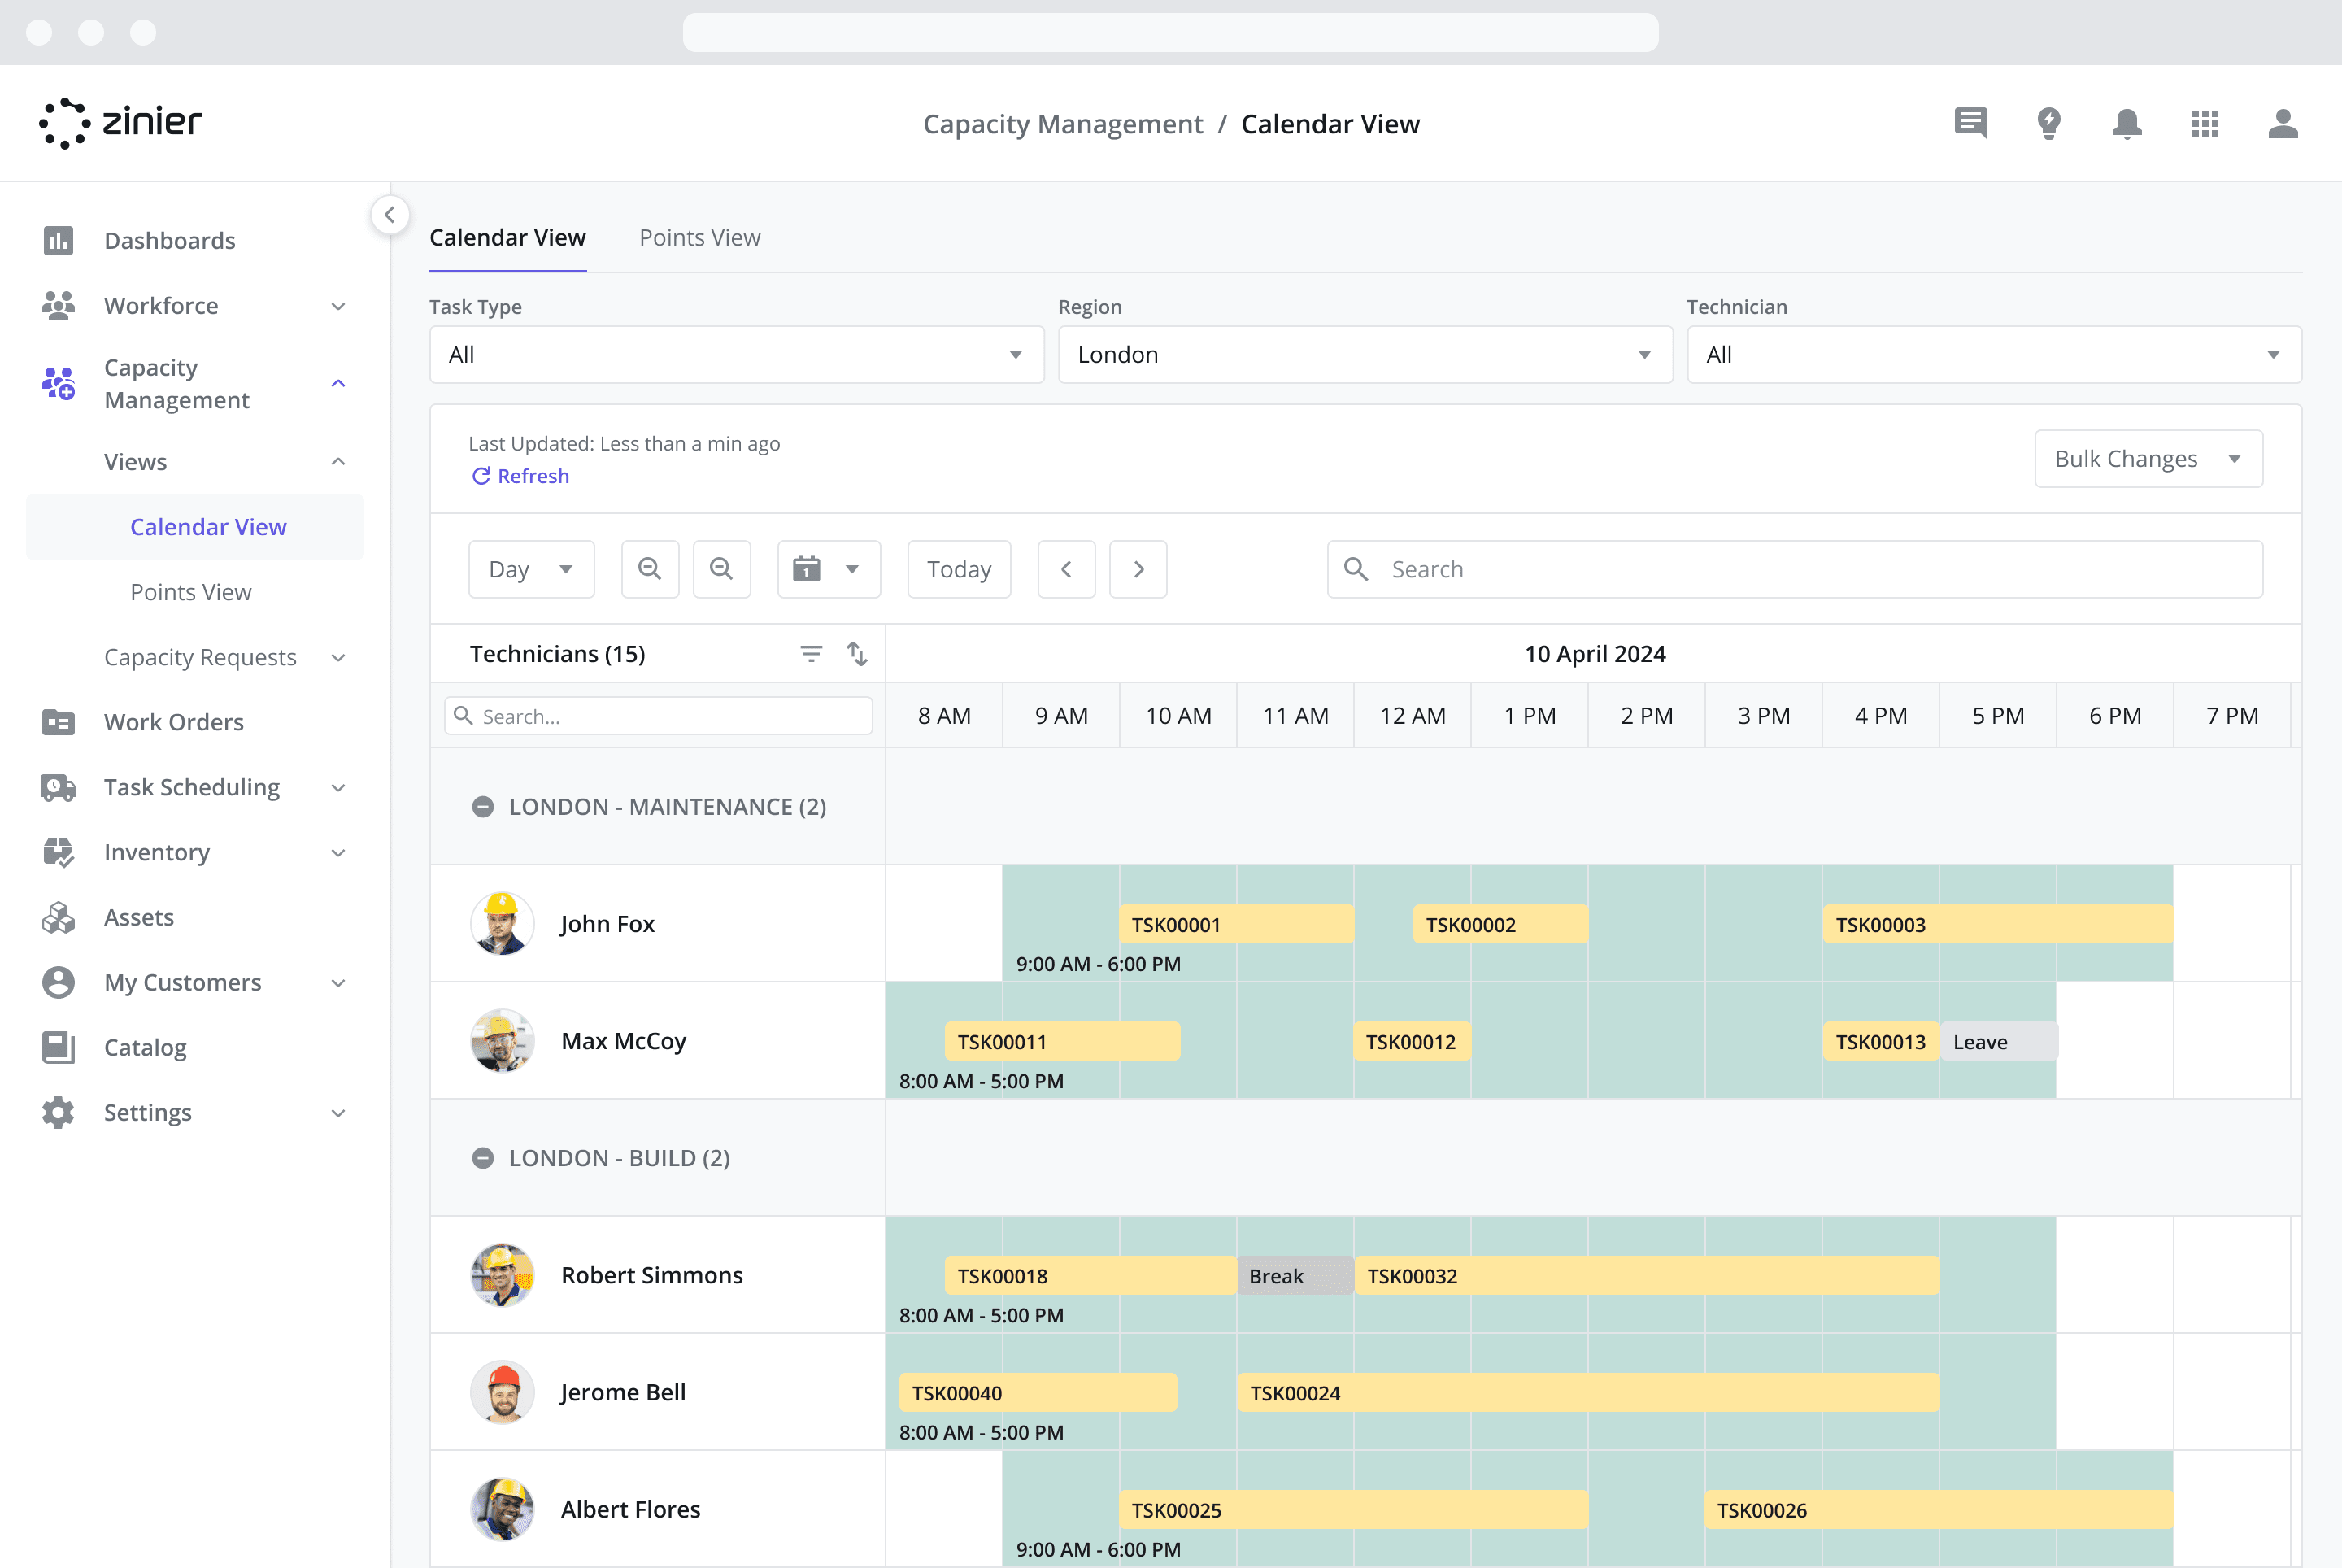
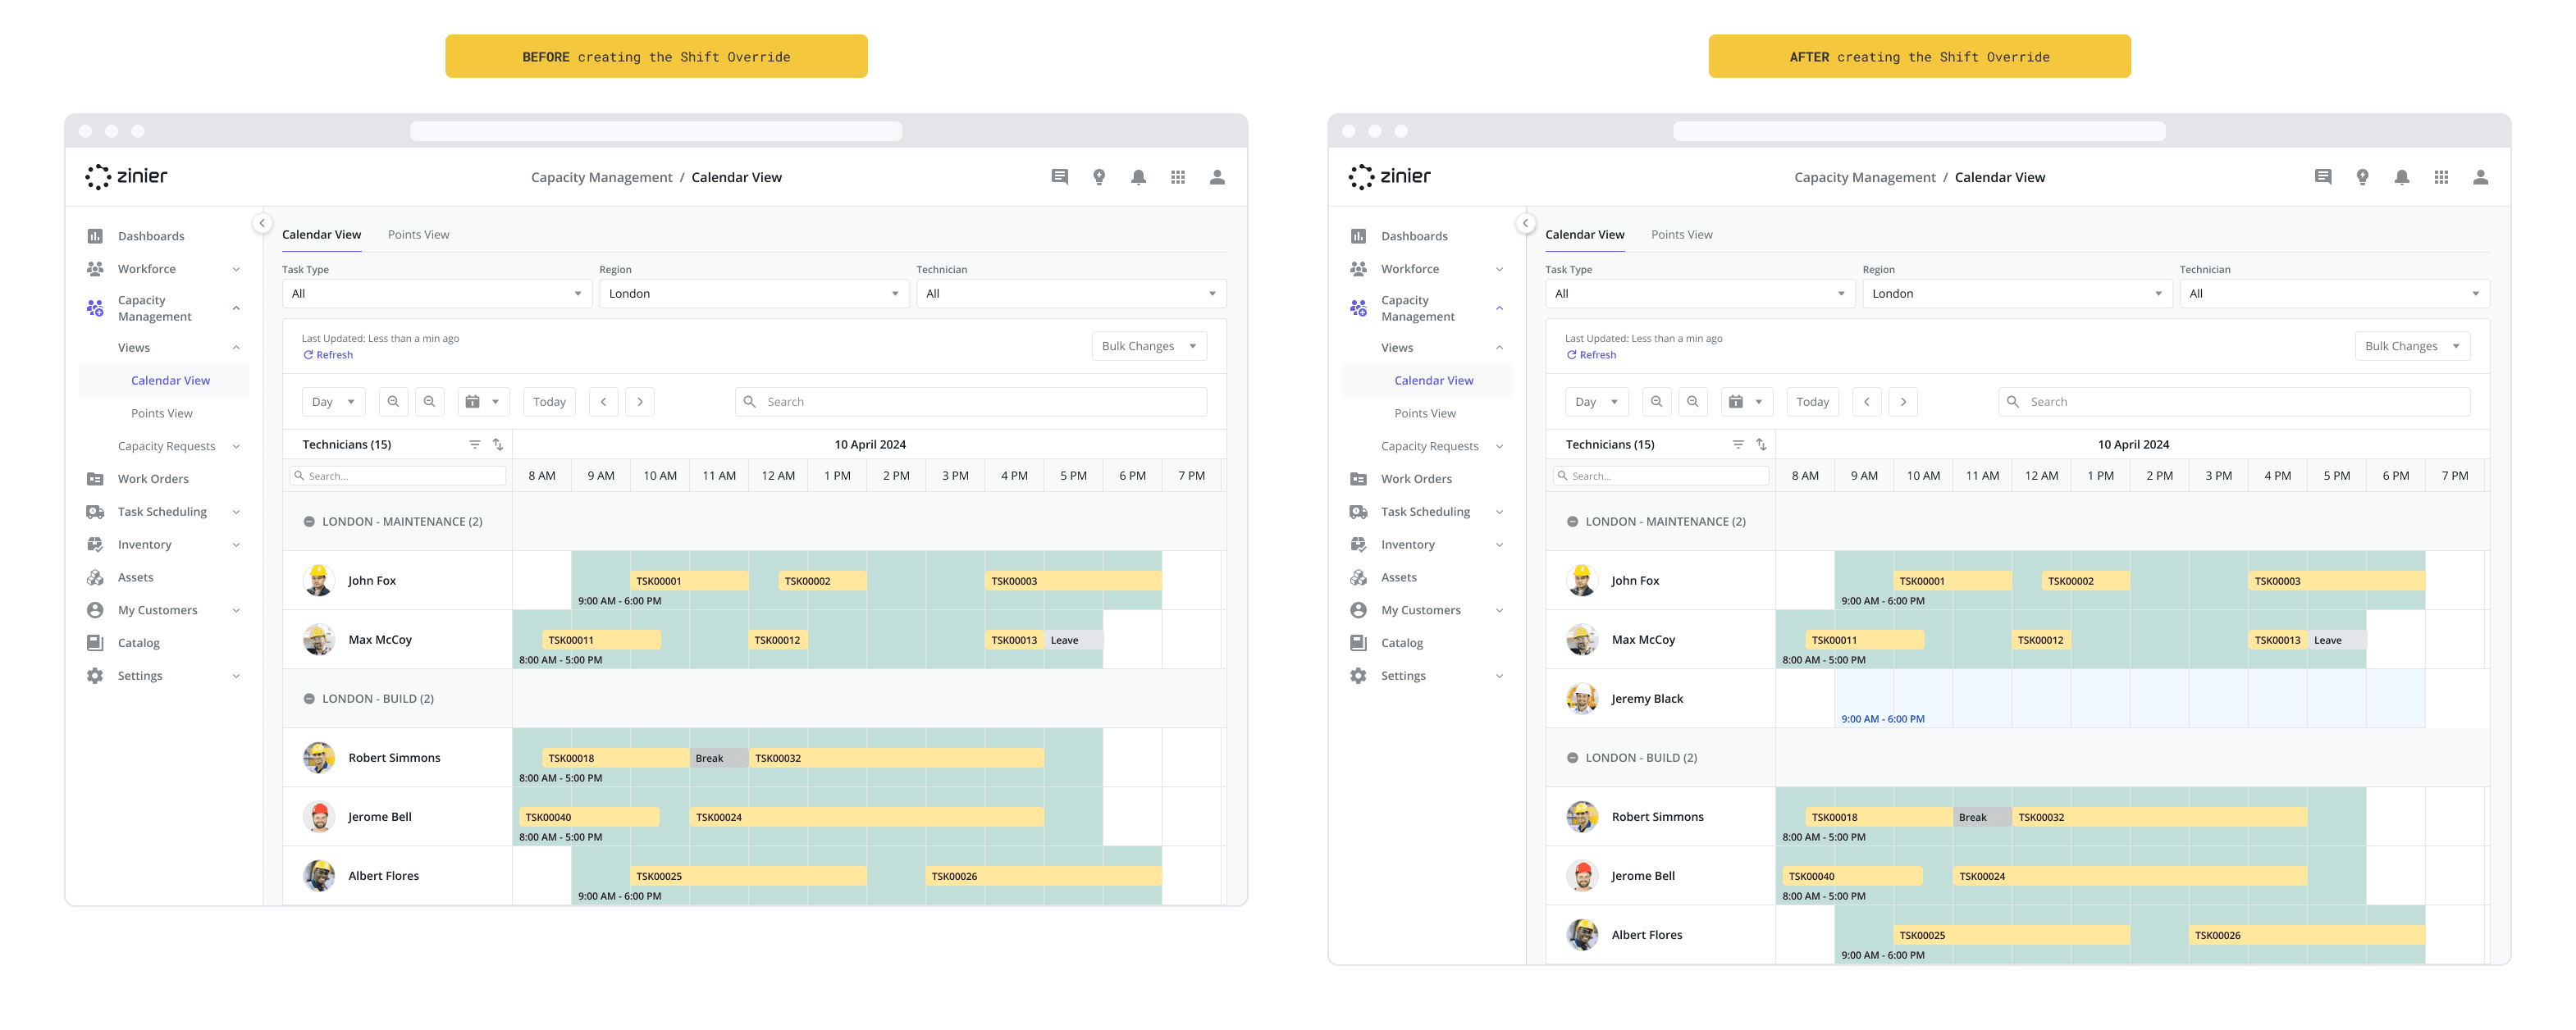
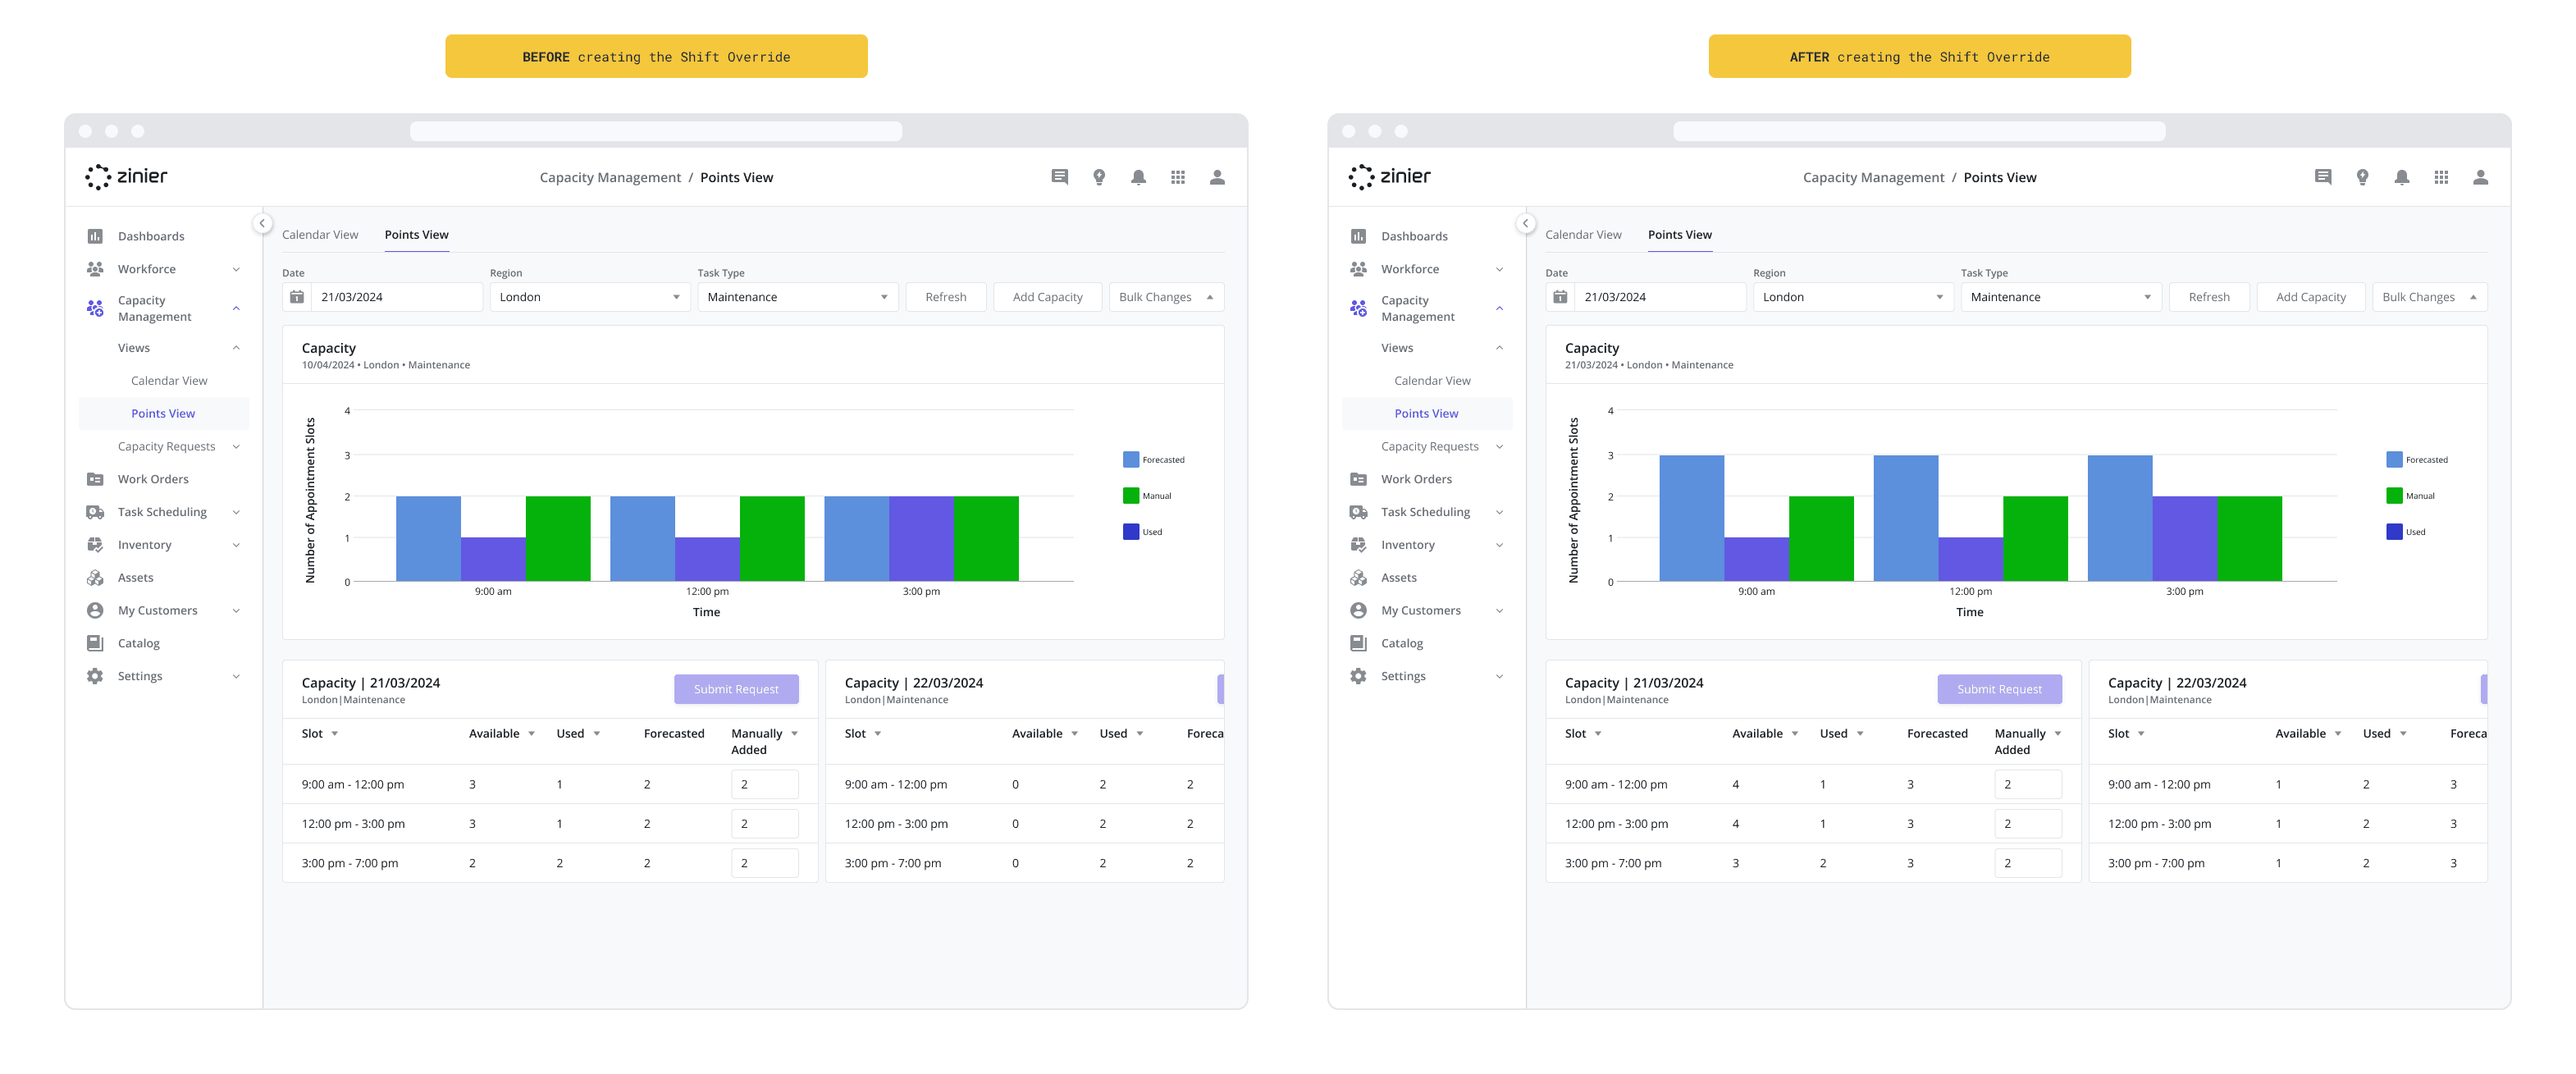
Impact of Shift Overrides on the Capacity Calendar
After creating a Shift Override, the Capacity Calendar will be updated to reflect the changes. In the example screenshots above, capacity was needed in the “London” Region for ”Build” Task Types on 21/03/2024 until 21/05/2024 from 9am - 6pm on Monday, Tuesday and Wednesday to cover another employee’s leave.
To address this use case, a Shift Override was created that temporarily moved the technician Jeremy Black into the “London” Work Group and “Build” Work Group at the times above. As a result, the Capacity Calendar now shows Jeremy Black in the appropriate Work Group list with a blue box representing the Shift Override :
Impact of Shift Overrides to Capacity in the Points View
After creating a Shift Override, the capacity calculations in the Points View will also be updated to reflect the changes. In the example above, additional Forecasted Capacity is added to the “London” Region for ”Build” Task Types on 21/03/2024 until 21/05/2024 from 9am - 6pm on Monday, Tuesday and Wednesday corresponding to the capacity added by having another technician available to work during the Shift Override. The image below is representative only – actual numbers may differ depending on how you’ve set up Appointment Windows, the duration of the tasks, and the actual work schedule of each technician.
For more information on how capacity points are calculated, go to the Capacity Points View page.
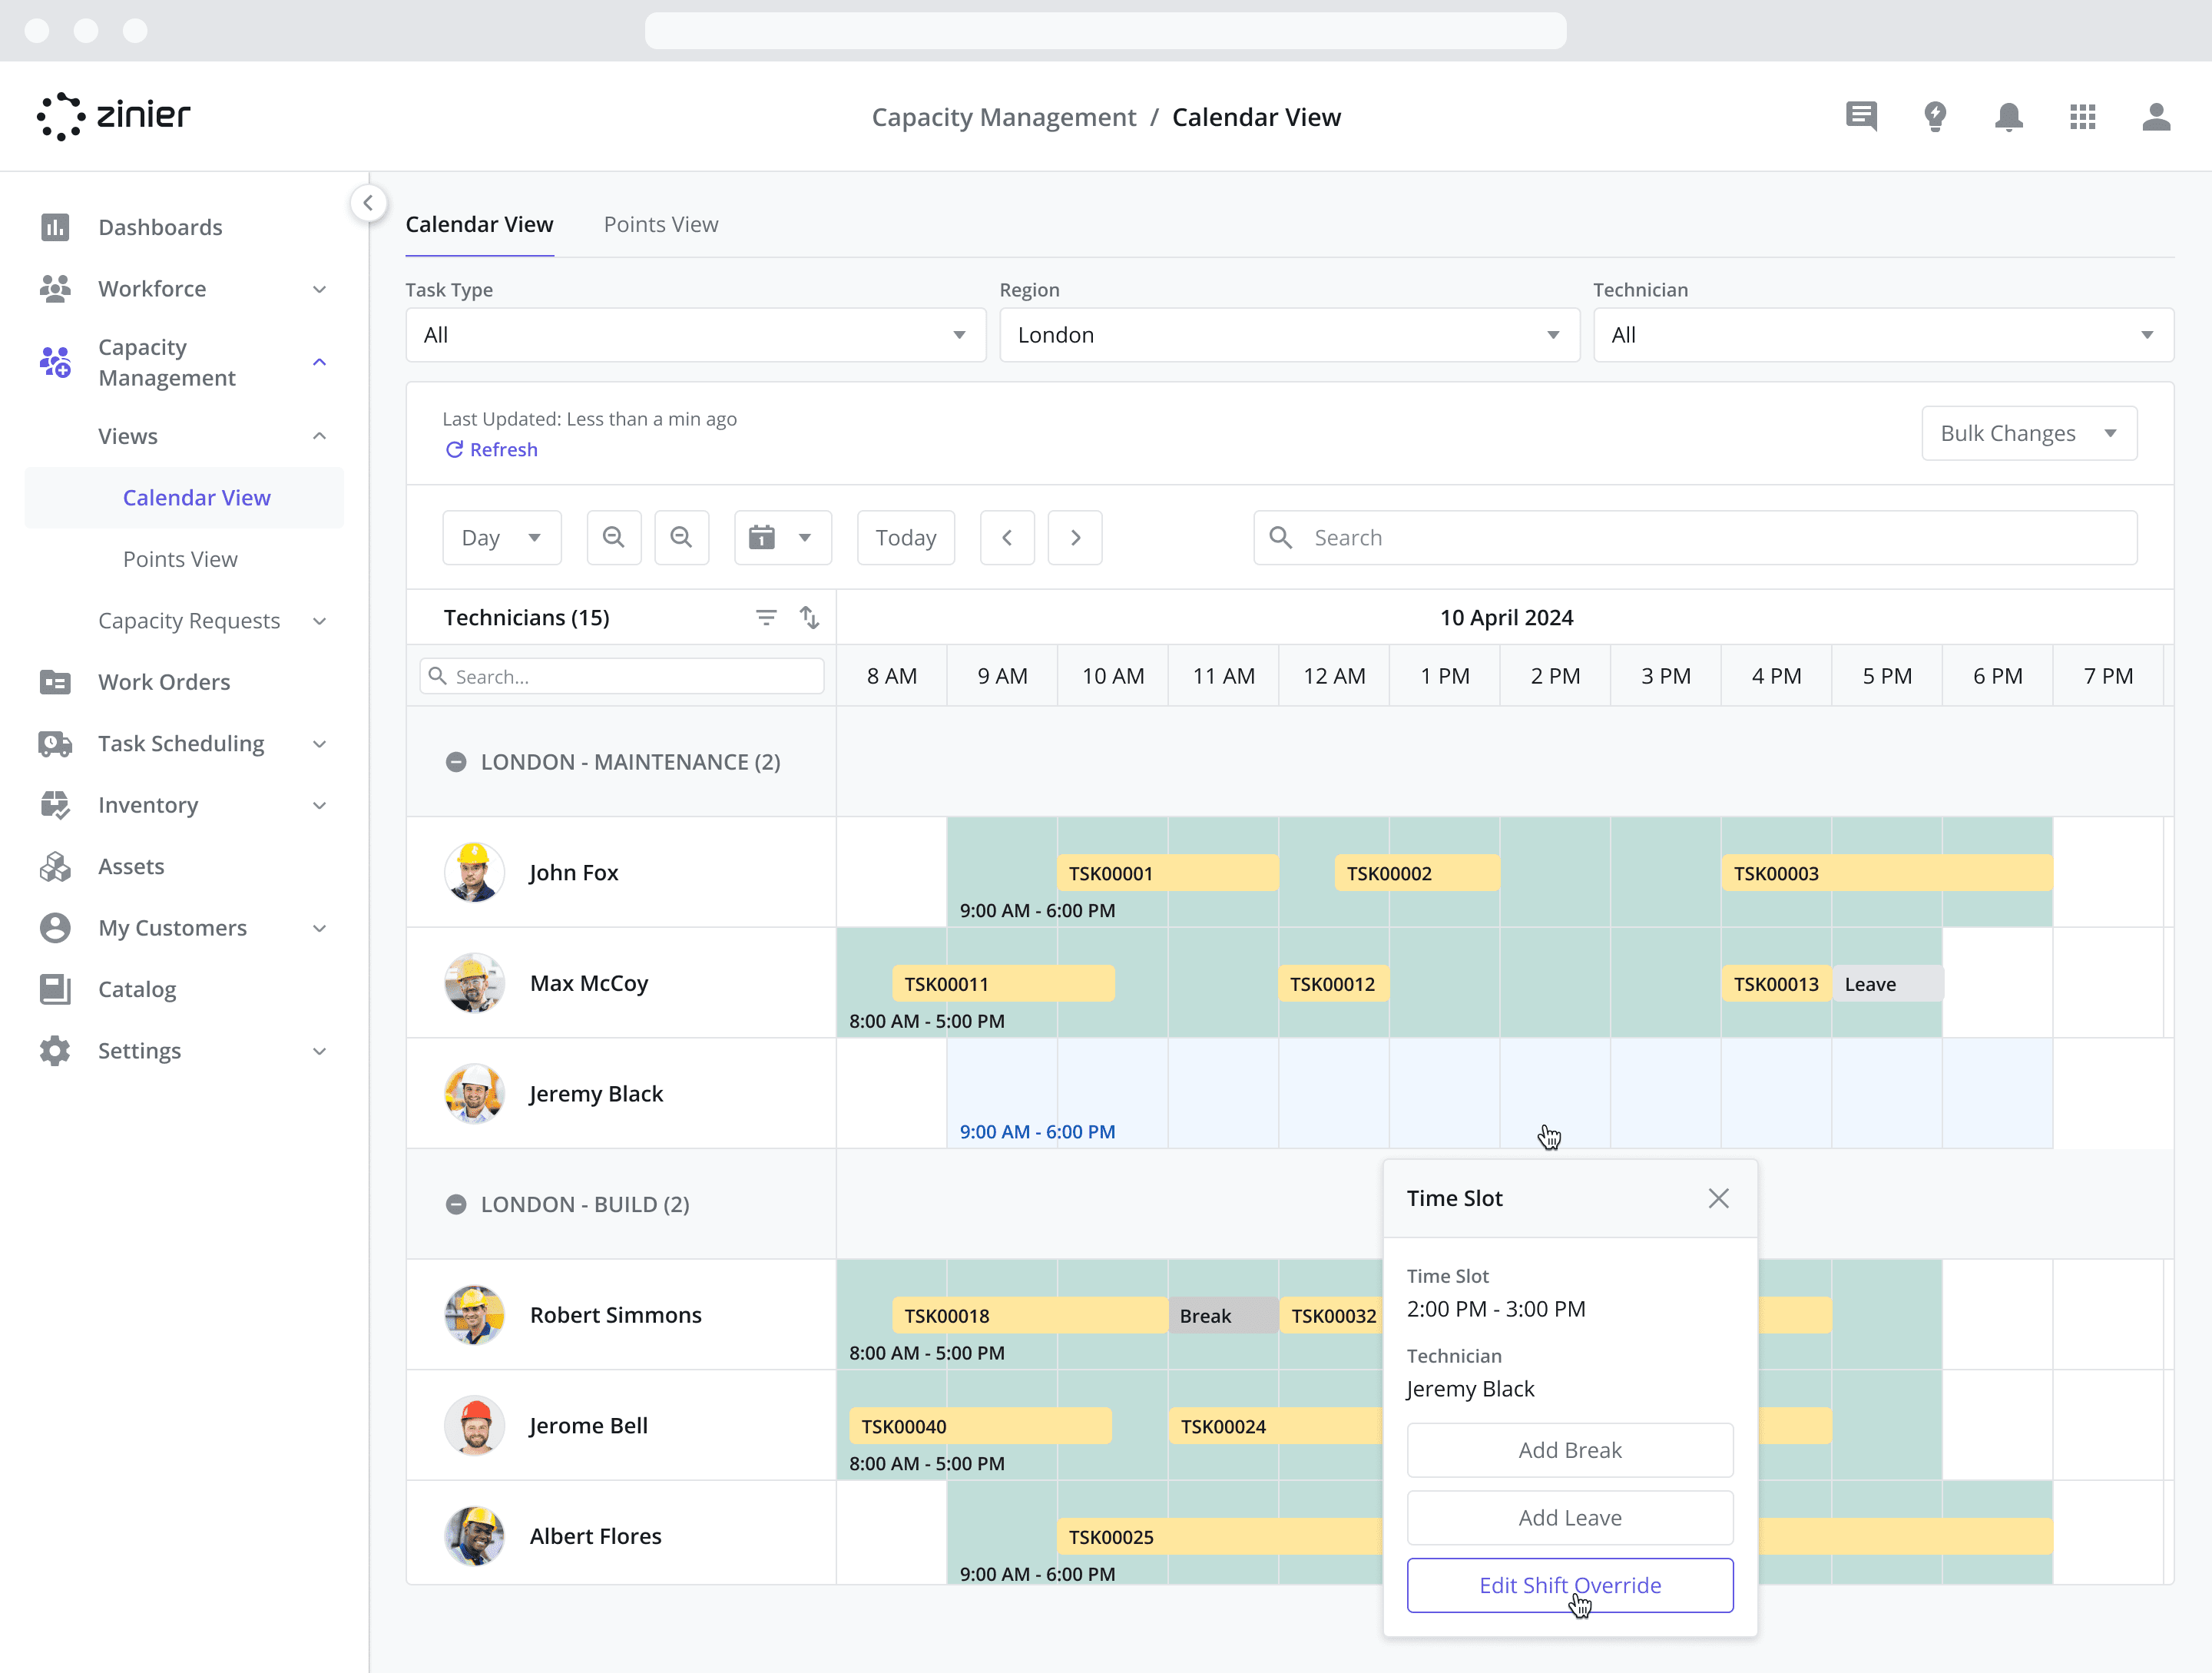
Editing a Shift Override from the Calendar
In addition to making bulk changes, you can also edit individual Shift Overrides by clicking directly on the event in the Calendar. To edit an existing Shift Override, follow the steps below:
Click on the Shift Override event you wish to edit in the Calendar. Shift overrides are displayed as blue boxes.
Click the “Edit Shift Override” button from the popup to bring up the sidepanel.
Depending on whether you wish to modify or delete the record, follow the steps below:
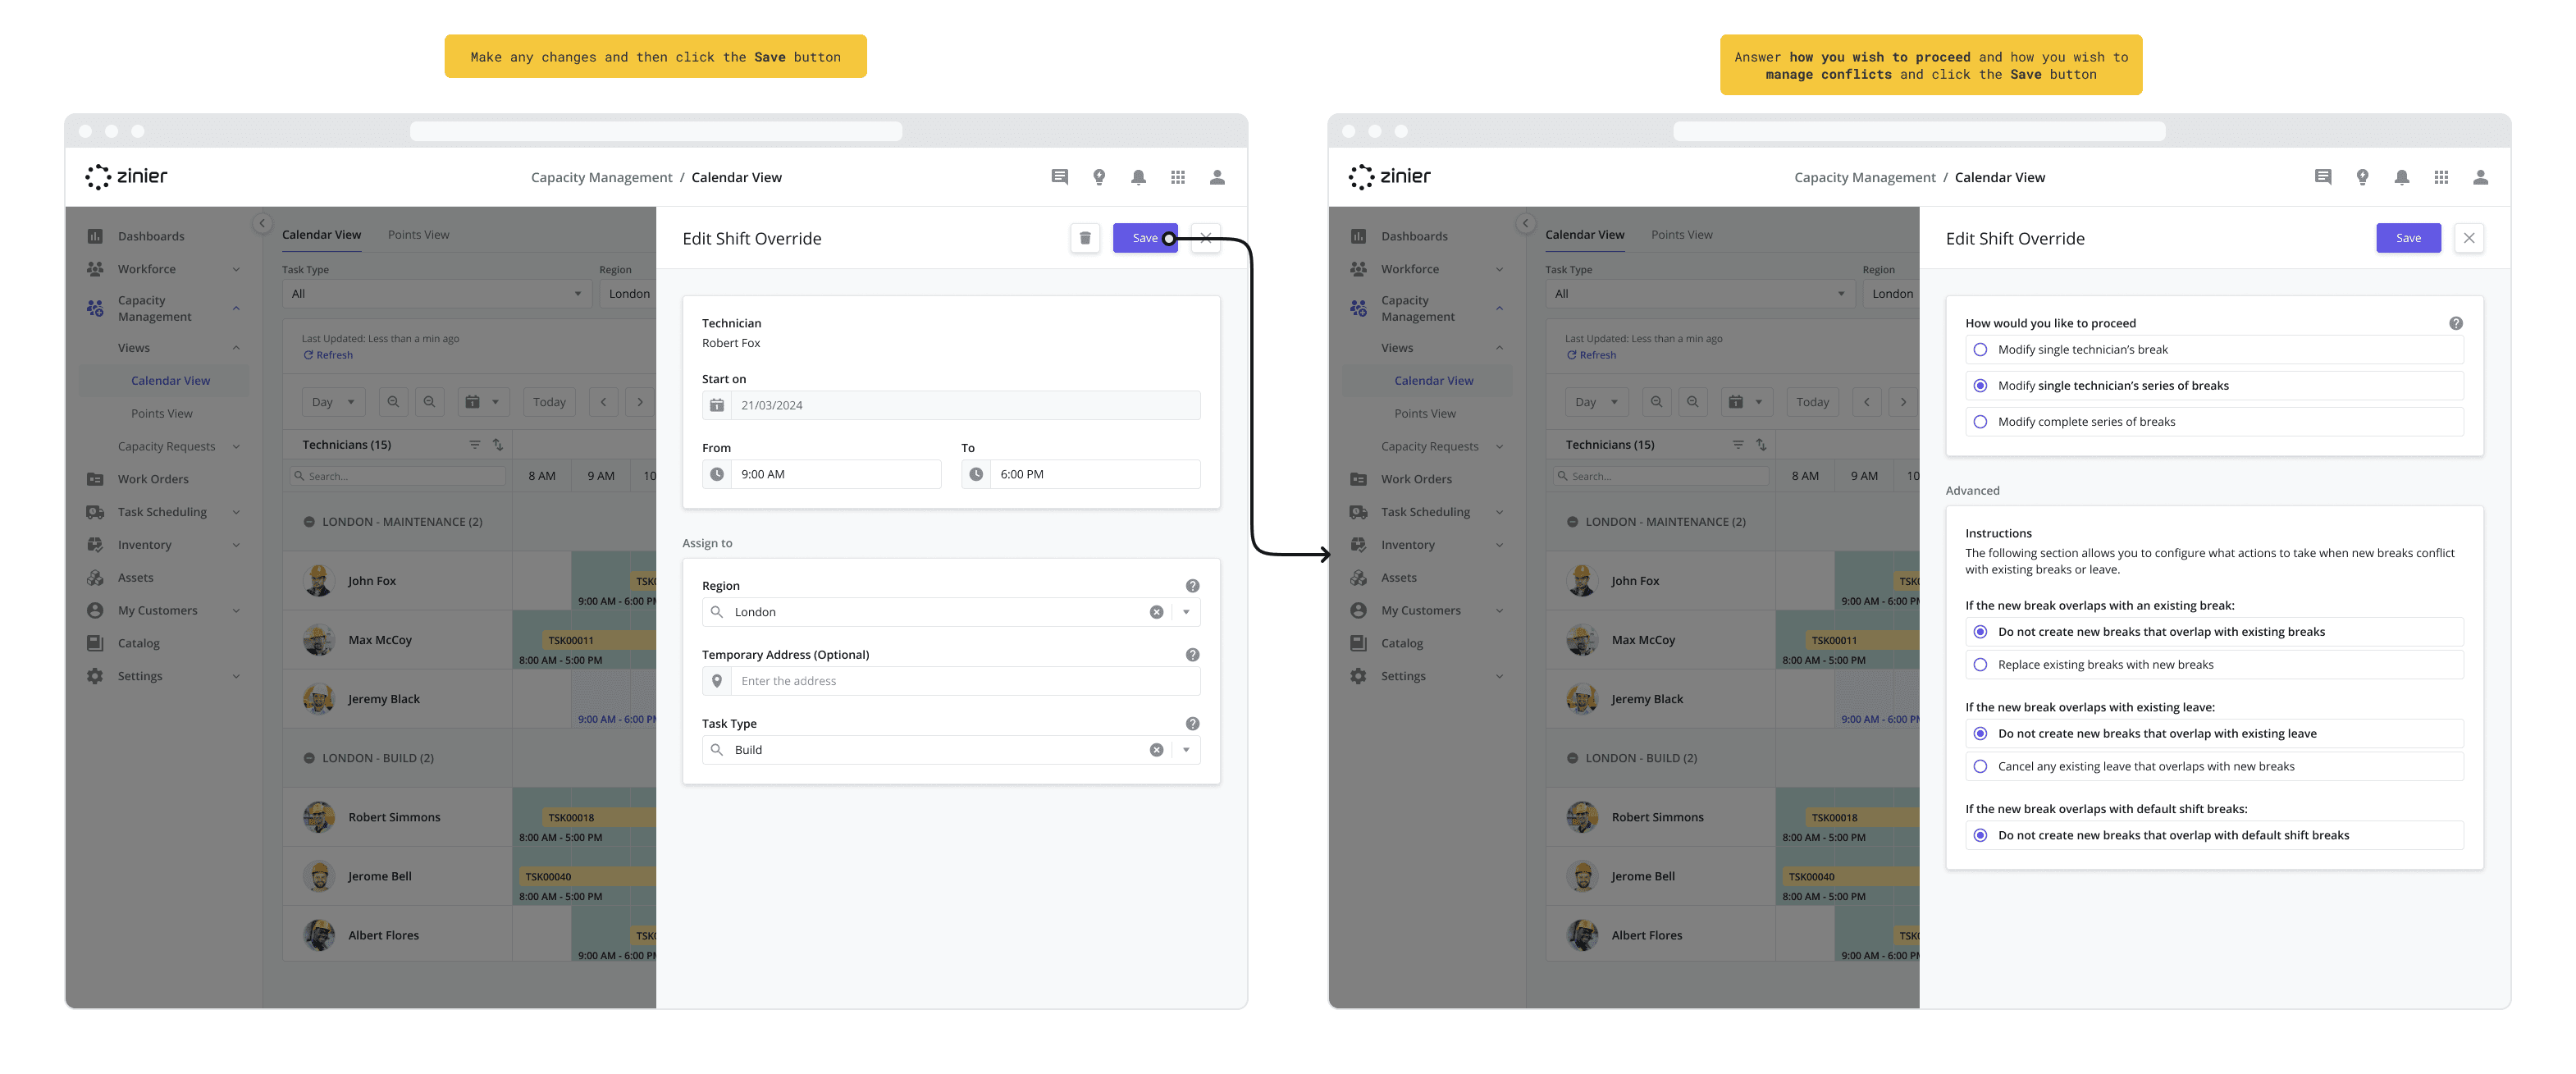
To Modify the record:
First make any changes to the timeframe, Region, Task Type and Temporary Address and click the Save button.
To proceed, select from the following options to determine which record(s) to modify:
Modify single technician’s shift override: Select this option to modify the individual Shift Override for that day for the selected technician. If this is a recurring Shift Override, none of the records on following days will be modified.
Modify single technician's series of shift override: Select this option to modify ALL of the remaining Shift Overrides on ALL future days for the selected technician. If this is a recurring Shift Override, all records on the following days will be modified for that technician.
Modify complete series of shift override: Select this option to modify ALL of the remaining Shift Overrides on ALL future days for ALL of the technicians that were added to the Shift Override. If this is a recurring Shift Override, all records for all associated technicians on the following days will be modified.
Decide what to do If the new shift override overlaps with an existing shift override. Here you have two options:
Do not create new shift overrides that overlap with existing shift overrides
Replace existing shift overrides with new shift overrides
Decide what to do If the new shift override overlaps with existing overtime. Here you have two options:
Do not create new shift overrides that overlap with existing overtime
Cancel any existing overtime that overlaps with the shift override
Decide what to do If the new shift override overlaps with existing leave. Here you have two options:
Do not create new shift overrides that overlap with existing leave
Cancel any existing leave that overlaps with the shift override
Click the Save button to apply the changes.
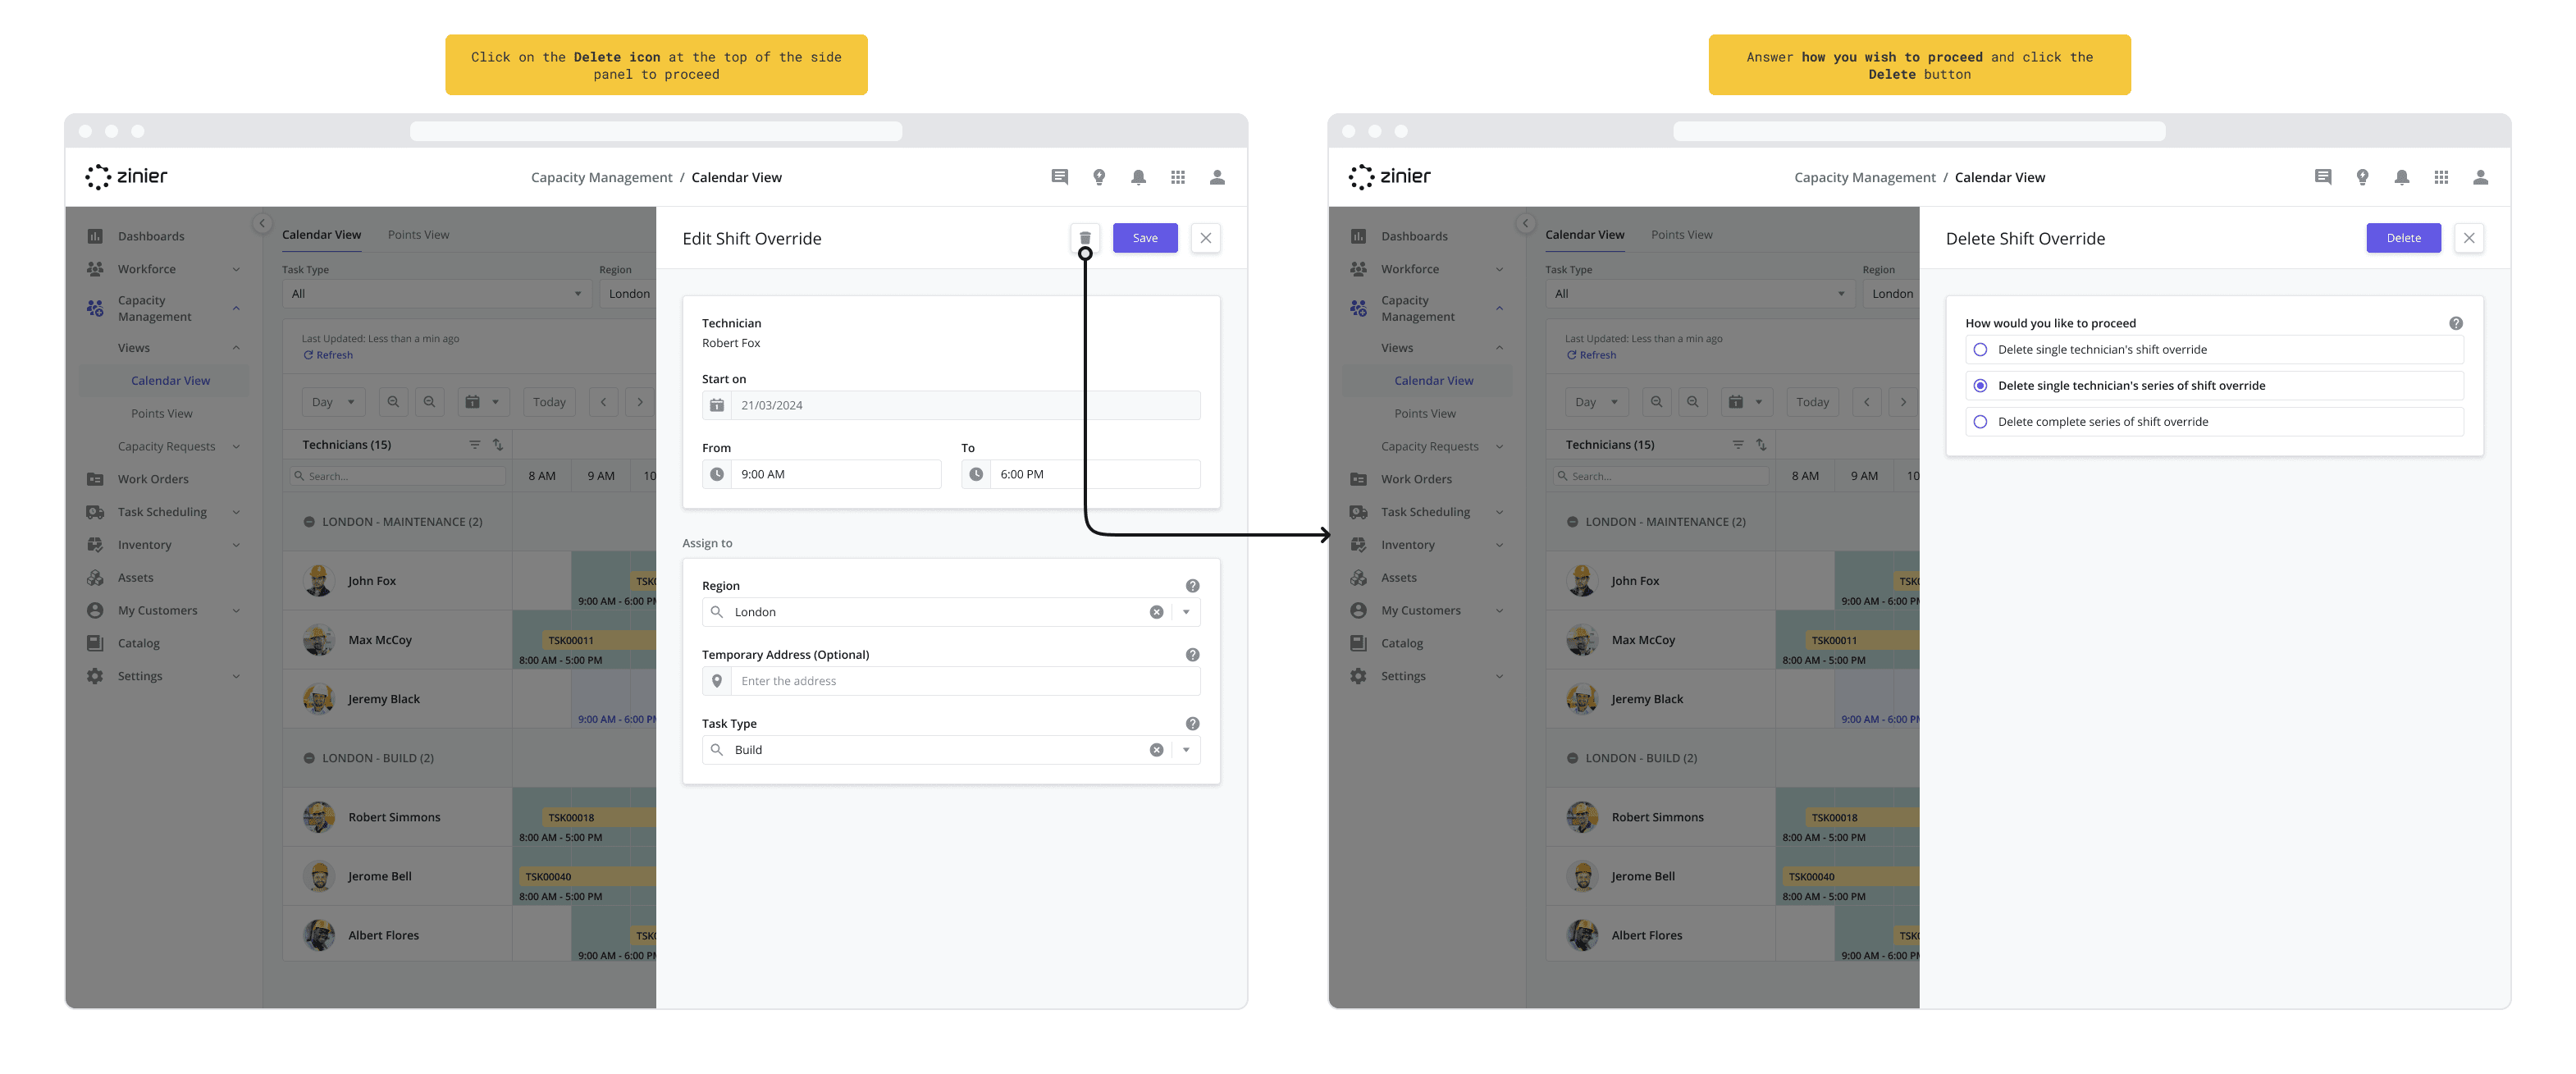
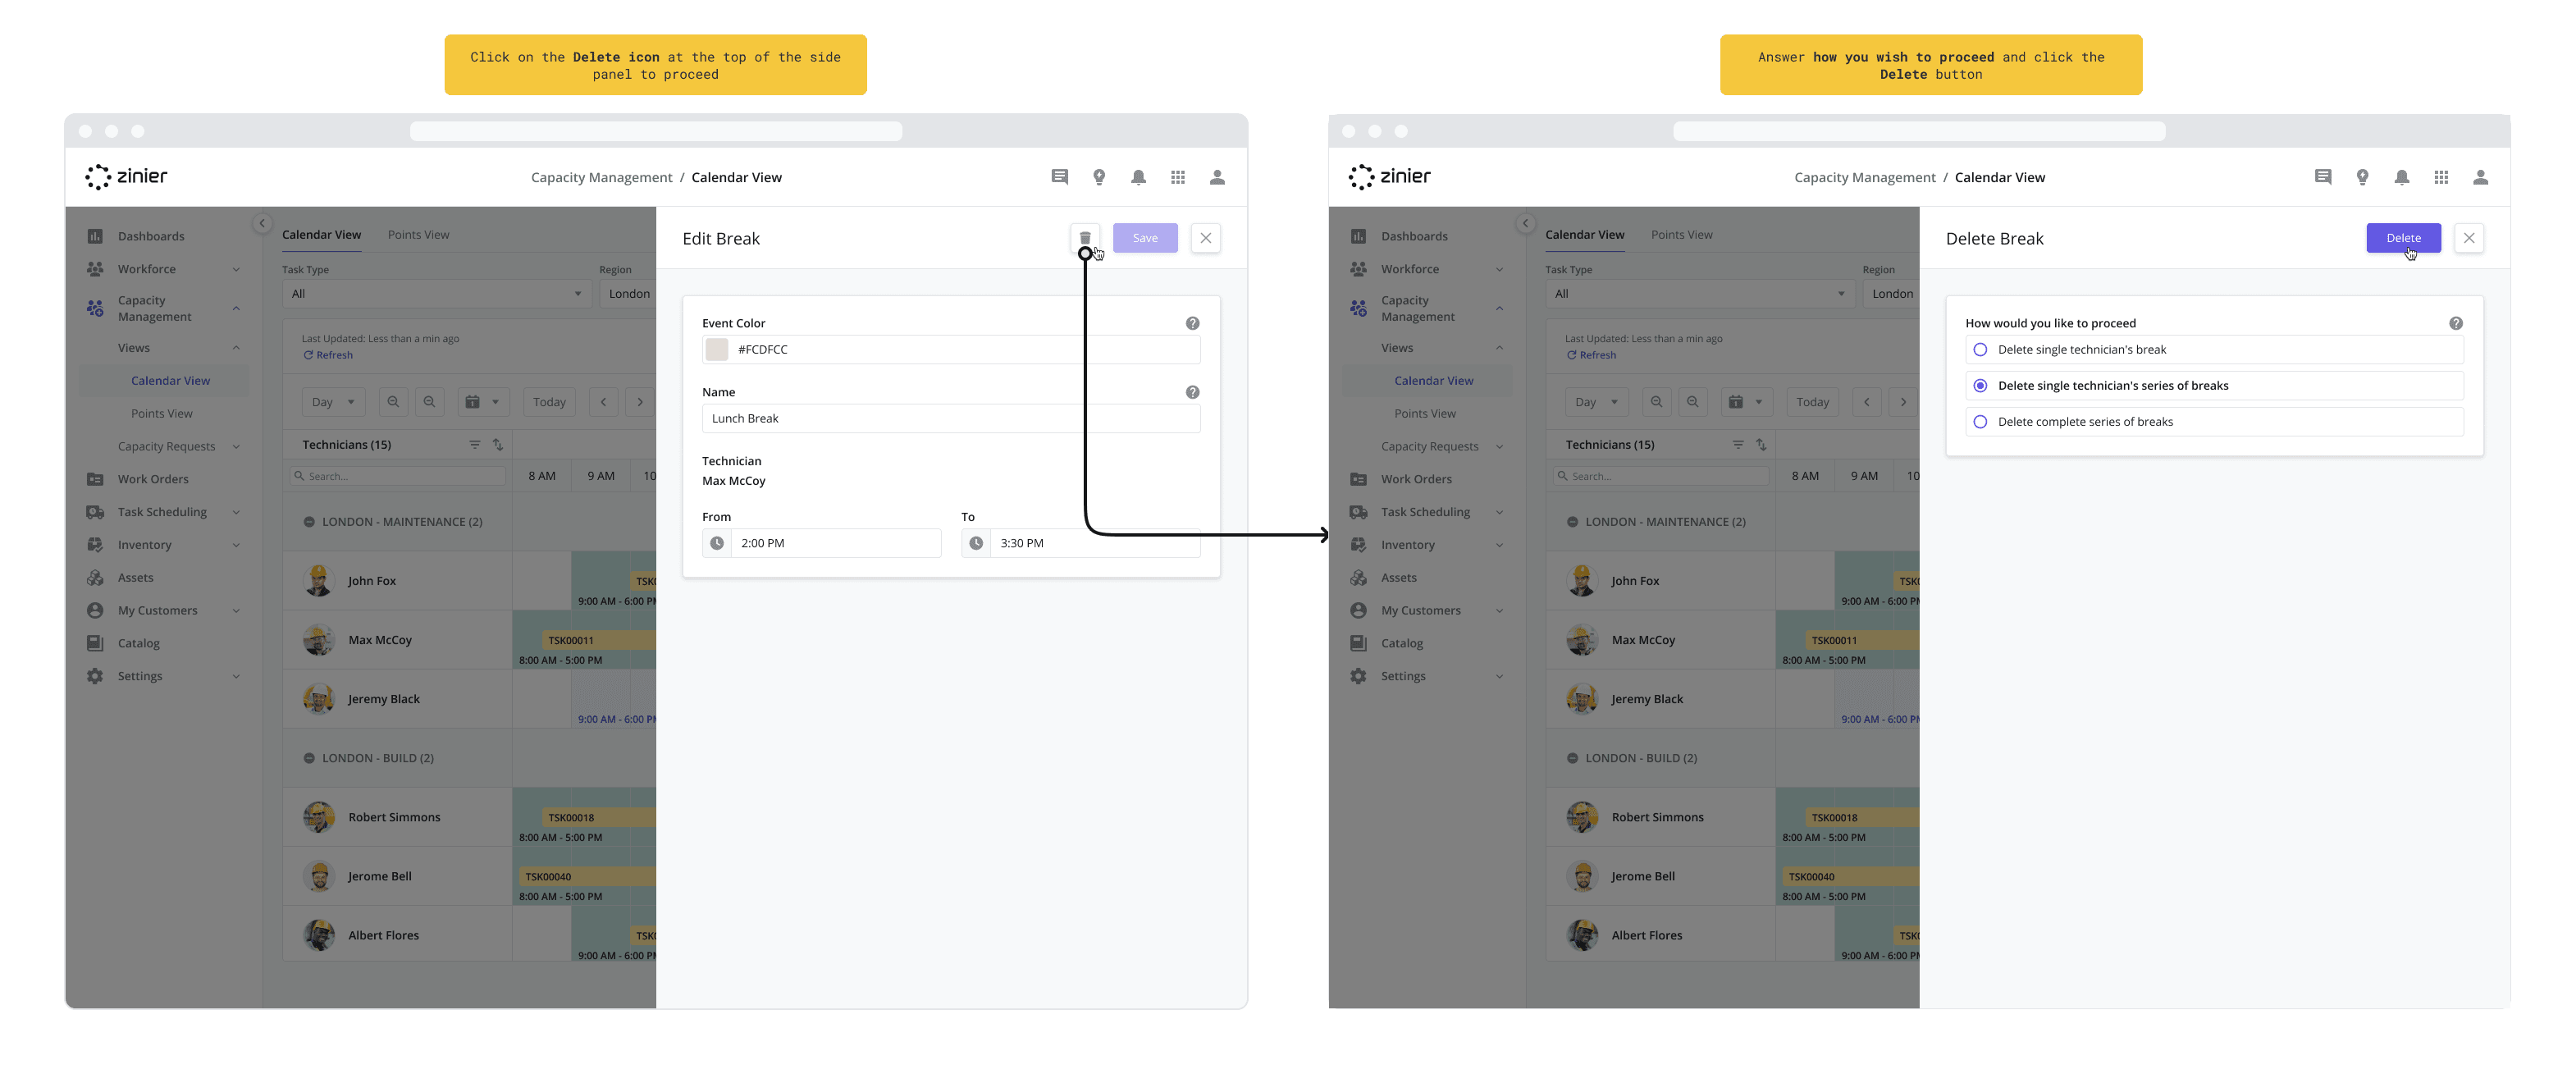
To Delete the record:
Click on the Delete icon at the top of the side panel.
To proceed, select from the following options to determine which record(s) to delete:
Delete single technician's shift override: Select this option to delete the individual Shift Override for that day for the selected technician. If this is a recurring Shift Override, none of the records on following days will be impacted.
Delete single technician's series of shift override: Select this option to delete ALL of the remaining Shift Overrides on ALL future days for the selected technician. If this is a recurring Shift Override, all records on the following days will be deleted for that technician.
Delete complete series of shift override: Select this option to delete ALL of the remaining Shift Overrides on ALL future days for ALL of the technicians that were added to the Shift Override. If this is a recurring Shift Override, all records for all associated technicians on the following days will be deleted.
Click the Delete button to apply the changes.
Update Default Shifts to Adjust Capacity
UPDATED (24.4)
The Calendar View also allows you to modify the default working hours (Shifts) of your workforce which is used to determine the availability of a technician during Scheduling & Dispatch. While this can also be done from the Workforce module, the benefit of doing it here is that you can make changes in bulk.
When creating a new Technician, the selected Shift will populate the Work Schedule tab in the side panel after the record is saved. For more information on configuring Shifts, see the Workforce Management Settings page.
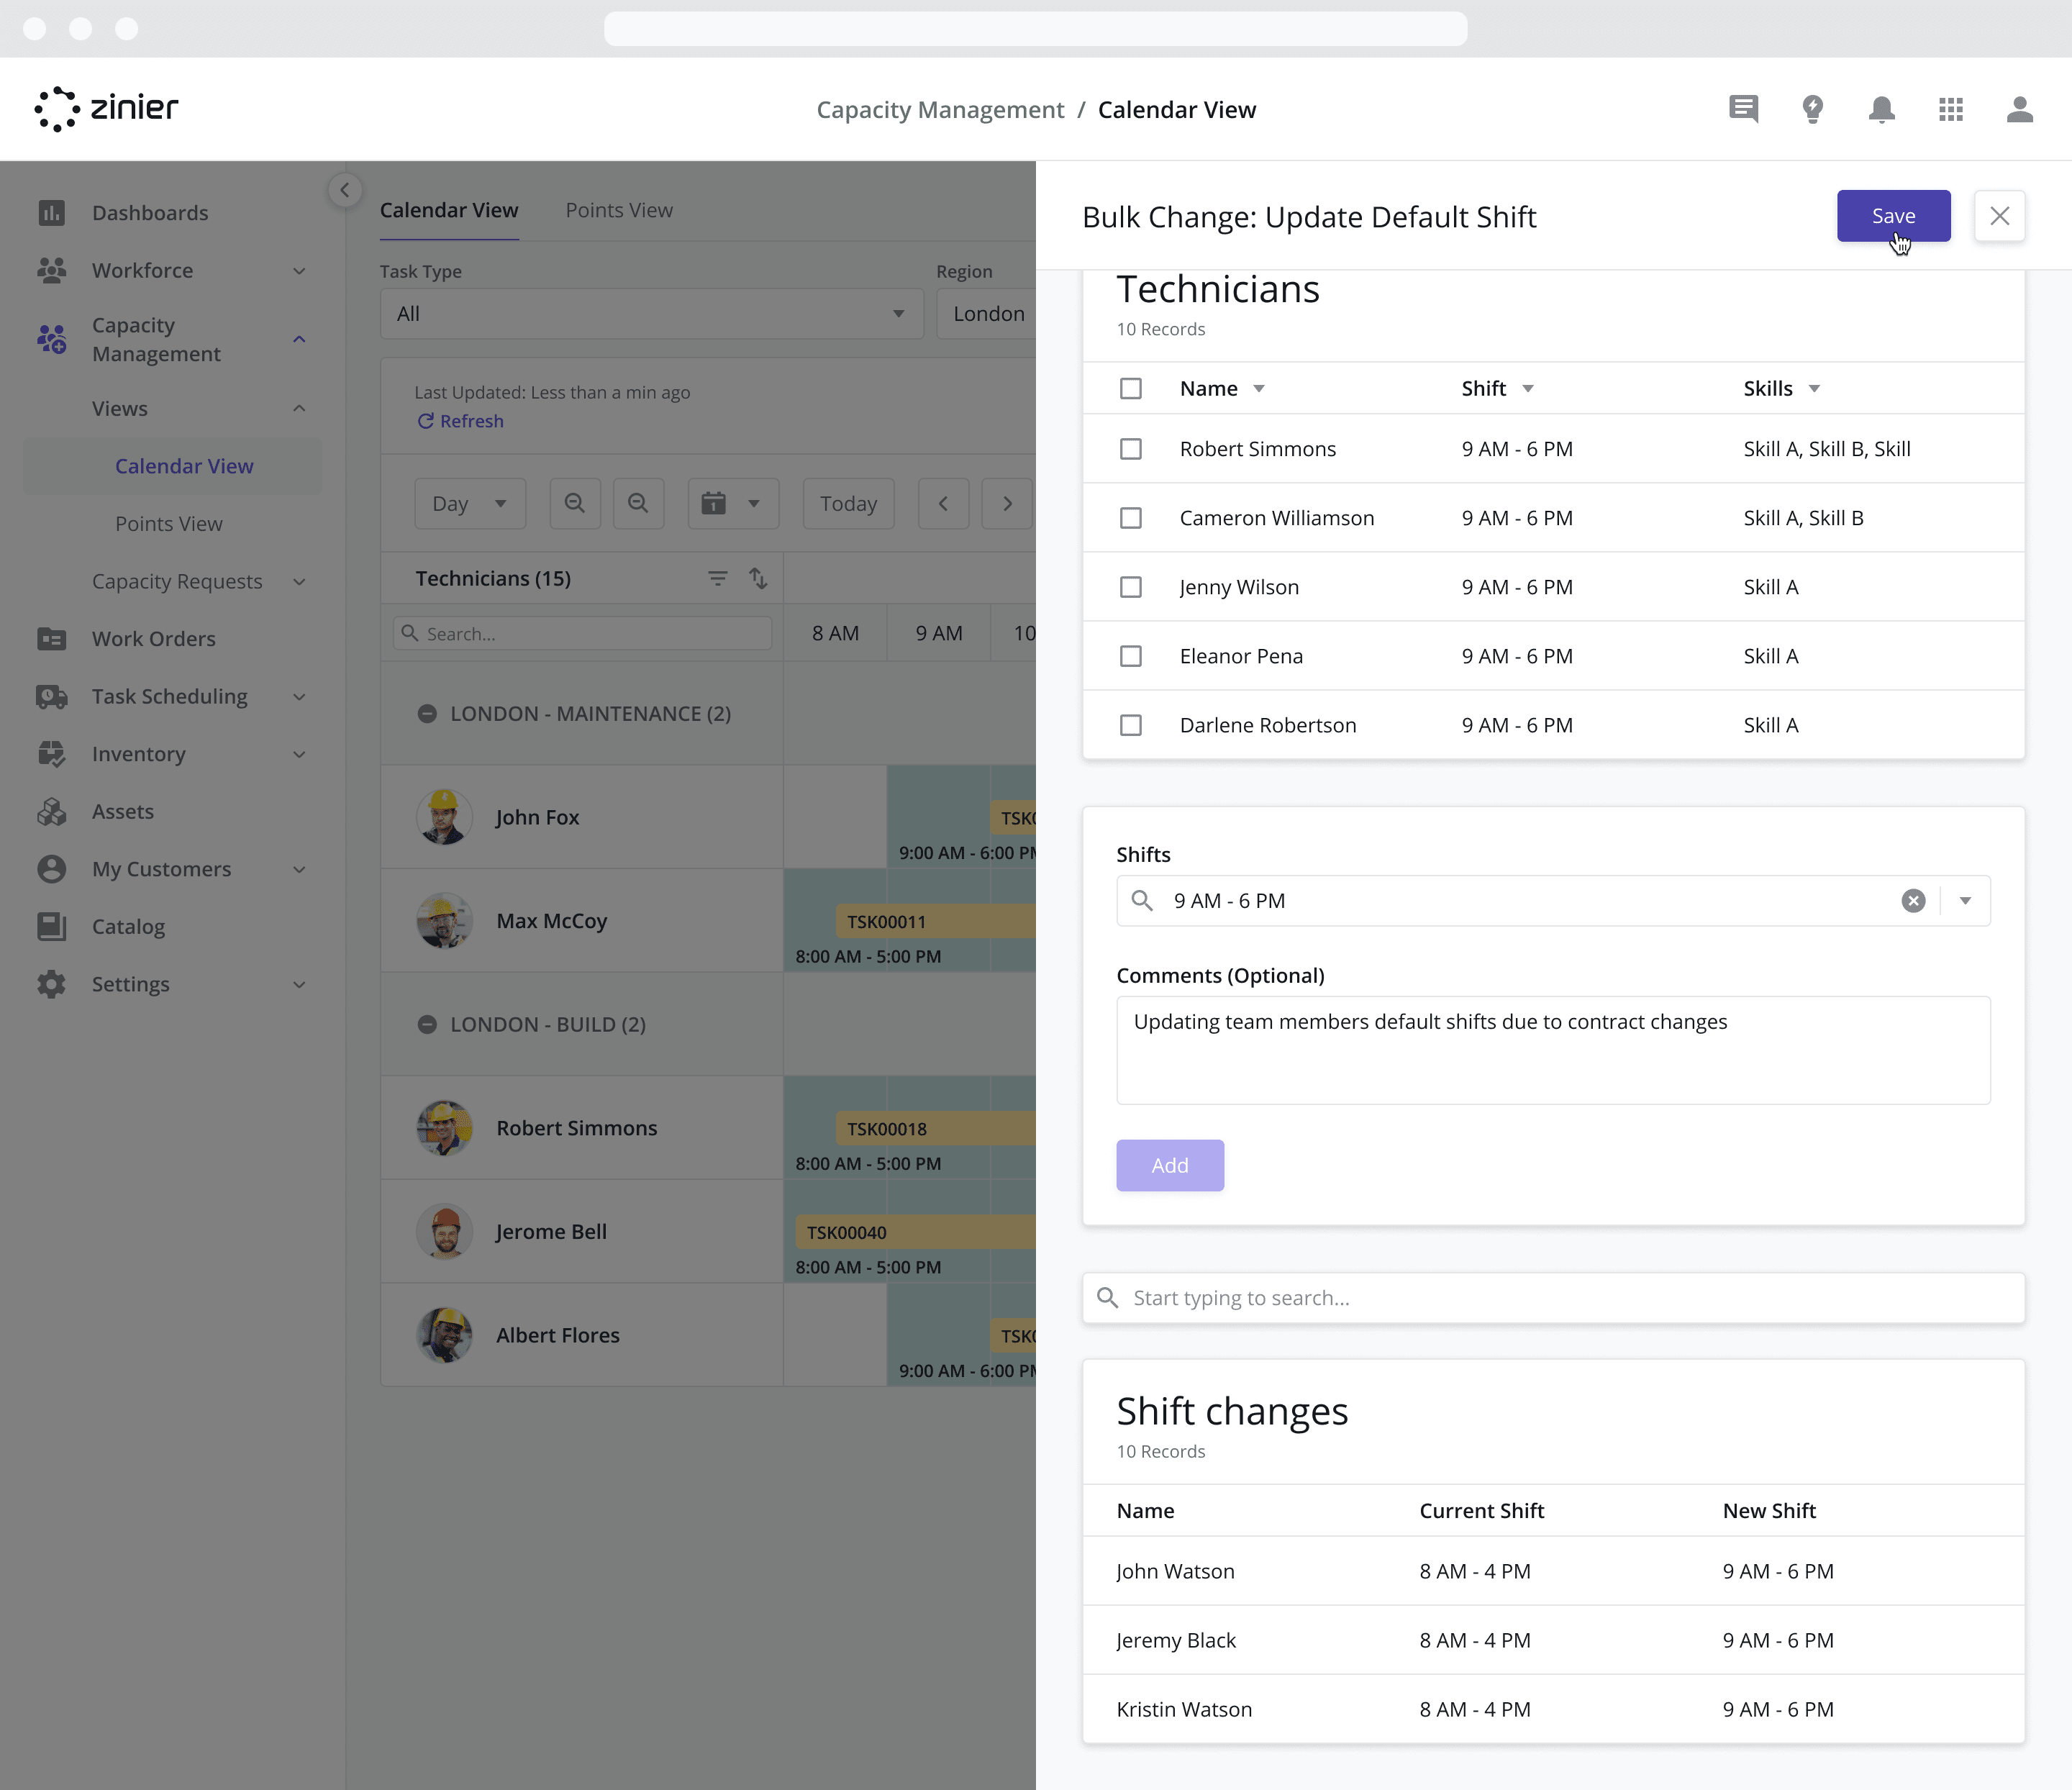
Updating Default Shifts (in bulk)
To update the default Shift of one or more Technicians, follow the steps below:
Click on the “Bulk Actions” dropdown from the top of the datagrid and select “Update Default Shift”.
Select the new Shift you would like applied to the technicians you select in the next step.
Select the Technicians you’d like the changes applied to from the list.
Click the Add button to apply the changes to the selected technicians. Once added, the technicians will appear in a new list below. Note that the changes have not yet been applied or saved.
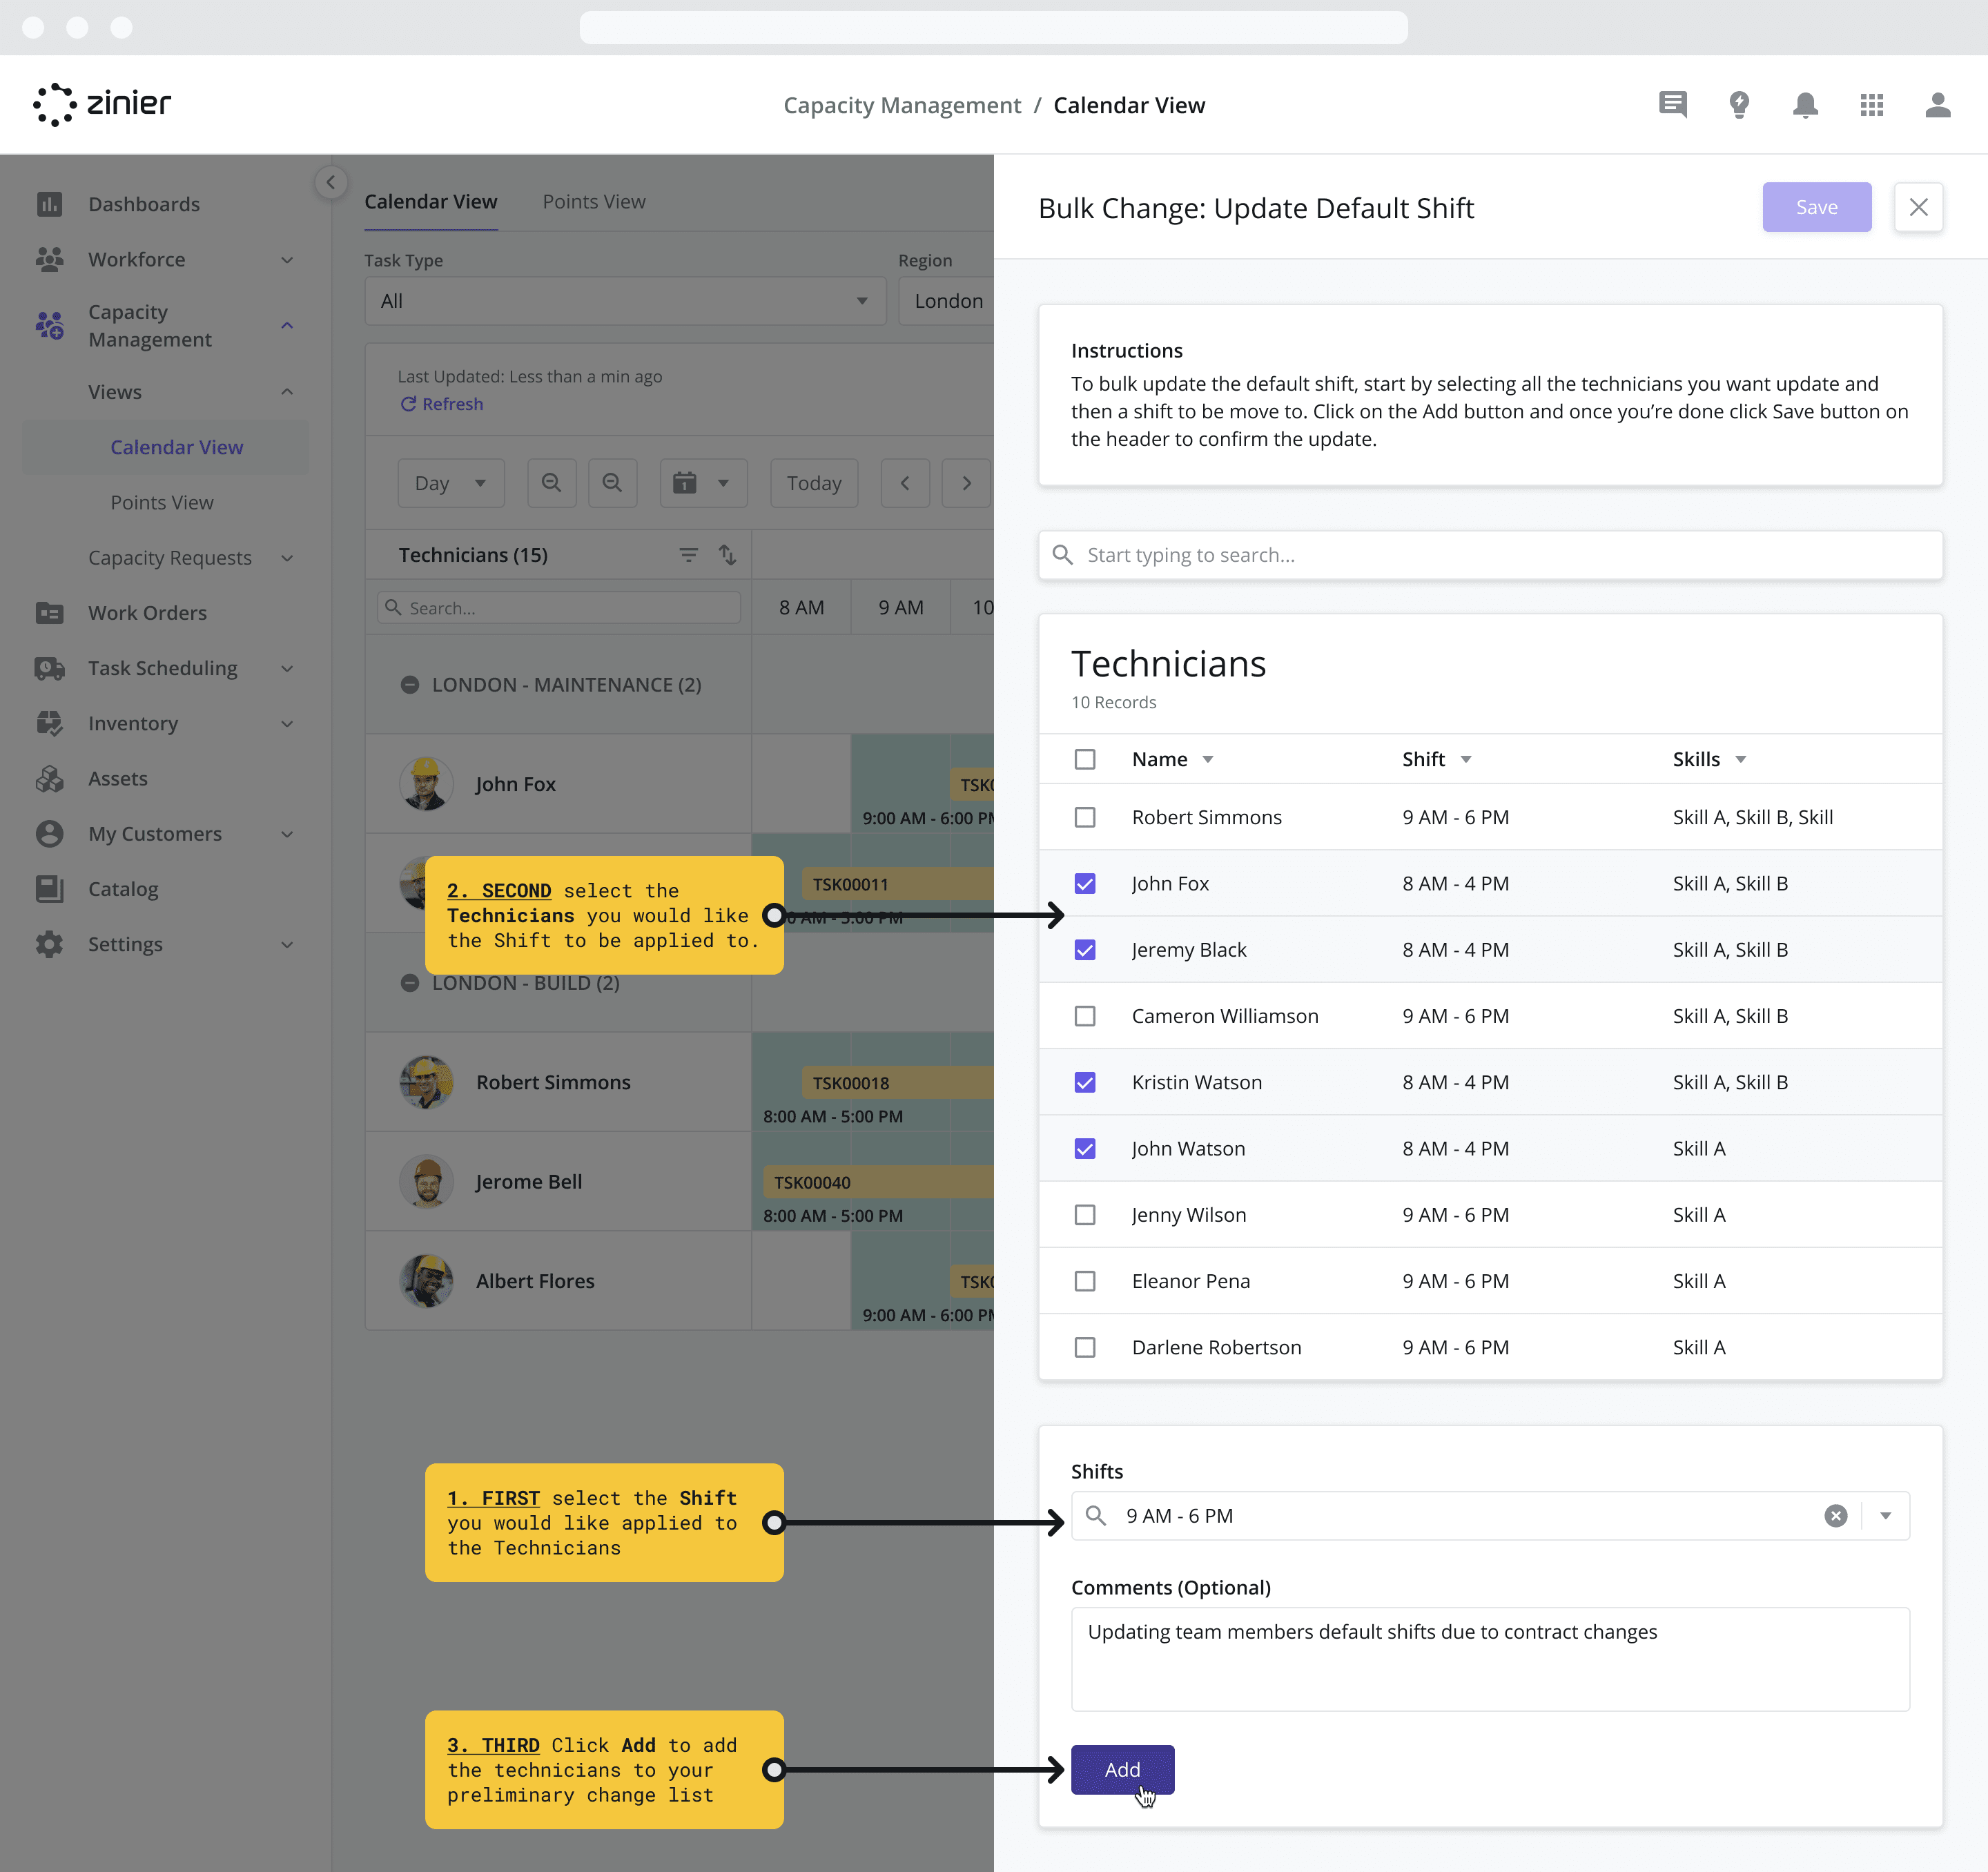
Repeat steps 2-4 as needed to make additional Shift changes.
Click the Save button to apply the changes.
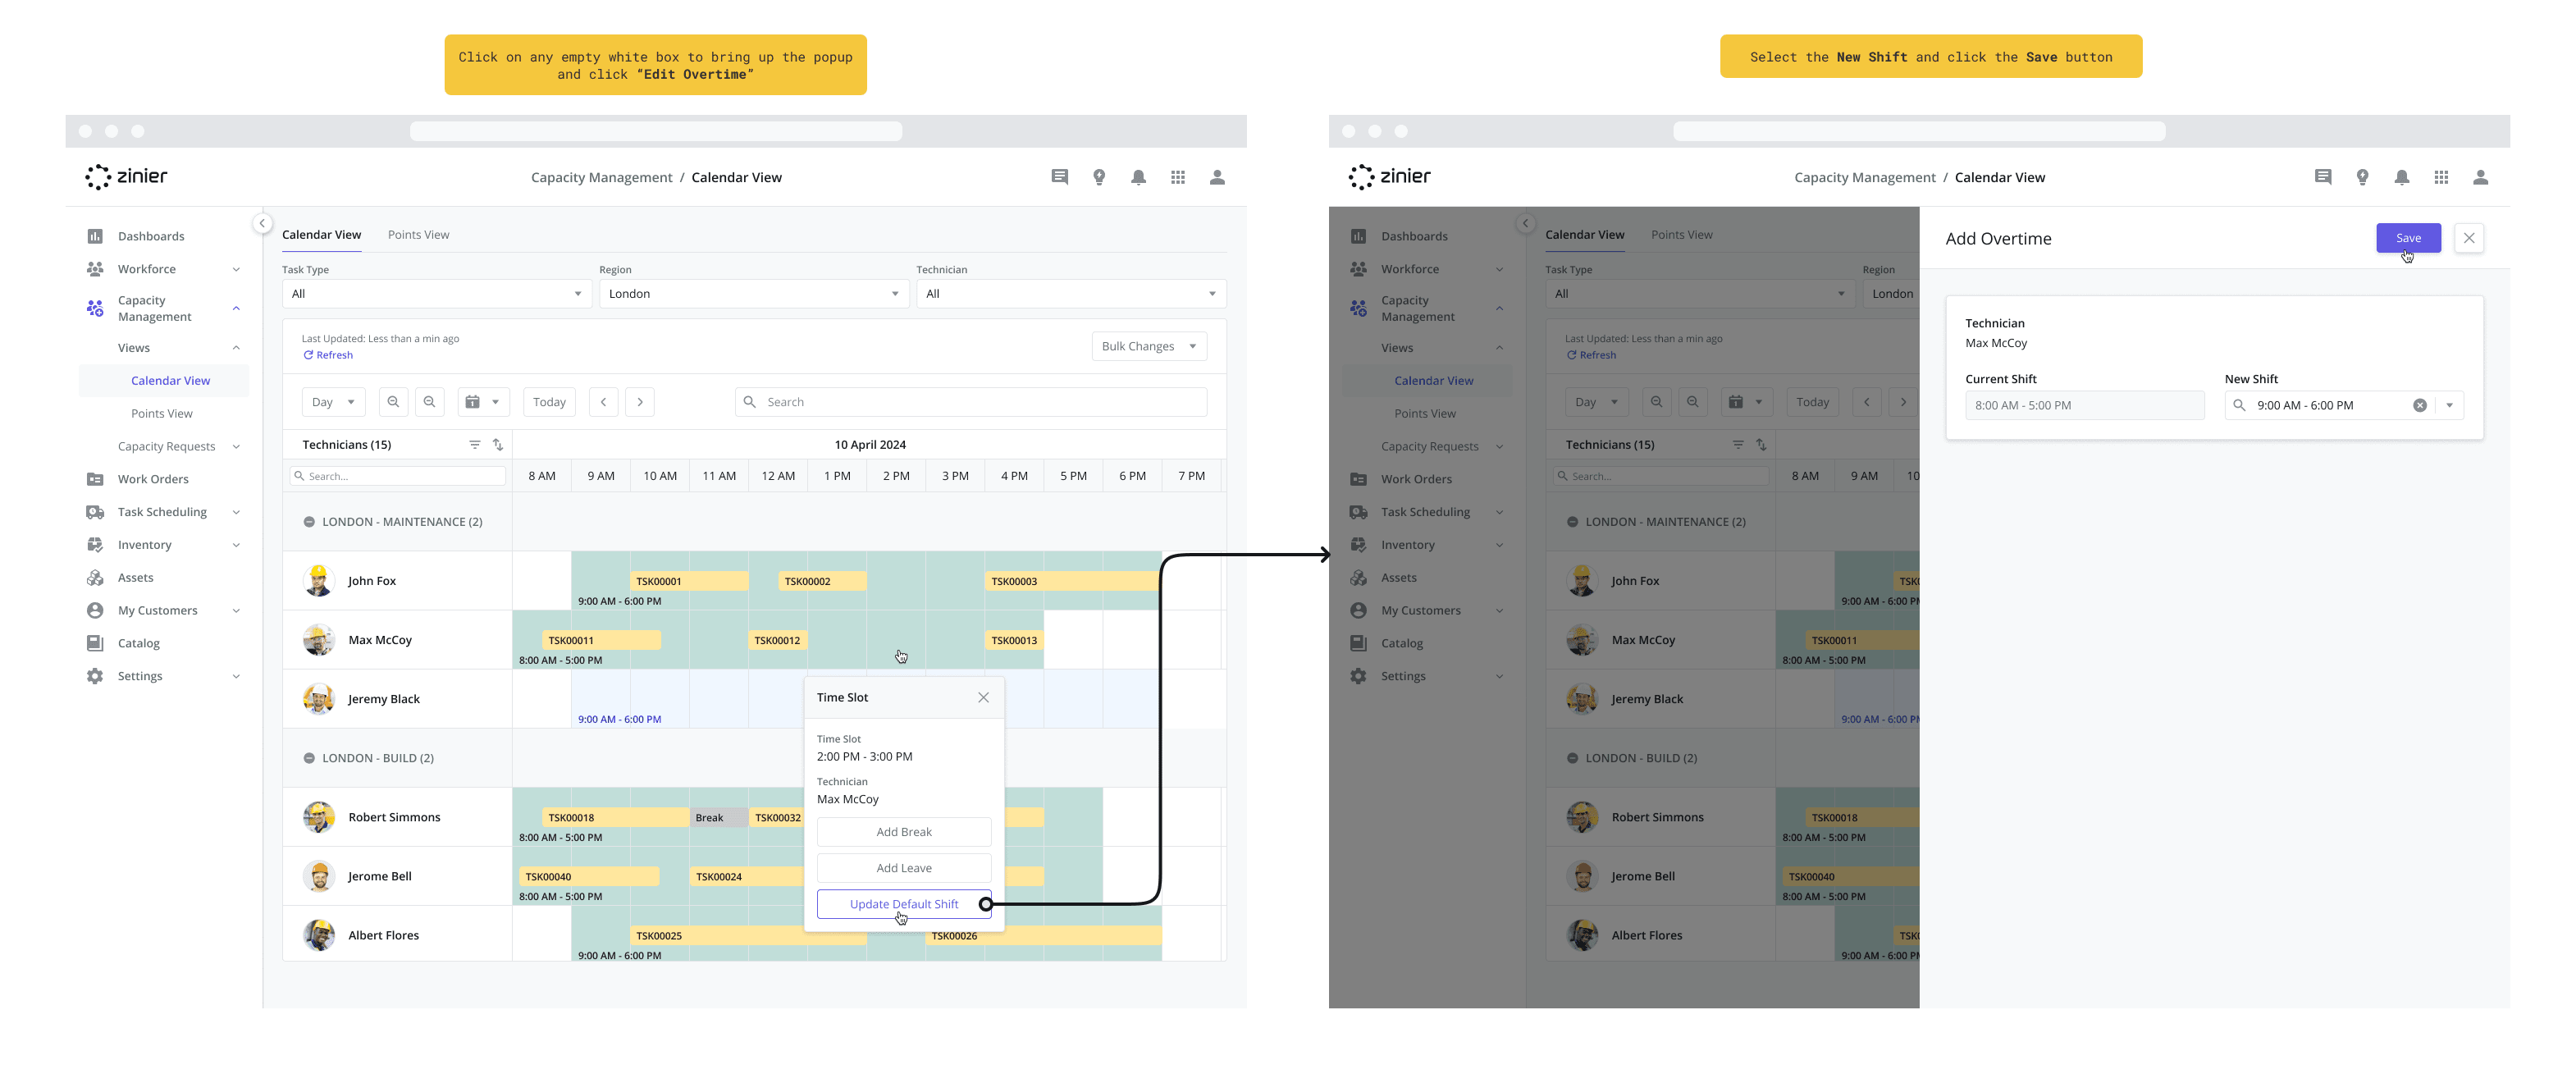
Editing a Default Shift from the Calendar
In addition to making bulk changes, you can also modify individual default Shifts by clicking directly on the event in the Calendar. To edit an existing default Shift, follow the steps below:
Click on the Shift event you wish to edit in the Calendar. Defaults Shifts are displayed as green boxes.
Click the “Update Default Shift” button from the popup to bring up the sidepanel.
The dropdown on the left displays the technician’s Current Shift - the Shift that will be changed. Select the Shift you wish to change it to from the Shifts dropdown.
Click the Save button to apply the changes.
Add Overtime to Temporarily Increase Capacity
UPDATED (24.4)
Adding Overtime allows you to increase the capacity of your workforce by adding additional working hours to the calendar (Shift) of your technicians. During Overtime, technicians are available for Scheduling & Dispatch, even if the task falls outside their Work Schedule/default Shift. While Overtime can be added from the Workforce module, the benefit of adding it here is that you can make changes in bulk.
When creating a new Technician, you add Overtime from the Work Schedule tab in the side panel after the record is saved. For more information on adding Leave, see the Workforce Management Settings page.
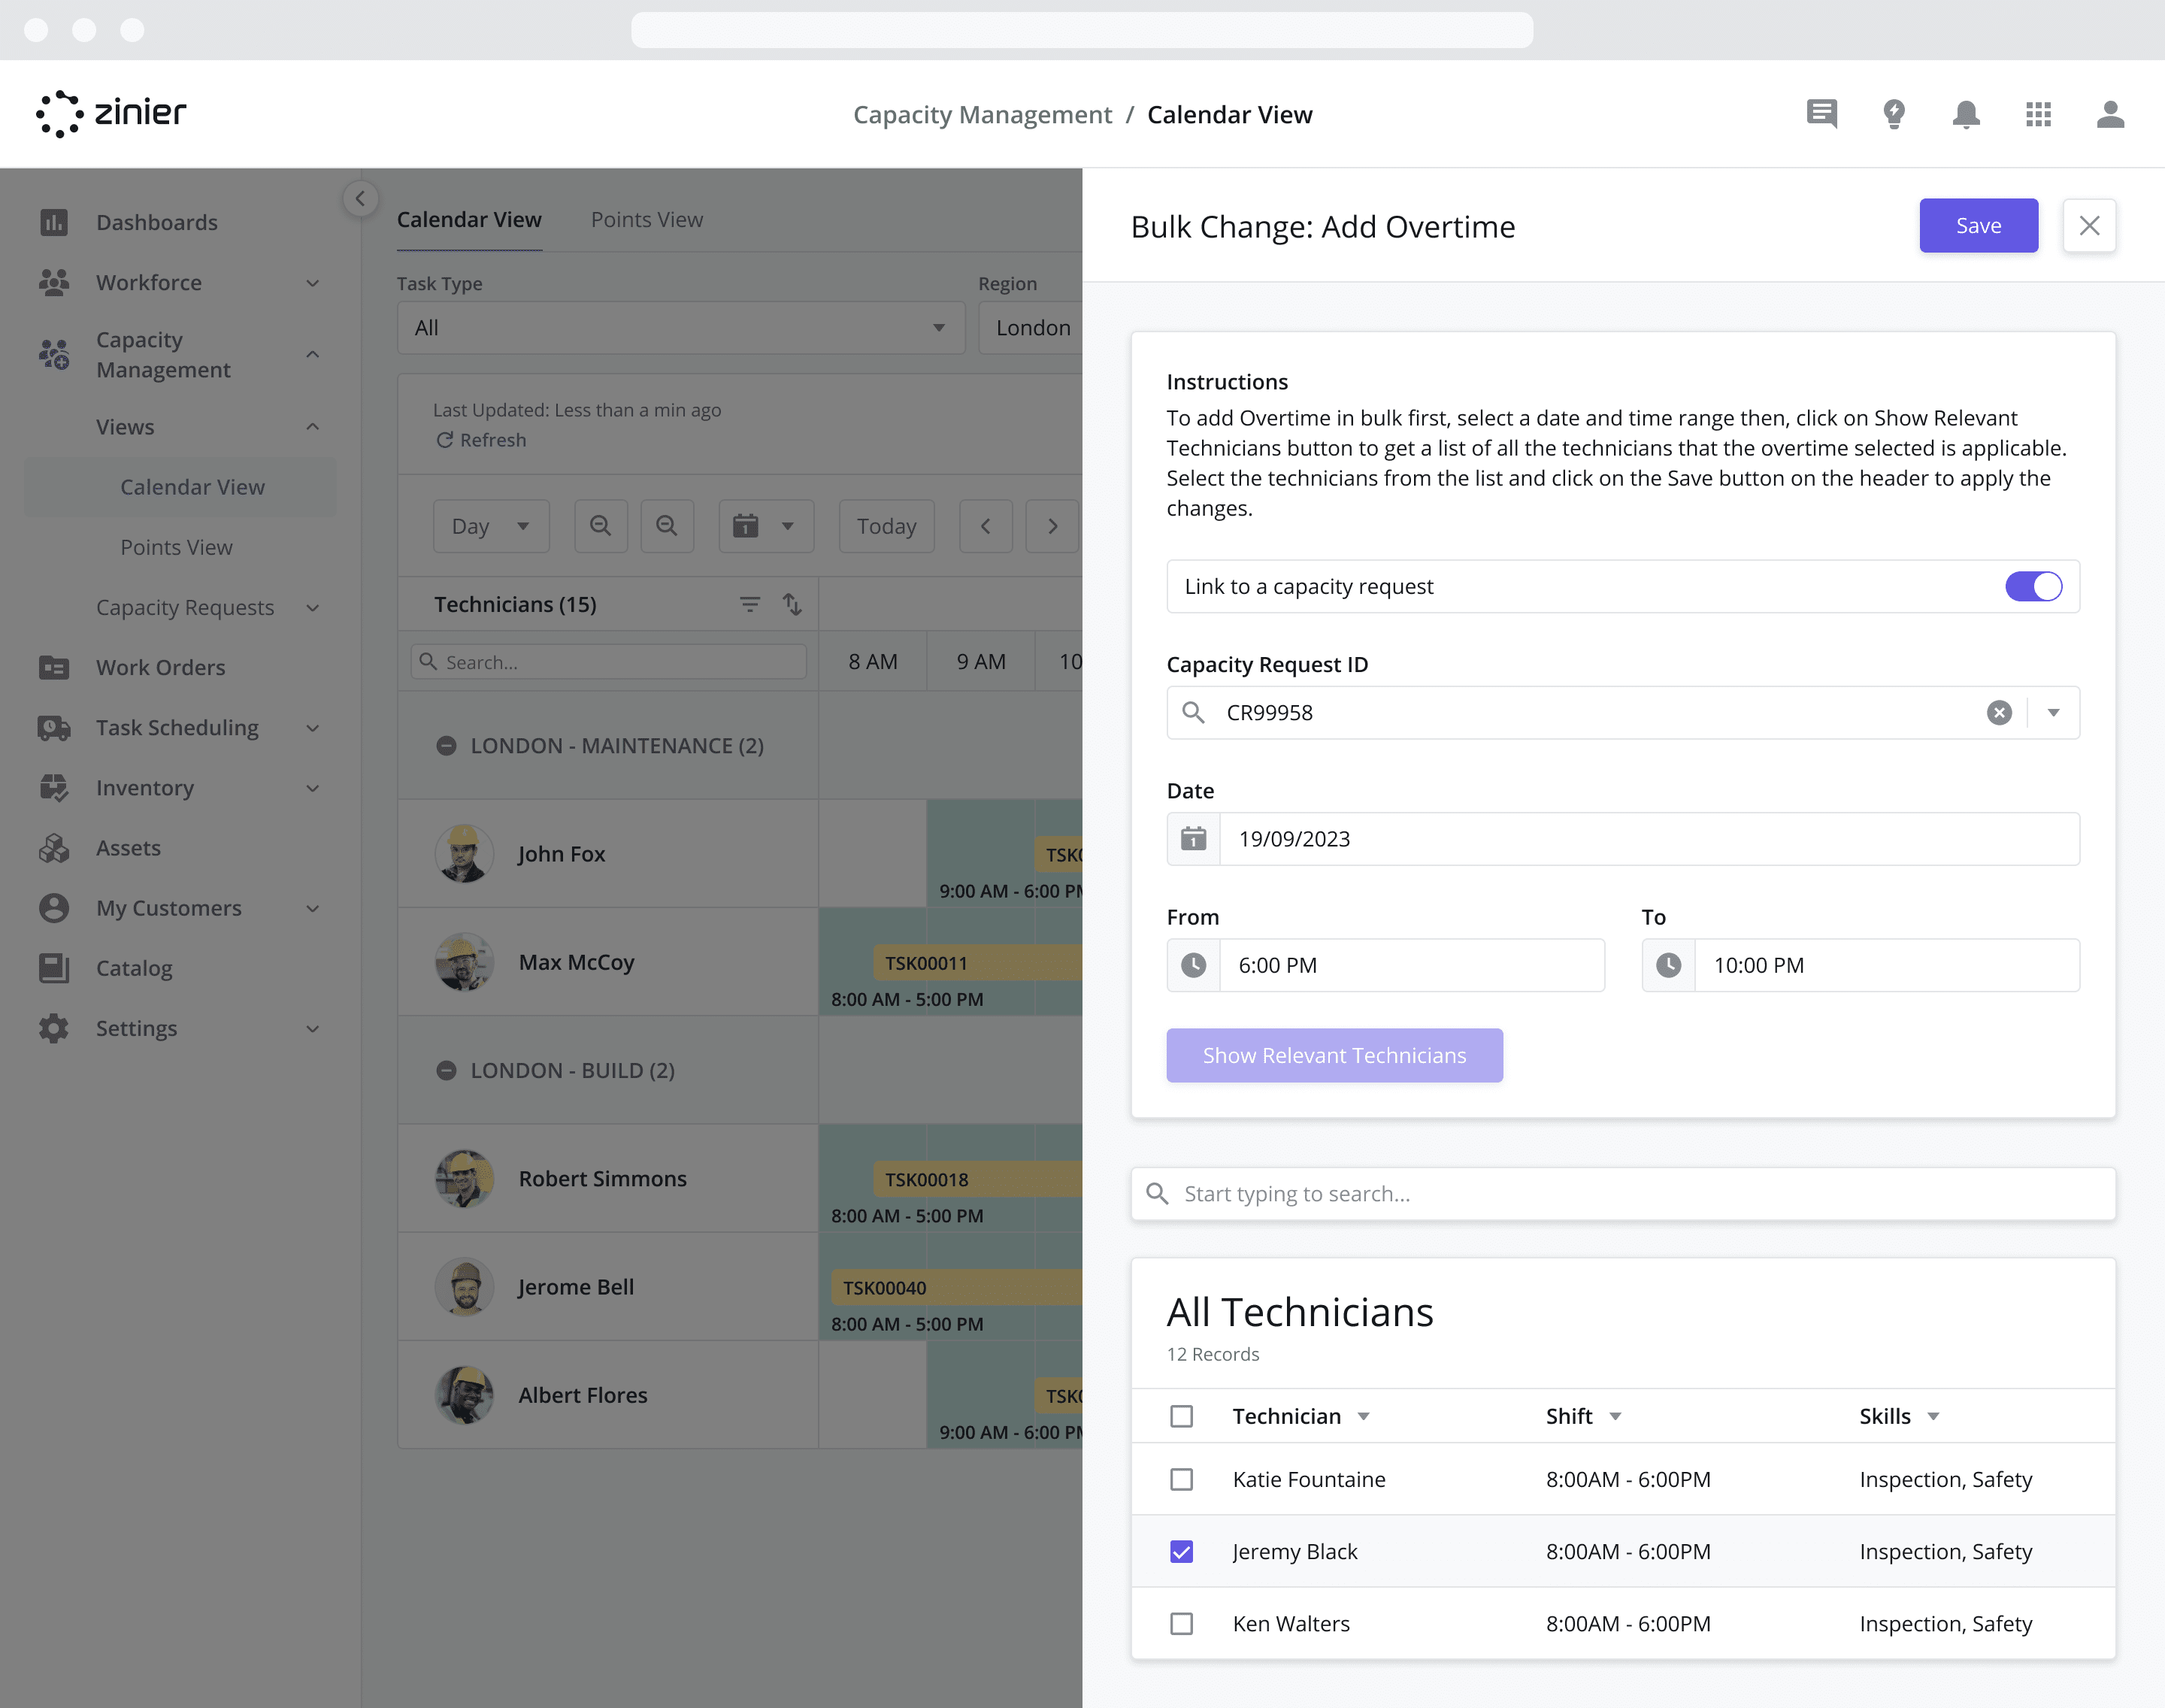
Adding Overtime (in bulk)
To add Overtime to your workforce in bulk, follow the steps below:
Click on the “Bulk Actions” dropdown at the top of the datagrid and select “Add Overtime”.
Decide whether or not to Link to a capacity request:
If Enabled: You will have the option to select the Capacity Request Id you wish to associate the Overtime with. Essentially, the Overtime added is then used to “fulfill” the Capacity Request.
If Disabled: Nothing is required – the Overtime will not be associated with a Capacity Request.
Select the Date you wish the Overtime to start.
Using the From dropdown, select the starting time for Overtime. This is applied to the date selected above.
Using the To dropdown, select the ending time for Overtime. This is applied to the date selected above.
Click the Show Relevant Technicians button to show a list of technicians where the overtime selected is applicable.
Select the Technicians you’d like the Overtime applied to from the list.
Click the Save button to apply the changes.
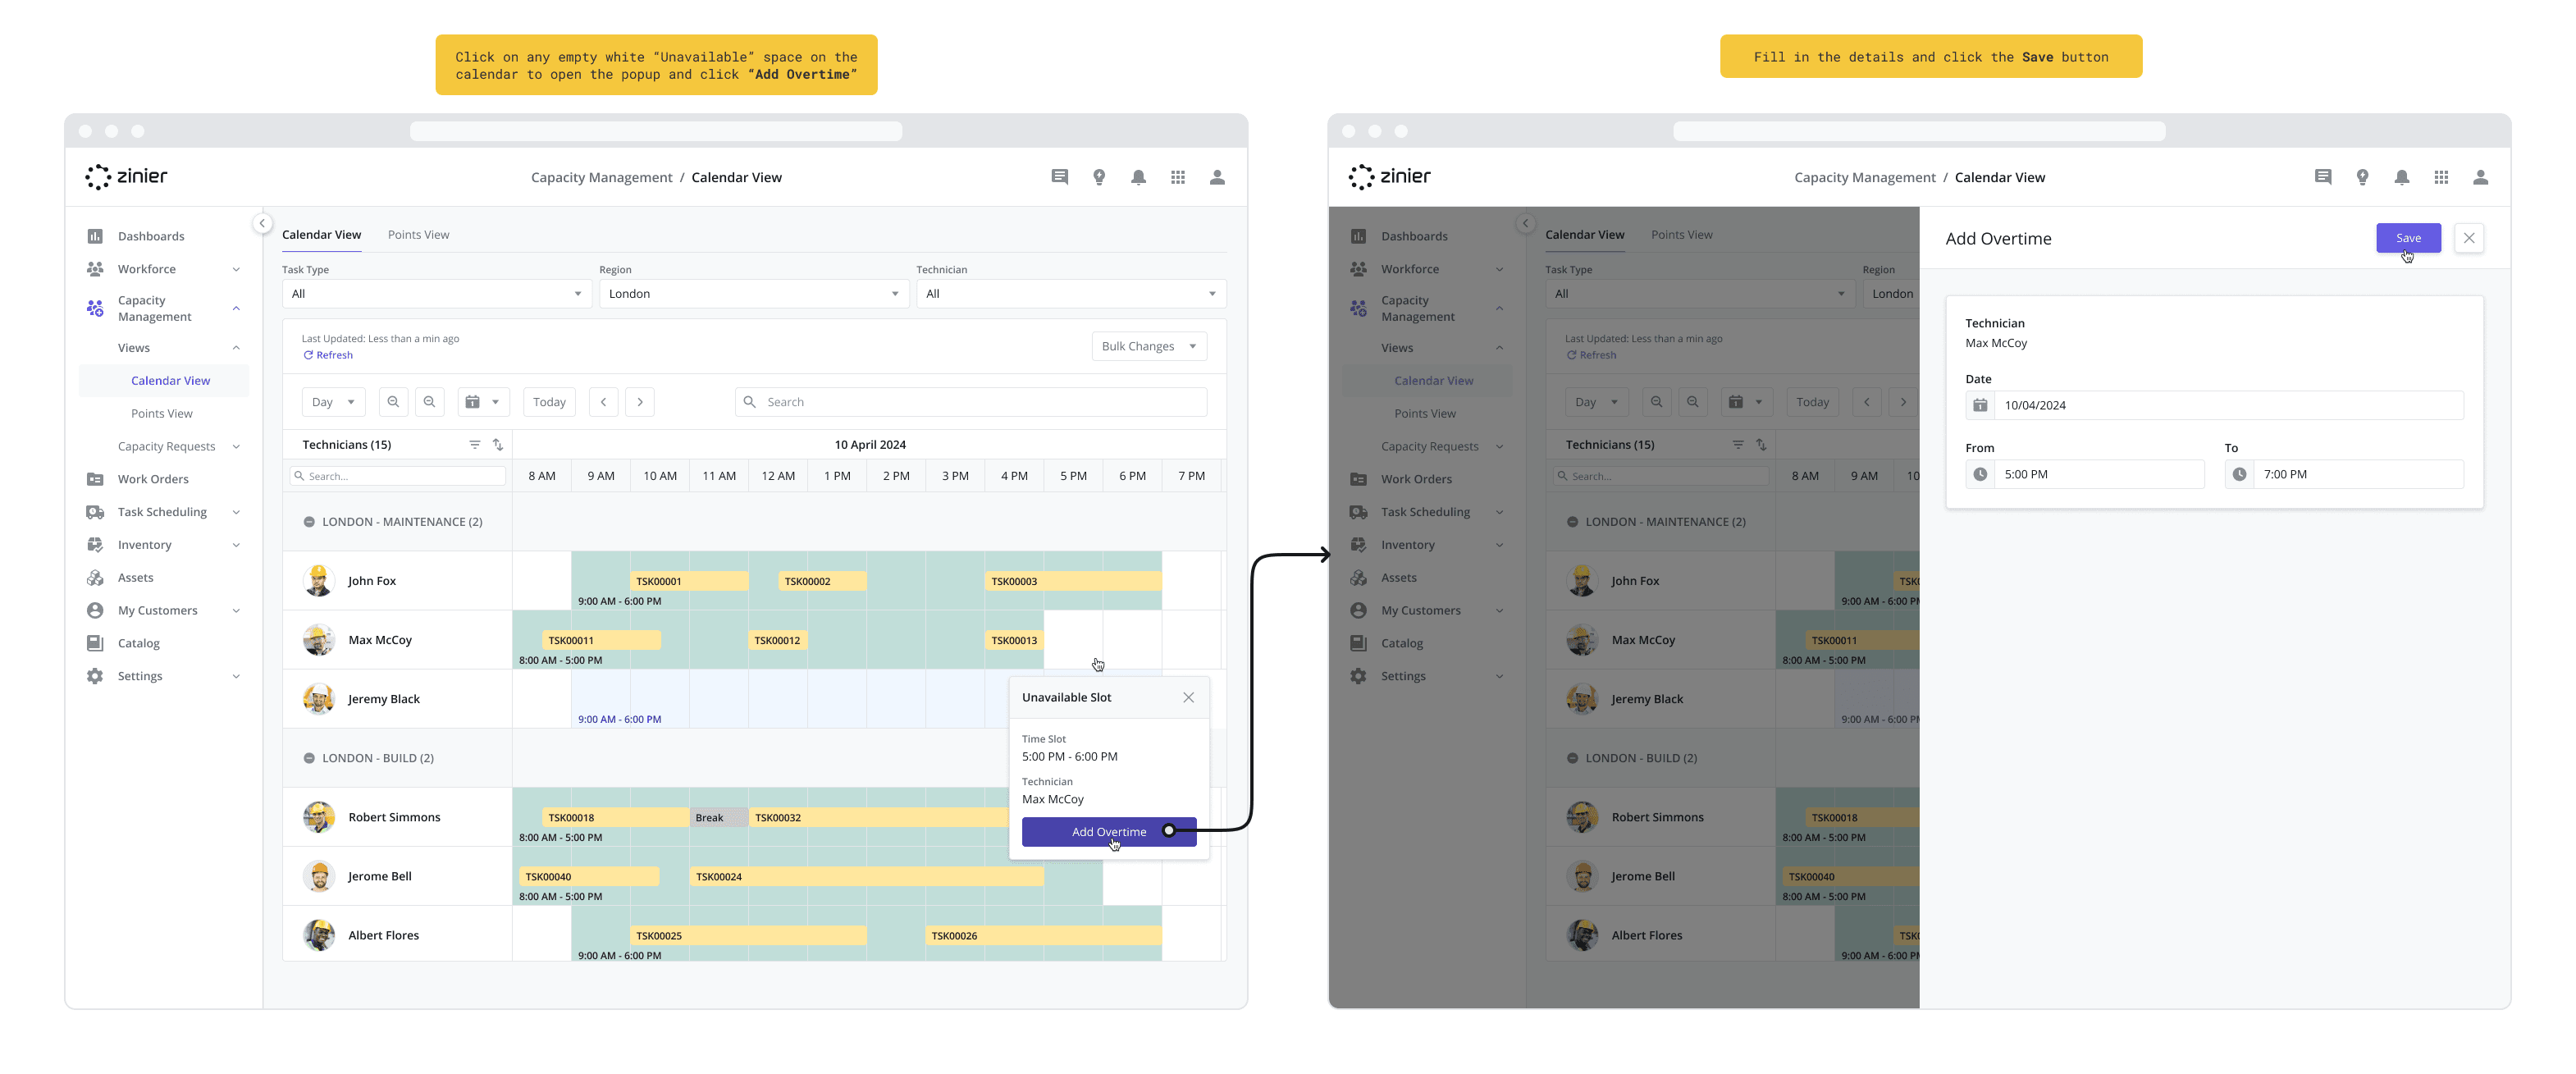
Adding Overtime from the Calendar
In addition to making bulk changes, you can also add individual Overtime events by clicking directly on the Calendar. To do so, follow the steps below:
Click on an empty white box in the Calendar to bring up the popup. Empty white space represents Unavailable time for the technician - time outside his or her Default Shift or Shift Override.
Click the “Add Overtime” button from the popup to bring up the sidepanel.
Select the Date you wish the Overtime to start.
Using the From dropdown, select the starting time for Overtime. This is applied to the date selected above.
Using the To dropdown, select the ending time for Overtime. This is applied to the date selected above.
Click the Save button to apply the changes - overtime will be added to the calendar for that technician represented as a bright green box labeled “Overtime”.
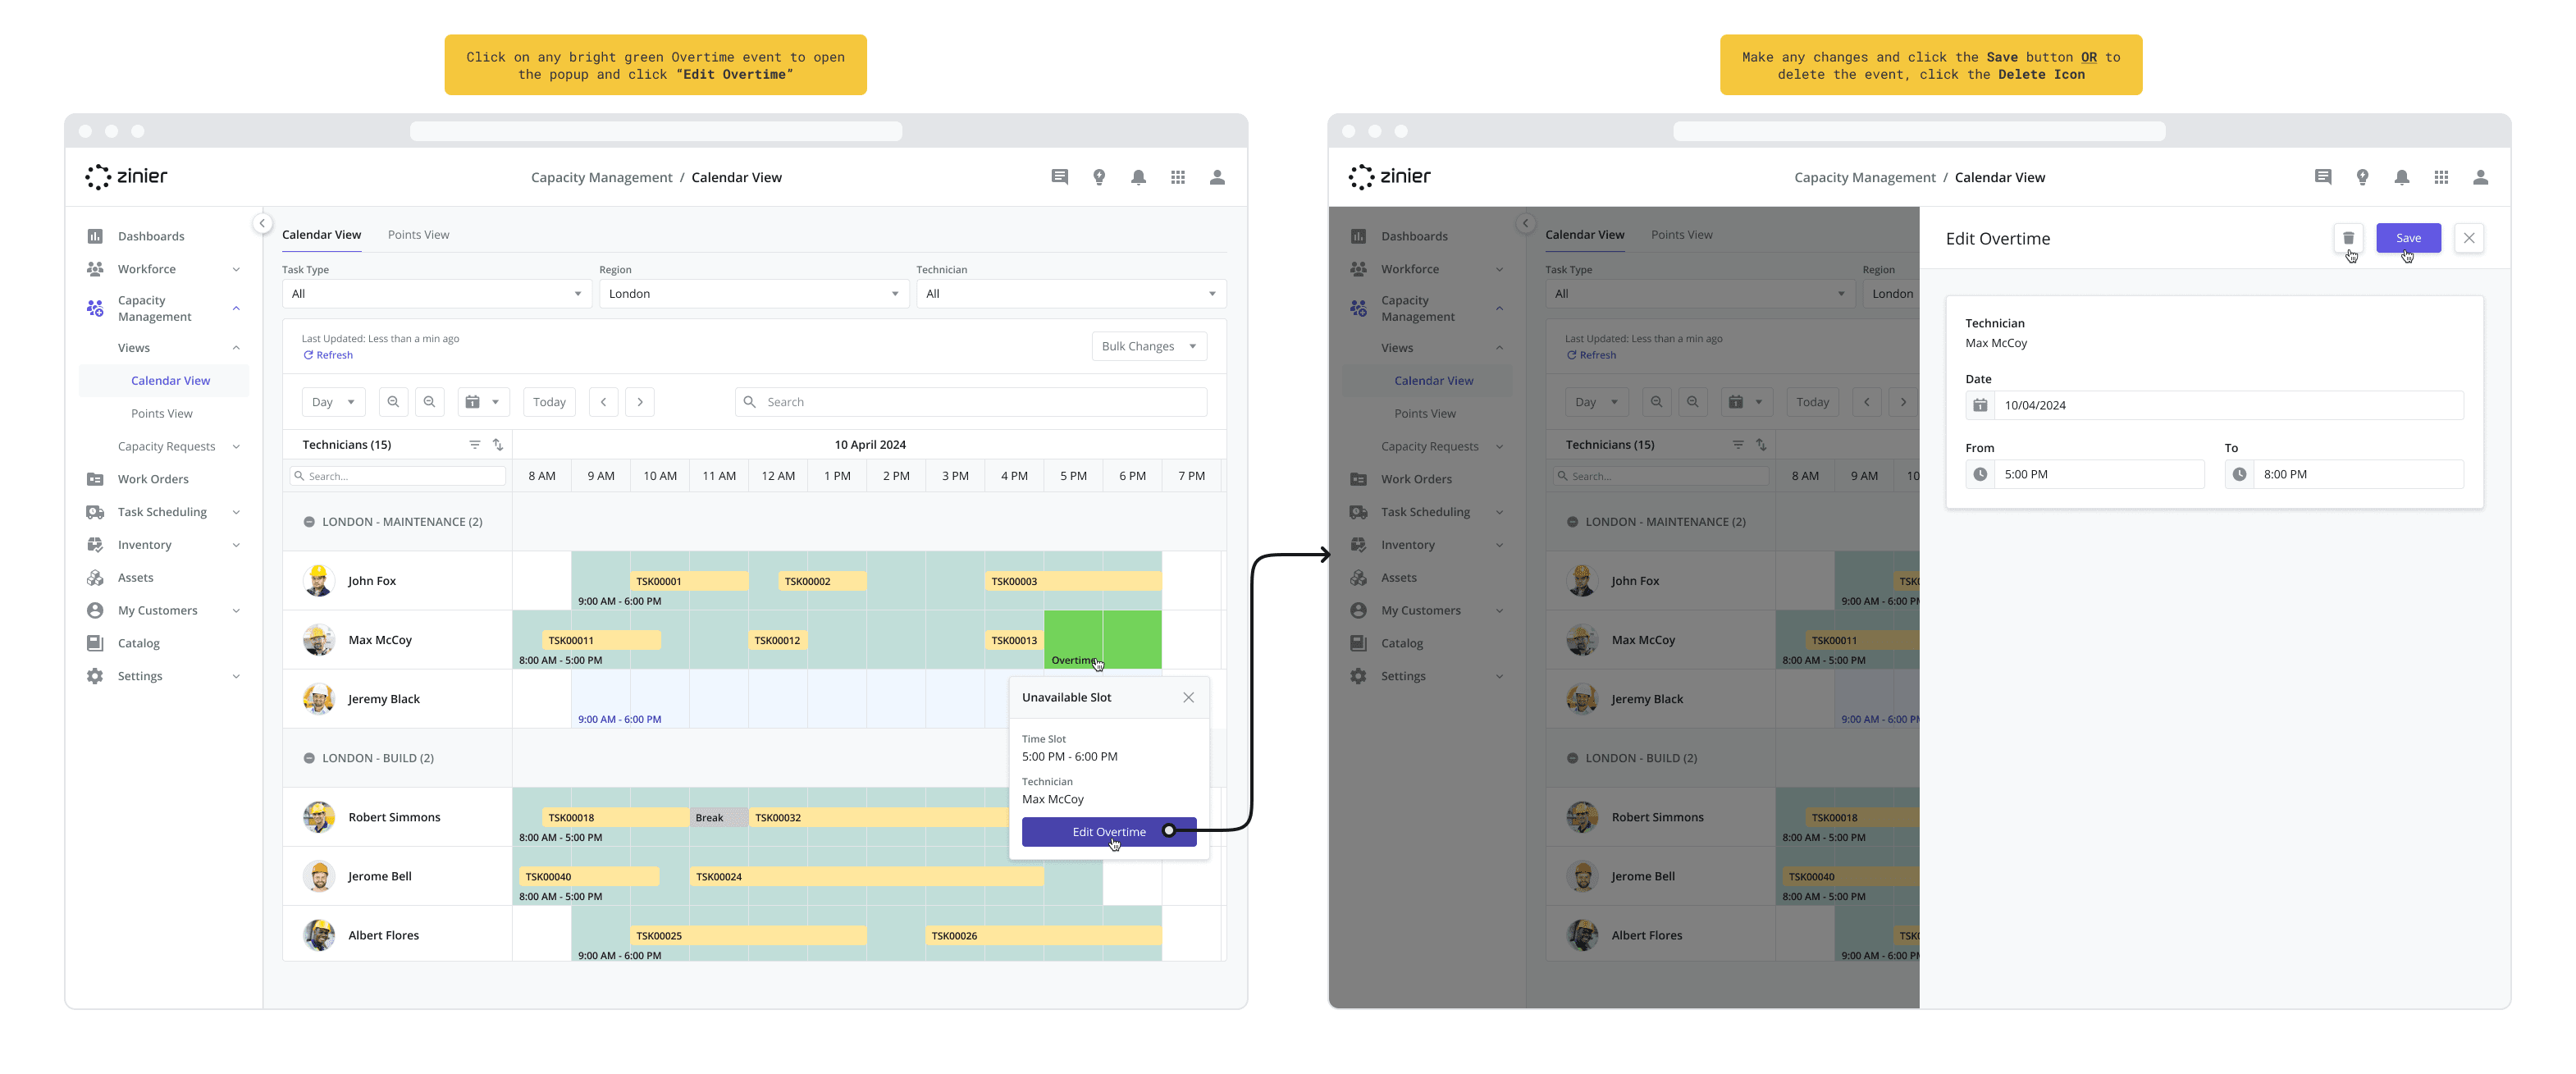
Editing / Deleting Overtime from the Calendar
To edit an existing Overtime event, follow the steps below:
Click on the Overtime event you wish to edit in the Calendar. Overtime events are displayed as bright green boxes.
Click the “Edit Overtime” button from the popup to bring up the sidepanel.
Depending on whether you wish to modify or delete the record, follow the steps below:
To Modify the record:
Make any changes to the timeframe by modifying the Date, From or To fields.
Click the Save button.
To Delete the record:
Click on the Delete icon at the top of the side panel.
Add Breaks and Leave
UPDATED (24.4)
Adding Breaks and Leave decrease the capacity of your workforce by removing working hours from your technicians' Work Schedules.
Breaks vs. Leave
Much like Leave, during breaks, technicians are not available for Scheduling & Dispatch, even if the task falls within their Work Schedule/default Shift. While Leave and Breaks are similar from a scheduling perspective, Breaks do offer a bit more flexibility. For example, I could define a break to represent another non-leave activity such taking stock inventory or company outings where the technician may be working but is not available for scheduling. To summarize some of the main differences:
Duration: Leave events can span more than a single day – if a technician goes on holiday for a week for example. Break events must fall within a single day.
One off vs. Recurring: Leave events are individual events that can not be recurring. Break events can be recurring. For example, I might define “Lunch” as a Break event and have it occur every weekday from 12pm-1pm. This serves the purpose to block the technician from scheduling during his or her lunch break.
Leave includes a Reason: Leave events must be accompanied by a “Reason” which must also be configured for your org using the List Options feature. For example, you might configure the reasons as “Sick Day”, “Vacation”, “Personal Day” etc. The reason is what appears in the text box of the event on the calendar. Breaks do not include reasons by default.
Color and Name of Breaks can be Customized: The color of the event on the calendar and the name of the Break can be customized, providing more flexibility to how they are used. When leave is added to the calendar, it always shows up as “grey” and the text displayed takes on the “Reason” by default.
When creating a new Technician or editing the profile, you can also add “Leave” from the Work Schedule tab in the side panel. For more information on adding Leave from the Workforce module, see the Workforce Management Settings page.
Adding Breaks (in bulk)
To add Breaks to your workforce, follow the steps below:
Step 1: Enter the Break settings and timeframe and select the Technicians
Click on the “Bulk Actions” dropdown at the top of the datagrid and select “Define Breaks”.
In the Event Color field, enter a color hex code to define the color used in the Calendar for the break. Or use the default hex color code provided. For example hex color codes and palettes, you may find this site useful: https://www.color-hex.com/
Give your Break a Name (i.e. Lunch or Inventory Restock). This will be displayed in the calendar once the Break is saved.
Select the Start On date, which is the date you wish the Break to start.
Using the From dropdown, select the starting time for the Break. This time is applied to the Start On date.
Using the To dropdown, select the ending time for the Break. This time is applied to the Start On date.
To repeat the Break so that it recurs on more than one day, enable the “Repeats” toggle and define the recurrence:
Define how often the Break will repeat (Daily, Weekly, Monthly, etc)
Or, create a custom recurrence by entering the time unit and a number to define how often it will occur.
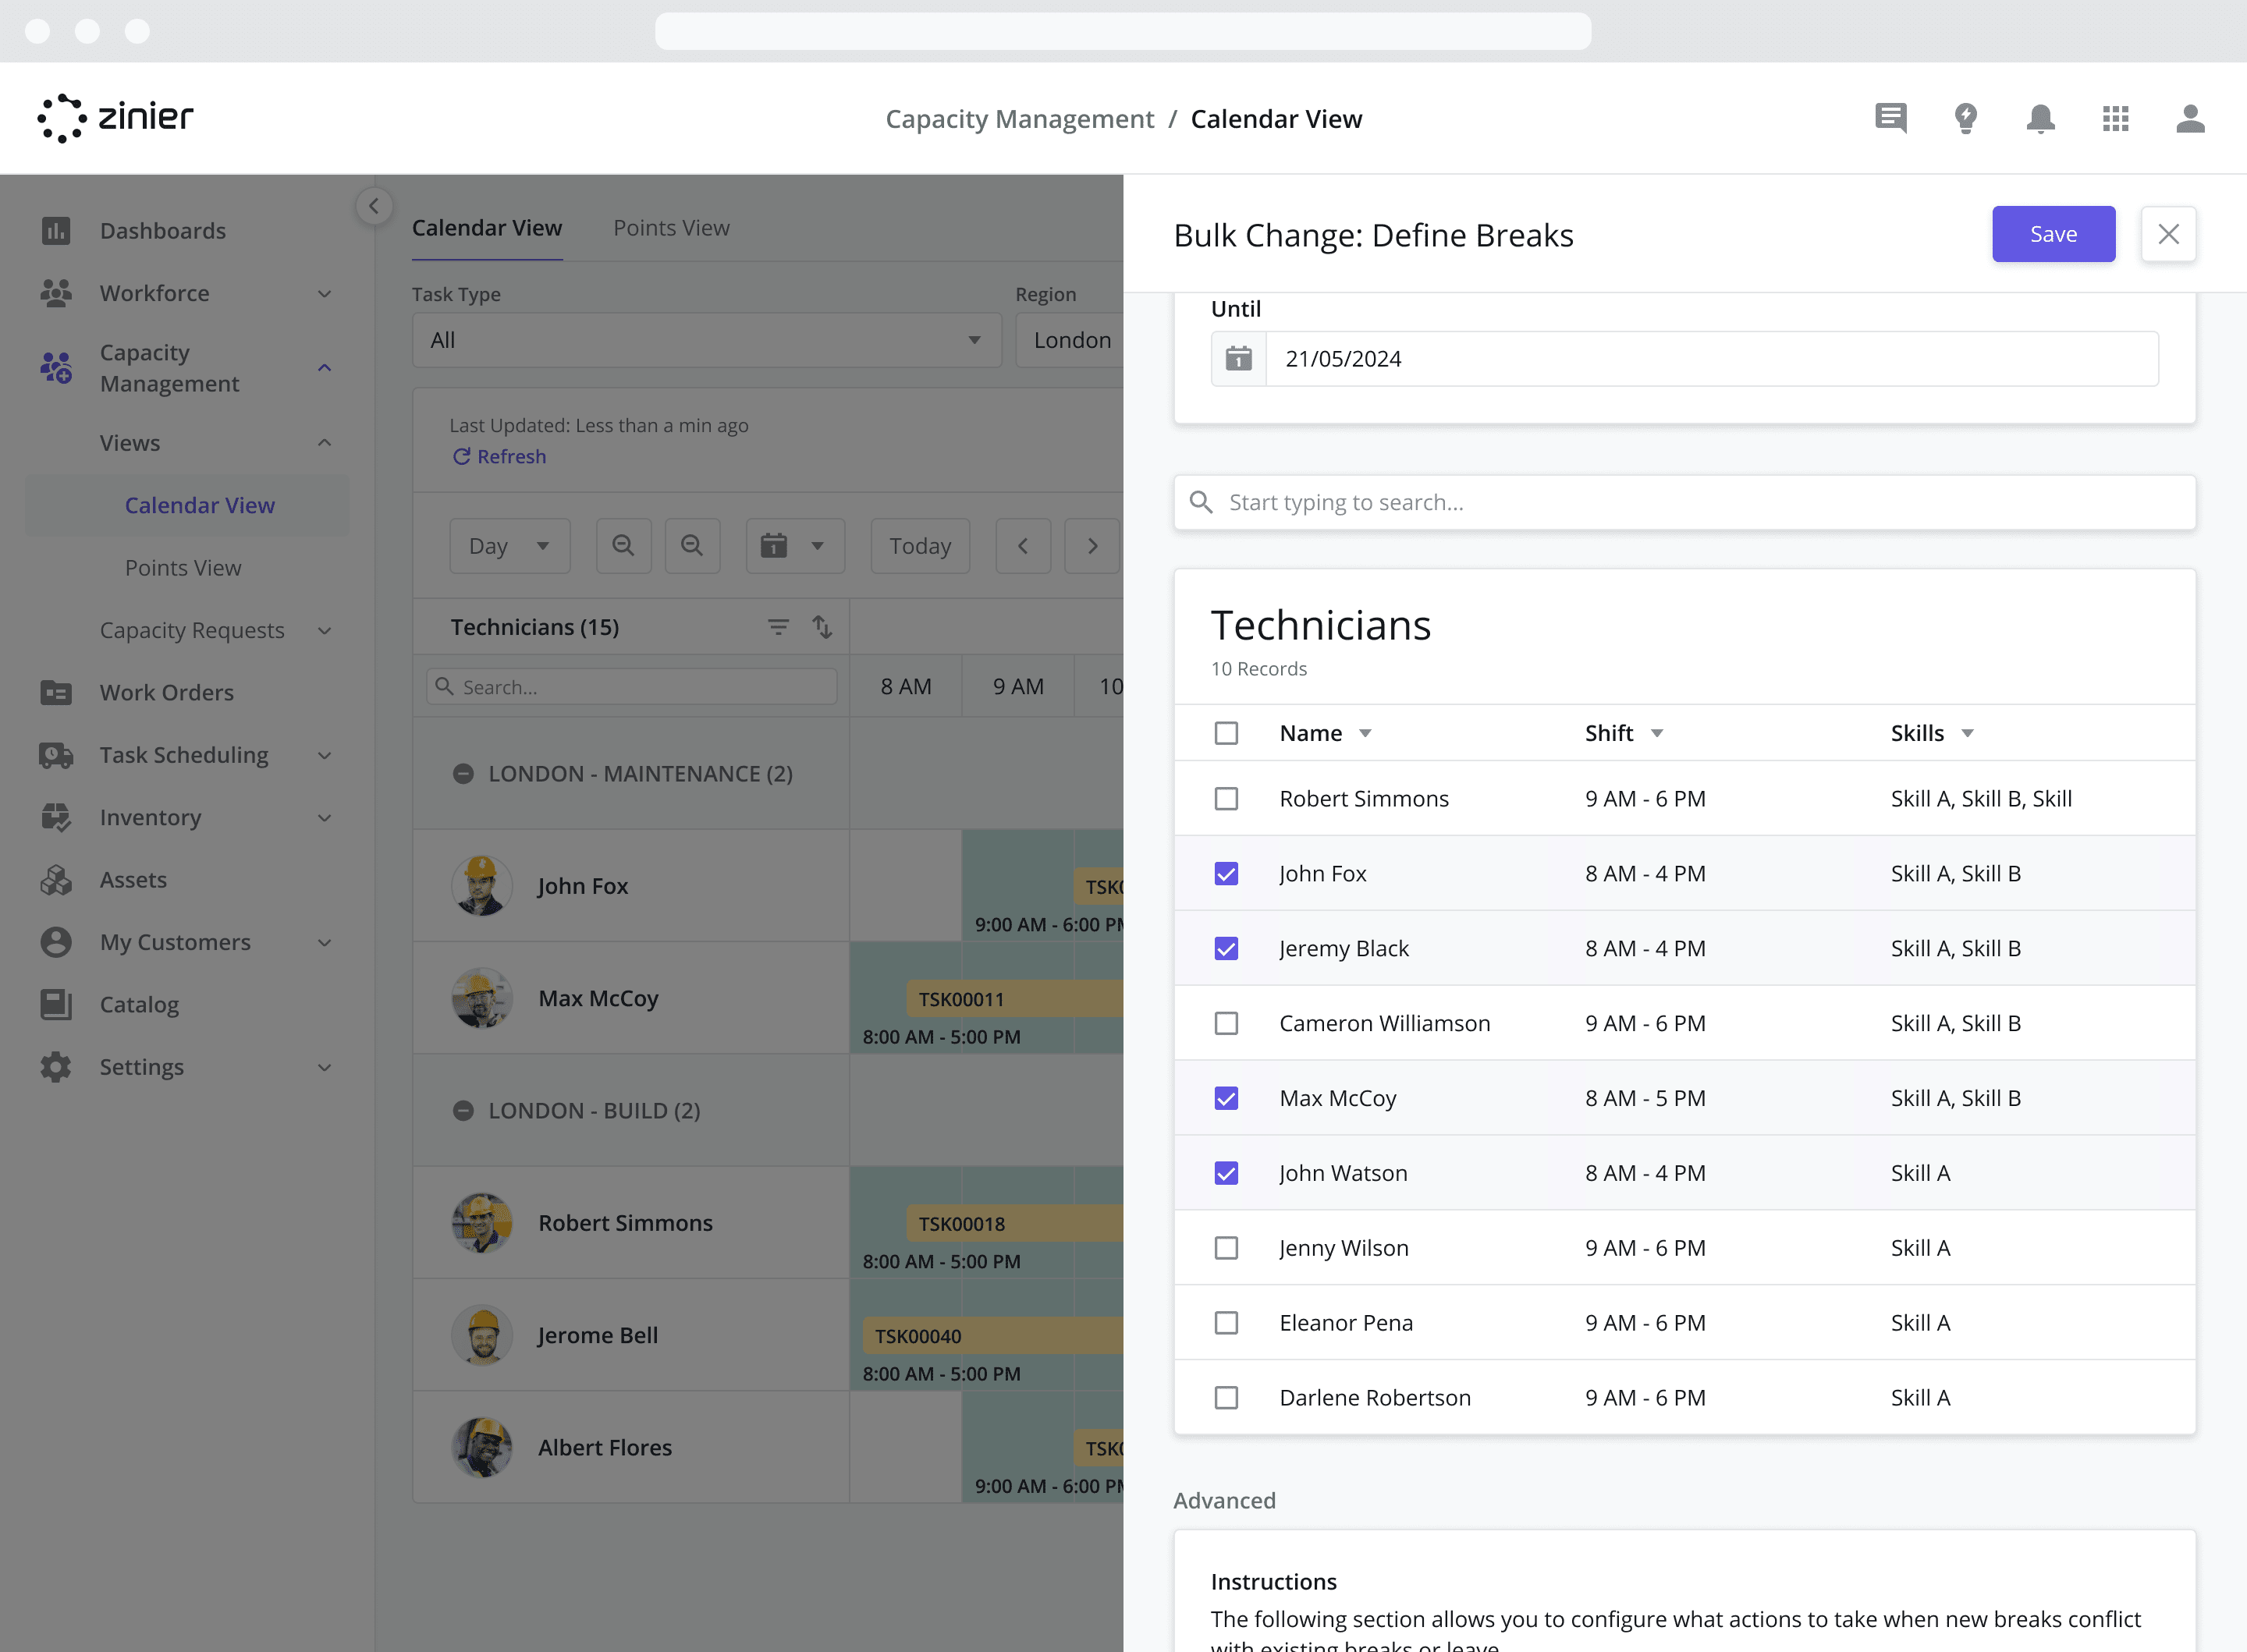
Using the Until dropdown, enter the ending date for the recurring Break. After this date, the Technician(s) will revert to their default Work Schedule.
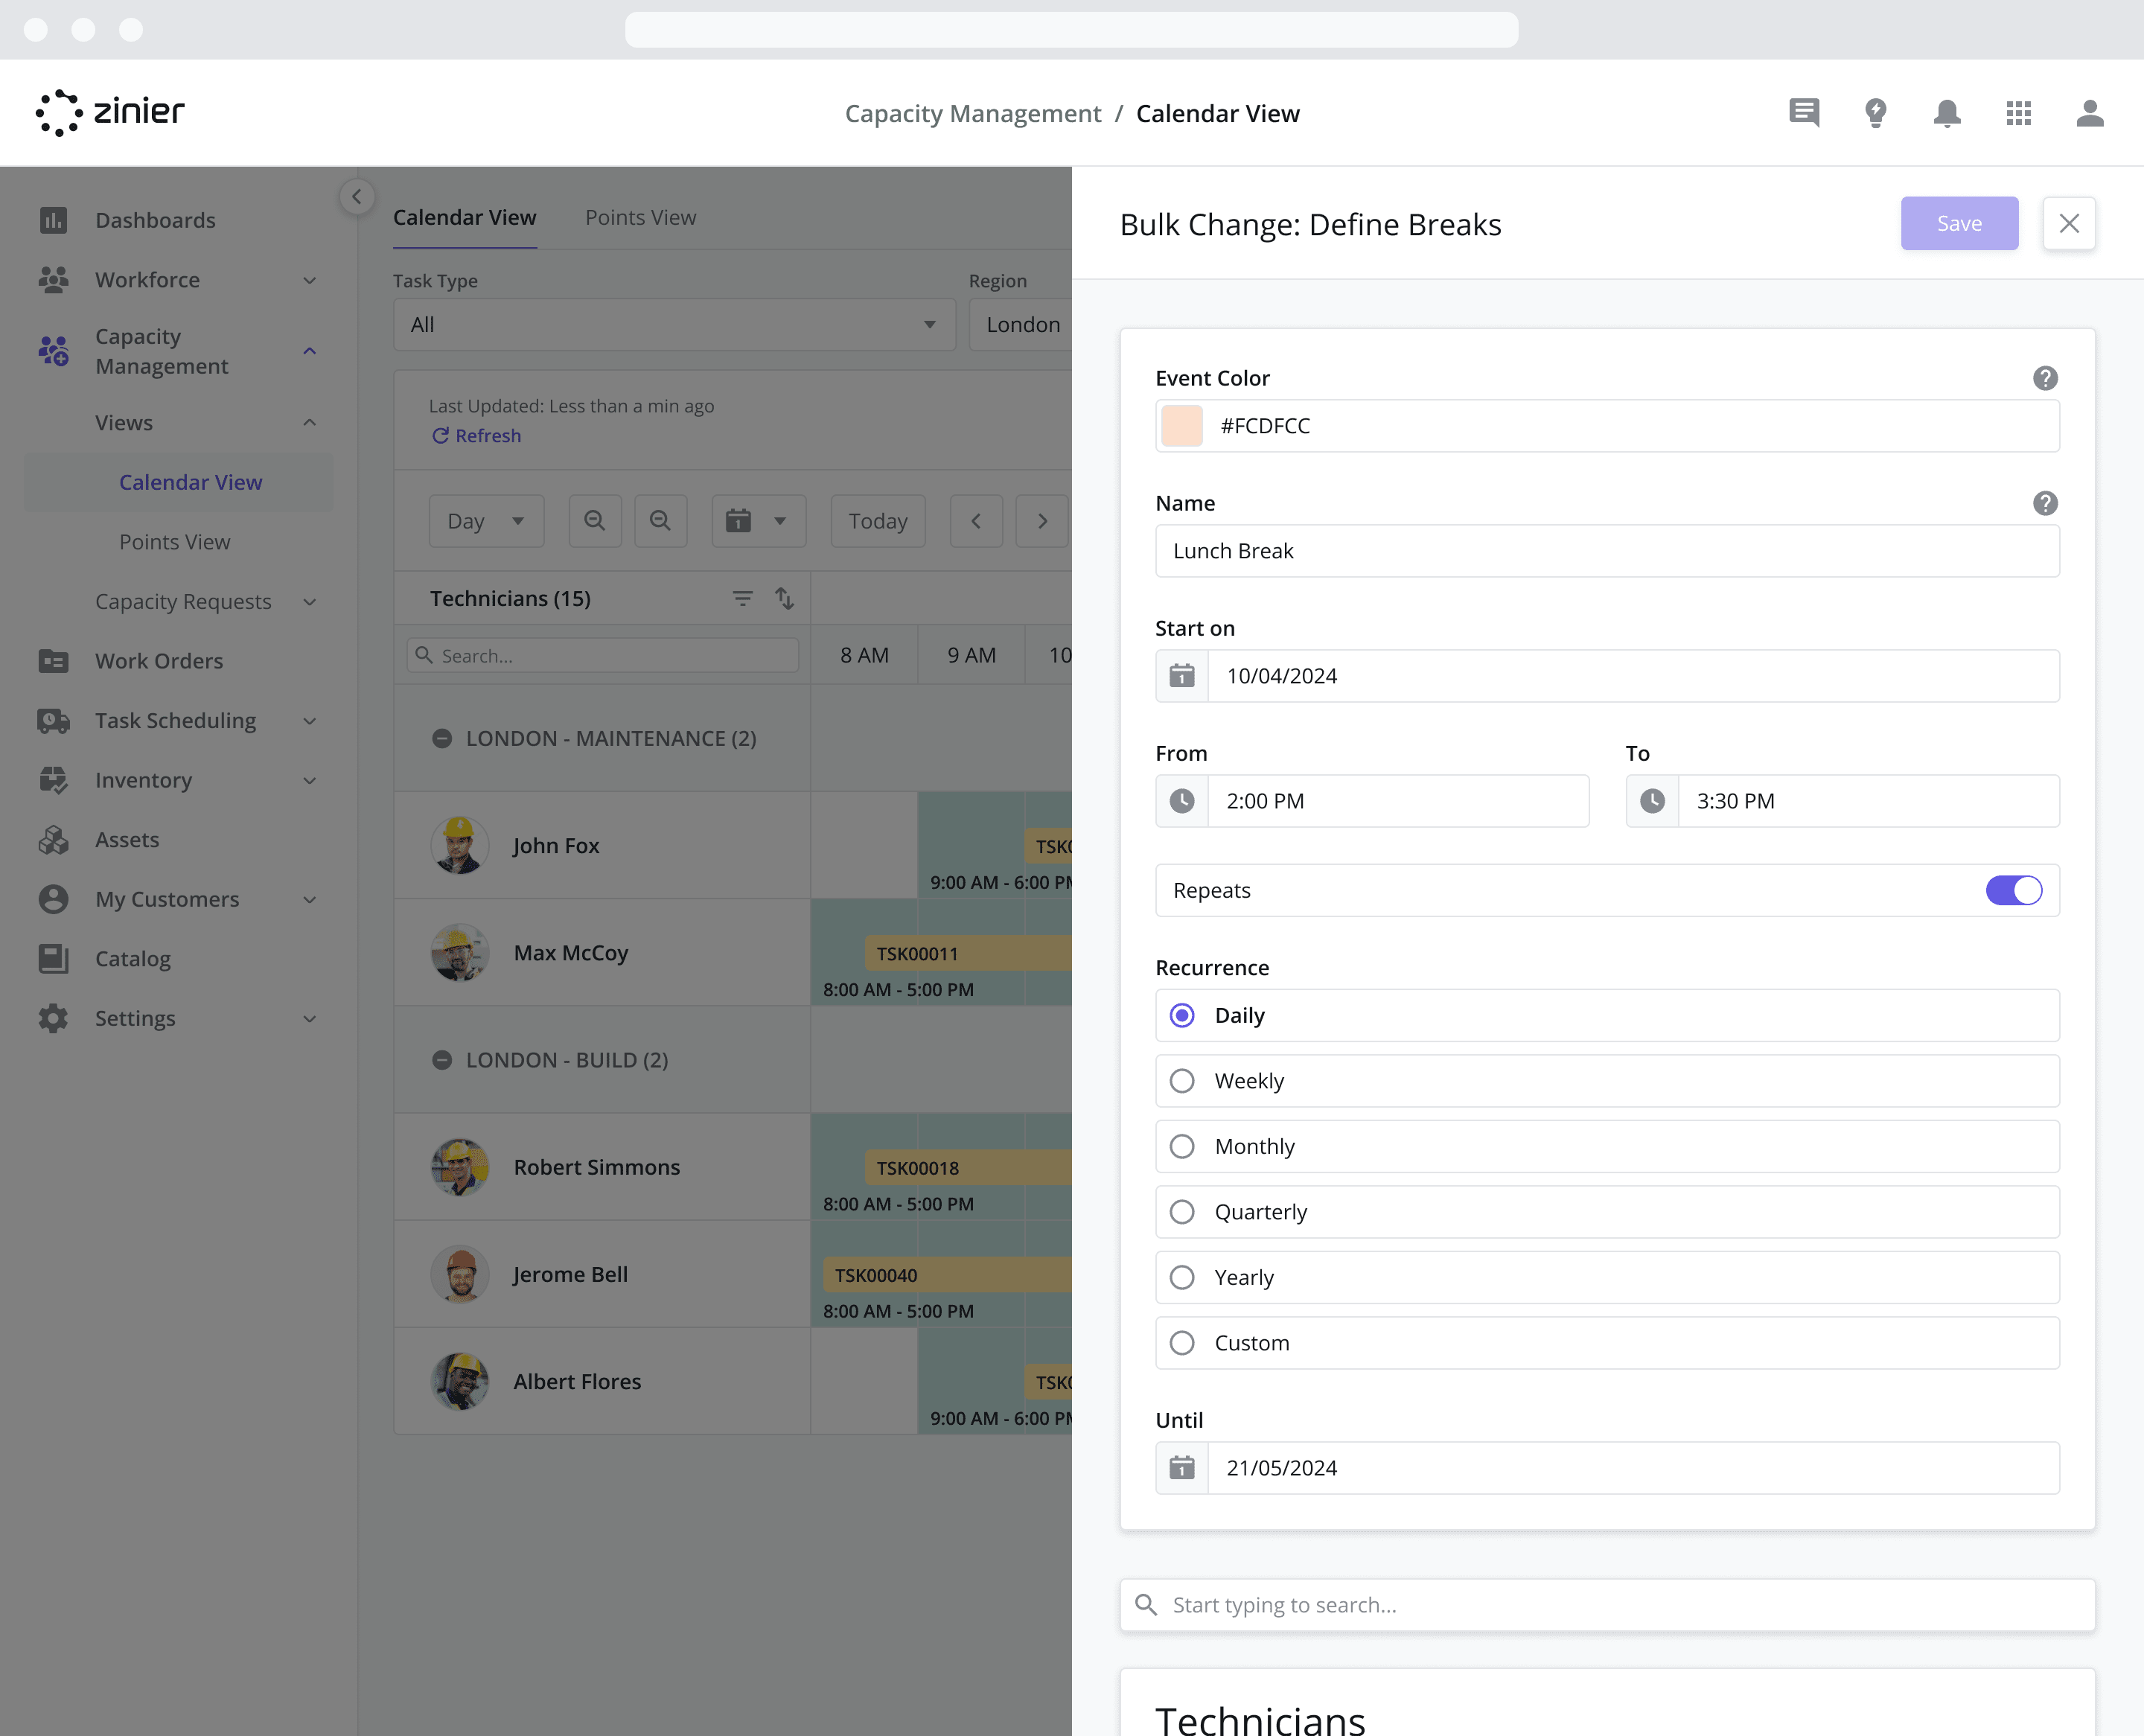
Select the Technicians you’d like the Break applied to from the list.
Step 2: (Advanced) Define how to manage conflicts
Creating a Break can at times overlap with existing Breaks and Leave events. The Advanced section allows you to define how to manage such conflicts:
Decide what to do If the new break overlaps with an existing break. Here you have two options:
Do not create new breaks that overlap with existing breaks
Replace existing breaks with new breaks
Decide what to do If the new break overlaps with existing leave. Here you have two options:
Do not create new breaks that overlap with existing leave
Cancel any existing leave that overlaps with new breaks
Decide what to do If the new break overlaps with default shift breaks. Here you have two options:
Do not create new breaks that overlap with default shift breaks
Click the Save button to apply the changes.
Adding Breaks within a specific Default Shift or Shift Override from the Calendar
In addition to adding Breaks in bulk, you can add Breaks to individual default Shifts and Shift Overrides by clicking directly on the event in the Calendar. Adding Breaks in this manner allows you to define non-working hours for specific reasons inside a working shift. i.e: Inventory Restock, Lunch, Internal Job, etc.
To add a Break to a default Shift or Shift Override, do the following:
Click on the Shift or Shift Override event you wish to edit in the Calendar. Defaults Shifts are displayed as green boxes while Shift Overrides are displayed as blue boxes.
Click the “Add Break” button from the popup to bring up the sidepanel
In the Event Color field, enter a color hex code to define the color used in the Calendar for the break. Or use the default hex color code provided. For example hex color codes and palettes, you may find this site useful: https://www.color-hex.com/
Give your Break a Name (i.e. Lunch or Inventory Restock). This will be displayed in the calendar once the Break is saved.
Select the Start On date, which is the date you wish the Break to start.
Using the From dropdown, select the starting time for the Break. This time is applied to the Start On date.
Using the To dropdown, select the ending time for the Break. This time is applied to the Start On date.
To repeat the Break so that it recurs on more than one day, enable the “Repeats” toggle and define the recurrence:
Define how often the Break will repeat (Daily, Weekly, Monthly, etc)
Or, create a custom recurrence by entering the time unit and a number to define how often it will occur.
Using the Until dropdown, enter the ending date for the recurring Break. After this date, the Technician(s) will revert to their default Work Schedule.
Click the Save button to apply the changes.

Editing / Deleting Breaks from the Calendar
To edit an existing Break event, follow the steps below:
Click on the Break event you wish to edit in the Calendar.
Click the “Edit Break” button from the popup to bring up the sidepanel.
Depending on whether you wish to modify or delete the record, follow the steps below:
To Modify the record:
Make any changes to the timeframe by modifying the Event Color, From, To or Until fields.
Click the Save button.
Answer how you wish to proceed and how you wish to manage conflicts and click the Save button.

To Delete the record:
Click on the Delete icon at the top of the side panel.
Answer how you wish to proceed and click the Delete button.
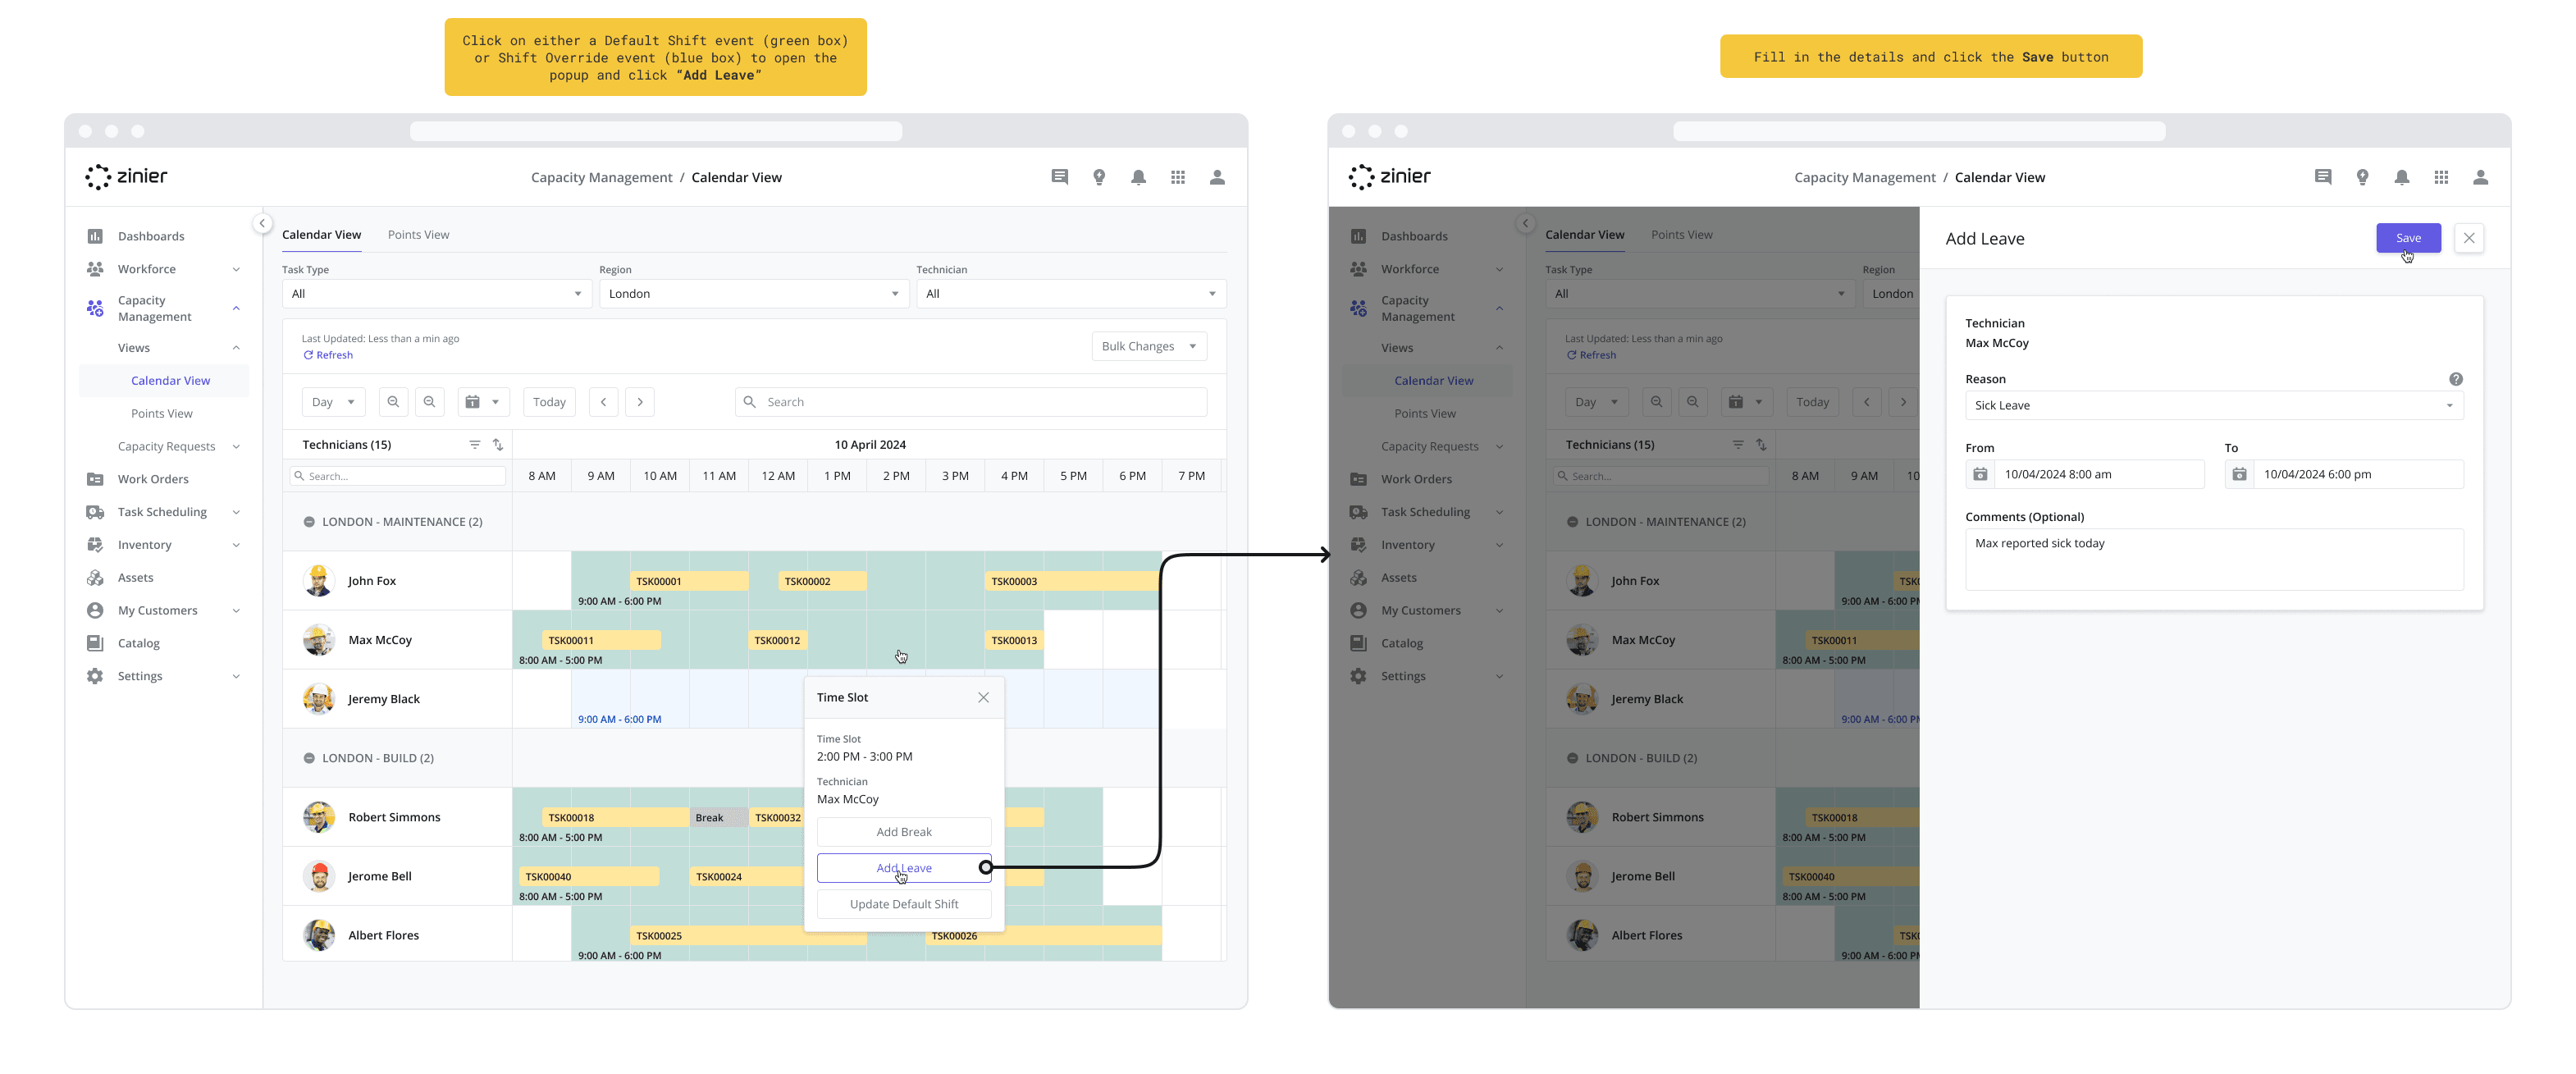
Adding Leave within a specific Work Shift or Shift Override from the Calendar
In addition to adding Breaks, you can also add Leave to individual default Shifts and Shift Overrides by clicking directly on the event in the Calendar. Adding Leave blocks time on a technician’s calendar so they can take time off. During Leave, the technician is considered unavailable for Scheduling & Dispatch. Adding Leave in this manner allows you to select a specific reason for the leave from a dropdown menu (i.e. Vacation, Personal Time).
Configuring the Reasons that can be selected for Leave is done from the Settings > General Settings > List Options. For more information on configuring List Options, visit the List Options page
To add Leave to a default Shift or Shift Override, do the following:
Click on the Shift or Shift Override event you wish to edit in the Calendar. Defaults Shifts are displayed as green boxes while Shift Overrides are displayed as blue boxes
Click the “Add Leave” button from the popup to bring up the sidepanel
Select a Reason for the Leave from the dropdown menu (i.e. Personal Time or Vacation). The default dropdown menu options can be modified at any time from the List Options module.
Using the From dropdown, select the starting date and time for the Leave.
Using the To dropdown, select the ending date and time for the Leave.
Enter any additional Notes (Optional) if required.
Click the Save button to apply the changes.
Editing / Deleting Leave from the Calendar
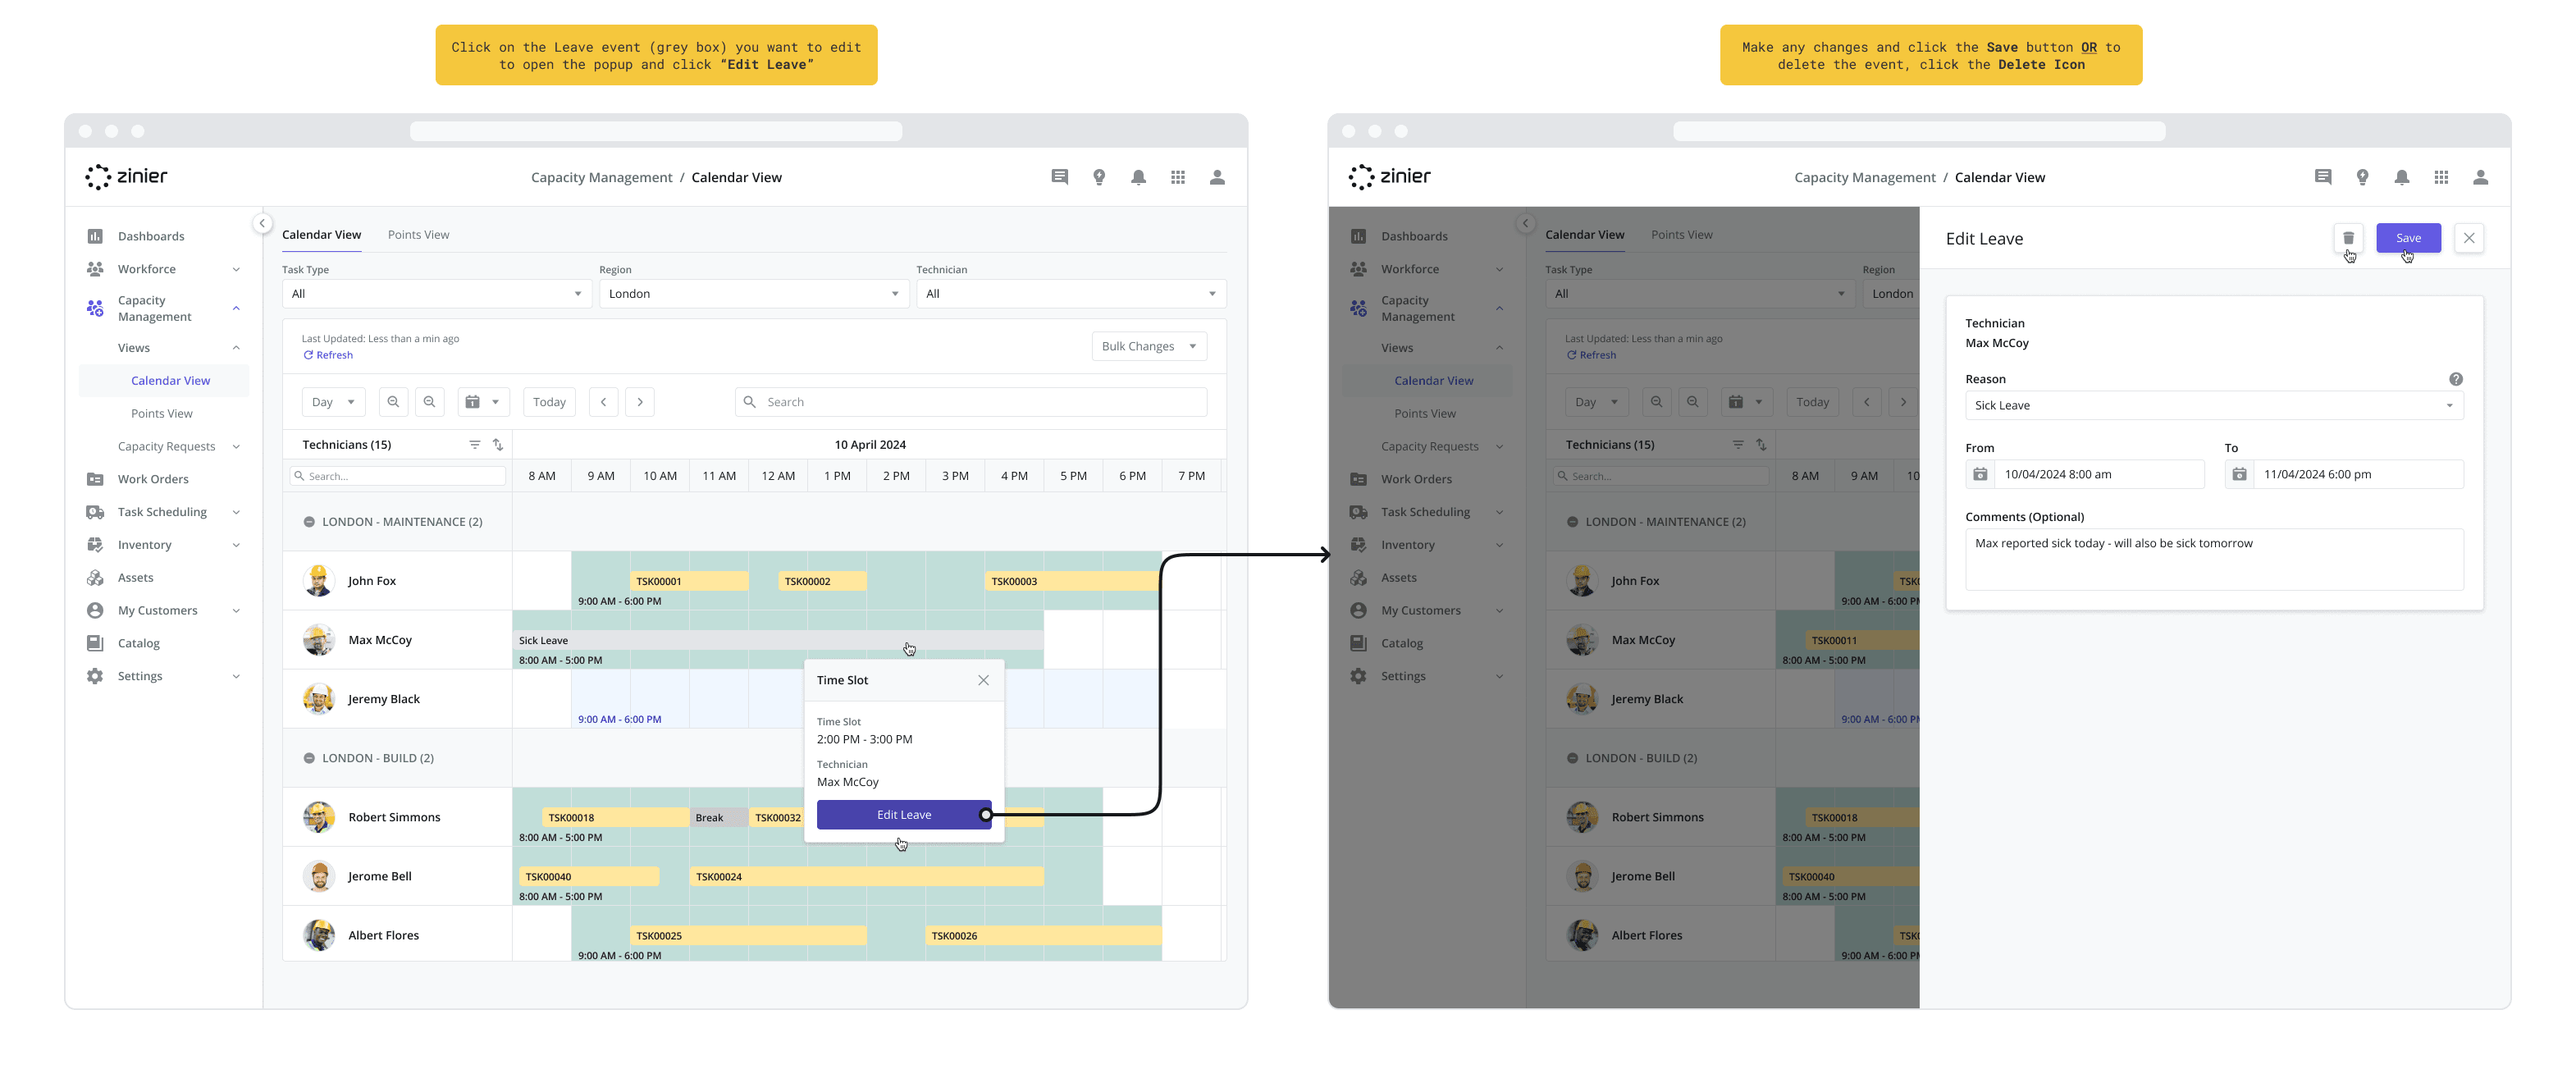
To edit an existing Leave event, follow the steps below:
Click on the Leave event you wish to edit in the Calendar. Break events are displayed as grey boxes.
Click the “Edit Leave” button from the popup to bring up the sidepanel.
Depending on whether you wish to modify or delete the record, follow the steps below:
To Modify the record:
Make any changes to the timeframe by modifying the Reason, From, To or Comments fields.
Click the Save button.
To Delete the record:
Click on the Delete icon at the top of the side panel.