Capacity Points View
UPDATED (24.4)
The Points View module gives you a view into your field team’s workforce capacity by converting availability into “points” for a particular Region/Task Type combination at a particular date, within a particular Appointment Window / Slot on that date. What does a point represent? It’s simple: 1 point of availability means that 1 technician can complete a single task within the allotted Appointment Slot/Window. This view is critical for organizations that want to get a real-time view of their workforce’s overall capacity while providing tools that allow you to adjust capacity (Capacity Requests) for future planning purposes.
The Points View module allows you to both visualize actual and forecasted demand and capacity while providing the tools to adjust your capacity to meet that anticipated demand. With the Points View you can:
View available, used (booked capacity), and forecasted capacity for a given Task Type, on a given day for a particular Region as represented by points.
Capacity Requests: Manually (and in bulk) add points to free up capacity and make booking available via the Customer Portal, even if your actual capacity is limited. By increasing or decreasing points, you can take full control over the availability seen by customers by increasing or decreasing the number of time slots available for appointment bookings. This capability allows you to open up future capacity, knowing that you will be able to move team members around to meet the demand later.
Viewing Capacity Using Points
Points in Zinier represent the availability of a particular Appointment Slot / Window for customers booking appointments using the Customer Portal. When points are available at a particular Appointment Slot / Window on a given date, it means capacity is available and the customer can select the timeslot. When points are NOT available, the appointment slot is greyed out and is not bookable.
Let’s take a closer look at how the interface is structured and where the information comes from:
How Time “Slots” are Configured Using Appointment Windows
When setting up your organization to manage capacity, an important step is configuring Appointment Booking by Task Type. This will determine which time “Slots” appear in the Points View data grids below the chart.
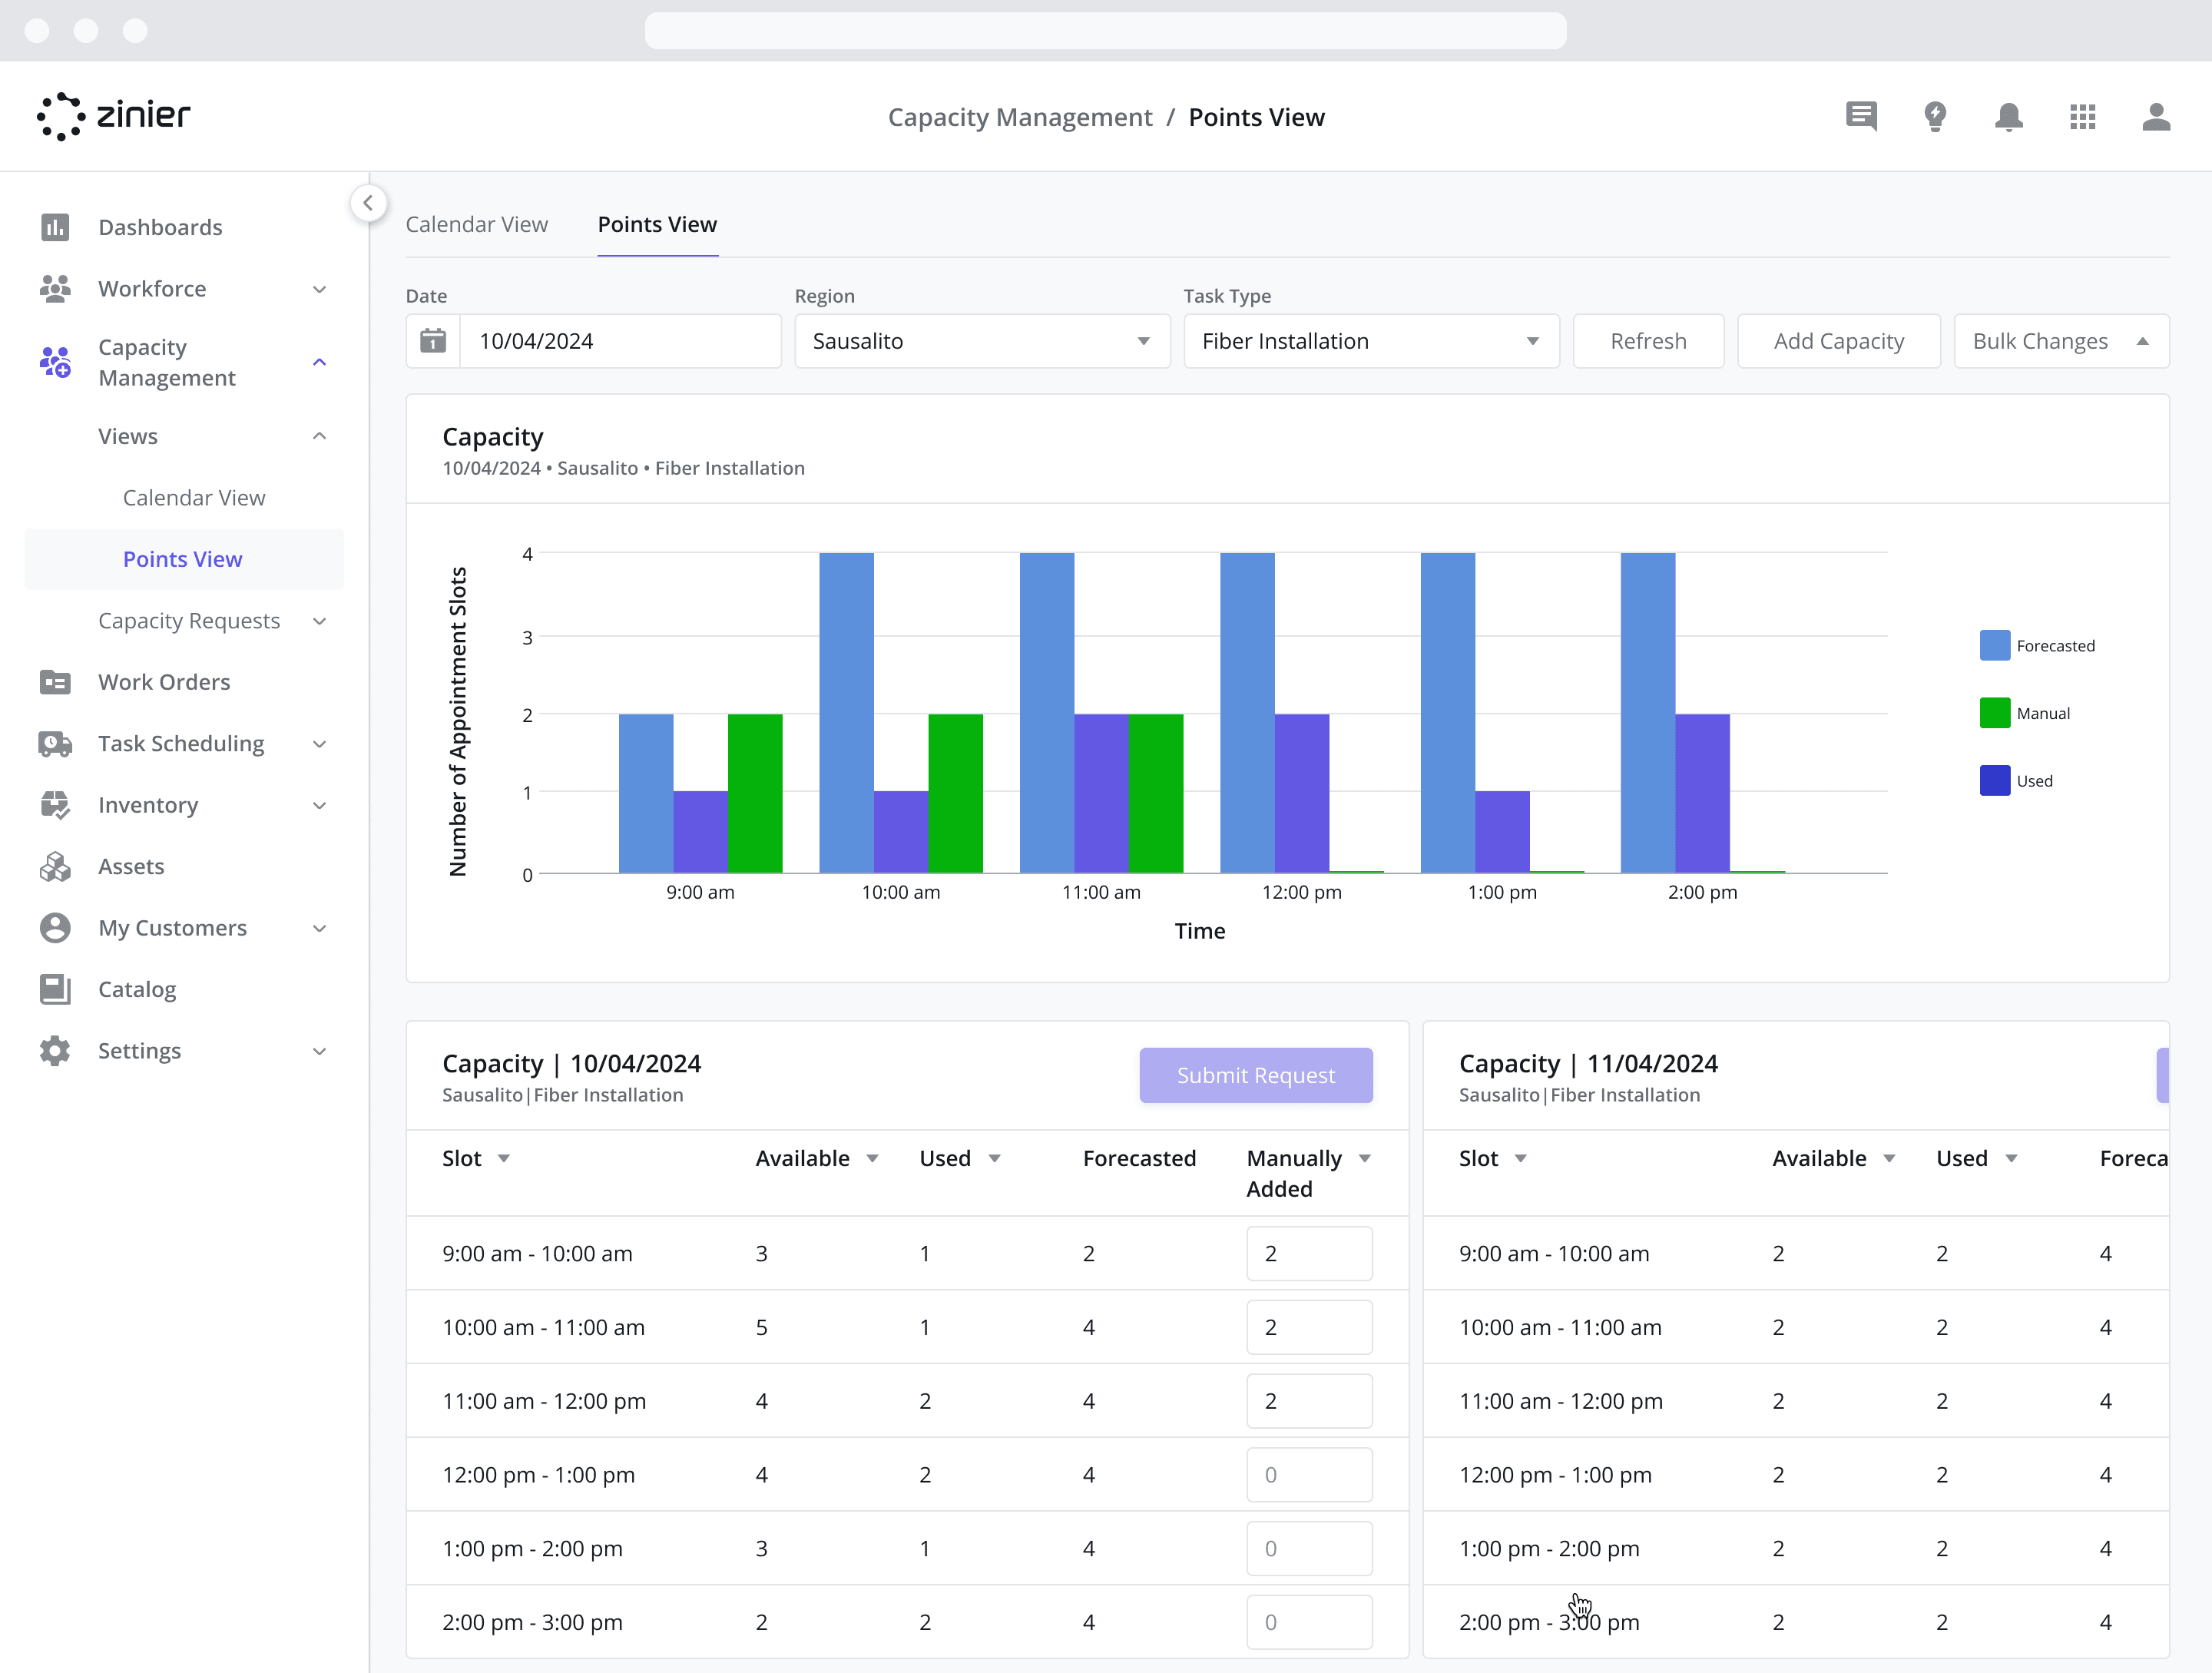
Filtering Points
The data grids below the chart show the points by day for 7 days based on the filters selected at the top of the screen.
Date: Selecting a Date from this field will update the data grids below and show 7 days' worth of points for the Region and Task Type starting from the date selected here.
Region: Filters the points for the next 7 days to the Region selected.
Task Type: Filters the points for the next 7 days to the Task Type selected.

Points Calculations and Glossary
It is important to note that points are calculated differently depending on which Appointment Booking method is used: Appointment Windows vs. Appointment Slots. , whereas with Appointment Windows, the Technician must be able to COMPLETE the task within the Appointment Window time frame.
Appointment Slots Points Calculations
For Appointment Slots, the Technician must be able to start the task on-site at the START of the Time Slot. If the Task Type selected in the filter has been configured to work with Appointment Slots, the Capacity is calculated in the following way:
Forecasted (Capacity)
This represents the calculated capacity of your team for a given time Slot for a given Task Type in a given Region. Essentially it shows the number of Tasks that can be started in that time slot when analyzing the number of technicians in the region that have the skills to complete the job (“Number of Techs”) and taking into account the average travel time, Work Schedules, and the duration of the time slot compared to the duration of the Task Type (all of which factor into the “Availability”).
“Number of Techs” =
Number of Technicians that are assigned to the Region and Task Type Work Groups, AND
Have the skills associated with the Task Type, AND
Have the “Availability” to complete the task.
“Availability” for Technician above is “Yes” if both things below are true:
Available Hours to Travel is TRUE: Based on their Work Schedule, they have the Available Hours, to travel to a site by the Time Slot Start time. This is true if “Available Hours” just prior to the Time Slot Start Time > Average Travel Time (as configured for the Region in the Regions module)
Available Hours to Complete the Task is TRUE: Based on their Work Schedule, they have the available hours to complete the task within the Slot Duration. This is true if “Available Hours” after Time Slot Start Time > The Maximum of Value from the Task Duration and Slot Duration
The “Available Hours” for both calculations above considers the Technician's Work Schedule as follows:
(Number of default working hours falling in the time slot or Number of Shift Overrides hours falling in the time slot)
+ (Overtime hours falling in the time slot)
- (Holiday hours falling in the time slot)
- (Leave hours falling in the time slot)
- (Break hours falling in the time slot)
Used (Capacity)
Number of tasks within the region and task type Work Groups that are scheduled within the time slot. Think of these as appointments matching the region and task type that have been scheduled by a customer using the Customer Portal.
Manual (Capacity)
These are the number of points that have been manually added to the time slot by the user. Manually adding capacity will create a Capacity Request, which will be used to track the changes needed by the Field Supervisor to ensure the manually added capacity is actually met. For more information on manually adding capacity, see the section below.
Manually added capacity is considered in the Available Capacity as long as the Capacity Request is in Pending status. If the Capacity Request is Cancelled or Completed, the manually added capacity will no longer be added to the Available Capacity. The reason for this is that when a Capacity Request is completed, the assumption is that the Field Supervisor has moved resources around to increase the Forecasted Capacity.
Available (Capacity)
Forecasted Capacity + Manually Added Capacity (if applicable) - Used CapacityAppointment Windows Points Calculations
For Appointment Windows, the Technician must be able to travel to and complete the task by the End Time of the Appointment Window time slot. If the Task Type selected in the filter has been configured to work with Appointment Slots, the Capacity is calculated in the following way:
Forecasted (Capacity)
This represents the calculated capacity of your team for a given Appointment Window for a given Task Type in a given Region. Essentially it shows the number of Tasks that can be completed in that Appointment Window when analyzing the number of technicians in the region that have the skills to complete the job (“Number of Techs”) and taking into account the average travel time, Work Schedules, and the duration of the time slot compared to the duration of the Task Type (all of which factor into the “Availability”).
“Number of Techs” =
Number of Technicians that are assigned to the Region and Task Type Work Groups, AND
Have the skills associated with the Task Type, AND
Have the “Availability” to complete the task or tasks
“Availability” for Technician above is TRUE if:
Based on their Work Schedule, they have the available hours to travel to the site and complete the task within the Appointment Window. This is true if “Available Hours” > Average Travel Time + Task Duration
Only techs that have a minimum “Available Hours” > Average Travel Time + Task Duration in one stretch are considered in the total available hours. For example, for a 1-hour duration task, a tech having two sets of availability of 30 mins separated by a break is not considered.
The “Available Hours” considers the Technician's Work Schedule as follows:
(Default working time falling in the appointment window or Shift Override time falling in the appointment window)
+ (Overtime falling in the appointment window)
- (Holiday falling in the appointment window)
- (Leave falling in the appointment window)
- (Break falling in the appointment window)
Used (Capacity)
The number of tasks within the region and task type Work Groups that are scheduled within the time slot. Think of these as appointments matching the region and task type that have been scheduled by a customer using the Customer Portal. Keep in mind that it may be possible to book multiple tasks within a single Appointment Window.
Manual (Capacity)
These are the number of points that have been manually added to the Appointment Window slot by the user. Manually adding capacity will create a Capacity Request, which will be used to track the changes needed by the Field Supervisor to ensure the manually added capacity is actually met. For more information on manually adding capacity, see the section below.
Manually added capacity is considered in the Available Capacity as long as the Capacity Request is in Pending status. If the Capacity Request is Cancelled or Completed, the manually added capacity will no longer be added to the Available Capacity. The reason for this is that when a Capacity Request is completed, the assumption is that the Field Supervisor has moved resources around to increase the Forecasted Capacity.
Available (Capacity)
Forecasted Capacity + Manually Added Capacity (if applicable) - Used CapacityCustomer Portal Behavior
As you may have guessed, the Customer Portal and resulting Task Scheduling data differ depending on whether or not the Appointment Booking Mode for the Task Type being booked is Appointment Slots or Appointment Windows.
Appointment Slots
When the Task Type being booked uses Appointment Slots, the following occurs:
Available Time Slots: The selectable time slots for an appointment show the Appointment Slots (Start Time and End Time) as configured for the Task Type in the Appointment Booking by Task Type module.
Booking Availability: These time slots are only selectable when there is 1 or more Available Capacity for the time slot.
Task Scheduling Details: Once an open slot is selected and saved, the following information is stored for the task and made available to dispatchers:
Scheduled Date = Start Time of the Time Slot selected. For example, if the selected time slot is 9:00 am - 10:00 am on April 21st, the Scheduled Date = April 21st at 9:00 am.
Due Date = Scheduled Date + Task Duration. Using the example above, if the Task Duration = 30 mins, the Due Date = April 21st at 9:30 am.
Appointment Windows
When the Task Type being booked uses Appointment Windows, the following occurs:
Available Time Slots: The selectable time slots for an appointment show the Appointment Windows (Start Time and End Time) as configured for the Task Type in the Appointment Booking by Task Type module.
Booking Availability: These time slots are only selectable when there is 1 or more Available Capacity for the time slot.
Task Scheduling Details: Once an open slot is selected and saved, the following information is stored for the task and made available to dispatchers:
Appointment Window Start Time = Appointment Window start time at the task location. For example, if the selected time slot is 8:00 am - 11:00 am on April 21st, the Appointment Window Start Time = April 21st at 8:00 am.
Appointment Window End Time = Appointment Window end time at the task location. In the example above, the Appointment Window End Time = April 21st at 11:00 am.
Manually Adding Capacity with Capacity Requests
At times, you may want to enable customers to book appointments even if your capacity at a given time is not available. Doing so allows you to unblock appointment bookings for customers while you shift resources around to meet that future demand. Manually added capacity is displayed in the “Manually Added” field in the Points View data grids as explained above.
Manually adding capacity from the Points View automatically creates a Capacity Requests which resource managers can reference in the future in order to understand where capacity is required so they can shift resources to meet the request – either by moving technicians into different Region/Task Type combinations temporarily using Shift Overrides, or by adjusting Default Shifts and Overtime.
Capacity can be manually added in 2 different ways from the Points View, each of which results in a Capacity Request record being created in the Capacity Requests module.
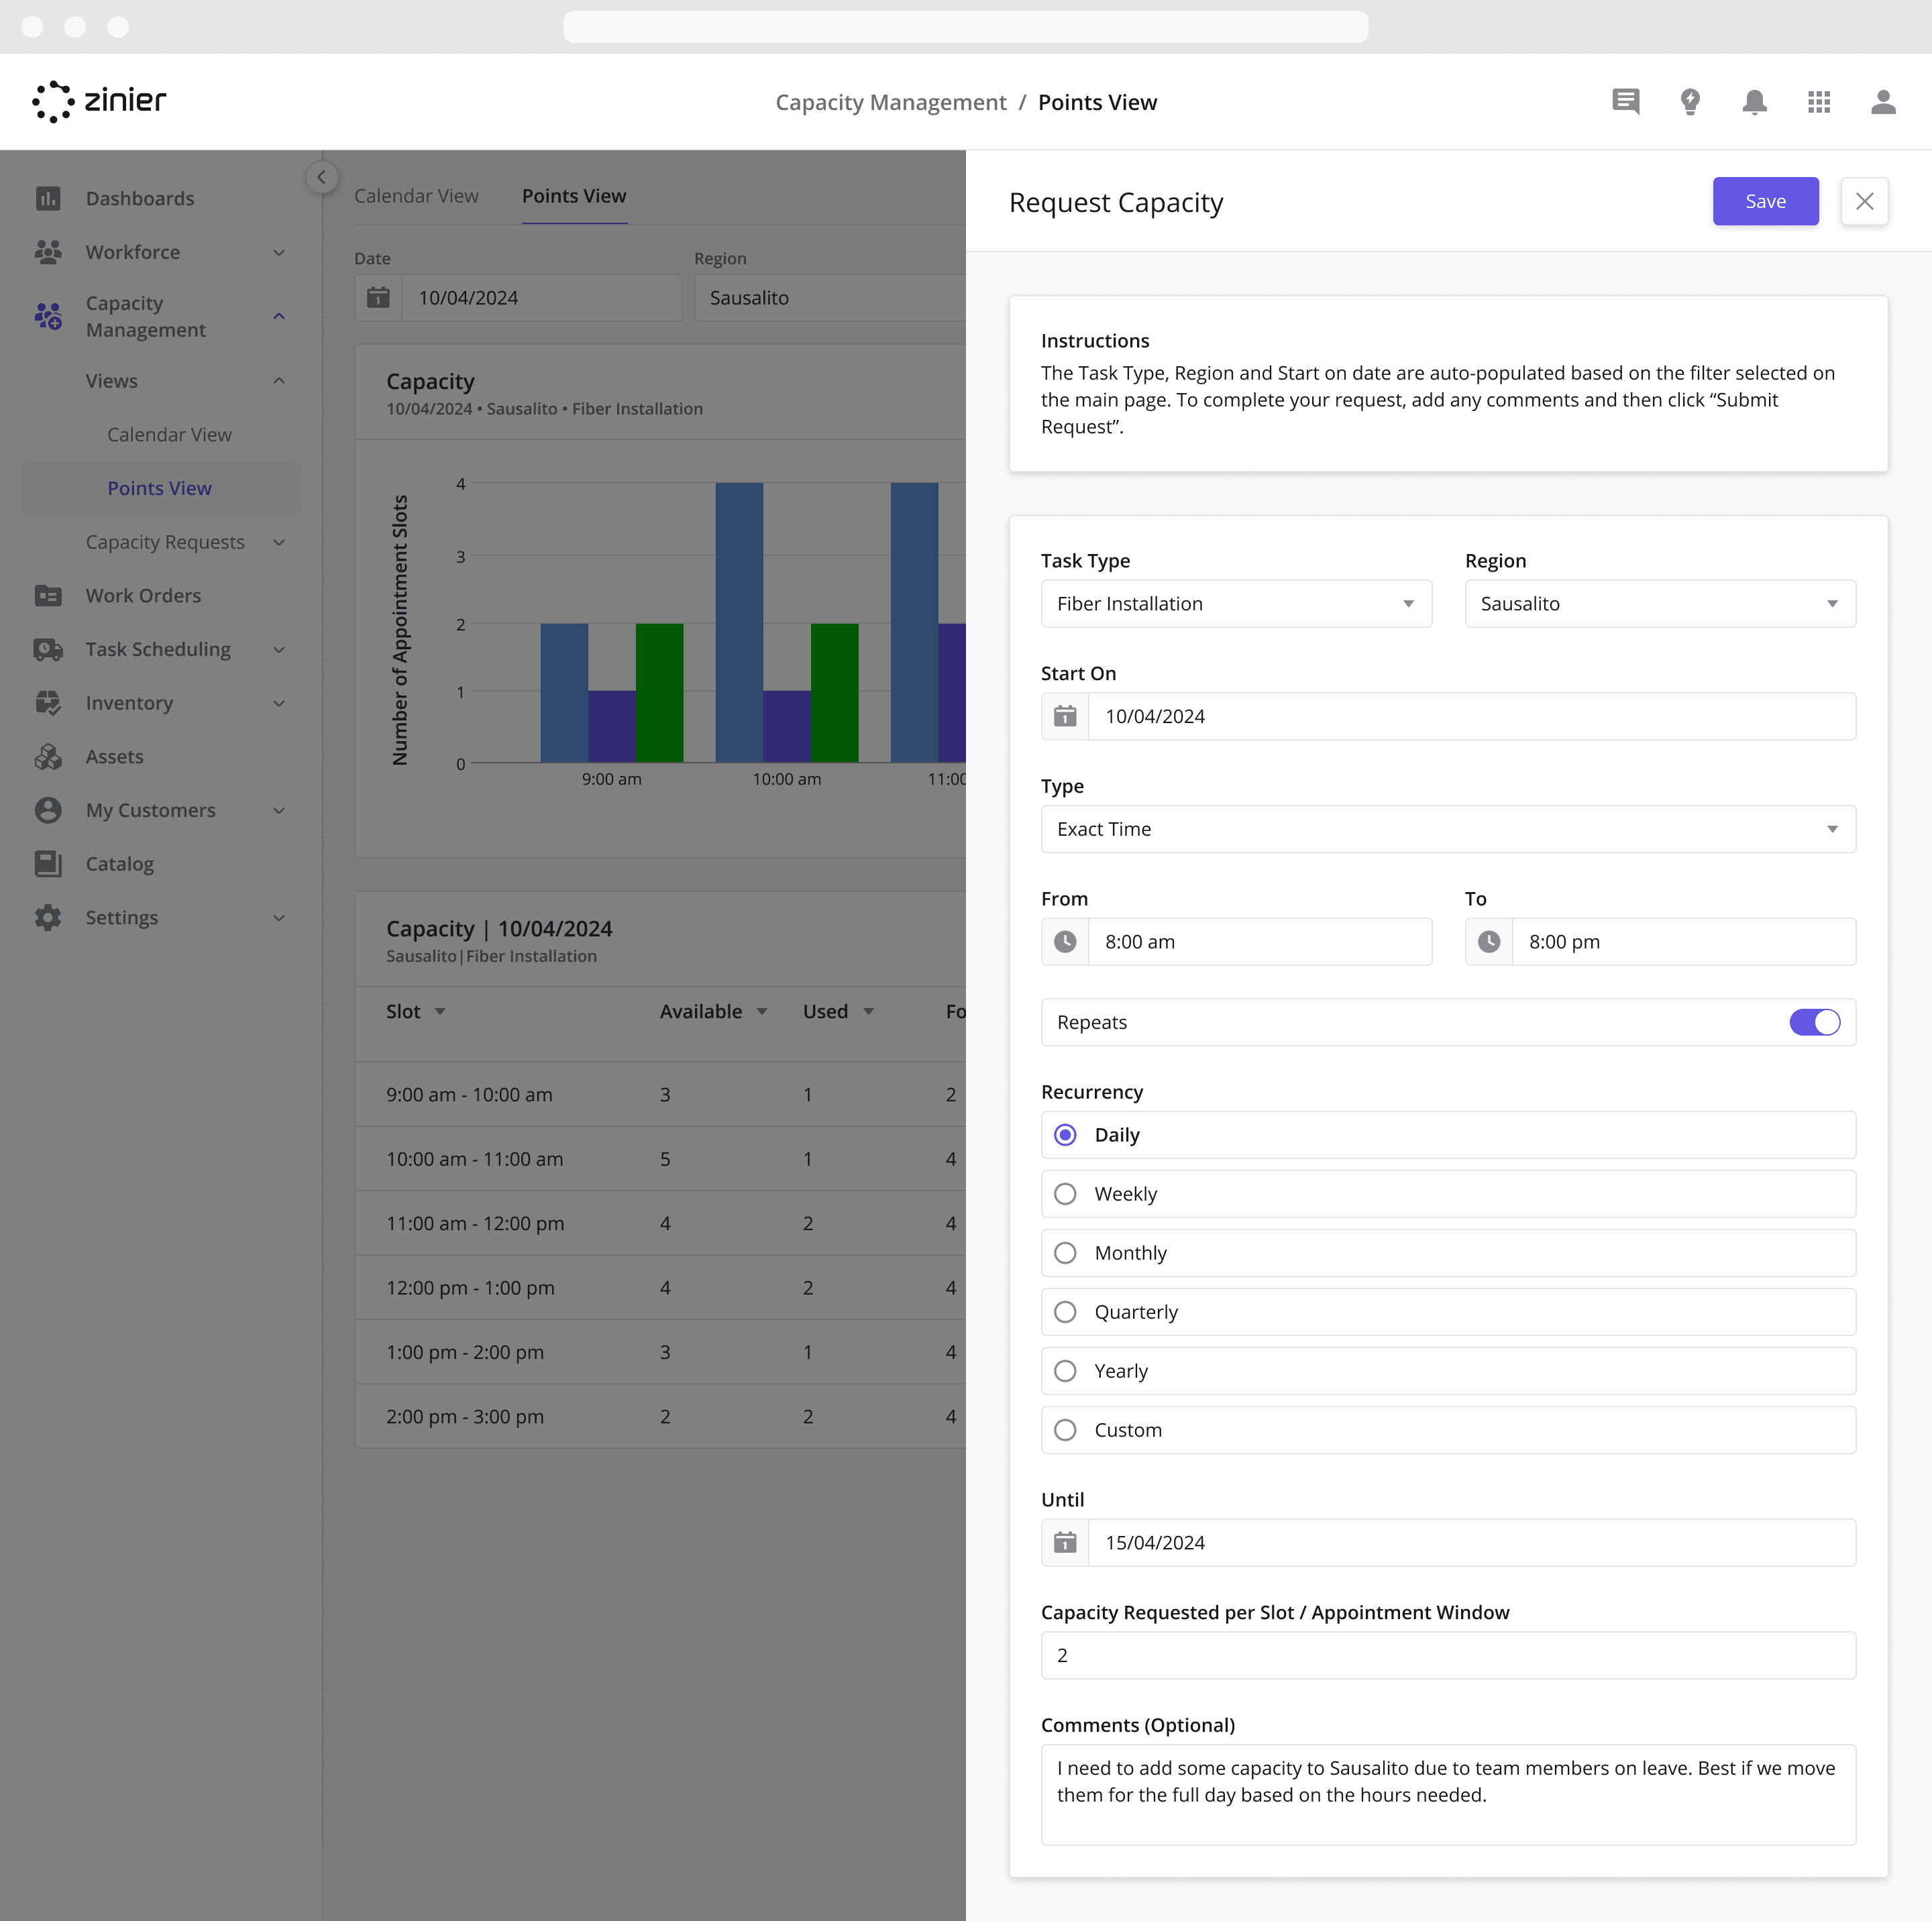
Add Capacity Using the “Add Capacity” Button
Click the “Add Capacity” button at the top right of the Points View screen.
Select the Task Type and Region to which you want to add capacity. These fields are auto-populated based on the filters selected from the Points View screen when you clicked the Add Capacity button.
Select the Start On date – the date for which you’d like to add capacity. This field is also auto-populated based on the Date selected from the Points View screen when you clicked the Add Capacity button.
From the Type dropdown, choose from the following options:
Exact Time: Allows you to add capacity using a specific time. If selected, fill in the From and To fields to indicate the start and end times for the capacity request.
Appointment Window: Allows you to add capacity for a specific Appointment Window / Appointment Slot. If selected, add the Appointment Windows / Slots from the Window dropdown. Multiple can be selected.
To repeat the capacity request so that it recurs on more than one day, enable the “Repeats” toggle and define the recurrence:
Define how often the manually added capacity will repeat (Daily, Weekly, Monthly, etc)
Or, create a custom recurrence by entering the time unit and a number to define how often it will occur.
Using the Until dropdown, enter the ending date for the recurring manually added capacity.
In the Capacity Requested per Slot / Appointment Window field, indicate how much capacity to add to each Appointment Window / Slot. Each unit of capacity frees up an additional appointment slot when customers book an appointment through the Customer Portal. For example, if you have “0” available capacity during the “Afternoon” Appointment Window slot, adding “2” units of capacity will enable two additional customer bookings for the given Task Type / Region before the time slot is disabled.
Add any comments you wish to convey about the request in the Comments (Optional) field.
Click the Submit Request button to apply the changes and create the Capacity Request.
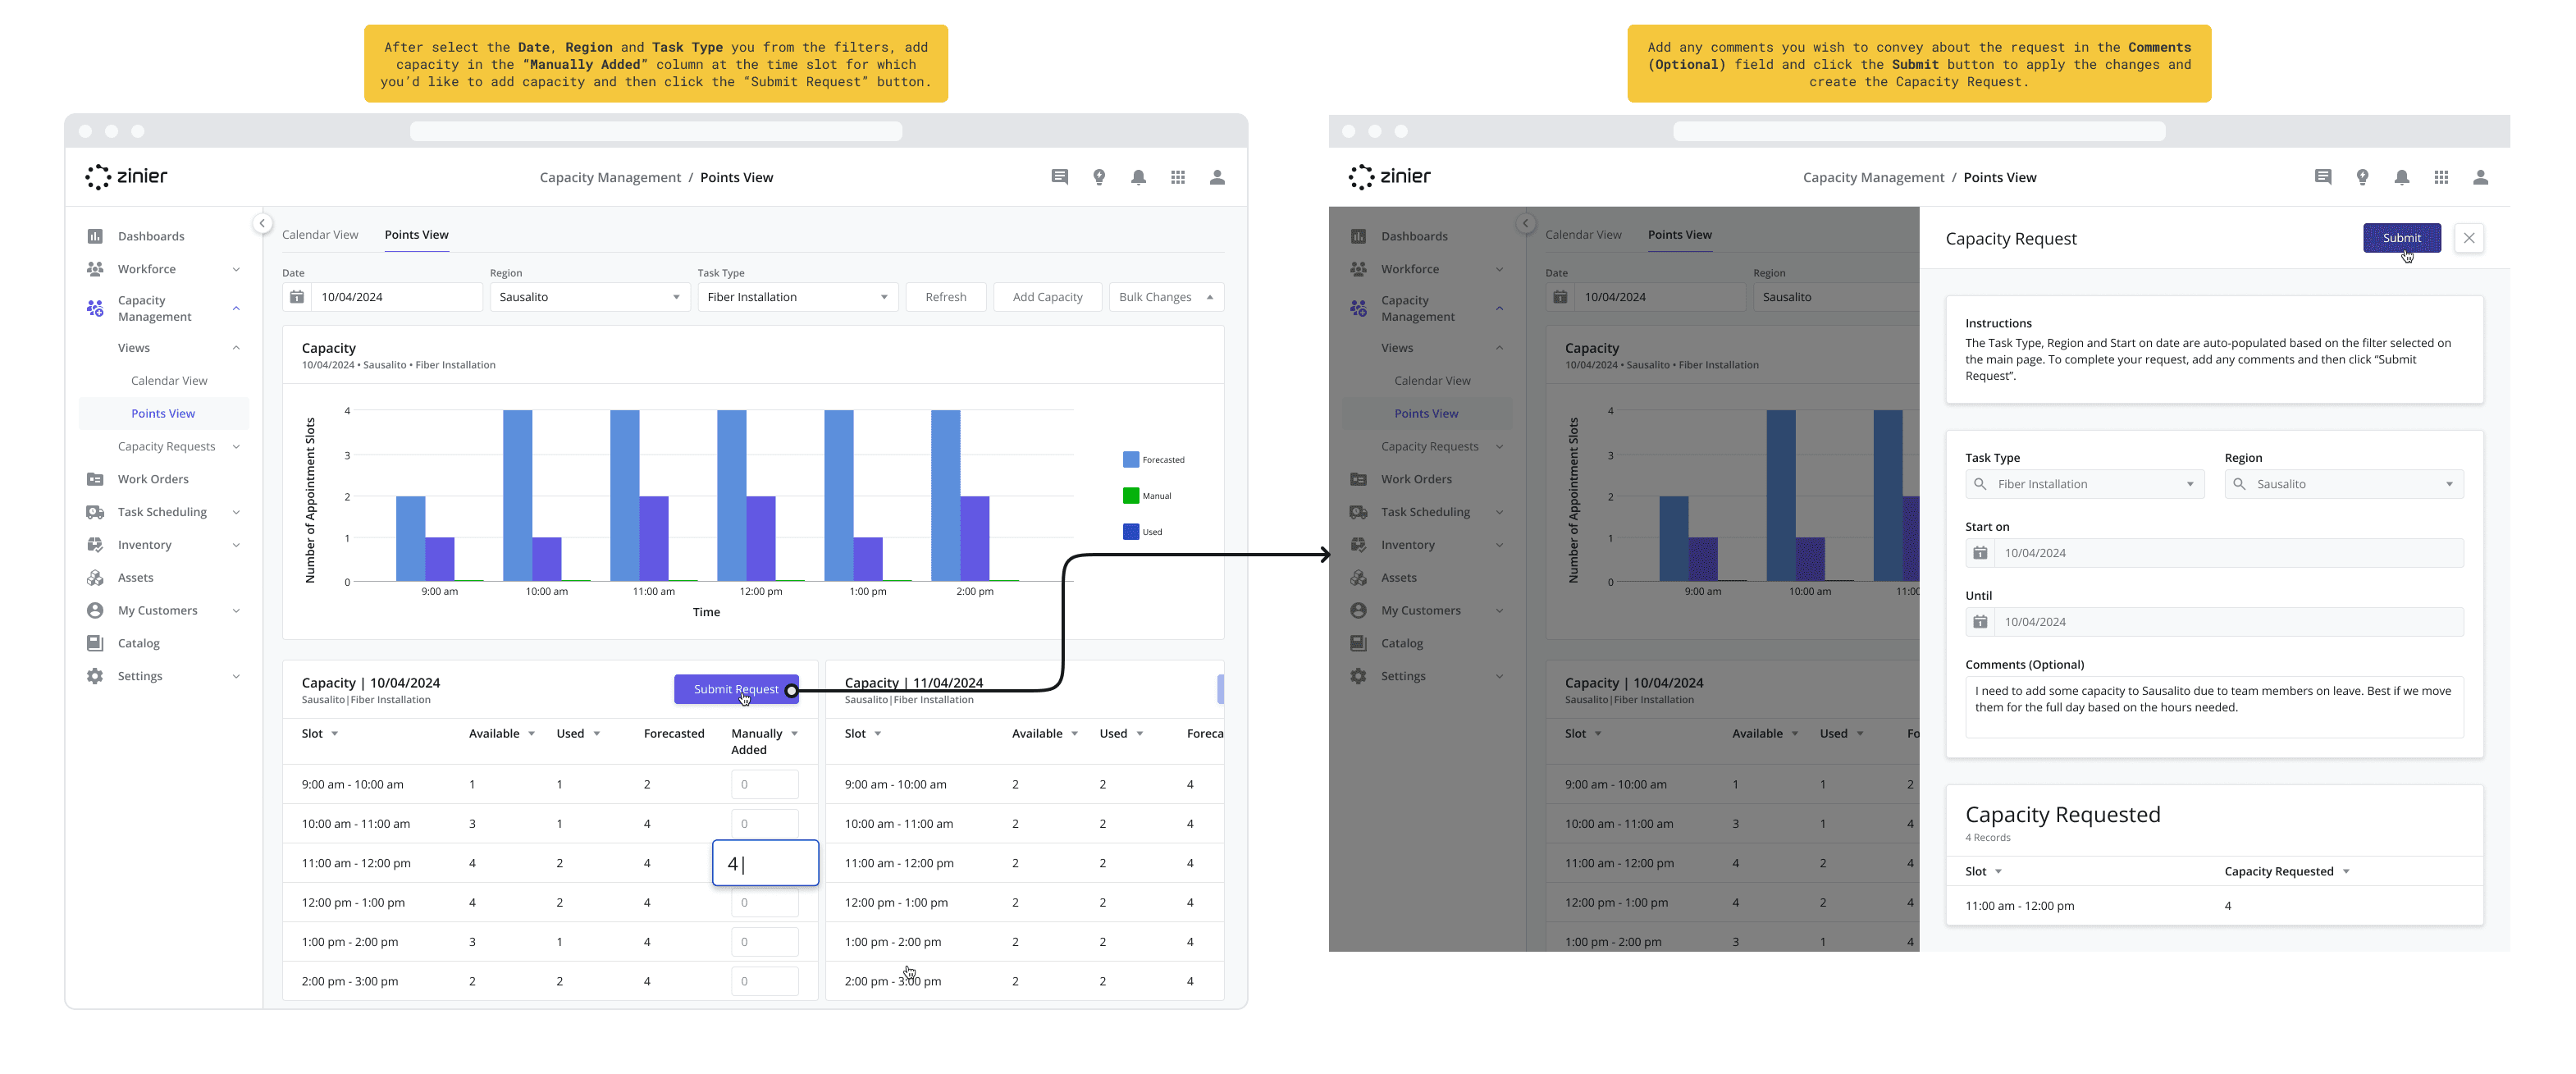
Add Capacity “Manually Added” Column
Select the Date, Region and Task Type you want to add capacity for from the Points View filters at the top of the page.
Scroll to the datagrid on the date for which you want to add capacity. From the “Manually Added” column, click on the input field at the time slot for which you’d like to add capacity and enter a number greater than 0. Repeat for as many time slots as you need.
Click the Submit Request button at the top of the datagrid to bring up the Capacity Request side panel.
Add any comments you wish to convey about the request in the Comments (Optional) field.
Click the Submit button to apply the changes and create the Capacity Request.