Settings Pages (NOT VISIBLE)
Manage Skills & Skill Levels
Once defined, Skills and Skill Levels can be assigned to Technicians and Task Types and used by the Tech Recommendation / Auto Scheduler to match a Technician with a Task Type.
Adding New Skills
To add a new Skill, follow the steps below:
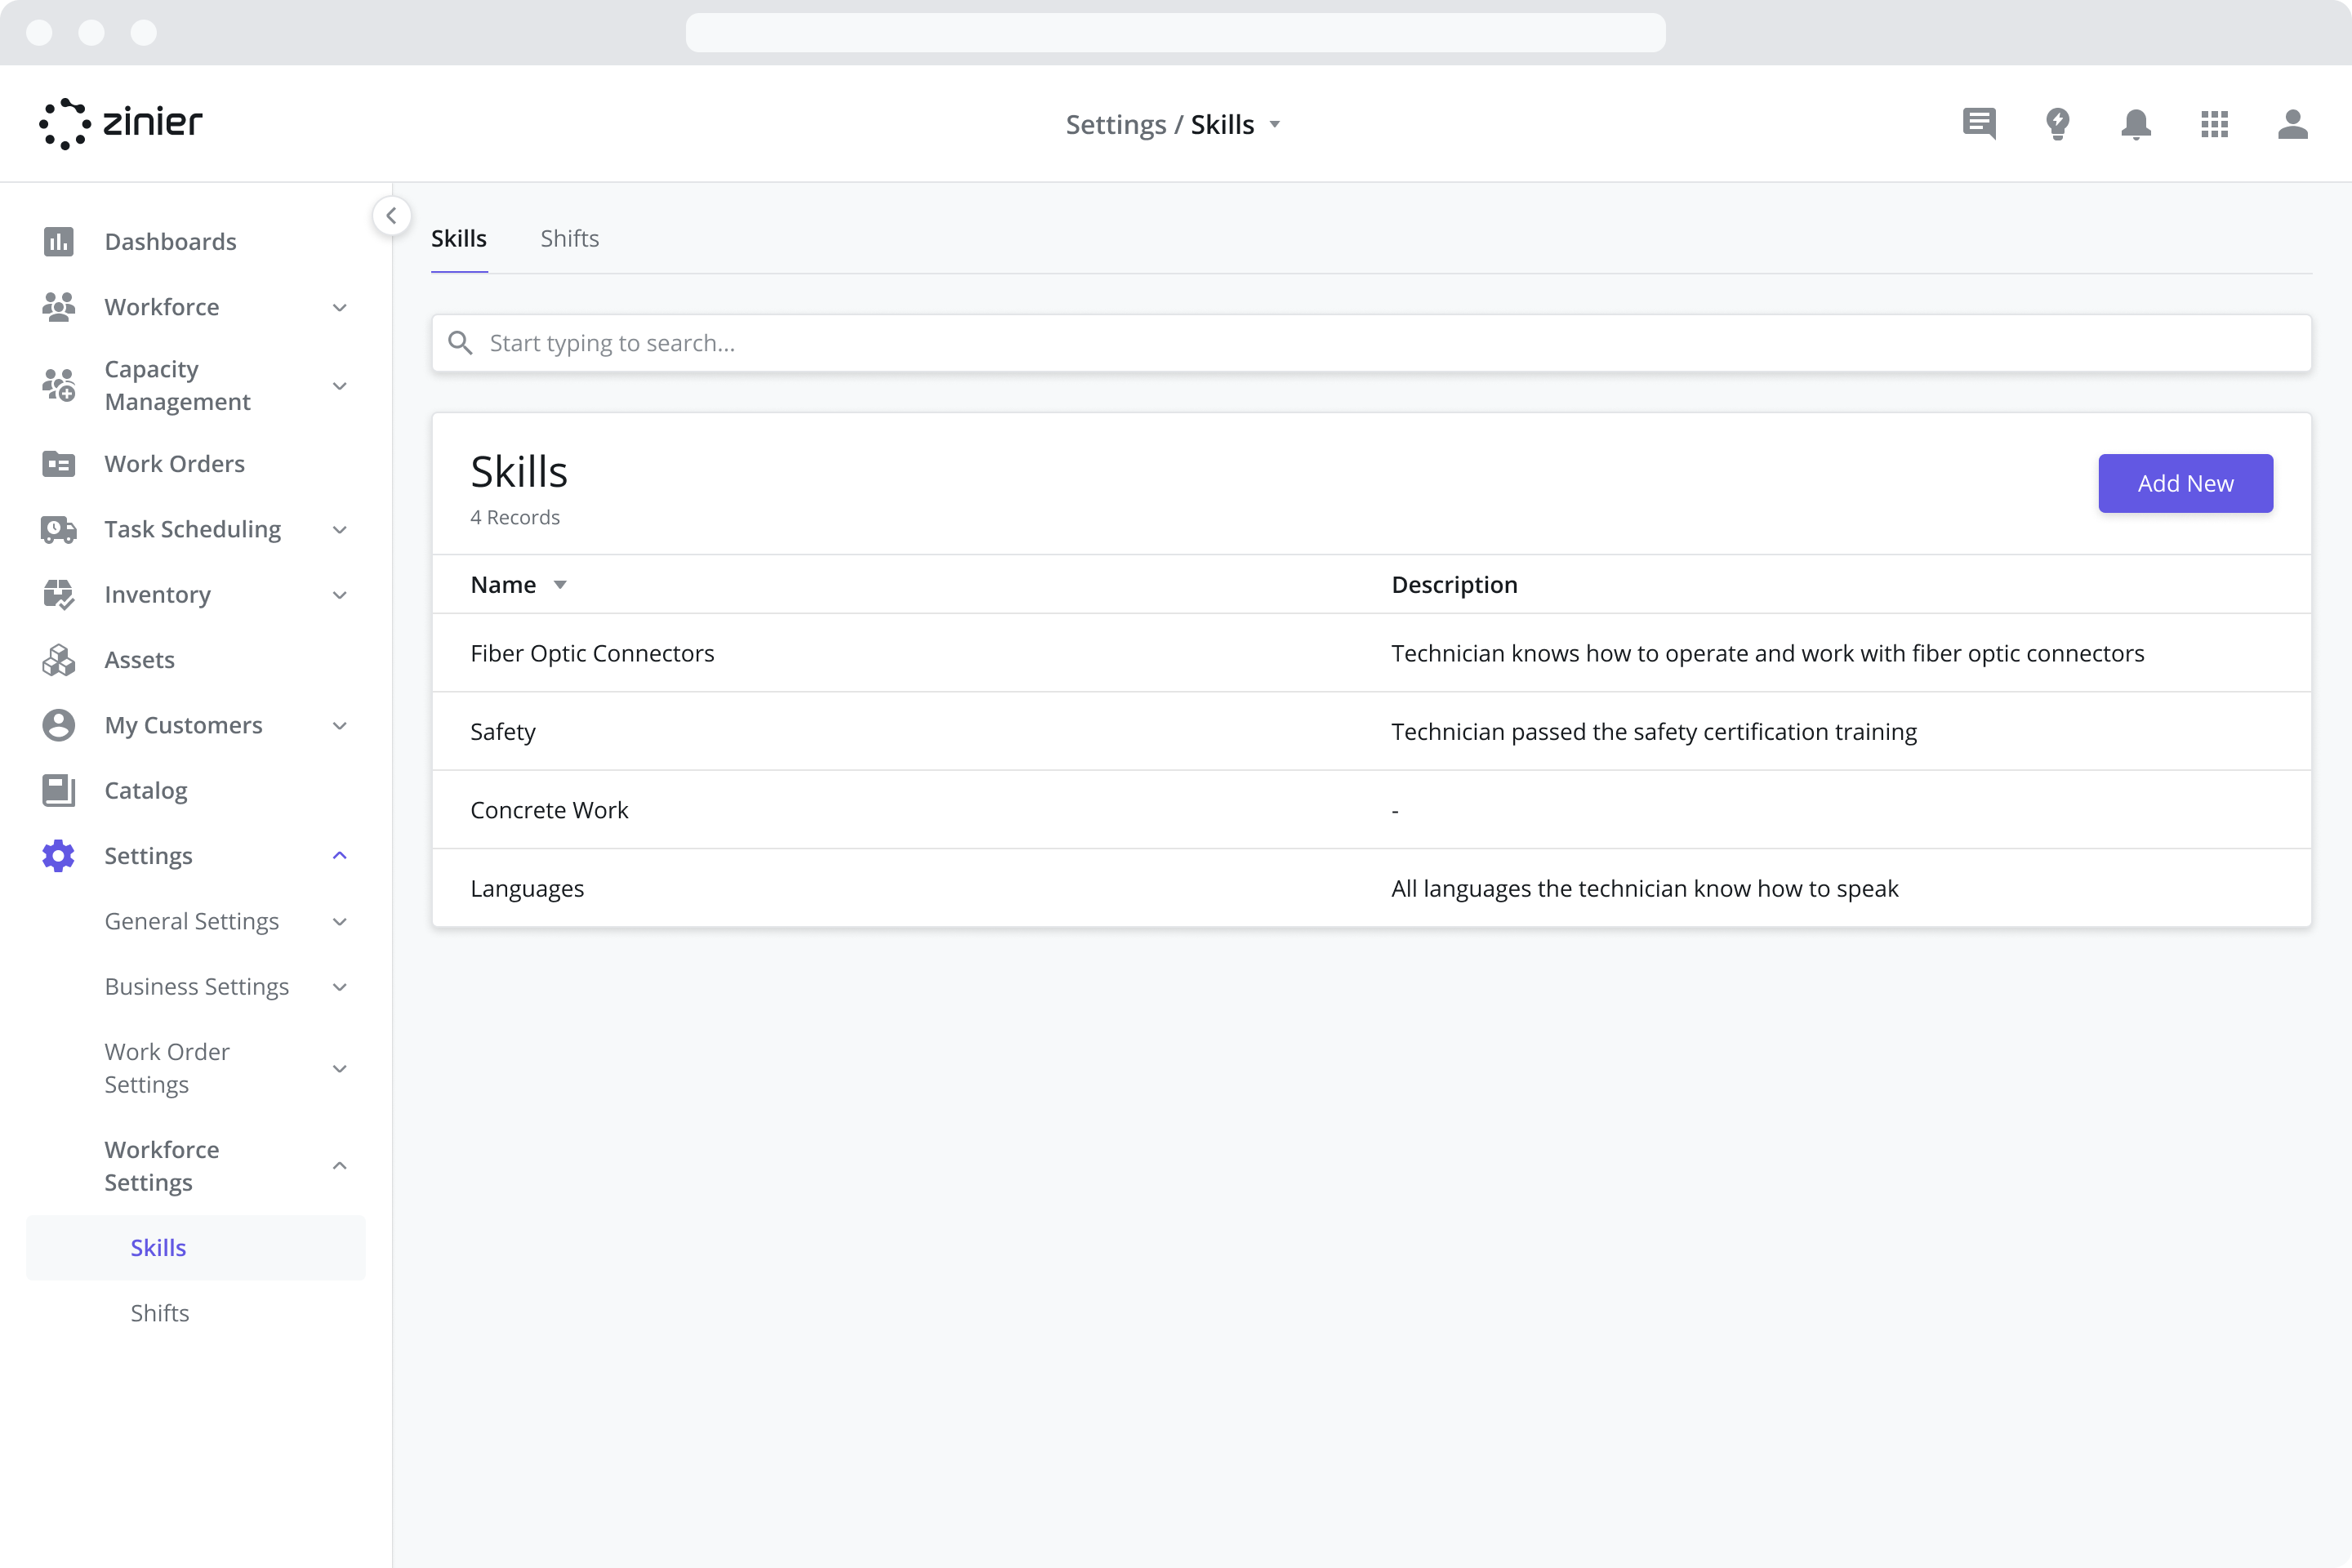
Go to the Settings > Workforce Settings > Skills module
Click the “Add New” button from the data grid
Enter a Name and Description (Optional)

Click Save and Continue
Next, add at least one Skill Level by clicking the “Add New” button from the Skill Levels data grid
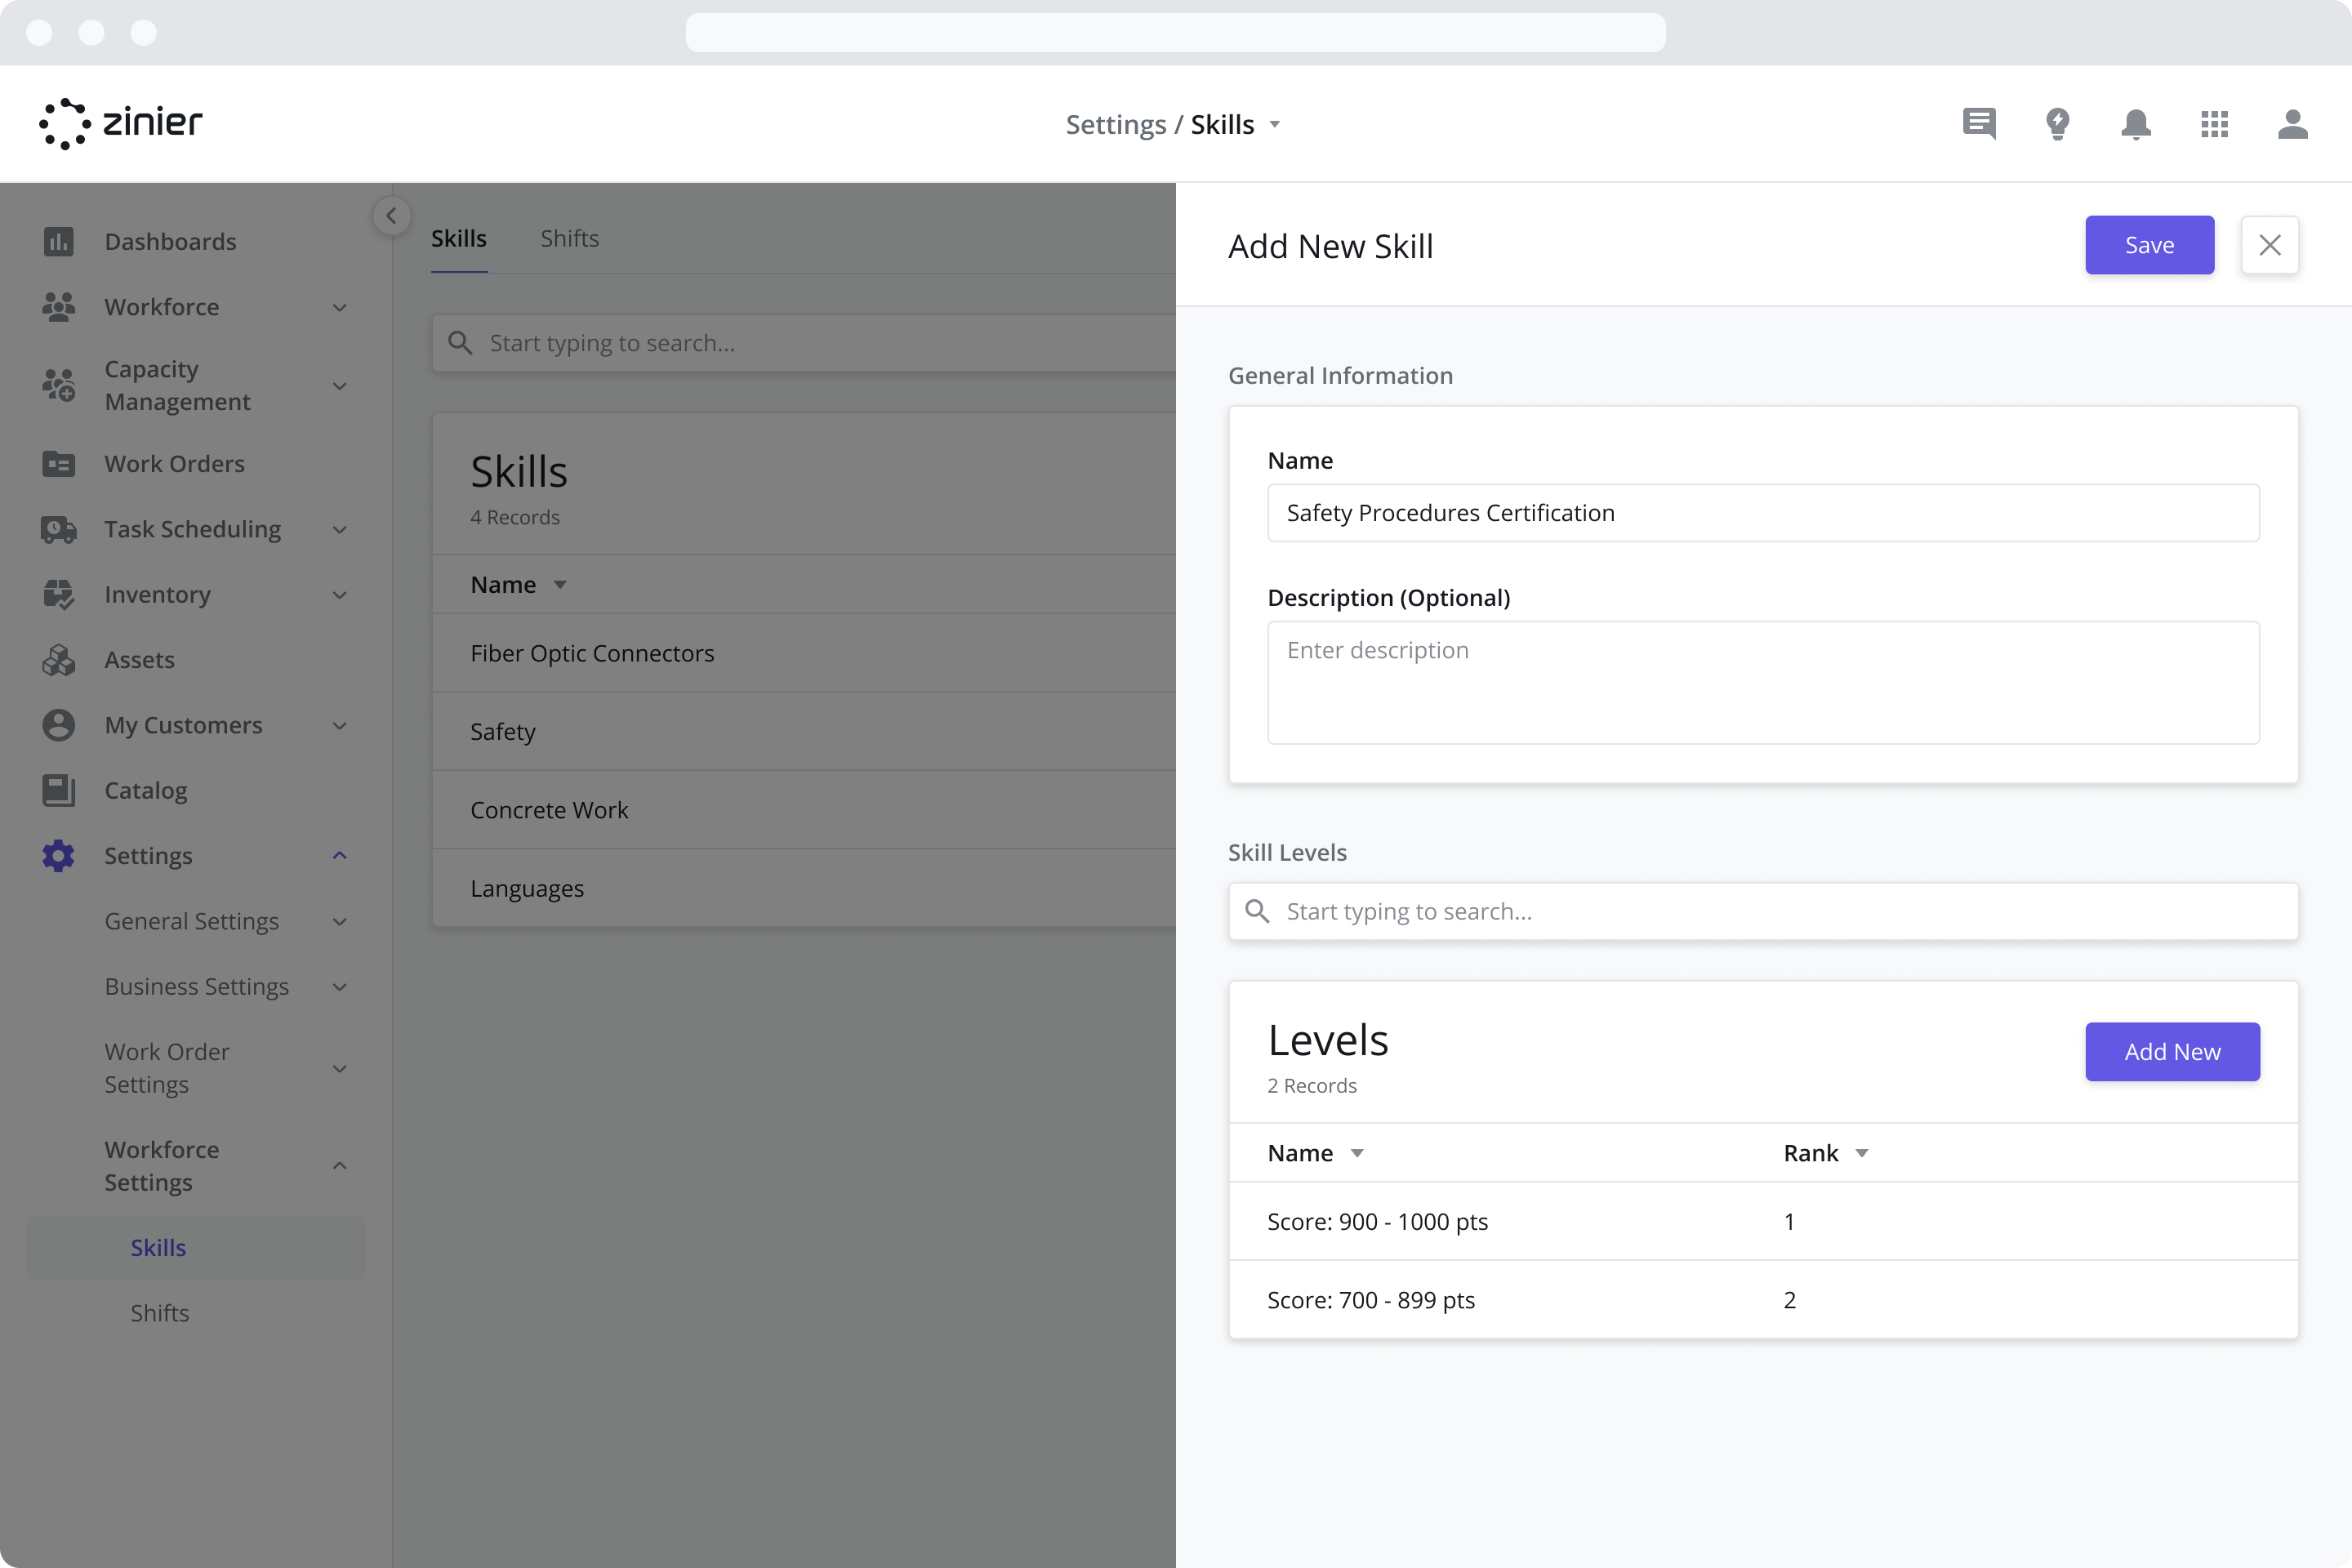
Give the Skill Level a Name and assign it a numerical Rank (0 is the lowest rank)
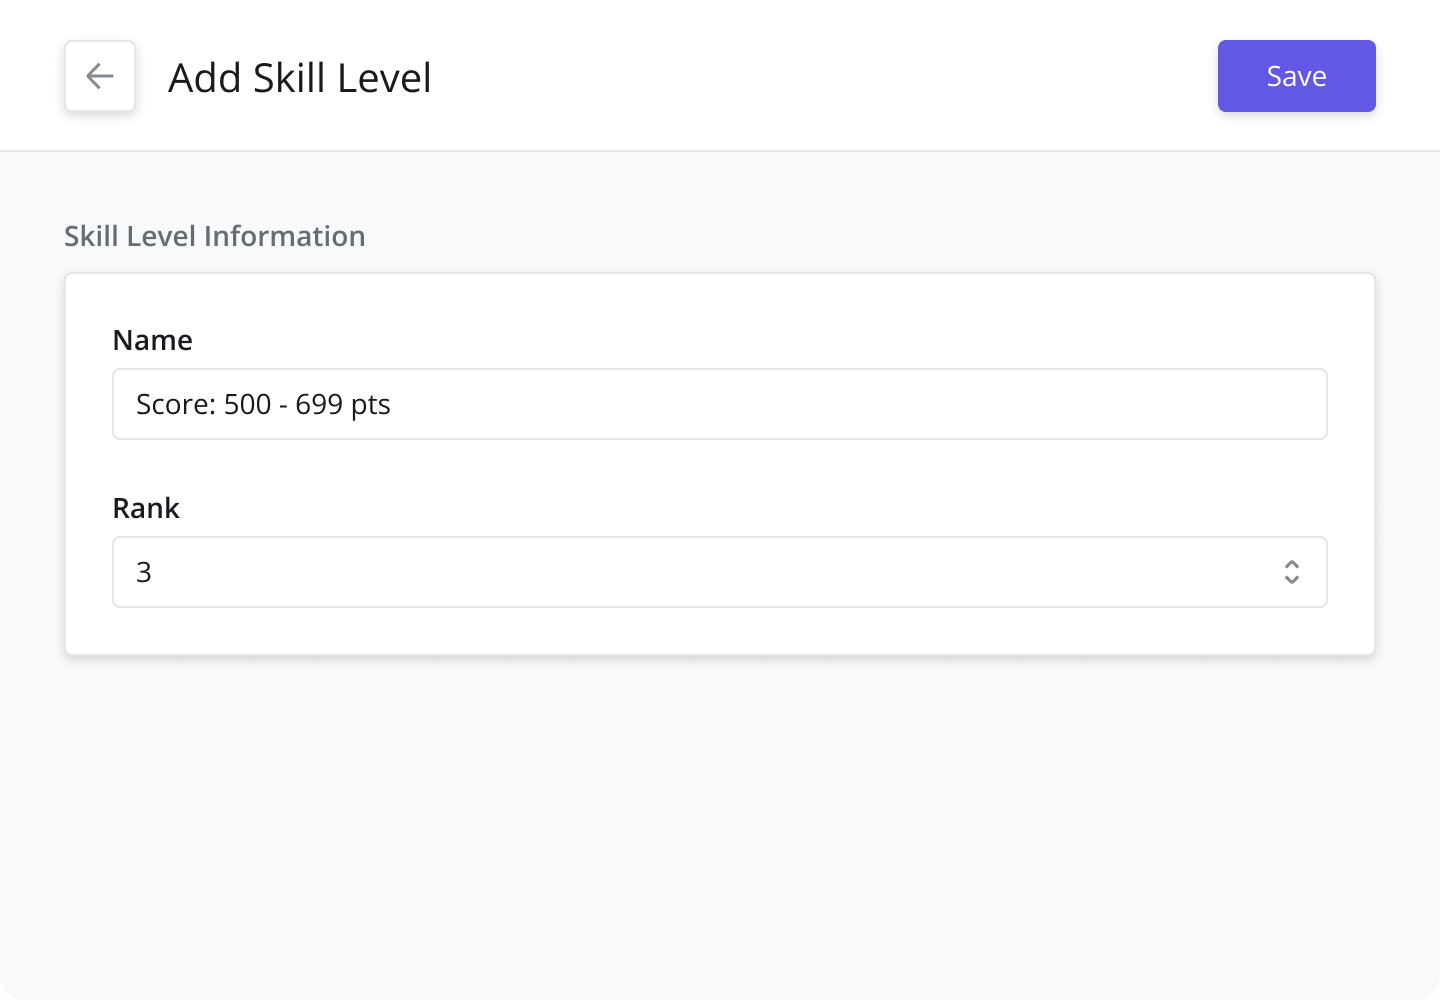
Click Save
Repeat steps 5-7 to add as many Skill Levels as needed
Manage Shift Configurations for Techs
Define (add and edit) a master list of Shift Configurations. Shifts define the weekly schedule and public holidays for a technician and are used to determine the availability of a tech when scheduling and dispatching. Once defined, Shifts can be assigned to Technicians.
Adding New Shifts
Once added, the Shift can be assigned to a Tech. To add a new Shift, follow the steps below:
Step 1: Create a Shift
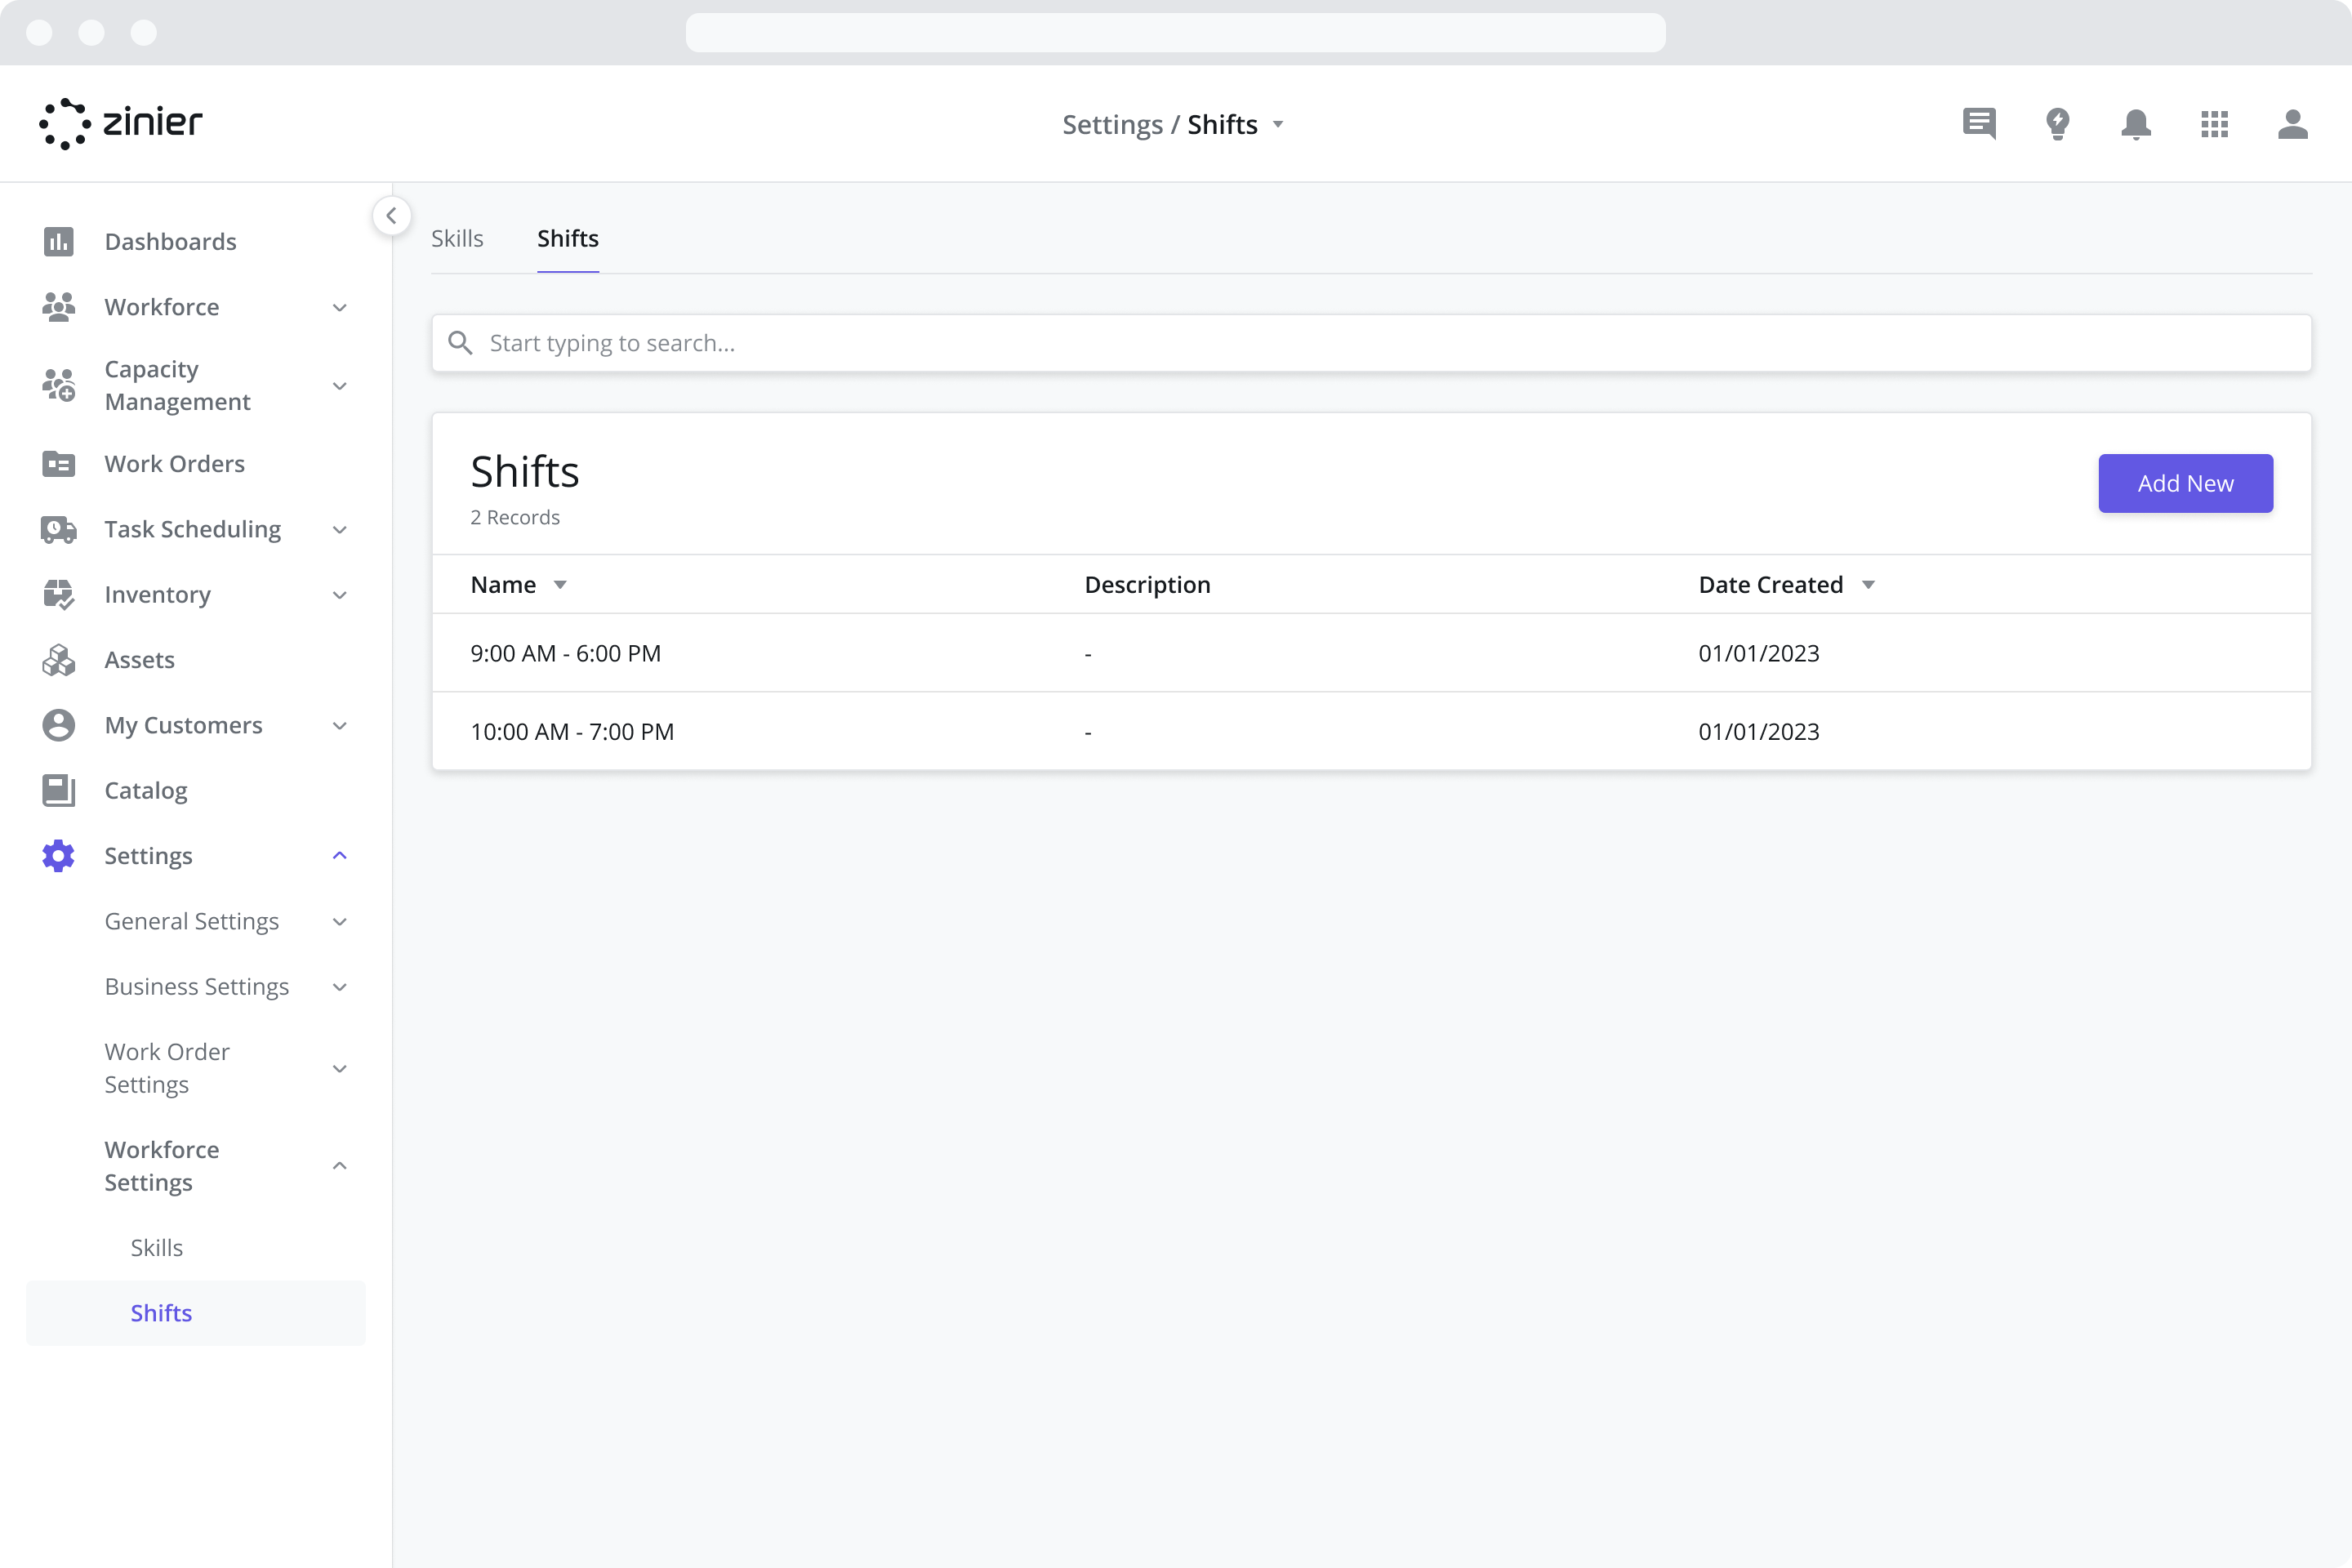
Go to the Settings > Workforce Settings > Shifts module
Click the “Add New” button from the data grid
Enter a Name and Description (Optional)
Click Save and Continue
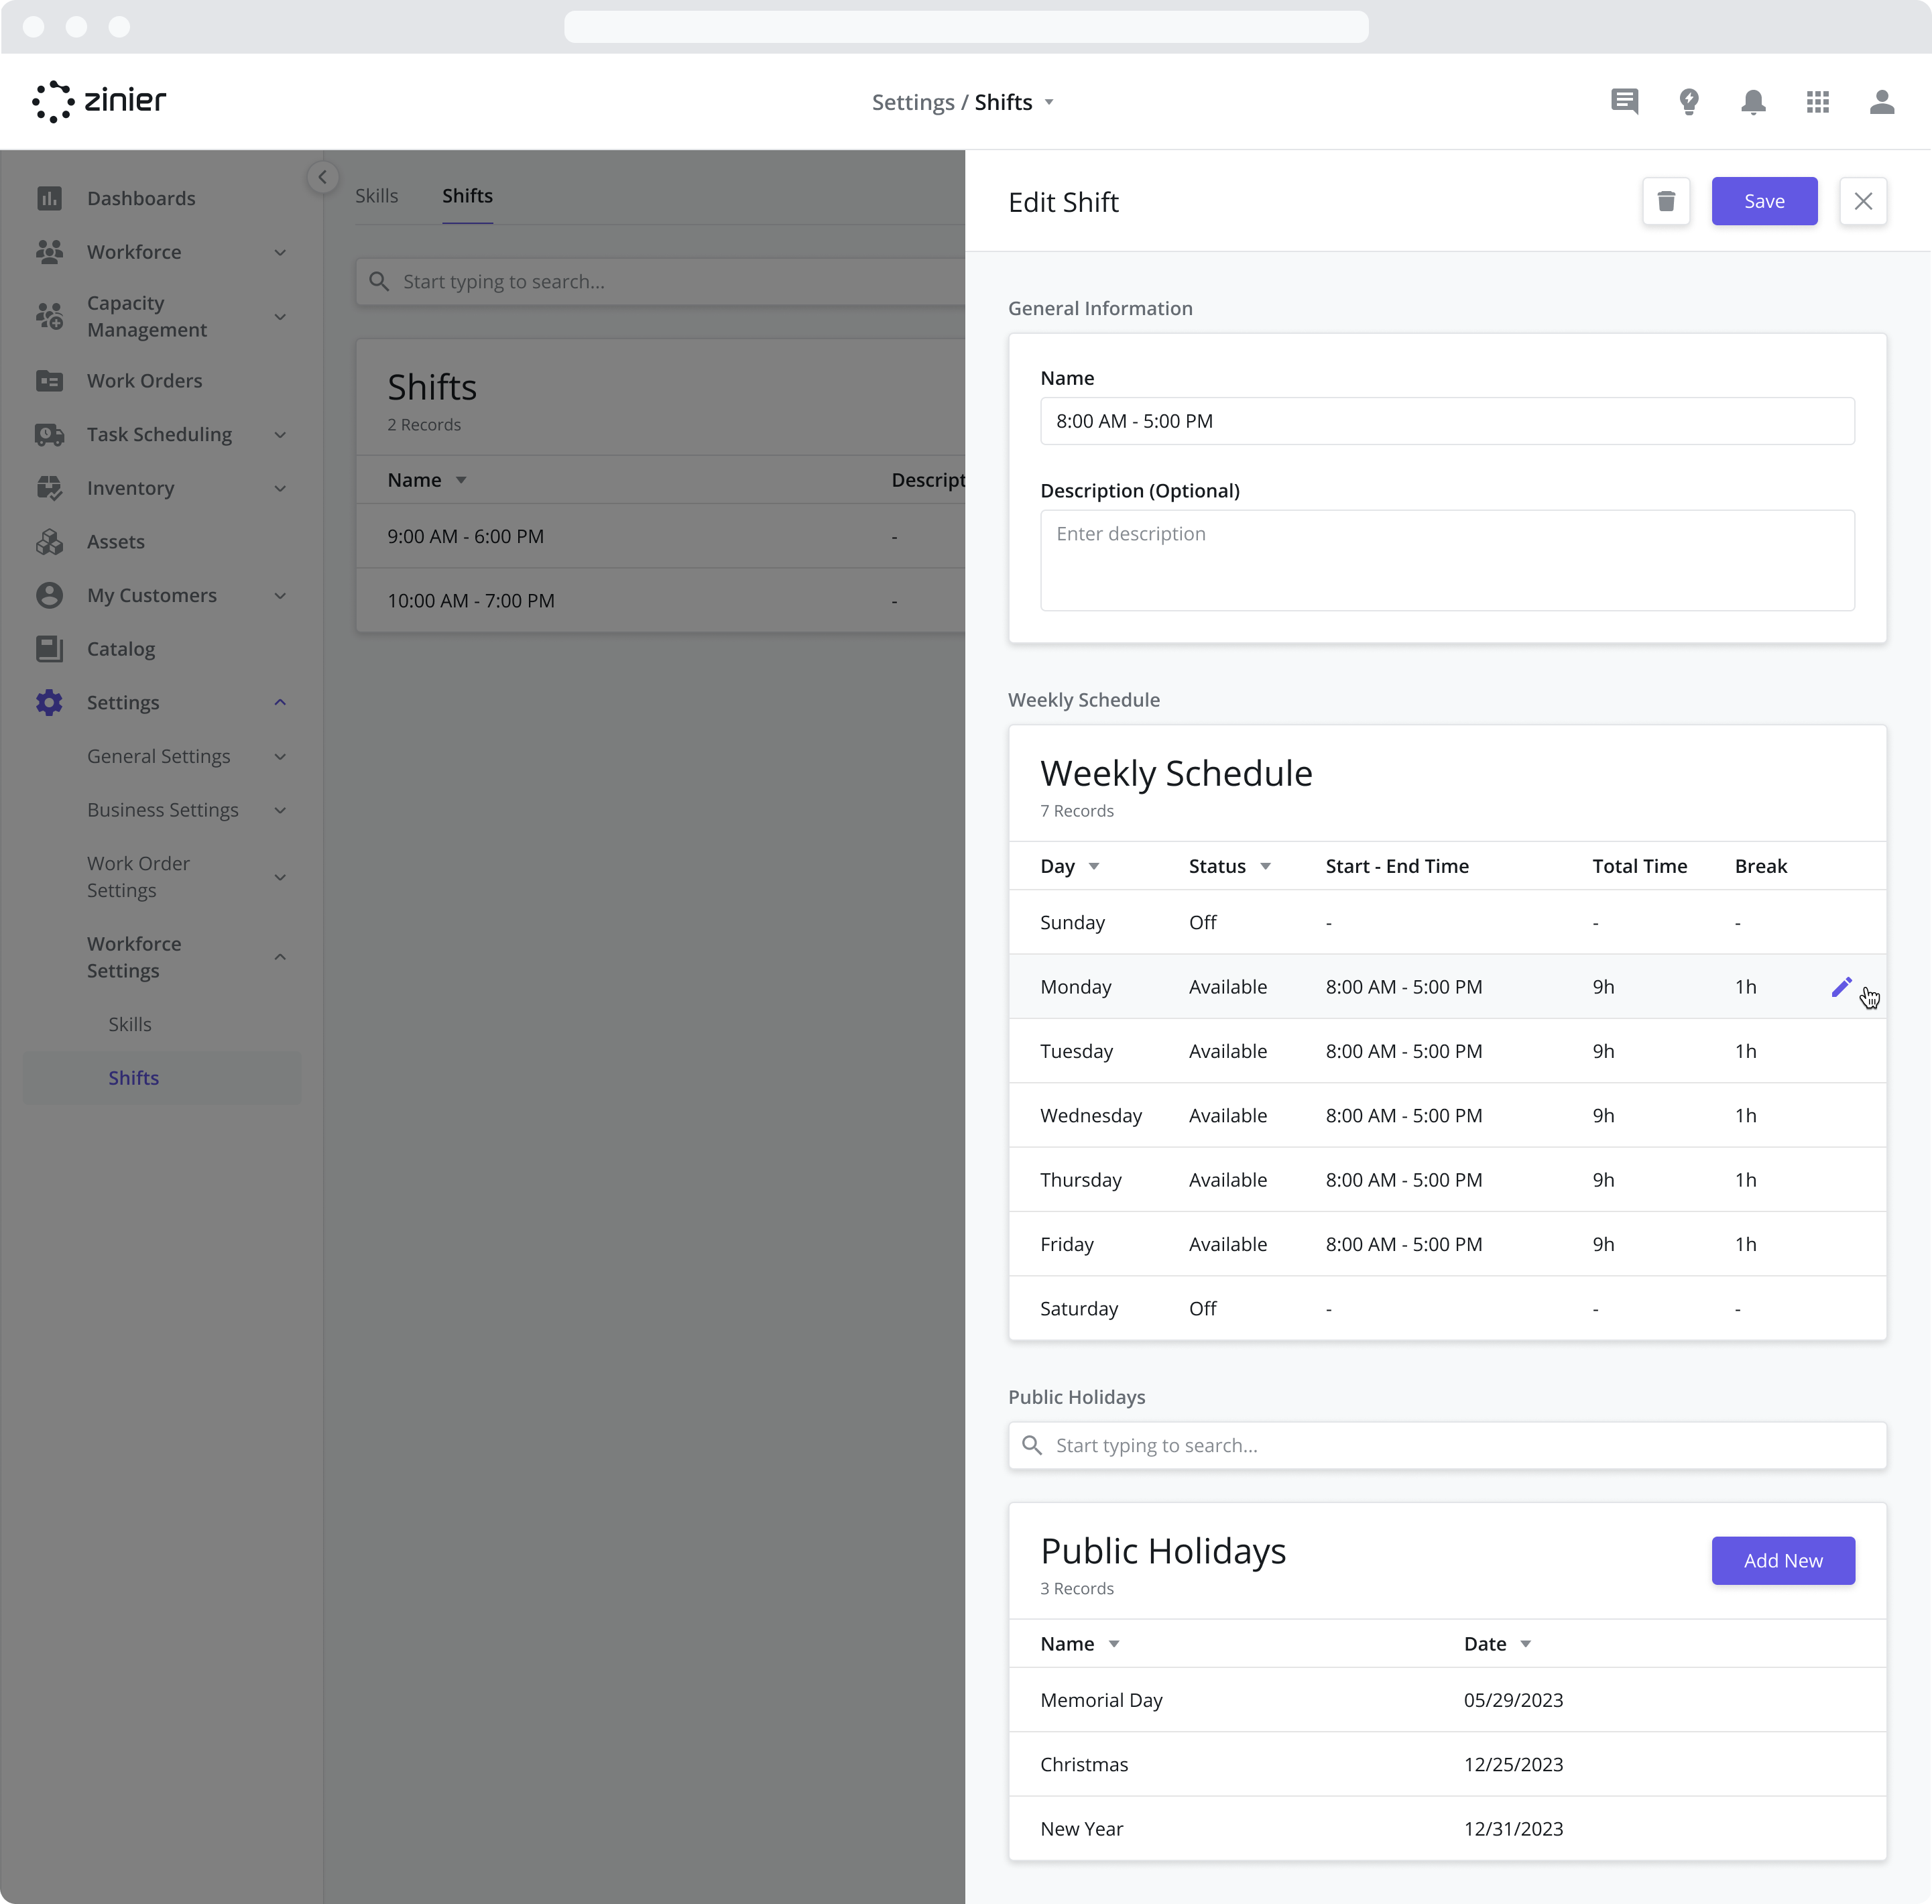
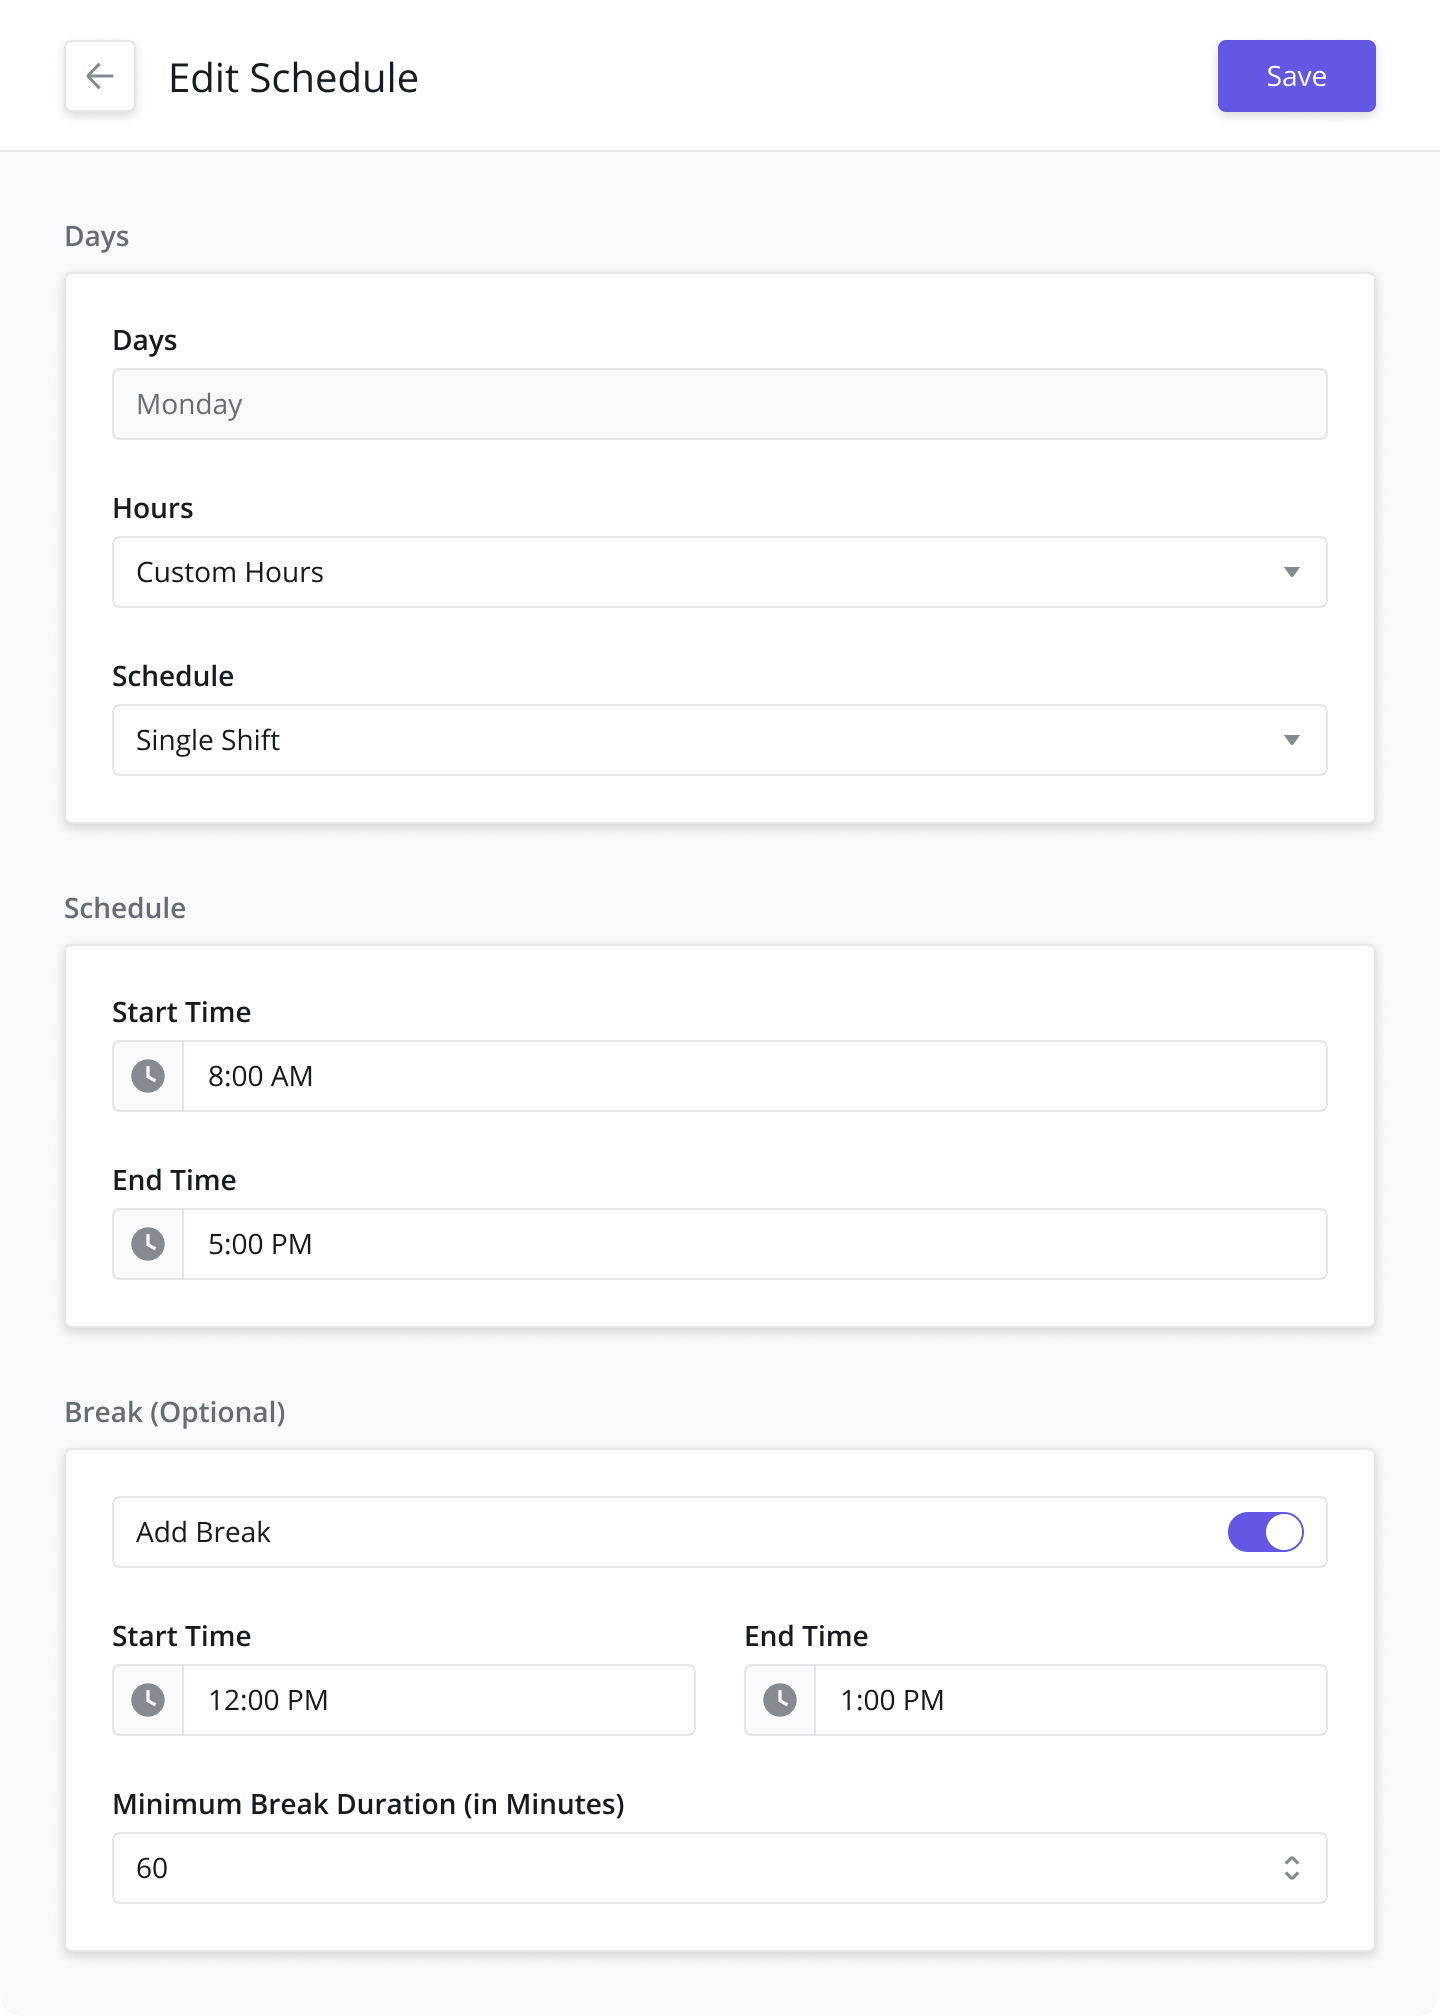
Step 2: Adjust the Weekly Schedule
Next, adjust the Weekly Schedule with the desired working hours by clicking on each day of the week from the data grid
From the Hours dropdown menu, select from the following Options:
Custom Hours: Allows you to enter a custom start and end time for the day
24 hours: Users will be available for the entire day
Off: Users will not be available to work on this day
From the Schedule dropdown, select from the following options:
Single Shift: A standard Shift with a Start Time and End Time for the day
Split Shift: This allows you to split the day into two separate segments, each with a Start and End Time.
If you’ve Selected Custom Hours and Single Shift, enter a Start Time and End Time for the day
If you’ve Selected Custom Hours and Split Shift, enter a Start Time and End Time for both Shift segments
If you’d like to Add a Break (Optional) to the day, do the following
Turn the “Add Break” toggle to On
Enter a Start Time and End Time for the Break
Provide a Minimum Break Duration
Click Save
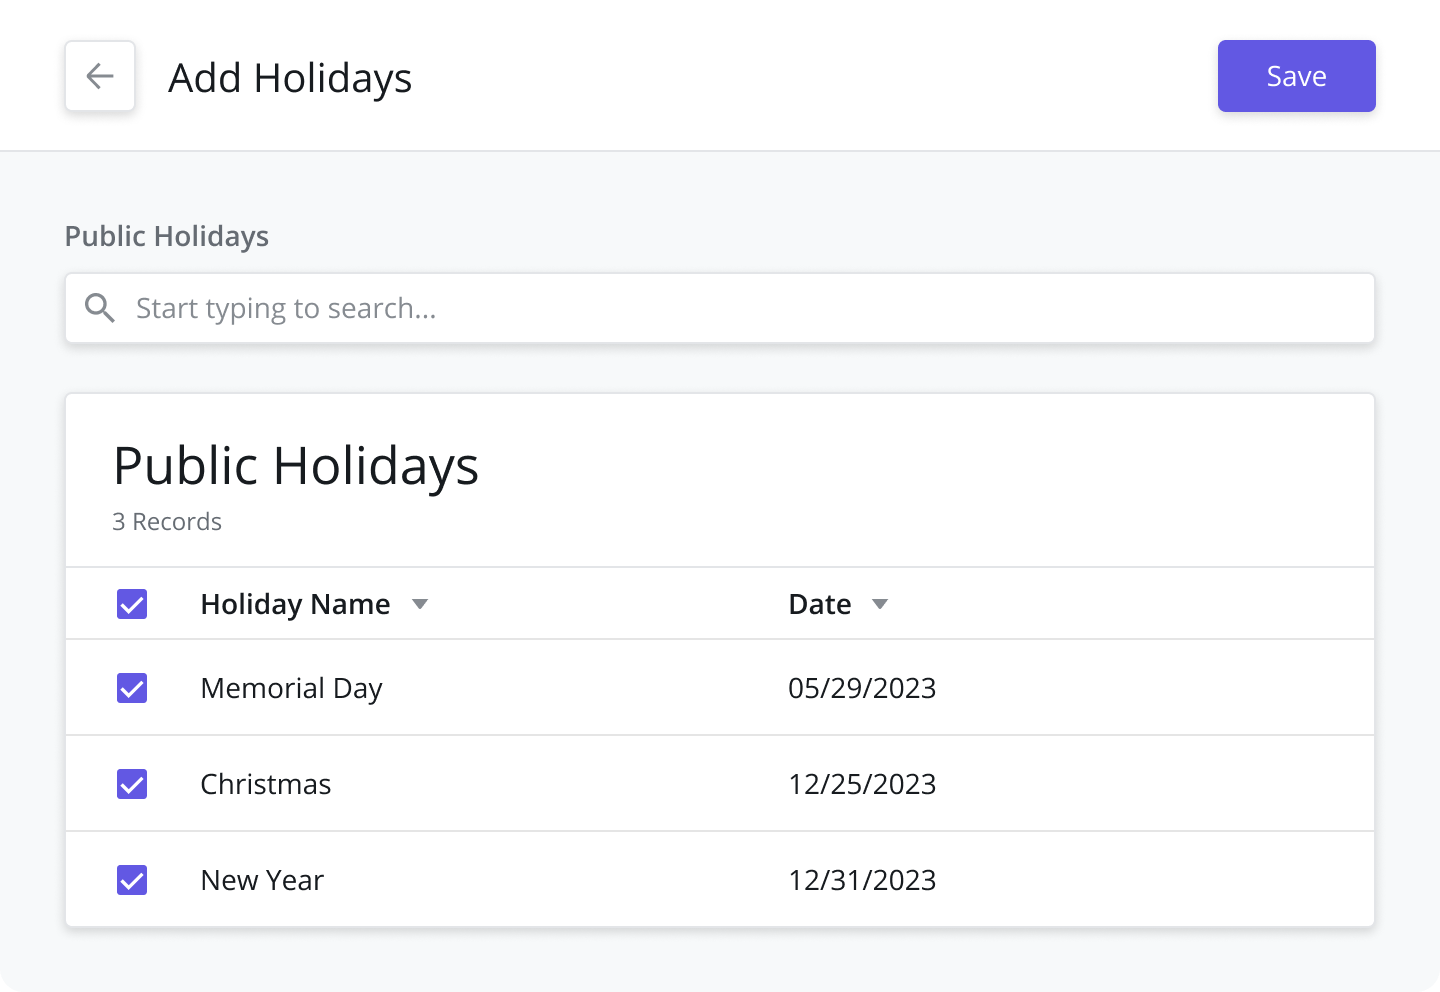
Step 3: Add your Public Holidays
Add any Public Holidays to the Shift by clicking the Add New button from the Public Holidays data grid
Click Save
Managing List Options
List Options are used to create the options that can be chosen in drop-down menus across the Zinier web and mobile applications. For example, List Options are used to create a specific list of rejection reasons for use when Approving tasks.
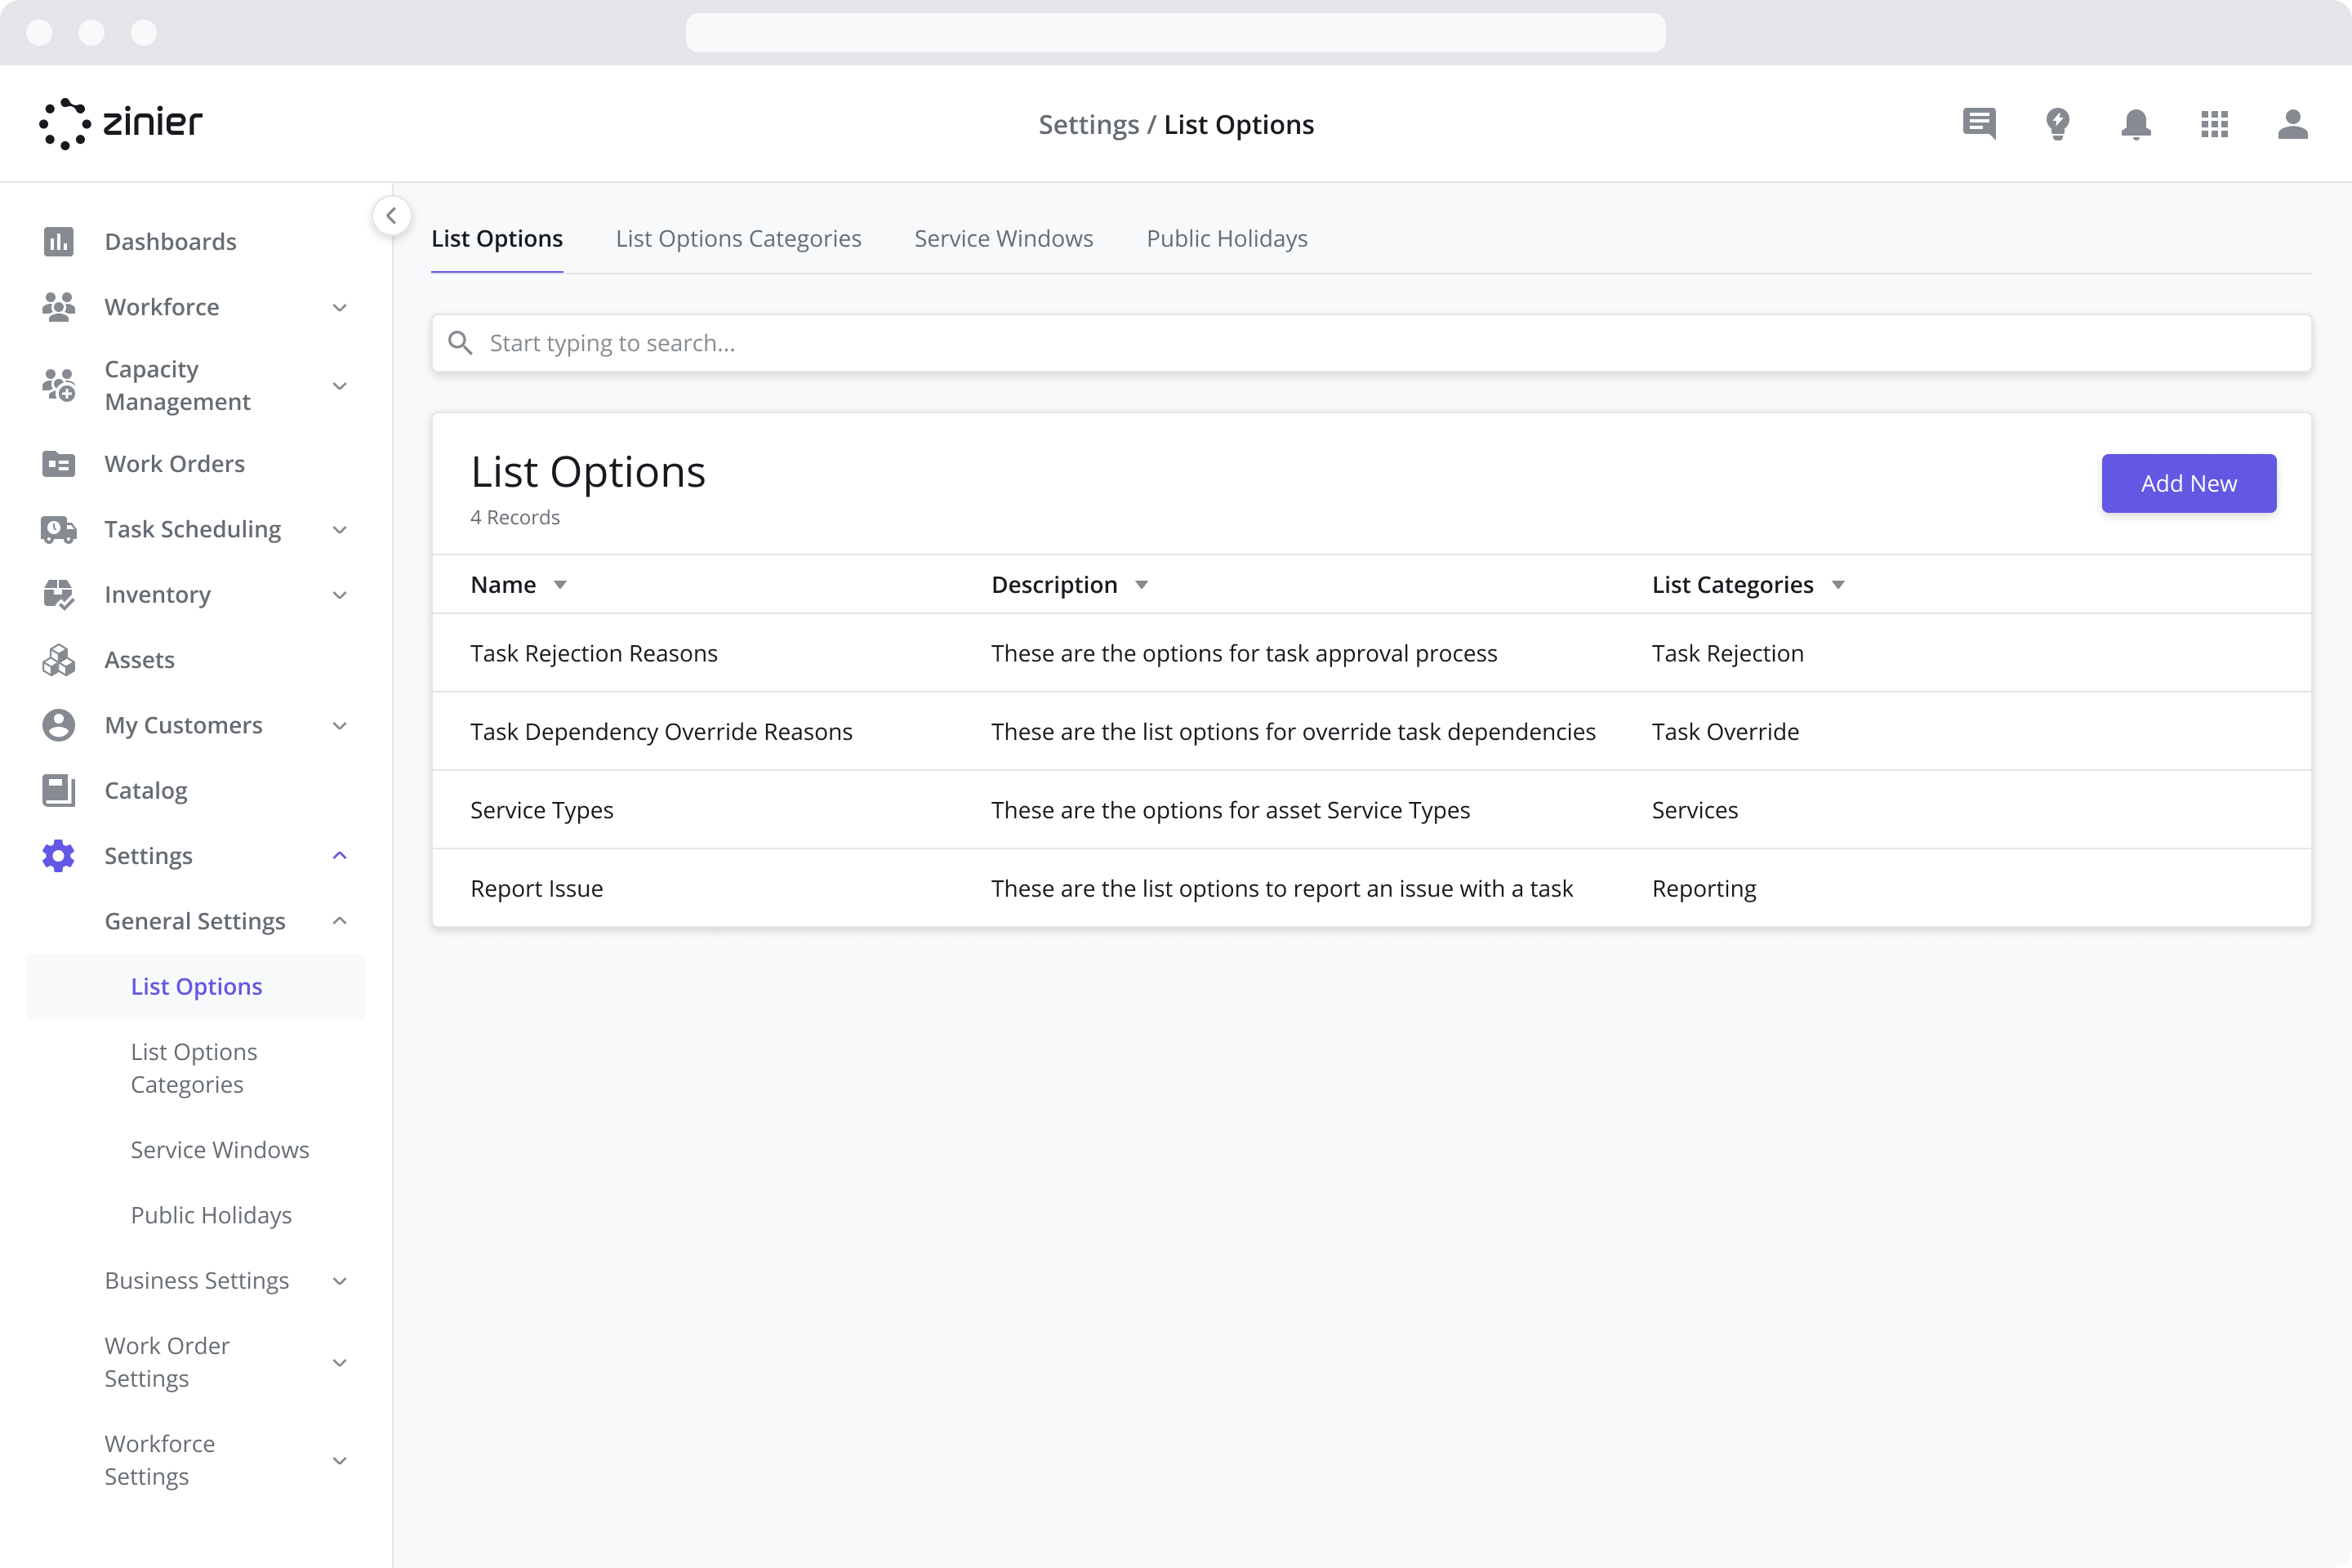
Adding New List Options
To add a new List Option, follow the steps below:
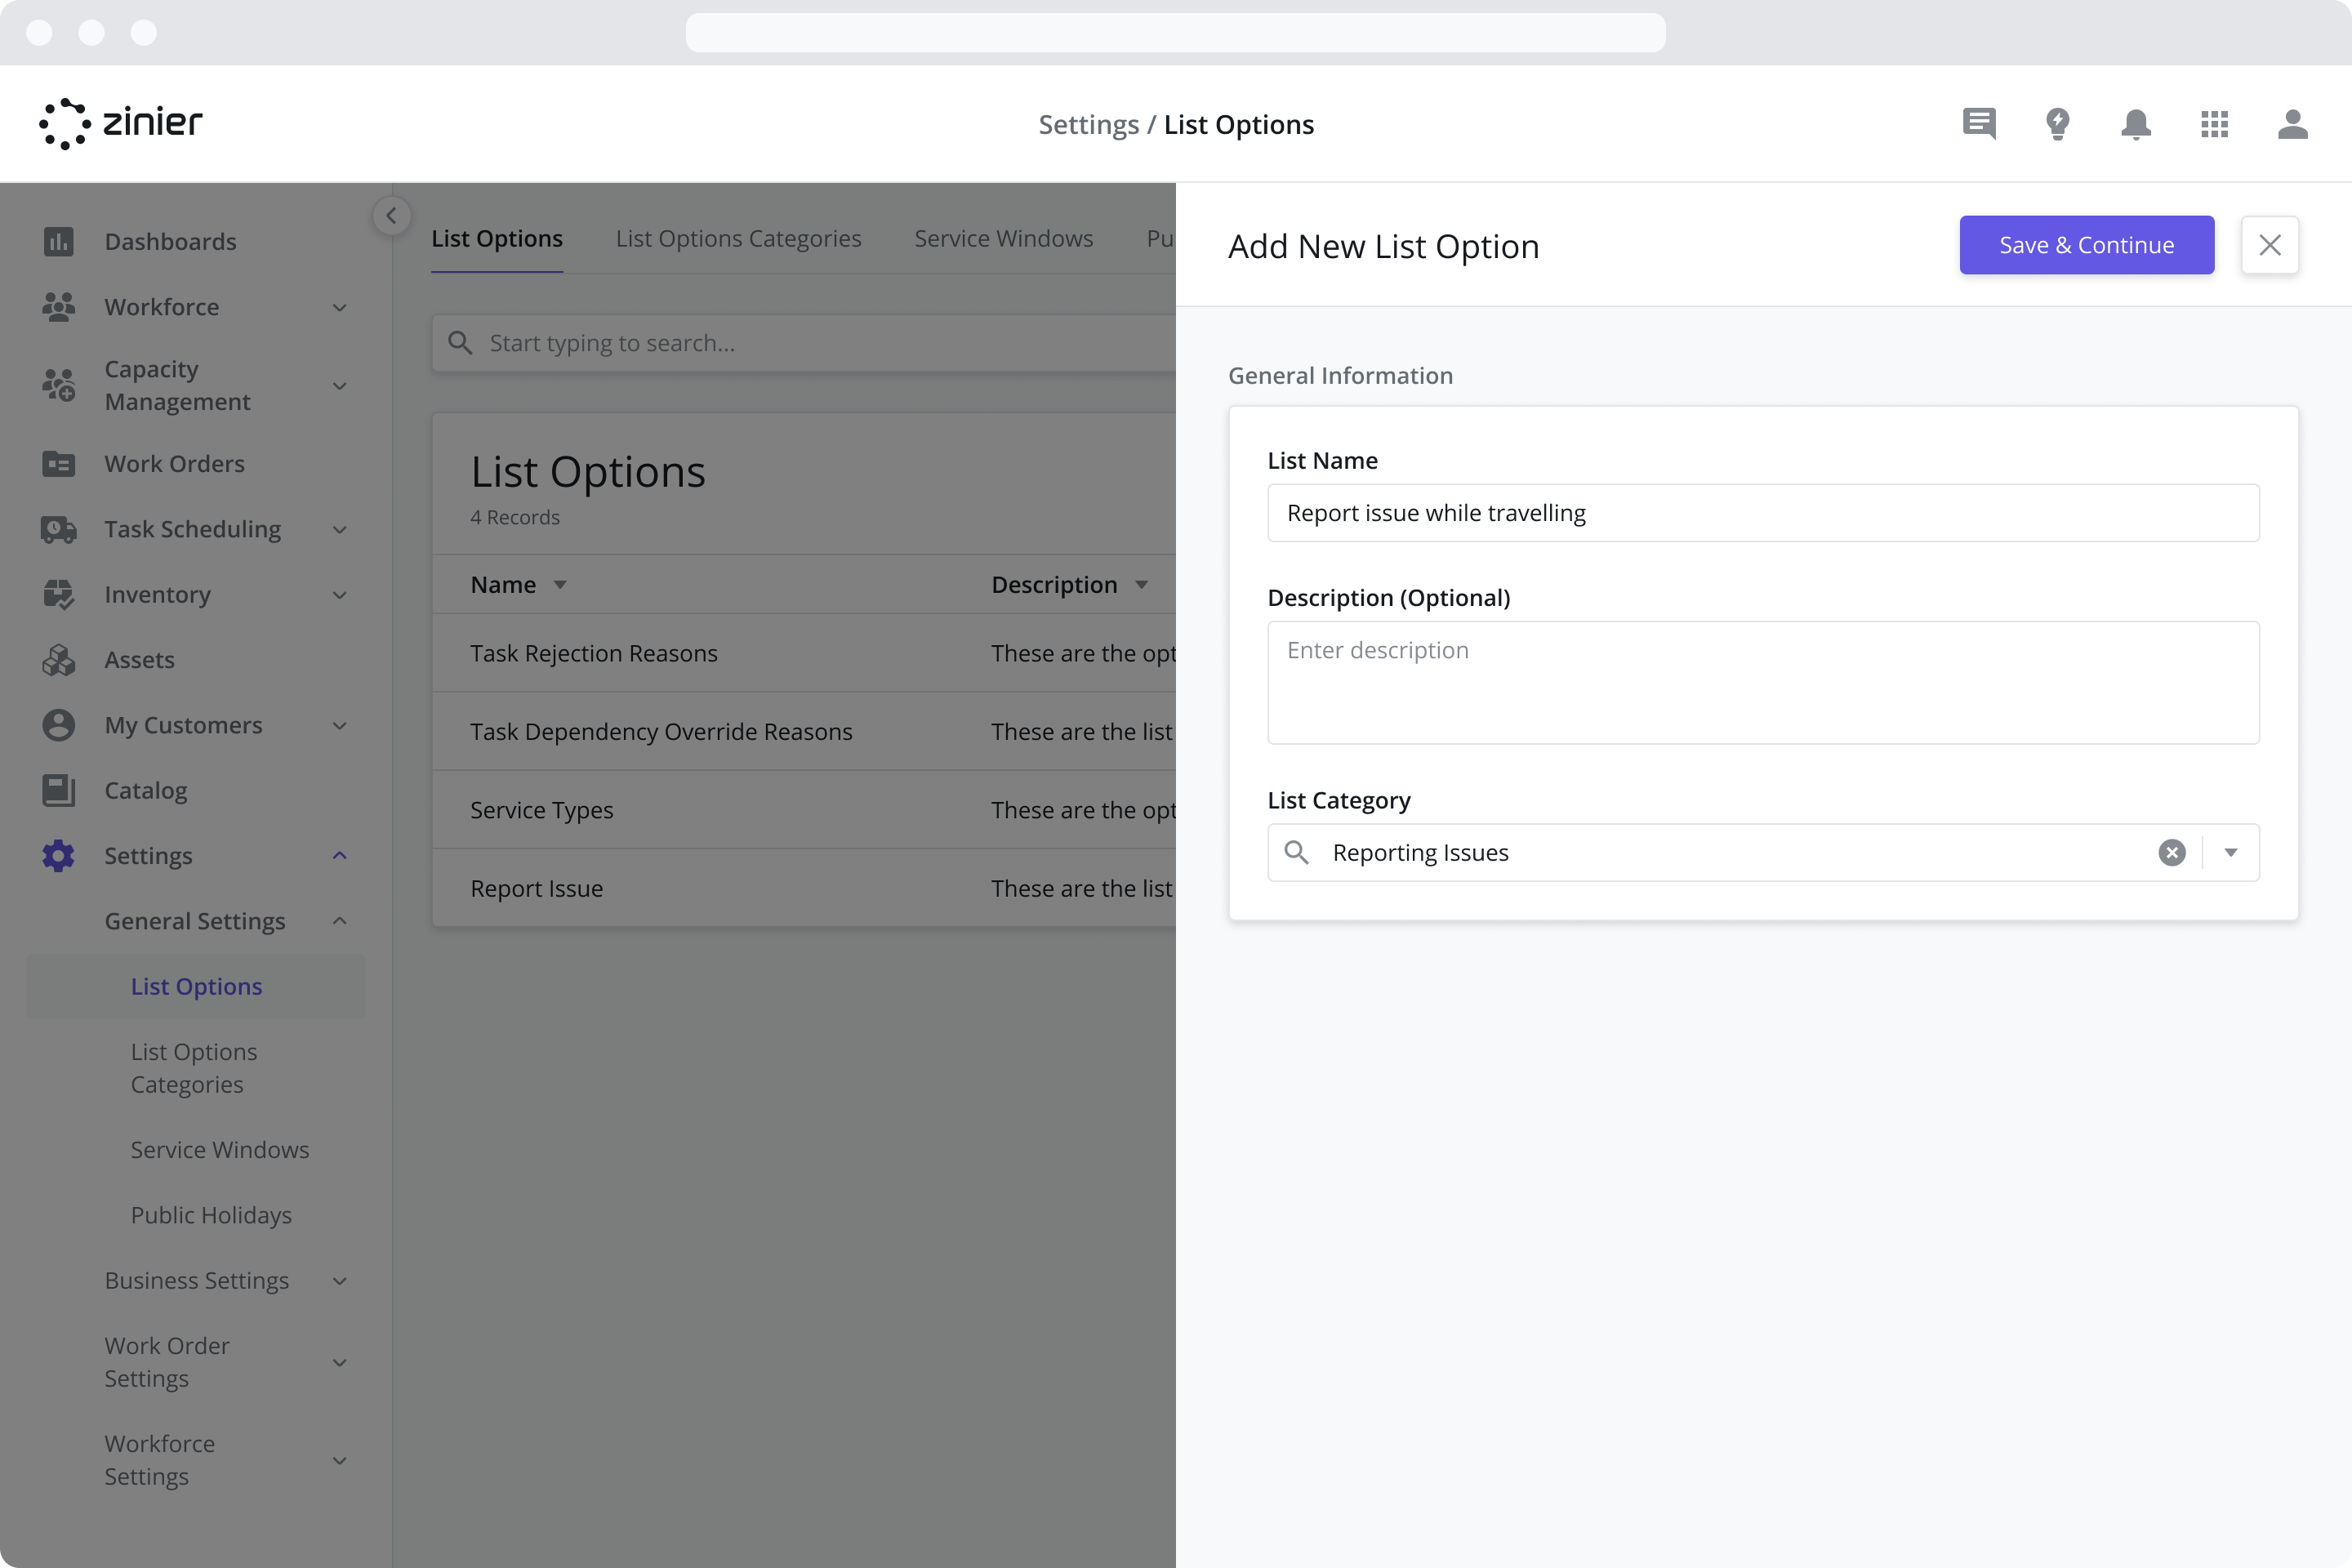
Step 1: Add a new List Option
Go to the Settings > General Settings > List Options module
Click the “Add New” button from the data grid
Enter a Name and Description (Optional)
Select the List Category from the dropdown menu. This option will help you organize your List Options by category
Click Save and Continue
Step 2: Add your Answer Options
Next, add at least one Answer Option by clicking the “Add New” button from the Answer Options data grid
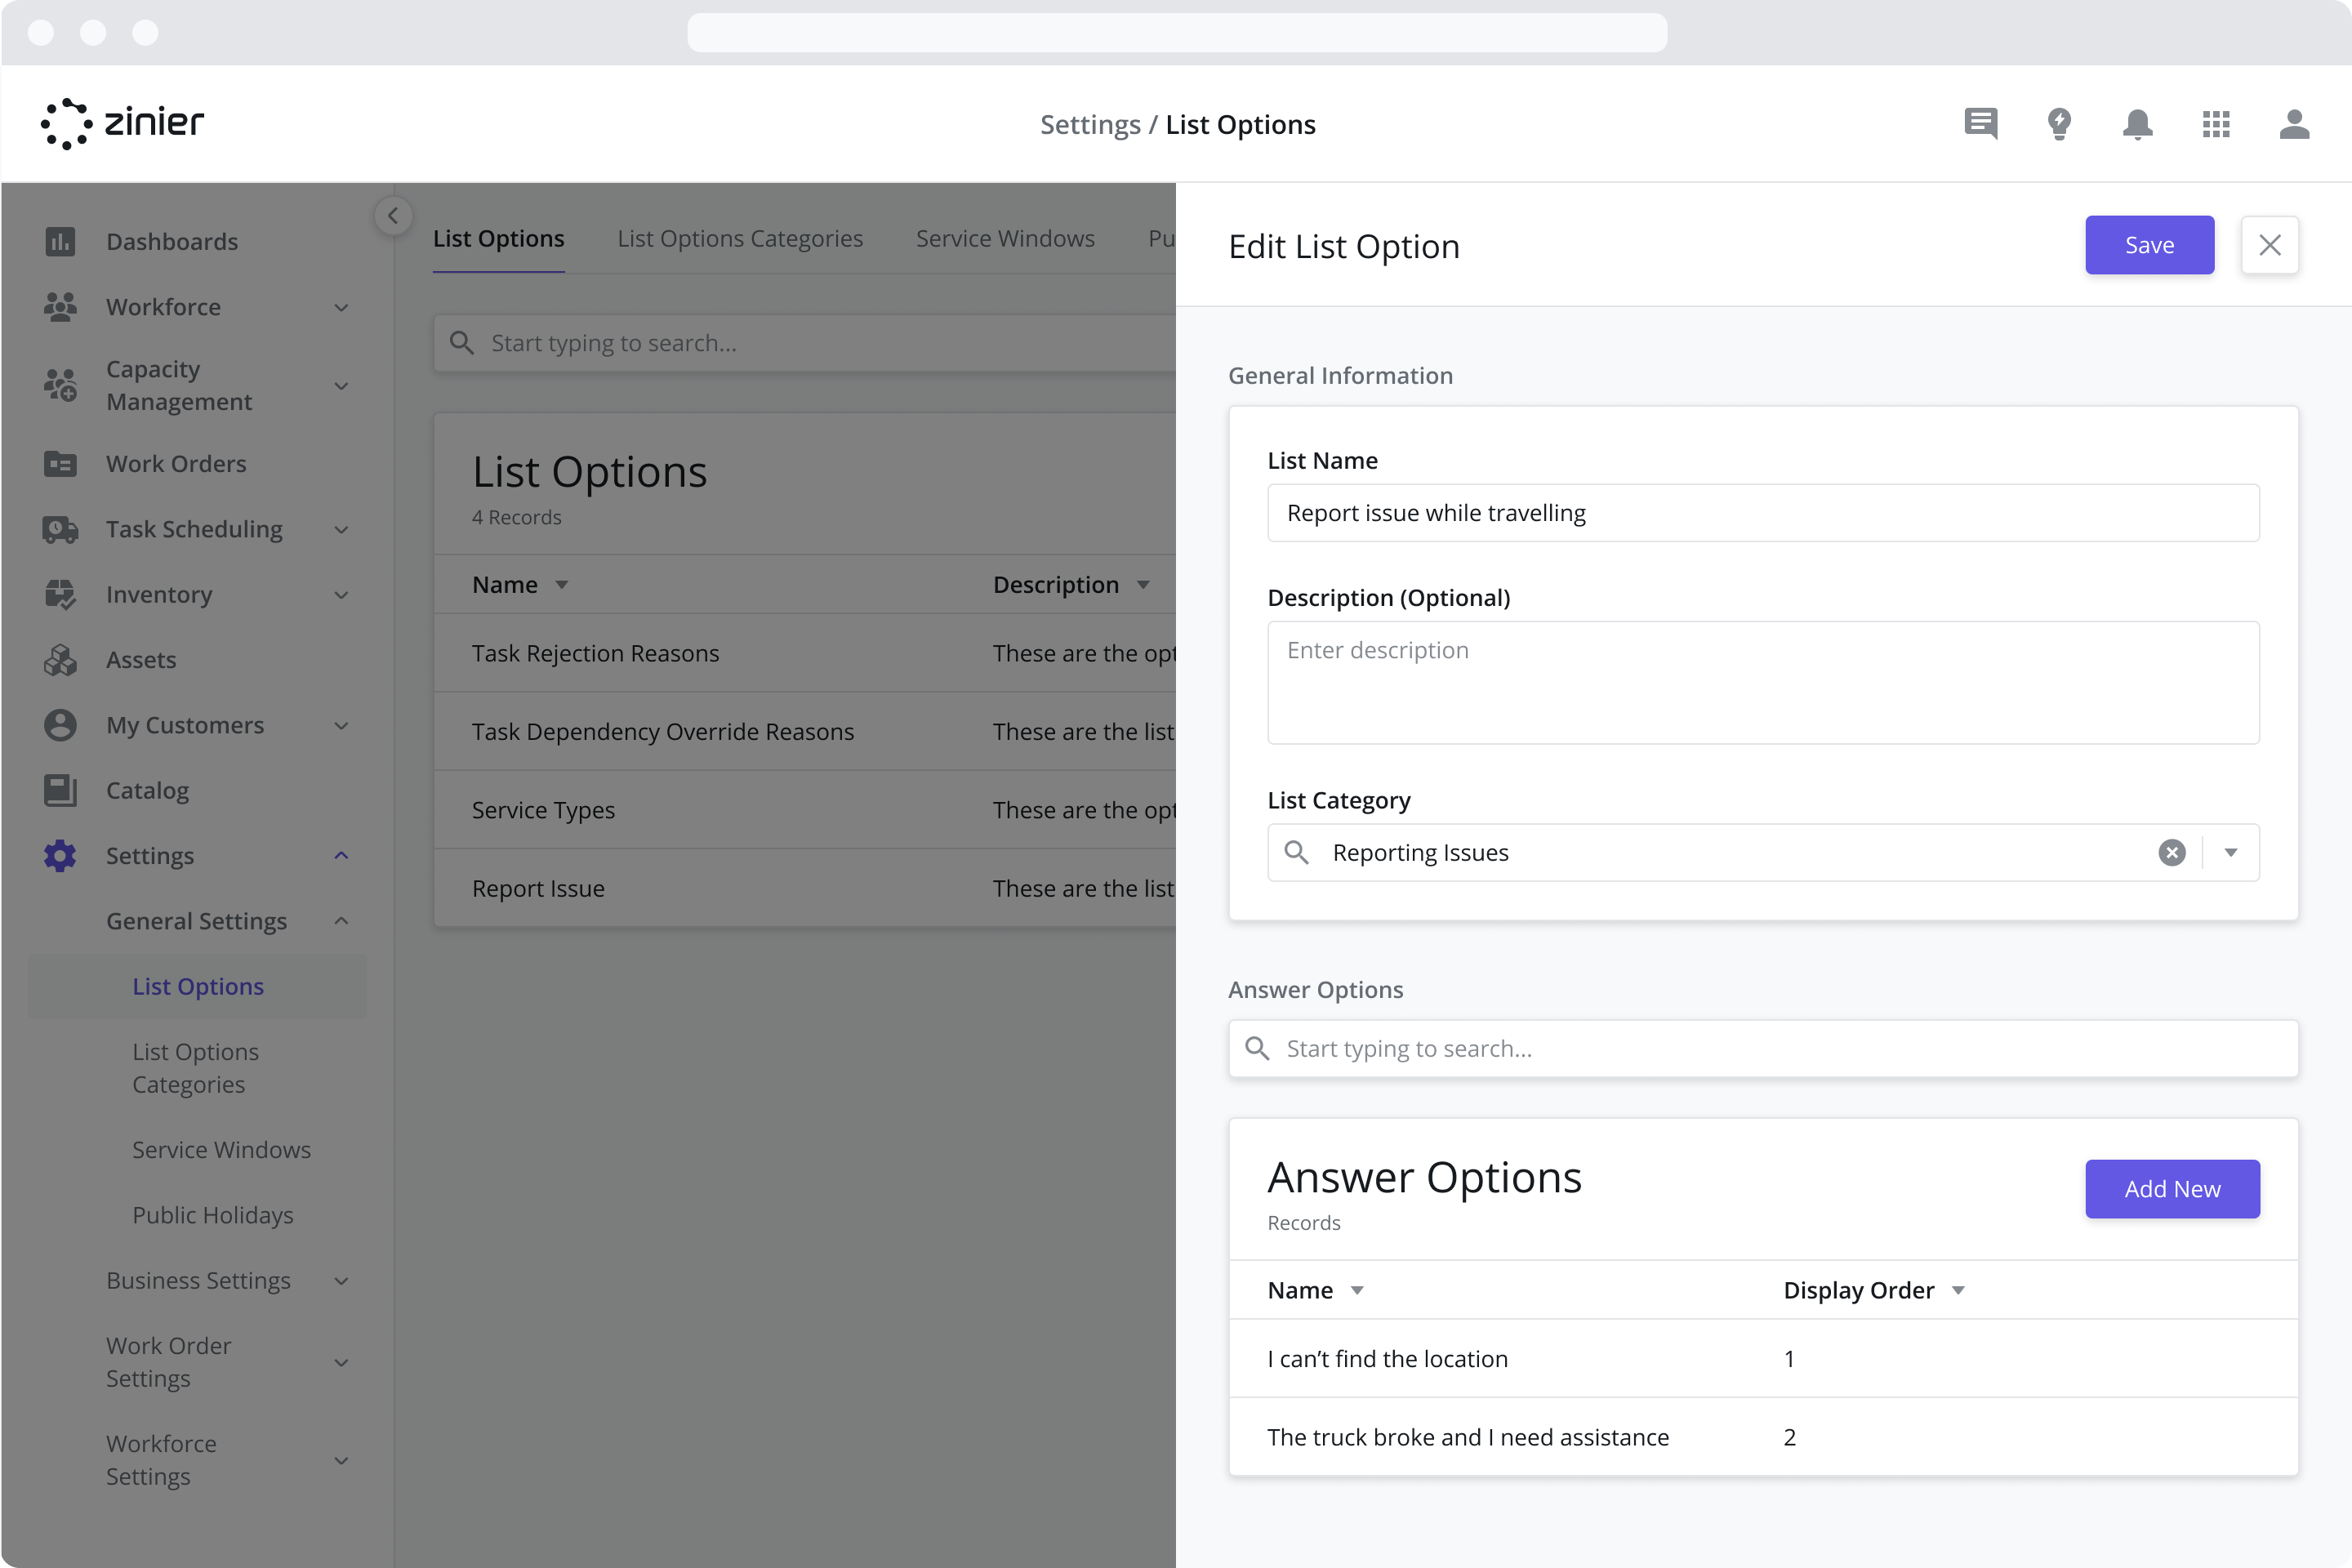
Give the Answer Option a Name and assign it a Display Order. The Display Order indicates the order in the dropdown menu / list the answer option will appear. For example, if I have three answer options and I assign them Display Orders of “Answer 1” = 1, “Answer 2” = 2, and “Answer 3” = 3, then they will be displayed in the dropdown menu with Answer 1 at the top of the list and Answer 3 at the bottom of the list.
Click Save
Repeat steps 1-3 to add as many Answer Options as needed

Default List Options
The Zinier Productivity Suite comes with several pre-built List Options which are used across modules and as part of the Standard Mobile Workflows.
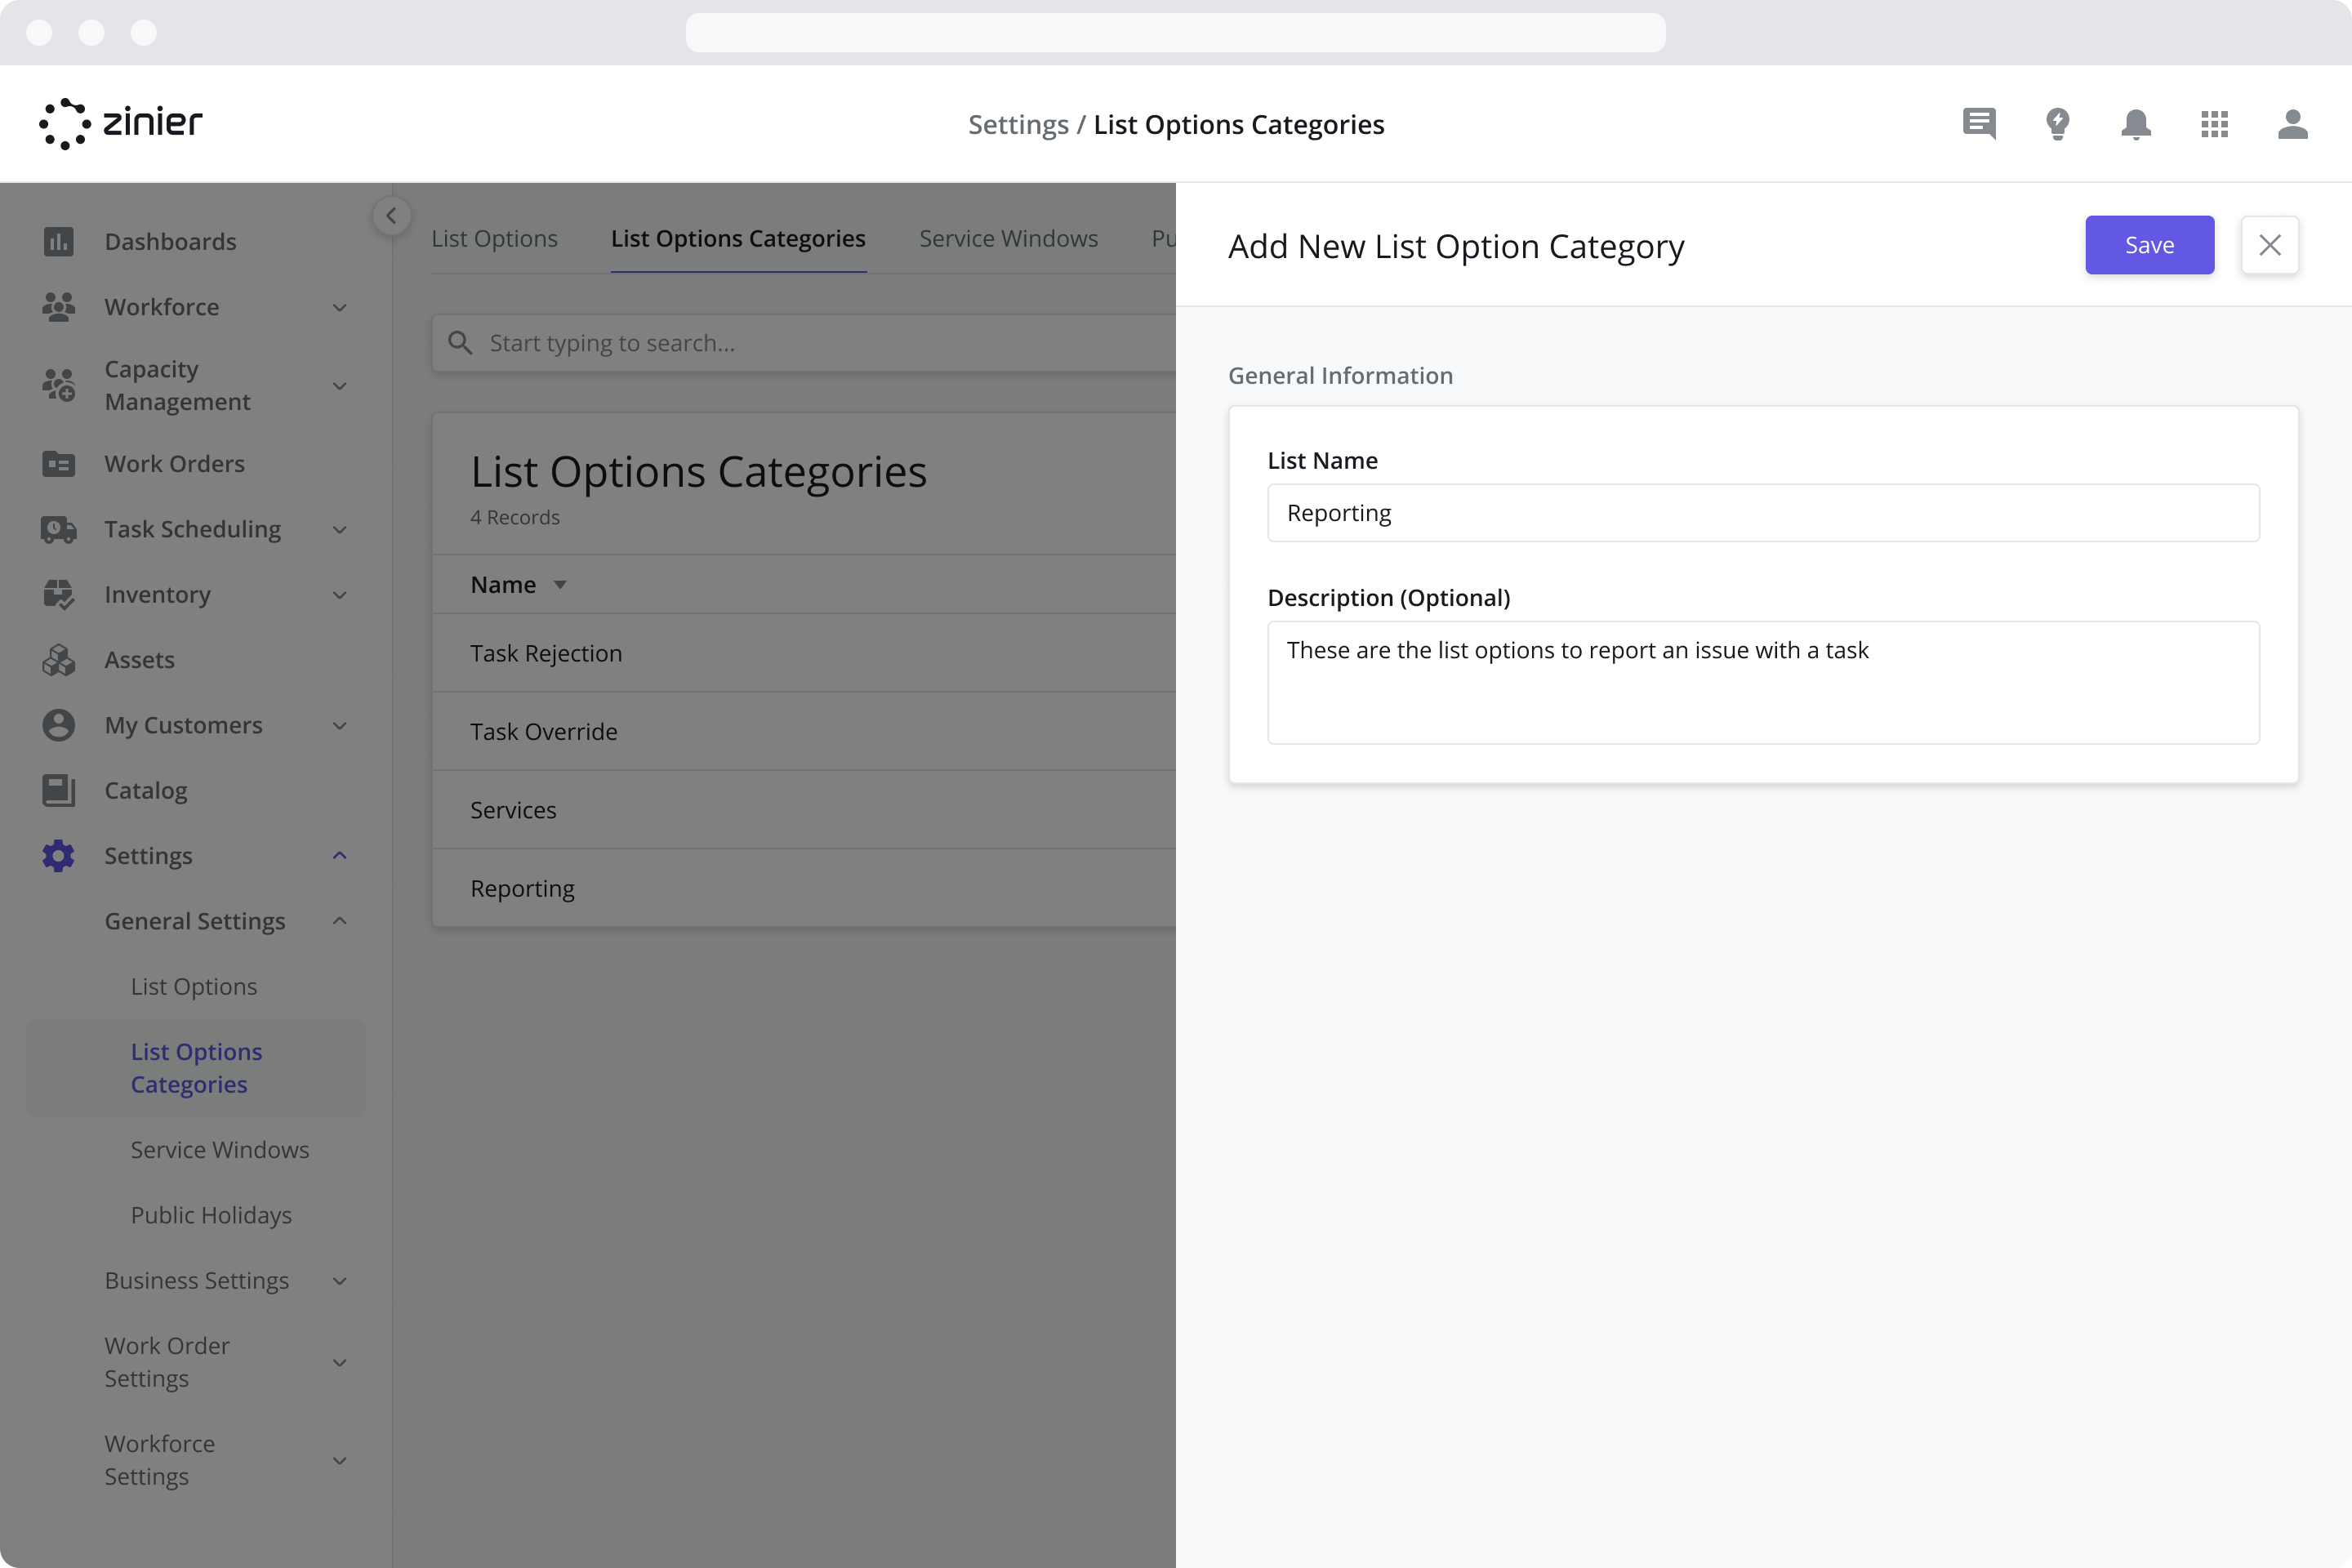
Manage List Option Categories
List Option Categories are organizational tags used to group List Options and make them easier to manage.
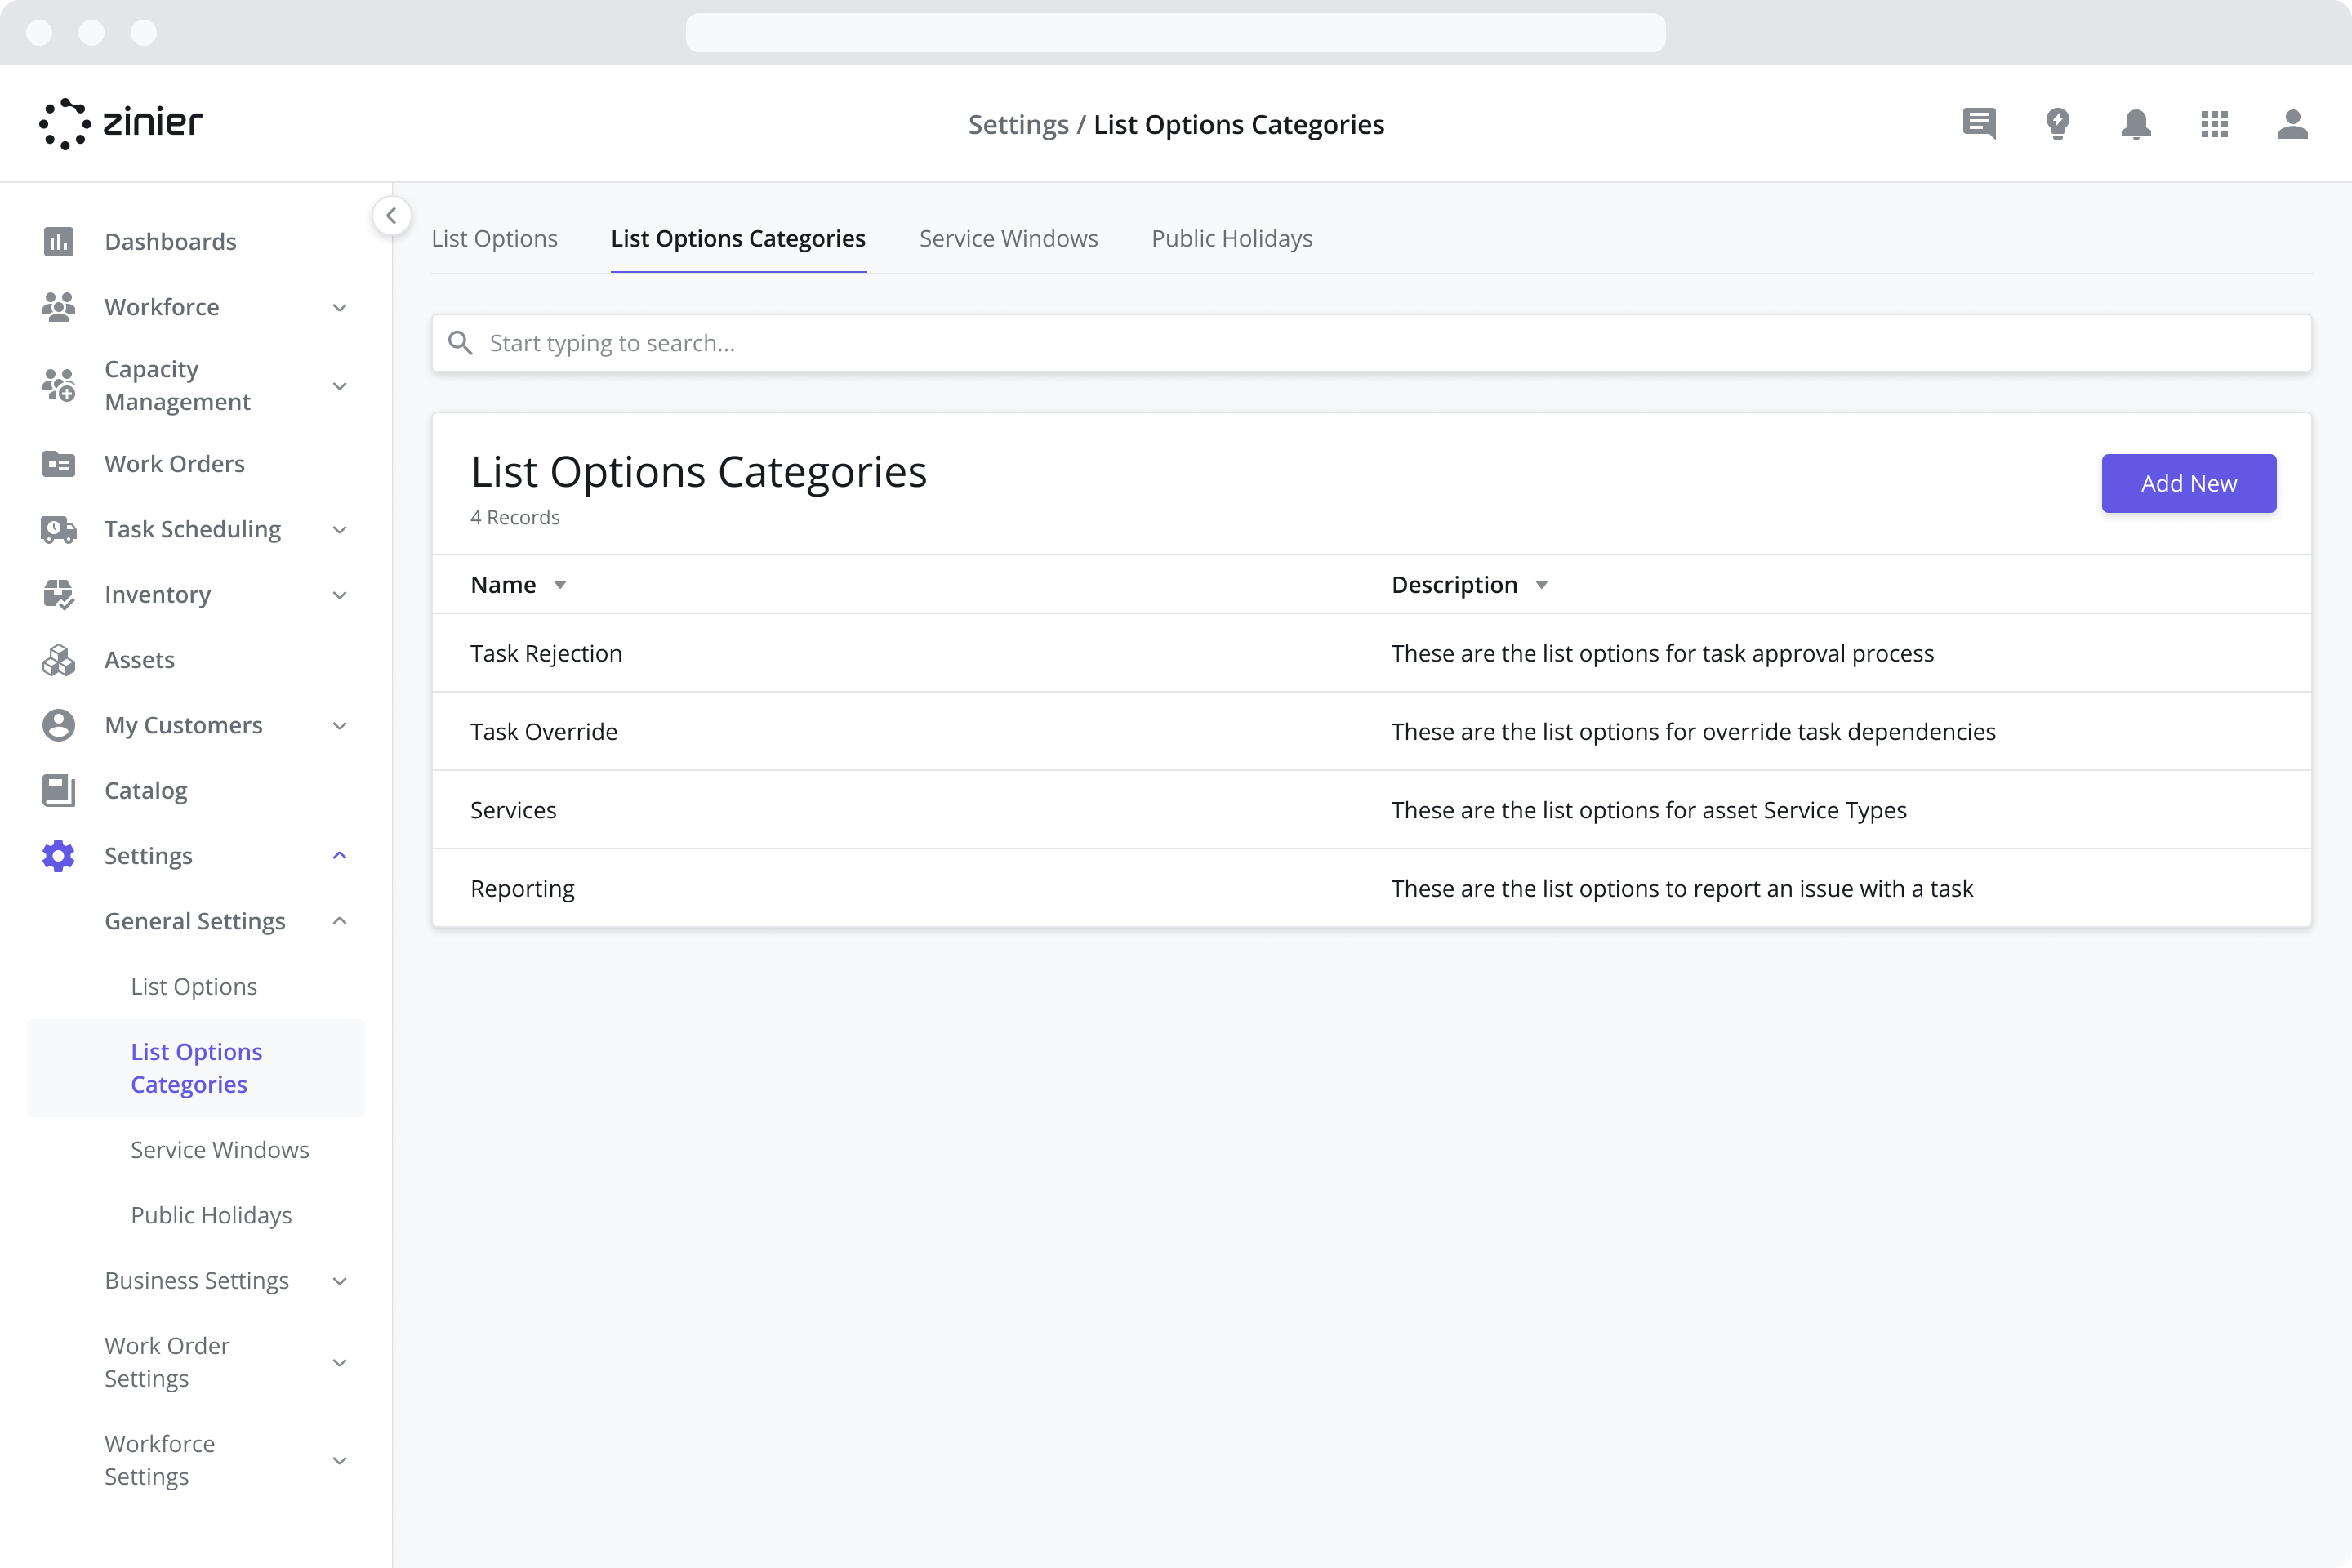
To add a new List Option Category, go to the Settings > General Settings > List Option Categories module, click the “Add New” button in the top right of the data grid, and enter the information shown in the sidepanel. Once added, List Option Categories can be tagged to List Options as described above.
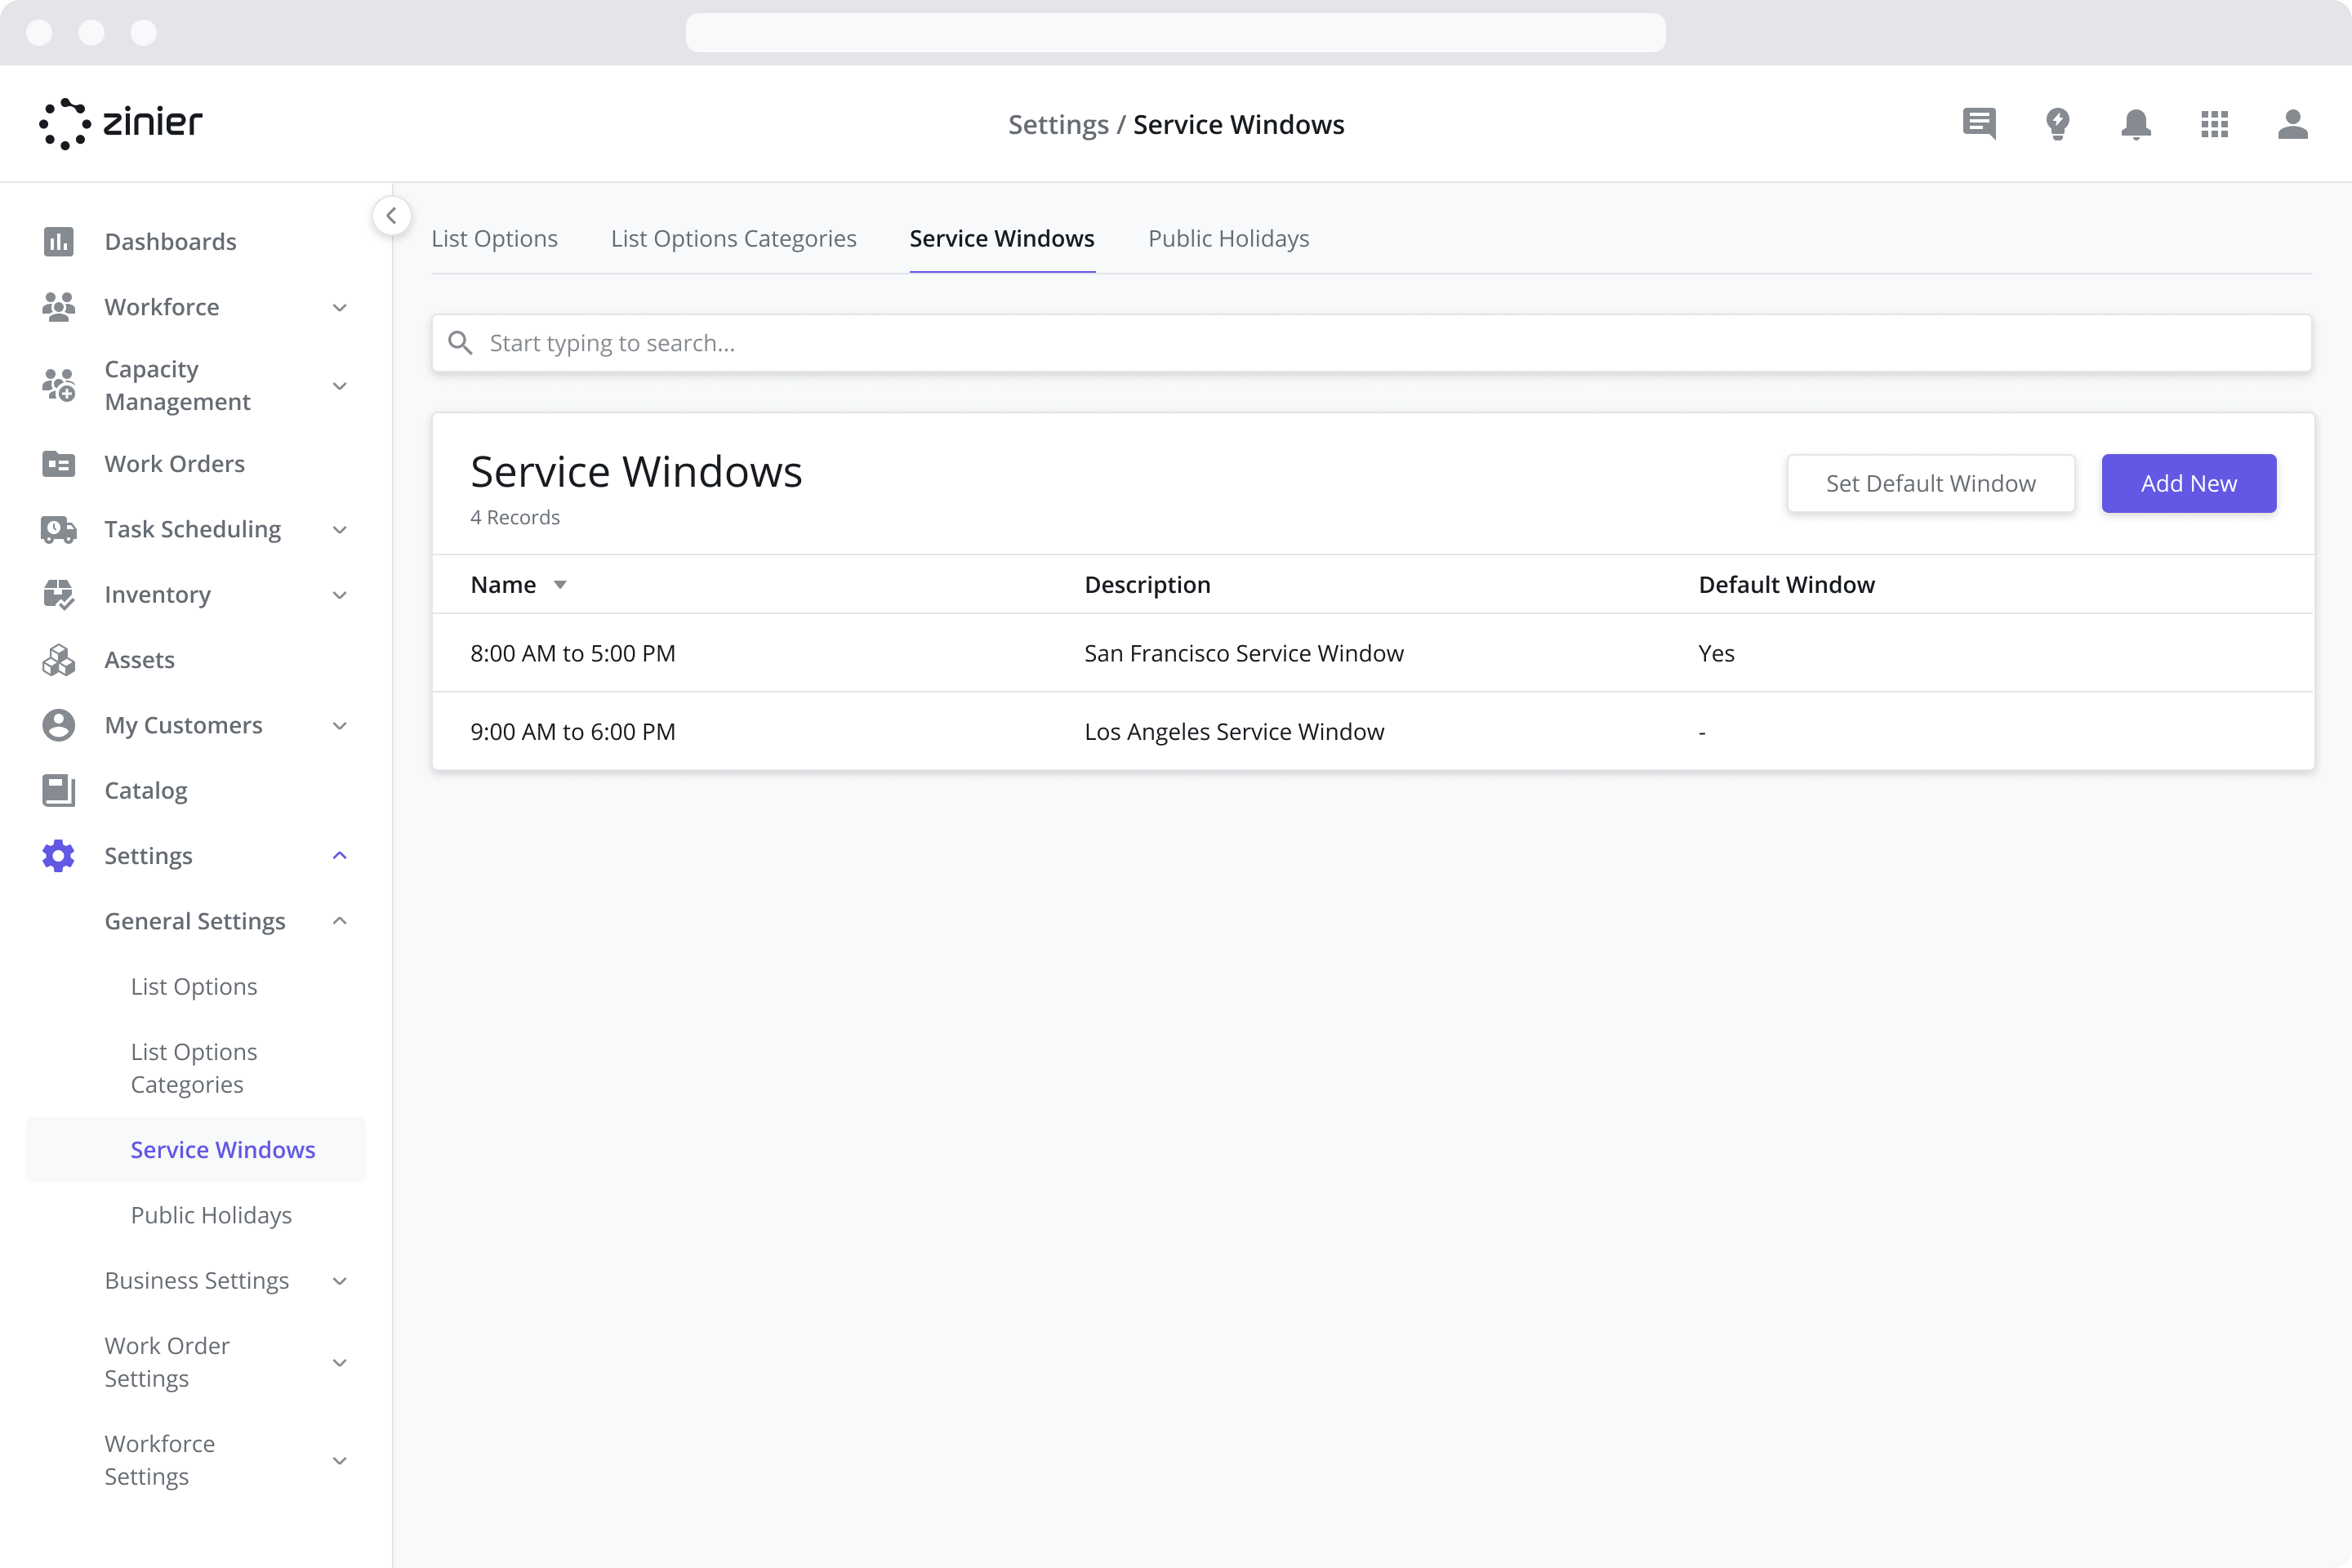
Managing Service Windows
Service Windows determine the hours of operation for when a Task can be scheduled with a specific Customer. This is determined by which Contract / Service Window is used when creating the Work Order.
For example, Customer A has normal operating hours at their various customer sites of 9 am - 5 pm (M-F) and no Public Holidays.
To enable Service Windows in a Work Order, I would take the following steps:
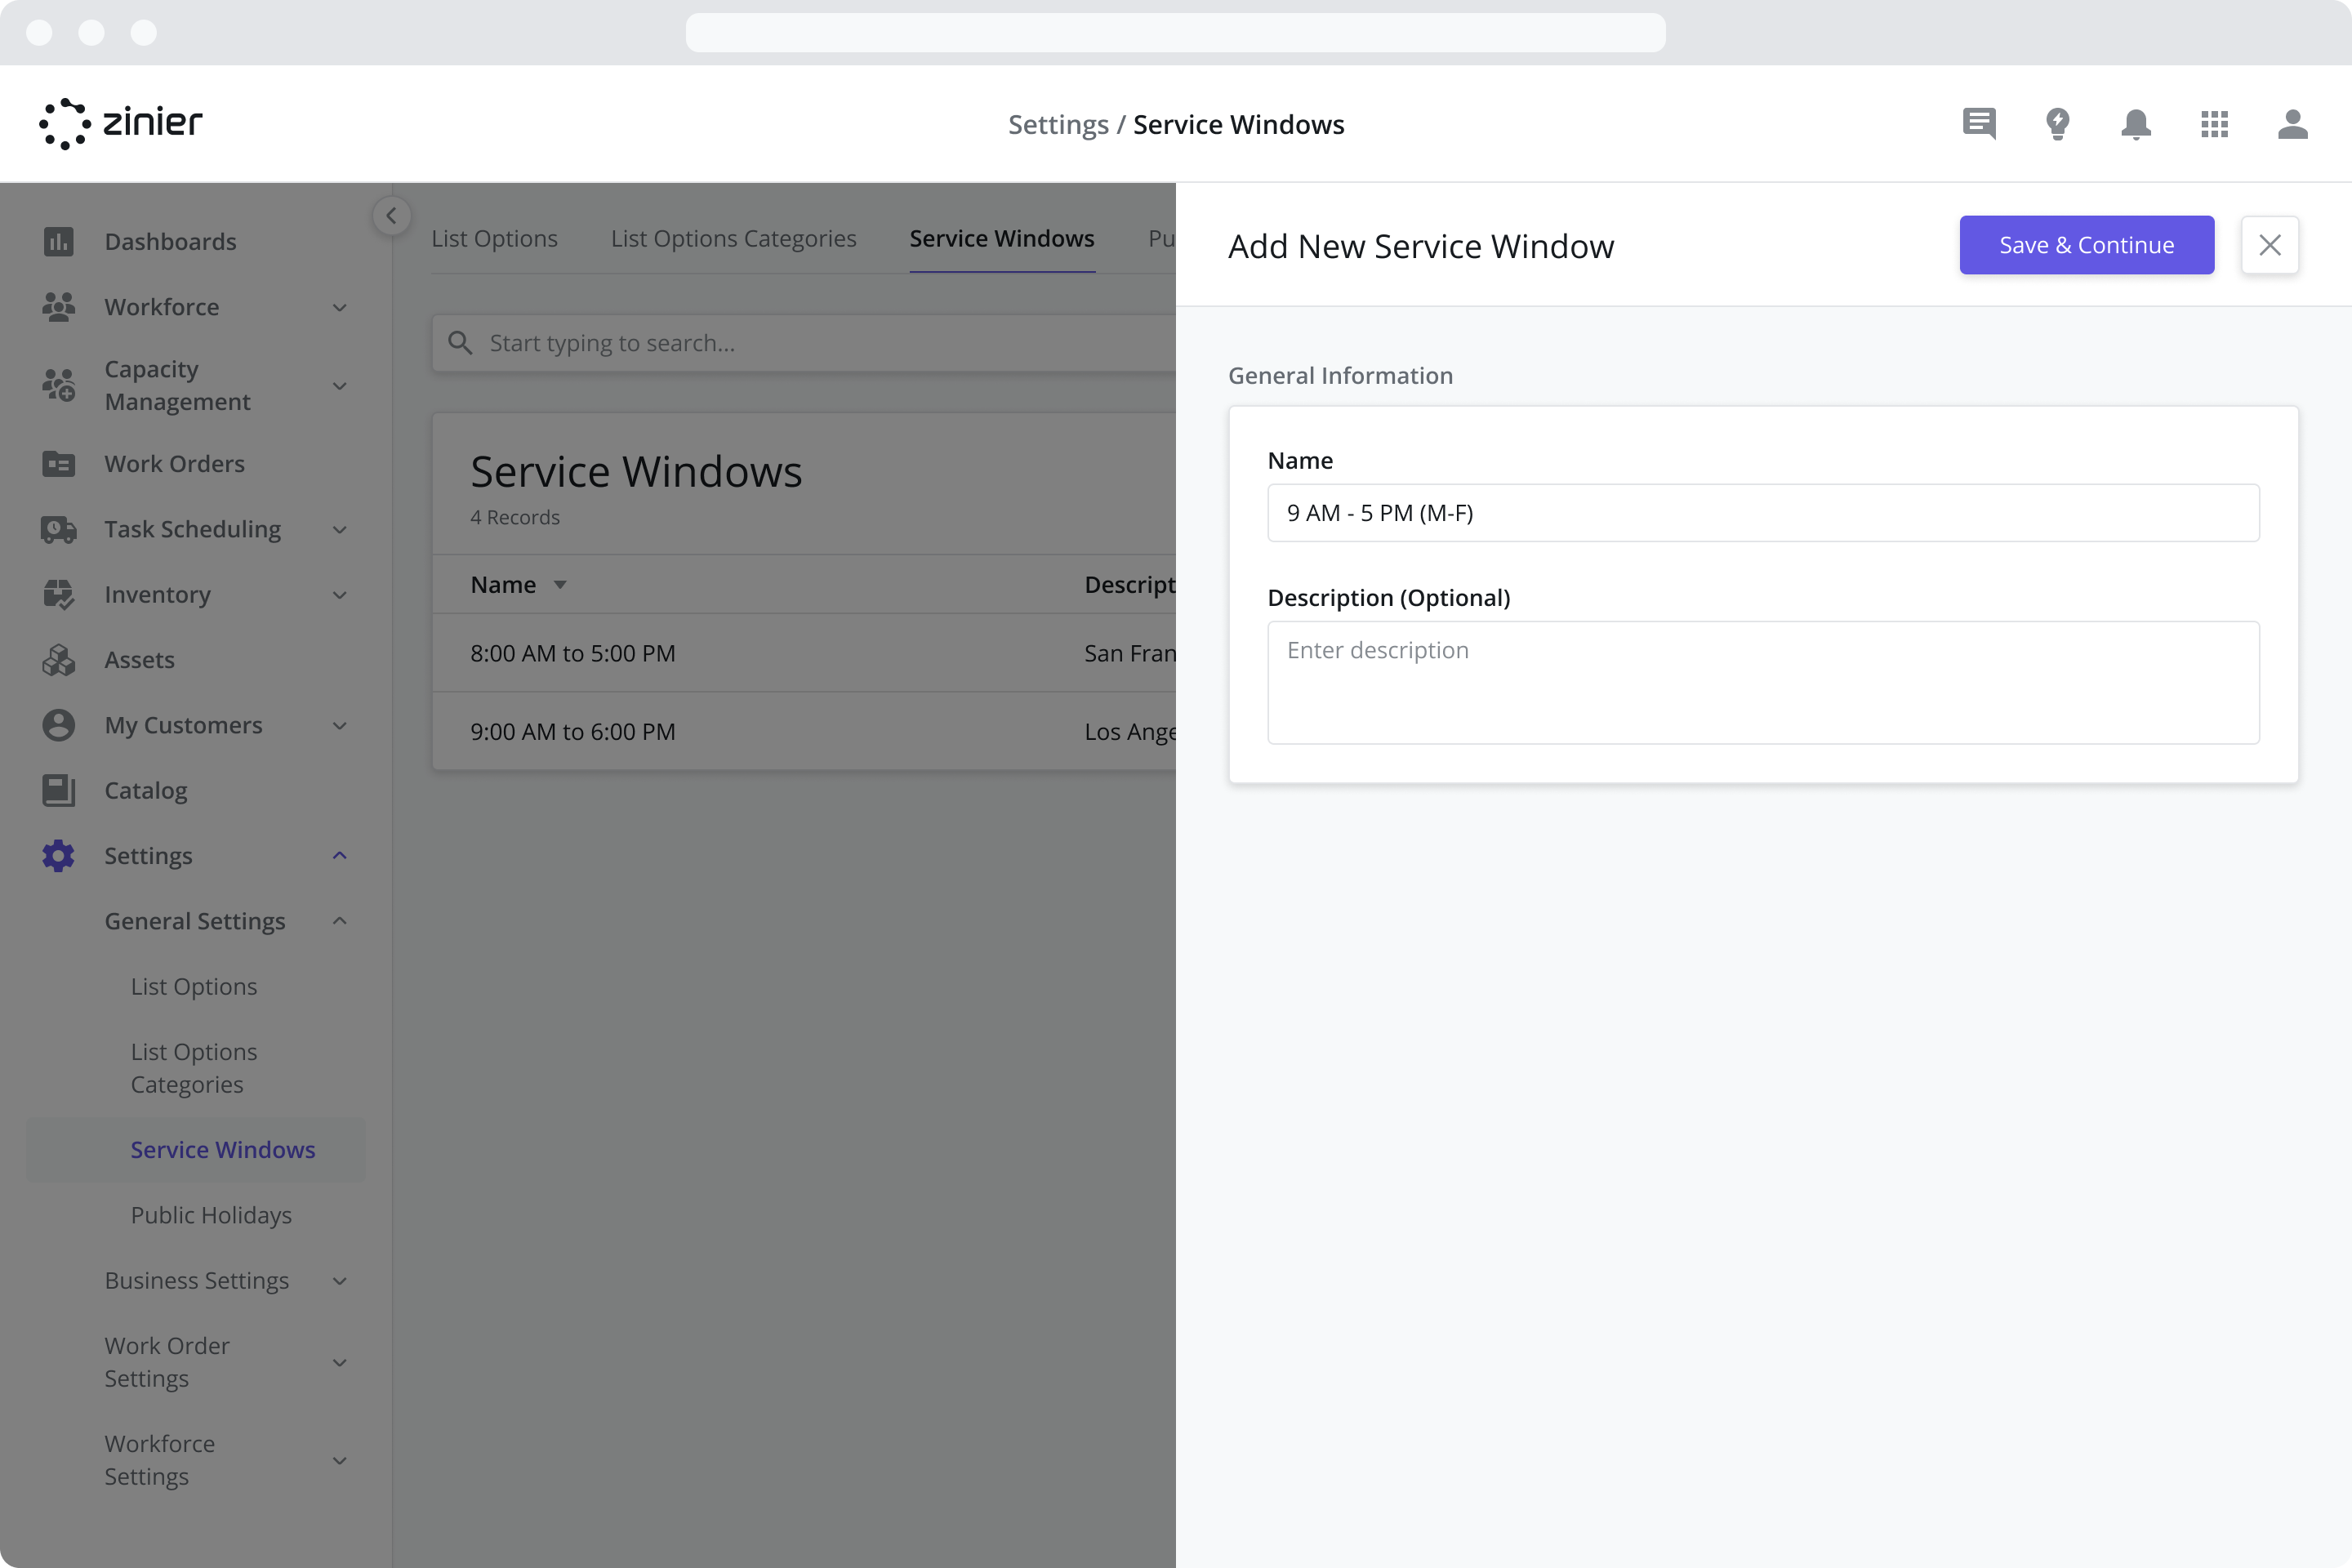
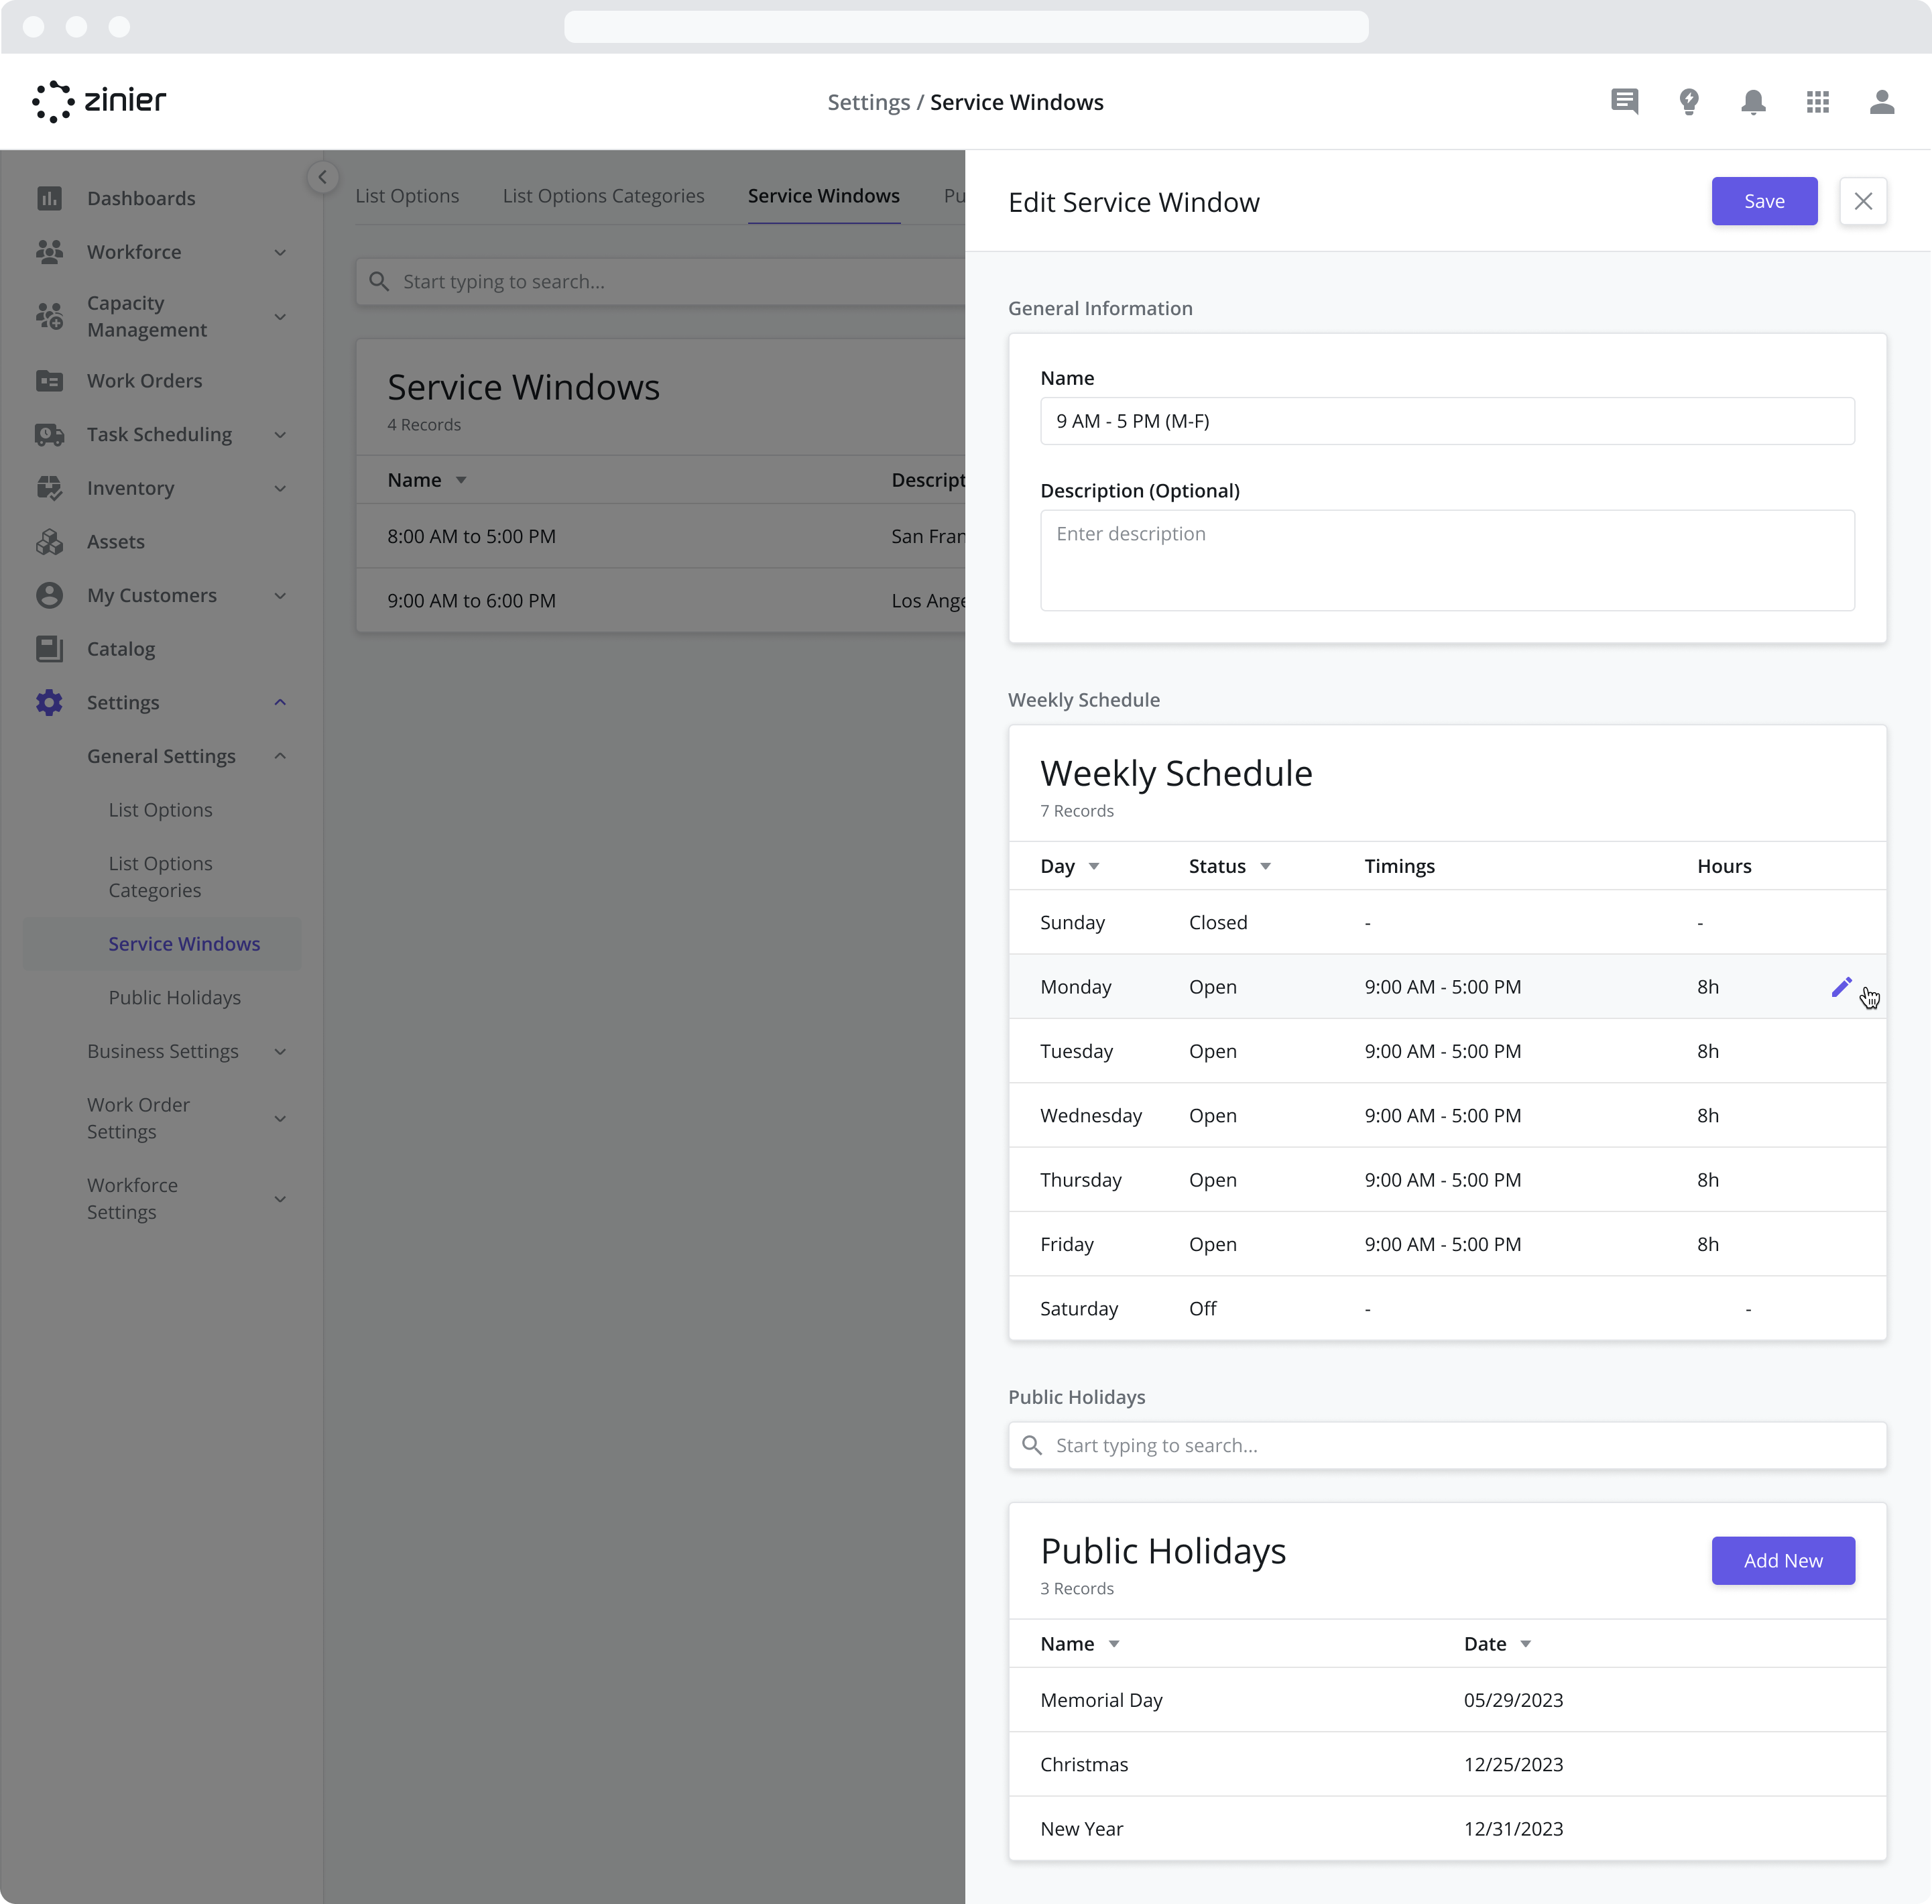
Step 1: Create a Service Window
I would first add this Service Window by going to the Settings > General Settings > Service Windows module.
Click the “Add New” button from the data grid
Enter a Name and Description (Optional). In this case, I’ve used the name “9am to 5pm M-F”
Click Save and Continue
Edit the Weekly Schedule so that it has and add any Public Holidays as desired
Click Save to create the Service Window
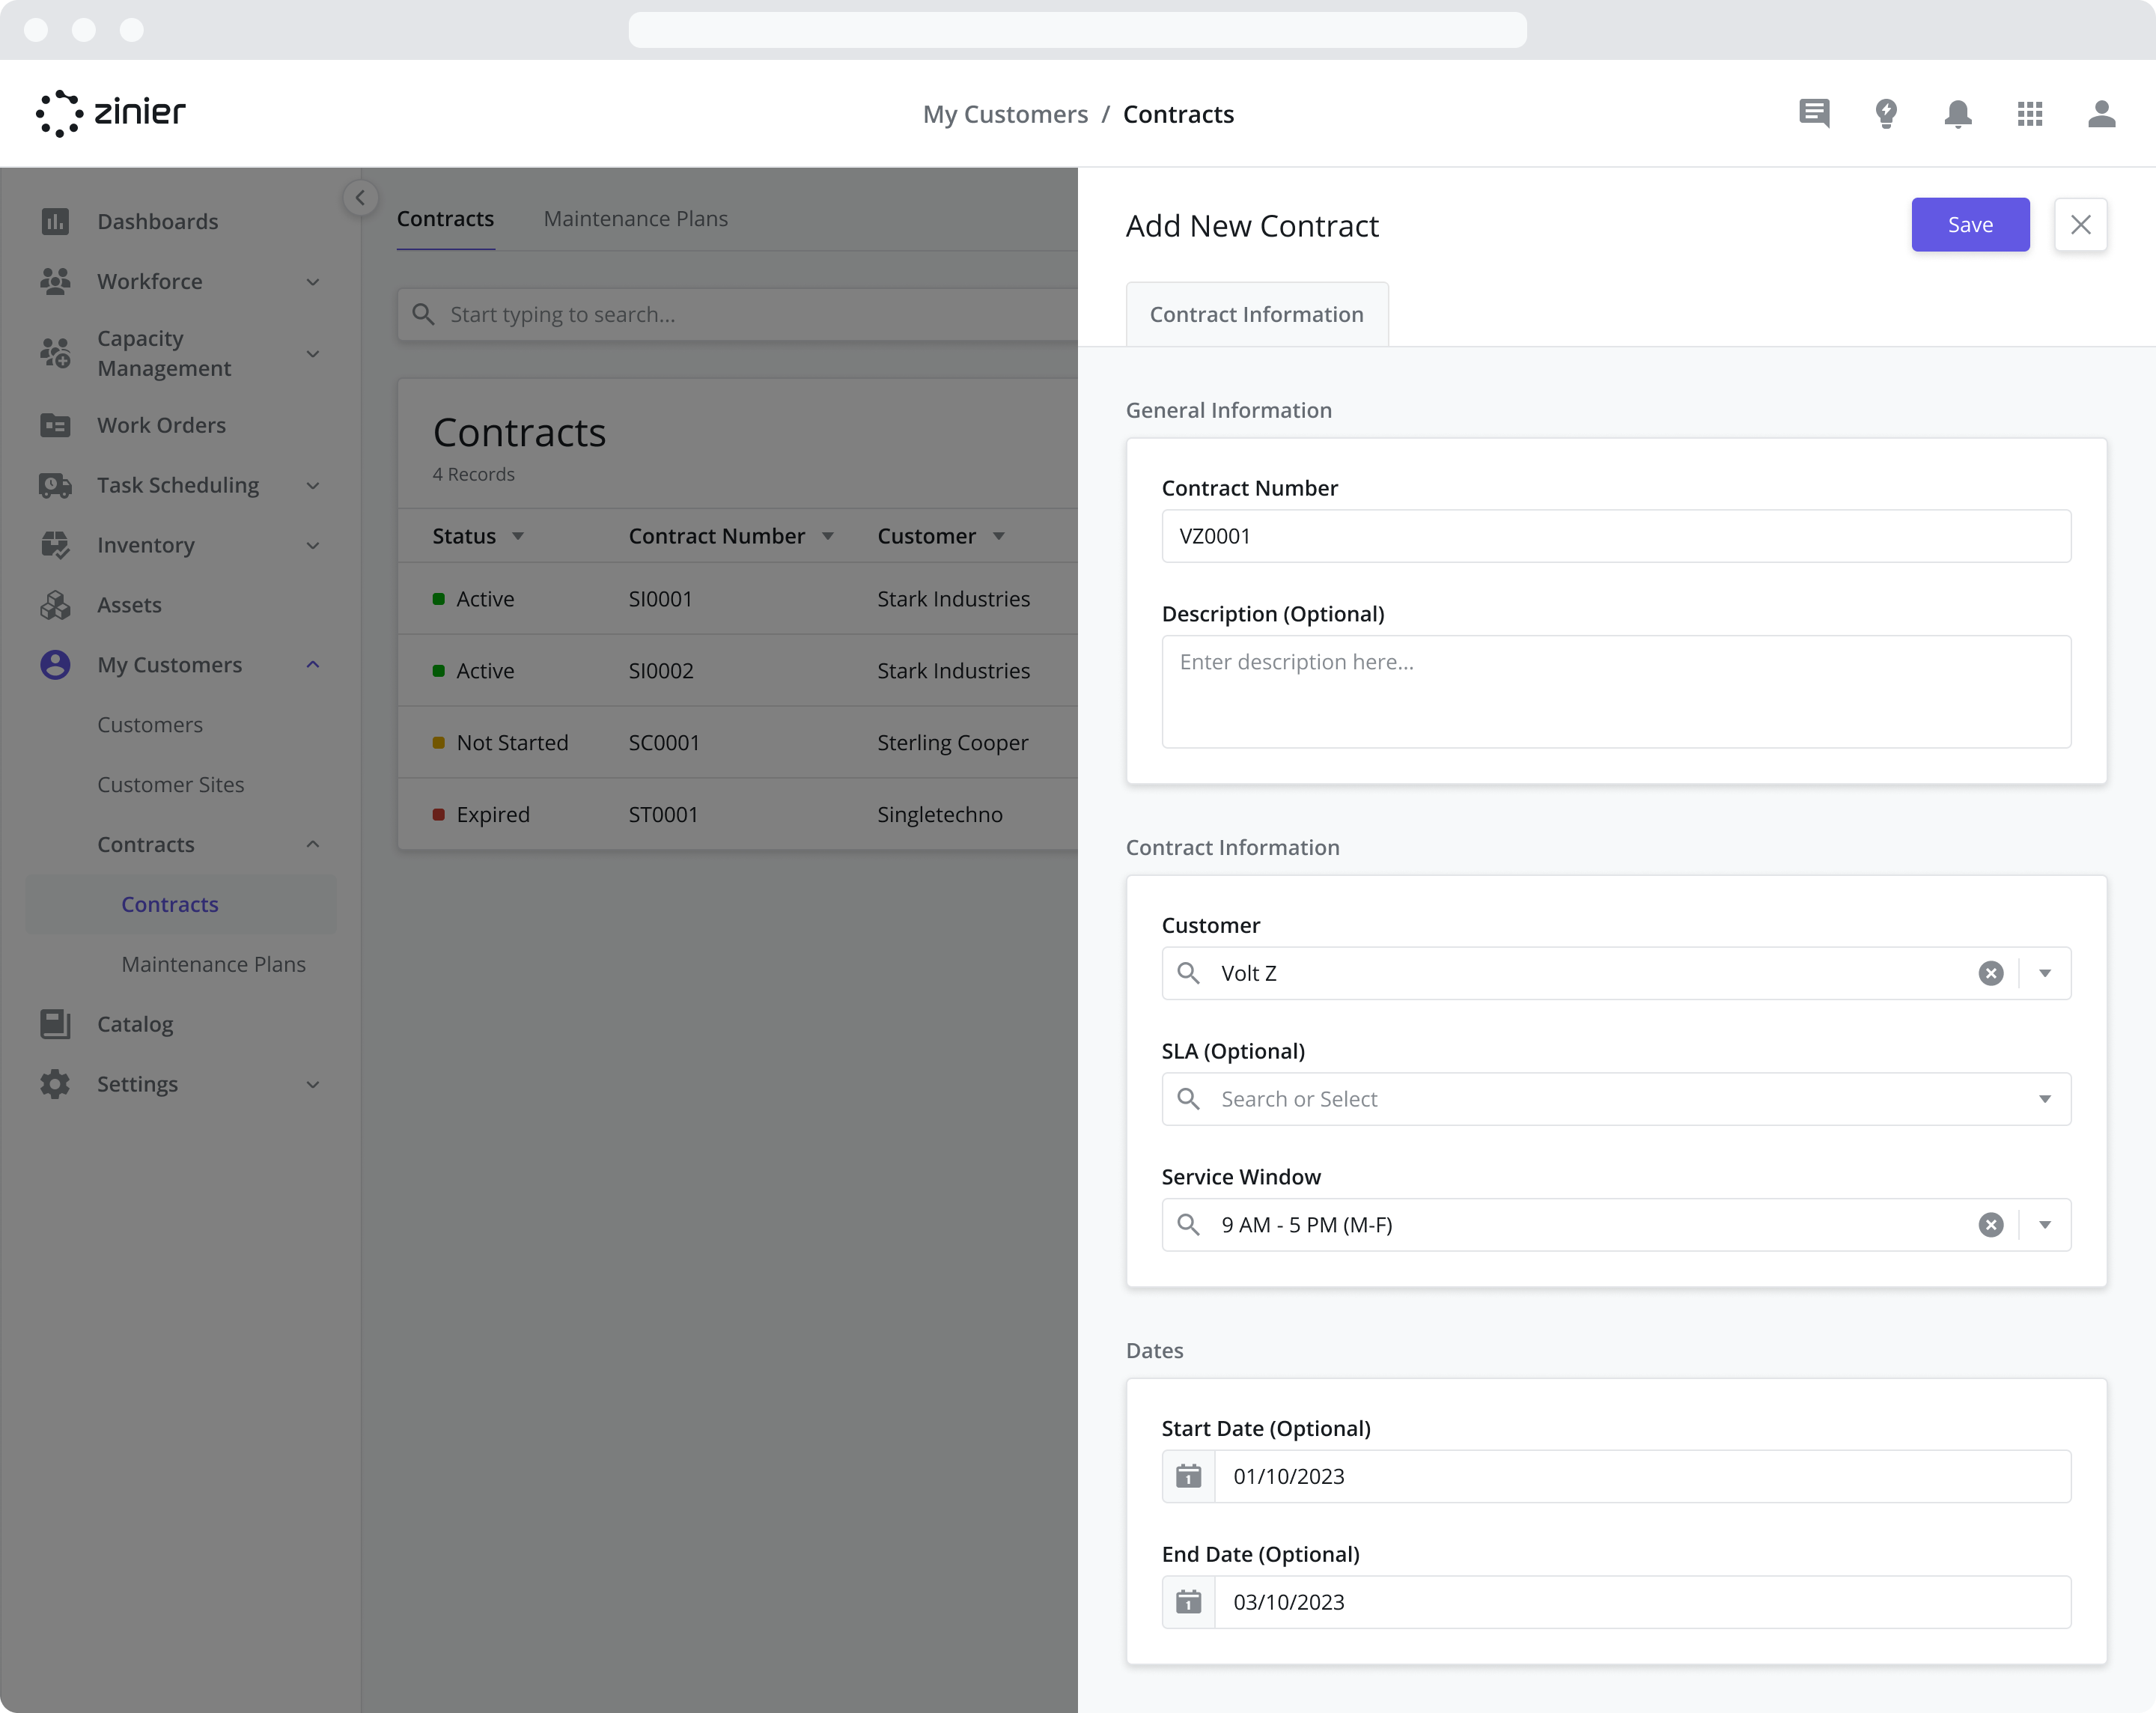
Step 2: Create a Customer Contract using the Service Window
Create a Customer Contract by going to the My Customers > Contracts module
Click the “Add New” button from the data grid
Select “Customer A” from the Customers dropdown (or create it first if it does not exist)
Select “9am to 5pm M-F” from the Service Windows dropdown – the Service Window created in Step 1.
Fill in the remaining information in the sidepanel and Click Save
Step 3: Use the Contract in a Work Order
Create a Work Order by going to the Work Orders > Active Work Orders module
Click the “Add New” button from the data grid
Select “Customer A” from the Customers dropdown
Select “9am to 5pm M-F” from the Service Windows dropdown
Fill in the remaining information in the sidepanel and Click Save
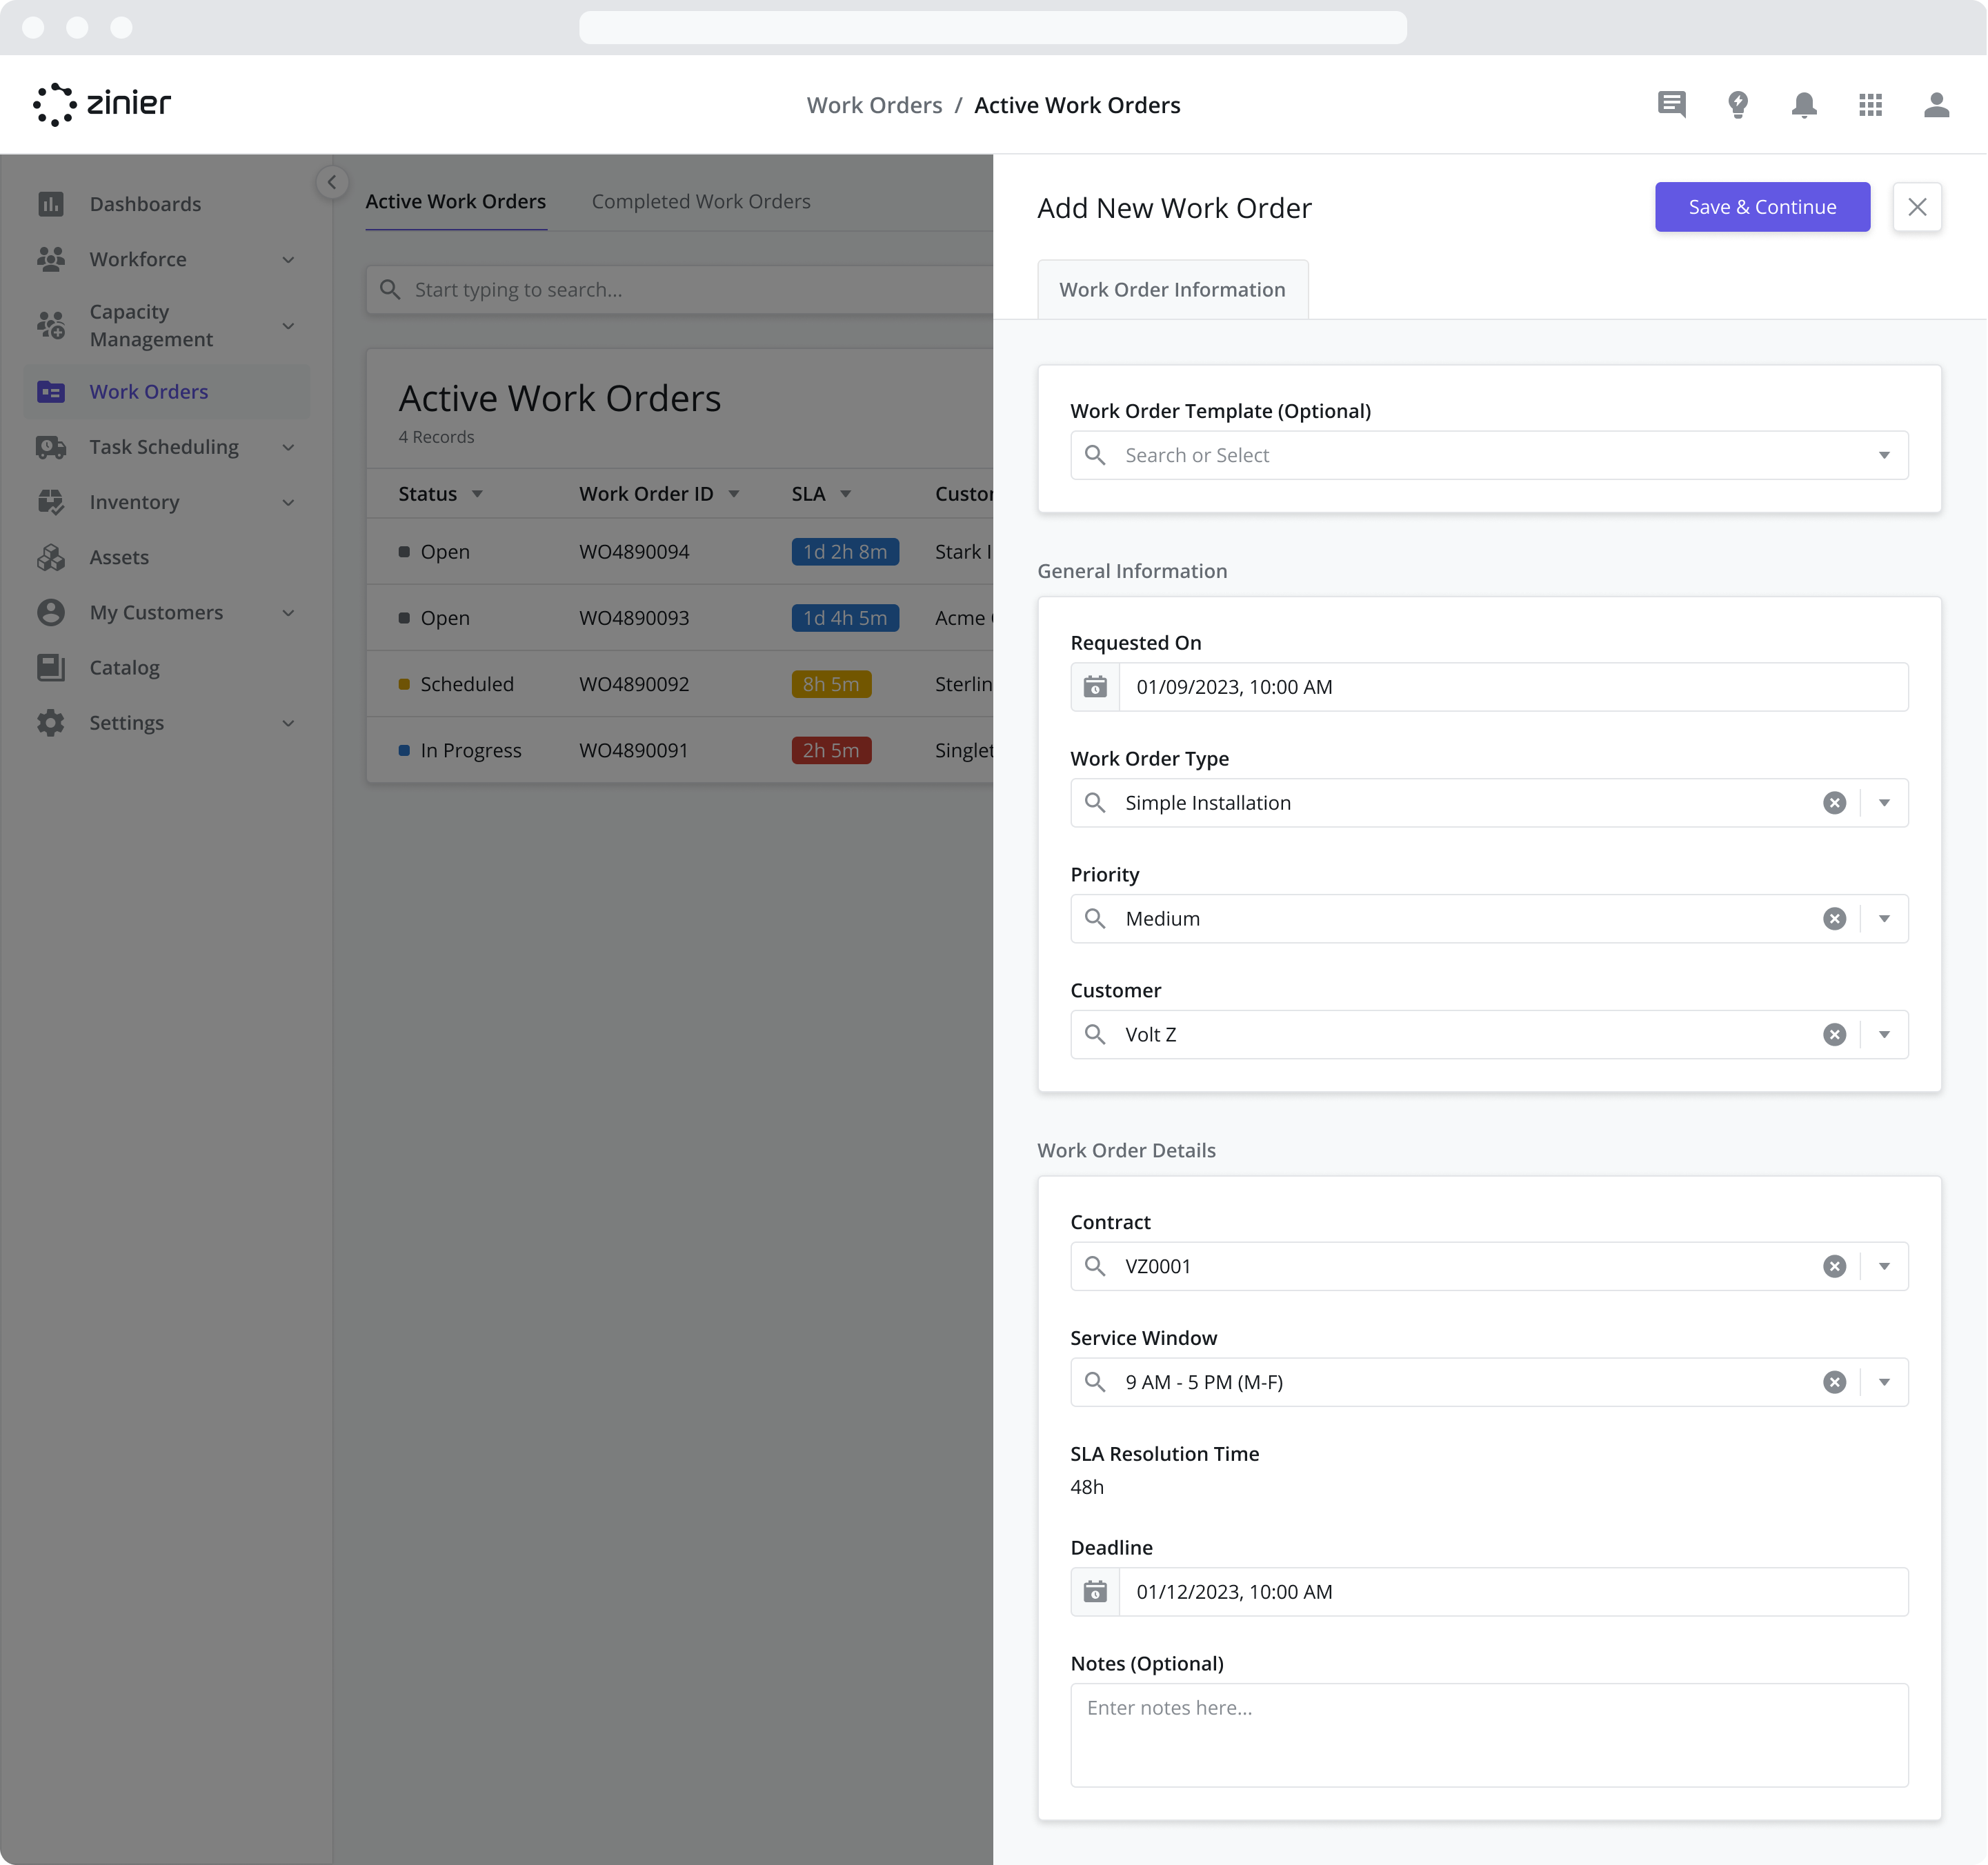
When creating a Work Order, the Service Window is pre-populated based on the Contract assigned to the Work Order. But if you have not created a Contract for that specific Customer, you can still use Service Windows by selecting the desired option from the Service Window dropdown.
For more information on adding Service Windows to Contracts, refer to the Contracts page.
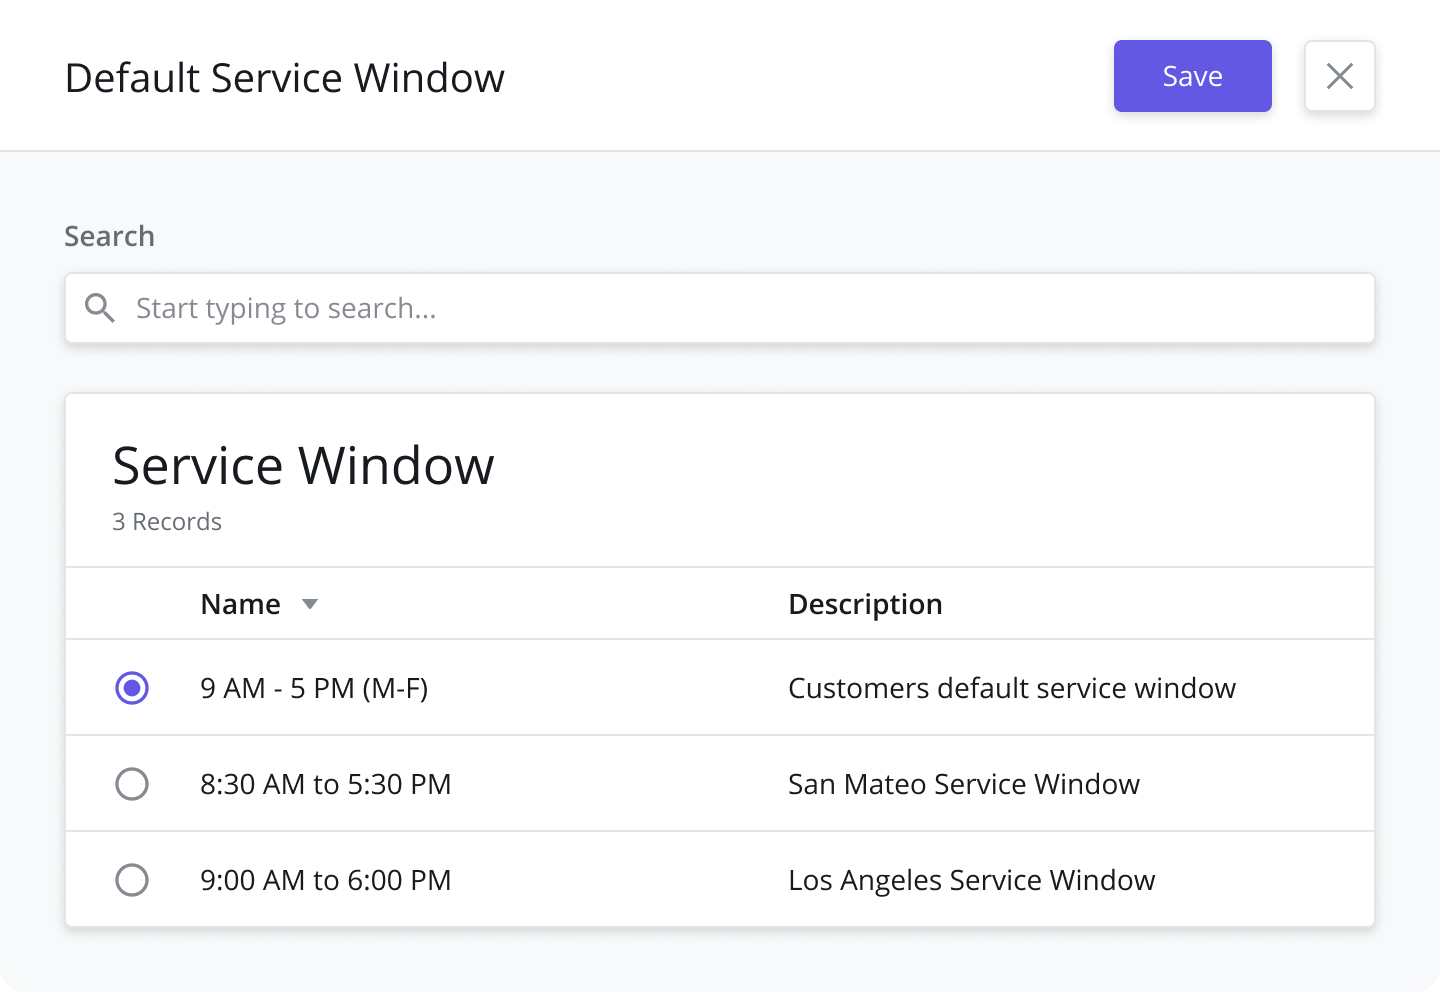
Set a Default Service Window
You also have the option of setting the Default Service Window used when creating Work Orders and Contracts. To set the Default Service Window, follow the steps below:
Navigate to the Settings > General Settings > Service Windows module.
Click the “Set Default Window” button from the data grid
Select the Service Window from the data grid in the sidepanel
Click Save
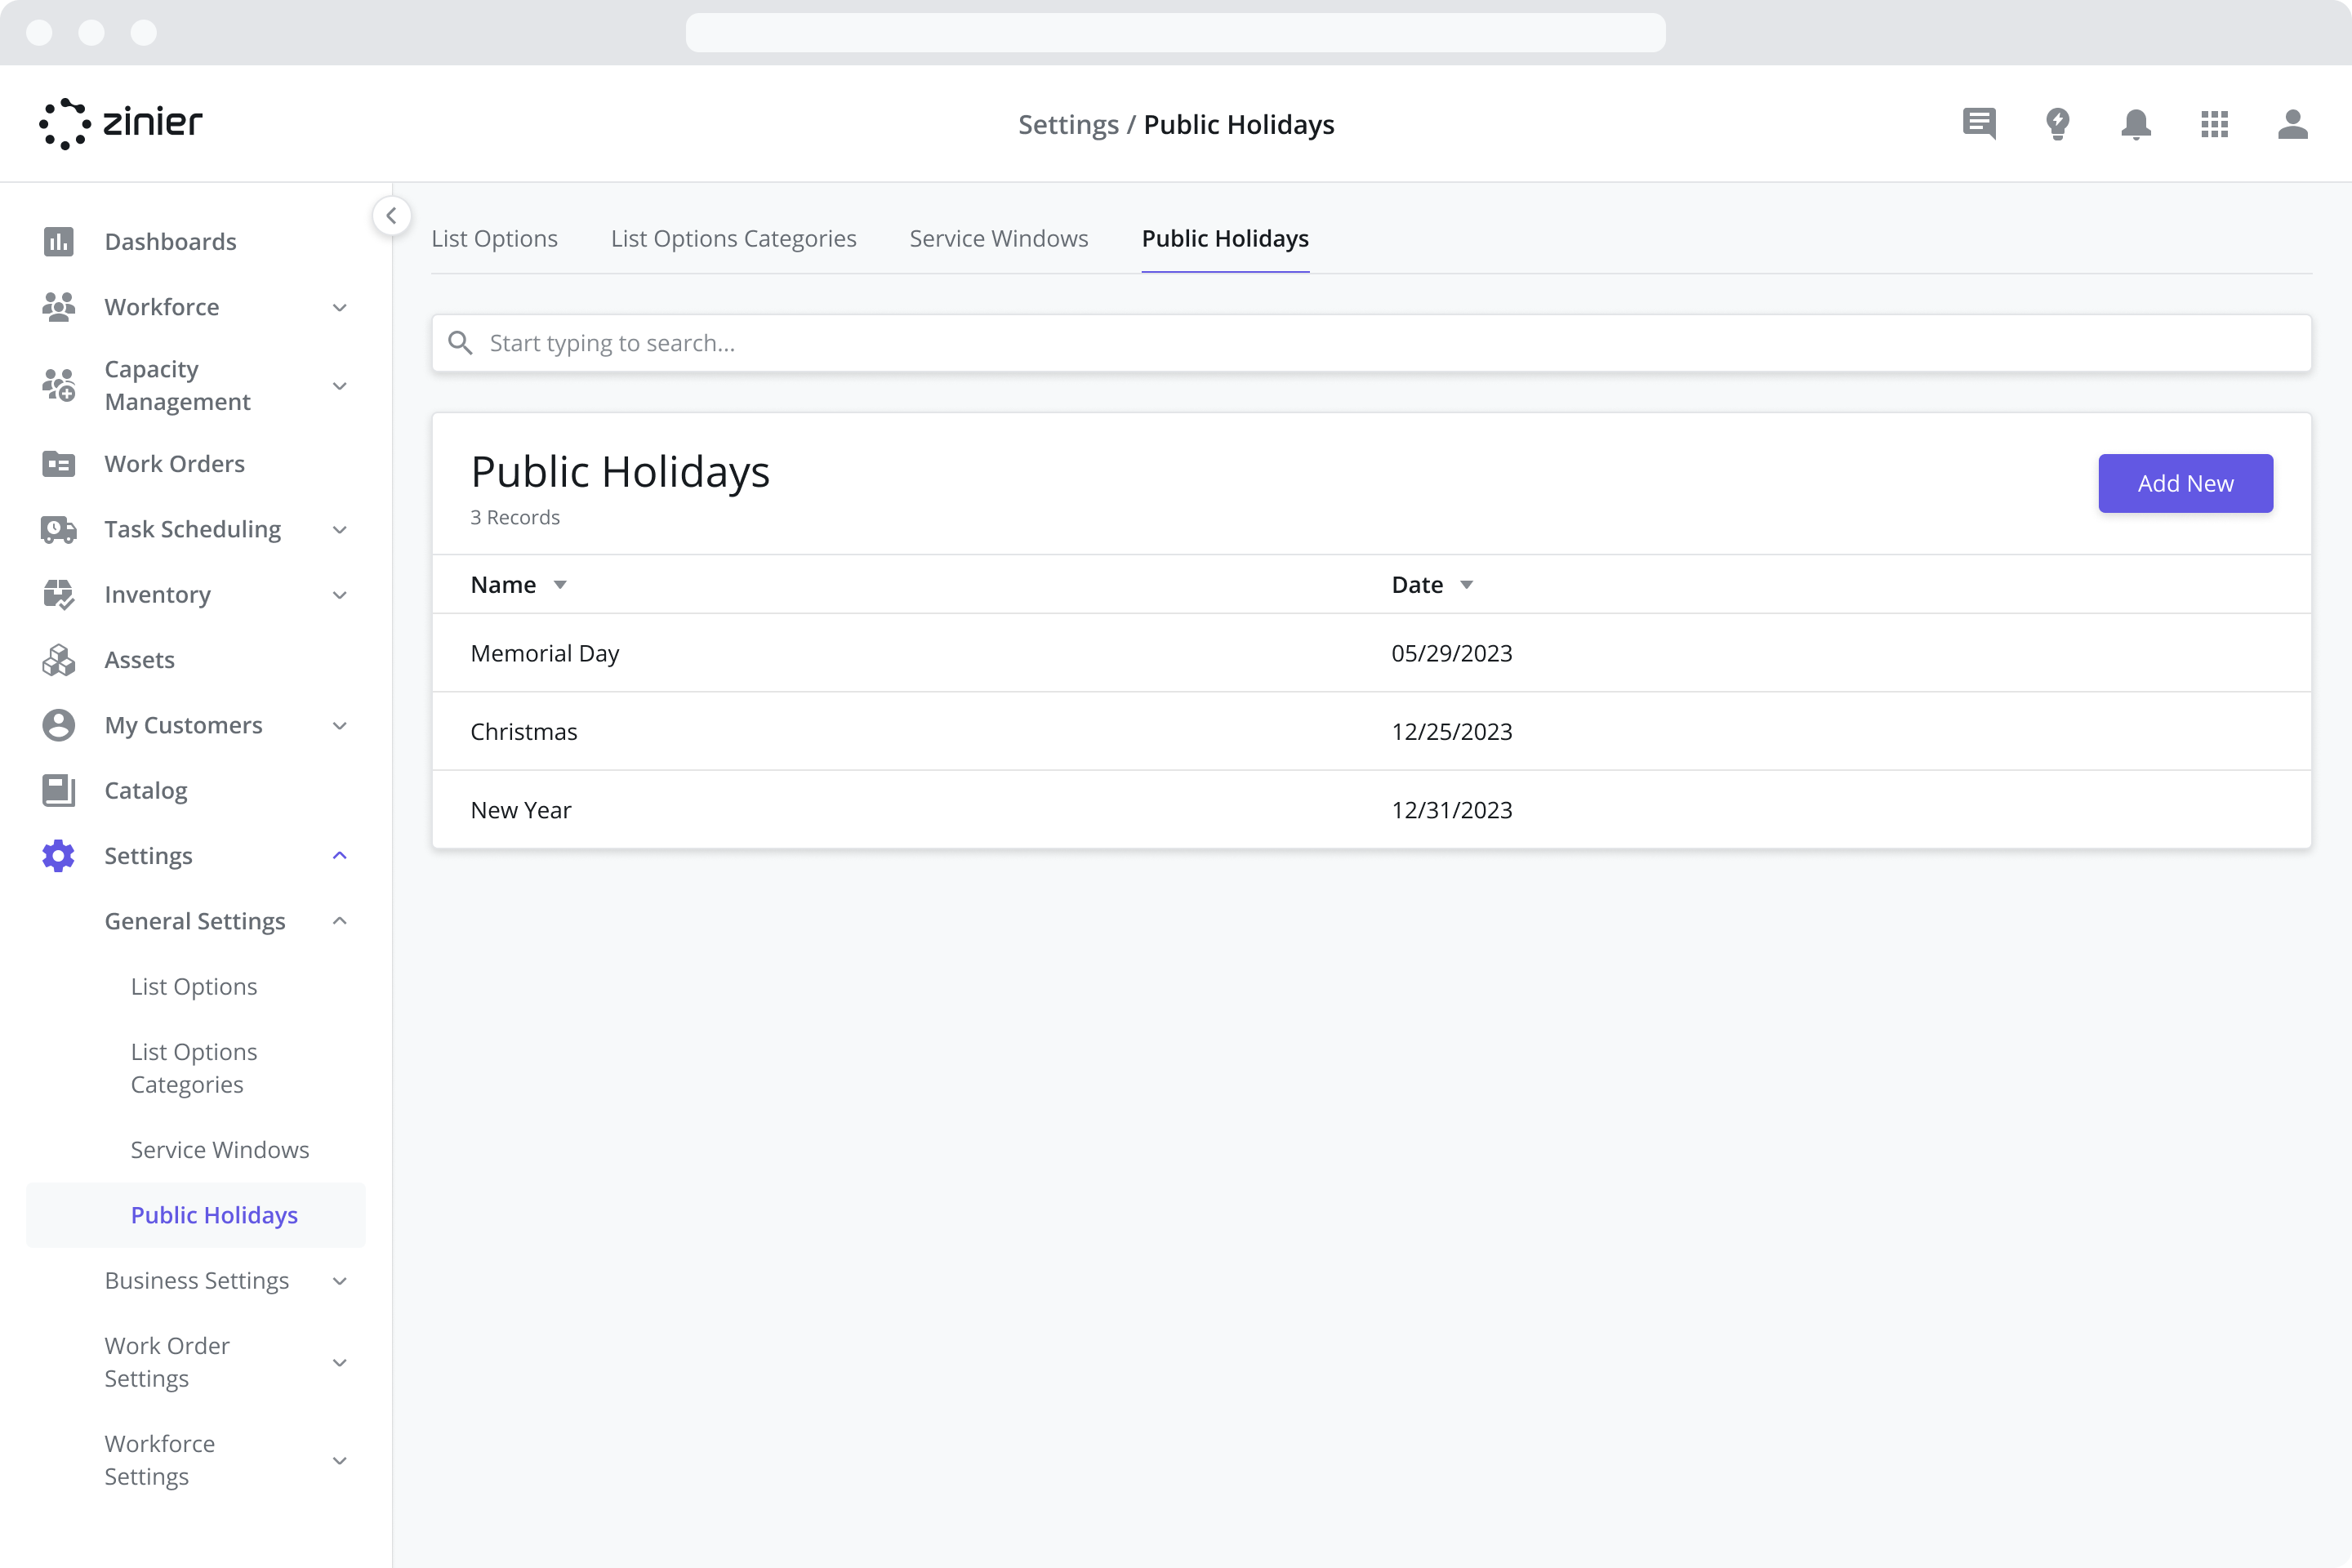
Managing Public Holidays
The Public Holidays module allows you to define a master list of Public Holidays for your Org. Once added, a Public Holiday can be applied to both Shifts and Service Windows.
Adding a Public Holiday
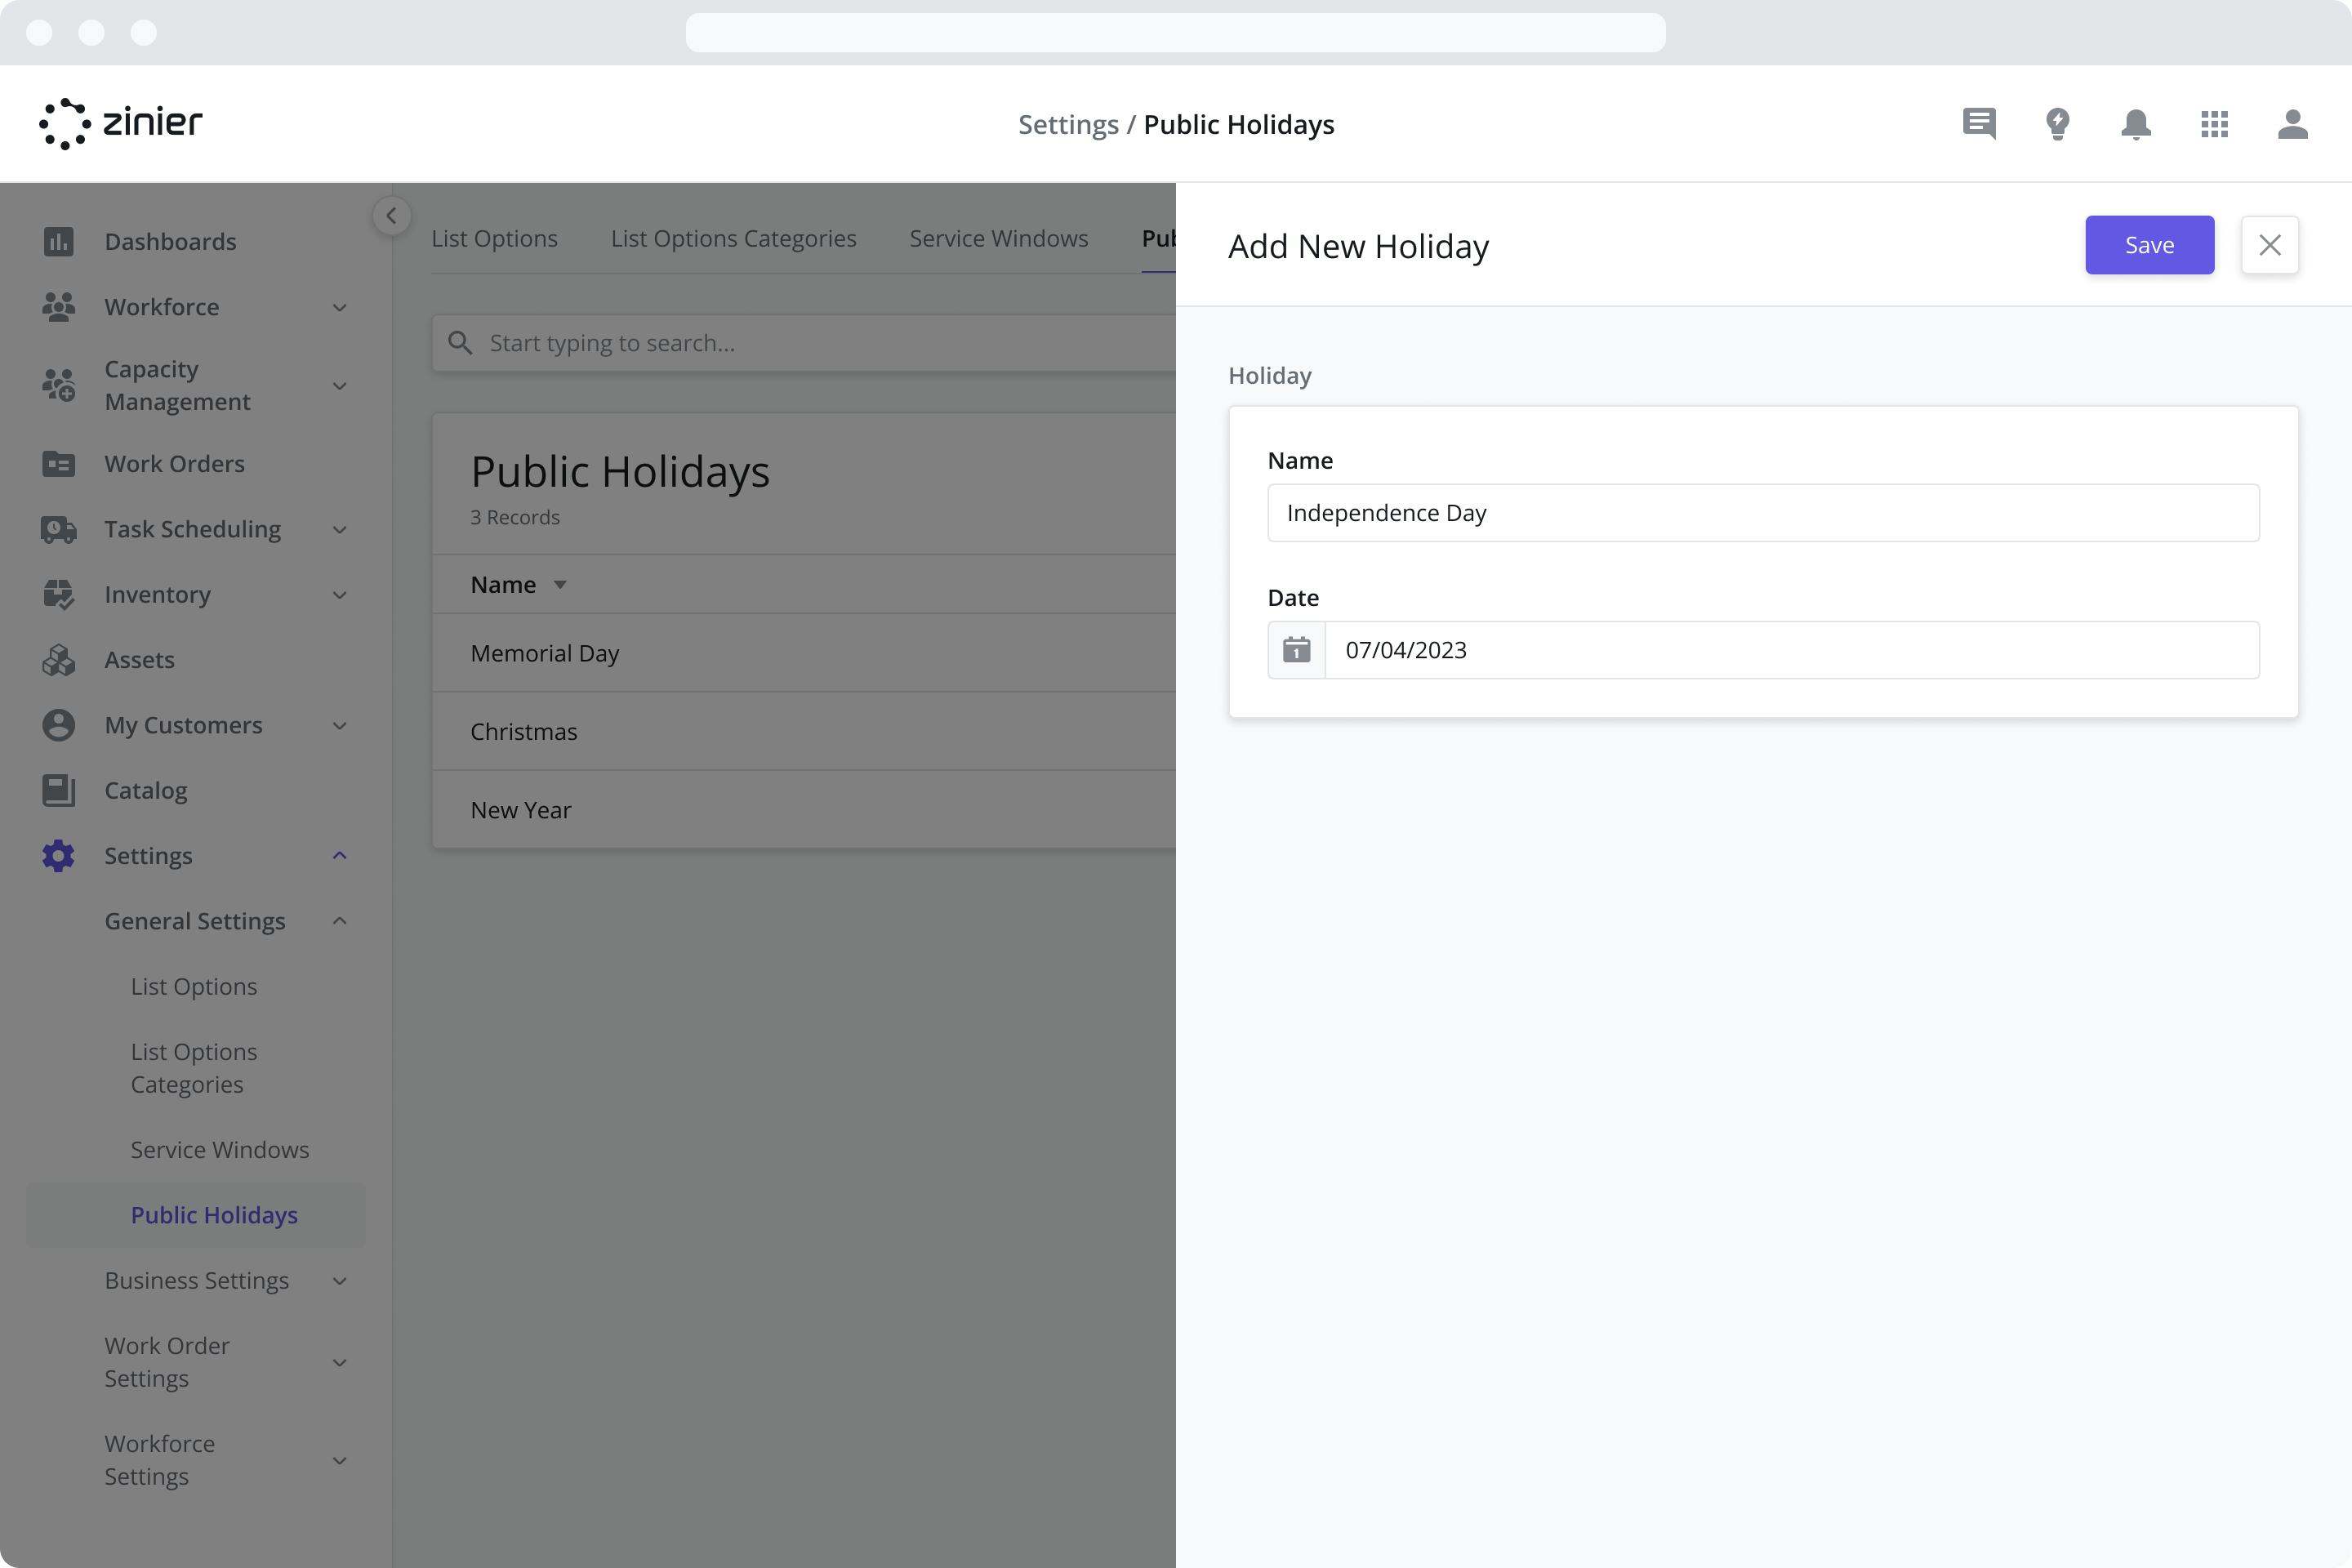
To add a new Public Holiday, follow the steps below:
Go to the Settings > General Settings > Public Holidays module
Click the “Add New” button from the data grid
Enter the “Holiday Name” and select a “Date” from the sidepanel
Click Save
Technician Calendars / Shifts
Adding a Public Holiday to a Shift blocks off the Technician's calendar and restricts tasks from being auto-scheduled on the given holidays.
For more information on adding Public Holidays to Shifts, refer to the Shifts section.
Adding Public Holidays to Service Windows
Adding a Public Holiday to a Service Windows will restrict tasks from being performed at the Customer Site on the given holidays.
For more information on adding Public Holidays to Service Windows, refer to the Service Windows section.
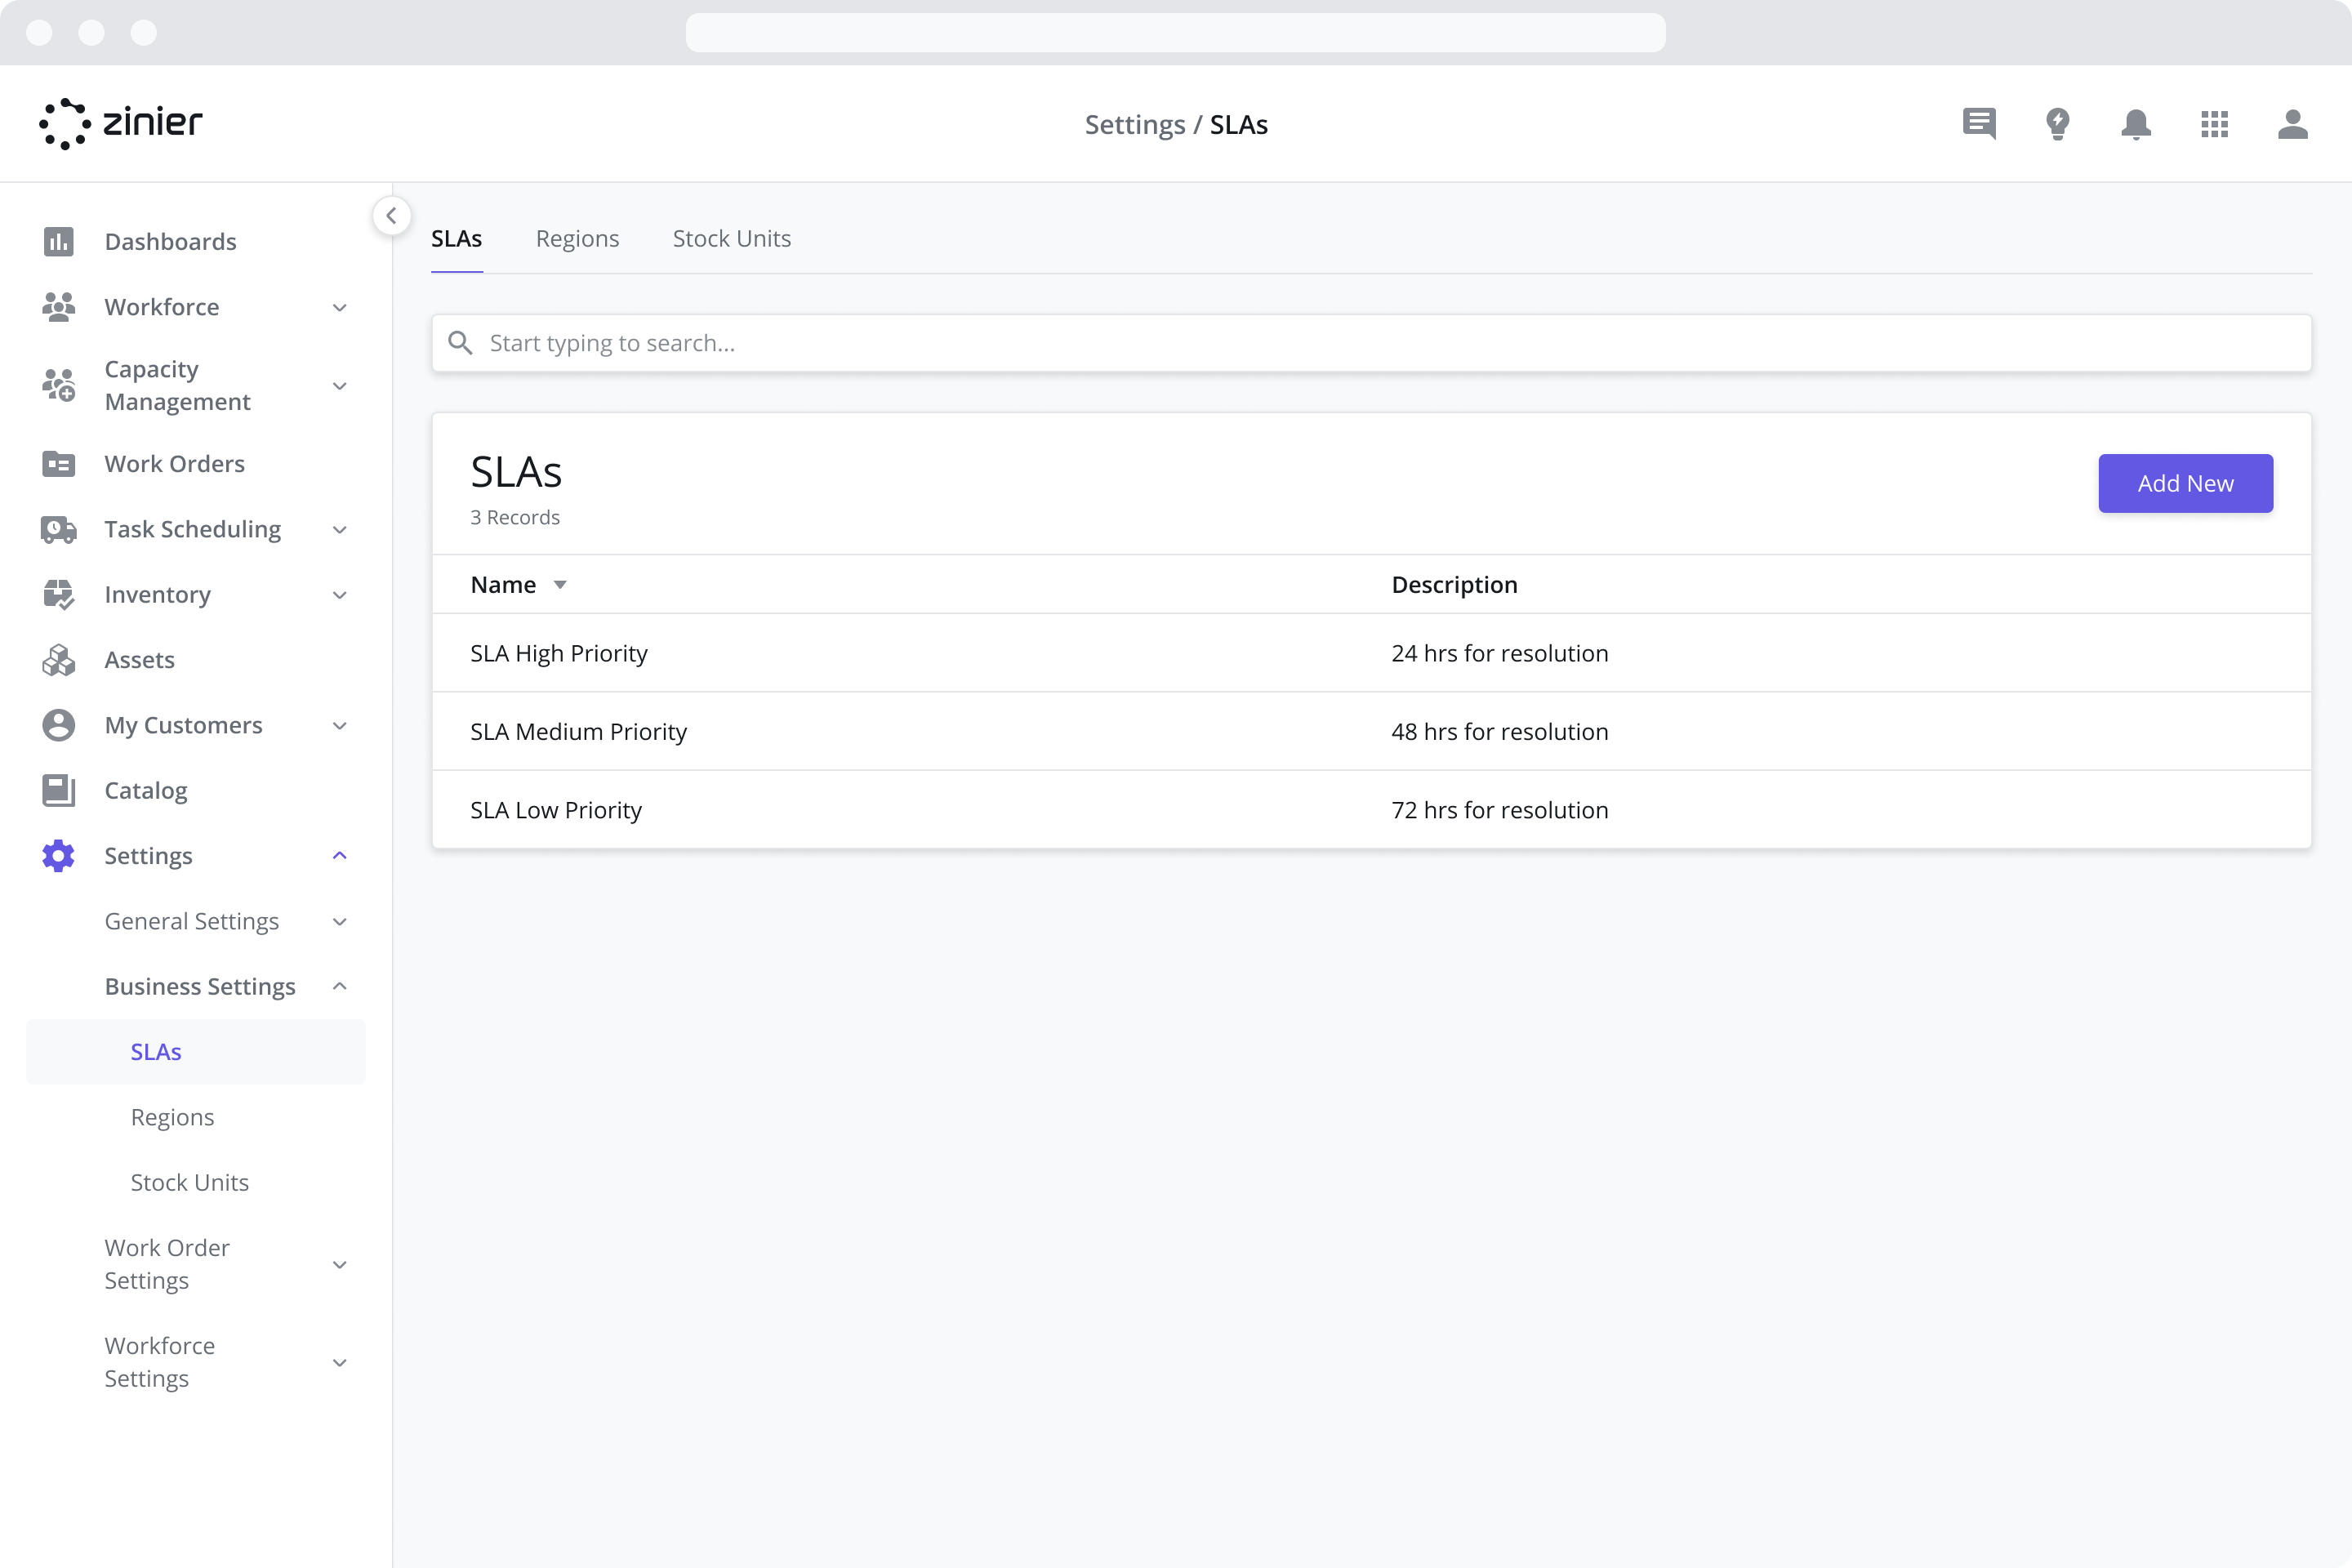
Managing SLAs
The SLAs module is where you configure different SLA Resolution Times for each Work Order Priority (Low, Medium, High, etc.) to enforce specific contract terms and assist with scheduling and dispatch. SLAs are tied to Work Orders by Customer Contracts. SLA Resolution Time and Default Deadline are pre-populated based on the Contract assigned to the Work Order.
SLAs use the concept of Priority Time Frames which tie a particular SLA Resolution Time to the particular Priority you set when creating a Work Order. When you select a Priority for the Work Order, it will take the SLA Resolution Time and use that to calculate the default Deadline for the Work Order and Tasks added to the Work Order.
For more information on adding SLAs to Contracts, refer to the Contracts page.
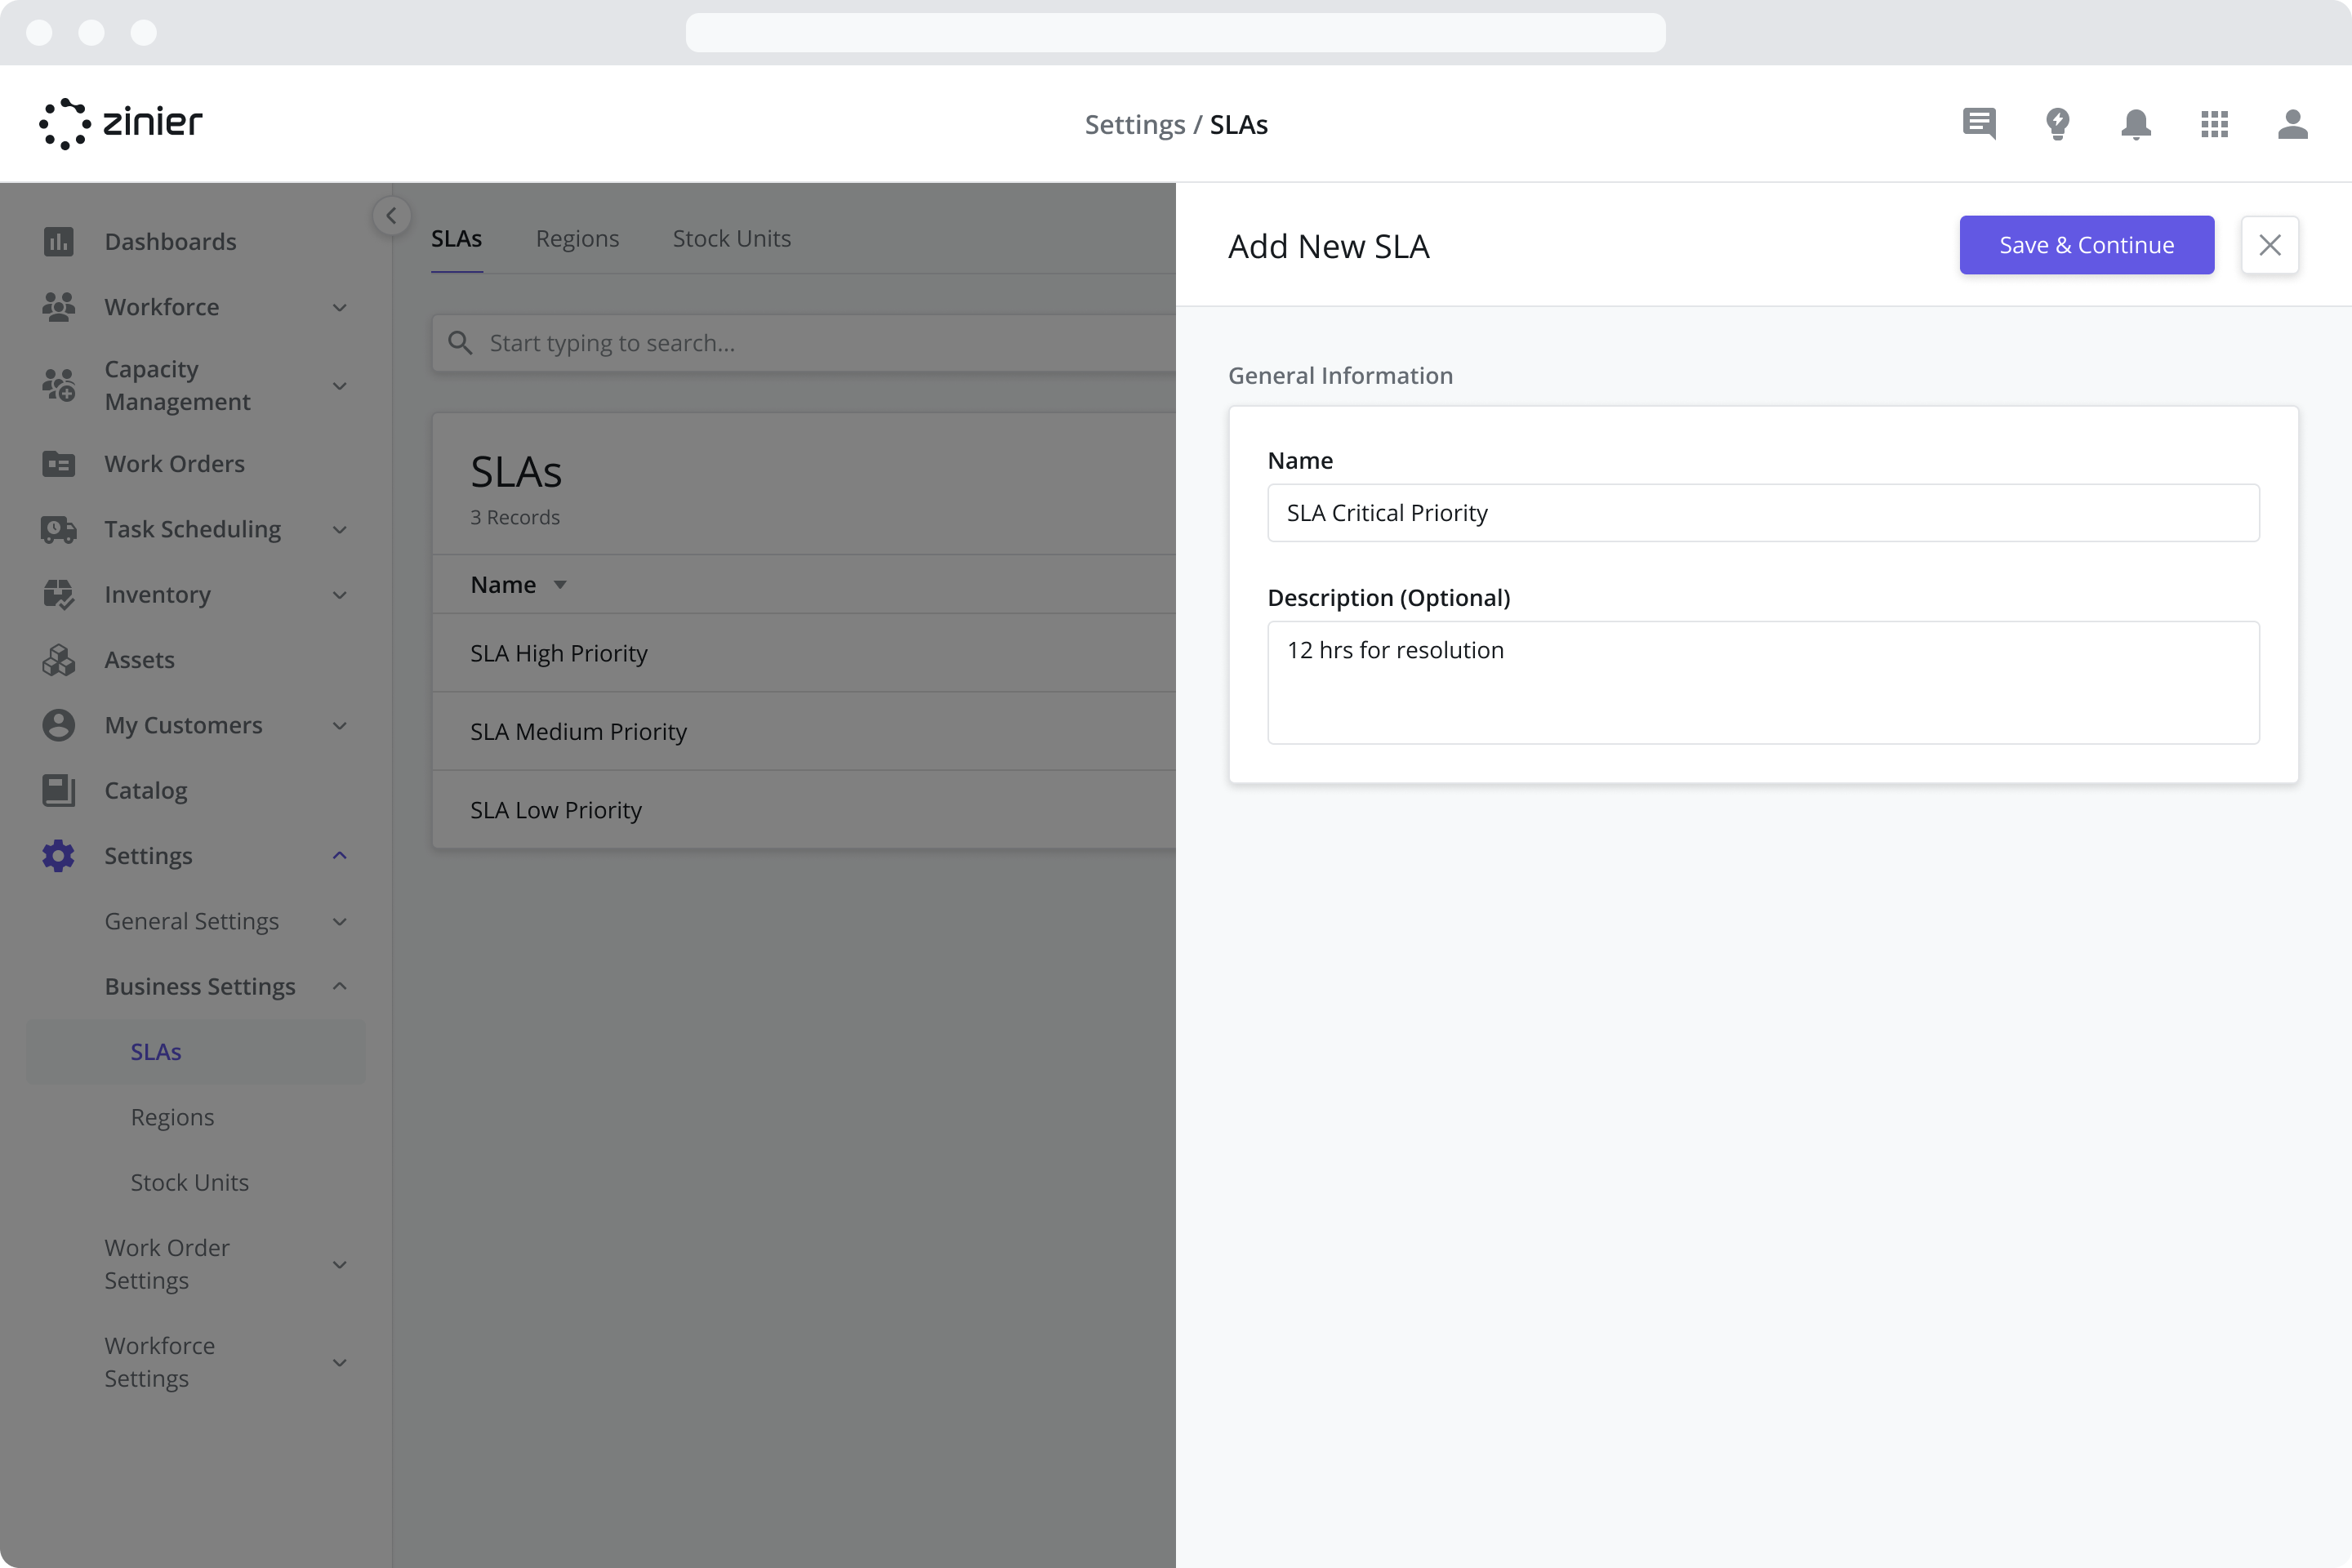
To add a new SLA, follow the steps below:
Go to the Settings > Business Settings > SLAs module
Click the “Add New” button from the data grid
Enter a Name and Description (Optional)
Click Save and Continue
Next, add at least one SLA Time Frame by clicking the “Add New” button from the SLA Time Frames data grid.
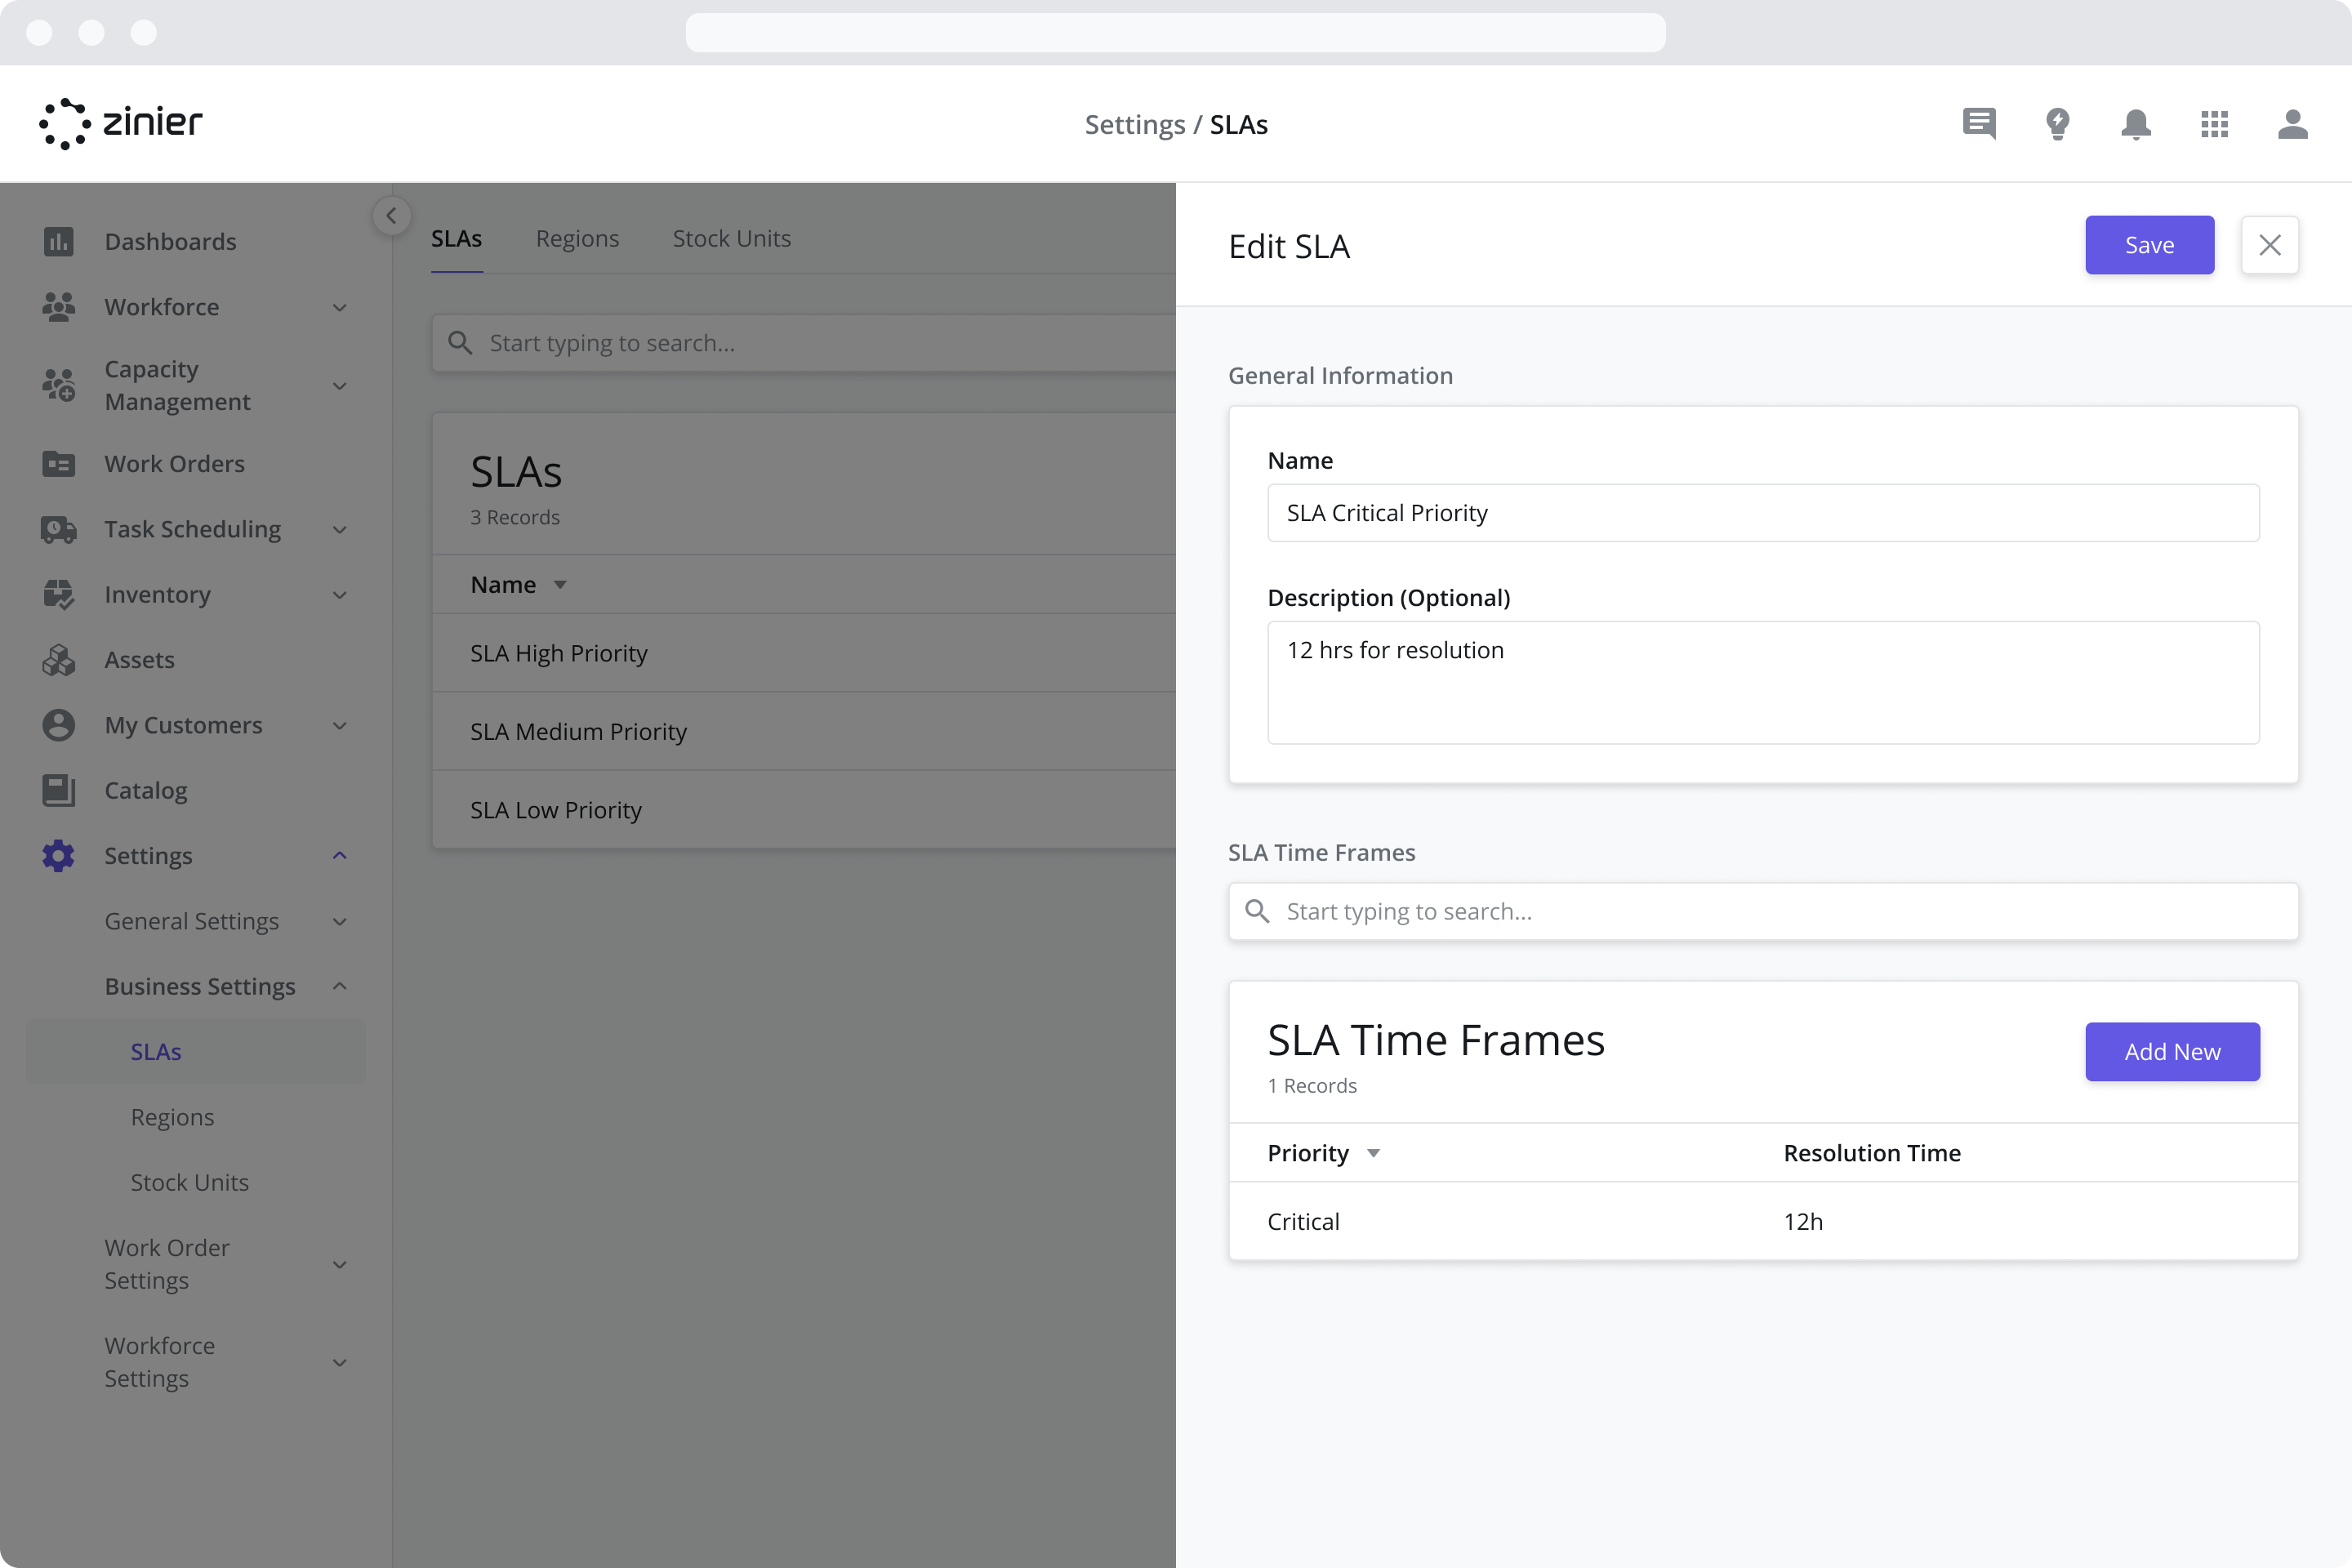
Select the Priority you want to associate the Time Frame with. Work Orders created with this same priority will pick up this associated time frame for use in the SLA calculation.
Enter the Resolution Time from and time units to use in the calculation (Minutes, Hours, or Days)

Click Save
Repeat steps 5-8 to add as many SLA Time Frames as needed
Managing Regions / Sub-regions
UPDATED (24.4)
The Regions module is where you define a master list of Regions / Sub-regions for use in various related modules of the Zinier Productivity Suite. Once added, a Region can be assigned to a Contractor, Customer Site or used as a filtering criterion in Work Groups.
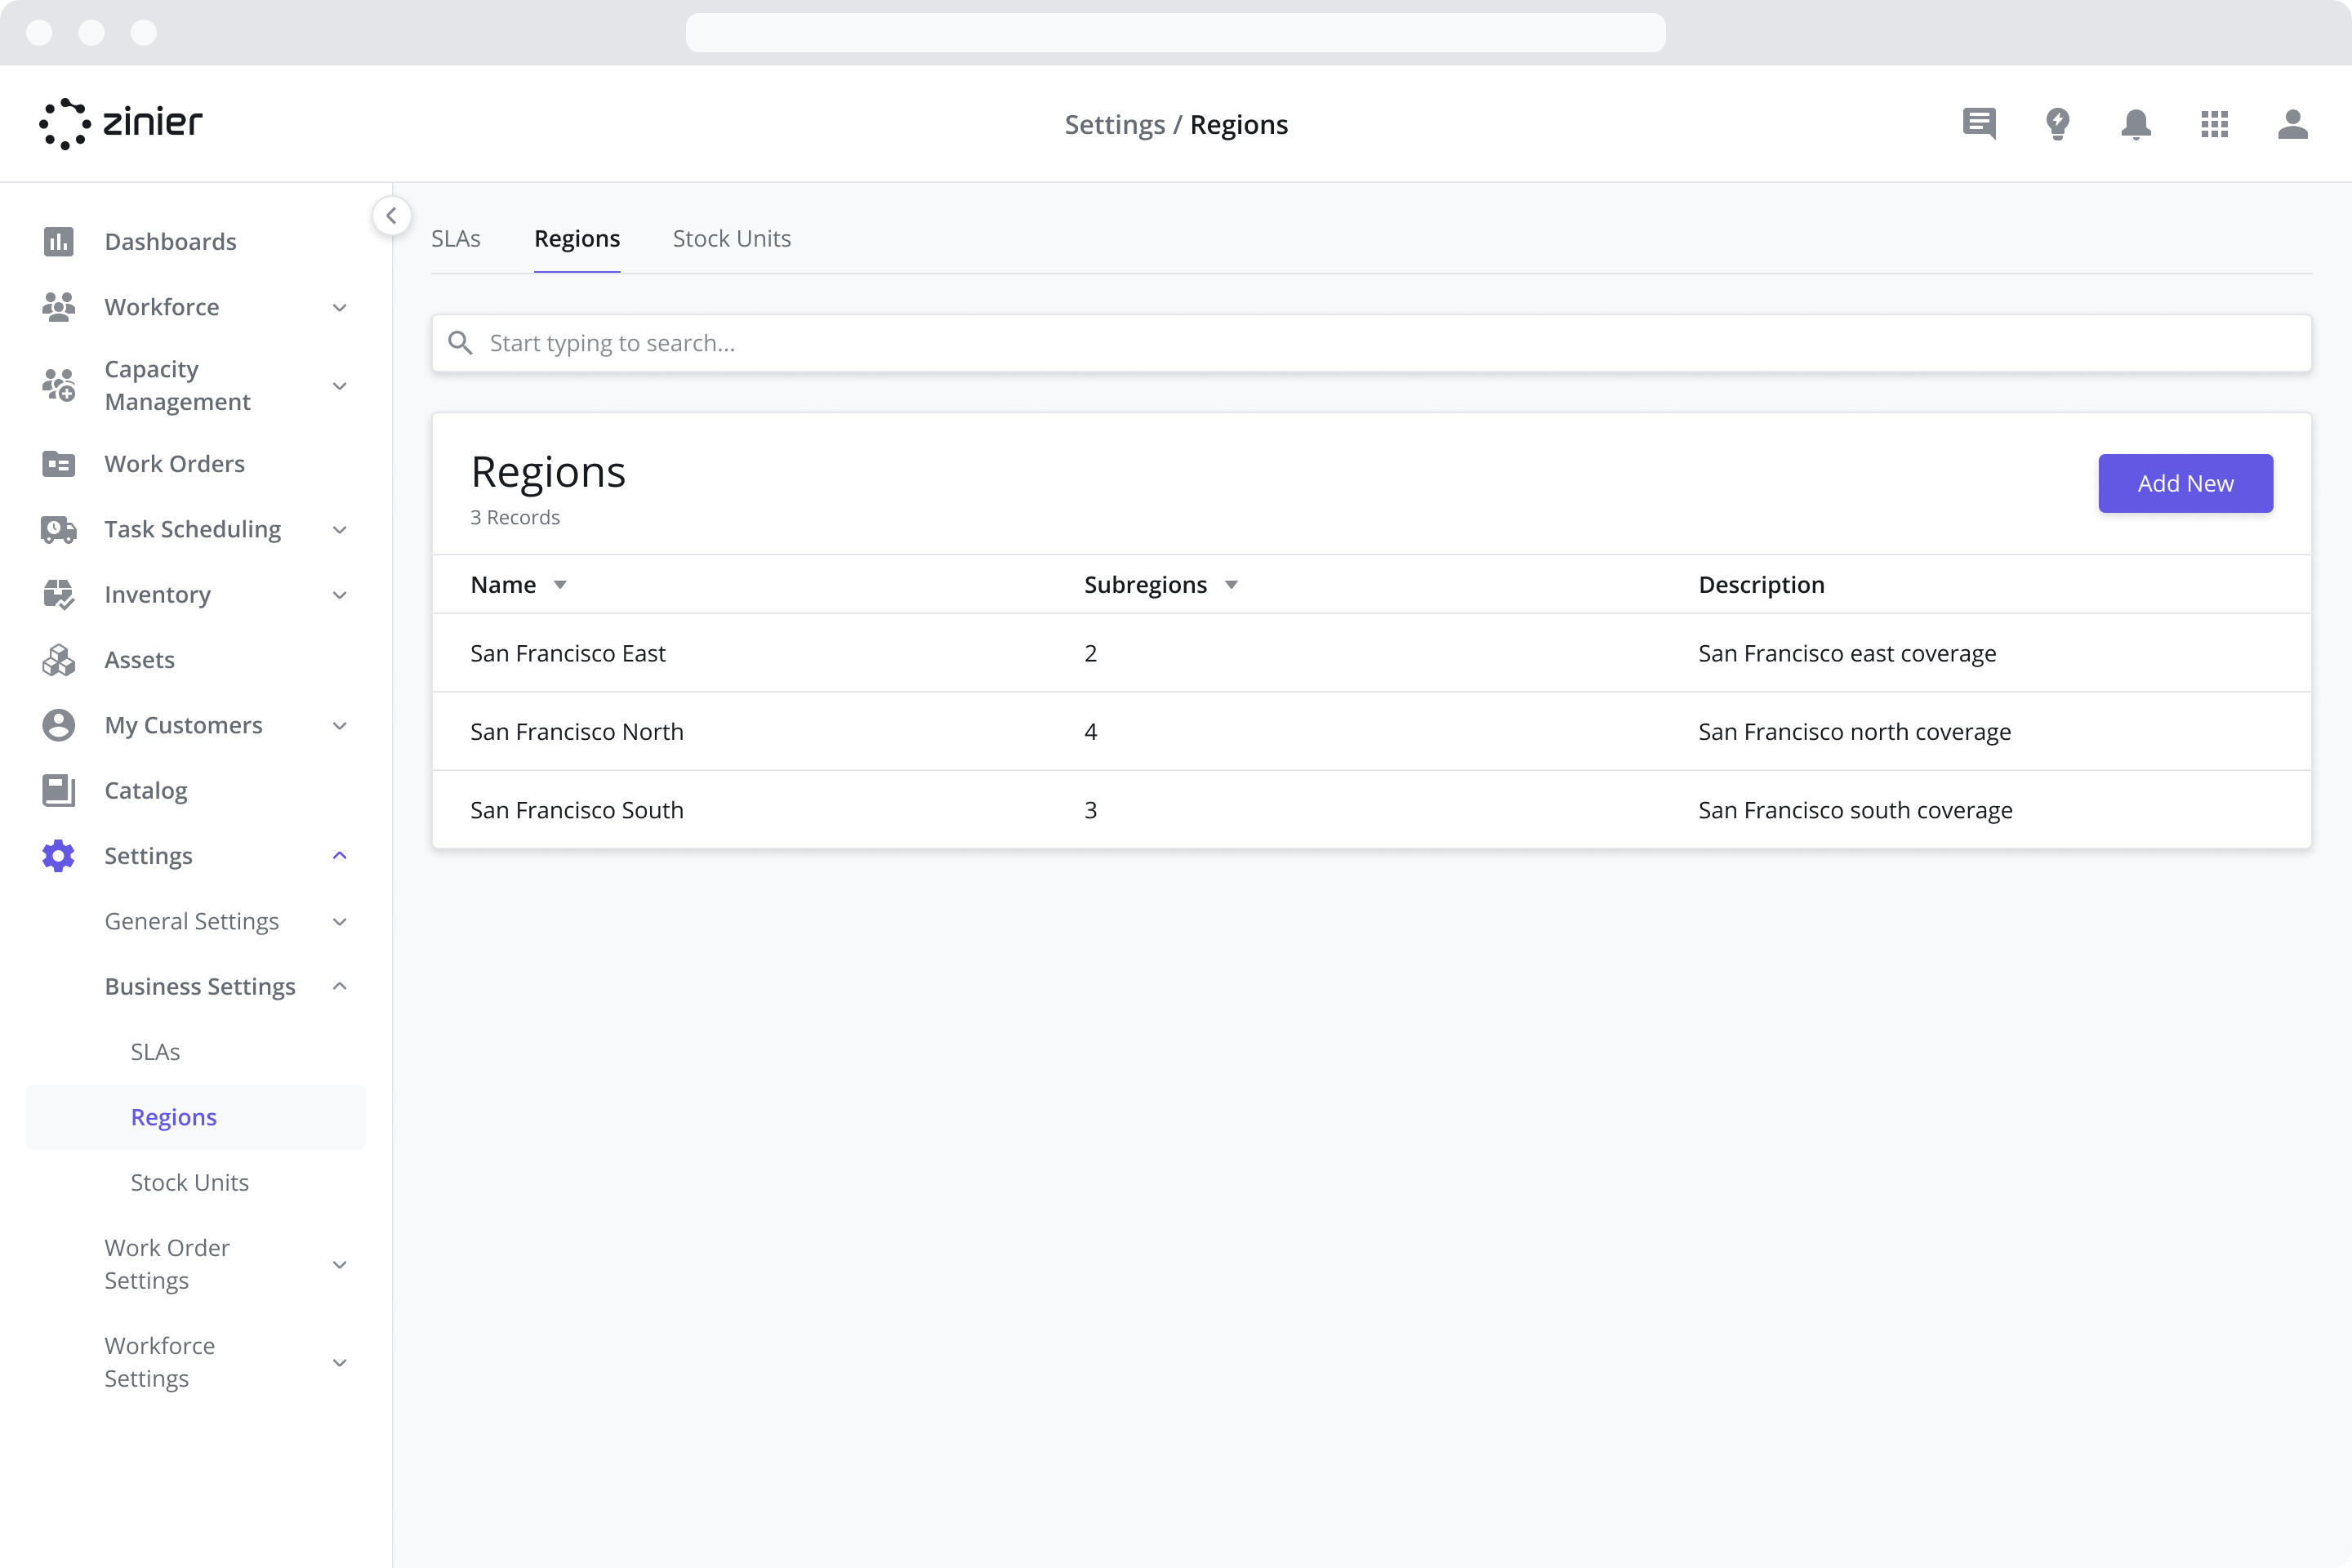
Adding Regions and Sub-regions
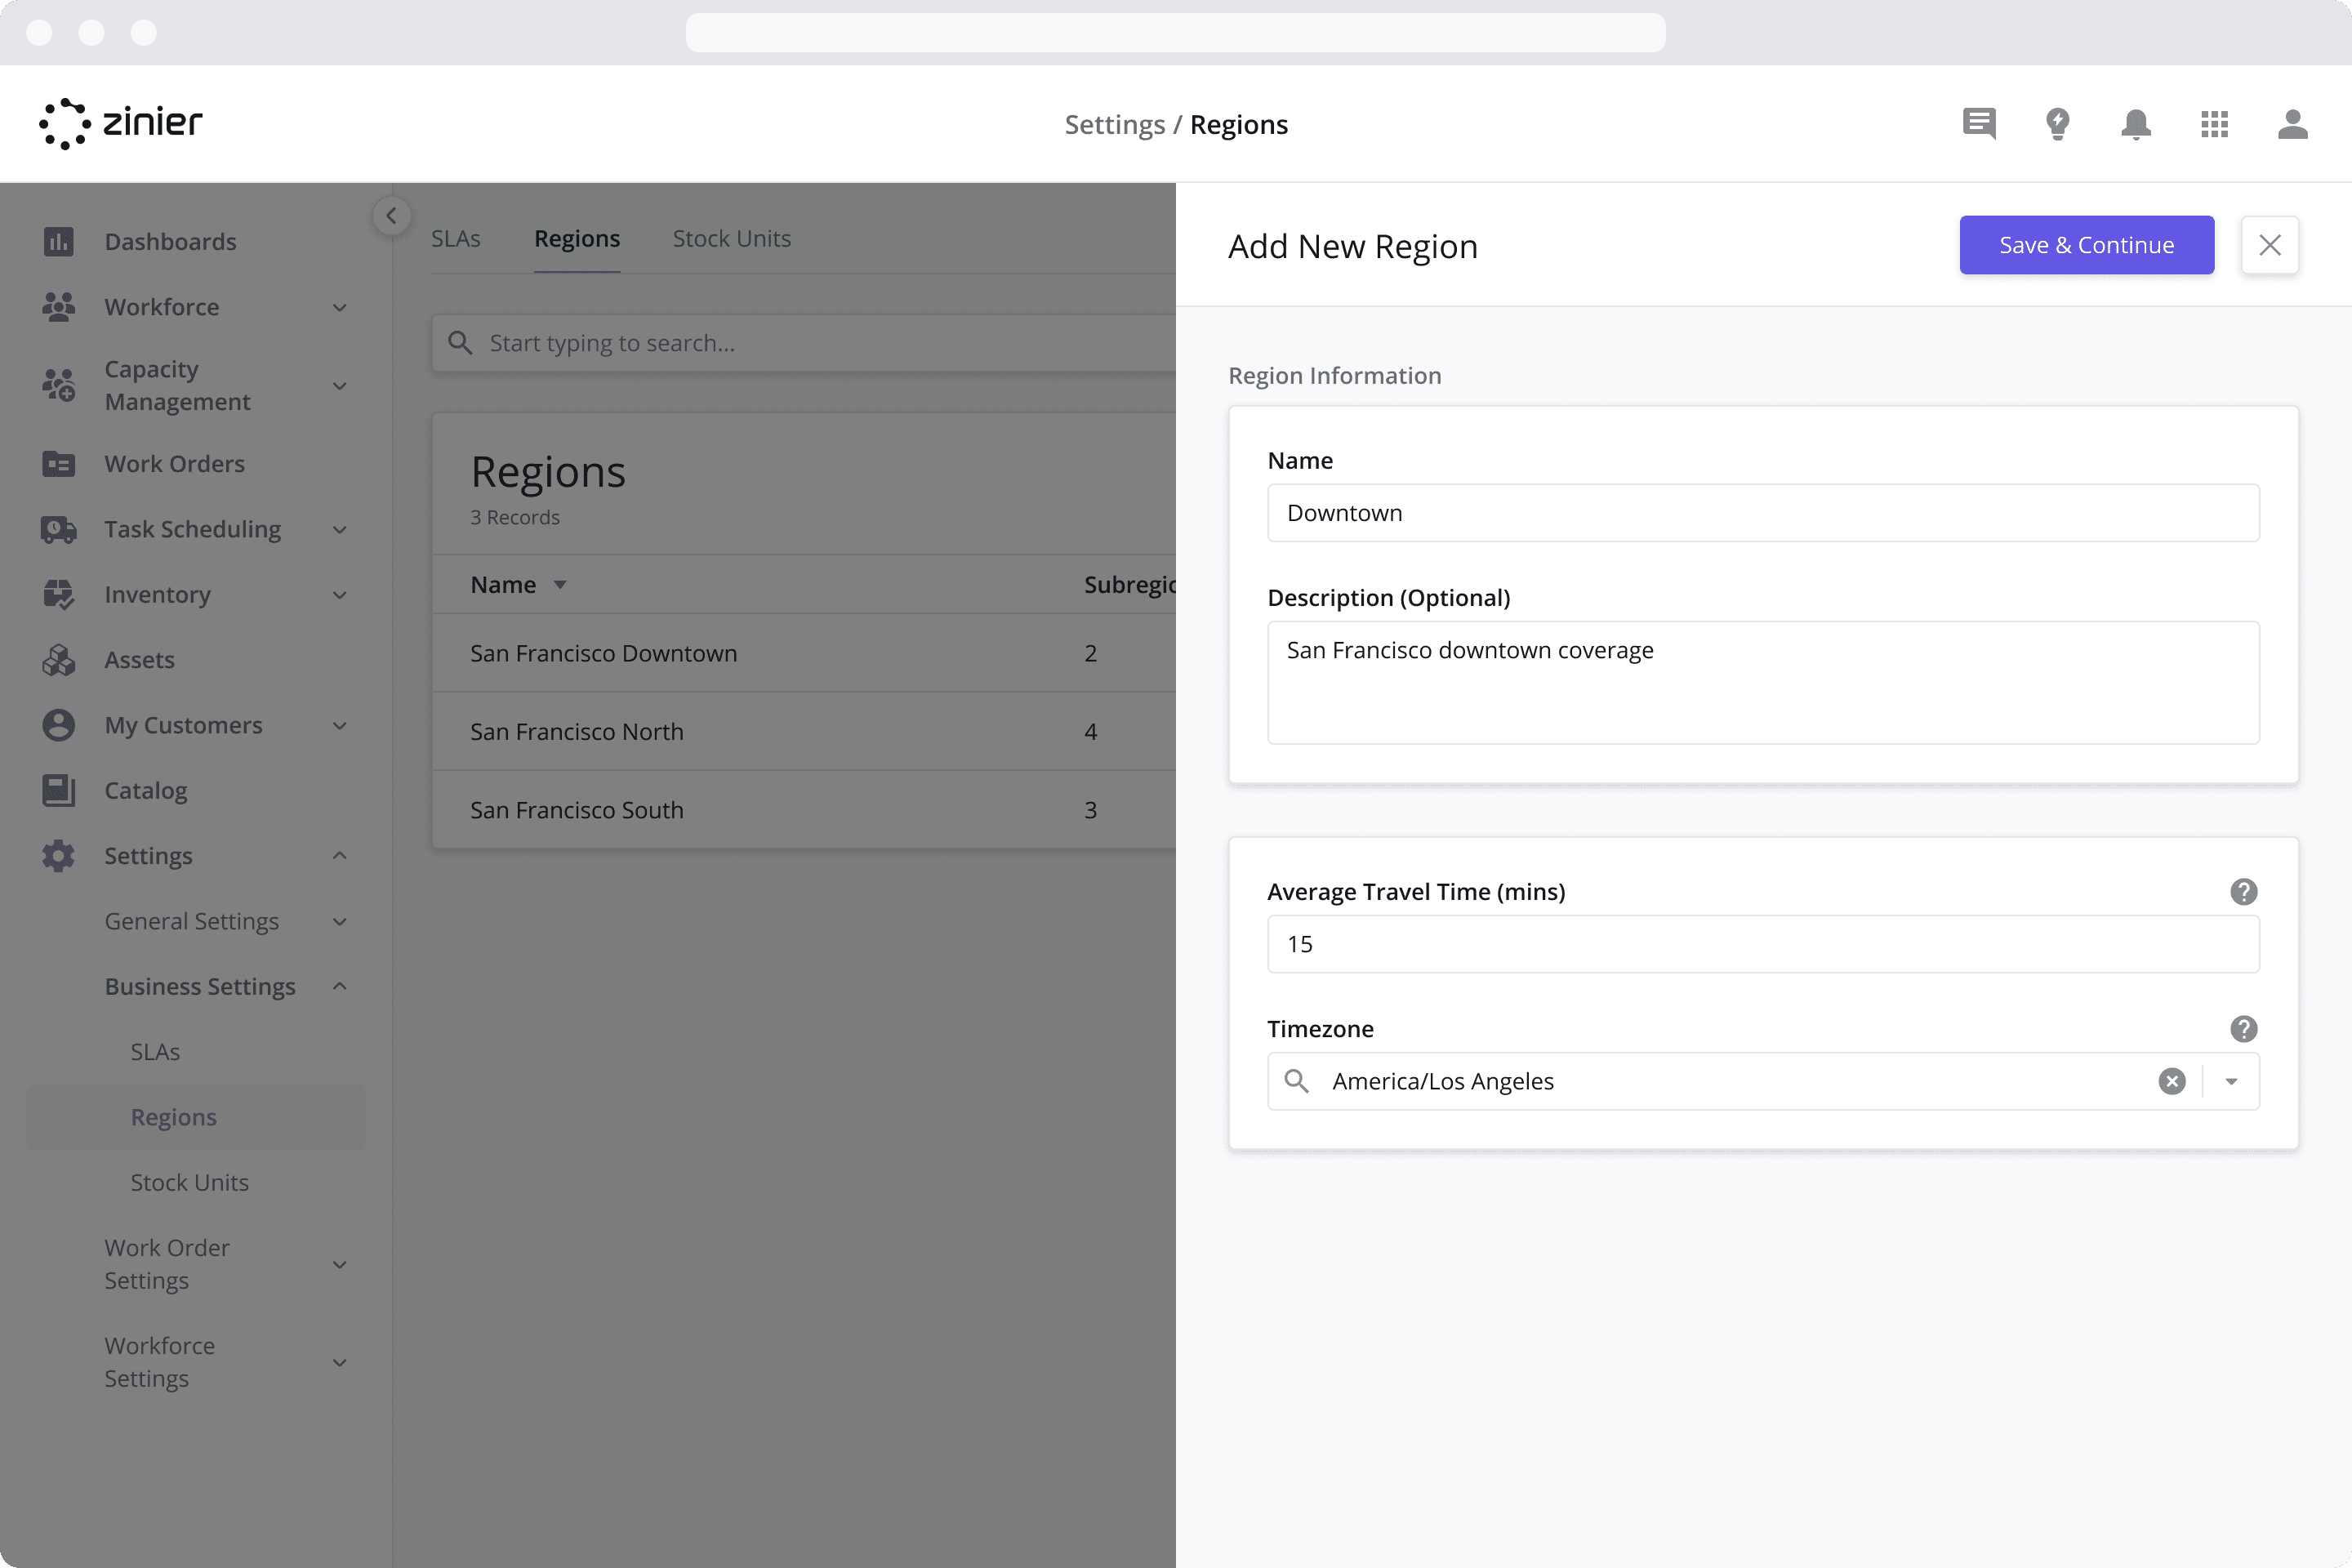
To add a Region / Sub-region to your Org, follow the steps below:
Go to the Settings > Business Settings > Regions module
Click the “Add New” button from the data grid
Give the Region a Name and Description (Optional)
Enter the Average Travel Time (mins) for the Region. This is used when calculating Capacity for tasks performed in that Region. For more information on how travel time impacts capacity, visit the Capacity Points View page.
Select a Timezone for the Region. The Timezone you select here can be leveraged in the Solution for various purposes.
Click Save and Continue
To add a Sub-region, click the “Add New” button from the Subregion data grid.
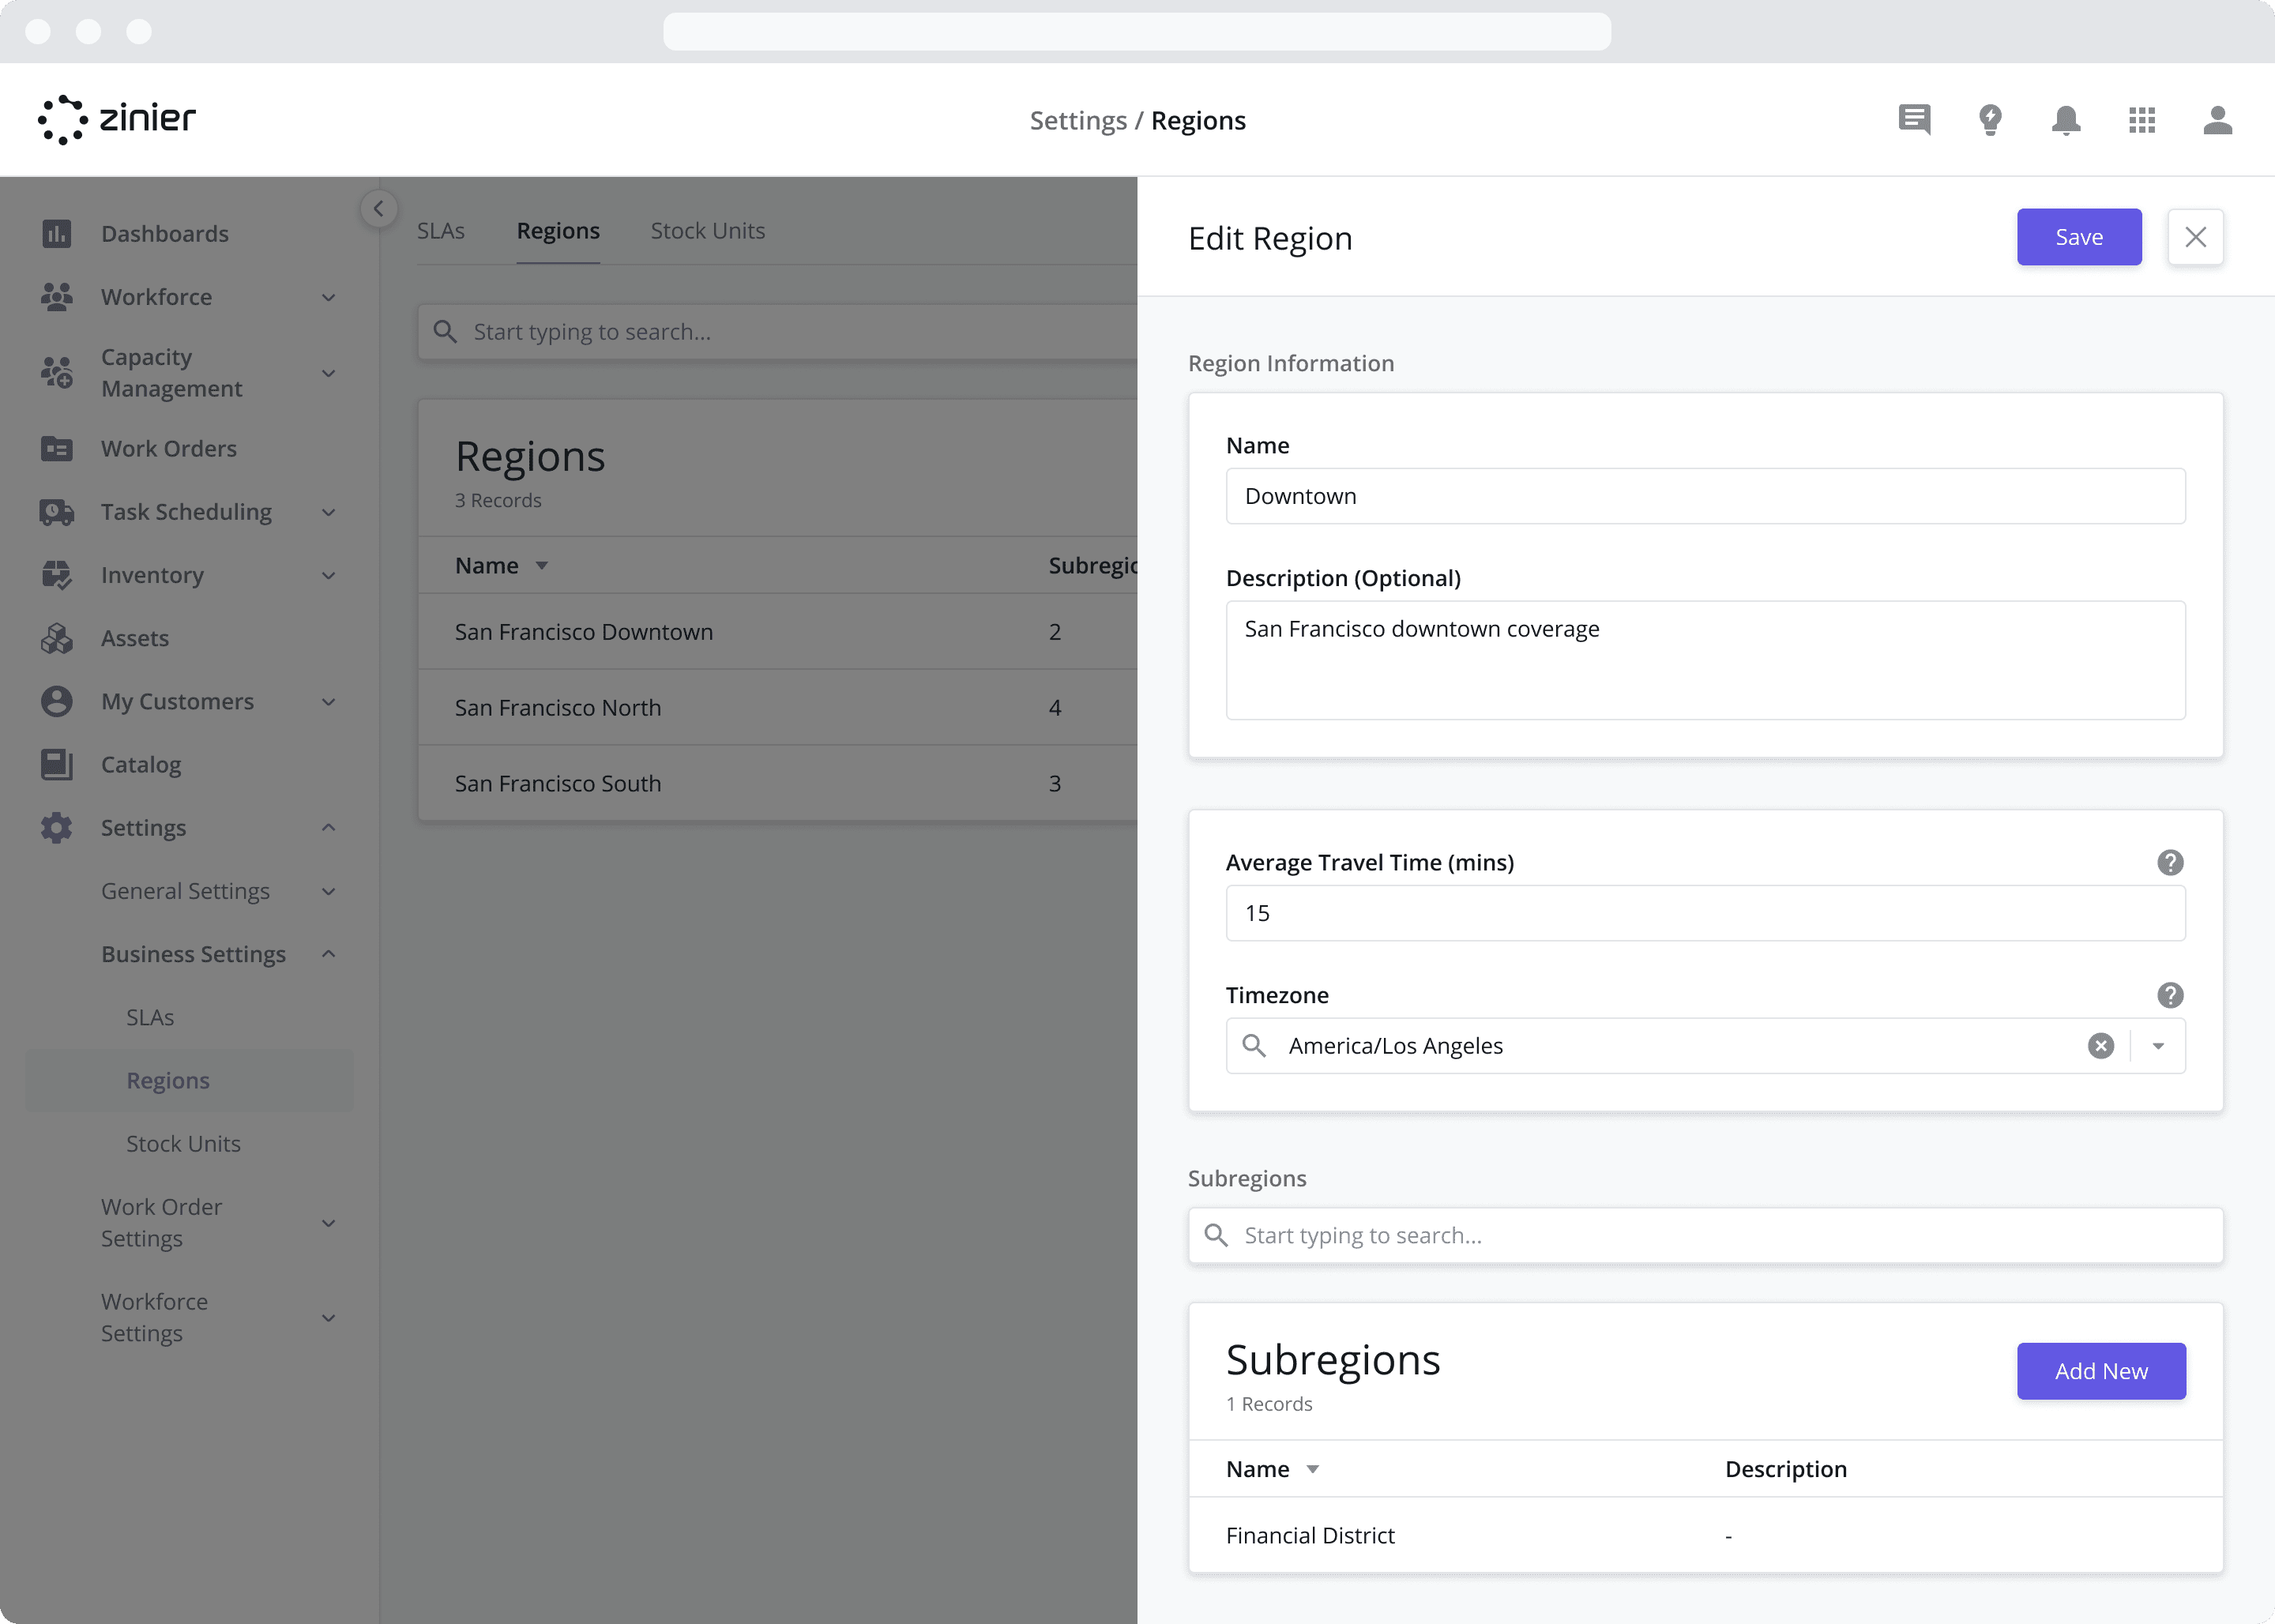
Give the Subregion a Name and Description (Optional)
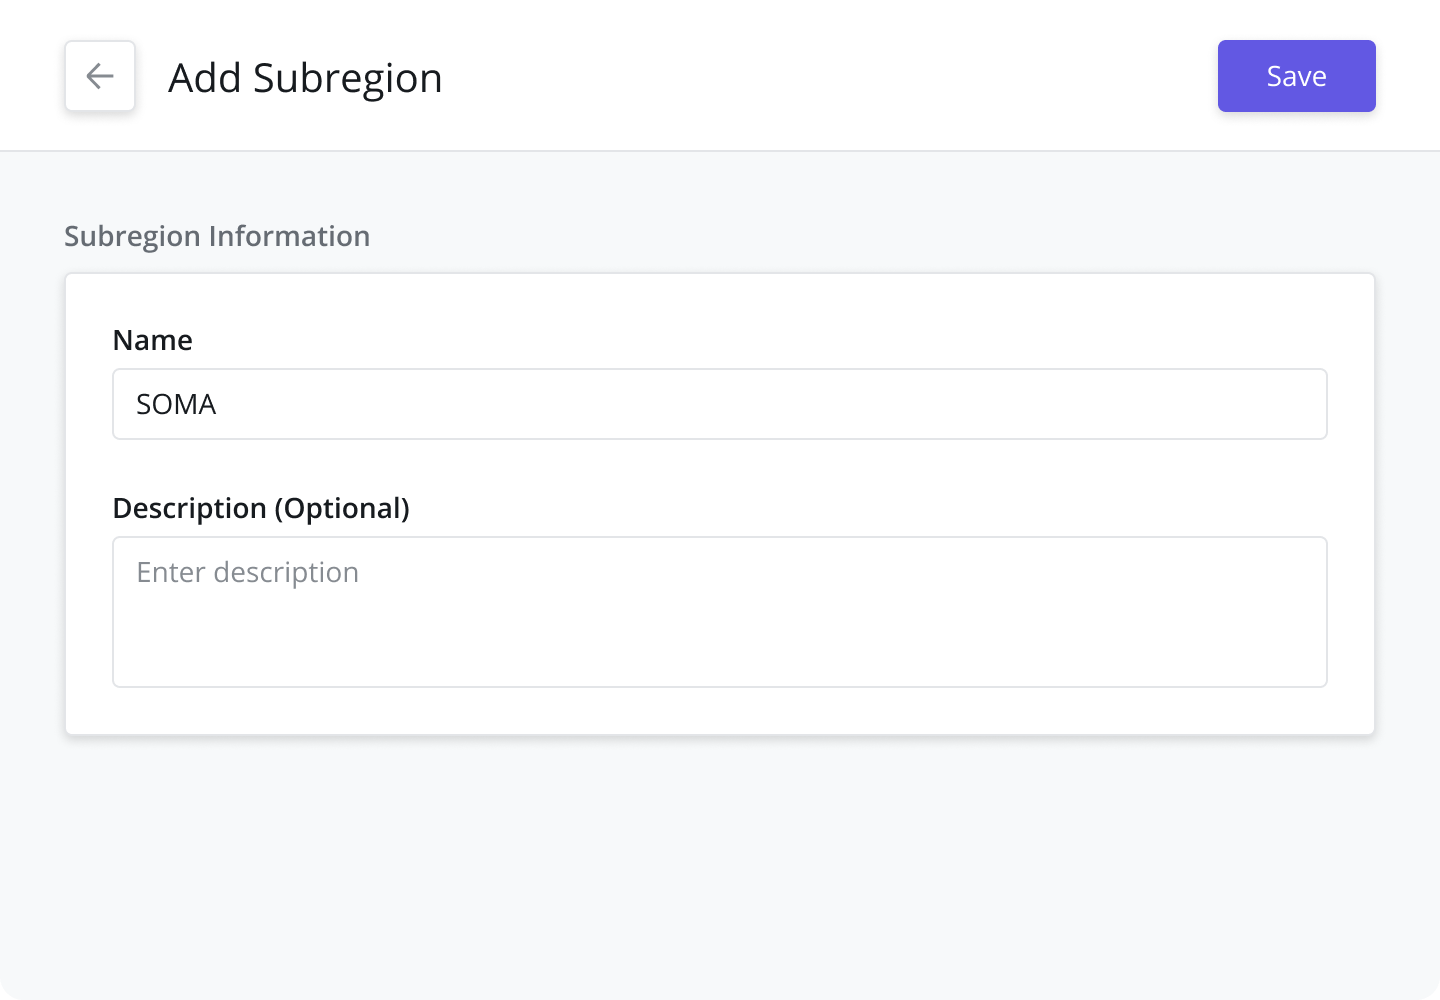
Click Save
Add as many Subregions as needed
Using Regions with Contractors / Customer Sites
Regions are (optionally) used as part of the matching criteria when assigning a Technician to a Task at a Customer Site. IF a technician has been assigned to a Contractor, when the Tech Recommendation attempts to match a Technician with a Task, it will check to see if the Region of the Customer Site matches the Region(s) of the Contractor(s) the Technician is associated with. If the Technician is associated with a Contractor with the same Region as the Customer Site, the Technician can be assigned to Tasks performed at the Customer Site.
For more information on adding Regions to a Customer Site, refer to the Customer Sites page.
Using Regions with Work Groups
Regions are primarily used as a filtering criterion in Work Groups to help filter tasks and technicians so Web Users only see the tasks and technicians that they are responsible for.
For more information on adding Regions to a Work Group, refer to the Work Groups page.
Using Regions with Capacity
Regions are also used as a primary filter when viewing capacity. Planners and workforce managers can filter by Region (and Task Type) to gain a real-time view of their team’s capacity for a particular Task Type and Region when using the Points View. This helps them understand the used and forecasted capacity on a specific day for a Region / Task Type combination, enabling better workforce planning.
For more information on how Regions can be leveraged to understand capacity, refer to the Capacity Points View page.